
This baguette has many inspirations: the long cold autolyse from Anis, long cold bulkrise from Gosselin, SD instead of instant yeast from David's San Joaqin SD... With 12 hr autolyse, 24 hr cold rise, the process last at least 40 hours from start to finish, however, very little time is spent on real work, most of the time, I just have to wait and let time do its magic.
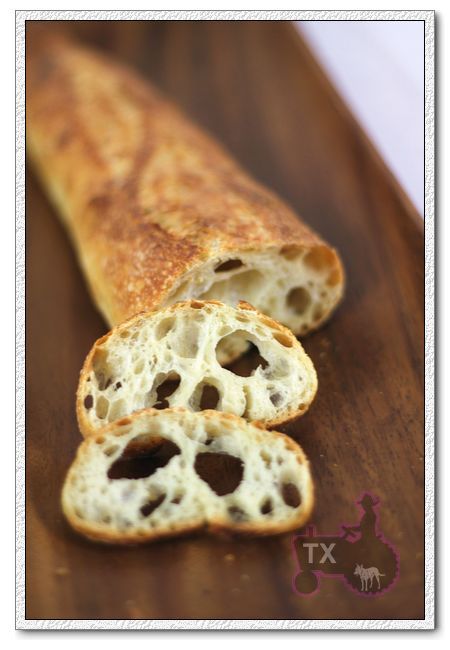
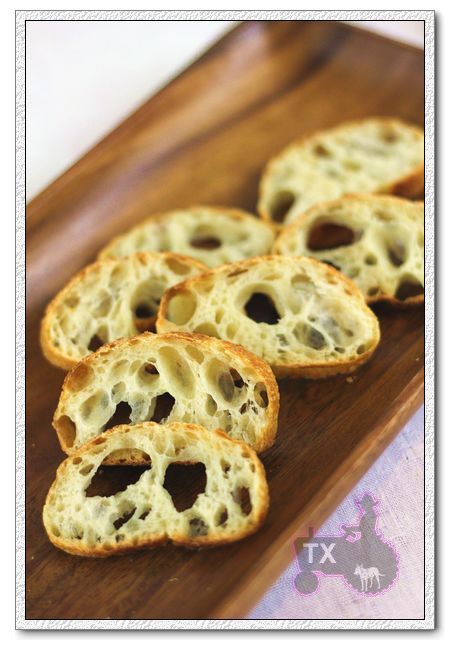
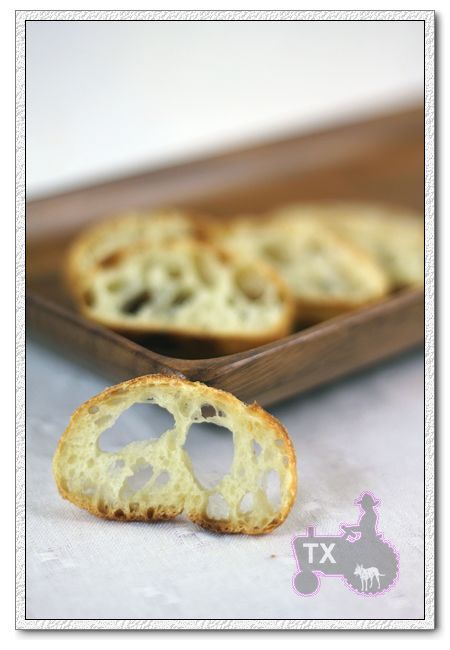
"Little hands-on work" does NOT equal to "easy to make", in fact, with the extra long process, there could be a lot of variations on how much to S&F, when to start and stop fermentation, etc, not to mention shaping and scoring continue to be a challenge at 75%+ hydration. With plenty of tweeking and adjusting, tthe end result is DELICIOUS: thin and crackling crust dark from all the caramalized sugar, airy and moist crumb, sweet and layered flavor - in the past 2 months, this is our weekend dinner of choice. I have made it at least once a week, sometimes twice a week.
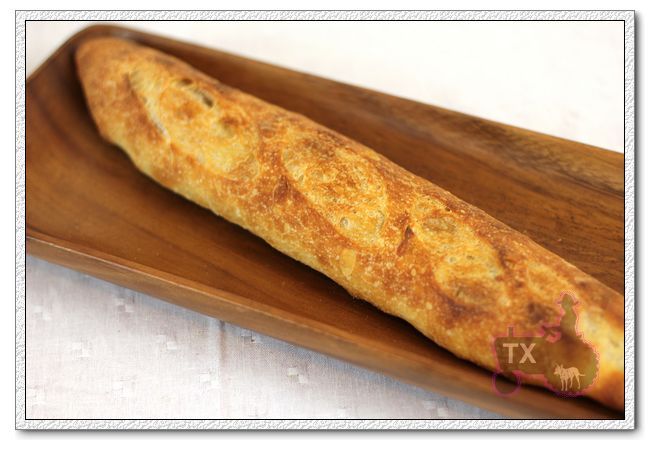
Right now, this is my favorite bagette to eat - and to make.
36hr+ SD baguette
100% hydration starter: 150g
flour: 425g (I usually use KA AP)
ice water: 300g (sometimes a tad more when I feel extra daring)
salt: 10g
1. mix flour and water into a lump of mass, cover and put in fridge for 12 hours. (let's say Thurs morning, takes <5 min)
2. add starter and salt to the dough, use hand to mix until roughly evenly distributed. Note that the 100% starter here has two purpose: it's levaining power to raise the bread, AND it's extra water acts as the "2nd hydration" step in the original Anis formula. To make it even better, the consistency of the starter is much closer to the dough than pure water, so it's easier to mix.
3. bulk rise at room temp (70 to 75F) for 2-3 hours until it grows about 1/3 in volume, S&F every half hour until enough strength has been developed. Put in fridge. (Thurs evening, 3 hours, with 15 min of hands-on work.)
4. 24 hours later, take out dough, if it has not doubled or nearly doubled, give it more time to rise at room temp. I usually have to give it about 1 to 2 hours, depending on temperature, which means the dough can probably be stored in the fridge for even longer than 24 hours.Do make sure it has a sufficient bulk rise, so the dough is strong enough; but don't let it go too long, the dough will be so bubbly that the shaping would be difficult - this is where you need to experiment with timing a lot.
5. divide and rest for 40min.
6. shape and proof for 30 to 50min, score, bake with steam at 460F for 25min. (about 2 to 4hours on Friday night)
There is a lot of room here in term of how to arrange the bulk rise timing - more time before fridge, less during/after; OR more in the fridge; OR now that it's cooler at night, put the dough outside instead and skip fridge all together... The goal is to give the dough a long sufficient bulk rise, regardless how it's done. The key for me is to learn how the dough "feels" and "looks" when it's properly fermentated, so I know I've gotten to the finish line, using whatever fermentation schedule. Before I thought the most difficult part of making baguettes is the shaping, now I thihk it's in managing fermentation - even though I am really not doing anything in that step.
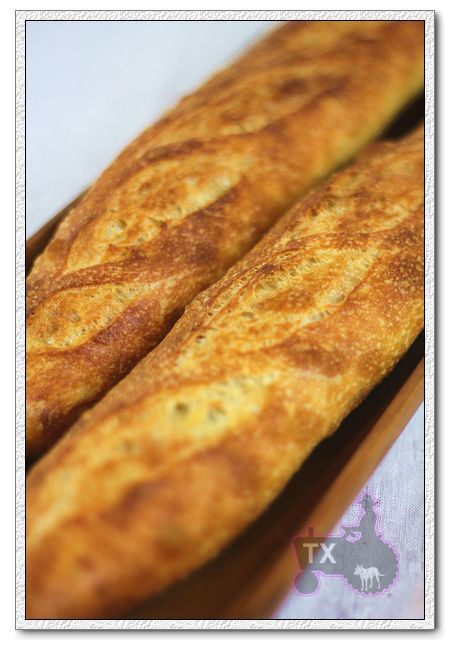
Since we love to eat it, I will conitnue to make this bread a lot, hopefully I will get better with scoring this wet dough! Right now, I am not even trying to get ears, just aim to have the cuts expand properly in the bake.
Sending this bread to Wild Yeast's YeastSpotting event.
- txfarmer's Blog
- Log in or register to post comments
Another great demonstration of how successful you can be fitting bread baking into a busy schedule.
David
Your SJ SD is a big inspiration for this bread, thank you so much!
Really... Really nice!
Tim
Thanks! :)
Wow, no wonder its your favorite loaf. It's internal structure is remarkable! I bet some bakeries would love that recipe.
Most bakeries probably would think the long schedule is not worth it, good thing we can make these at home!
I find your summary of work time and elapsed time very useful. Thanks.
Glenn
I am glad you find it helpful, it meant as a rough guideline, most probably will need to adjust more or less.
very nice writeup on your lovely baguettes, thank you for sharing!
Sylvia
THank you for being so encouraging!
Wow... that crumb is amazing!
Would you mind if I post this on the front page for a bit?
Please do. :)
Wow, those are very awesome. Amazingly awesome.
I think mastering fermentation is the most crucial aspect for all breads.
I'm still at the lower end of that learning curve - but you, txfarmer, have mastered it.
THank you for the kind words, but I am far from "mastering" it, just experimenting and trying out ideas, that's the fun of it right?
Agreed, LindyD., fermentation mastered!
Natural levain and cold fermented all that time...plus the small matter of 75% hydration.
Some talent here!
Wonderful delicate baguettes txfarmer
BW
Andy
What is bulk rise?
What is S&F?
what is Bulk rise?
bulk rise == main/first fermentation == the first rise you do before shaping after mixing
if you haven't, may I refer you to the "handbook" link of this site, very useful. specifically: http://www.thefreshloaf.com/handbook/appendix-glossary :
Fermentation: (1) the process by which yeast metabolizes sugars to produce carbon dioxide and alcohol (2) (aka bulk fermentation, first fermentation) the period of time the dough rests after mixing and before dividing/shaping.
I'll be trying this one soon. Thanks for sharing.
Keith
I just KNEW this had to be your post... :-)
I've been pretty depressed about my bread baking lately, things are working for regular leavened bread, but my sourdough baking has failed me. I am tempted to give these baguettes a try, maybe my electric oven could work....
I will definitely keep you posted when I try it.
Great job, Txfarmer, as usual!
Txfarmer, I am not sure I missed it, but how many baguettes does this recipe make? I already printed out the recipe and will give it very careful consideration for this weekend...... (cross your fingers for me!)
For me, this recipe gives 4 baguettes, each has about 220g of dough. It's tight on my 16x16 baking stone.
Good luck Sally!
Thanks!
I might have to half the recipe to suit my small oven.... I will be home for a wekk in October, and if I have a chance, I'll make them in my regular oven.
Hi,
That's the most open crumb that I can imagine. Awesome.
I'm attempting to follow your instructions at the moment. You say to let the initial mixture of refrigerated flour/water mixed with 150g starter and 10g salt rise for ~ 3 hours until it grows about 1/3 in size, while doing a stretch and fold every half hour. My problem is that the way I do a stretch and fold it degasses the dough and it essentially returns to its initial bulk. In other words, if I keep doint s&f every 1/2 hour I don't think the dough will ever get much larger than it started because I keep degassing it. Can you help me?
Thanks,
:-Paul
S&F is not degassing the dough. For me, I simple oil my hands, take out the dough, gently stretch it with my right hand, fold back (seam under), repeat with left side, put back to the container smooth side up. The whole process takes <1 min, consists of 4 movements exactly (right hand out, right hand in, left hand out, left hand in), the dough never touches the table (so there would not be sticking), just my well oiled hands. That's just my way of doing S&F, there are other ways that's equally effective, but however you do it, be gentle, do NOT punch down, you should be able to preserve most of the gas.
Thanks. I'm at that point in the recipe now and I see that the next time that I do this I will pay more attention to getting the dough into an oiled container to begin with and oiling my hands to manipulate the dough. That worked really well. I have the dough currently fermenting in a 75 degree environment.
I look forward to baking these tomorrow and seeing if my crumb comes anywhere near that amazing crumb that you have produced. Thanks again for the initial posting and the help along the way.
:-Paul
Thanks! :-Paul
Very Nice!
It jsut gets better and better. I was more comfortable having done the process once and noted things to improve in my implementation of the techniques in my kitchen. I have a 15 x 20 stone specifically to bake large baguettes so I upped the recipe a tad and did 2 500g baguettes.
Nice size - just what I'm after
while not as totally amazing crumb as yours, they're on their way.
Just a beautiful close-up.
I can't thank you enough for this formula. The dough feels tremendous at the end of the bulk ferment, pliable but full of life. I've often done long fermentations and gotten into proteolytic situations where the dough has lost it's body and become morbidly flaccid. There is none of this here.
There are many differences between this formula and how I've been treating my dough. I dont know which technique changes are more meanful than others but I intend to keep experimenting. Off hand, your initial remonstrance to be more gentle in my stretch and fold was tremendously helpful. Your post division, preshape rest of 40 minutes instead of my usual 15 was interesting, baking baguettes at 460 instead of 550 is quite different than my previous efforts. Then, of course, there are the two long ferments.
There's no denying results and these results are fabulous. I'm just wondering which technique changes are the most effective. It's great fun. I love baking so much, especially with just flour, water, and salt baguettes, batards, etc. where the only differences are the techniques of manipulating the processes with he same ingredients.
So, thanks again. Somehow there seems something incongruous about calling an open crumb, bougouise baguette a Texas Farmer inspiration, so I'm working on what to call it as I work with it.
sincerely,
:-Paul
I am so glad that it's working out for you! Look at those holes!
I think the gentler handling made the biggest difference. Let time and wild yeast do the work, and we just stand back and not be in the way. Since baguettes need to be stretched out, it would get more "man-handled" during shaping more than most of other breads, hence the longer bench rest. This way the dough is sufficiently relaxed so it would take less "handling" to stretch them out. I think "minimal" handling to accomplish what needs to be done is the key for an open crumb.
At some point in my journey I got the idea that baguettes needed really high heat for rising and crust. 550F and the top shelf and plenty of preheating. This has certainly put the lie to that! I was so pleased with these being nearly 20 inches long but still not burnt on the ends closest to the sides of the stone. That may be a combination of a lower baking temperature as well as slightly oversized parchment paper that shielded the ends from blackening.
Yes, I agree that the gentler handling is probably important. When I divide them I also do a little bagetty preshape to minimize handling in the shaping phase. This time I proofed for an hour since the first batch blew out its seams a bit after 40 minutes. They do get manhandled pretty savagely to get beguettized but seem to bound back admirably. It's amazing how well some people can manage dough on the bench. Practice, practice, practic. The dough is still cold enough for me that I can get pretty good slashes for ears.
Again, this is such a thrill for me to be able to do really long fermentations without turning the dough into a proteolytic puddle. I've never been a fan of overnight fermentations in the loaf shape, it's never worked for me, so this is great to do the shaping after the long fermentation.
This morning it was lox and cream cheese and baguettes. Delicious! I'm interested as to how these techniques will transfer over to a petite batard shape. If I get anything interesting I'll post it. I wonder how the whold deal would work running through the KA rather than by hand. I wanted to ditch the KA awhile back altogether "by hand only" but I didn't and I've been using it more lately. Doing some cakes and pastry as well as my usual bread obcessions.
Your technique has been a great hit and help with me. I intend to keep expanding and exploring.
:-Paul
The keywords for this baguette are: wet dough, min. handling with enough S&F, and long fermentation. I think these can be applied successfully to any dough, not just baguette. I made the basic country loaf from the new Tartine Bread Book this weekend, 77% hydration, no kneading, the S&F procedure is very similar to this, and I retarded the dough after shaping (which I often do with success) - great results. Since boule and batard shapes are easier than baguettes, it's easier to keep those bubbles inside. I will post a blog post about it later, but the crumb is amazingly open and moist.
I have a KA pro6 and I willl never let it go. :P I make a lot of Asian style sandwich loaves (sourdough ones too),which require a thorough kneading. Not to mention all the chiffon cake and gnoise I make regularly, without my KA, I would need to seriously get some serious arm muscles!:P
Hi TxFarmer,
My third shot at this dough. This time I doubled the recipe, substituted 20% reduced bran w/w and machine mixed. I kept the long fermentations and the very gentle handling of the dough. ' hope you like photos:
3 bâtards, prebake weight: 715g - this is the usual house shape for daily bread
Bâtards turned onto parchment paper. That's a piece of poster board for my 20" peel.
They looked pretty good. I would have liked more vertical lift.
I think it's a pretty loaf of bread.
Still with a wonderfully open crumb.
I'm thinking I might try bumping the hydration down to 73% from 75% to try for a bit more vertical spring... I don't know what that will do to the crumb though.
For all this fermenting, I still am looking for more flavour. That's why I substituted the whole wheat in for part of the white flour. It did make the dough a bit sticker and slacker as well as adding some whole wheat flavour. I think I'll try about 10% rye as well.
I can't thank you enough for this recipe. I hope you enjoy the report. I wanted you to know that your inspiration lives on in my kitchen.
:-Paul
It looks wonderful!Thank you so much for showing me the fantanstic outcome. :)
With the ww flour, I would bump UP the hydration since ww tend to absorb more water. As far as height, maybe you can do an extra S&F or two? Another idea is to shape into a boule and bake it in a dutch oven type of container to keep the shape better. Or maybe keep the temp very high for the first 5 min to encourage a speedier oven spring. Regardless, this is already a first-rated loaf!
Pablo...
I've been following your progress with this recipe, and wow, you are doing a great job!
Tomorrow will be my first attempt, I am a little "out of practice", haven't made a baguette in many months, but - it's exciting to try this method by our very own Txfarmer!
please keep your fingers crossed for me - as my scale stayed behind in Los Angeles, I'll have to bake by volume, so that's already a bit of trouble in the horizon, but... I have no choice
Fingers Crossed. No scale! That's a touch bridge to cross! Good luck.
:-Paul
Oh, my!
THEY ARE AWESOME!
Txfarmer, thank you thank you thank you!
Pablo, thanks for the fingers crossed - I actually took one measuring cylinder from the lab (don't tell anyone... :-) to measure the water amount with more accuracy. I was "very close" to taking our precision scale, but decided against it, some students come to work during the weekend, and they could need it
anyway, worked great - I hope I can get some nice photos out of it, don't have much time to work on them today, but hopefully later in the week I'll do so and post here.
By far, the best batch of baguettes I've ever made, I know it will get better the more I play with it, shaping is tricky, but doable.
Good for you! I'm completely enthralled with this formula - I'm doing it over and over with different flour combinations. I love the big holes. Ain't baking' great?!?
:-Paul
Sally, congrats! I am so glad it worked out for you! Even without precise measurement.
Paul, I am so happy to see that you are liking this formula so much and keep tweaking it. I have made variations of it myself, all with great results. I will collect the pictures and do a combo post later.
Beautiful baguettes!
I have tried making sourdough based baguettes in the past, but they usually turned out with less light crumb and less holey compared to yeast based ones, so I definitely want to try your method next time. Thank you for sharing. Your posts are always inspiring and enlightening.
Can I ask you something? Can you elaborate the explanation on your method of S & F for me please?
You mean you pick up the dough with your oiled hands and S & F it while holding it in your hands? Do you repeat the 4 movements you described for several times so that the total S & F time by 4 movements would be about 1 minute? (Just picturing it in my head, I'm a bit worried if the earlier S & Fs would be a bit tricky to do because of less developed gluten... or am I misunderstanding completely?)
I understand other S & F methoeds would be as effective as yours (I usually S & F in a bowl or letter-folds on worktop), as you mentioned, but I'd like to try your method, too.
Thanks in advance.
Jjust 4 movements. Once. When I say <1min, it's actually just seconds. All I am doing is gently stretch the dough out to either side and fold it back. with 500g of flour, the dough is small enough for me to do it in my oiled hand. It's really not complicated, don't overthink. After such a long autolyse, and some mixing in the beginning, it would already have some strength at the very first S&F. Try it and you will see.
Thanks!
I'll definitely try and let you know how I got on. :)
Terrific airy loaf!
How do you do your "steam bake". I am new to this and have only done the no knead method. Your recipe sounds like something I could do (physically). But have never done steam bake. Can't wait to try.
It's not steam bake, it's "bake with steam", here's the explanation from the handbook section of this forum[Note: since you are new to baking, I suggest to first read through the handbook of this forum (http://www.thefreshloaf.com/handbook), and follow the lessons section of the forum to make your first loaf (http://www.thefreshloaf.com/lessons/yourfirstloaf). I wouldn't make this buguette as your first bread, even though it looks "hands off", it actualy involves a lot of judgement calls that require experience. Not to mention the challenge of shaping 75% wet dough into baguettes.]:
-------------------
Steaming: A crackling, crunchy crust requires more than just a hot oven. It also needs steam, and that's not easy to do in a home oven. But it can be done. Here are a couple of methods:
• The Cast Iron Pan Method: Under the stone, even on the bottom of the oven, if you like, place a cast iron pan and let it heat up along with the stone. Not one you like to use day-to-day, because this process will rip the seasoning right off.
Just before you put the bread in the oven, boil some water. Get a towel and, after you open the oven door, cover the glass of the oven door with the towel. This will prevent water droplets from hitting the hot glass and shattering it (ask me how I know.) You may also want to shield the front of the pan with aluminum foil so that droplets don't jump out of the pan onto the glass and crack it (again, ask me how I know).
Load the bread and dump one cup of boiling water in the pan. WEAR MITTS WHEN YOU DO THIS. Close the oven door, and let it bake. About halfway through the bake, remove the pan so that the bread can finish in a dry oven.
• Covered Cooker Method: In this method, do not use a baking stone. Instead, place a cast-iron Dutch oven (enameled and non-enameled both work fine) or a clay cloche (Sassafras makes a good one - you can find them at Amazon or King Arthur Flour for about $50) in the oven and let it heat up for 45 minutes. Pull out the oven rack, take off the lid, plop your bread into the bottom, score it quickly and replace the top and the rack.
About 15 to 20 minutes before the bake is done, remove the top so that the bread can finish in a dry oven.
The covered cooker captures the steam given off by the dough, and so mimics a wood-fired brick oven. Unfortunately, this method only works for round loaves (though Sassafras also makes a 14 1/2 x 5 1/8 inch clay cooker which works for batards).
Would adding a small ice cube to the DO be a good thing? If so, why? If not, why? Thank you!
Your mastery of bread making is absolutely awesome. Thank you for sharing.
Bernie Piel
Hi
I'm very new to bread making and would love to make this bread.
What do you mean by 100% hydration starter: 150g?
How do you make the starter ?! Would appreciate your help = )
Thank you and Blessings
Chris
Hi
It's me again... I've never started a sour dough starter before and after reading some of the comments on starting a sourdough... got even more confused !
Please help !
Thanks
Chris
Here's a good tutorial:
http://www.thefreshloaf.com/node/10251/starting-starter-sourdough-101-tutorial
A good summary here:
http://www.thefreshloaf.com/lessons/sourdough
100% means water:flour ration is 1:1, which is baker's percentage - i.e. (X/total flour weight)%
For any new comer, I would highly recommend to go to the "Handbook" and "Lessons" section of this website, it would save you a lot of time and headache.
Hi
Thank you so much for your prompt reply... I will check out the link and will let you know how everything turned out = )
Blessings
Chris
beautiful, astounding result IMHO !
As far as i'm concerned, the more i bake, the more i realize how important it is to actually trust the process, once a process has indeed been elaborated.
Working on highly hydrated doughs can be really daunting, when one's never seen the final result.
But, the long and cold autolyse, added to the lengthy retardation and the few S&F sessions in between are actually sufficient to give the dough enough strength to endure the delicate shaping and oven spring phases.
In fact, the deeper i explore this new path, the more i seem to acknowledge that such a dough (between 80 and 100% hydratation), despite its actual absence of kneading (4 S&F spreaded on 4 days, roughly averaged), tends to develop way more once in the oven than heavily worked dough.
Perfect for baguettes, in a word.
The only foreseeable reserve for a beginner stands in two arguments :
- the initial look of the dough, right after the beginning of the autolyse. Let's admit it, it looks more like a soup than like a regular workable dough, doesn' t it ?
- it actually is hard to preshape and shape a highly hydrated dough.
My answer is simple, and can be summed up into one principle and two major rules :
- Time is on your side. I often autolyse on tuesday or wednesday, and bake by midday sunday, except for when my son comes home from college for the w.e. unannouced.
- Have faith in the process, particularly in the autolyse. Autolyse does a great job as far as dough's strength and starter's bubbling capacity (as defined by the initial expression of gluten and sugars) are concerned. The longer the better. 12 hours are better than one. And cold is definitely a must.
- When considering that the cold fermentation process has had enough time to fully develop (i've gone up to 6 full days —144 hours, i guess— with amazing results, both in terms of taste and consistency), don't let your dough stand on the counter too long before preshaping it : divide, preshape while it's cold and doesn't stick too much, and let sit for 10 mns. Then proceed throughout the final shaping stage, let proof for a good half an hour (for baguettes or batards) and score generously before baking.
- One more hint : steam it up, babe, steam it ! One can never have too much steam when time comes to put the loaves in the oven.
This process has given me a steady , reliable and consistent result over the last quarter, ending up into loaves that'd be good and nice enough to sell.
Keep up this great work, and don't forget to boogie with experimentation, you'll get surprised !
Seb
Looks like I have a problem. Started Wed. night. Everything was fine. After the 24 hours in frig (after s&F) there was no rise at all. It has now been out at room temp. for an hour and still no rise. My starter was active. Just made sourdough the day before. It was just fed and looked like it always had. Any suggestions on maybe what I did wrong. Should I just throw this batch away and start over. Or leave out for more hours than the 2 suggested? It just seems there should be a little rise by now........I do have bubbles though
Let it sit at room temperature for a whlle longer and see whats up. My dough "usually" (I've only done this process 3 times) takes 4 or 5 hours out of the 'firdge to double. And what does "room temperture" mean? I do this phase in the proofing box set to 73F. If it's colder, it'll take longer. Try to get a feel for the dough. Maybe it'll come 'round with some more time. You've got nothing to lose by waiting and watching.
Good luck!
:-Paul
From my experience, once the autolyse is done and it comes to inseminating, either with dry yeast or with a starter, it's better to mix salt+yeast thoroughly, let it rest for a couple hours over the counter, then give it about 10 S&F and let it begin bubbling before putting it in the fridge. Once the reaction has started, it really keeps on going despite of the low temperature. But you gotta give it a chance to start.
In any case, don't, i repeat : don't throw your dough away, just reinseminate it with a couple teaspoons dry yeast, mix thoroughly, let it gain 25 % in volume and refrigerate it at will. That'll do just fine, believe me, it'll just be a "pain sur levain de levure" instead of a "pain au levain".
Seb
Like Paul said above, you won't lose anything by waiting. Some starter just needs more time to recover from cold. What's your room temp? Mine is around 73F. If possible move it to a warm spot, like oven with pilot light on. If your room is indeed much colder than 73, such as 60s, next you need more time to rise after mixing before putting in the fridge.
Me again....Well I let it rise to double and then followed the remaining steps. It came out really wierd, but edible. I am half way to my second batch now - its in the frig for 24 hours until tomorrow a.m. I must say the most difficult part of this is forming the wet dough. Any suggestions? Should I oil my hands to form, or is it best to flour, or???
I'm a fan of flour. My whole preshape/shape process is like this:
First I flour a basket that's lined with cloth, I flour it plenty and I dust the counter with flour as well. I put the basket on the scale and zero it out then I pour/scrape the entire dough mass into the basket and get a weight. Then I calculate what that means to me, that is, how many lumps of what weight I want to end up with. For example, 4 baguettes of 220g each if my total dough weight was 880 grams.
I then dump the lump of dough out of the basket onto the floured counter and separate what looks to be the right size and using the counter scraper and my hands I put it back in the basket to check the weight and make additions/subtractions as needed to get to the weight I want for a single piece. I then pull the sides up and incorporate the pieces into a single ball. I do this carefully and lightly and pinch the final ends together to encourage it staying one ball. If my hands start to stick i dust them with more flour. I don't use a tremendous amount of flour, but I try to keep flour between me and the dough so I don't stick to it. Then I cover the preshaped pieces and let them rest the prescribed amount of time.
Shaping is similar. I generally shape batards, but for baguettes especially I would preshape into kind of hot dog bun shapes. For final shaping I would just do a single lengthwise fold, pulling gently on the dough while I was doing that to lengthen it. Then I would pinch/seal the fold and then I would roll the dough. Rolling is touchy - too much flour and it doesn't roll, it slides, too little flour and it doesn't roll, it sticks, so it's hard to find the place between too much and not enough, but it's possible. Anyway, I roll the baguettes, hopefully just once or twice and they're long enough. Then proof, etc.
The trick, for me, in the whole process is getting enough flour without too much flour.
Watching lots of videos on handling dough is helpful.
Good luck.
:-Paul
First of all, baguette shaping is the trickest shaping procedure in all of bread shapes.
Secondly, baguette shaping with a 75% hydration dough is challenging. No ways around it.
Thirdly, unfortunately there's not really a trick to it. Just do it a lot, know from experience what needs to be done (keep the surface tension taunt yet keeping the gas inside intact, iron hands velvet gloves), and do just those movements, no extra touching at all - because the more you touch it, the more you stick, and the more you man-handle the dough.
Finally, if you have not made baguettes before, may I suggest to 1) watch some shaping videos on youtube (search baguette shaping) 2) practice on some dryer dough (68% hydration is a good start)
Some have asked me how much flour I use, the truth is I don't know and it changes. 2 months ago, I probably flour a lot more than now because I have become a bit more familiar with the procedure. Keep at it, practice practice practice. Baguette is one of those breads that really shows how much time you've invested in it, no shortcuts at all. I have made baguettes at thsi hydration for 6 months+, once or twice every week, I still make shaping mistakes every time.
Even though inexperienced shaping would result in untraditional shapes, but usually it doesn't affect taste that much. If you bread comes out weird "tasting", usually it means something went wrong with fermentation, not shaping. A well fermentated dough can recover from "some" degassing during shaping. In fact the original Gosseline baguette doesn't even shape the dough, just stretch it long and call it "rustic", the fermentation is the key.
It tasted great. Tomorrows will be better. Learned a lot in the first one. But it was really ugly.....
Hi
What's the taste like for the sourdough loaf here ? Is it very sour ?
I see two types of sourdough starter on the tutorial - one that is started with just water and flour and the other one with pineapple juice. What's the difference and which is better ?
I'll be starting my sourdough starter soon and would love to hear from you experts ; )
Chris
No, it's not very sour. It has a mild taste.
For pineapple juice solution, see here:
http://www.thefreshloaf.com/node/10856/pineapple-juice-solution-part-1 , it should tell you the reasons for adding pineapple juice and you can decide for yourself which way to go. I have no tried pineapple juice method, so I don't have first hand opnion on it.
The search function on the left is great for getting answer fast (search for pineapple juice, the link above should be among the first ones returned), and you can get a lot of people's input on the topic.
Good luck!
Allow me to share with you some photos of my baguettes! I promise a more detailed description of my adventures, as I tested three different ways to generate steam during baking (you will notice the surface of the baguettes has slightly different color)
I also played with the shaping, in one case "stretching" it after shaping, but the crumb suffered - the other ones had more airy texture
I think I'm in love..... :-)
about the crumb - my good bread knife stayed in LA, so I had to use a horrible knife to cut my bread, and that messed up quite a bit. Amazing the difference a good knife can make, I advise all of you who use a less than great bread knife to invest in a good product
They're gorgeous. How satisfying!
:-Paul
Even with the dull knife I can see a very nice crumb. :)
I have tried this recipe twice and I cannot get a good rise. I do very well with the sour dough no knead recipe. Have been doing that at least once a week for many months.....Could it be that our house is oceanfront on the Oregon coast????
1. Starter not active enough
2. Too cold -- not enough time to rise, keep dough at room temp for longer to rise, or use warmer water to mix (but not so hot that it will kill the starter)
3. Not enough strength in the dough -- this is NOT a no knead formula, it requires some S&F to develope dough strength, without enough strength, you won't get enough rise both in fermentation and oven.
Like I said in the original post, it's a formula that's not "easy", it requires tweaking according to you own temperature and starter condition. However the rule of the thumb is that if your starter is indeed alive, give it enough time to bulk rise, and develop enough strength by S&F during that period, so that it will grow in volume by 50% to 100%(i.e. double or nearly double).
Sorry to bother you again, Txfarmer, but I just wanted to clarify something - when you shape your baguettes, particularly if you are in the "daring mode" and add a little more water, do you go through the pre-shaping plus shaping routine? (you know, form a little batard shape, then roll it to form surface tension two or three times?)
I am wondering if with the high hydration it would be better to skip the shaping and just "coach" them genly into a baguette-like form?
I pretty much decided I will skip the stretching part anyway - I liked the crumb better when I omitted that step.
I do preshaping and shaping like regular baguettes. I find that both of those steps are there for a purpose - they provide a taunt surface so that the dough can rise effectively during prooofing and in the oven. I've tried the "rustic" method of just stretching it, the crumb is much less open - which is counter-intuitive since you handle the dough less by skipping preshapping and shapping, until you realize that when done right, those two steps benefit the dough more than hurting it.
Ok, I understand - I will not skip it then. The shaping was not too hard, actually, I followed a youtube video that was very detailed. Of course, the guy makes it seem like the easiest thing in the world, but with practice I think I can improve.
Too bad I won't be able to try them again until my next trip home in November. But it's ok, I took a lot of notes, should be easier then
I used this recipe for Pizza today with 70% hydration and baked at 540. Best pizza I have ever made. Crust was soft and full of wholes.
It's a great idea to use this dough for pizza!
You beat me to it! As soon as I read txfarmer's post on this dough and saw that amazing crumb, I thought 'pizza'! Maybe I'm subconsciously planning an escape route in advance. I've made a lot of SD bread over the last 2 years, but have never tried baguettes...if the shaping doesn't work out, I can always flatten 'em and change to pizza!
Currently have txfarmer's baguette dough waiting in the fridge, now only a few hours off shaping. The moment of truth approacheth!
Cheers
Ross
things have been pretty hectic lately, but here is the full description of Txfarmer's baguettes experience in my kitchen....
I look forward to baking another batch next month
http://bewitchingkitchen.com/2010/10/18/36-hour-sourdough-baguettes/
Please see my new blog post for more variations on this formula!
Wow, great looking baguettes! Thanks for the recipe, I will try it this weekend.
do you worm up the flour and water mixture to come to room temperature before adding starter and salt or you use it straight from the fridge?
Straight from the fridge.
You should consider making a video tutorial on making this bread, or at least on shaping it! The next viral hit it shall be!
36+ hours is so worth the wait! I made this recipe using my 100% starter about 2 hours after feeding it, while it was still young. Baked at 460F with 25 seconds injected steam and lid on for 10 minutes, then another 10 minutes with the lid off. I didn't get much in the way of ears, but the crumb and the taste... out of this world. Thanks txfarmer for all of your hard work.
-Pamela
This post was extremely helpful, thanks for sharing all that you did to acheive your breads. I am using this method, tweaked of course, for my breads which have quite a bit of whole wheat flour in them and I am getting nice open crumb for WW flour breads.
had to let it double out of the fridge for about 4 hrs before dividing up the dough. (kitchen is 23°C) I used Austrian W700 which is a bread flour/relative high ash and the dough is final proofing right now. I hope the long retard didn't make them too sour. That fact that it took so long to double is reassuring that they are not too sour. We shall see... The dough has a nice elastic feel to it and no signs of age that I can tell. Plan on baking them crowded in a two part steel roaster for the first 20 min. then onto the rack to brown and dry out.
Baked. Not good, got the holy bread but chewy hard crust, going back to AP flour. Sour is just right! (innoculated with 10g rye sour) Baked the third baguette after the first two and ...see I could proofed longer, came out with a rounder shape and singing crust. :)
Yeah, even thought the name says 36 hours, but in reality, the timing is rather flexible. I have also retarded 2 days instead of one, which worked out ok.
thinking about yellow baguettes... :)
beautiful looking breads nice crumb
gave it a try -
Thank you for the excellent recipe. I could eat this bread all day long (and wide).
Hello txfarmer,
I have been reading a lot about sourdough, and have been experimenting with different starters, trying to achieve good results. It seems like the "nature" of the sourdough starter changes a lot based on the procedure one uses to feed it. I am amazed by your results, and I'm wondering if you could share your approach to feeding your starter? Do you feed it once a day, twice a day, and do you feed 1:2:2, 1:3:3, etc? I couldn't find anywhere where you discussed this. Thanks!
Twice a day, 1:1.5:1.5. However it's in fridge most of the week, only fed at room temp over the weekend when I have time to make breads.
Thanks for the response! Seeing as you keep it in the fridge during the week, how many times do you feed it after taking it out of the fridge before you use it to build your bread's levain? Do you feed with bread flour or whole wheat? Thanks!
Once or twice (it's doubling/tripling reliably after the first time anyway). I feed bread flour to the white starter and rye to the rye starter.
Beautiful bread.. would like to try out someday!!! looks really yummy!! btw u mentioned the 100% hydration starter. is that like sourdough starter? I am very new to baking thus do not know what is tt!!
ans u mentioned tt u feel your starter twice a day.. what is 1:1.5:1.5??? can i prepare the 100% starter one day before i bake the bread?
I am almost at the end of the final stage,the scoring and baking. One question. before putting into the fridge for its 24hour rise, I did not stretch and fold. Was I meant to ?
I do like an open crumb, but yours are just holes and i wonder how can you ever spread anything on this one?
I bet the taste is wonderful though.
I like what you achieved, but isnt it a bit impractical to eat ? btw i adopted one of your yeast recipes into a straight sourdough baguette one and thats my standard now :) so thx for directing me there
I am going to try and incorporate some of your techniques into my sourdough baguette! thanks!
Am going to try this over the weekend!!
How many baguettes does this make and how long? Want to know so that IO can figure out how many to divide into.
About 18"-19" each. Good luck, post the results!