When I tell people I am into bread baking, people often respond by telling me that they wish they could bake bread but it just seems too complicated. I find this discouraging, because baking a basic loaf of bread is about the easiest thing you can do in the kitchen. Once you understand what is going on in a simple loaf of bread you should be able to look at 90% of more difficult bread recipes and have a sense of what that loaf will taste and feel like.
Bread, at its core, is just four things:
Flour
Water
Yeast
Salt
That's it. There are even methods to cut out at least two more of those (yeast and salt), but the end product is unlikely to come out tasting like a typical loaf of bread.
Each ingredient and step in the process of making bread serves a distinct purpose. Once you understand what role each ingredient performs and what is occurring in each step of the process you will feel liberated to experiment and create your own recipes.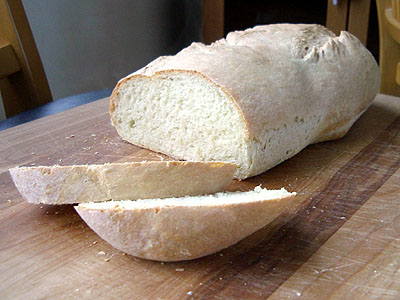
Understanding the Ingredients
- Flour. There are a million different types of flour. Among them are those made from different grains, those made from different types of wheat, bleached and unbleached flour, enriched flour, blended flours, whole grain flours, and on and on. Don't let this intimidate you! Realize that your standard grocery store, All-Purpose Enriched Unbleached Flour that comes in a ten pound bag for under two bucks is good enough to produce an excellent loaf of bread. It is probably higher quality than the flour that 90% of bakers throughout history have ever gotten their hands on. Ok, you are unlikely to win the Coupe du Monde de la Boulangerie (The Bread Baker's World Cup) using it, but that isn't what most of us are aiming for.
Flour forms the basis for your loaf of bread. No flour, no bread.
- Water. You can probably find some of this around the house, can't you?
Water activates the yeast and dissolves all of the other ingredients. Adding more water results is a stickier, flatter loaf with less regular holes in it, like a Ciabatta. Too little water restricts the expansion of the dough and results in a tight, dry, hard loaf.
- Yeast. Once again, basic Instant Yeast (also known as Bread Machine Yeast) from the grocery store that comes in those little packets is good enough for all but the most elite baker.
Active Dry Yeast, another kind commonly found in grocery stores, needs to be activated by pouring it in warm water prior to mixing it into the dough. So read the back of the packet before adding it to your mixture.
Yeast is what causes the dough to rise. Adding more yeast will cause the loaf to rise more quickly. Adding too much yeast can cause a beery, off taste in your loaf. A teaspoon or two of yeast per loaf is typically called for.
- Salt. Table salt works well enough. The kosher salt or sea salt that most grocery stores carry tastes a little better, but it isn't worth picking any up just for baking your first loaf: use whatever you've got in the house.
Salt retards the yeast and helps control the fermentation process. It also adds flavor that most of us expect in even the simplest of breads.
These are the fundamental ingredients for making a decent loaf of bread. Additional ingredients add flavor or complexity to your bread. These will be discussed in a later article.
Once you understand the way these four principle ingredients function, you can look at any recipe and realize that the basic rules of how bread works don't change.
Understanding The Process
For a basic loaf, all you need to do is put the ingredients together in a large bowl, mix them together with a wooden spoon, and then knead the dough on a hard surface for approximately 10 minutes.
Kneading
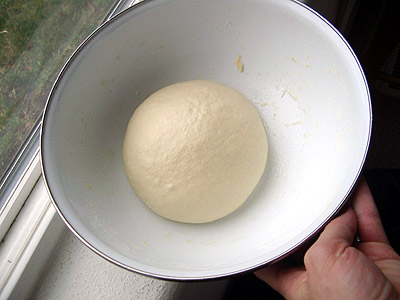
before rising |
Kneading is more than just stirring: kneading actually releases and aligns a protein in the flour called gluten. Gluten strands are what allow bread to form irregular pockets of carbon dioxide. Without this step your bread will have uniformly small holes, more like a muffin or loaf of banana bread.
As long as you aren't tearing or cutting the dough it is hard to go wrong with kneading. Squish and roll, squish and fold, applying a fair amount of pressure on the dough, is a basic kneading technique.
At some point, typically around seven or eight minutes into the process, the consistency of the dough will change. It'll become silky and smooth. You should feel it change. This is a good sign that you've kneaded enough. I typically give it another 2 or 3 minutes before calling it quits.
At this point, drop the dough into a bowl (it's helpful if the bowl is greased to keep your dough from sticking to the bottom - regular spray oil will usually do the trick) and throw a towel over the bowl, and leave it alone to let it rise.
Rising
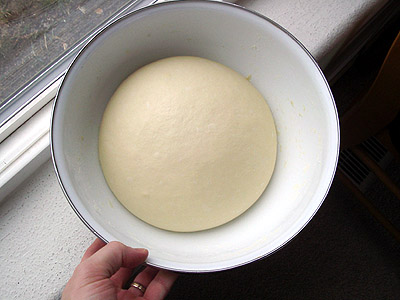
after rising |
Status check: by the time you are ready to let your loaf rise the yeast should be activated and the gluten should be aligned. The yeast does what any organism does after a long nap: it eats. The yeast feeds on the simple sugars that occur naturally in the flour. The yeast then releases carbon dioxide, which causes the bread to swell and form pockets.
If you have kneaded properly the dough will form long strands of gluten which allow large air pockets to form in your loaf. If not you will end up with numerous smaller holes. No holes in your dough means your yeast failed to activate.
The loaf must rise until it is approximately double in size. This typically takes from 45 minutes to a couple of hours, all depending on how much yeast the recipe called for. Temperature too is a factor: the warmer the room is the quicker the yeast will rise.
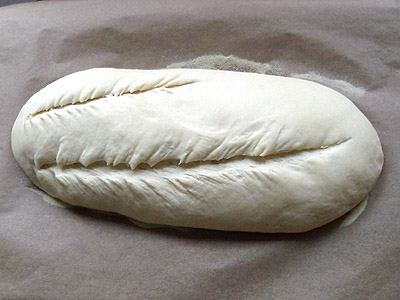
Punching Down and Shaping
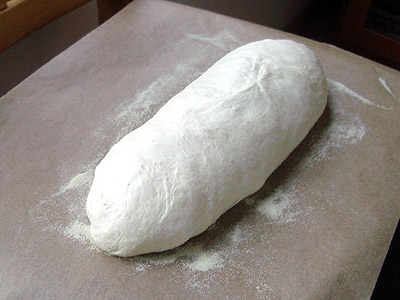
shaped loaf |
Some recipes call for one rise before shaping the loaf. Other recipes call for punching down the loaf to allow two or more rises. Punching down means simply to squish the risen dough down and re-knead it so that it is smaller again.
The purpose of punching down is to free up more food for the yeast. The longer the yeast feeds, the more complex the flavor of the loaf. Too many rises, however, can result in off flavors, such as bitterness and a beery flavor, to occur in your bread. As well as carbon dioxide yeast releases alcohol and acids. Too much acid in your loaf can actually cause the yeast to die off.
You do not shape the loaf until you are ready for the final rise. Either you place the loaf in a loaf pan or you shape it into a baguette, batard, round, or whatever shape you want. Then you give it another hour or so to double in size again.
scored loaf |
Scoring the bread is just slicing it. You'll want to use something really sharp so that the dough doesn't fall and collapse again. A razor blade does the trick if you don't have fancy knives. The purpose of this is to release some of the trapped gases in your loaf so that it doesn't tear open while baking. It also makes your loaf look nice.
Baking
In the first five minutes in the oven your loaf will have one last growth spurt. This is called oven spring. Think of it as the yeast feeding itself quicker and quicker as it heats up until the rising temperature finally kills it off.
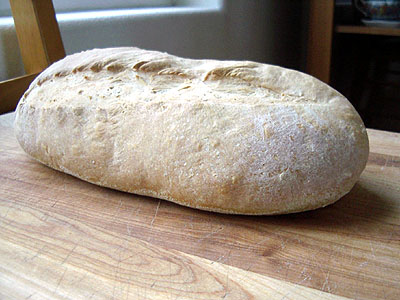
done |
Many bakers use baking stones, which retain heat, to try to maximize the oven spring. This is helpful but not necessary when starting out.
Let's Make a Loaf!
OK, now that you have the basic idea, let's try it out with a really simple basic recipe. I tried this one today while stuck inside during an ice storm. This worked out well, since the freezing rain hit before we had realized that our refrigerator was lacking eggs and milk, along with a variety of other grocery items!
A Generic Recipe
3 cups flour
2 teaspoons salt
2 teaspoons yeast
1 1/8 cup water
Mix everything together. If it is too wet and won't come free from the sides of the bowl or keeps sticking to your hands, add a little more flour. If it is too dry and won't form into a ball, add a bit of water.
Knead it for 10 minutes. Cover and set it aside to rise until it doubles in size, approximately 90 minutes. Punch it down and let it rise again. Shape it, either by putting it in a greased loaf pan or by rolling it out into a long loaf and putting it on the back of a cookie sheet.
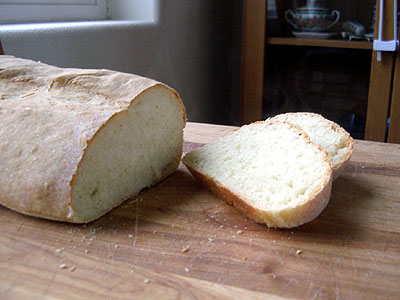
Ready to eat! |
After it has risen to twice it size again, another hour or so, put the loaf into a preheated oven at 375 degrees. Let it bake for 45 minutes and then pull it out. If you made it into a long skinny loaf, it may cook 5 or 10 minutes quicker, so adjust the time based on what shape you chose. I baked the loaf in these photos for 40 minutes). 350-375°F for 45 minutes is typical for a loaf in a loaf pan.
Eat!
Wrap Up
Well, how was it? It may not be the best loaf of bread you've ever had, but it ain't bad.
There are many additional ingredients and techniques that are used in creating world class breads (some of which I will talk about in future articles), and each step of the process that we discussed (kneading, rising, shaping, scoring, baking) can be further elaborated on, but the approach used in this recipe is at the core of almost every other recipe you will encounter.
Continue to Lesson Two: Adding Something More to Your Loaf.
Comments
Sugar? It's all a matter of what flavor you like. I think that sucrose (table sugar) gives the bread a cloying mouth (the taste in the front of your mouth - where the tounge moves around). Others like the fullness of flavor resulting from the combination of the sugar and salt. Who is right? We all are.
If the dough sticks to everything in sight, it's too wet. Flour, added after the first rise, doesn't get worked on by the yeast as much. Since you will have to add it sometime, might as well add it to the original mix. This "issue" is all about feel and texture. To misquote "Pirates of the Carribean" The measuring cup is more like guidelines.
I think that the best advise is to fool around a bit. After 3 years of fooling around, I found an idea on the Wikipedia regarding the first American cookbook (1798). I now use maltose and sponge ferment to get the "full mouth" while avoiding what I consider the cloying flavor of sucrose. Is this the perfect solution? I don't know, as I am still fooling around.
While we are on this topic. I normally can't tell the difference between sea salt and mined salt. In bread, I can - especially when sugars are involved.
I used Spelt flour.
2 cups wholemeal to one cup white unbleached.
I also made a starter. I think I have the yeast that needs to be woken up, so I added 1 teaspoon of Dark raw honey to the water.
I kneaded for 6 mins as I have read alot that too much kneading breaks down the delicate gluten structure.
I know it needed more water in the initial mixing but then the dough was sticky when kneeding so I just added more flour during the kneading. By the end it was a good consistency and was as elastic as I have ever had my bread dough go.
The first proofing it more than doubled in size, the second proofing did the same, the third time when I put it in the loaf pan it didnt rise much as all. In fact it didnt reach the top of the loaf pan........which is quite shallow anyway. :(
I also think I need to place a moist tea towel over the top when it is proofing as it dried out alot on top.
I baked it for 40 mins and it came out lovely in taste and texture.
My guests enjoyed it none the less :)
It actually was elastic/chewy like "real bakers bread" is. I was proud of myself for that.
I wonder if the third proof was a mistake? Was I meant to let it rise 3 times? I might have misunderstood the lesson :S
I am going to try again.
Thank you so much for writing this tutorial. It's very well organized and easy to understand. Love the pictures! I hope you don't mind me sharing this page with some of my online friends. Keep up the good work!
Al
Most often I get rock hard loaves.
They do rise, but NEVER has it ever "doubled in size" even after letting it rise 12 hours!
I had tried all three types of yeast and it reacts to proofing like it should.
When I kneed it it acts like rubber and springs right back making kneading hard as all get out!
If the bread does not taste like beer, it has no flavor at all!
The dough usually forms a near rock hard crust while rising.
Today was the first time I had a crust soft enough not to break teeth and that's only because I washed it with starch and water (advise from a book).
I have only had one loaf that was not only edible, it was somewhat palatable, but not decent enough to be considered tasty.
So far I have purchased 3 book on baking bread and they all had some good info, but none had a list of "if this happened, this is what you did wrong" chapter.
I have even looked for a bread baking class, but unless I want to enter a culinary institute, there is nothing out there local to me.
King Arthur in VT had a class while I was visiting last year, but it was $400 for a 2 day class!!!!!!!!
Ok, first of all welcome to TFL. Welcome to the Techical Difficulties pages!
I'm glad you are still motivated to keep going. Good sign. I also suggest that you check out some of the videos on site, sometimes a moving picture can help.
To start.... It does sound like you have too much flour in your dough or too little moisture. If the dough is too dry, your dough will not be stretchy and therefore not rise as it should.
It happens to many of us in the beginning, we use too much flour kneading the dough so that it isn't sticky. Big mistake, good dough consistancy will always have a bit of stickiness. Get used to it. It can be fun.
I suggest that if you like to knead in flour, don't add the last cup of flour in a recipe and use it for kneading. Try to keep your dough soft. Oiling your hands (when you oil a bowl) before you knead may help. Also I find that after mixing the dough together, let it just sit 20-30 min before kneading. You will find the resulting dough will come together much easier and generally it's less sticky and requires less flour.
The other solution is to knead with wet hands. Yes, wet hands! Keep a large bowl of water near you so that you can dunk your hands into it. Very lightly oil the counter top first and try it. You may find you like this method more!
Don't forget to cover your dough to prevent it from drying out when you're not handling it. This can be done in a number of ways.
Hope to hear back from you soon,
Mini
You don't need a $400 class. You just need a change in concept.
I'm pretty sure you're putting too much flour in it. This happens in two ways. First, if you are scooping or packing the flour into your measuring cup, you can get a lot more flour (by weight) than what the recipe intended. Try using recipes that call for measurement by weight, in order to eliminate this. Kitchen scales aren't expensive. Second, realize that it's ok for dough to be sticky or tacky. Some, dependng on the recipe, are even soupy! (a loose description of ciabatta dough here, in beginner's terms) I used to (wrongly) imagine that dough should be firm and dry in feel, simply because I didn't learn to bake bread with Mom.
Once I started putting NO more flour in than what the recipe called for, and started just accepting that dough might be sticky, my bread suddenly started rising and even looking and tasting nice! Give it a try!
Thank you so much for creating this page and sharing your passion! I LOVE bread in all it's yeasty goodness. Bread, rolls, buns, biscuits, you name it, I love it. We had been living abroad in England for a number of years and I frequented my favorite local bakery often but now we are back in the states and have no access to that wonderful selection of artisan breads, so I decided to put a bit more effort into learning about bread so I can make them myself. While I am certainly not an expert by any stretch of the imagination, I do seem to have a natural knack for breads (as opposed to pastry to which I resemble a plague). I have enjoyed reading this lesson and all the comments and have identified a number of areas in my own baking that need improvement. I can't wait to read the next lesson and tackle my next loaf!
Hi there. I followed lesson 1 recipe completely, with the exception of the oven at 400 ºF and used a water pan at the bottom. I started kneading it with a Kitchenaid mixer (I have a back problem so I can`t do it by hand for more than a few minutes) and after like 7 min. the dough was still sticking to the sides of the bowl and the hook like a circus tent. I added a little flour and improved for a little while and did again. Since I wanted to follow the recipe as closely as possible, decided to knead by hand as you suggested somewhere in the site, so I could "feel it changing", still needed more flour, but not as much as I usually have to add to the mixer (about a 1/4 - 1/3 of a cup). I liked the result so much, that I am very enthusiastic about bread making now; but would like to solve the mixer problem, I am not sure about the right consistency of the dough in the mixer. I have looked in the web and KA claims all there is needed is about 2 min. and it should be clearing from the sides of the bowl. I am afraid that if I keep adding flour the dough may be too stiff. By the way, here in my country there is nothing like Bread Flour (at least in the supermarkets) and AP flour has 4,5% protein content; don´t know if that should account for the additional flour. Take a look at my first Lesson 1 loaf. It was incrdible, I just hope it was,`t a"lucky mistake".
Thanks, really, for this excellent website and your help !.
Eugenio
Congratulations! The really good news is that it gets even better as you have more practice!
You mention that the bread has a dense texture, which your photo corroborates. The dough probably wanted a bit more time to rise in the pan before going into the oven. And it isn't so much a matter of clock time as it is a matter of dough readiness. Higher or lower temperatures can have just as much influence as time. So, on your next bake, look for the dough to nearly double in volume (ignoring the clock) before putting it into the oven. You can also use the "poke test" to determine readiness: gently press a fingertip a little way into the dough, say 1/2 inch or 1 cm, approximately. Pull your finger back and watch how the dough responds. If it bounces right back, it isn't ready to bake so let it rise some more. If it slowly fills back in, it's just right; put it into the oven. If it does not rebound at all, it is probably over-proofed. You can bake it but there's a good possibility that the dough will partially deflate from handling or from thermal shock when it goes into the oven. Best to take it out of the pan, knead it lightly, reshape, and put it back in the pan to rise again.
Since the bread's crumb in your photo also looks a bit moist and sticky, I'm guessing that you might have sliced into it while it was still hot. ;-) Allowing the bread to cool all the way down to room temperature allows the bread to finish baking (kind of like letting a roast stand for a few minutes before carving after taking it out of the oven), permits some moisture to evaporate and allows the rest of the moisture to be evenly distributed in the bread.
You can probably get rid of the beery flavor in your next bake by reducing the yeast to half the quantity that you used in this bake. It may take a bit longer to rise but that's a good thing. You'll taste more of the flavors in the flour and less of yeast's flavors.
Keep on baking. You are off to a very good start.
Paul
I don't think this is correct. I believe oven spring occurs due to the rapid increase in temperature resulting in the moisture in the dough being converted to steam. Much the way a pancake or waffle will 'spring' when it hits the pan or iron.
Just a minor observation.
Yes, and for most people ordinary tap water is good enough, but if you are having rising problems, try using something that hasn't got chlorine in it. Whilst I'm not an advocate of bottled water, you could use water that has been boiled or that from a filter jug (Britta for example).
Hi,
I am attempting this loaf today.I have just finished kneading the dough for the specified time, but it kept tearing with each knead after about five minutes, I did keep going to ten minutes assuming/hoping that this would help, but nope still tearing. I let it sit for ten minutes, thinking I would let it rest and knead some more. When I came back to it, it was already almost doubled in size, I did knead some more for about four minutes but it kept tearing again. The dough seemed smooth initially and not sticky at all, I didn't need to put any dough on my hands or fingers to work with the dough. Should I add more water at the start of putting all the ingredients together next time? I was using the heel of my hand for the kneading and turning after each time. Any advice would be great. tempe
This recipe isn't meant to be a great bread, just an easy bread. Yes, I would certainly suggest moving on to a wetter dough.
Thanks for your reply, I will do just that. I went ahead and baked the loaf and it came out better than I thought it would, must have been as the family seemed to enjoy it. And thanks very much for all the info you have taken the time put up here, I really appreciate it.
Sorry someone hasn't replied sooned. Seems like not enough water and oven too hot. With the mix, the dough should come together and be shaggy. Let rest 5 minutes. When you begin to knead the dough will feel very wet and stick to your hands. The more you knead the more it will firm up. It's okay to take a break, 5 minutes, along the way. Kneading is done when the dough barely sticks to your fingers. Like a post-it note.
Jim
Hello
Thank you so much for these lessons; I'm delighted to have found this site and have since much improvement in my bread making this week. I have only tried a couple of times before and I have not been very successful.
Attached are pictures of my second attempt at lesson one. The first attempt had a very similar result, except all the seeds fell off it and is was even a little flatter. Apart from adding the seeds to the top (which I can now successfully do having looked that up elsewhere on this site!) I did not change the recipe or method at all. However, as you can see I'm getting a very flat result that's a little too dense. It tastes great however (and my other half agrees!) and has a good crisp crust and a soft crumb. It does show good signs of the yeast still being active throughout the kneeding and proofing process and it does increase in size, it's just that after shaping it seems to do all of it's growing sideways rather than up, and has no 'spring' once in the oven.
I feel like I might not be kneeding it for long enough; even though I do so for at least 10 minutes perhaps I move too slowly in that time and therefore do less in that time! The reason I wonder this is that although I definitely notice the consistency of the dough change while kneeding, it doesn't look as beautiful and silky as the pictures I see here and elsewhere, but I'm afraid of continuing too much and over-kneeding.
The other thing I wonder about is mixing; I add my water a little at a time so that there is just enough to form a ball, but when kneeding I find I'm having to add quite a lot of flour every few moments to prevent the dough sticking to the board and to my hands. It would be easily another cup that I add, incrementally, if not more.
When I try again I'm going to note carefully what I do at every stage; that way if my result hasn't improved much perhaps I'll have more to go on to get better the next time :-)
I would be very grateful for any suggestions...
Thank you!
In ARTISAN BAKING ACROSS AMERICA, Maggie Glezer says for every 150 g (5.3oz, 1 cup) of flour in the recipe to use either of:
3 gm compressed fresh yeast (0.1 oz, 1/6 cake)
2 gm active dry yeast (0.05oz, 1/2 tsp)
1 gm instant active dry yeast (0.04oz, 3/8 tsp)
------------------------------------------------
* 1 tsp instant = 3.1 g
* 1 g instant = 1.25 g active dry = 2.5 g fresh
* 1 tsp instant = 1.3 tsp active dry = 0.4 cake fresh
* ——–
* 1 tsp active dry = 2.9 g
* 1 g active dry = 0.8 g instant = 2 g fresh
* 1 tsp active dry = 0.75 tsp instant = 0.3 cake fresh
* ——–
* 1 g fresh = 0.5 g active dry = 0.4 g instant
* 1 cake fresh = 3 tsp active dry (8.7g) = 2.25 tsp instant (7g)
----------------------------------
1 teaspoon instant (aka instant active dry ) =1-1/4 teaspoons active dry or 1-1/2 packed teaspoons [0.75 ounce] fresh cake yeast
Tried this one yesterday - but have a few questions. I did the first rise in a mixing bowl and the second rise on a pizza peel . Then I shaped and allowed it to rise again on the pizza peel before placing it in the oven and baking it. I believe I overproofed it during that third and final rise ( after shaping) and also I had a little difficulty getting it off the pizza peel onto the breadstone in the oven because of the weight of the dough. Hence the loaf lost much of its round shape and flattened out.
Would it be best to do the second rise in a bowl? Should I do the shaping on the (cold) plate that I will be baking it on?? How do people place a well risen shaped loaf into a hot oven (and hot baking stone) without destroying the rise.
I use a kenwood mixer, let it rise in the bowl, no problem, knock it back but on the second rise it spreads rather than rises and i get a thin loaf, any suggestions please.
Yesterday I made this recipe (turned out pretty ok if I do say so myself!) and tonight I made a cross between this one and lesson two (I omitted the butter and maybe something else?) and it also turned out decent. Since it doesn't keep so hot for more than a day, 1400 calories per loaf it is a LOT of bread for the 2 1/2 people in our household. Can I just halve the amounts? I am only 2 days into bread baking so I am not sure of any ratios/rules/the chemistry behaind all this. My goal is to make a loaf a day for the next few weeks and see if we can save money over buying the ever-increasing-in-cost french baguetts from Publix while learning a new skill. :)
Yup. It should work fine. Good luck!
-Floyd
Thanks for the fast response! I'll give the reduced recipe a shot tomorrow. Many thanks for this site; I have had the ingredients for bread sitting in my pantry for 3 months now but was paralyzed by uncertainty. I had my countertop prepped and the dough mixing 10 minutes after reading this post!
Hi all
Here is my first attempt at baking using the generic recipe above. I followed the instructions and this is what I got. I was pleased with the structure and the yeasty taste, but the shape was a disaster. I wanted an artisan style bread (no tin) so just put on a cookie tray for the final rise.
This got me thinking about a cool video I saw that had bread put into baskets while they were rising.
Do you guys use these baskets? Would it have made a difference to my bread?
Thanks
wannabbaker :)
i tried to rush my loaf and ended up with the same results. i also had been trying to make breadsticks to go with our salads. When my bread looked like this, I simply sliced the bread, heated up my griddle, butter the bread and threw it on the hot griddle. Great toast and it was just crispy enoug for breadsticks. Love what you can do with mistakes. Love this website and helpful tips and recipes.
I was sick and tired of trying to decipher ingredients on the packing of bread so I thought I would give it a try. I found this website, which is awesome, and it made baking my first loaf a cinch. I followed the directions to a tee and my loaf turned out great. Tasty too! Thanks
I've tried this recipe twice. The only alteration I made was to substitue about 1/2 cup of the flour with whole wheat.Otherwise, I was careful to follow the recipe faithfully. The process of making this bread seems to go well, in that the first two rises double in about the expected time. However, having shaped the loaf (long loaf on cookie sheet) and left it to rise again, while it does increase in volume, this is not directed upward, but more in a sprawl, and when baking there is little or no oven spring. The result is a rather wide, flat loaf that is a little too dense and heavy.
So - both times the yeast seemed to proof well. I probably kneaded in a little more flour the first time, resulting in a slightly drier dough, and the second time, I let the dough rise in a slightly warmer place, as the house was rather cool both times, and I wondered whether this would help.
Is the small amount of whole wheat flour I'm using to blame?
I only kneaded the dough briefly after the punching down, and not at all before shaping the loaf after the 2nd rise. Was this correct?
I am determined to become a regular bread baker!
Kris
Are all these recipes in these lessons containing instant yeast? And, since these are made to help the beginners (like me) to understand and aid in baking with the simplest of instructions, can active be used with these if I proof the yeast?
I was planning on trying out a loaf for the first time and all I have is actve, but if I need to start out with instant, that is fine, I will just do it tomorrow.
thanks,
JJ
Yes, active dry yeast will work fine. It is a little less concentrated than instant, so round up a tad or expect it to take a little bit longer. And, yes, proof it first.
Good luck!
-Floyd
In the videos provided by TFL there are what appears to be two different instructions. In the epicurious video it tells you that you can tell when you are finished with the kneading because if you put two fingers into the dough it will stay dented. In the other videos the instructions are to knead until the two finger dents bounce back immediately. Which is it--do the finger holes bounce back when you have kneaded enough, or do they stay indented when you are finished?
Thank you,
the dents should spring back after kneading.
I used:
369 grams of KA organic AP flour, ~3c
235 ml room temp water (63.7%) ~ 1c
6 g Instant Yeast (1.6%) ~2 tsp
10 g table salt (2.7%) ~2 tsp
I mixed the flour, yeast and water in a bowl and added the salt. Kneaded for 10 minutes, I did see the transformation from a thready, rough ball into a more silky ball, but texture was never completely smooth (maybe more kneading?).
Its now covered sitting on the fridge. Will post on progress.
UPDATE: rise- 90 mins, punch down, rise 60 mins, shape and final rise underway
UPDATE: in oven...we'll see!
UPDATE: well...it looks and tastes OK to me!
I tried the manual knead, but to nou avail, can I mix and knead the dough with a doug hook and mixer and for how long and what speed. Excellent site.
Thanks
P
Yes I use a dough hook and Kenwood mixer. Works just fine. I keep mine on the dry side and just add flour at first mix stage before first prove . 1 minute at speed 1 the 2 minutes at speed 2. Knock down after first prove at speed 1 for 2 minutes. Good baking eh?
I know this article was posted in 2005 but the link for "More information on yeast can be found here." doesn't work. Can anyone refer me to more information on this? I would like to understand how it works. Any help would be greatly appreciated.
Glad I found your site. I tried the bread recipe and it is delicious!!! I am going to work through all the recipes and make great bread with you!
hey!
The atmosphere in my house is very dry and the hottest place is usually somewhere in the kitchen. I'm surprised that everyone needs about an hour or so before their dough rises properly when mine takes more than 8 hours. I usually leave it overnight.
My dough was a nice sticky texture, and my yeast was properly activated (foamed up properly before added to the flour)
I've oiled my pan and left the dough to rise.
can some one guide me on ways to proof the dough properly so that it's the first rise is under 2 hours at least?
Highly appreciate the help!
Thanks :)
Temperature C° or F° (My brother said something similar, thought 65°F was warm in the kitchen.)
Recipe.
Exact type of yeast (label) expire date and
your location (about, winter or summer?)
Rise time is affected by the amount of water in the dough, ambient temperature, amount type and age of yeast, elevation, dough temp (cold water or frozen flour) type of flour. Flour is important as some build more gluten than others and trapping gas is crucial to rise. The more specific you are, the easier it is to trouble shoot.
Dry conditions require covering the dough to prevent loss of moisture. Drying out can happen faster than one thinks. Too much flour in the dough can also hamper rise. Too warm a temperature is also not good and can kill yeast.
My first loaf! I was expecting to get something similar to sandwich bread, but what came out was nothing like. I didn't really let it rise as much as I should have after shaping, and scored more than probably necessary. I tossed in a bit of oregano before mixing, and what I ended up with was akin to what you get at a place like Carrabba's to dip in oil&herbs before your entree arrives. A dense, flattened-oval loaf with a hard crust but moist, springy inside.
Image

As you can see, the crust never really browned up, but believe me, it was crunchy and solid. I think it's due to not having added any sugar to brown, nor using a coating. At the very least, I now have a dead-simple recipe to go with Italian cuisine.
Ok, I just made my first loaf. I think it came out pretty good for my first loaf. The crust came out a bit crunchy and tough. Does that mean I over cooked it a bit? or does it have to do with something else I did in the process?
Thanks :)
You didn't tell us to be careful and avoid knocking the loaf pan.
I knocked the pan on the oven handle and the loaf collapsed dramatically!
Also sounds like the risen dough might have been a tad over proofed. So what did you do after it sank? Bake it? How did it come out? Or reshape and let it rise again?
Baked it!
Small but solid. Solid as a rock.
Made pretty good bruschetta toasted!