San Francisco Sour Dough French Bread
according to
Kline, Sugihara and McCready
(The Bakers Digest, April, 1970)

In their 1970 Bakers Digest articles, Kline, Sugihara and McCready first deliniated the microbiology of San Francisco Sourdough bread. Their discovery of the special relationship between the dominant yeast – S. exeguna – and a unique species of Lactobacillus provided understanding of the special flavor of San Francisco sourdough and the stability of the sourdough cultures over time.
In the first of their articles, they also described the process San Francisco bakeries used to maintain their starters and make their breads. They describe the process as if all of the bakeries used the same process without actually stating this was the case. Regardless, the process they describe is significantly different in several respects from those found in any of the currently popular baking books in my collection. Because of that, and because I'm curious about whether the process they described can be successfully replicated in my own kitchen and produce bread like that of the traditional San Francisco sourdough breads with which I'm familial, I made a couple of loaves following their procedures.
The formulas and procedures described by Kline, et al. in the articles cited are as follows:
Sponge | Bakers' % |
Firm starter | 100 |
High-gluten flour | 100 |
Water | 46-52 |
Ferment for 7-8 hours at 80º F
In the bakery, fed every 8 hours
Can feed less often by fermenting for 6 hours and retarding at 50-55ºF or fermenting 3-4 hours and retarding for longer times with refreshments 3-4 times per week, rather than 3 times per day.
Dough | Bakers' % |
Sponge | 20 |
AP flour | 100 |
Water | 60 |
Salt | 2 |
Mix ingredients (No mix method or time is given.)
Rest for 30 minutes at room temperature.
Divide and pre-shape.
Proof for 1 hour at 90ºF
Shape.
Proof for 6-8 hours at 85-90º F.
Score loaves and Bake with lots of steam for the first half of the bake at 375-390ºF for 45-55 minutes.
To make 2 kg of dough, I proceeded as follows:
Sponge | Bakers' % | Wt (g) |
Firm starter | 100 | 88 |
High-gluten flour | 100 | 88 |
Water | 50 | 44 |
Total | 250 | 220 |
1. I built the firm starter for the sponge with two elaborations, starting with my firm stored starter.
2. The sponge was mixed and fermented at 80º F for 10 hours.
Dough | Bakers' % | Wt (g) |
Sponge | 20 | 220 |
AP flour | 100 | 1099 |
Water | 60 | 659 |
Salt | 2 | 22 |
Total | 182 | 2000 |
Note: Accounting for the flour and water in the sponge, the actual final dough hydration was 58.9%.
Procedures
All the dough ingredients except the salt were mixed and allowed to rest, covered, at room temperature for one hour.
The salt was sprinkled over the dough and mixed in a Bosch Universal Plus mixer at First (lowest) speed for 1-2 minutes, then at Second speed for 5 minutes.
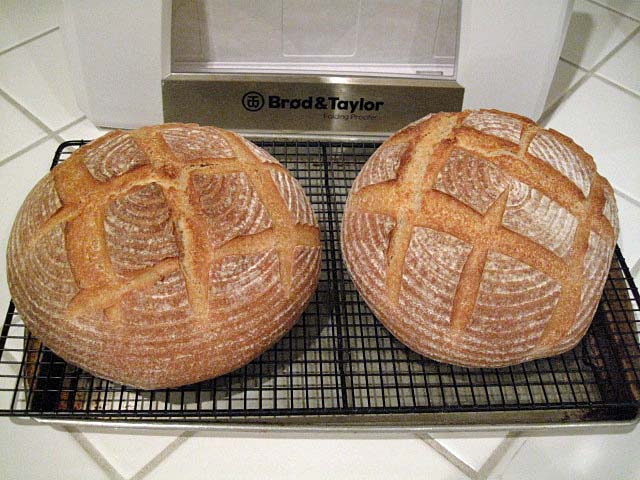
The dough was then divided into two 1 kg pieces, pre-shaped as rounds and proofed at 90º F for 1 hour. (I placed the pieces on a bakers' linen-covered 1/4 sheet pan in a Brød & Taylor Folding Proofer.)
The pieces were than shaped tightly as boules, transferred to floured bannetons and placed in plastic bags.
The loaves were then proofed in the Folding Proofer at 85º F for 6 hours.
45 minutes before baking, the oven was pre-heated to 450º F/convection with a baking stone on the middle shelf and a cast iron skillet filled with lava rocks on the bottom shelf.
The loaves were dusted with semolina, transferred to a peel, scored and loaded on the baking stone. A perforated pie tin filled with ice cubes was placed on the lava rocks. The oven was turned town to 380º F/conventional bake.
After 23 minutes, the skillet was removed from the oven. The oven setting was changed to 360º F/convection bake, and the loaves were baked for another 22 minutes.
The oven was turned off, but the loaves were left on the baking stone, with the oven door ajar, for another 15 minutes.
The loaves were then cooled on a rack before slicing.
This is a low-hydration dough. After mixing, it was very smooth and barely tacky in consistency. It was still very dry and firm before the final shaping. After the six hours final proofing, the dough was very soft and puffy. I was afraid it was over-proofed and would deflate when scored or, at least, have poor oven spring and bloom. However, It took the scoring well and had good oven spring and bloom.
The baking temperature was lower than I usually employ for lean dough hearth loaves, and the crust color was thus lighter than most of my bakes. The crust color was quite characteristic of the San Francisco Sourdough breads I remember from the 1960's and 1970's. The loaf profile also was typical – a rather flat loaf.
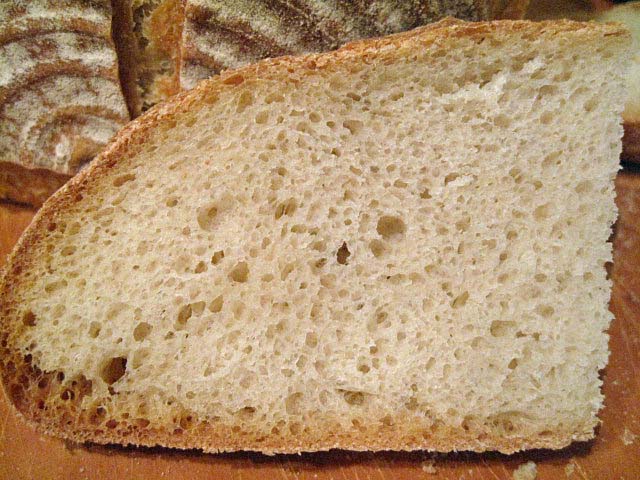
The aroma of the vented oven air was remarkably sour during the final 10-15 minutes of the bake. The bread, once baked, cooled and sliced, revealed a very even crumb. The crust was somewhat crunchy but more chewy. The flavor was minimally sour and had little complexity or sweetness to it. All in all, a handsome loaf with undistinguished eating quality.
I expect I could tweak more sourness out of this dough by retarding the loaves overnight, but I don't particularly feel inclined to experiment further when there are so many other breads that are so much better.
Comments regarding the process described would be very welcome. I am curious regarding the disparity between the San Francisco Sourdough's I have had, supposedly produced by this method, and what I baked at home. Any thoughts?
David
- dmsnyder's Blog
- Log in or register to post comments
Now we don't have to.
I wonder if the bread would taste different if made with a sourdough starter that lives in San Francisco.
The loaves are very pretty, and I hope they make good toast or croutons or something.
Glenn
your starter produced/produces superb loaves: wonderfully sour with a tantalizing note of sweetness owing to the long ferment and my custom of retarding my sourdoughs for 12-24 hours.
Stan
The hydration is (what I would have thought) on the low side for this type of loaf. The crumb is consistent with a low hydration, but I would have expected a higher profile. Interesting. Perhaps that is due to only 7 minutes of mixing and no stretch and folds during the bulk ferment.
Perhaps this formula with the addition of 5% rye or 10% WW would make for a more interesting flavour.
Best,
Syd
I think the gluten was well-developed by the mixing. The character of the dough at the end of proofing suggested to me that the long, warm proof resulted in some proteolysis, and that accounts for the loaf profile.
The addition of some whole grain rye or wheat would certainly enhance the flavor, but this bread, traditionally, was very white, and the best of it had pronounced sourness with a nice balence of flavors. This bake just didn't hit the mark.
David
Great looking Loaves, David! Neat scoring, and beautiful color on the crust. The crumb is typical of a low hydration, as Syd said.
I havn't had a sourdough bread from a bakery in Dubai save from my kitchen, let alone San. Fransisco sourdough. However, your bakes, especially the beautifully crafted San Joaquin SD inspired me. I think you should stick to those breads you like most.
David,
I have made similar, but not identical, bread using half of the dough as you did and cold retarding the other half for baking one day later. The dough that cold fermented for 24 for hours longer was so incredibly superior to the dough baked on the first day that it made you believe that they could not possibly be the same dough. As for your original recipe and technique...who knows wheher or not it is accurate, how many actually did it that way, and what the quality of that particular bread might have been.
Jeff
I used to come up from Los Angeles and would invariably grab a Larraburu baguette and a whole crab and munch contentedly on the waterfront. That light, chewy crust is something I've seen replicated along with a very strong sourness at some "artisinal" bakeries in surprising locations (such as supermarket bake shops); there is a good version made by Rock Hill Bakery in my upstate NY location. I've wondered if maybe some lemon juice, yogurt or vinegar is added to get such sourness.
Interesting that the loaf smelled sour when baking, but the final bread wasn't sour. Thanks for sharing.
Otis
Very interesting procedure. Two things stood out for me:
1) Relatively frequent feeding of the starter. Maybe the temp at the bakery was high? Every 8 hours, it's almost like the schedule for Italian sweet starters, and those are fed to avoid sourness!
2) That's a VERY long proof, and barely a bulk rise!
As someone who just spent this past holiday season turning out sourdough panettones, this fermentation schedule is similar, which is interesting, since I'd think that these are two styles of breads with very different aims.
I have to believe that there are some important details left out of the procedures reported by Kline. One cannot believe that all of the 1960's San Francisco bakeries used exactly the same formula and procedures, and there were unique qualities to each bakery's sourdough bread.
I think we know that the main variables affecting flavor (assuming a white, wheat bread) are time, temperature and hydration. The percent starter in the final dough mix also will impact fermentation time and bread flavor, especially sourness.
I think the safe to assume commonalities among the SF bakeries' formulas and procedures were:
1. Frequent feedings of a firm culture based on a pâte fermenté. In other words, a piece of the complete dough from one day's bake was saved and fed every 8 hours, until needed for the next day's dough. (Although Galal's description of the Larraburu Bros. process has the pâte fermenté refrigerated until the next day, when it had a single feeding before mixing in the final dough.)
2. Dough hydration of 60-65%.
3. Around 20% pre-ferment in the final dough.
4. A very short bulk fermentation and relatively long proofing at warm temperature.
5. Baking at low temperatures (for hearth loaves) for a long time.
6. Most bakeries did not retard their formed loaves, although I cannot recall ever seeing bread from Boudin without the crust bubbles characteristic of loaves that have been retarded.
This still leaves lots of room for important variations.
David
David,
I was reminded by your first photo that these breads from the 60-70's didn't have a dark bold bake. It was a long time ago for me to remember but the golden color stuck with me. The crumb you got with this procedure is nothing like I remember. As you point out, it seems unusually low in hydration for this type of bread.Perhaps all that is needed to change is an increase in hydration and a bulk ferment based on performance (seeing the gas pockets) and proofing to a greater degree.
The use of a sweet starter is the beginning of the flavor profile. Similar to Robertson's feeding regime, the lactic acids should be the prominent flavor component I would think. If I recall, Debra Wink makes the point that LAB's are more active at higher temperatures. Add to that idea the encouraging of LAB's in the short cycle feedings. The concept seems to make sense to me. I don't see the bakers using a high temperature proof for production reasons. It had to be a flavor control consideration.
The one other thing that would have an impact on crumb quality and flavor is the flour. If you have an inroad to discuss this with Nicky, perhaps he could shed some light on what was being used back then and what is available today.
I'm really glad you have published this old document and your work to recreate those old breads David. The process is so unique it must be authentic to some degree. This was the bread that made me take notice of good food. I was only 18 years old at the time and I have a clear memory of that day on the Wharf with my parents. That boule was wonderful. My 89 yo Father also remembers how good it was to this day. I don't think we would have been so struck by the flavor if it had been overly sour.
Eric
For the 3rd time: The every 8 hour feeding is described in the Kline, et al. article. What you are quoting from doc.dough appears in the Galal article on the Larraburu process.
Quoting from the Kline article, The Baker's Digest, April, 1970, pg.48, 3rd column,1st paragraph, 5th line and following:
"In commercial practice, the starter sponge is rebuilt about every eight hours or at least two to three times a day, seven days a week. Presumably it has been carried in this fashion for 100 years, although we can only guess how it got started originally."
David
Hi David, Chris,
If it helps for clarification, I worked for several years in a bakery which operated 3 bread production shifts of 8 hours every 24. Each shift made a batch of Pain de Campagne using wheat levain. In practice, this meant a refreshment cycle of every 8 hours for that levain held in stock. Reading these most recent posts in the thread, I'm reflecting that the authors David cites were referring to a very similar production system to the one I am describing.
All good wishes
Andy
Thanks for chiming in, Andy. In several of the baking books aimed at professionals, this levain feeding regimen is documented. I suspect it's used especially when a sweet pain au levain is desired.
I'm not sure why Chris repeatedly questioned the description in the Kline paper. I suspect he misunderstood Doc.Dough's mentioning it and then citing only the Larraburu regimen in the other paper. I hope it's clear to all now.
Regards,
David