Bolstered by my success in baking White Mountain Bread, I finally had the time and the flour to attempt the second recipe in Beth Hensperger’s Bread Bible, French bread, or Pain Ordinaire.
Things began auspiciously enough with a beautifully smelling, light, spongy and almost fluffy slurry.

Since I proofed the yeast in a glass prep bowl, I actually ended up adding the slurry to the two cups of bread flower and salt (as opposed to adding the flour to the slurry; I guess Mom was right about me never following instructions). This didn’t seem to ruin anything, however, and I proceeded to mix the batter into a dough using my trusty and deceptively strong wooden baking spoon.
Just when I thought my arm would tire, (I always mix by hand, partially because using my hands is my favorite part of baking bread, and partially because I use the kneading and mixing process as a way to justify putting melting pads of butter on the warm, oven-fresh bread I’ve baked. All that mixing has to burn off some calories, right?), the “shaggy dough” Hensperger described seemed to form.
I found, however, that I only needed to use 2 ½ cups of all-purposed flour (which I should add here is bleached, though this doesn’t seem to make too much of a difference in taste or texture).
With that, I rolled the dough into a ball and tucked it into an olive-oil shmeared bowl to rise.
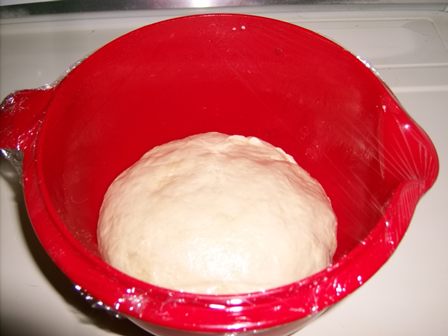
I was happy to see that it did, though I worried about the lumpiness of the post-risen dough.

With that, I deflated the dough by gently turning it out on to the table. It let out a satisfying little pphht sound and gently exhaled upon hitting the surface. Knowing I have a tendency to over-work dough (which has resulted in an almost too-tight and compact sponge in the past), I resisted the temptation to sink my fingers into the dough and start kneading.
Instead, I grabbed my dough slicer (super handy with inch measurements on the side) and did my best to create three equal portions. Since I don’t have a food scale, this always gets a little tricky, but I thought I did pretty well.

Covering the hopeful little dough boules with some plastic wrap, I put them back in the laundry closet on top of the dryer to rise.
Forty minutes later, I saw that—clearly—I had not done as well of a job creating equal boules as I would’ve liked.

Still, they looked and smelled delicious, the oven and stone were preheated, and I had loving brushed on the nice egg glaze.
I used the whole egg with two tablespoons of water, even though in the introduction Hensperger does suggest just egg whites for French breads.
It was time for one of the most difficult parts of bread baking: The Transfer.
And naturally, this is where things went a little awry. Despite having sprinkled my peel with what I thought was a liberal amount of cornmeal, the boules stubbornly clung to the wood. I shaked, and shimmied, I scotched the peel, terrified of collapsing the three boules I had worked so hard to shape until finally, worried about the heat escaping from the oven, I nudged the boules in with my thumb.
While the boules didn’t collapse, one of them did seem to crack on the side (see below, on upper left-hand side) as a result.
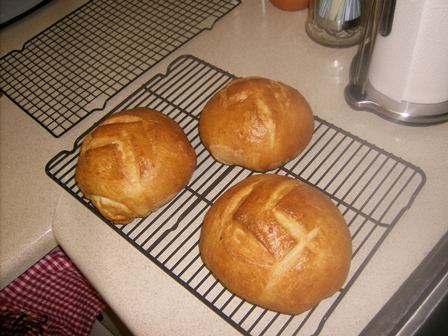

But, all in all, they looked gorgeous and smelled even better. We gave one to our new neighbors, who seemed to enjoy it, froze one (using both plastic and foil, which I have to admit, does seem to keep it tasting a bit fresher after thawing), and made it through the third in two days. Which is why I don’t have any pictures of the crumb. It was even, uniform, light and fluffy.
- Shutzie27's Blog
- Log in or register to post comments
Beautiful breads Shutzie27. Thank you for sharing.
Eric
Thanks, Eric!
I can see the butter melting ;) FWIW, the next time put some rice flour on the peel and see if this works better to transfer. Quite a few TFLers use it in the bannetons and it does seem to have Teflon qualities.
Anna
Thank you, Anna. I've never heard of rice flour being used before, but I'm certainly willing to give it a shot. Anything that makes transferring easier (it's always been my baking bugaboo) would be welcome.
for rice flour, works really great. I bought a small box, was in the Asia section of my supermarket.
Best,
Anna
Good looking loaves. I'd think of using parchment paper to put your boules on and then slide that into the oven. It's a little more expensive than cornmeal, but it makes the effort oh so much easier.
As for the flour, I'd avoid bleached or bromated flour. It's just not going to give you the same flavor. Since it's the most important (and major) ingredient in your bread, splurge.
Larry
Thanks, Larry. I did use unbleached and unbromated bread flour for the first part, as the formula calls for, but I didn't know you could get all-purpose flour unbleached. I'll be sure to look for that this week when I stock up on flour again. :-) The bread flour, I know, always seems to make a huge difference, so what you're saying makes sense.
The problem I've had in the past with parchment paper is that it burns in the oven and sets off the smoke alarm in my building. But maybe it's a good idea for lower temperature breads; under 300 degrees maybe...? I'm not sure if this is an issue exclusively with my oven or a parchment paper issue in general.
Genius, Larry! I'll definately be giving that idea a shot.