The Fresh Loaf

A Community of Amateur Bakers and Artisan Bread Enthusiasts.

txfarmer's blog

txfarmer's picture
txfarmer


Another winning recipe I adapted from "Laurel's Kitchen Bread Book" - my main change is to use SD starter instead of dry yeast, changed fermentation schedule accordingly, and used more water. This my first time baking with bulgur, why did I wait for so long? They are fragrant, full of flavor/nutrients, AND easy to work with. Do note that bulgur is different from cracked wheat, the former has been par-cooked, and the latter has not, which means they require different method of cooking. To make it more confusing, stores often label bulgur as "cracked wheat".


Sourdough 100% Whole Wheat Sandwich Bread with Bulgur(Adapted from "Laurel's Kitchen Bread Book")

Note: 15% of the flour is in levain

Note: total flour is 415g, fit a 8X4 loaf pan. For my Chinese small-ish pullman pan (shown in picture), I used 385g total flour. For mini loaf pans in the picture, I used 138g of flour each.


- levain

ww starter (100%), 17g

water, 29g

ww bread flour, 54g

1. Mix and let fermentation at room temp (73F) for 12 hours.


- soaker

bulgur, 64g

water, 90g

molasses, 17g

2. Mix and bring to boil, set aside before start mixing the dough. By the time it's incorporated into the dough, it would've been soaked for at least two hours.


- final dough

ww flour, 353g (I used KAF)

water, 121g

butter, 17g, softened

salt, 5g

milk, 150g

honey, 17g

all levain

all soaker

3. Mix together flour, water, milk, honey, butter, salt and all levain, autolyse for 40-60min. Knead until the gluten has just been developed. More kneading will be done later, so do not fully develope the gluten network now.

4. Rise at room temp (74F) for 2 hours. Punch down, add soaker, and knead until the dough is very developed. This intensive kneading s the key to a soft crumb, and proper volume. The windowpane will be thin and speckled with bulgur grains, but NOT as strong as one would get form a white flour dough. For more info on intensive kneading, see here.

5. Put in fridge overnight.

6. Take out dough, punch down, divide and rest for one hour.

7. Shape into sandwich loaves, the goal here is to get rid of all air bubles in the dough, and shape them very tightly and uniformly, this way the crumb of final breads would be even and velvety, with no unsightly holes. For different ways to shape (rolling once or twice, i.e. 3 piecing etc) see here.

8. Proof until the dough reaches one inch higher than the tin (for 8X4 inch tin), or 80% full (for pullman pan). About 4 hours at 74F.

9. Bake at 375F for 40-45min for the big loaves, only 30min for the mini ones. Brush with butter when it's warm.


Don't be fooled by all the visible grains, the bread is NOT tough, nor dry, nor hard


It's soft and full of flavor


I live it lightly toasted, so fragrant! Still got enough bulgur left to play with, cant wait.


Sending this to Yeastspotting.

txfarmer's picture
txfarmer

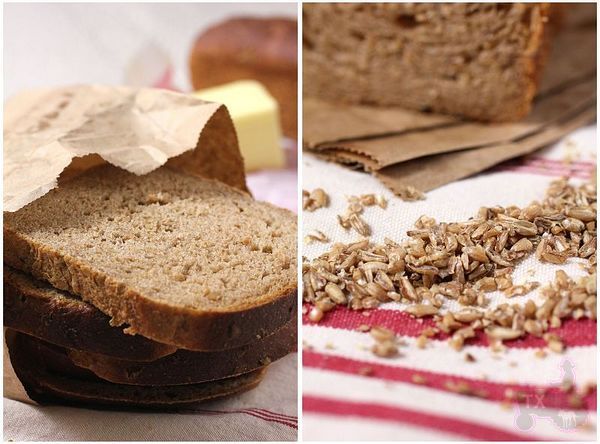
I have been working like crazy lately, with so little time, I like to make rye breads: deliciou and fast.

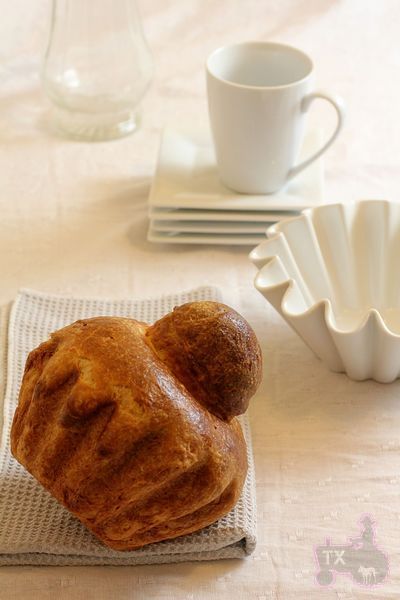
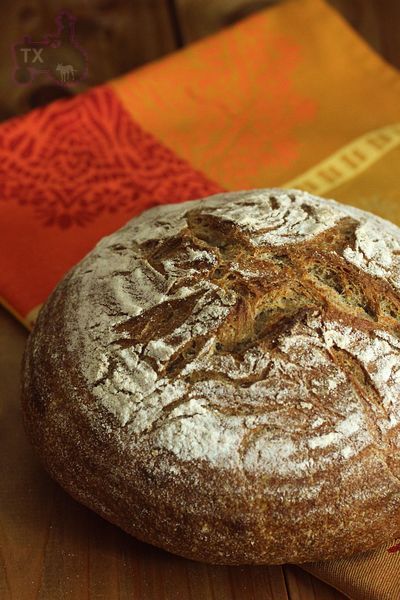
First, it's the sourdough rye with walnuts from "Bread", however, I followed Hans's modification here, used SD levain only (no dry yeast) and baked smooth side down to get that lovely pattern on top. My hydration was 75%, bulk rise time 1 hour, and proofing time was 100min.
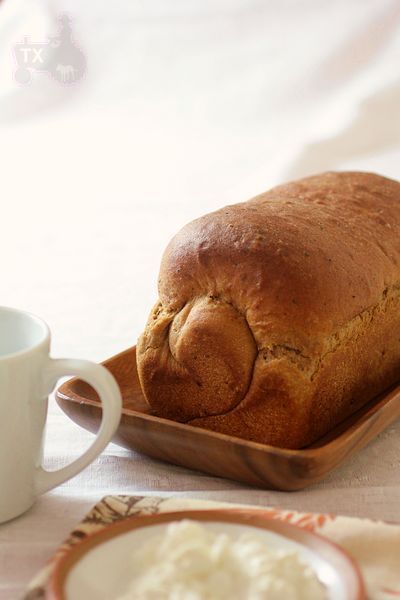
 

Used pecan instead of walnuts since that's what I have on hand, still delicious. 50% of the flour is rye, with gives a rich flavor, without losing too much gluten structure


It did take me more than once to get the cracking look right. I think the dough has to be wet and not strongly developed for the surface to crack in multiple places like this, if the gluten is too strong, it will burst in one place. When I round and shape the dough, I also used more flour than usual on the table, so that the seam wouldn't completely close. My rye starter is exceptionally fast, so I had to really watch the dough to avoid over proofing. I uaually don't like too much dry flour on my bread, but for this one I shifted some flour on top before sending it to the oven, otherwise the cracks won't be as striking.


Exceptional with some cheese


The next rye is even simpler. I made it for my parents who are used to soft breads, but in need of more whole grain in their diet. I want to gently train their taste to like rye/ww/other whole grain, this KAF recipe is a good start. I did use much more water than the recipe instructed to get a dough I am comfortable with.


It has about 30% rye, as well as a bit of butter and sugar, so that the crumb is softer than a lean hearth loaf. Flavorful and slightly rich, it was a hit with my parents.


I want to thank Minioven for her post on how to use scissors to creat scoring patterns, the technique is perfect for a "fake hearth bread" like this one.


Sending this to Yeastspotting.

txfarmer's picture
txfarmer


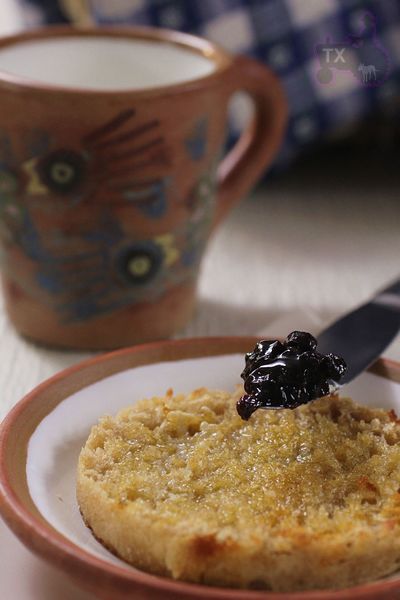
I have been after a good English Muffin since I started baking breads 2 years ago. I tried the BBA recipe, too bread like, crumb is even and soft, good for a dinner roll, not an English muffin. I tried Alton Brown's recipe. Simple, and gives lots of holes. However the crumb is more like a crumpt. In addition, with a very short rise, AB's EM lacks a little flavor.
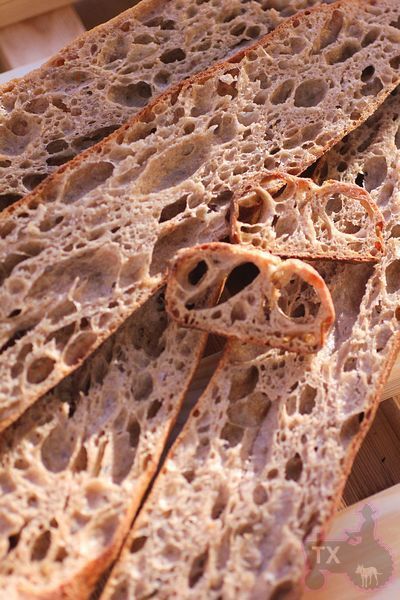
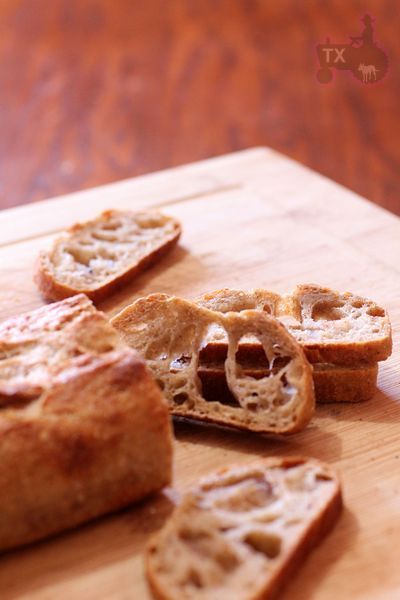
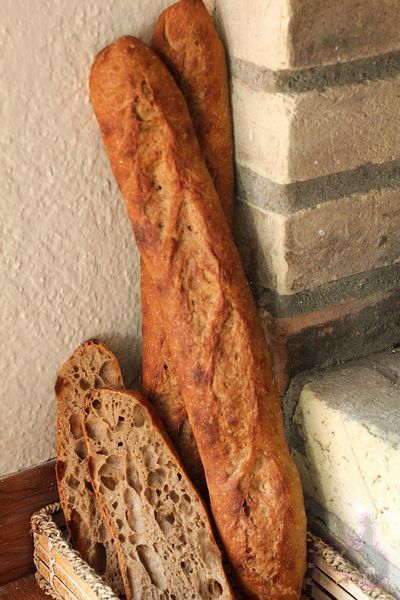
 

Recently I tried Wild Yeast's Sourdough English Muffin (here), jackpot! Not only it gives the "PERFECT" crumb (for me), but also complex whole wheat flavor. On top of that, it was easy to make too! I have read that the nooks and crannies in English Muffin crumb can be achieved by a very wet dough, which is ALMOST overkneaded. Sounds odd, but I do think the rough crumb struture of a EM is indeed similar to a dough whose gluten is on the verge of breaking down. "Laurel's Kitchen Bread Book" advices to knead a wet dough to pass windownpane, then KEEP KNEADING until it's over kneaded. I trust her results, but dont' want to spend all the effort to "over knead" a dough. I think Wild Yeast formula accompolishes the same goal with a much easier method: creat a sourdough spong, let it fermentate for a long time until the gluten almost breaking down, add a little bit of flour so that it can take shape, proof for a bit, cook and done!


However I did modify the procedure: the original formula wants me to knead well after adding the flour, then pat the dough out flat and cut out rounds of dough. That is hard to do if the dough is very wet - and the dough simply has to be wet for good results. What I did was to skip kneading all together, we are not after gluten formation here anyway. Simply mix with a spoon, then scoop chunks of dough(I use a scale to make sure of their sizes) on a baking sheet, use WELL OILED hands to shape these little puddles of wet dough into flat disks, let proof, then cook them in English Muffin rings. Easy and prefect. Since I don't have to knead/pat/cut, I can affort to up the hydration even more.


Sourdough English Muffing (Adapted from Wild Yeast)

-Sponge

100% starter, 55g

AP flour, 80g

WW flour, 50g

milk, 140g

1. Mix and let rise for 12 hours. (I let it go longer than the original instruction since I want the gluten to almost break)

-Final dough

AP flour, 35g

salt, 1/2tsp

baking soda, 1/2tsp

agave nectar (or honey, but agave nectar tastes so great), 1t

all of sponge


2. Mix with a spong, then scoop chunks of wet dough onto a baking sheet (wiht bakign mat or parchment paper), each chunk is about 73g, 5 chunks in total. The size matters here, if the dough chunks is too large, it won't cook through/rise well. Well oil/water your hands and nudge the dough chunks into rough disks.


3, cover and let rise for 45min (73F), until very light


4 I don't have a griddle, so I cooked them in a cast iron pan. Preheat for 5min on medium low heat, with muffin rings inside. The pan and rings were all lightly oiled. Lift the parchment paper/baking mat, and flip the dough onto your oiled/watered hand, drop into the ring. Don't pick up the dough, do the lift and flip, it's much less sticky this way, and you can preserve most of the air bubbles.

5. Cook on medium low heat for about 5min before flipping, during that time, the dough would rise to the rim, or even over the rim a bit. Flip and keep cooking until done, about 15min in total, flipping every few minutes.


Let's look at the crumb, it'd my idea of a perfect EM


But of course, I only cut one for the picture, the rest I did the proper way: fork split, look at all that nooks and crannies!


Butter and jam has no way to escape!


Perfect for a breakfast sandwich too, with a lot of sauce of course


Sending this to Yeastspotting.

txfarmer's picture
txfarmer


In the past 1.5 months, this is what I have been doing in the kitchen, once, or even two batches every week. I have occasionally made croissants before, however, this time I really want to get the techinques down. My idea of a perfect croissant: golden flaky high on the outside, crisp layers and honeycomb like crumb inside, and of course, buttery rich taste. Using European style butter (Plugra), in TX warm weather, with no professional equipment (no sheeter here!), it's a process that requires patience, thorough understanding for each step, a lot of attention to details, and insane amount of practice. I am nowhere near "perfect" yet, but heading in the right direction, here are some lessons learned in the process.


First, the following are resources that helped me a great deal, many thanks!

1)"Advanced Bread and Pastry". This book has a whole chapter on viennoiserie, the formula I am used is adapted from it. However, the formula and procedures require quite a bit of changes in a home kitchen.

2)Hamelman's formula from here. while I didn't use his ingredient ratios, but his procedure is much more suitable for a home kitchen, comparing to what's in AB&P.

3)Ralph from this thread. The whole thread is helpful, but Ralph's input was extra enlightening to me. I emailed him asking for the formula he uses in the shop. Since his posting was from over a year ago, I really didn't expect a reply, but he did write back! I really appreciate his insight and generosity.

4)Many enlightening posts from TFL, especially andy's post here.


Since I made many mistakes along the way, and learned a lot form each of them, I am writing them all down below. Warning, it's long. I mean looooooooong.


Poolish Croissant (Adapted from AB&P)

*I get about 12 standard sized croissants from each batch, with some small rolls from scraps.


- Poolish

AP flour (KAF AP), 160g

water, 160g

instant yeast, 1/8tsp


1. mix and ferment 12 to 16 hours.

- Final Dough

AP flour (KAF AP), 362g

milk, 135g

sugar, 67g

salt, 10g

osmotolerant instant yeast (SAF gold), 3.55g, 1tsp+1/8tsp

malt, 3.55g (I used a tsp of barley malt syrup)

butter, 22g, softened

poolish, all

roll-in butter, 287g

NOTE 1, there are two poolish croissant formulas from AB&P, one for hand rolling, one for sheeter. The sheeter one has less liquid and less rest time between folding and rolling, the hand rolling one has much more liquid and more rest time. I find drier dough would give a more well defined cleaner crumb structur, but it's harder to rol out; wetter dough would be easier to roll out, but the crumb would be more sticky and less layered. What I try to do is to adjust the liquid amount so that it's dry, but still possible to roll out without messing up the layers. In the end, this amoutn is closer to the sheeter formula (the hand rolling one is way too wet for me), but with a tad more liquid.

NOTE 2, the original formula uses bread flour. As Andy mentions in his post, contrary to conventional belief, croissants need a strong dough to rise well and create layer in the end. Since the formula was meant for machine rolling, it can afford to use BF, however, 10 years of marathon running gave me strong legs, not arms, I had to change it to AP flour, otherwise butter would melt and leak when I struggle with the strong dough. Note that Hamelman's formula I quoted above is meant for home bakers, and it uses AP; while Ralph's formula (which he emailed to me) uses BF, but it's meant for shop production. I have seen recipes that uses mostly, even all, cake flour. It never ends well. The final product is usally small and bread like, with less rise. The crumb structure is not layered. IMO, those recipes are sacraficing the crumb structure for the ease of handling


NOTE3, this is probably the most important lesson in terms of ingredients. The industry standard for rolling in butter is apparently 25% of the dough weight, which comes out to be about 45%of flour weight. Andy says it's about the same over the pond. However, I have found that in a home environment, when the rolling is less even and efficient, more rolling-in butter is needs for a well defined crumb. The less butter to use, the thinner the butter layers are, which means easier for the butter to melt into the dough or leak out. I have increased the roll-in butter ratio to 55% of the flour weight, about 30% of dough weight, which gives me much more consistent good results. I know many have said more butter would cause butter to leak out during final proof or baking - it's simply not true. Butter leakage during proofing is caused by proofing temp being too hight, and butter leakage during baking is caused by under-proofing, neither is related to the amount of roll-in butter. With 55% of roll-in butter, zero butter is leaked during proofing for me, minimal leaks during baking - sometimes none at all.

NOTE4, I use  Plugra European style butter for most of my croissants. Have also used Kerry Gold occasionally. Both taste great. I would suggest to stick to a good European butter, different brand handls a bit differently. My Chinese baking friends can buy "butter sheets" which are 100% butter with high melting point. Those are much easier to handle, but I have not found any here in US, if anyone knows a resouce pelase let me know. In fact if anyone knows why we don't have such a thing here, I am curious to know as well. Those are made in New Zealand and Europe.


1. Mix everything but the rolling butter, knead until gluten starts to form. In my KA mixer, 3min at first speed, 3 min at 3rd speed. The dough is not very smooth, but not sticky. Pat flat and put in fridge for at least 2 hours, or overnight.

NOTE5, some recipes ask for a thorough kneaded dough, some ask for no kneading at all. I think the objective is to have a strong dough with well developed gluten structure AT THE END. All the rolling, folding, even relaxing in the fridge would strengthen gluten, so it's not a good idea to knead the dough too well in the beginning. It will make rolling near impossible (if you don't have a sheeter).


NOTE6, some recipe would ask for some bulk rise time at room temperature. I think it's not suitable for home bakers. Bulk fermentations strengthen the dough, which means one would need to play with knead time, and rolling technique to accomodate the added dough strength. Furthurmore, there are a lot of resting in my procedure because the dough would get too tight or too warm. With a bulk rise, I am risking over fermentating, which would cause the final proof and oven spring to be weak.

2. Cut the roll-in butter into pieces, put between two sheets of plastic or wax paper. Use a rolling pin to tap the butter until it's soft enough to roll, roll between the two sheets until it's a 7.5X7.5inch square. Put in fridge.

NOTE7, this is a good time to learn how your butter behave. How long does it take for it to get soft? How long until it's melty? That's the guideline for later.

3. Roll the dough out until it's double size of the butter sheet, 11X11inch in this case. Tap butter until it's roll-able, and the texture is similar to the dough. put the butter in the middle of the dough as following, fold up dough and seal the butter. Pay attention to corners and edges, you don't want spots where there's no butter.


4. Roll out into a 8X24inch rectangle, do your first fold as following:

NOTE8, as Ralph emphasized in his posting: don't trap the dough! Before folding, cut the edge off to expose the layers before folding that side into the crease of the dough, that way there's no "extra trapped dough".

NOTE9, even though at this stage, it doesn't seem important to roll the dough out into specified sizes, but you will get better results if you do. The reason is simple: if your dough piece is smaller at this step, you will have to do more rolling in the later steps. Later steps would have more layers of butter, which means it will be harder to roll out evenly. Roll out the dough to the size now.

NOTE10, pay attention to corners and edges. Every imperfection would be magnified 27 times because you are folding 3 times.


5 Put in fridge and rest for 1 hour. Take out dough and repeat the rolling and folding 2 mroe times, which gives 3 folds in total.

NOTE11, I had the misconception that the more folds, the more layers, the flakier it will be. Wrong. With too many folds, butter layers would be thinner and thinner, and it will be more likely for the butter to melt and leak. Even with perfect rolling, too may layers would mean smaller honeycomb "holes" in the crumb. With no sheeter and TX weather, I find 3 folds sufficient, any more it's risky.

NOTE12, 1 hour is "MINIMAL" resting time. I often have rested longer since I was doing something else. There's no harm in resting a bit longer. During final fold, I sometimes have to rest it in the middle in order to roll out to the desired size. Sometimes when it's way too warm (the curse of TX, at one point I was rolling out croissant while hubby was eating watermelon in a tshirt), I would also rest in the middle to avoid butter melting. It's always better to be overly cautious. Allow you self more time than your expect.


6. Put in fridge and rest for at least 90min.Roll out to 9X36inch, 1/8inch thickness.

NOTE13, I don't have such a big counter space, niether do I have such a big fridge, so I cut the dough in half, which means I have 2 pieces, each one is 9X18inch.

NOTE14, Rest often. Rest when there's any indication of butter getting too warm, or the dough getting too elasticy. There's no harm in resting too much.

NOTE15, Use enough flour so the dough don't stick.


7. Cut into triangles, 4.5inch wide at the base, 9inches tall(the one on the left). Don't hesitate to cut off inperfect edges if you want a pefect crumb. Fridge and rest the triangle pieces, then strech them into 10inch high(the one on the right), this will creat more layers.


8. Roll up fairly tight, stretch out the tip with one hand when you roll the bottom with the other hand. You should get 3 rolls, and 7 little steps, wich the tip underneath.

NOTE16, this is the straight shape, if you want a curved shape, you will need to cut a slit in the base before rolling, and roll to the outside as you start from the base. See Hamelman's formual link.


9. At this point, you can proof right away, fridge overnight and proof next day, or freeze (defrost overnight in fridge before proofing). Brush with egg wash (1 egg beaten with 1 TBSP of water), then proof @ about 80F until very soft and jiggly. About 3 hours for me. Brush another layer of egg wash after proofing.

NOTE17, don't proof warmer than 80F, the butter might leak otherwise.

NOTE18, don't under proof, otherwise butter will leak during baking. I have yet to overproof these. They have to be REALLY soft and jiggly. The layers will be very obvious at the end.

NOTE19, the egg wash before proofing would reduce the requirement on proofing humidity.

NOTE20, I have a madeshift proofing box made from foam box, a temperature sensor and control from pet shop, and a light bulb, works great.


10. Bake at 425F for 10min, 375 for 15min.


Honeycomb enough? Not really, but getting there.They should be more well defined, and the wall of each cell should be thinner.


For this one, I didn't cut off the imperfect edge before rolling up , which made the center too doughy.


I don't even know whether a "perfect" croissant can be achieved in a home kitchen, especially a warm TX home kitchen, but I will keep trying. In the mean time, my family, friends, and coworkers are loving me for feeding them such delicious breads.


Sending this to Yeastspotting.

txfarmer's picture
txfarmer


This formula is adapted from Wild Yeast's great recipe here: http://www.wildyeastblog.com/2008/07/28/sourdough-ciabatta-rolls/, with the following changes:

1. Increased the hydration to 85%

2. The original formual requires no machine kneading but does do a bit of hand kneading in the beginning, I don't knead at all, not with machine, not with hand. I used the same technique from my 36 hour sourdough baguettes: a long cold autolyse (4 hours in this case) to develope the initial gluten, then add in the 100% starter and salt, mix until roughly even. At that point, the "dough" looks like following, don't worry, it will be fine.


3. Added a S&F during bulk rise, which makes 4 S&F in total. And look how smooth the dough looks at the end of the 2 hour bulk rise! Magic!


4. After an overnight stay in the fridge and 1.5 hour of warm up at room temp, it full of bubbles, beautiful.


5. I only made 1/3 of the recipe since I didn't have enough starter, so 4 rolls rather than 12. They look very flat and sad proofing, I decreased the proofing time to 1 hour since the house was warm.


6. Flip over one by one then into an hot oven they go. Amazing ovenspring. They sang loud and proud out of the oven.


Nice open crumb. Nice delicious flavor.


I think all that dividing for rolls destroyed some bubbles. Next time I will just make one big loaf with this amount of the dough, I think the crumb will be even more open.


Submitting to Yeastspotting.


txfarmer's picture
txfarmer


I went all in. (original recipe here, 3 earlier variations here, 3 more variations here, previous whole grain experiments here, with 60% whole grain here, 80% version here)

barley flour, 75g

ww flour, 375g

ice water, 475g

salt, 10g

rye starter (100%) 100g

-Mix flour, ice water and autolyse for 12 hours.

-Mix in salt, starter, then follow the basic 36 hour sourdough baguette formula here.


Whole grain flour breakdown: 15% barley flour, 10% rye flour (all in starter), 75% ww. Hydration: 105%, yup, you read that right, I think it's necessary in order to get an open crumb and relatively thin crust. Note that the percentage of starter is lower than previous versions, that's because whole grain dough fermentate much faster, I reduced starter amount to maintain the convenient 36 hour timeline without over-rise.


Crumb is open, especially for a 100% whole grain dough, flavor is rich, HOWEVER, it's far from perfect:

1. the crust is a tad too thick for baguettes, and crumb a tad too "chewy", mouth feel is not as light as I would've liked for a baguette

2. the profile is a bit flat, one or two more S&F may give the dough mroe strength to rise higher


All in all a good and delicious baguette, but not our favorite. My husband thinks the 60% whole grain version has the best flavor/texture, I thing the ones with 40% to 60% whole grain all have a good balance between rich whole grain flavor and light mouth feel.


Interestingly, this batch tasted better the next day (baked for another 5min to warm up and re-crisp the crust before eating), the flavor improved, and the texture is less ... "wet", more crisp, this is opposite to white flour baguettes which taste the best fresh. Maybe high ratio whole grain breads need time for the crumb to "set". This is far from the end, I want to keep playing with this dough to see whether I can improve on the rise and the texture.


Submitting to Yeastspotting.

txfarmer's picture
txfarmer


Yes, this brioche has 100% butter ratio, i.e butter weight == flour weight. According to BBA 80% butter brioche is considered "richman's", so this brioche is probably "Bill Gates'"?


First saw this bread from a blog, but it didn't provide a formula except to say it's from "Patisserie of Pierre Herme", I am not about to spend a few hundred bucks on that book, yet can't find a copy of the recipe online, so it has been taunting me ever since. Recently a reader of my Chinese blog was nice enough to send me the recipe, finally I got to make this bread!


I know some of you may suspect a bread with so much butter would taste greasy or heavy. I have made many enriched breads, a lot of them are brioches with various butter ratio, I think for a rich yet light brioche, the key is in the kneading. I kneaded it very well, and the final bread had a croissant -like crust with a "lighter than air" crumb. The contrast of a crispy flaky crust and a chiffon cake-like crumb creates a wonderful mouth feel, along with great butter flavor, it's a bread worth every bit of effort and calorie!


100% Brioche (adapted from "Patisserie of Pierre Herme")

note: I changed the qantity to be more family friendly

note: I used SAF Gold osmotolerant yeast instead of fresh

note: PH is very short on procedures, so I had to improvise a lot. My adaptions are noted in brackets.


bread flour, 300g (100%)

sugar, 39g (13%)

SAF Gold osmotolerant yeast, 4.8g (1.6%) (if you use instant dry, you may need a bit more due to higher ratio of sugar)

salt, 8.4g(2.8%)

egg, 210g(70%)

butter, 300g(100%), softened


1. Mix flour, sugar, yeast, salt, and half of eggs together with dough hook until clean the bowl, add the rest of eggs, mix until clean the bowl. (The dough was too dry with half of the eggs, then too wet with all of the eggs. I added eggs in one shot, and used paddle attachment the whole time for my KA 6pro. Mixed until it cleans the bowl, it will take a while but you need the gluten to be strong before adding that much butter.)

2. Add butter, mix well. (I added butter a bit at a time, and mixed until the dough wraps around the paddle attachment and cleans the bowl. It can pass windowpane very well. This intensive kneading is essential for a light and tall bread.)

3. Rise at room temp until double (about 1 hour to 1.5 hour for me), punch down, put in fridge for 2 hours, punch down again, put back in fridge for at least 4 hours or overnight.

4. PH doesn't say anything after the bulk rise, so everything below is my adaption. (Divide and shape right out of frdige when the dough is cold and managable. This dough will expand A LOT, so only fill the molds 1/4 to 1/3 full.)

5. (Proof at room temp (~73F) until the dough reach the rim of the molds, 2.5 to 3 hours for me.)

6. Egg wash once or twice, bake my 550g large brioche at 420F for 15min, then 375F for 30min. Other smaller ones (160g dough size) were baked at 420F for 15min, then 375 for 10 to 15min.


With good quality butter, and enough kneading/fermentation, this bread is both rich and light, heavenly!


Not for everyday consumption, but perfect for an occasional treat.


Submitting to Yeastspotting.

txfarmer's picture
txfarmer


Continue to experimetn with whole grain in my baguettes (original recipe here, 3 earlier variations here, 3 more variations here, previous whole grain experiments here, with 60% whole grain here)

AP Flour, 100g

barley flour, 75g

ww flour, 250

ice water, 415g

salt, 10g

rye starter (100%) 150g

-Mix flour, ice water and autolyse for 12 hours.

-Mix in salt, starter, then follow the basic 36 hour sourdough baguette formula here.


In last post, I was encouraged to "bet all my chips" and go for 100% whole grain, luckily I didn't! :P This intermediate step is important since I learned a few things which needs to be taken account into:

1. It rose way fast. I had to preshape right out of fridge without warming up since the dough was very bubbly and expanded already. I think with so much ww flour, I will need to reduce the starter amount to 100g or even less.

2. Hydration was 98%, because I know precisely that 100% would be too much. .... WHATEVER! Honestly, I just got scared by the concept of 100% hydration. At 98%, the dough was very sticky to handle, BUT the crust was thin as you can see from the picture above. With large holes in the crumb.

3. With so much whole grain and water, baguettes rose well, cuts opened fully, but the profile was a tad flat. I think it needs more S&F. And less starter/acidity might help with volume too.


Anyway, very good results with open crumb, relatively thin and definitely crispy crust, and most importantly, deep whole grain flavor.


I will be out of town this coming weekend, so the experiment will have to pause, but I will continue when I come back!


Submitting to Yeastspotting.

txfarmer's picture
txfarmer


Continue to push the limit on how much whole grain flour can be used in baguettes, yet still maintain the light texture. (original recipe here, 3 earlier variations here, 3 more variations here, previous whole grain experiments here)

AP Flour, 200g

barley flour, 75g

ww flour, 150

ice water, 375g

salt, 10g

rye starter (100%) 150g

-Mix flour, ice water and autolyse for 12 hours.

-Mix in salt, starte, then follow the basic 36 hour sourdough baguette formula here.

15% rye (in starter), 15% barley, 30% ww, which makes 60% whole grain flour in total. Since my last try of 45% whole grain baguettes were a bit heavy, I was not holding too much hope for this batch, which means I was reckless and not paying too much attention. (Quote from my husband: you were BEGGING to fail!) And boy, did I mess up in so many ways:

1. Didn't have enough rye starter ready. The 12 hour autolyse was done, but I only had 100g of rye starter, Ugh! Decided to use that, and added another 25g of water and 25g of rye flour to make all the ratio "correct". However, 1/3 less starter means much slower rise, so I knew I had to really read the dough carefully.

2. At first S&F, something is off. What? Oh, the salt! I had forgot to mix in the salt! Luckily the rise is long due to less starter, so I had plenty of time to add salt and S&F to distribute it evenly. On the other hand, it may have helped the dough to rise faster by "holding back" the salt.

3. I literally "forgot about" the dough after taking it out from fridge to finish rising. Again the reduced starter was a blessing, the dough was way bubbly and expanded, but not disasterously so.

4. The hydration was 90%, yeah, you read that right, remember? I was "begging to fail"? That hydration, along with too long of a bulk rise, made shaping and scoring...interesting. UGH.

5. When it's time to score, I knew it wasn't gonna be easy, so I decide to install a new blade on my lame. Apparently I was so careless that it was not properly installed, it came loose during scoring, and by second baguette, it fell!! Into a puddle of dough. Sigh, fished it out and continued.

6. Forgot to prehead the oven well in advance, so when the baguettes went in, the stone was only reheated for 30min, much shorter than my usual 1 to 2 hours. 

After all that, I was expecting bricks and making alternative dinner plans, yet this is what I got!


Was I ever surpised! Talking about a no fail recipe! The weekend after, I made this formula again, properly this time. The results were even better.


Here's the best part: due to my reckless 90% hydration, the crust was not too thick - unlike my 45% whole grain baguettes, so the battle with super wet dough was well worth it! Nice crispy but "not too thick" crust, along with open crumb with lots of holes, and great whole grain flavor, make this formula a winner.When I started out this "whole grain in baguettes" experiment, I didn't expect anything beyond 50% whole grain would still produce light baguettes, but this formula proves me wrong. Of course, now I have to try even more whole grain flour, and even more water!


Submitting to Yeastspotting.

txfarmer's picture
txfarmer


This recipe is adapted from "Laurel's Kitchen Bread Book", my favorite WW bread book. There's nothing wrong with the formula itself, other than needing quite a bit more water, however, my attempt to convert it to sourdough has failed completely. Oh, don't think I haven't tried many time. Different rising schedule, different starter ratio, different cottage cheese, even added baking soda to offset the acidity of cottage cheese, they all ended up the same: the dough started tearing and collapsing 3 to 4 hours into the rise, no ovenspring to speak of.


2 huge tubs of cottage cheese later, I declare defeat. Here's my guess on why this formula doesn't work with sourdough, but I am in no way certain, and welcome all advices and theories!

- cheese has extra protease

- this formula has quite a bit of cottage cheese mixed in as part of liquid (35%)

- since it's part of liquid, cottage cheese were kneaded into the dough from the start, so it's very integrated into the dough structure

- using sourdough starter, my rise schedule is way longer than the 3 hours in the original formula. The loaf in the picture were made according to original formula with instant yeast, as you can see, there's no gluten break down, the loaf is tall and proud. so I guess my sourdough verion simply takes too long to rise, giving extra protease enough time to destroy the gluten structure.

- I could try to reduce the cottage cheese ratio, or shortened the rising time, but then that defeat the purpose of making pure sourdough verison of THIS formula


Anyway, here's the (slightly adapted) original formula and pictures using instant yeast, the bread is very delicious, even without sourdough.

Lemony Loaf (adapted from "Laurel's Kitchen Bread Book")

*formula is good for a 8X4inch loaf pan


ww flour, 413g

wheat germ,14g

instant yeast, 3.5g

water, 247g

cottage cheese, 145g

honey, 21g

butter, 14g

salt, 5.5g

lemon zest, from one lemon


1. Mix cottage cheese, honey, and 120g of water, heat to almost boiled, well mixed. Cool to room temp.

2. Add the rest of cold water, flour, wheat germ, yeast, salt, lemon zest, autolyse for 30min. Knead well, add buter, knead until past windowpane.

3. Rise at 80F for 1.5 to 2 hours until double, press with finger the dough won't bounce back. Punch down, and rise again until double, it will take half of the time as the first rise.

4. Shape and put in a 8X4in loaf pan

5. Rise at 90F until the dough is about 1inch above the rim, slowly bounce back a bit when pressed. About 45min to 1 hour.

6. Bake at 350F for 45min. Brush with butter when warm


You can't taste cottage cheese perse, but it does make the crumb very soft. This effect makes me wonder whether it also completely "breaks down" the gluten given enough time.


As delicous as this loaf is, the questions are still nagging me: "WHY exactly has my sourdough version failed?", "Can it work somehow?"


Submitting to Yeastspotting.

Pages

Subscribe to RSS - txfarmer's blog