Sending this to Yeastspotting.
For a lot of bakers, it's an important milestone to learn to make a good baguette. I have been asked many times both at my Chinese blog and TFL what the "trick" is for those big holes in the crumb. The truth is that, there's no trick. It's everything: appropriate flour, S&F rather than intensive kneading, appropriate fermentation, precise shaping, clean scoring, good steam and high temperature baking. I have yet to make a baguette that I am totally happy with, probably it's the chase that keeps me making it again and again. For that reason, I hesitate to call this post a tutorial - how can a student in bread baking offer a tutorial at all. However, I did write it up for some of my blog friends who are new to bread/baguette baking, and in need of a simple recipe to get started. This recipe contains lessons and notes learned from many many many baguettes I have made over the years, hopefully it will be helpful to others.
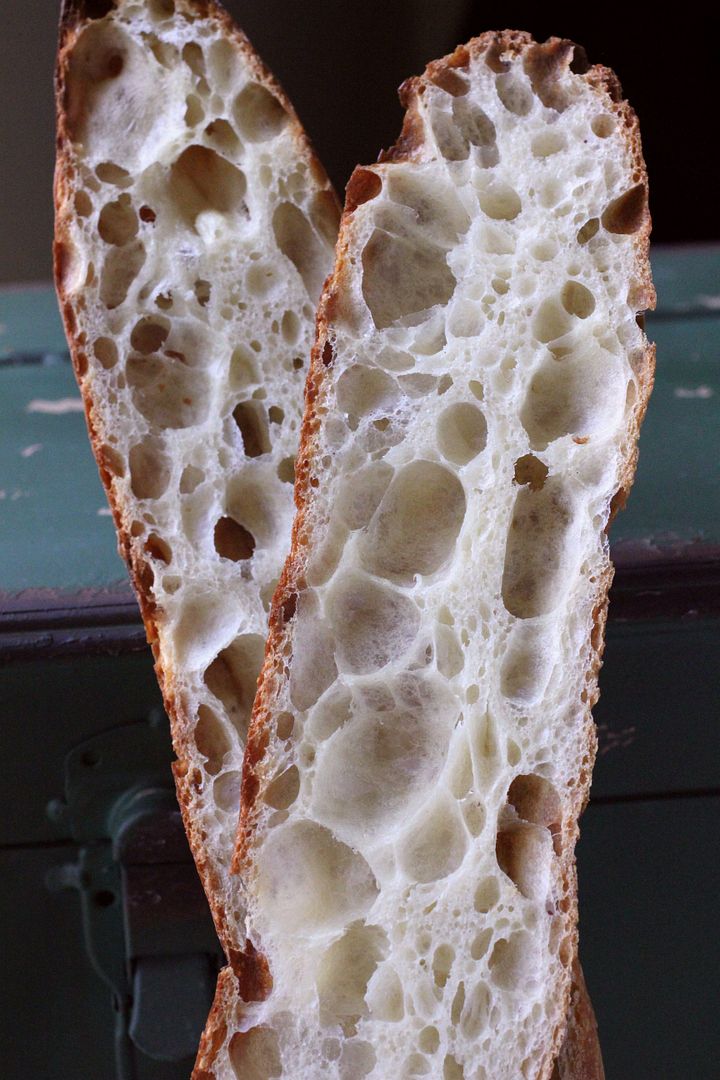
Since this recipe is meant for newbies, I intentionally kept it as simple as possible. No sourdogh, just dry yeast. No long cold fermentation, just straight method. No whole grain flour or addins, just white AP flour. By taking out all those variables, hopefully it's easier to follow and repeat. Even with such simplification, as the pictures show, the crumb still can be very hole-y, and the crust still can be very crisp, however, the flavor does suffer. Its taste is not nearly as complex as my favorite 36 hour baguette formula and its many variations (see here). Therefore, once you are comfortable with this straight method, I would definitely encourage you to move on to more complex recipes.
Straight Baguette
Note: makes 4 baguettes, each 220g, 40CM in length
AP flour (I used King Arthur AP flour because most people can get that easily and reproduce the recipe with the same flour), 500g
water, 375g (this means the dough is 75% hydration, yes, it's wet, but trust me, it's managable, especially after a few tries)
salt, 10g
instant yeast, 2g
1. Mix everything together. No need for kneading. Just mix everything into a rough dough.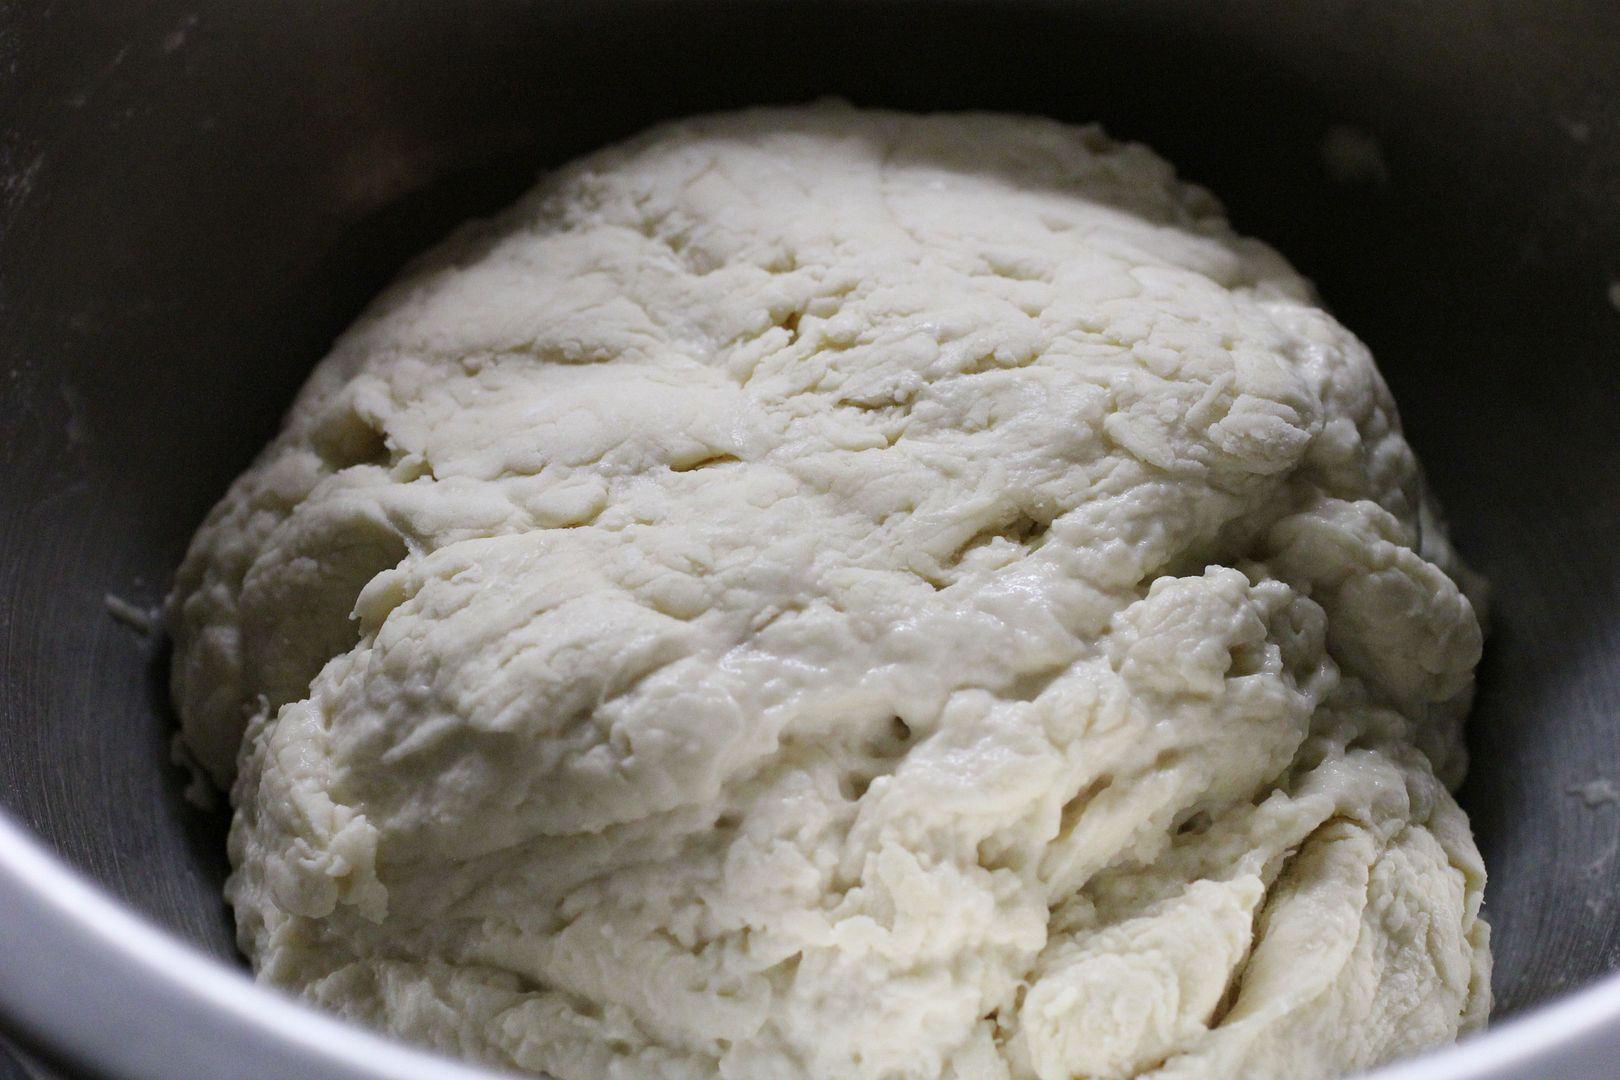
2. Cover the container, rise at room temp (22C-25C) for 3 hours. At 45, 90, 135min, do Stretch and Fold (S&F). TFL handbook has good explanation on S&F. For a dough this size, I find it's the best to water/oil/flour my hands, lift the dough out and do S&F directly in my hands. That's two quick movements, one in horizontal direction and one in vertical direction . The hand/dough touch time is so brief that sticking is not an issue. By the end of 3rd S&F, the dough magically becomes very smooth. And by the 3rd S&F, you can feel the dough offers resistence when being stretched out, that's a sign of gluten developement. Rember how the dough feels, because you want to remember how "elastic" (i.e. gluten strength) yet extensible of a "good baguette dough" should be. Oh yeah, keep the container oiled and covered the entire time.
3. Dump the dough out and divide into 4 portions. Try to have less small scrap pieces. I have practiced enough to eyeball and cut 4 equal portions without too much weighing and adjustment. I find each detail in preshaping and shaping affects final crumb, in general the less I touch the dough (yet still get all the tasks done) the better crumb is. Roll each piece into a colum, with tight skin surface . This is my version of preshaping, there are other methods. Again, the key for less sticking is lightly flour/oil/water hands and surface, AND MINIMAL TOUCHING. Cover and rest for 25-30 minutes.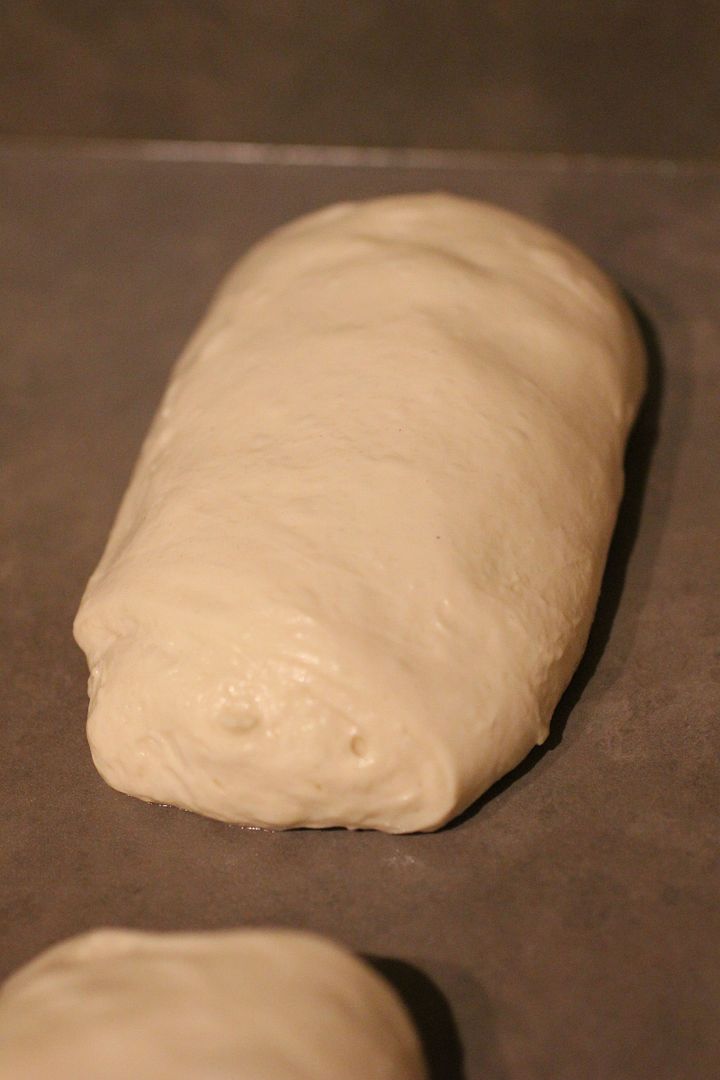
4. Shaping the baguette. Now there are so many good ways to do this, my method below is just what I am used to. As long as you can shape the dough into desired size/shape with minimal handling, your method is good. The key here is 1)keep skin surface tight, AND 2)don't destroy too much of internal bubbles. Be gentle yet effective.If you find it hard to roll the dough long enough, the dough is too strong, S&F less next time or use a weaker flour. If you find the dough to be limpy, extensible but offers zero resistence when being rolled long, can't keep a tight surface, the dough is too weak, use a stronger flour or S&F more next time.
a. Lightly pat the preshaped column into a rectangle, roll the top edge down twice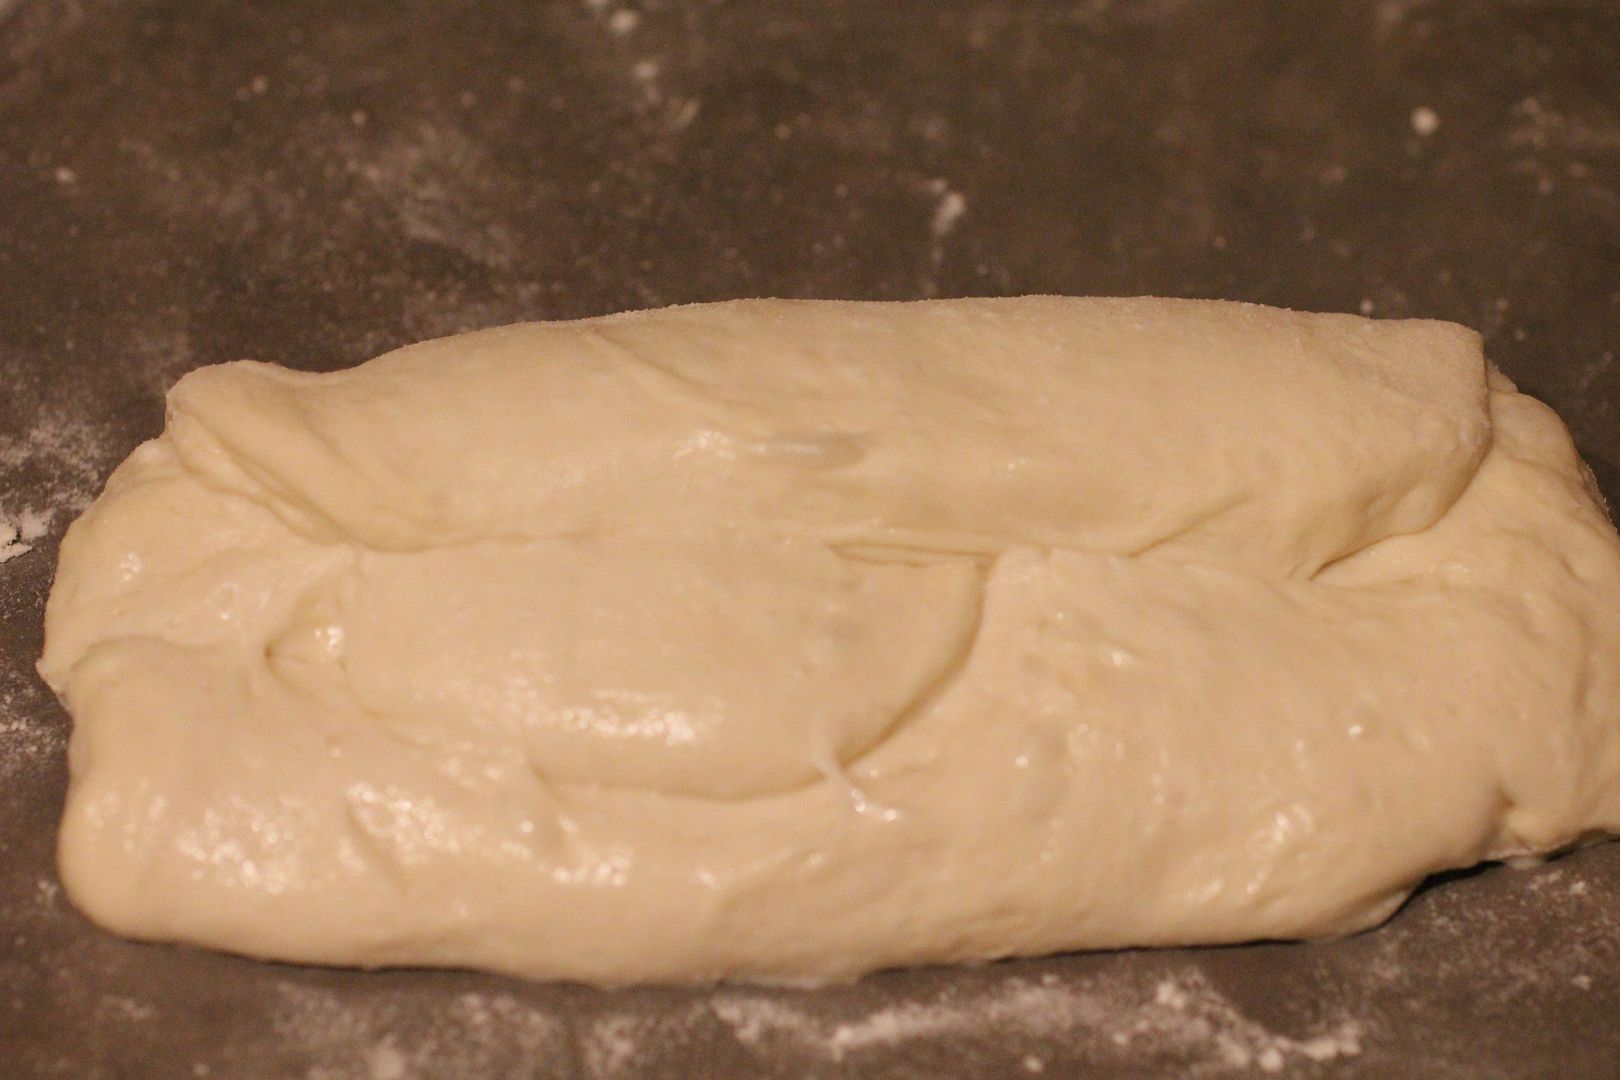
b. Turn the dough 180 degrees, and fold the now top edge to middle
c.Fold in half again, top edge meeting bottom edge, seal. Roll it to 40cm long. "Light", "firm", and "even" are the key words while rolling out. Start rolling from the middle, move both hands outward until the ends, while applying light force downward and outward. If the skin of the dough is tight enough, it should be enough to just lightly flour the surface for the dough not to stick. Most of the flour should end up on skin, rather than inside of the dough anyway. If you find the dough slipping while rolling, you might be flouring the dough and surface too much. Put them on lightly oiled parchment paper (and the whole thing sits on the back of a baking sheet), with middle part of the parchment paper srunched up to act as dividers. Note that there are people who prefer bakers couche such as this, and I have seen/used it in a class using profession oven with great success, HOWEVER, in a home environment, I much prefer to use parchment paper so that I can slip the dough along with paper together into the small home oven onto the steaming hot stone. I don't want risks associated with moving the dough onto a peel, then moving the dough again from peel onto stone. It's just safer, neater, and quicker.
5. Cover and proof at room temp (22C-25C) for 30-60minutes. The dough should have grown noticably but still have enough bounce left. If you dough does not grow much in oven, you have over-proofed, proof for less time next time. If the dough grew too much in oven, resulting in bursting seams and uneven distribution of holes, proof longer next time. Score. For tips on scoring, please see this great tutorial from David. For baguettes in general, the dough is pretty wet, which means you need to be quicker and firmer with your movement for the blade not to drag and stick. Dipping thd blade in water before each cut sometimes help. Furthurmore, David's tutorial mentions "classic cut", which is done by cutting at a shallow angle to get "ear/grigne/bloom". With a 75% hydrated dough, you might at first have trouble cutting at the shallow angle without sticking, don't worry, just cut perpenticular to the surface for now, once you get all the other components correct, you can then start cutting at an angle and try to get "ear" for your cuts. The dough may seem deflated somewhat when you score it, don't worry, a well executed baguette dough would recover and expand beautifully in the oven.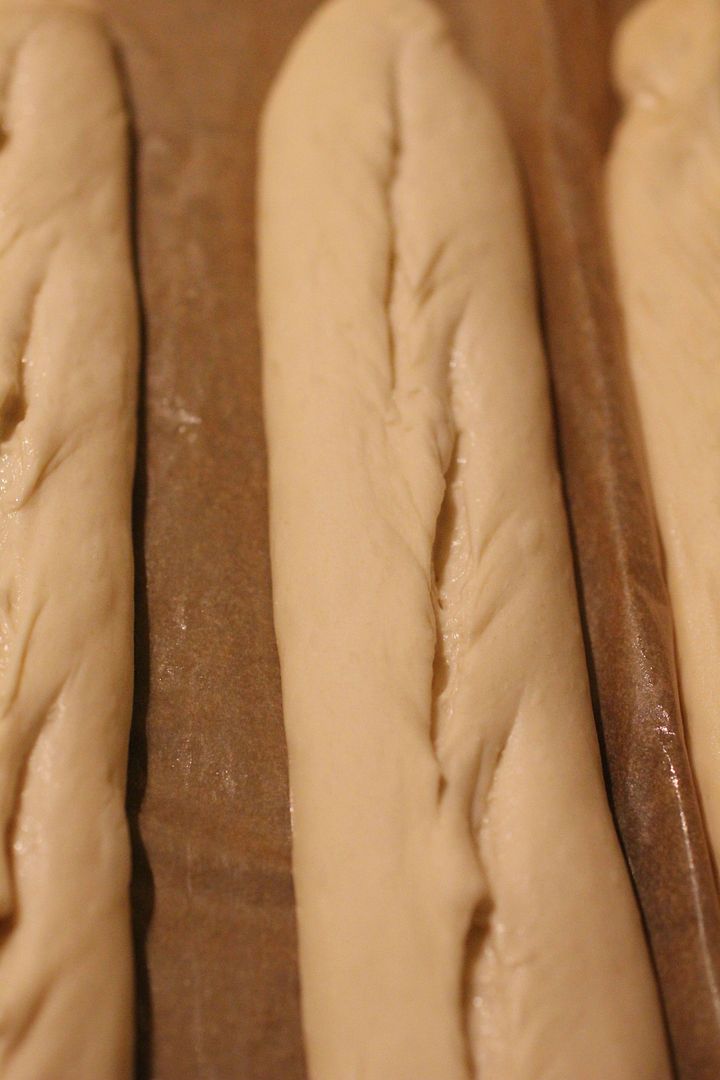
6. Bake at 460F for 10 min with steam, then 15min without steam. Turn off oven, crack the door open, and keep baguettes inside for about 5 minutes. Take out and cool. Note that I preheated my stone at 500F for an hour to make sure the oven is hot enough, only reduce the temp to 460F when the dough is loaded. There are many ways to steam and load, each oven seems to prefer a different way. I use the most common method for my very ordinary electric home oven: a cast iron pan on a rack below the stone with some rocks inside; it's preheaded along with the stone; once the dough is ready to be loaded, I pour a bit of boiling water onto the cast iron pan (steam comes out, watch out!), close the door and get the baking sheet (with the dough/parchment on top) in hand; open the door again and slide parchment paper along with dough onto the hot stone; pour another cup of boiling water into the cast iron pan (watch out again, more steam comes out); close the door. The whole operation is pretty intense, my husband is still amazed that I haven't lost a finger loading bread doughs ... yet. However, it does get easier with practice.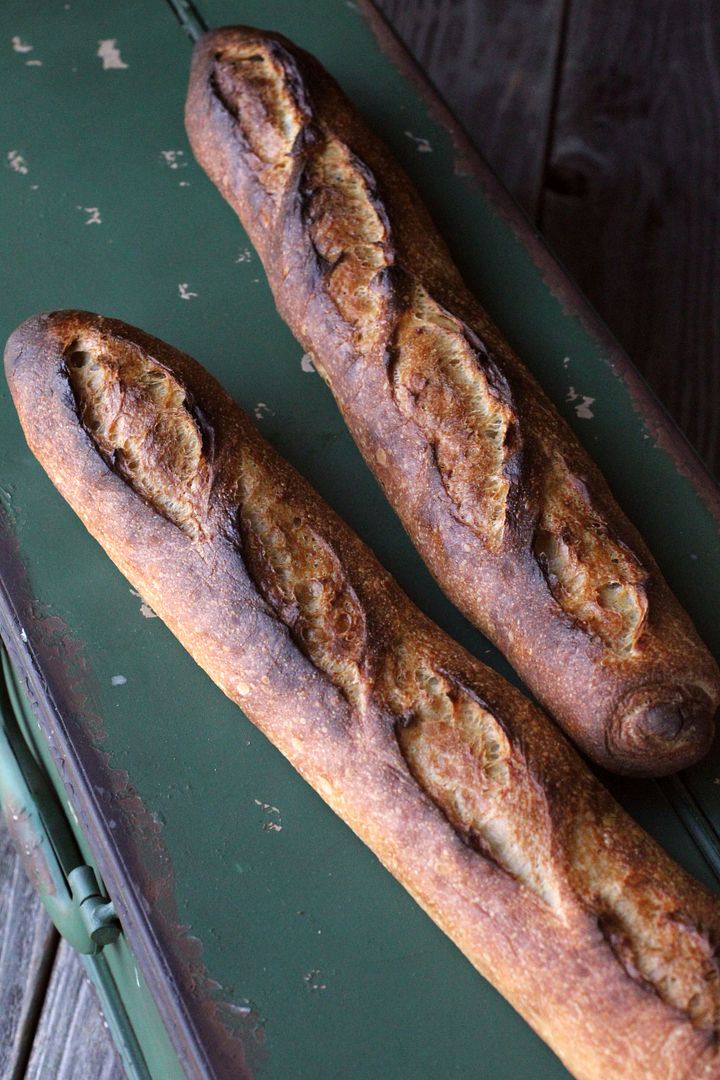
Comparing to my 36 hour baguette doughs, this dough is much easier to score! 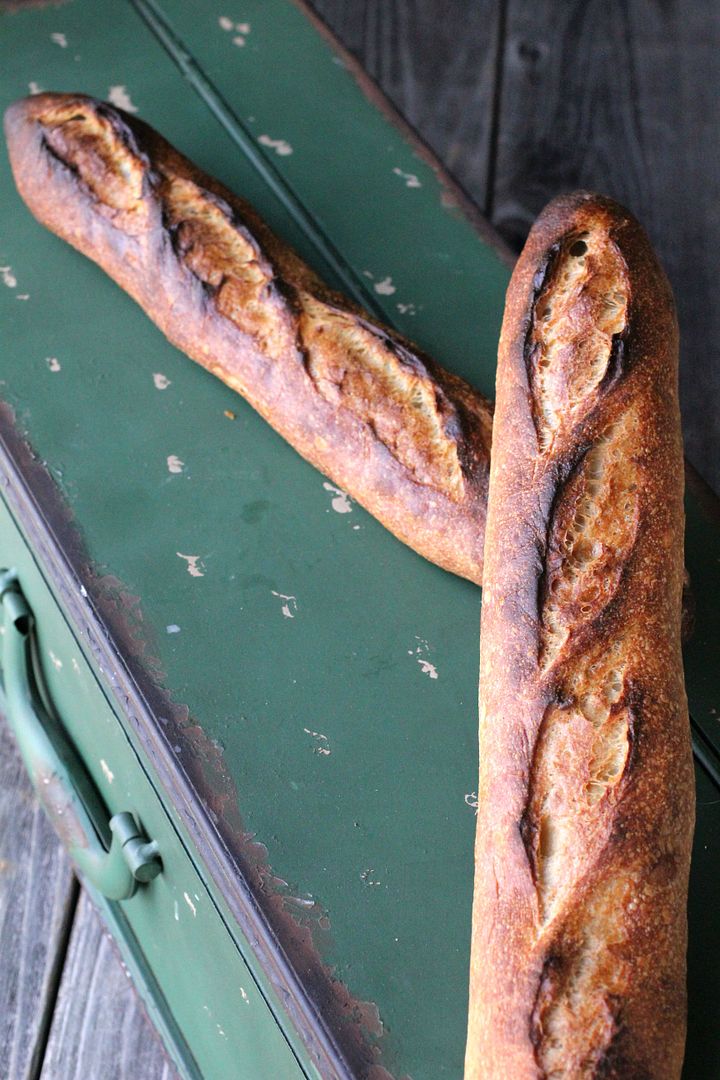
Crumb is decently hole-y, and even. :) 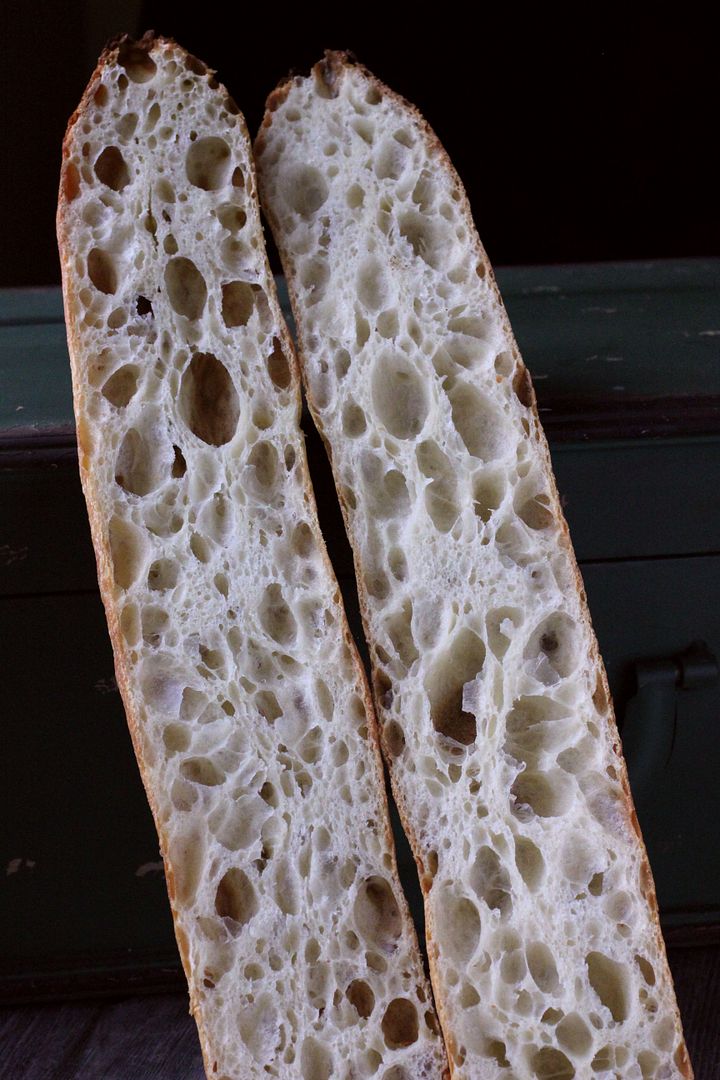
Crust is thin and crispy. If they are baked enough, they should be singing for a long time while cooling, which means a lot of tiny cracks on the crust.
However, I am never completely happy with my baguette. Holes can be bigger, more even, and I can live without the line in the middle of the crumb coming from the seam at the bottom. But hey, like I said at the begining, the fun is in the chase. :)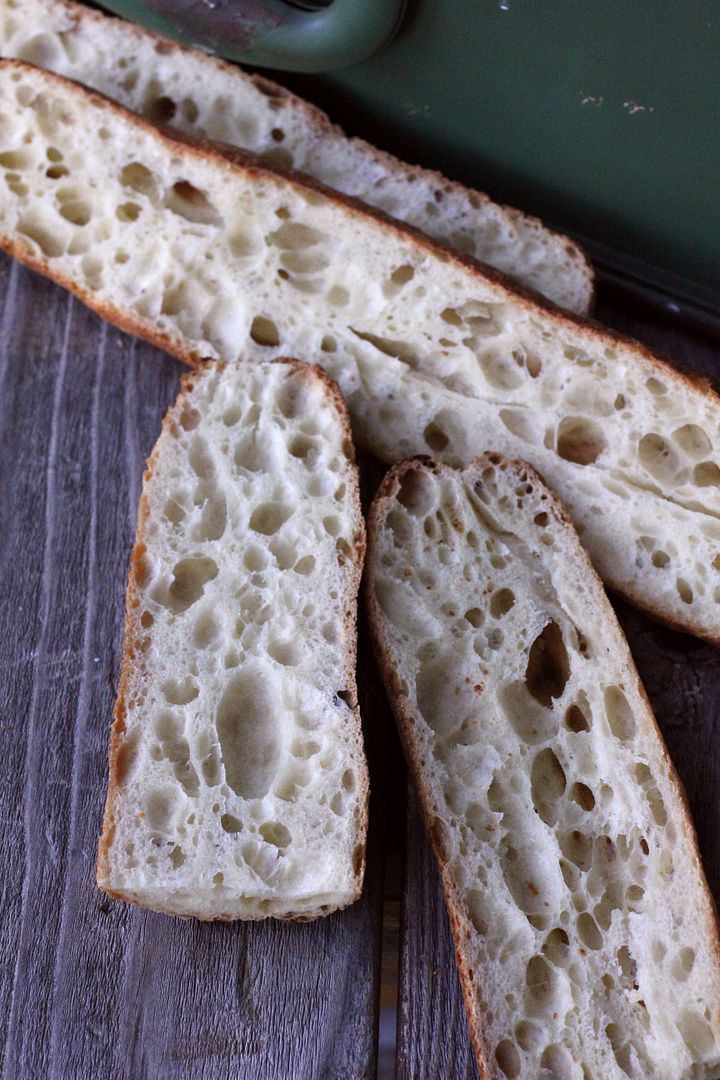
- txfarmer's Blog
- Log in or register to post comments
Beautiful baguettes. Even though they may not taste as good or rich as your signature baguettes, I'm sure these must have been pretty tasty all the same. After 3 attempts I finally got your 36 hour one down close to yours, but I have not made them for a while. I even experimented using your technique to make a boule and it came out very nice. I think it may be time soon to try them again with some add-ins.
Thanks for sharing your beauties.
Regards,
Ian
So glad that you liked the 36 hour recipe. The variation using rye starter is my favorite, and I have used it for boule, pizza, ciabatta, etc with good results.
ultra holey 40% Whole Wheat 36 hour Baggies - since they are very healthy for me but could use some rye to get them to 50% whole grains ( I'd take 50% whole grains - half rye half WW as a better, if not best option). When I can make them like you do, I will have died and gone to heaven with 'Empress Ying still rules' as the last words anyone hears coming out of my mouth. You are a Fresh Lofian baking treasure as this post clearly shows. Thanks Ying!
I'm just now getting ready to do a 2nd take on your croissants, which is even a more massive undertaking :-)
Even these simple baguettes meant for us mere mortals are nothing short of perfection personified.
Bake On!
Ha, I do notice your preference for whole grain breads. Keep on with the croissants, I practiced weekly in TX summer, elbow deep in a mess of butter and dough, but it's all worthwhile in the end!
Great post with beautiful baguette, txfarmer! And the tutorial, especially on shaping is just what I wanted and definitely needed as I haven't been able to produce a baguette with exta-holey crumb like yours, how much I tried. The process is actually quite similar to mine but I suppose I need more delicate touch and precision...... plus more suitable flour, maybe.....
Huge thanks for sharing your 'trade secret.' :D. It'll be my baguette-bible for a long time, I'm sure. :)
Hey, haven't "seen" you for a while. Your baguettes featured on the front page are beautiful!
Great, glad to hear it's helpful to you!
txfarmer,
Thank you for sharing your experience and these pictures! Your baguettes are always superb and I want to bake the baguettes like yours sometime :-)
Best,
Yuko
With a bit of practice, you will be able to in no time!:)
I made baguettes today for the first time since forever, inspired by Lumos' recent post. As I was reflecting on just how much honing my baguette skills need, your tutorial appeared. What timing.
The main thing I'm taking away from what you are saying is gentle, gentle, gentle - without even a mix at the beginning. It does seem that half the problem with gentle, gentle, gentle is the high hydration you are using, as stickiness is a constant enemy. And I'm curious, why go that high? Have you tried lower and found it impossible to get the results you want?
Your crumb is absolutely amazing, so that could simply be your answer. But now I feel like I need to prove that one (I) can get the job done at lower hydration. Does that make sense? Does it really have to be 75%?
-Varda
It doesn't HAVE TO be high hydration, but
"Given that everything else remains the same, the higher hydration, the more holes." That's just a fact. However, it's difficult to keep "everything else remains the same" because you are right, the higher hydration, the harder to handle the dough. Therefore the key is to find that point where the dough is not impossible to handle, yet wet enough. The reason why I keep it at 75% is that I think, from my personal experience, with this particular flour, the dough is definitely managable at this hydration.
Another point: it's not just gentle. It's "get everything done" with "minimal dough handling" -- the less you touch the dough, the less chance for sticking and "hurting the crumb", assuming the necessary steps are still accomplished.
In summary, like everything else, it's about finding that balance point. If you can make a hole-y baguette at a lowe hydration, congrats, however, I would immediately challenge you to practice at a higher hydration, because I know if you can handle that wetter dough as effectively as the drier one, you will get MORE holes.
Thanks for the thoughtful answer. -Varda
I guess it's from different points of view:
If my 70% hydration baguette and 75% hydration baguette have the same crumb (could be equally hole-y), I don't see it as proof that "I don't need to operate on the wetter dough", instead, I see it as evidence that my handling of the wetter dough has room for improvement, and the 75% hydrated baguettes should be mor hole-y.
Of course at some point, it's hole-y enough, so I stop and go eat some bread. :)
And the baguettes are beautiful.
David
Thanks David! Love how you updated that scoring tutorial!
David
Beautiful detailed write up txfarmer. Crumb looks amazing. Thanks for making baguettes so much more accessible! I have yet to really tackle working on them regularly, and now I feel inspired to try to develop my skills in this area, and I think this is the recipe to use.
Great! That's the best result I want to have for this post -- encouraging people to start baking baguettes!
Txfarmer, your baguette is outstanding and your explanation is really FANTASTIC! I'd say it's probably the best explanation I ever read of how to handle and interpret a dough. Your scientific background really shows, and I assure you it's a serious compliment.
Thank you so much, it's a compliment I would treasure!
Wonderful crumb, nice and open. And the crust and scoring look great- dark for more flavor.
Thanks! I do like a bold bake...
Those are gorgeous. I bet the flavor profile could be amped up with a small portion of ripe starter replacing part of the water and flour. I'll ahve to try this. Maybe a scant amount of rye as well. I love when people bake it dark. I wish the American population was privy to darkly baked bread.
Great Baking/Tutorial
Josh
Funny, the two variations you mentioned leads me straight to my 36 hour sourdough baguette recipe:
http://www.thefreshloaf.com/node/19830/36-hours-sourdough-baguette-everything-i-know-one-bread -- original 36 hour sourdough baguette with starter
http://www.thefreshloaf.com/node/20141/3-variations-36-hour-soudough-baguette-when-it039s-good-play-your-food -- go to the bottom for the same 36 hour sourdough baguette recipe using rye starter
http://www.thefreshloaf.com/node/24437/blog-index-will-keep-updating-and-linking-it -- here has many many variations on that 36 hour recipe, some using a lot of whole grain flour.
Beautiful baguettes with a nice bold bake! Thanks for the useful advice too. Always felt baguttes as being not very suited for a home oven having had a few attempts of rolling out too long and it sticking on the sides of the oven. Great tutorial on how good it can be when done right. Makes me feel like practicing more on such simple classic breads!
-Tim
txfarmer,
I had already mixed up a batch of Poolish before I read your post. So I decided to use Hamelman's formula and your method.
These certainly are the best baguettes I've made to date. We were just in Paris and these baguettes are very, very close to what we enjoyed there. My shaping and scoring can use improvement. The crumb can also use improvement.
Hello,
I am attempting your starter baguette and it is a challenge for me. However, I do not easily give up. I do not suppose you would consider videotaping yourself making this? I would love to see how you handle this dough. I find it to be challenging and exciting that one day I will figure out how to work with it. In the mean time, It looks really gooey and I am struggling to get it to shape. Thank you for such detailed instructions and pictures.
Kind Regards,
Casey
i think they are perfect, especially for the time given to produce them they look OUTSTANDING .and ..I do not think you need bigger holes in a baguette. sometimes you want to spread something on them :) I will try this one today with french flour but ill add more flour since i will add caramelized onions and 10% rye.
I tried and tried and tried but still fail on the 36 levain one.
So I decide to start from basic and follow your instruction completely with yr straight method.
Here is what I get, can u get me some comment how to improve it?
Failed 36 version( not hole-y)
Straight version:
not as opened as yours
I'm 2.5 hours into the proofing and I can still pour the dough out of the bowl as I would a liquid, its not sticking to the sides of the bowl at all. What might I have done wrong?
Also, do you consider the additional flour you are infusing into the dough each time you S&F? As you have mentioned, using a lot of flour is the only way to work with the dough in its early stages, it is clearly picking up some of that flour each time I S&F. On Friday I found I had to use a cup or so of flour to be able to work with the dough, with not very much left over when I was done. Would there be a difference to adding the additional flour up front?
1) I never said "use a lot of flour is the only way to work with the dough". I said sometime it can't be avoid sometimes to use "some" oil/water/flour to work with this dough. The key to limit the amount of flour/oil/water, is not to touch the dough unnecessarily. If you don't tough the dough, it can't stick to you. You have to get stuff done with minimal touching. At this point, I don't use ANY flour while s&f, just a bit of water, and a very quick movement. That's it. Even before, when I needed some flour, it was WAY less than a cup. When I shape the baguette dough, I do use some flour, but again, it's way less than 1 cup. The total amount is so insignificant it won't affect dough hydration.
2) The dough can be poured means it's wet, however it says nothing about its strength. If it's well developed (which it should), it would drape down, but elastic.
As a new baker, I failed to realize that things would be different using a different flour. My earlier attempts were with Bread Flour, whereas yesterday's attempts were with Unbleached All Purpose flour. I should've realized the lack of elasticity was a good demonstration of a lack of strength. Thanks again.
does one end up "sacrificing" the cast iron pan, or doesn't rust develop?
很早就关注你的中文博客德州农民了,这两天在做法棍,又打开你的文章在看,突然看到你说有逛美国烘焙论坛,我刚好觉得国内信息太少,就翻墙出来搜索美国烘焙论坛,几个小时以后我在这个网站看到你的文章,看着看着才觉得,咦,怎么这么眼熟,一看ID名,好嘛,找到你说美国烘焙论坛了哈哈
Thank you txfarmer, after so many years I finally got my hands at baguette making. Following your directions I managed to make some very nice first time baguettes :-)
Hello TxFarmer - thanks for the amazing recipe.
I am following your recipe as precisely as I can. And throughout the process I believe I am doing okay... expect that the air pockets are not as big, they don't rise as much as I guess they ought to and they don't brown and charr on top as well as they should.
I live in the UAE and use 11.6% protein flour.
Any ideas?
I’m wanting fresh baguettes to be ready around 10 a.m. Is it possible to rest the dough overnight after the initial rise, then continue with dividing and shaping first thing in the morning?
I had hoped to dabble into my first sourdough this weekend but the yeast gods were fighting me. I live almost 2 hours away form a decent baguette so I followed your directions. These might have been a tiny bit underproofed but were crusty and delicious.
Notice the two sizes? They are identical in weight! The difference is strictly position in the oven. Two went onto a hot baking tile low in the oven, the other onto a perforated baking tin on top a preheated cast iron griddle higher up. They were rotated after 10 minutes. Do I know which was which? Nope! Will pay closer attention next time around.
Image

75% hydration baguettes is a huge headache. I've looked at all kinds of baguette recipes across the fresh loaf and other websites, these are the highest hydration baguettes i've seen and they don't even use whole wheat flour. Also don't think you can shape a baguette properly at 75% hydration with all white flour. Unless you add more flour during shaping, in which case you might as well just do lower hydration to start, no good reason to fold in all that flour during the shaping process. Using oil or water the baguettes will just slide across the counter and not roll out. Also, if you're going to deviate from the recipe and attempt to put these on a couche, you'll definitely need rice flour or semolina flour. Otherwise the dough will just suck up the AP flour and stick to the couche.
If anyone is going to attempt this recipe as a first time recipe, go with 325g/350g of water. The difference in the end result is negligible and it's going to save you during shaping. I don't see myself ever attempting to do 75% hydration white flour baguettes again, no point really, and I don't like the idea of adding flour during shaping because you have to fold baguettes so much. Maybe some french rolls/boules or something doesn't require multiple folds during shaping.
Third try making baguettes first time using this recipe. Notice all the added flour(didn't stop the dough sticking to my couche) Anyways I'm fairly happy with my results and this recipe despite all my nit picking.
Welcome to TFL!
I suggest you don't attempt shaping a 75% hydration baguette until you have mastered baguettes at a less challenging hydration. But I hardly think your comments about this formula are warranted by your half-vast prior experience of 2 baguette bakes. And, if you read all the comments in this thread, you would realize that some of your comments are not consistent with the described facts. Nor with the beautiful results the OP achieved with her recipe.
Baguettes are already the most challenging of breads, and making them with a slack dough does require a level of mastery that only comes with much experience.
When you are ready to tackle techniques for handling 75% hydration dough, please don't hesitate to ask for advice. There are many more experienced bakers here who would be happy to help you.
Happy baking!
David
Hey, Appreciate all your recipes and comments on this forum, I read a lot of them. Also have read all of the comments in this thread.
Wow, you think my experience is half vast? That's nice of you, but I don't think of my experience that highly.
Agreed, 75% hydration is not a good place to start for baguettes, which was my main concern about this recipe. Just trying to help out new bakers like myself. I'm not the type to ask for advice, but if i need it hopefully you will respond! You humble and wise man.
I want to say thanks a million to you, I really appreciate your recipe, I make a thousand baguettes but it’s all failed! Now with your recipe , it’s gorgeous, nice crumb, nice ear, no words to describe! Thanks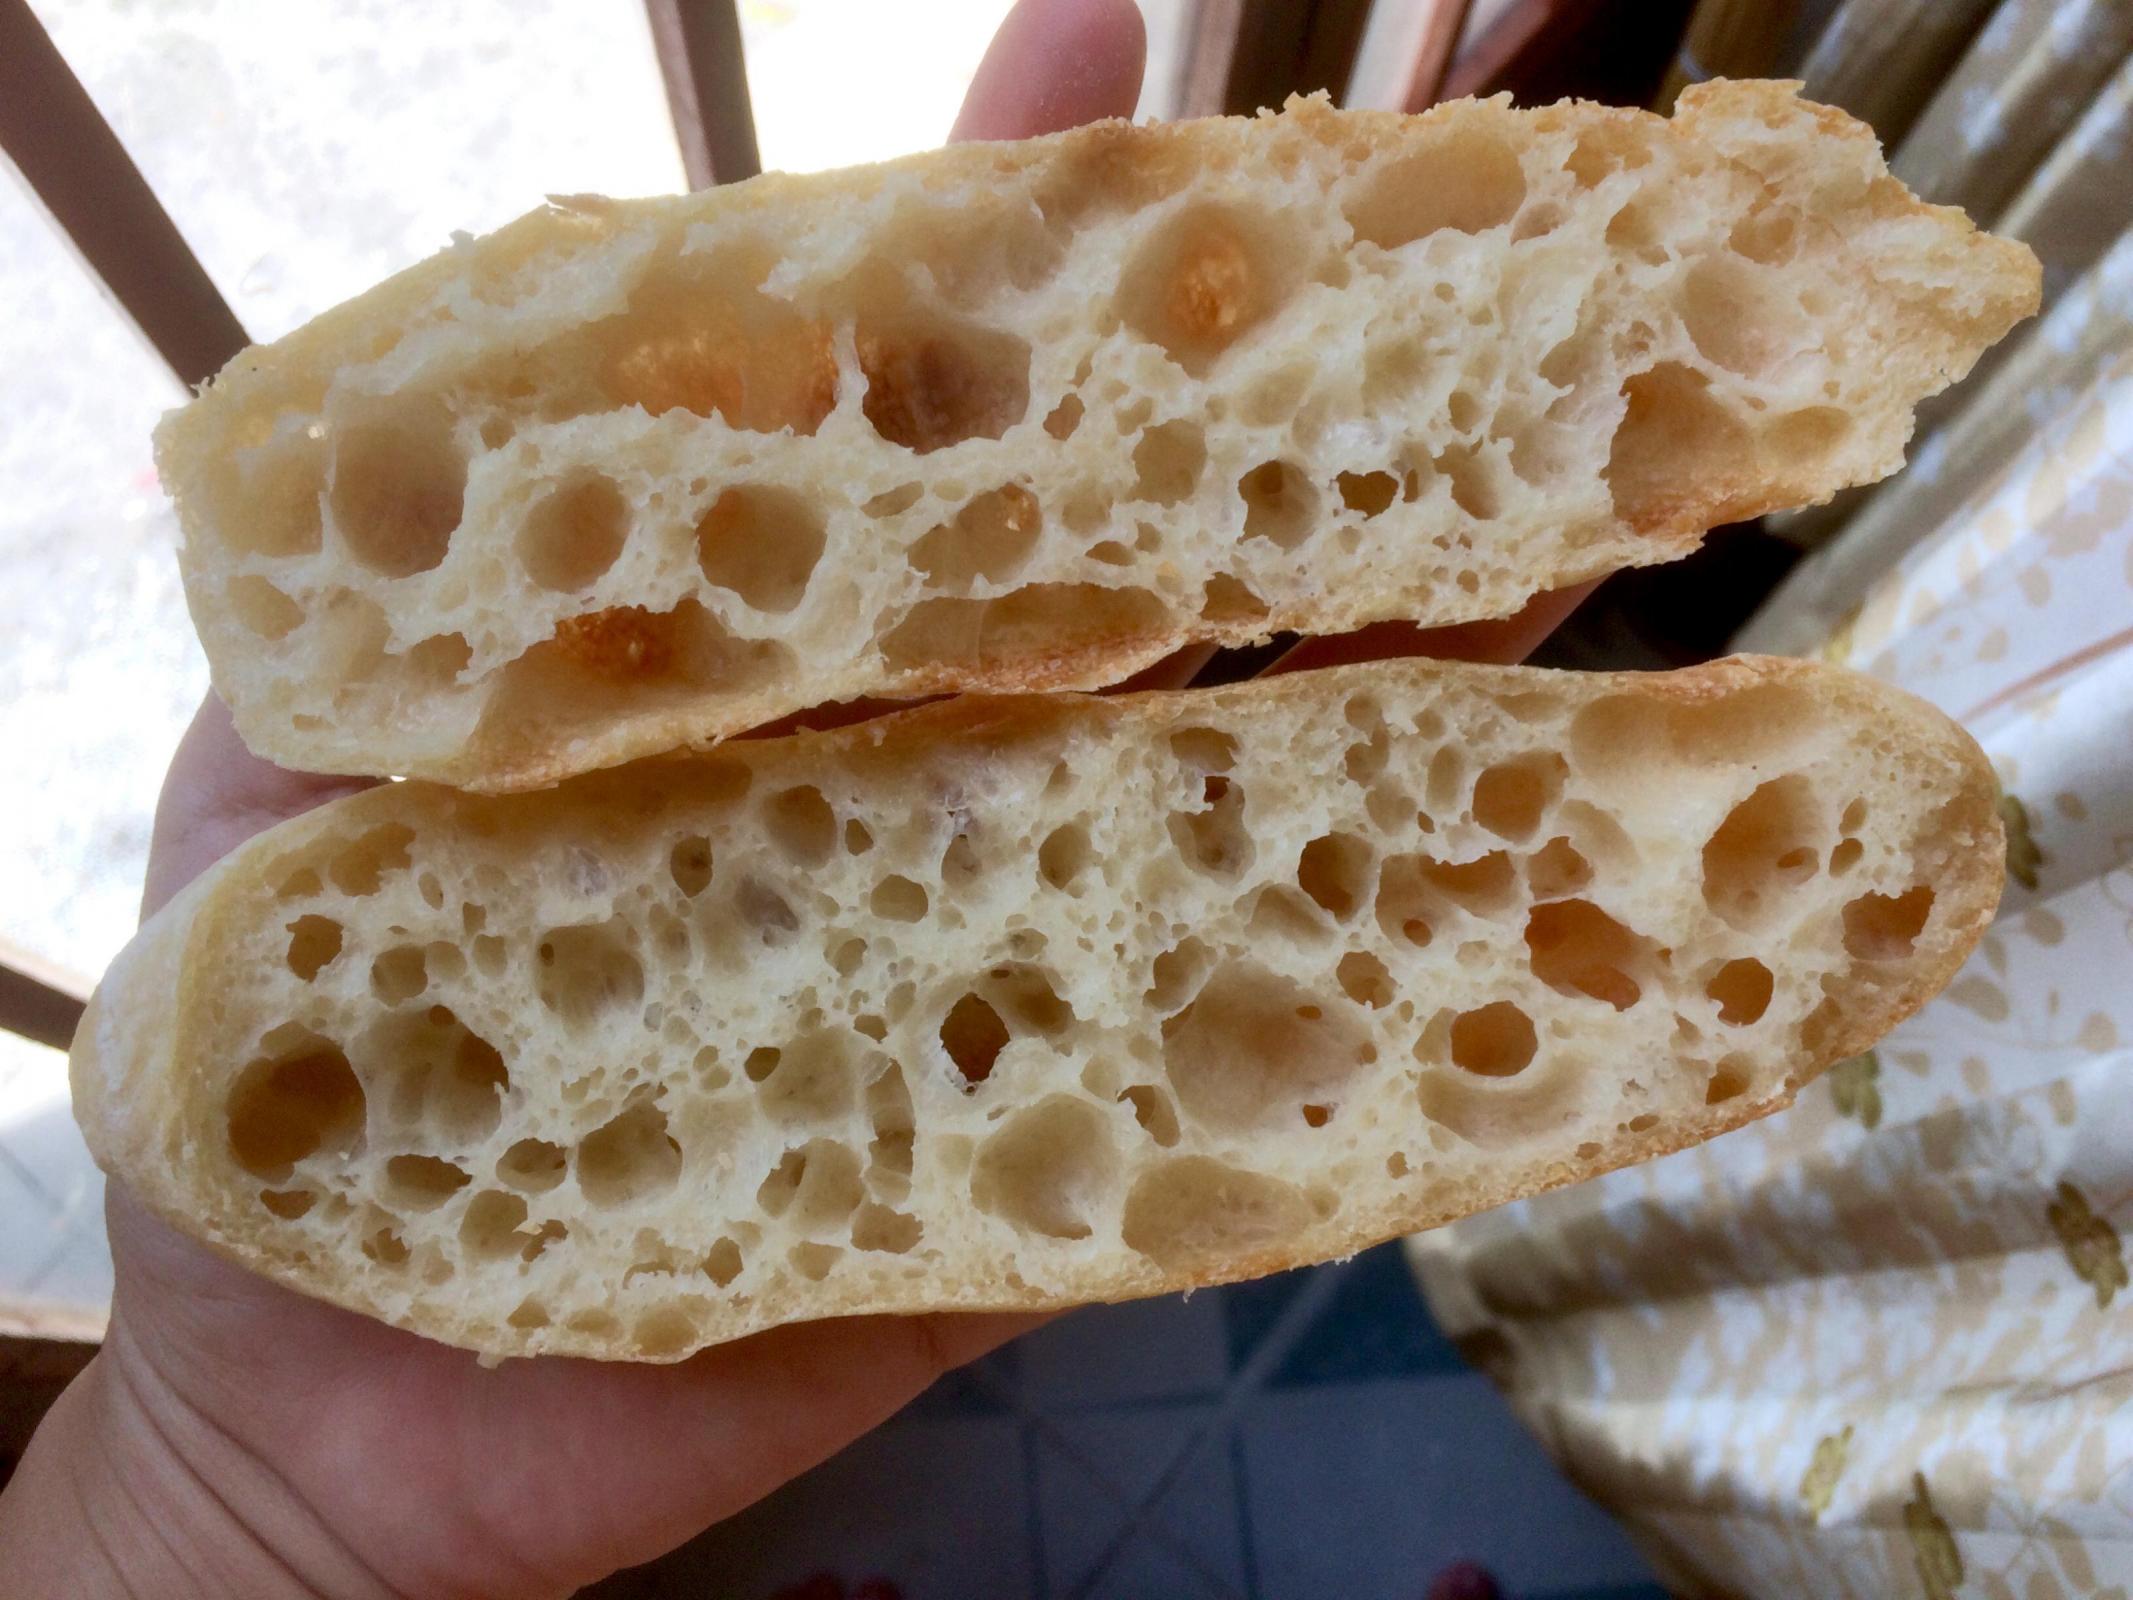
Ergebnis zur Übersetzung
DeutschEnglisch Thank you for this recipe. I've often baked baguettes, but they've never turned out so well. To improve it, I added 50 grams of starter and chilled the dough overnight at 5°C just before ripening. The next morning just shaped and quickly baked. A perfect result. Warm regards from Germany, Astrid