
I ordered and received the top and bottom stones for my Mock Mill. Now I see there are no directions for replacing the bottom stone. I’ve called and left messages .
They responded with perfect instructions. Regular hex4 and a wooden wedge and some muscle. All done.
Happy Milling.
Thank you Breadtopia Gianni! Service technician.
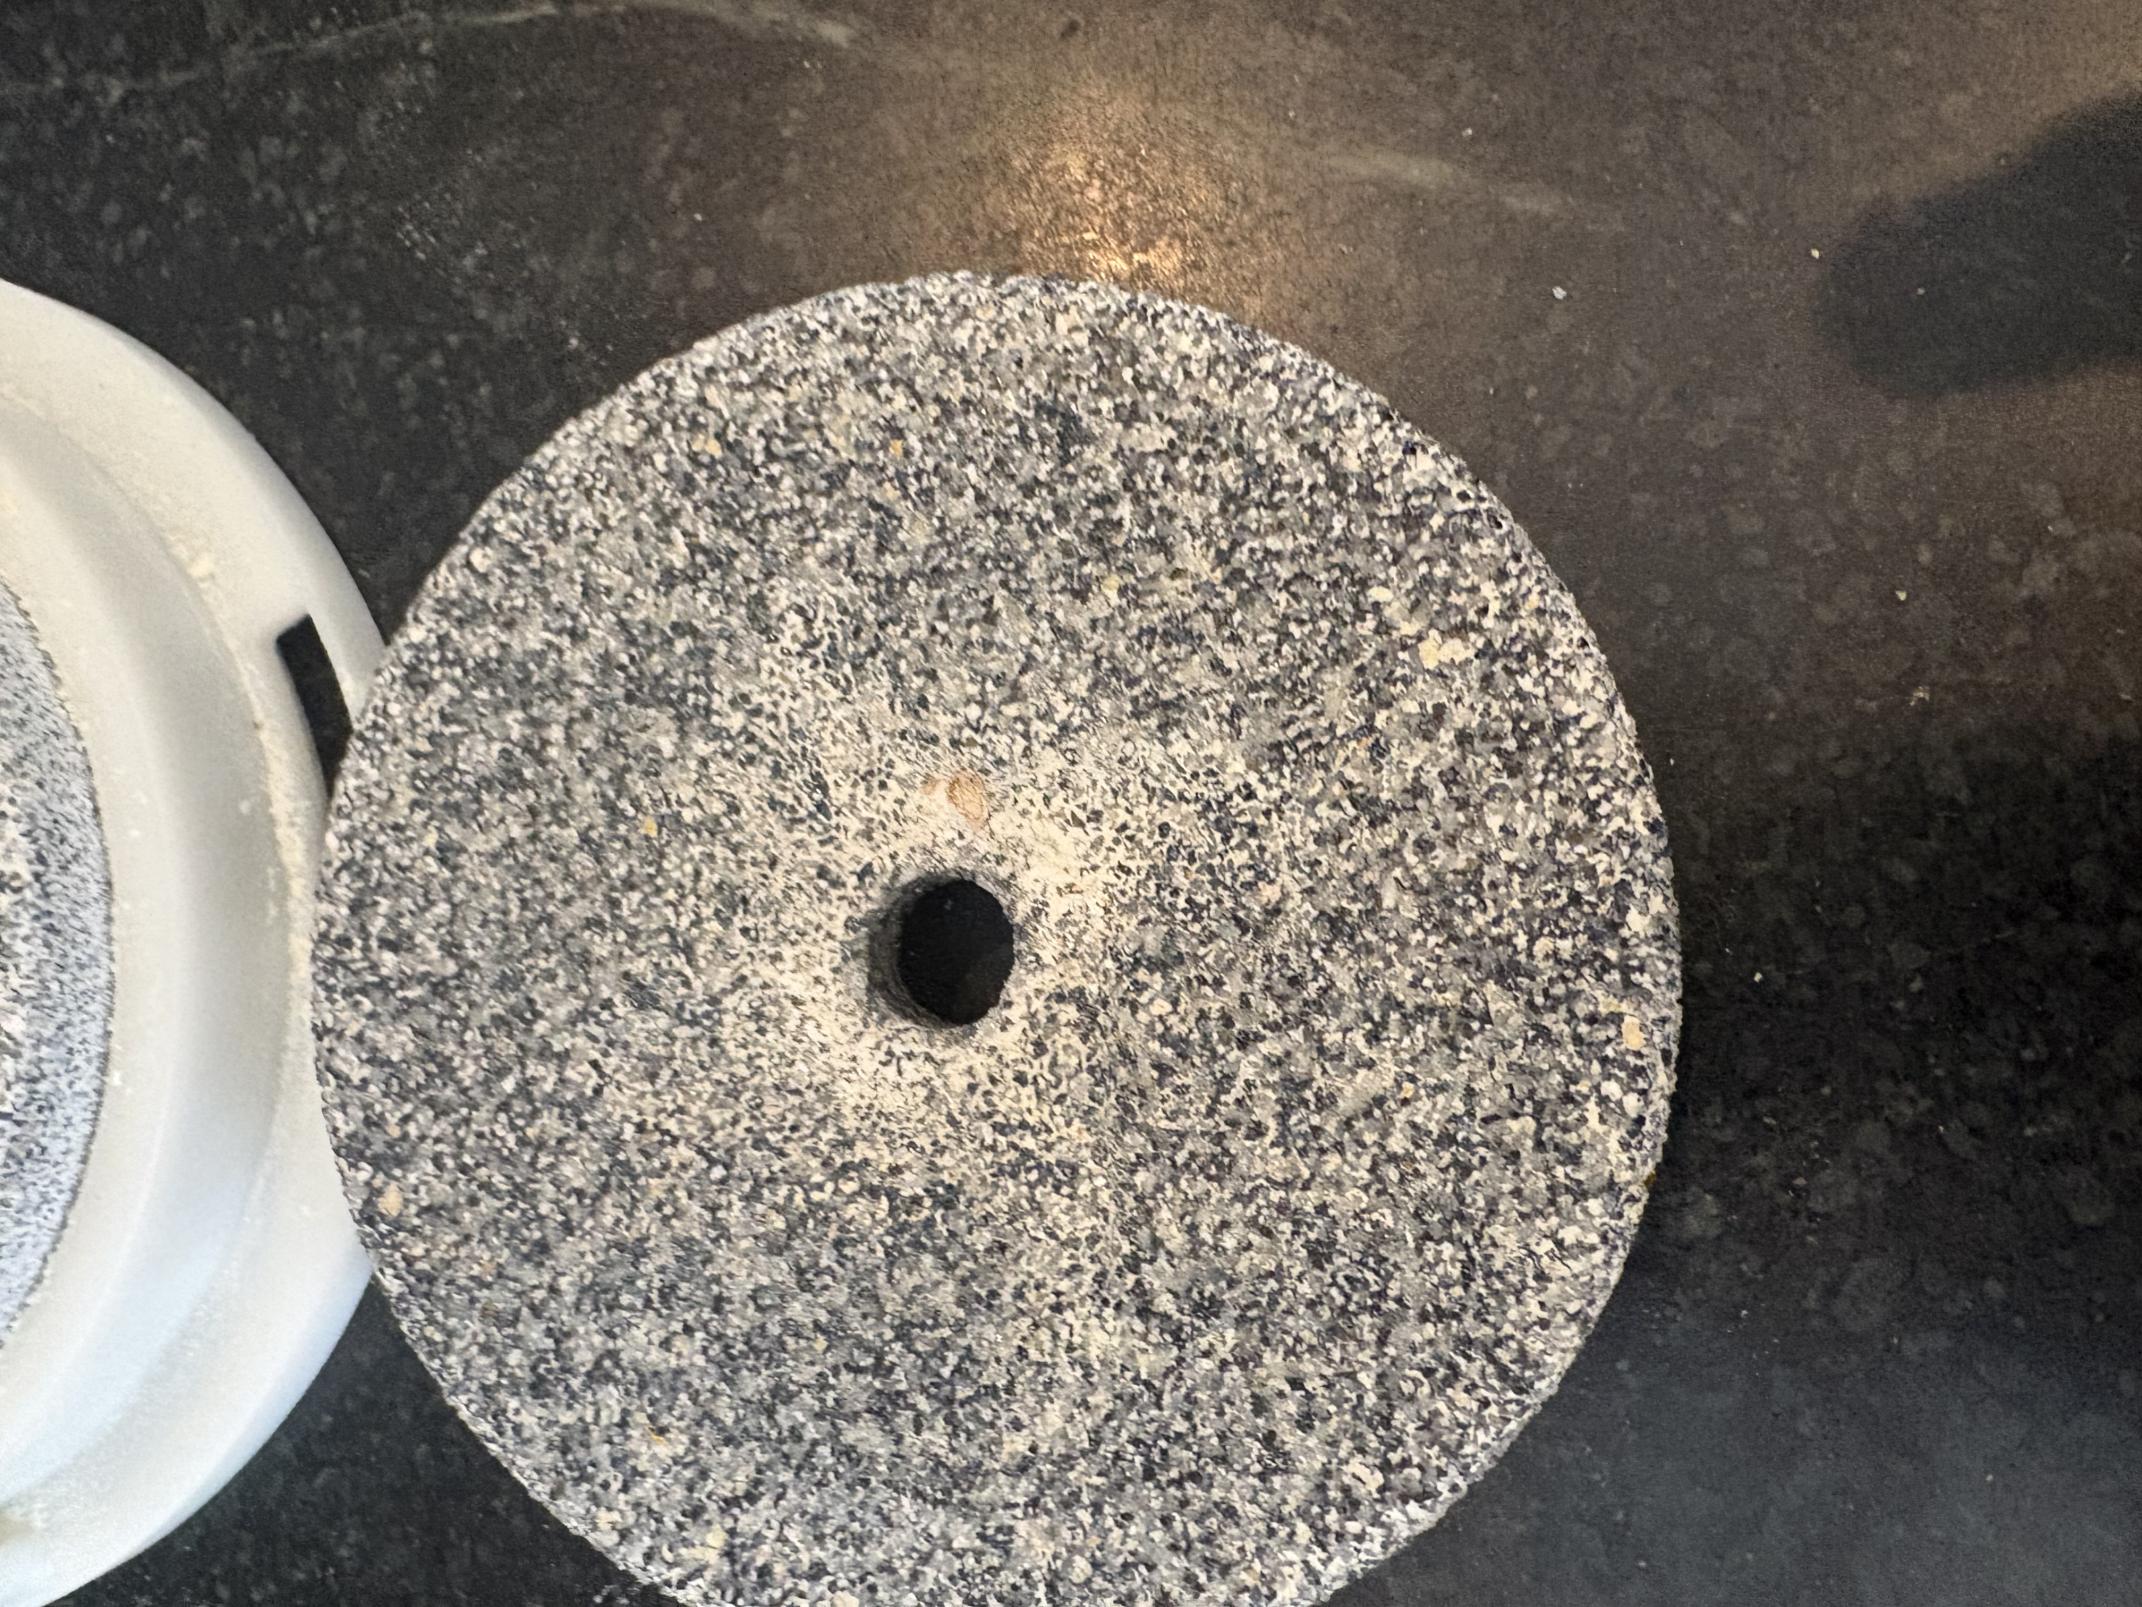
Old stones. Note they are almost smooth. The new ones are beautiful. 7 yr old stones. A lot of history in them.

Very cool, thanks for posting! Just the other day I was wondering how long the stones would last, I can't imagine being without mine. I'm curious; were the replacements noticeably thicker? i.e. how much thickness was lost in 7 years of use?
The thickness of the stone itself isn’t what changes. It’s the cutouts you will note in the photo attached below . If you look at my 2 photos above you will see they are basically flat. Look at the photo below of replacement stone and you can see VERY defined swoops cutout in the stone. They are where the wear appears.
You should be cleaning your stone periodically with a cup of white rice . While the rice is running through slide the knob on the side back and forth slowly to increase/ decrease the grinding stone distance. This facilitates the cleaning.
Things to note that indicate need new stones , besides their texture. 1) lots of dust when milling 2) clogging of the grain so motor won’t start til you clean everything but then it happens again before long 3) flour warmer than usual after milling. 4) harder to mill fine flour
Maybe the whole surface of the stones does wear down, which then make the grooves appear less indented?
But without having any pass/fail specs and how to measure them, it's pretty academic.
Lance
Here is side by side old / new old left new right . Second pic you can see most difference. My PhD science guy ( aka husband) just came in and started to laugh when I told him what I was doing.
He said the flat surface of the stone wears away. It’s not possible for the cutouts to wear . The cutouts are there only to funnel out the flour as it’s milled. So there you have it. Dr Science has spoken.
This is why the flour was making so much dust and also why the flour backs up and cakes in the machine. Funneling is really important.
And because he’s a comedian he said “ saying it’s the cutouts wearing off not the flats is known as ‘ alternative facts’. “
That was a given... even to us non-PhD's... :)
I do think it would be possible to Dremel out the grooves. My 100 is a tad less than 3 yo, so I don't have to worry about it for while.
I’m dense!
Not as dense as the 100% dark rye I just made!
Thanks for those pics, BTW.
You are too kind. I understand a lot of stuff but sometimes the most obvious escapes my brain.
I’ll take a look at your bread. c
I didn't mean to suggest that it needed help; 100% dark ryes are dense. Between the CLAS and the L7 aluminum pans, it always comes out quite good. It's a fresh-milled rye version of this RusBrot recipe: 100% rye bread with minimum effort on the baking day - YouTube
I've made this 7-8 times, and this was the first time that I fermented it (as suggested) at 82º. Usually I would just do room-temp, whatever that was. Following the directions does improve the taste...
I’m not organized enough to measure etc accurately. Beautiful rich looking loaves. cc
Interesting. Gotta wonder if there's a way to restore/refurbish those grooves.
That said, their price on replacement stones seems quite reasonable.
$20 each + $7.50 shipping. I’m sure it’s not worth it to have them retooled. There was no mention of that.
Amazing the difference when I milled the rice! No dust , quieter and really fine. I’m pleased and ready to bake. 😊
I was thinking of a DIY fix, maybe a Dremel with the right attachment. But at $20, maybe not worth it.
Fine tuning the curves would be a challenge. $40 every 7 yrs works for me 😊put the old ones in a decorative box and use as a doorstop
My mill is old..it's actually a Wolfgang branded mill but made by Mockmill...bought it 2005. Haven't use it in a while.
I used a #10 file to hold the stone steady but I could not get the hex bolt to move..even with a socket wrench.
Appreciate the info you posted.
Impact driver H4. We used the wooden wedges as shown. My husband had to do the turning I wasn’t able to do it. Ours is the Hex as shown. Please call Breadtopia and get assistance. Gianni will call you back.
https://breadtopia.com/ link here to phone.
But I used a different socket wrench..bigger one and now I've stripped the hex bolt, it even tore up my h4 bit.
to Mock Mill. I don’t know where you are living but if you haven’t used Shippo do that. It’s ever so much cheaper and can insure etc. It’s worth it given how expensive the mills are. Download the app for Shippo .
Good luck. The only other alternative is if you know an extremely good machinist used to detail work you could ask if they can drill out the mangled hex and replace.
Good luck and please follow up. c
Sometimes the chuck of an electric drill will grip a stripped bolt head firmly enough to break it loose.
I will definitely give that a try to use the chuck on my drill.
Though I've never worked on a mock mill, I've used this hack on many old typewriters: PB Blaster penetrating oil. If you can manage to get it into the thread of the stuck nut, it seeps in and dissolve rust and miscellaneous crud. It's only failed on me a couple of times, and only with horribly rusted hulks. Of course, it won't solve the stripped hex problem.
Rob
Is the game changer. Drilling it out by someone with great expertise as it’s a tiny opening . Rather than risk destroying the machine which so far hasn’t happened . They can take apart the entire machine and work from inside out replacing only the screw after all is said and done. Good luck. c
My husband says the penetrating oil will ruin more than help due to the actual problem.
My grain mill is so heavy and dovetailed and about 20 yrs old. In great shape except for the face plate on the front, and the bolt.
I would really worry about it being damaged in shipment and not working at all. Unless I could get insurance to cover it completely.
I'm afraid to mess with it myself though, so we'll see what Mark says when he returns to work on Monday. The picture was oriented correctly until I posted it here.
Thanks!!
Wow! I’d definitely get his expertise and go from there. I’m sure it’s not the first time they’ve had a stripped bolt. Packing wouldn’t be hard at all. Big enough box and styrofoam peanuts with paper wadded and stuffed. Insurance covers what you have as proof of value. You’d need to have before pictures and they’d want age of mill as proof of value.
The best thing about insuring high for something is they see that it’s expensive so generally they take better care. I’ve had incredibly great luck with UPS and FedX.
If you ship definitely use Shippo. I sent my huge old Kitchen Aid mixer to Mr Mixer and packed it myself. It was only $35 by UPS. Well worth it .
Keep me posted. That’s a gorgeous mill.
help me, very sad about that. I also have a barely broken spring but he said he can't fix that either.
My husband said please take it to someone who works on electronics and can carefully drill out the nut. It can be replaced and will be in working order then. You can PM me if you want with location so we can get you some help. 🙏
I just don't know who to take it to and also the technician felt it was impossible because the threads are different. Even if I had a miracle and someone was able to remove it..where would I get another one to fit it? Because that's what the tech said, that he had no bolt to fit it.
But I appreciate your positivity!! :-) These things are not cheap to replace!
He’s got a very limited set of supplies to meet only the requirements of the mill they sell.
After the 1st I’d make a few calls around to see. Louisville should have resources. Get it out and then see about a match.
Otherwise use as a beautiful doorstop and with all it’s memories… buy a new mill. c
Start calling
https://www.google.com/search?q=louisville+kentucky+technical+engineering+shop&sca_esv=283b61cf11016ab2&rlz=1CDGOYI_enUS1149US1149&hl=en-US&sxs…
after the 1st. Thanks! And I'll update ya later.
Good luck. Happy Holidays and New Year.
No need for guesswork or hope. Measure the thread pitch and diameter yourself. I assume it's an EU-built machine so measure in metric.
Thread pitch = the distance between threads
Thread diameter = the outer diameter of the male part.
Those are the specs you need. They're marketed as diameter x pitch. i.e. a 12x1 metric nut is 12mm diaameter with 1mm thread pitch. Bolts also specify a length.
Then go looking for the part you need. That "technician" sounds lazy/unmotivated to me.
An engineer used to this sort of technique will measure and remove and source the needed item.
I know for sure measurements of the item as precaud suggests would be WAY beyond the scope of most of us 😊😂🙏
Really? All you need is a ruler and calipers.
Thread gauges... that's what they are for ... any machine shop should have a bunch.
TomP
If I can get it loose...thanks.
I’m so so sorry. That’s a beautiful mill. Can you Google that mill and check Reddit for comments? They are a source of infinite posts on arcane topics.
I’ll see if I find anything also. 🙏
Haley3, sorry to read of your problem. BTW, this makes no sense
technician felt it was impossible because the threads are different.
First, every screw has a certain diameter ( meaning how wide it is ) and a number of threads per inch ( meaning how close the individual threads are to each other ). There are several set of standard screw sizes - metric and imperial ( US ). For example, in the US, it is standard to see a 1/4" diameter screw with either 20 threads per inch or 28 threads per inch. In the rest of the world, they primarily use metric, so the diameter and threads would be different, but it is easy to source any of those standard sizes, even at a Lowes dept store, or online. Even if for some extraodinary reason the thread is not one of the standard metric or imperial sizes, any competent machine shop can make a new screw in a size and threads per inch to match the original. So if he said it is impossible, I disagree.
My suggestion is you search around you for a machine shop willing to tackle a small project like this. They will have the equipment to remove the stripped screw and measure it and replace it. While nearly any machine shop can handle that job, it may be tough to find one that is willing, because they normally handle much bigger jobs.
If you can't find a shop who is willing to do it, check on facebook to see if you can find a hobbyist who is willing to tackle it. If you were local , I would do it for you. Any hobbyist with a metal lathe likely has a great deal of experience in removing stripped screws, I know I do. And as Tom says, any hobbyist with a metal late will have gauges to allow them the measure and deternine the right diameter and threads per inch to ensure the replacement is correct.
He’s in Iowa . She doesn’t want to ship this huge huge heavy mill.It would make no sense to expect the Mock Mill tech to fix it.
I sent a link to her local listings and made the suggestion you made. It will all come right in no time with little trouble.
Glad we have jointly likely found a solution. 🙏
bolts and all it did was shave the outside making it more smooth than it was. So I'm giving up on that idea...
that the right person with the right tool will get you squared away. Have a Happy New Year getting your stones turning.
“ leave no stone UNturned “ 👍🙏