In the strictest sense, sourdough is the result of naturally fermented flour from grain (usually either wheat or rye) that achieves a symbiotic relationship between lactic acid bacteria and yeast that is used for the purpose of leavening bread.
The advantage of this “natural” process is the acidification of the dough which adds flavor, reduces phytic acid, and slows amylase enzymes effects on starch (especially in rye breads). It is difficult, if not impossible,to make an edible high percentage rye bread without acidifying the dough.
Modern bakers yeast eliminates the relationship between the yeast and bacteria and allows bread to be leavened with only yeast, resulting in less digestible, less wholesome bread.
Below are some of the many ways fermentation and acidification of dough can be achieved to make naturally fermented easily digestible bread.
I intend to update and append this list as better, and additional links are brought to my attention. The purpose of this list is to have a single source of as many fermented options for making bread as possible available in one place.
Some Terms Defined A great primer by Mini Oven
Basic Sourdough Starter A tutorial for starting a traditional sourdough by gaaarp
Pineapple solution to basic starter by Debra Wink
Sauerkraut no stir sauerkraut quick-start a semi-traditional sourdough by Mini Oven
NMNF (No Muss No Fuss Starter) An alternative to a traditional sourdough by dabrownman
CLAS Concentrated lactic acid sourdough instructions and links by Yippee
CLAS in a thermos How to make CLAS without a proofing box by joe_n
FLAS flourless lactic acid sourdough compilation by GaryBishop of info from Mariana
Flavored LAB My personal favorite quick fermenting sour for rye breads
Don't be a Hostage How to avoid discards!
I've been reading for years about the health benefits of fermenting foods. Some foods are eaten in their fermented state, supplying the body with probiotics and diversifying the flora in our digestive tract, while others, like LAB bacteria in bread, benefit us by acidifying the dough, removing Phytic acid and predigesting the proteins and starches of the flour, making the nutrients in the resulting bread more readily available.
To be honest, I really don't care how good something is for me if I don't like the way it tastes. I've always thought (despite our propensity for sweet, salty, fatty foods) that if I liked something (after giving it a fair chance) it's probably good for me.
I bake, primarily, wheat/rye bread. Anywhere from 30 to 50% ryes, to be exact. I bake other bread, but that is my go-to, don't give it a thought bread. One of the first things I realized when I started trying to bake rye bread was the need for a fermented starter/sour. I say realized when I should say after ruining about 50 loaves of bread trying every other option, following old-time and online recipes that relied solely on yeast.
While I've kept a sourdough starter alive for a few months in the past, I found the daily feedings - refreshments and discards really didn't fit into my lifestyle, so I gave up on rye bread for several years until I retired.
Now, with time on my hands and enough flour, grain and malts to start a small bakery, I started on my journey to make the perfect deli rye bread. Not the kind you find in the store, but the chewy, fragrant, long-keeping ryes of my imagination that taste best with cream cheese, a hearty bean soup or corned beef.
My solution is one of the links above, but I realized that many other bakers have been on a similar road to mine and there really wasn't a single source to explore the options.
With your help, I hope this thread will supply future bakers with all the options they need to find the sourdough system that works for them.
Thank you for the exceptional help you have all provided to me, and for whatever you can do to make this a resource for future bakers.
In for content.
I believe "healthier" is relative when discussing bread. I'm going to poke the bear and pose a question:
Is a 100% white flour sourdough bread healthier (read: more nutritious) than a 100% WW yeasted loaf?
Phytic acid has some anti-cancer potential that, for some, may outweigh some of its other negatives.
Probably very few TFL members have advanced degrees in nutrition, so we are at a disadvantage and are offering our own biases.
I will say that whatever bread you want to eat is the one you should make!
While most healthy adults are not harmed by the levels of phytic acid in whole grain, they benefit from its reduction. Phytic acid therapy (if it was ever approved) would be like chemotherapy - not something a healthy person would want or need.
One does not need an advanced degree in nutrition to benefit from the advice and research made by those who do made freely available online.
A more accurate comparison is not your white flour vs whole wheat comparison, but white flour to white flour. Sourdough breads (made from white flour) have been shown to be safer for people with gluten intolerance and more digestible, the acids produced by LAB alter the gluten.
‘Finally, to your point “whatever bread you want to eat you should make” this thread is obviously aimed at those who want to make naturally fermented breads. I look forward to your contributions with that understanding.
I consider sourdough one of many tools in my toolbox to achieve a desired outcome. I also use IDY when I want a different outcome. One can extol the virtues of SD without denigrating yeasted breads as less healthy, or less flavorful, etc. That's what I meant by whatever is a person's bread preference. I have made SD breads that did not meet the flavor criteria of others (didn't taste right as toast with jam).
And it really is unnecessary to use quotes when discussing someone's statements. I never said phytic acid is a cancer cure and there is nothing wrong with scientists testing a theory to see if it has merit. And we could trade journal article references all day long supporting one position or the other and never come to an agreement. There is a lot we don't understand about how food interacts with our bodies.
With that said, I will offer some SD info.
I have a 100% rye sour culture that is almost NMNF. Vaal lives in the fridge and I generally only feed it once every two weeks. But I have also really abused it, once not being able to feed it for six weeks with no apparent negative effects. I feed 1:10:10 to a total of 100 g. I could probably maintain it at a lower level if I wanted. I was reluctant to create a SD culture because the maintenance that is often described seemed like too much work. I have found it very easy to maintain and I'm glad I have it.
I use it mainly for high% rye doughs, but I also have used it in other breads, including King Arthur's Do-Nothing Sourdough.bread. In the latter I used it unfed to make it as Do-Nothing as possible.
How is your procedure different from the NMNF method as described by dabrownman?
…How I Learned to Stop Worrying and Love the Starter.
My initial experience with sourdough many years ago and reading the various ways others maintain a starter made me hesitate to create a new one. I didn't want to feed every day (or twice a day) or have deal with huge quantities of discard. But I wanted to make high% rye breads, and the only way to do that seemed to require some sort of acidifying culture.
My sourdough starter is really nothing special. It is a 100% hydration rye culture created using the method described by Stanley Ginsberg in The Rye Baker. It took about a week to prepare the mother culture using organic whole rye flour and then from that a maintenance culture.
I don't bake SD exclusively, so I feed the culture about every two weeks with a 1:10:10 (culture/water/flour) regimen. I refresh to 100 g, but I think I could go lower. I have gone as long as six weeks without feeding for reasons beyond my control. I doubt this is the upper limit on interval between feedings. I usually feed at least 24–36 h before I bake with it, but I have used it unfed in non-rye breads, too. I don't even worry about whether it is at peak, etc., when I use it in a rye bread.
What I have found is that this approach has made me feel much more relaxed about sourdough. I don't feel like I have to feed it all the time. This "no-fuss" approach may not work for everyone, but it allows me to enjoy baking that much more.
Struggling/Slow: Temperature? Sourdough at 70°F (21°C) or lower, will appear to be sluggish. Around 74-76°F (23-24°C) should increase fermentation activity. Hungry? Try adding whole-grain rye flour (more nutrients), and make sure it's getting fed when it's ripe.
Is it dead? Unlikely, unless it got too hot (temperatures over 120F (48C) are deadly to yeast. If it smells disgusting and has signs that mold (pink, orange, or green colors, white fuzzy spots, or sometimes areas that are darker with white areas on top) best to throw it away and start again.
Not sour: Sour bread flavor is developed in the preferment. Increase whole grains, keep it warmer (80°F/26°C) wait for it to be fully ripe before baking.
There is a thin, clear layer on top. You've (most likely) discovered “hooch” which is nothing to worry about. It might smell a bit like nail polish remover, or just very pungent. Just pour off the clear liquid and start feeding again as usual. If this happens often, you're starving your pet and need to feed it more often.
Water? While any drinkable water is safe, most tap water is chlorinated and your beasties will thank you for leaving the water out to breathe (degas the chlorine) before adding it to the mix. Rarely (but it's happened) tap water can have beasties that contaminate a sourdough - filtered or bottled water will fix that.
Failed a float test? Unless you've got a white flour starter, it most likely doesn't matter, and even if you do if everything else is happy and healthy it still may not matter.
Troubleshooting sourdough bread. Abe's helpful advice.
I’ve cut and pasted the text since it is a link outside this site:
https://bake-street.com/en/how-to-make-stiff-sourdough-for-panettone/
MATERIAL WE’LL NEED FOR THE WHOLE PROCESS:
Ingredients
FIRST DAY:
SECOND DAY:
THIRD-FOURTH DAY:
FIFTH DAY:
SIXTH - FIFTEENTH DAY:
Instructions
FIRST DAY
SECOND DAY
THIRD - FOURTH DAY
FIFTH DAY
SIXTH DAY
SEVENTH - FIFTEENTH DAY
That is a helpful post, thank you Ron.
Benny
like lievito madre work for sweet breads.
I've found several sources that suggest that a stiff dough and an anaerobic environment promote less acidic dough and increased CO2 production.
To test this I recently made 50% sourdough and vacuum-packed it. After 3 days the gallon bag that held the 200g of dough had expanded quite a bit. When I cut the bag open the dough was not the least bit sour with just the slightest hint of alcohol. I then used the dough as a starter for a great Pizza!
.
https://www.ncbi.nlm.nih.gov/pmc/articles/PMC7278618/
“it can be concluded that baked wheat goods produced with sourdough have the potential to decrease immunoreactivity and can be tolerated well by patients with moderate gluten intolerance.”
“Based on hereby research it can be concluded that the use of sourdough in bread has the potential to increase the inhibition of α-amylase activity (in the range 10%–90%) and as a consequence, slow down starch digestion. This suggests that sourdough bread is more suitable for diabetics.”
Consuming products with high levels of IACE may be beneficial for people suffering from hypertension. The average ACE inhibition of the samples without digestion was 93% and after digestion 59%.“
The indigestible sugars broken down by fermentation (inside or outside our bodies ;0).
NIH
Another reason to preferment your bread dough
I don't need to eat a low FODMAP diet as I'm not susceptible to digestion discomfort when eating these foods apart from one - Rye! That's why I keep Rye (say that fast) to a minimum. Just a treat every now and again. But it does cause discomfort sourdough or not. I'm wondering if there was a rye sourdough method which depletes these sugars enough to make it more digestible. So far the benefits are minimal. I do like Rye and it would be nice to have it more often. Ideas welcome.
P.s. my reasoning why Rye disagrees with me is guesswork. I'm fine eating beans and barley (both high FODMAP foods) yet not Rye. So there may be another reason altogether.
P.P.s. bean flour in bread is very nice.
Might have something to do with Rye being a problem ...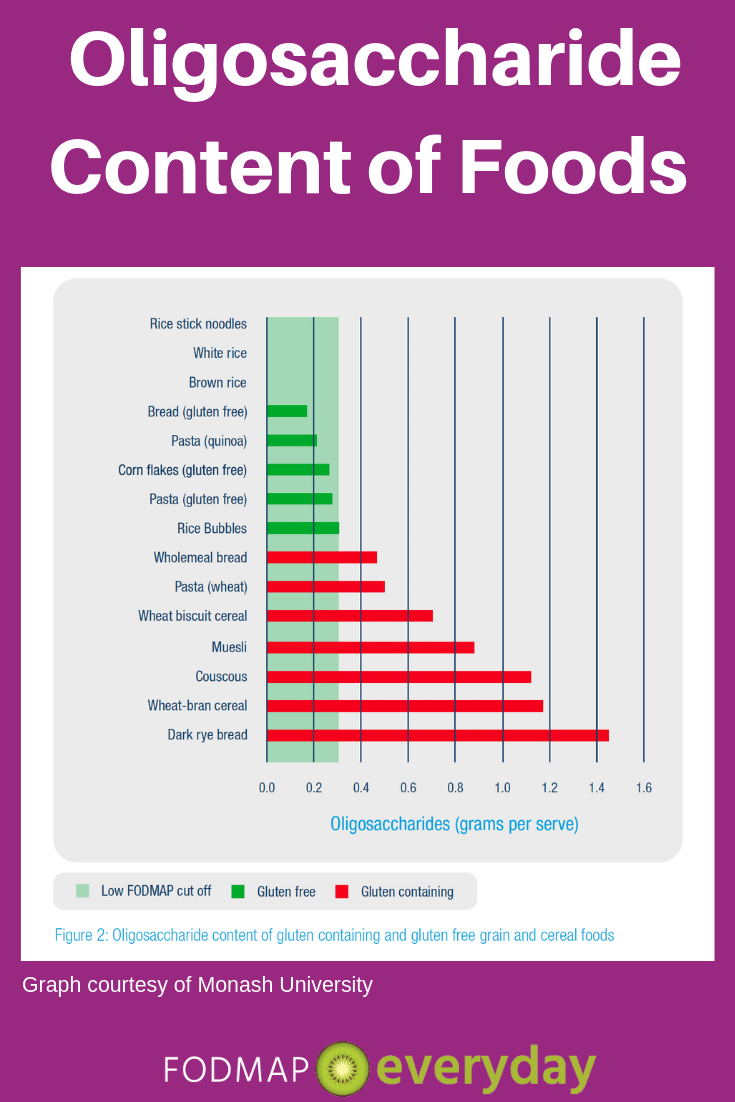
Legumes do seem to have a much lower oligosaccharide content than rye:
https://www.researchgate.net/publication/228696683_Oligosaccharide_Content_and_Composition_of_Legumes_and_Their_Reduction_by_Soaking_Cooking_Ultrasound_and_High_Hydrostatic_Pressure
Sometimes it’s the.FODMAPs <<===Link<<
“ People who are sensitive to FODMAPs have noticed various levels of improvement when they eliminate another ingredient from their diet: gluten. Why is that so, given that only people who have celiac disease are known to be sensitive to gluten? The reason is that foods contain different compounds. Intolerance to grain-based foods, such as bread and pasta, is not because they contain gluten but because they also contain FODMAPs.”
The last two times I tried to make a fresh batch of CLAS, they failed, so I returned to my original instructions (copied from the Rus Brot blog) and realized what I was doing wrong. This is an anaerobic fermentation, and I am leaving almost 3/4 head space in a quart jar - WAY too much air. Tried again with a pint jar and an airlock. Viola, problem solved.
Super link provided by GaryBishop
A must read!
Debora Wink Interview about sourdough starters
Can I Store My Sourdough Starter?
Yes, it's safe and possible to store your sourdough starter if you want to take a break from baking bread. You can store your starter for short periods (up to a week or two) in the refrigerator, or months by drying it out, or even years by completely dehydrating it and saving the dried pieces in a sealed container.
Read through my guide to storing your starter for any duration →
What's the Best Way to Revive a Sourdough Starter From the Fridge?
Every sourdough starter is different, but for my decade-old starter, the best way to revive it from the fridge is to take it out and let it warm for a few hours on the kitchen counter. Then, give it a feeding with its typical maintenance flour. Let this mixture ferment during the day or overnight, then give it another feeding. Repeat this process, feeding it twice a day for two days. After this time, the starter should be strong and ready for baking.
Related to this, I always think of the fridge as a stressful environment for my starter. To bake the best bread possible, always take it out and give it a few feedings until it shows strong signs of fermentation consistently each day. While I know some bakers who can make sourdough bread using their starter from the fridge, mine has never worked in this way.
Microbes Present in a Sourdough starter
The exact microbes—lactic acid bacteria and yeasts—present in a given sourdough starter highly depend on how the starter is maintained: the flour used for feedings, the amount of ripe carryover, and the maintenance temperature. Several lactic acid bacteria species, primarily Lactobacillus sp., Leuconostoc sp., and Weissella sp., are most often present, in addition to yeasts, primarily Saccharomyces cerevisiae and Candida sp.