I started making 70% whole wheat sourdough last year and have ended up with a loaf that tastes pretty good, but doesn't look great or get a good rise. I'm not sure what I'm doing wrong (and I'm mostly self-taught) so I thought I'd just post my whole process here (along with photos) and ask for feedback! Thanks in advance for any advice you have.
This is based on the New York Times version of Tartine sourdough. I use a starter that my uncle's family has had for generations—it lives in the fridge but I feed it weekly with a mix of whole wheat and bread flour, and feed it at least once before starting on this recipe.
1. The night before baking, combine 1 teaspoon active starter, 66 grams warm water, and 66 grams bread/WW flour mix
2. The next day (~12 hours later), combine 100g leaven with 350g warm water and stir to disperse
3. Add 500g flour (I use 150g white bread flour, 75g rye flour, and then about 137g each of whole hard wheat flour and bolted hard wheat flour; I use all flours from a local mill, Castle Valley Mill in Pennsylvania, except the white bread flour is King Arthur), mix with hands until dry flour is gone, and let rest 30min covered
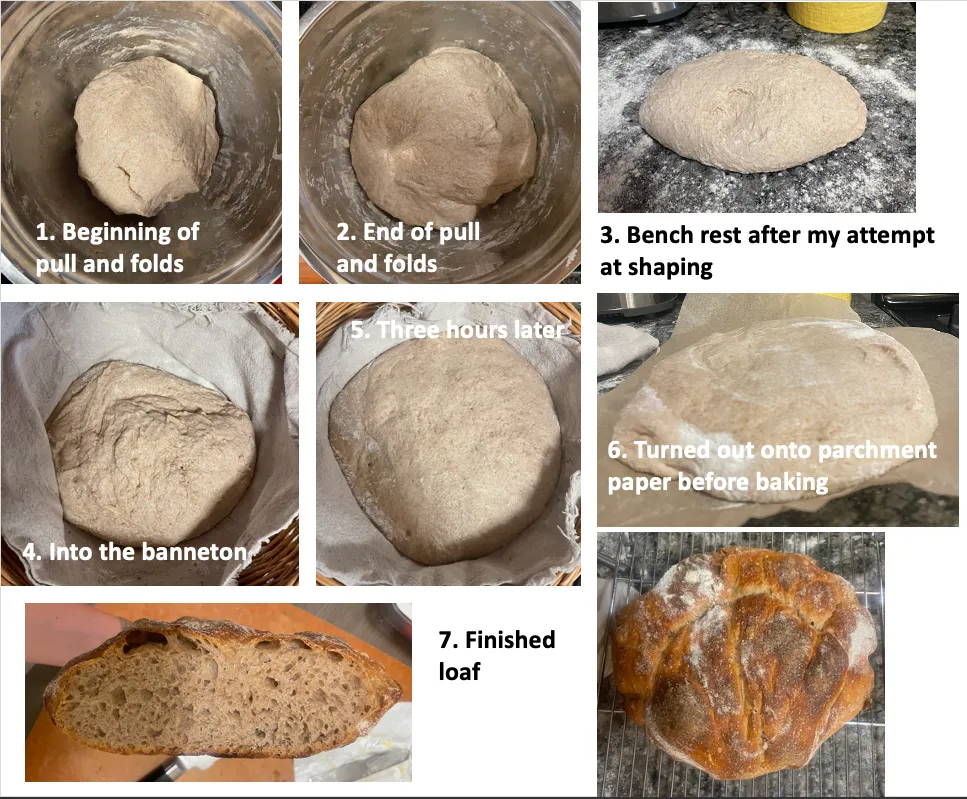
4. Add 10g salt and 25g warm water, mix in with hands, and cover. At this stage I move the dough inside a turned-off oven which is probably around 80F. I then pull and fold every 30 minutes for the next 2 1/2 hours (3 hours total, 5 pull and folds I think?) and by the end the dough has noticeably expanded. I use wet hands to handle the dough so a little more water gets incorporated each time
5. Transfer to a floured surface, stretch dough as thin as possible, fold in three like a pamphlet, and roll into a tight ball. I then try to roll and shape the ball to build surface tension following various videos I've seen, but I think I'm pretty bad at this (and it's hard to do without the dough sticking to me). Let rest 30 min (at the end of this the dough has usually flattened considerably)
6. Line a banneton with a cloth and flour generously. Transfer loaf seam-side-up to the banneton, cover with a towel, and let rest in the turned-off oven for 3 hours
7. When close to baking, move the loaf somewhere safe and heat a Dutch oven for at least 30min at 500F
8. Turn the loaf out onto a sheet of parchment paper (I don't love doing this because it gives it weird wrinkles while baking, but it's easier for me than turning it into the super hot baker) and cut it with a razor blade. At this stage the loaf is usually very billowy and airy, but also flattens like a pancake when turned out of the banneton
9. Transfer to Dutch oven; drop oven temperature to 465; bake for 20 min covered and then 20 min uncovered.
You can see the results of all this in the photo; bread that tastes great, but doesn't look remotely close to what you'd get in a bakery! Any tips for getting a better crust, rise, ear, etc.?
In the AM when you look at your refreshed starter, what do you see?
Lots of tiny bubbles. It expands in size substantially (maybe 3x the volume?) but never has the huge, soapy bubbles I see in other people's videos.
That's looks pretty good for a 70% WW SD! I would be very satisfied with that loaf.
Thank you!! I so appreciate that!
In step 8 it flattens like a pancake which means that your step 6 is too long.
Shorten its final proof to 2 hours and see if the dough holds its shape and doesnt't deflate when you take it out of its banneton onto parchment paper. If not, shorten step 6 even more until it does.
Thank you!!! Will do!
You have 3 issues. 1. You need to keep working on your shaping and creating more surface tension. This will help with you overall appearance and rise. 2. Not sure what you are using for scoring or what method but if scored incorrectly you will effect the final shape. There is a great tutorial on this site from David Snyder that you should check out.
3. It looks like your dough is over-fermented and you should lessen the amount. Also depends on what temp you are using for your final fermentation.
All will come with practice and the good thing is it still tastes good 😊
Thank you so much! I will work on my scoring and I appreciate the tip... I definitely am not doing it right. Did you mean lessen the amount of time, or of leaven/starter?
You need to reduce the amount of time for your bulk rise and/ or final rise. You can also check out some if my posts and try my method if you want. I always use an overnight bulk rise which works for me perfectly.
That part of stretching as thin as possible:
"5. Transfer to a floured surface, stretch dough as thin as possible, fold in three like a pamphlet, and roll into a tight ball."
Was that in the NYT recipe? I don't remember seeing that in the two Tartine bread books by Chad Robertson. "Letter fold" - yes. "thin as possible" - I don't remember seeing that.
In your previous post, you gave a link to the NYT formula, but it's behind a pay-wall now.
--
I also concur about it looking overfermented.
And the crust says to me it might be over-hydrated.
Anyways, looks like good progress from your previous post.
So, congrats.
Thanks so much for remembering, that's very kind! The NYT recipe has two steps to build surface tension. The first, before the bench rest, says:
Fold the cut side of each piece up onto itself so the flour on the surface remains entirely on the outside of the loaf; this will become the crust. Work dough into taut rounds.
The second, after the bench rest, says:
Dust rounds with whole-wheat flour. Use a dough scraper to flip them over onto a work surface so floured sides are facing down. Take one round, and starting at the side closest to you, pull the bottom 2 corners of the dough down toward you, then fold them up into the middle third of the dough. Repeat this action on the right and left sides, pulling the edges out and folding them in over the center. Finally, lift the top corners up and fold down over previous folds. (Imagine folding a piece of paper in on itself from all 4 sides.) Roll dough over so the folded side becomes the bottom of the loaf. Shape into a smooth, taut ball.
I guess what I wrote was a mix of that and what I saw in videos about building surface tension. I've been struggling to figure out how to build surface tension from the NYT instructions. I'll try to avoid getting the loaf so wet when I'm handling it next time for the overhydration, and will shorten the fermentation time!
But if you ever get discouraged, try teaching someone who has never tried it before. You will realize that you have already developed quite a bit of skill.
I think you're right. I really appreciate the encouragement.