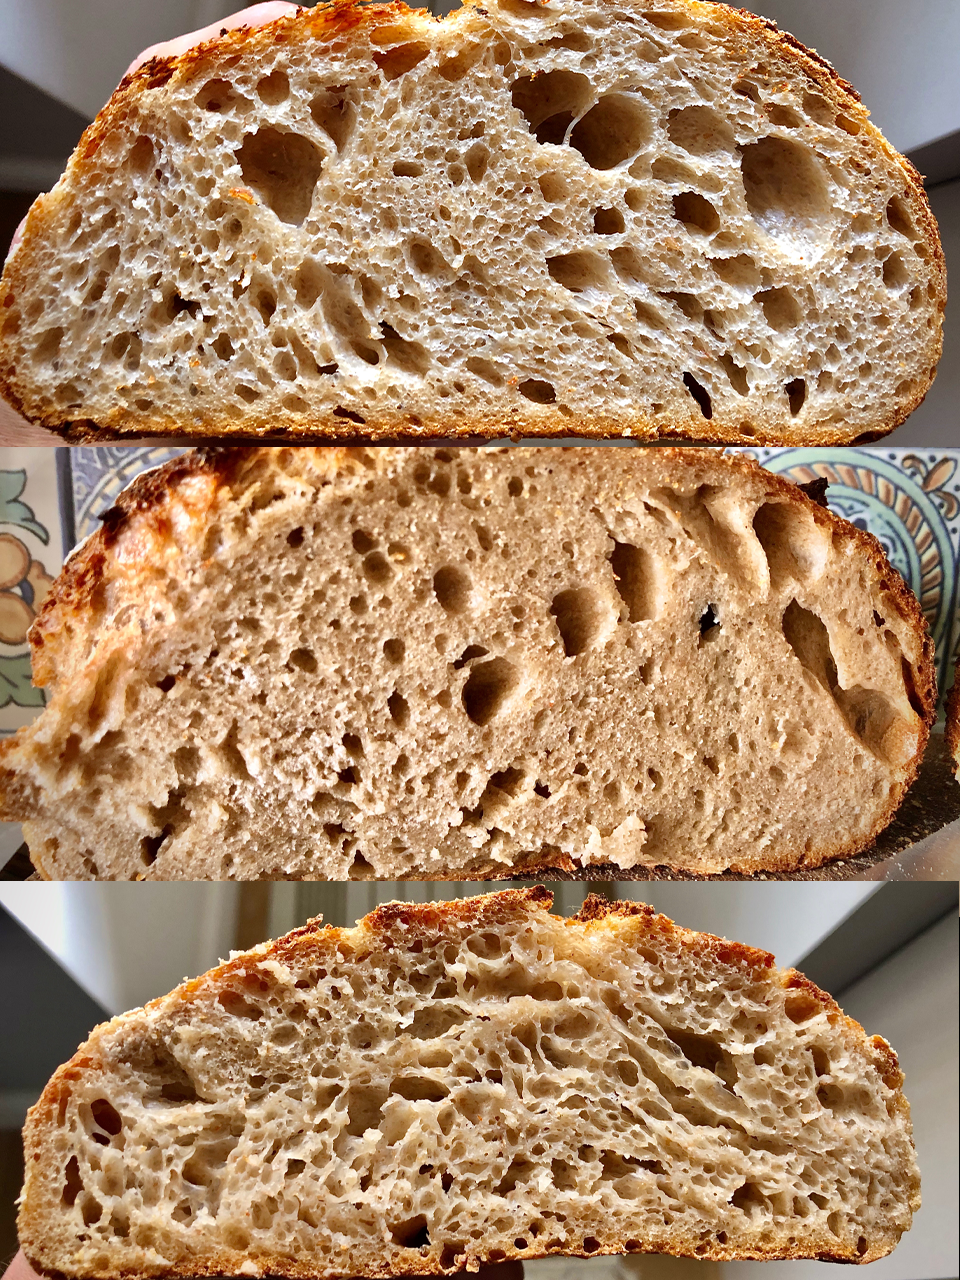
Hey everyone! I've been actively learning to bake sourdough for the past month and got my share of loaves with all kinds of proofing gone right and wrong, and wanted to share crumb photos of 3 loaves with the same recipe (about 75% hydration, 85% AP flour, 10% whole wheat and 5% rye) but different proofing — one just right, another clearly underproofed, and the last one clearly overproofed. Hope it helps another beginner like me!
Just right — the one at the top — is easy to recognize by looking between the big wholes. The "smaller" bubbles comprising most of the loaf are still clearly visible, making it airy, light and very pleasant to eat.
Underproofed — in the middle — is characterized by super-dense crumb between the big holes. The crumb is gummy and can be undercooked in places because of the density. This is the most common type of crumb beginners make (myself included).
Overproofed — the last one — didn't get any oven spring, so it's quite flat, and you can see that all the bigger bubbles collapsed, leaving only smaller ones. The texture is still airy, and despite flatness, it's as delicious as the one with the right proofing, even if not as instagrammable. That made me realize I shouldn't be afraid of overproofing!
very helpful, looks like im always underproving then.....
just got another one on the go, done a few stretch and folds, now leaving it to BF, its been around 5 hours and i really dont have much of an idea when itll be ready to pre-shape. previously id maybe have called it about now.
theres a big bubble or two on the top, but no real sign of any expansion, or bubbles on the bottom or side. i think ill just gamble and leave it another 3 hours maybe, then thatll leave enough time to pre-shape, shape, then stick in the fridge overnight.
What helped me is making photos of the dough in a transparent container from the side (when its relaxed, not after a fold), and then comparing them. The volume needs to increase by 30-50% for a proper bulk rise. Also, once I got proofing right at least once, it became much easier to judge by touch and feel — the dough gets silky smooth and feels very light. Also, it helps a lot to do the same recipe over and over so that you only change one variable (proofing) instead of guessing what went wrong with a different hydration/flour every time.
Hiya! I appreciate the photos and your comments. Can you provide a few more details about your process regarding times for bulk and proofing, etc. I am curious about that and how it compares with some of the recipes I am using.
For the "good" loaf, I did a 8-hour bulk rise with 20% starter to flour ratio in an oven (slightly higher than room temp) followed by an overnight proof in the fridge. But generally I agree with the advice of not relying on comparisons because conditions differ a lot — starters have different levels of activity (younger ones are much less active), temperature during bulk is different (unless you have one of those Brod & Taylor proofers), flour is different, so what might be a perfect recipe for one person will be a disaster for another one. It's better to rely on look & feel when judging fermentation, and as far as I understand, that can only come with more practice. One good tip is to stick to the same recipe and do it over and over, so that you have less variables to control / worry about, until you get more experience — that's what I decided to do.
Thanks for the tip to do the same recipe over and over to get it right. It makes so much sense.
This is a very nice post. Well done. I'm sure many folks will find it helpful. And your advice to watch the dough rather than trying to replicate someone else's timings, and to make the same dough repeatedly, only adjusting one variable at a time, are both spot on. Thanks for a great contribution. - Jess
All the advice comes from Trevor J Wilson's book "Open Crumb Mastery", I just found it extremely helpful for myself as a beginner, so reiterating :)
i used my new-found info on watching the dough for this one, but it didnt really rise in the oven. i suspect a weak starter, but it rose in the BF and had bubbles almost all the way up the side, and i also saw little bubbles in the dough when i scored it.
ive tried comparing to your pics in the OP and the nearest i get is 'just right', but it obviously wasnt as it didnt rise well, plus it was a little gummy, as all of my sourdough seems to be. if it seems spot on during the BF and my handling/shaping all seemed to go well, what would prevent it from having a good oven spring?
any advice or suggestions on how to improve?
thank you
I get it; feels like you did everything right and you end up with a gummy loaf. I look forward to comments on how to prevent this. Mine too, seemed "just right" but something fell short. I made one tonight that didn't proof like I expected, I completed the process and baked anyway. The bake is beautiful! I am afraid to cut into it, for fear it sucks on the inside - HaHa. Good thing I am still practicing :-)