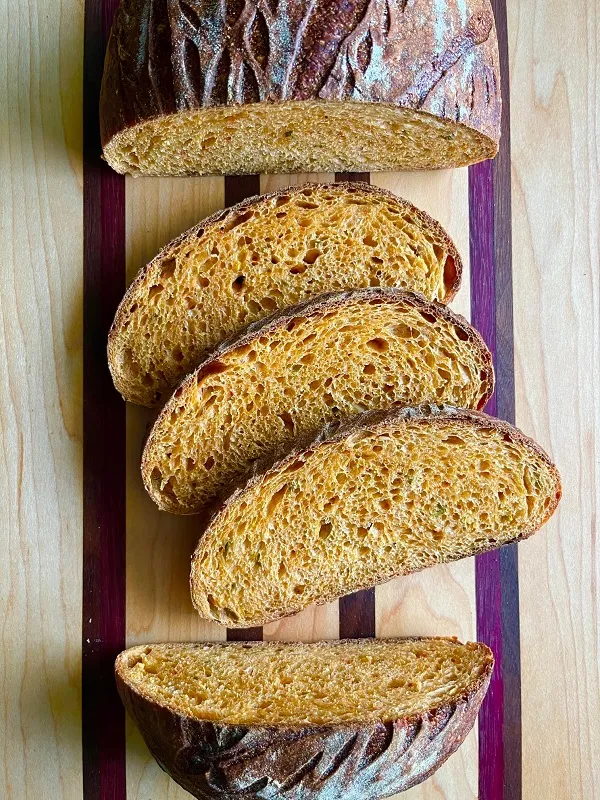
As the weather gets cooler, I find comfort in having hot rice porridge with savory sides. One of these sides is caramelized kimchi. I made it from the last quarter tub I had and reserved the juice/liquid, and the left over from the meal, I figured I should try caramelized kimchi and its juice in a test bake - having read about this on TFL (can't find the thread now). For a burst of umami, I used a little bit of fermented tofu liquid. :)
This loaf was devoured in less than a day! Now, I've run out of kimchi for another bake!
Sourdough with caramelized kimchi and scallions
Dough
90g water
70g kimchi water
5g fermented tofu liquid
100g starter ww:ap (100% hydration)
190g all purpose flour
60g Kamut flour
30g spelt flour
10g vital wheat gluten
3g salt (reduced here - kimchi, kimchi water & tofu liquid are salty)
5g light olive oil
Mix-ins
*caramelized kimchi with sesame seeds
20g scallions, thinly sliced
*Caramelized kimchi with sesame seeds
100g kimchi, chopped fine
25g sugar
25g rice wine vinegar
20g sesame seeds
Make the caramelized kimchi: Drain kimchi and then chop them into smaller pieces. Doing this will release more kimchi juices. Squeeze the juices out further (set kimchi juice/water aside). Weigh the chopped and drained pieces for the next step.
Heat a nonstick pan over medium heat.
Mix 2/3 of the kimchi with sugar, sesame seeds and rice wine vinegar in a bowl. Then, add these to the hot pan.
Cook over medium heat until the mixture reduces and the kimchi is sticky and browned in spots, about 6 to 8 minutes. Transfer to a bowl or plate and let it cool slightly.
Add the 1/3 uncooked chopped kimchi, and mix until combined. Set aside to cool.
These are notes I jotted while making this loaf, I didn't have time to bake the same night but the loaf's tanginess from the starter & kimchi was totally worth waiting the next day for. Also, my starter had passed its peak (no thanks to using atta flour!), so my timing could be completely different for the next attempt at this:
Mix flours, water, kimchi water and fermented tofu liquid. Cover and rest 60 minutes.
Add starter. Cover and rest 30 minutes.
Mix in salt, half the c.kimchi and scallions. Cover and rest 30 minutes.
Mix in oil, half the c.kimchi and scallions. Then stretch and fold, transfer to a lightly greased container. Cover and rest 30 minutes.
Stretch and fold - in the container or on wet (lightly) counter. Cover and rest 30 minutes.
Lamination. Cover and rest 30 minutes.
Coil fold. Cover and rest 30 minutes. Dough temp: 23.6°C
Coil fold. Cover and rest 30 minutes. Dough temp: 24°C
Check the dough for windowpane. Cover and let it continue bulk ferment for 1 1/2 to 3 hours until at least 50% increase in volume, bubbles on the sides of the container and the dough jiggles when the container is shaken gently. Dough temperature: 25.5°C
Preshape into a boule. Leave it seamside down on the counter, rest 30 minutes.
Final shaping. Shape into a batard (or boule). Transfer to rice-floured banneton, cover and place in a sealed bag.
Final proof: Room temperature 45 minutes (oven 23°C). 16 hours chilling in the fridge.
Preheat oven to 230°C 30 minutes before bake time.
Score the dough and bake at 230°C 25 minutes with steam/lid.
Remove the steam source/lid, reduce the oven temperature to 220°C and continue baking for 15 to 20 minutes or until the internal temperature reaches at least 97°C/208°F.
Remove the loaf from the oven and turn off the oven. Remove from baking sheet (or Dutch oven) and transfer the loaf back onto middle rack as the oven cools. Let the baked loaf cool for at least 3 hours (or overnight) before slicing.
8 Nov 2021 - I've tested the loaf again last week with onions and garlic in the caramelized kimchi. These made the kimchi so divine I ate a third of it before making the bread.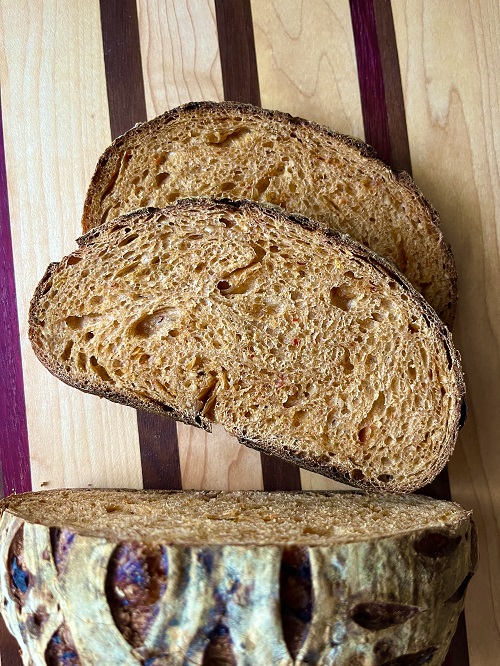
Look at the ridges at the bottom, that's me peeling fluffy shreds off the loaf :)
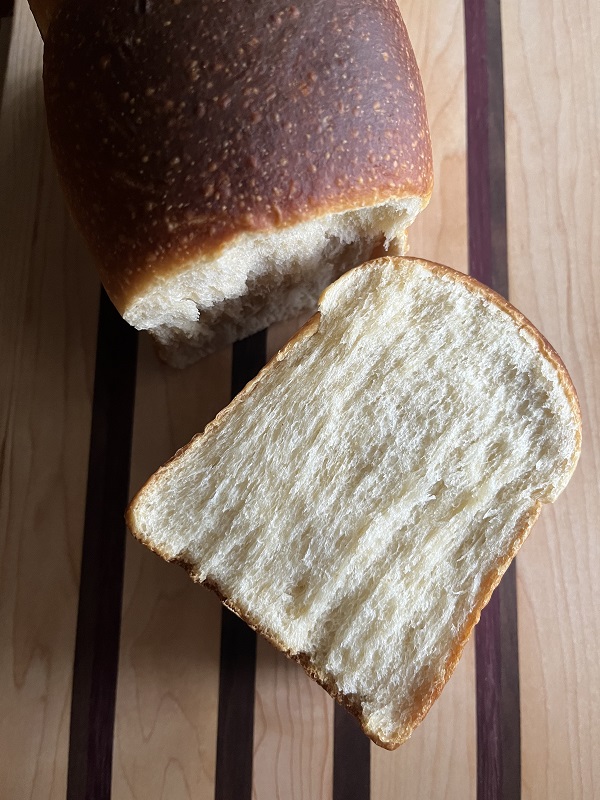
After the kimchi loaf, I was making AP+Kamut bread. With starter discard from the previous bake, I thought let's see if the 6-day chilled discard mix would make me sour milk bread. Not a hint of sour on the first one, probably because the instant yeast was doing all the work. Next, I tried using an 8-hour stiff starter that contained 50% atta flour with the same amount of sugar as the first loaf. This loaf turned out a little sour, not as white probably due to atta in the starter and more Kamut flour in the dough. The last loaf I tried, I sweetened the stiff starter and used only AP for it, it came out with a barely-there hint of sour and a lovely sweet crumb. :D 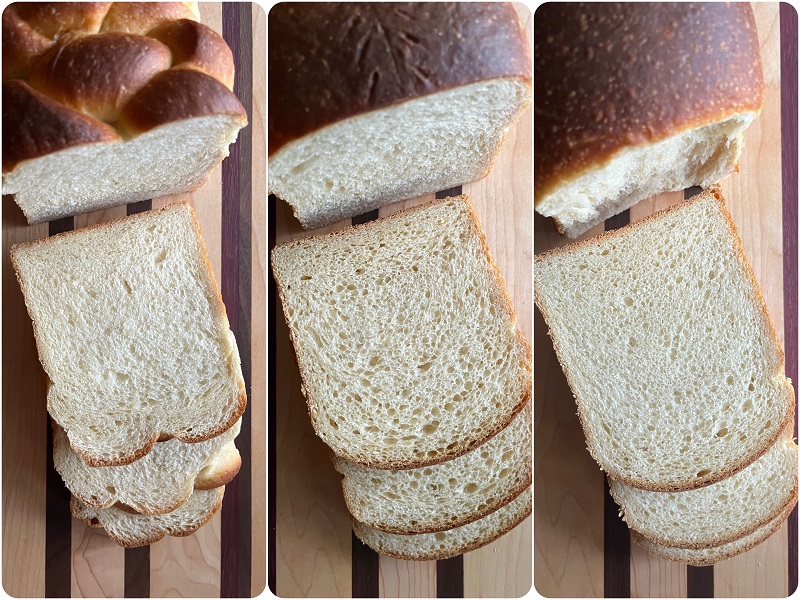
AP & Kamut milk bread with SD discard V1
Tangzhong
20g all purpose flour
100g milk
Dough
All of the Tangzhong
30g cream (MF35%)
45g milk
1 large egg
120g starter discard (100% hydration)
235g all purpose flour
5g vital wheat gluten
80g Kamut flour
2g instant yeast
20g sugar
6g salt
40g unsalted butter
10g olive oil
AP & Kamut milk bread V2
Starter
30g starter (50% hydration ap:atta)
70g water
100g all purpose flour
40g Kamut flour
Tangzhong
20g all purpose flour
100g milk
Dough
All of the Tangzhong
25g milk
30g cream
1 large egg
155g all purpose flour
5g vital wheat gluten
60g Kamut flour
20g sugar
All of the starter
6g salt
40g unsalted butter
10g light olive oil
AP & Kamut milk bread V3
Starter
12g stiff starter (50% hydration AP)
80g water
160g all purpose flour
20g sugar
Tangzhong
20g all purpose flour
100g milk
Dough
All of the Tangzhong
20g milk
30g cream
1 large egg
All of the starter
127g all purpose flour
5g vital wheat gluten
80g Kamut flour
30g sugar
6g salt
40g unsalted butter
10g olive oil
Moving away from bread, here's a very tasty gluten-free treat. 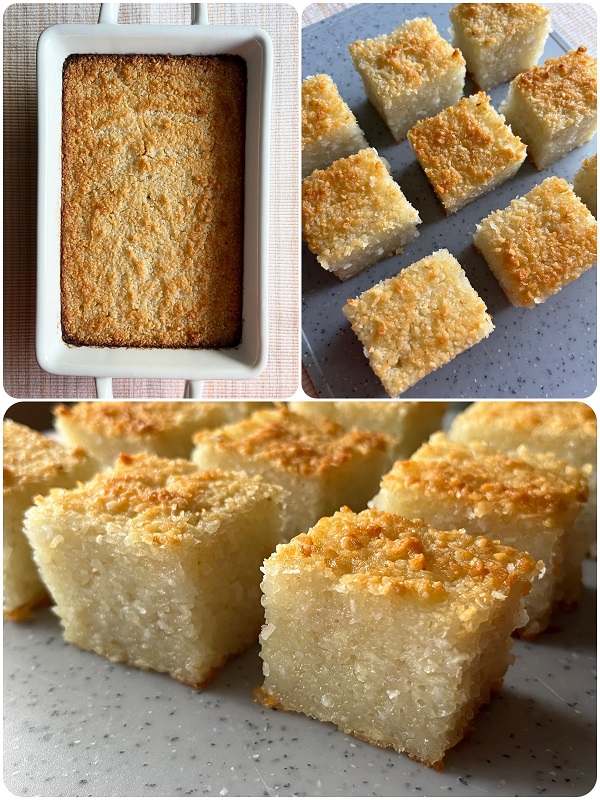
Of all the goodies from home, I miss bingka ubi (cassava/yuca cake) the most. It's very similar to cassava bibingka from the Philippines except, we don't include condensed milk in the recipe. We normally get this cake in markets, or cafes selling Nyonya or Malay cakes across Malaysia and Singapore. For my recipe, I chopped the cassava coarsely in a processor for extra bite together with the shredded coconut, you can see lil fibrous strands in the cross section. But, if you prefer a smoother cake, just grate the root with coconut to finer texture.
Bingka ubi (Malay cassava cake)
400g fresh yuca / cassava, grated
120g sugar
20g coconut oil
50g unsweetened shredded coconut
20g tapioca / cornstarch
1/4 tsp salt
1 large egg
200g coconut milk
1/4 tsp coconut extract, optional
Preheat the oven to 180°C. Grease a 9x5” loaf pan or 1/8th sheet pan with oil and line with parchment paper with an overhang.
Process 5cm/2” cubes of yuca/cassava with 3-4 tbsp coconut milk (from the total 200g). Transfer to a mixing bowl.
Add the rest of the coconut milk, and all the ingredients and mix until evenly combined.
Pour the batter into prepared pan and gently tap the pan on the counter to release air bubbles.
Use a spatula to even out the surface of the batter.
Bake the cake for 40 minutes. Remove from the oven and brush the surface lightly with coconut oil.
Continue baking for another 15 minutes until the centre is set and the top is golden brown. To test, a skewer inserted in the middle of the cake should come out almost-clean (it's starchy, it will only appear almost-set at this point).
Remove the cake from the oven, let it cool completely in the pan on a cooling rack before slicing. Lift it out with the overhang.
Like tapioca/boba pearls, this cake's chewy texture will change if it's kept in the fridge, hence the small batch enough to 2-3 days :D
8 Nov 2021 - made the same recipe in a quarter sheet pan for a thinner, crispier cake! 180°C for 45 minutes, gently brushed with coconut oil, continue bake 15 minutes.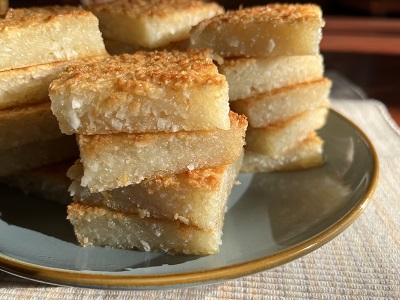
Usually only about 2/3 of a bag of cranberries gets used in our orange-cranberry sauce for Thanksgiving. So, the extras get into cakes. This year, I let these cranberries mingle with some blueberries and lemon zest. After making a semi-compote with half of the mixture, I made a small batch of pie dough (this same dough I use in tourtière, bakes up nice and flaky). Since the berries would not fill an 8" pie, they were turned into small galettes.
Mini fruit galette/pie
Pie dough with AP & spelt
- chill at least 45 minutes before use.
(Enough for 2x 1/8 sheet, 4x mini galettes)
130g unsalted butter, cold 2cm/1” pieces
170g all-purpose flour
20g spelt flour
10g cornstarch
16g granulated sugar
1/4 tsp salt
5 to 8 tbsp iced water with apple cider vinegar (120g water + 1/2 tbsp apple cider vinegar; I used 6)
Filling
Cranberry & blueberry
- mix everything except tapioca flour and butter. Reduce 2/3 of the mixture until it's soft and thickened. Then, fold in the uncooked 1/3 of the mixture and tapioca flour.
Zest of 1/2 lemon
100g fresh cranberries
200g fresh blueberries
60g sugar
1 tbsp lemon juice
1 tsp tapioca flour
1/2 tsp butter, small cubes or slivers
Cinnamon apple
- mix everything except butter.
1 apple, sliced thinly (unpeeled)
1/8 tsp ground cinnamon
A pinch of nutmeg
1 tsp lemon juice
30g sugar
A pinch of salt
1 tsp tapioca flour
1 tsp butter, small cubes or slivers
Strained apricot jam glaze (optional, post-bake)
Cream wash with 1/2 tsp sugar for the exposed dough.
Divide the dough. Roll into any shape (free-form pie after all), about 2mm for these. Dock the area in the middle of the dough meant for filling with a fork. Chill for 15 minutes.
Fill the dough with filling, fold the edges over the filling. Scatter butter over the filling and brush the exposed dough with cream. Sprinkle with sugar - this melts and forms a crunchy, sweet edge. Chill or freeze the assembled galette for 10-15 minutes while the oven preheats to 200°C.
Bake for 25 minutes. Then, tent the galette with foil and continue baking for 10-15 minutes until the crust is golden brown and filling appears bubbly. Let the pies
8 Nov 2021 - the last galette was an apple one!
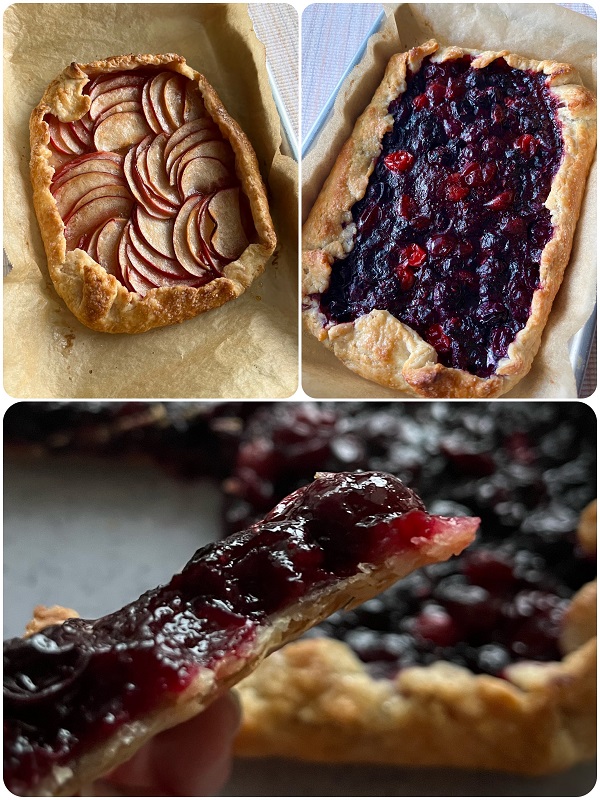
Here's a steamed cake (not a bake) that I enjoy from home as well:
This year I chose these small steamed cakes for our birthdays. They're normally prepared for Chinese New Year but, why not have Fortune cakes for other joyous occasions? :) I've made these with coconut milk and evaporated milk. Using palm sugar or Gula Melaka takes this simple cake into a whole other level (for the next CNY).
Fortune cakes/Huat kueh/Fatt gao
Adapted from https://www.huangkitchen.com/palm-sugar-fatt-koh/
Makes about 4 regular muffin-sized cakes
Preferment
50g all purpose flour
40g water
10g brown sugar (for white cake, use sugar)
1/4 tsp instant yeast
Sugar syrup
20g brown sugar (for white cake, use sugar)
20g sugar
30g water
1 x pandan leaf, cut into 2" pieces
Flour mixture
70g all purpose/cake flour
6g baking powder
50g coconut milk or evaporated milk
1/4 tsp coconut extract
A pinch of salt
Coconut oil (optional, brush on tops of steamed cake)
Matcha marble
80g of batter
Matcha paste (1/4 tsp sifted matcha + 1 tsp coconut milk)
Preferment: In a large mixing bowl, mix all-purpose flour, instant yeast and sugar. Then, add in water and mix until evenly combined. Cover with a damp cloth or clingfilm and let the mixture ferment at until bubbly and almost tripled in size, about 4 to 5 hours at 23-25°C.
Sugar syrup: In a medium sauce pan, bring water, sugar, pandan leaf to a gentle boil over medium heat. Stir the mixture and reduce heat to medium low until all the sugars have dissolved. Let the mixture simmer for 2 minutes. Remove from heat and strain the syrup, discarding pandan pieces. Set aside to cool to about 30-35°C.
Flour mixture: Bring water to a gentle boil in a steamer while preparing the rest of the ingredients.
In a mixing bowl, whisk together sifted all purpose flour, baking powder and salt. Stir in coconut milk until a thick paste forms.
Make the batter: Add warm sugar syrup and flour mixture into the fermented flour mixture.
Whisk to mix well, till a thick smooth batter forms.
Strain batter into a large measuring jug (this removes lumps in the batter). Use a piping bag or the measuring jug to pour batter into muffin molds until nearly full, about 2 mm from the rim of the mold. Doing this allows the cakes to rise higher and burst into it's characteristic bloom (hence its name "huat" or "fatt" for prosperity)
- To make matcha marbling, mix in matcha paste to 80g of batter. Then, spoon, pour or pipe matcha batter between dollops of plain batter.
Increase heat of the boiling water to high. Place the rack with filled molds over the boiling water in the steamer.
Cover and steam over high heat, for 15 to 18 minutes. Do not remove the steamer’s cover during the first 12 minutes. The steamed muffins are done when a skewer inserted into the muffin comes out clean.
Turn off heat and leave the steamed cakes in the steamer for a further 3 minutes. Then, remove the muffins to cool on a cooling rack. Brush the tops of the cakes with a little coconut oil while the cakes are hot (optional).
Alright, until next time, happy weekend!
- Christi
- Kistida's Blog
- Log in or register to post comments
My goodness Cristi, all your bakes and steams are so incredibly well done. Your kimchi loaf sounds and looks delicious. I love all the variations on the milk bread that you did as well. But really all of them are wonderful.
Benny
Especially your detailed steps in all your posts. Thank you for sharing so many wonderful recipes Benny :)
From time to time, I enjoy making non-bread goodies. One of these goodies is steamed carrot cake - I've attempted once with orange carrots but it never had the original turnip/radish taste. Pan-fried carrot cake is such a treat!
- Christi
You’re too kind Christi, I don’t think you’re learning much from me, your bakes are all showing a lot of skill. I’ve never heard of a steamed cake before but that sounds interesting.
Kimchi itself is not my thing but the colour of that loaf is stunning. Nice steamed cakes too. My wife used to make steamed cakes. She loves anything with a mochi kind of texture. My experiments with yudane are making breads with a chew she likes without going to mochi-ish for me. Lovely stuff!
I know I've saved one of Benny's recipe on this :D I've a question though, do you find making yudane easier than Tangzhong? I've tried yudane a few times but I didn't enjoy mixing a thick flour paste and there were lumps almost all the time. Yet, both methods produce soft, chewy bread which I like :D
- Christi
I guess they are just different.
The yudane was simple with fresh milled whole wheat... puffed up nicely. With buckwheat more of a challenge but I think super hot toasted flour plus boiling water was the mistake.
Any chance that your water is too hot? Take it down to 85-90c... ie 30-45s or so wait after boiling.
I don't think perfect mixing is necessary. I mostly fold in the water then cover in plastic and leave overnight to hydrate.
I always get so many baking ideas from your posts, thank you! Love these posts.
The cassava cakes, when you mean grate it coarsely for more bite, does that mean it is bitter?
Also love the kimchi bread idea, and it is amazing the vinegar doesn't destroy the gluten.
-Jon
I coarsely chopped them in a processor to get chunks in the cake to chew on. They did become translucent, chewy and there's a noticeable resistance as you bite or chew into it very much like a dense fruit cake. When it's still warm (I had no patience), it's soft, slightly gummy and doesn't produce clean cuts.
About the kimchi juice/water in the loaf, I did believe I will end up with a soupy mess that's why I added some vital wheat gluten. Maybe, the amount I used wasn't that damaging, :)
- Christi
Christi, Wonderful bakes! The caramelized kimchi is especially intriguing. I have sauerkraut fermenting right now, and it should be ready in the next week. That one has me thinking... :-)
.. assuming I’ve enough left to make some. I could eat it as a snack until my teeth melts! Do share when you’ve tested this!
- Christi
left in the fridge to make a loaf. (Although I have some well aged white kimchee.) Sounds like fun too! My husband thinks it ridiculous so I will be sneaking this one past him until it's done. The aroma of caramelizing might suck him into the kitchen like a moth to bright light. Don't see a need for extra gluten.
I have to confess I was nibbling on the bits of tangy sweet kimchi before preparing the dough. I’m wondering if adding some garlic or onion would be make it even better. Have fun!
- Christi
https://www.thefreshloaf.com/node/56523/korean-sourdough-boule
I recall replying to a comment about kimchi (or my old brain is tricking me) but thanks for sharing that delightful post Mini!
- Christi