
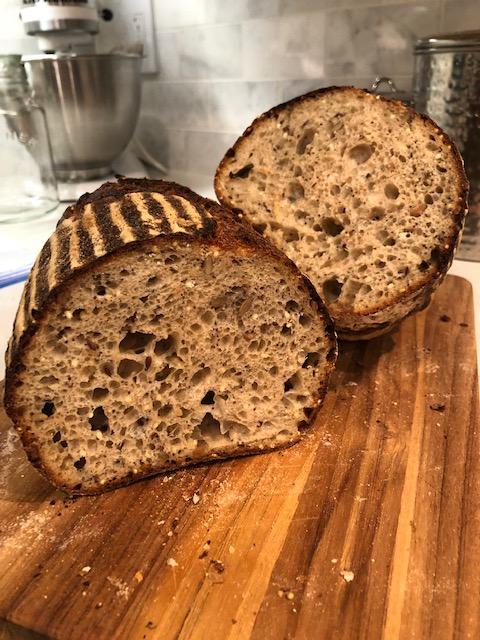
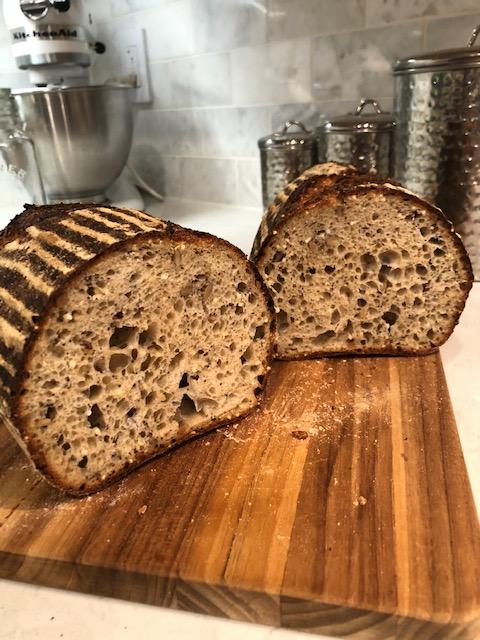
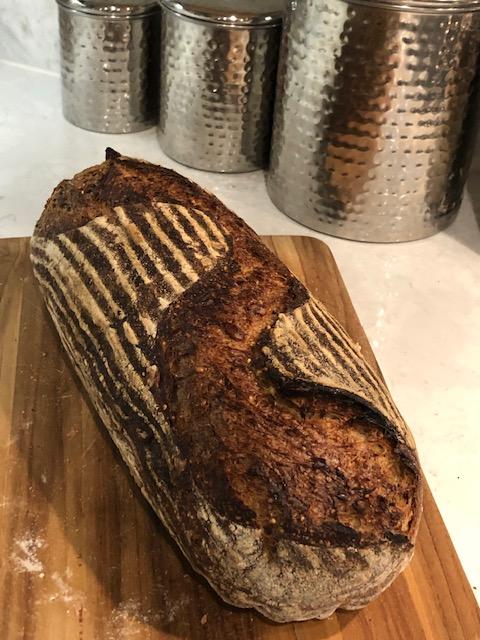
After many attempts, I finally achieved a light, (fairly) lofty seeded loaf, while utilizing a pretty high percentage of non-white flour. The first experiments were tasty but pretty dense. However, I will be cutting back on total volume next time as this dough literally filled the clay baker from edge to edge, resulting in...a torpedo! The texture of the crumb is divine...soft and springy without being gummy. I may have gotten even a little more loft if I had scored a little deeper--I think the crumb structure looks a little tight at the top. I never quite know how to score the longer loaves. Parallel slashes always result in broken bands across the top. Any advice on the best way to score this type of loaf would be appreciated--I may just let it do its thing next time and go for a 'natural' score. I used a long, thin clay baker, rather than a traditional batard or boule, in an attempt to make a more toaster-friendly bake.
Ingredients:
1:2:2 starter fed in the early morning (to double/triple in about 4 hours...will need 150 g fed starter for the dough)...I maintain a 60/30/10 starter mix of WW/AP/Rye respectively
365 g warm water (I used to use bottle spring water, but our tap water here is great quality, and I haven't noticed any change in my bakes since switching to tap)
300 g strong bread flour
135 g sifted/bolted Hard Red Winter Wheat (aka Golden Buffalo from Heartland Mills)
50 g duram flour
15 g dark rye flour (I used freshly ground since I had some berries on hand)
--total of 500 g flour with a 300/200 ratio
30 g honey
12 g salt
140 g mix of seeds (I used an eyeballed mixture of pumpkin, sunflower, sesame, poppy, flax and millet)
Enough boiling water to cover seed mixture by at least one inch
Day 1: Feed starter in the early morning (as noted above)
Around noon, mix the Autolyse ingredients (flour, water and honey), making sure no dry flour is visible, and let sit, covered, for 1 hour.
Immediately after mixing flour/water/honey, place the seed mixture in a bowl and pour boiling water over to generously cover and allow for absorption. Cover and set aside.
After one hour, spread 150 g of starter over the top of the autolyse mixture, and pinch into the top layer of the dough, then work in further by pulling small sections of the dough from the edge up and over the top, moving the bowl around in a circular motion. Continue this action (essentially mini stretch and folds) for approximately 5 minutes, to fully incorporate the starter; cover.
Rest 15 minutes.
Sprinkle 12 g salt over the top of the autolysed dough, and with wet hands, pinch in and then repeat the working in method from above, pulling small sections of dough from the edge over the center. Continue to work in for 5 minutes to fully incorporate the salt; cover.
Rest 15 minutes.
Complete 2 stretch and folds 20-30 minutes apart. After the 2nd S&F, rest 20-30 minutes.
Drain the seeds over a bowl, immediately after the last S&F, which allows excess moisture to drain out in time for the next step.
Complete a lamination of the dough on a lightly dampened counter top, using wet hands, stretching out the dough fairly thin without tearing. Spread about 2/3 to 3/4 of the seed mixture over the top of the dough, careful to not tear the dough. The mixture will be a little slimy from the flax seeds. Letter fold each side of the dough (right and left) so that all the exposed seeds are covered. Spread the remaining seeds over the thin strip of dough, then fold up the top and bottom over the exposed seeds. Cut away a small knob of dough, place in a fermentation jar (I use an old spice jar) flatten and mark the level. Gently lift the remaining 'package' of dough into a lightly greased 8X8 or 10X10 square, glass dish and cover. (Alternatively, I have also had some success just working in the seeds over the top of the dough while still in the bowl. The dough will kind of 'break' but will come back together with numerous stretch and folds. For me, the lamination method works better.)
Rest 45 minutes. Complete a series of 2-4 coil folds every 30-45 minutes, or until the dough feels strong and supple, then let rest undisturbed. The dough in the fermentation jar should rise around 30%-50%, which can be tricky to judge with so small a portion. Essentially, I try to make sure it doesn't double, in either the jar or the main dough. Under proofed is better than over with this dough. (In a 70-degree kitchen, I'm usually ready to shape around 6-7 hours after starting the autolyse.)
Sprinkle some flour around the edges of the dough in the dish, loosen edges slightly with a flexible dough scraper, and gently tip out onto a lightly floured surface. Gently shape as desired, careful not to deflate, and place into rice/flour-dusted banneton. Place the banneton and dough in the freezer for 15 minutes, then switch to the fridge for a cold 12-hour retard.
Day 2:
12 hours later, pre-heat oven and DO of choice (I use clay bakers) to 500F for at least one hour. Remove dough from the banneton onto a piece of parchment paper, score and bake at 500 for 25 minutes covered, reduce heat to 450 and remove lid and bake for a further 20 minutes. Turn the oven off and leave the bread in the DO for an additional 10 minutes. Remove to a cooling rack and cool completely, at least half a day.
- naturaleigh's Blog
- Log in or register to post comments
That is one good looking loaf of bread Leigh!! Crumb looks excellent as does the crust. I bet it is delicious as well, well done.
Benny
Thank you, Benny! It actually turned out to be one of my best/favorite bakes. The texture of the crumb is amazing...super light and springy. Wish I could share ;-)
It looks fantastic. May I ask what mold did you use to make this shape of loaf? It looks like the right size for what I need.
Thank you Ming! I used an oblong clay baker from Breadtopia (link below). I typically bake batards, but was trying to find a shape that would work better for toast, especially for this seeded loaf. Unfortunately, the coordinating cane banneton is actually a little larger, so the dough was pretty snug when I loaded it into the clay baker--I don't think I could have managed if I hadn't used some parchment. In my opinion, the clay baker needs to be a little wider.
I think I need to dial down the total grams in the dough a bit, perhaps by 20%, so it would fit better, but I kind of hate to do that since it takes the same amount of time to make it whether it's a larger or smaller loaf, and the recipe is a little more involved than my everyday loaves. Since it turned out so well this first time in this baker, and I'm not worried about winning any beauty contests for the loaf ;-), I may just leave things alone.
https://breadtopia.com/store/breadtopia-cloche-bread-baker-oblong/
Leigh, if you find that the banneton is a bit long for the clay baker, could you fill one end of it with something, say crumpled foil and then line it with a towel so that the length is shortened? Or, if you have a couche, you could use your couche to do your final proof on that way you can make your dough whatever length you want. Finally, you could do an open bake and steam your oven. I’ve recently started to do this and found that on advantage is that the crust seems to be thinner. Another advantage is that you can do a time lapse video and watch your dough rise and bloom.
Benny
Hey Benny! Thanks so much for the additional suggestions. The banneton is actually a little too wide for the baker (and I think the baker could be a smidge wider, but no one asked me about the pre-production specs, LOL) so the length wasn't a problem. I will think about an open bake since I have a pretty substantial baking stone and recently purchased a couche that I haven't broken in yet. The idea of a thinner crust is certainly appealing. I am still toying with scaling back on the total volume of the dough, hoping to have it sit a little lower in the banneton and not turn out so wide. So many experiments, so little time. Well, thanks again for all the great feedback...it is much appreciated!
Thanks Leigh for the link to the clay baker. I suppose that the cane banneton was the mold and the clay baker was the Dutch oven. Okay I guess I could use that clay baker as a mold too but it won't get heated in advance. Sorry I am a pizza baker so all these bread baking is a little new to me. Regardless, I would like to make French toast but I want the round shape rather than square, the reason I inquire about the mold after seeing your bread shape above which I really like.
Hi Ming...yes, the banneton is the 'mold' that the dough sits in prior to turning out and placing in the clay baker for baking. You can get an idea of how all that works together from the recipe above ^^. There is a bit of 'equipment' associated with bread baking, but not much different from pizza making I think ;-)
Just wow! Gorgeous loaf!