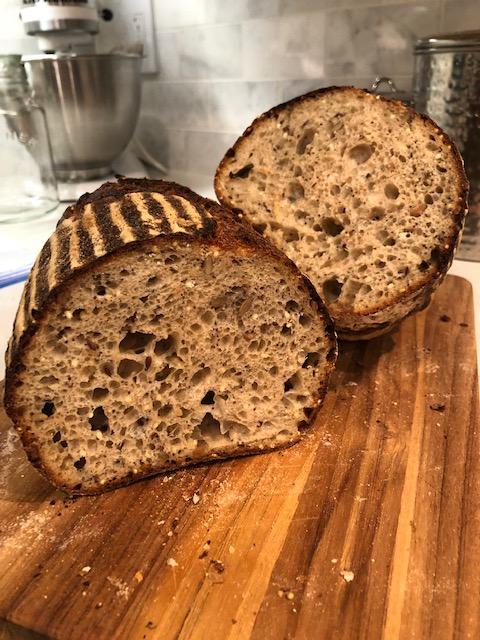
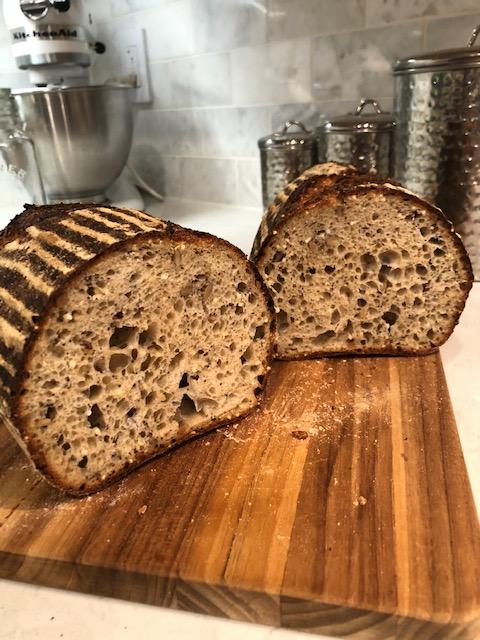
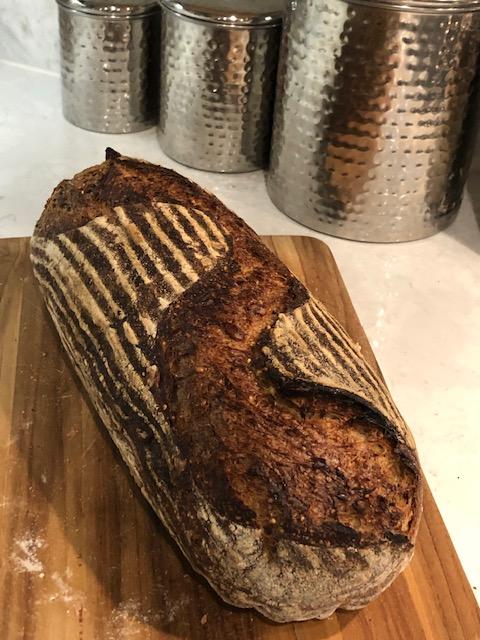
The Fresh Loaf

A Community of Amateur Bakers and Artisan Bread Enthusiasts.

naturaleigh's blog

naturaleigh's picture
naturaleigh

I started my first yeast water culture last weekend with a mix of dried fruit (raisins, dates and apricots...mostly raisins).  I didn't really know what to expect.  After four days, it looked like most of the fruit was floating and I had good fizz.  Some of the larger pieces of apricots and dates were still on the bottom but I had read that was to be expected (and made sense).  The 'test' starter was mixed up that evening and left in the cold oven with the light on over night.  It had nice activity by morning, having nearly tripled, so I mixed up a full levain that morning.  Three hours later it had tripled so I decided it was OK to bake with.

Wanted to make a 'normal loaf' bake first.  I used my 'standard' loaf recipe so I could evaluate everything fairly.  But, instead of using just 50% YW in the dough (subbed in for the called-for water) I went with 100% for some reason.  The final dough had a strange consistency, almost lumpy (mentioned in other posts here), resisted sticking together during shaping and was too sweet for a plain loaf.  The crumb was nothing special either.  It was a different kind of bake.  Not much aroma coming from the oven or the final bread, although the crumb was very tender, but almost too much so.  I'm assuming the heavy hand with the YW addition all played into this significantly.  Probably true with YW as with traditional sourdough starter...they should improve with age.  Evaluation of this inaugural bake: meh.  But, I'll try again next weekend with less YW subbed in for the water and see what happens. 

However, the YW pizza dough experiment was much more successful!  I used the YW starter and only used 50% YW in the dough.  Used my usual pizza dough formula, let it cold proof for 48 hours, rounded off portions, rest at room temp for around 1.5 to 2 hours, shape and bake.  The dough was very extensible and stretchy but still delicate.  It baked up lovely.  We all agreed it was probably the best pizza crust yet--thin but not floppy on the base, and soft, pillowy and puffy cornicione at the edge, with just the right amount of chew.  I will continue to cultivate the YW just for my pizza dough (if nothing else).  It was fantastic!

Sharing my adventures here since there seemed to be a some ongoing interest in YW.  Starting it was simple and maintaining it seems straight forward enough.  Thanks to all the info posted here by Jon, TrailRunner, et al...immensely helpful!

Strained yeast water: 

Strained yeast water

YW starter:

YW starter

YW Pizza!  (was a little heavy handed with the cheese)

naturaleigh's picture
naturaleigh

Tinkered with my Everyday Sourdough recipe by adding some freshly milled Kamut as well as incorporating some soaked Kamut flakes.  I was fairly happy with how this turned out given the fact that I let this dough go a bit too far during bulk ferment--trying to cook dinner while keeping an eye on fermenting dough continues to trip me up here and there.  During pre-bake research, I did note that several people stated Kamut tends to ferment quickly...wish I had remembered that last night during the bulk.  It stuck to the banneton on one side, just a bit. Sigh...

I'm going to try to stop bulk fermentation a little sooner with some of my next bakes and let the dough continue at room temp for a while as needed (after shaping and in the banneton) rather than trying to catch the 'perfect' fermentation stopping point, then rushing a bit to shape, place in the banneton and pop in fridge (which has been my usual routine).  Thinking this will provide some benefits as far as easier shaping and crumb (?) since there will be some time for the dough to 'recover' after shaping, before being placed in the fridge.  I think it should also be easier to babysit the dough since it is already in the banneton...just have to peek at it every so often then quickly tuck it in for the night once it has expanded a little more.

I had planned on rolling the loaf in some Kamut flakes before putting it in the banneton but forgot--multi-tasking dinner and two new dough recipes got the best of me.  I think this would help accentuate the Kamut flavor even more, and maybe might have helped with the sticking.

This is my first time using Kamut and I really like the flavor, even at only 25%--to me it tastes a little bit like a cross between oatmeal and cornmeal flavors.  It gives the dough a nice yellow tinge, somewhat akin to semolina.  The Kamut flake soaker/porridge adds some great moisture and texture to the dough.  I will definitely be incorporating more of this lovely flour into future recipes.

naturaleigh's picture
naturaleigh

I strayed from my 'usual' bakes this weekend and had some fun experimenting with some new recipes.  My jumping off point was a post for a sourdough loaf I saw a month or so ago on Breadtopia that used blue cornmeal.  That recipe called for freshly milled corn, which I didn't have, but I did have blue cornmeal in the freezer (which makes superior cornbread BTW). 

I had made another walnut loaf a while back but wanted more flavor punch, so I upped the amount of toasted walnuts and decided to add some toasted sesame seeds.  The sesame seeds seemed to disappear in the dough but really accentuate and compliment the walnut flavor.  The seeds and nuts were laminated in. 

I ended up halving the amount of blue cornmeal soaker called for in the recipe because it seemed like it was going to be too much and swapped out the white wheat for some sifted whole wheat that I've been trying to use up.  I also adjusted the bread flour/whole wheat flour ratio slightly in favor of more bread flour, in an attempt to lighten up the crumb and add some strength to what I knew was going to be a heavy dough, and added 30 g of honey.

Followed my 'usual' autolyse method with staged additions of starter then salt rather than mixing everything together at the beginning.  However, trying to pinch in the cornmeal soaker (at the same time as the salt) took quite a bit of mixing in and was a pain to get it evenly incorporated.  Wondering if it could just be incorporated during the autolyse or if the grittiness would impede gluten development too much...?  Would love some feedback/direction from anyone that has incorporated cornmeal into their bakes.

The toasted walnut flavor is really pronounced (in a good way) and the sesame and blue cornmeal flavors linger in the background.  I will try to increase the amount of cornmeal next time but will try to find a better method to incorporate it into the dough.  We cut into it tonight and it is really tasty--would be perfect with a cheese board (thinking some goat cheese and orange marmalade would be delicious...I almost added some orange zest to the loaf...maybe next time).  The crumb turned out pretty light, given all the add ins, and is super moist.  I let the loaf break where it wanted, which I thought was a better plan rather than trying to score it with all those walnut speed bumps in the way ;-)

Looking forward to some toast in the morning!

naturaleigh's picture
naturaleigh

This was an experiment with walnuts and some purple barley that I had on hand.  I modified my everyday loaf to incorporate the nuts and soaked barley during lamination (after an initial 2 S&Fs).  Although I nearly let the fermentation get away from me while busy cooking dinner last night, I'm happy with the crumb all things considered, not the least of which was the weight of the walnuts.  The areas of the crumb that have more purple are actually from the barley and not the walnuts (since those got toasted first).  The flavor is really nice and the crumb is quite delicate and soft.  The barley compliments the walnut flavor very well.  I will probably up the honey in this by 10 g or so next time, but, all in all, I'm quite pleased with how it turned out.  This should make some awesome toast or would be great with some cheese.  The inside looks lots better than the outside--I decided to go with a natural 'score' and let the loaf do what it wanted (baked seam side up) but the results were not pretty, which the bold bake did not improve...one of the homelier loaves I've ever made, so it gets bottom billing ;-)

naturaleigh's picture
naturaleigh

After requesting and receiving some nice feedback last time, I applied some good tips with, I think, better results in crumb and flavor.  Many thanks to trailrunner and JonJ! 

trailrunner's tips:  I didn't have a mister that I could use on food, so I just sprinkled in some moisture on the dried fruit before zapping it in the microwave for 30 seconds.  I decided to try orange juice instead of just water, which worked nicely; also used a couple teaspoons of cinnamon, sprinkled over the fruit after rehydrating.  This method worked much better as far as improving the flavor of the fruit and adding a bit of interest with the cinnamon.  

Per JonJ: I tried to make good contact between the dough and fruit during lamination, which I think helped with cavitation too.  I don't think the crumb was quite as custardy, but it was still moist and I like the better contact between the fruit and nuts with the dough.

The dough definitely seemed a little heavier, but I included a few more add-ins this time (raisins and walnuts in addition to the others, although I had to use dried cherries instead of cranberries since I used all those last time).  The tighter crumb will work better in the toaster.

All in all, a better bake as far as crumb and flavor!  Many thanks for the much-appreciated advice...so grateful for this forum!

naturaleigh's picture
naturaleigh

With the cooler weather I was tempted to experiment a bit with adding some dried fruit and nuts to my basic everyday sourdough loaf (with the addition of some honey).  If it turned out well, I planned on upping the whole wheat percentage on a subsequent bake (next week maybe). 

I should have let the hydrated fruit and nuts dry out a tad longer because I think they added some mini 'steam zones' within the crumb, resulting in some large holes.  However, instead of pulling moisture from the dough, they adding some to the crumb and I was super pleased with the resulting springy, custard-like texture.  The flavor is great as well.  I initially was going to use just dried apricots and pistachios but decided to add some dried cranberries and hazelnuts too, soaking the lot in some boiling water for a couple hours before adding them (drained) during lamination.  

I can't tell if the dough was slightly over-fermented or if the irregular crumb was due to the increased moisture from the hydrated fruit/nut mixture.  Since this is my first time using such a large 'add in' (the family likes pretty plain bread here unfortunately) I don't really have anything to judge by.  On the plus side, this loaf is all mine ;-).  I buzzed through half a loaf at frightening speed...had to slice the rest and put it in the freezer before I hurt myself.

Any comments from those bakers more versed on fruited/nut loaves would be greatly appreciated, including any info on better methods related to treatment of those add ins (like, how long is best for soaking as well as drying, when best to add to the dough, etc).  Cheers!

naturaleigh's picture
naturaleigh

After many attempts, I finally achieved a light, (fairly) lofty seeded loaf, while utilizing a pretty high percentage of non-white flour.  The first experiments were tasty but pretty dense.  However, I will be cutting back on total volume next time as this dough literally filled the clay baker from edge to edge, resulting in...a torpedo!  The texture of the crumb is divine...soft and springy without being gummy.  I may have gotten even a little more loft if I had scored a little deeper--I think the crumb structure looks a little tight at the top.  I never quite know how to score the longer loaves.  Parallel slashes always result in broken bands across the top.  Any advice on the best way to score this type of loaf would be appreciated--I may just let it do its thing next time and go for a 'natural' score.  I used a long, thin clay baker, rather than a traditional batard or boule, in an attempt to make a more toaster-friendly bake.

Ingredients:

1:2:2 starter fed in the early morning (to double/triple in about 4 hours...will need 150 g fed starter for the dough)...I maintain a 60/30/10 starter mix of WW/AP/Rye respectively

365 g warm water (I used to use bottle spring water, but our tap water here is great quality, and I haven't noticed any change in my bakes since switching to tap)

300 g strong bread flour

135 g sifted/bolted Hard Red Winter Wheat (aka Golden Buffalo from Heartland Mills)

50 g duram flour

15 g dark rye flour (I used freshly ground since I had some berries on hand)

--total of 500 g flour with a 300/200 ratio

30 g honey

12 g salt

140 g mix of seeds (I used an eyeballed mixture of pumpkin, sunflower, sesame, poppy, flax and millet)

Enough boiling water to cover seed mixture by at least one inch


Day 1: Feed starter in the early morning (as noted above)

Around noon, mix the Autolyse ingredients (flour, water and honey), making sure no dry flour is visible, and let sit, covered, for 1 hour.  

Immediately after mixing flour/water/honey, place the seed mixture in a bowl and pour boiling water over to generously cover and allow for absorption.  Cover and set aside.

After one hour, spread 150 g of starter over the top of the autolyse mixture, and pinch into the top layer of the dough, then work in further by pulling small sections of the dough from the edge up and over the top, moving the bowl around in a circular motion.  Continue this action (essentially mini stretch and folds) for approximately 5 minutes, to fully incorporate the starter; cover.

Rest 15 minutes.

Sprinkle 12 g salt over the top of the autolysed dough, and with wet hands, pinch in and then repeat the working in method from above, pulling small sections of dough from the edge over the center.  Continue to work in for 5 minutes to fully incorporate the salt; cover.

Rest 15 minutes.

Complete 2 stretch and folds 20-30 minutes apart.  After the 2nd S&F, rest 20-30 minutes.

Drain the seeds over a bowl, immediately after the last S&F, which allows excess moisture to drain out in time for the next step.

Complete a lamination of the dough on a lightly dampened counter top, using wet hands, stretching out the dough fairly thin without tearing.  Spread about 2/3 to 3/4 of the seed mixture over the top of the dough, careful to not tear the dough.  The mixture will be a little slimy from the flax seeds.  Letter fold each side of the dough (right and left) so that all the exposed seeds are covered.  Spread the remaining seeds over the thin strip of dough, then fold up the top and bottom over the exposed seeds.  Cut away a small knob of dough, place in a fermentation jar (I use an old spice jar) flatten and mark the level.  Gently lift the remaining 'package' of dough into a lightly greased 8X8 or 10X10 square, glass dish and cover.  (Alternatively, I have also had some success just working in the seeds over the top of the dough while still in the bowl.  The dough will kind of 'break' but will come back together with numerous stretch and folds.  For me, the lamination method works better.)

Rest 45 minutes.  Complete a series of 2-4 coil folds every 30-45 minutes, or until the dough feels strong and supple, then let rest undisturbed.  The dough in the fermentation jar should rise around 30%-50%, which can be tricky to judge with so small a portion.  Essentially, I try to make sure it doesn't double, in either the jar or the main dough.  Under proofed is better than over with this dough.  (In a 70-degree kitchen, I'm usually ready to shape around 6-7 hours after starting the autolyse.)

Sprinkle some flour around the edges of the dough in the dish, loosen edges slightly with a flexible dough scraper, and gently tip out onto a lightly floured surface.  Gently shape as desired, careful not to deflate, and place into rice/flour-dusted banneton.  Place the banneton and dough in the freezer for 15 minutes, then switch to the fridge for a cold 12-hour retard.

Day 2:

12 hours later, pre-heat oven and DO of choice (I use clay bakers) to 500F for at least one hour.  Remove dough from the banneton onto a piece of parchment paper, score and bake at 500 for 25 minutes covered, reduce heat to 450 and remove lid and bake for a further 20 minutes.  Turn the oven off and leave the bread in the DO for an additional 10 minutes.  Remove to a cooling rack and cool completely, at least half a day.

naturaleigh's picture
naturaleigh

I've posted before about using a tiny amount of commercial organic yeast in my sourdough bread recipes, and got some good feedback and information on that post.  I've continued to tweak my methods and have arrived at what I think is a happy compromise, making the most of the benefits of both sources of yeast in the same recipe.  I'm just using a pinch of organic yeast in my everyday sourdough recipe, and have probably baked some of the best bread I've ever made, even with skipping an autolyze and pre-shape steps.  I plan on trying this method next with a higher percentage of whole wheat and/or with additions of nuts and dried fruit, hopefully with similar results.  The ears came out looking burnt in the photos, but they weren't.  Super oven spring, the crumb is light, springy and airy (custard-like qualities), the taste seems to be the best of both worlds, aroma is great, and the crust is killer crunchy...all obtained in a same-day bake.  I should add that we prefer bread that isn't overtly sour, so this method might not be your cup of tea if you are looking for a typical sourdough tang, but could probably be tweaked with a longer cold ferment to get there.  I'm posting in case anyone else out there has been curious about utilizing some commercial yeast in their bakes.

Night before, around 8 hours before dough build: starter refresh at 1:2:2 or 1:3:3 (half whole wheat/half AP flour)...whatever needed to catch the starter at or near peak.

Day of bake:

350 g strong bread flour / 50 g whole wheat (bolted white winter) / 50 g AP...total of 450 g flour; 365 g warm water around 80F; 100 g refreshed starter; 11 g salt; pinch of organic yeast (currently using Red Star Organic, sorry that this amount isn't more precise...still haven't purchased that special scale yet).

In early AM: lightly mix all dough ingredients and let rest for 40 minutes.

S&Fs X 3 every 25-30 minutes, followed by 4 coil folds every 30-45 minutes...repeat until dough has risen approximately 30-50% and feels strong and elastic.  My dough stays at around 78F during this process.  The average amount of time that I'm bulk fermenting is around 5-5.5 hours.  My house stays at around 70F currently.

10 minutes after the last coil fold, gently tip out the dough onto a floured surface (tipping the bowl upside down releases the dough nicely).  The last coil fold essentially acts like a pre-shape.  With floured hands and scraper, gently shape the dough into a batard or boule shape and place into a floured banneton.

Place in freezer for 15 minutes to arrest the fermentation, then place in a cold refrigerator (mine is 36 degrees) for 4 hours.  If using the cane bannetons, make sure to cover the bottom as well as the top of the dough...these types of bannetons allow too much air circulation and the outer layer of dough will get too cold and dense.  Wood pulp bannetons are fine.  I typically use the shower cap type covers for both the top and bottom of the cane banneton since I prefer their shape.

3 hours into the cold proof, preheat the oven and DO to 500F.

After 4 hours of cold retard, remove from banneton (I utilize parchment paper, that I crunch up and then flatten out again...seems to help reduce the 'dimples' in the dough), and perform a deep, angled score.

Bake in a covered DO (I use clay bakers) covered for 25 minutes, uncovered for 20-25 minutes, until dough reaches approximately 210.  Let cool for at least 2 hours.


Subscribe to RSS - naturaleigh's blog