Not sure why my paragraph breaks aren't working today.... Might be something related to creating this post on my laptop instead of my phone? Apologies in advance.... This bake was inspired by idaveindy. I had read in one of his past threads about Steve Gamelin's no knead bread approach. I had never heard of him and on a whim decided to look into it. In part, because my 92 y.o. mother in law loves fresh bread, but can't handle all the kneading, etc. I ended up watching a bunch of what he has on you tube. By far, Mr. Gamelin has the easiest approach ever. He bakes with IDY, and shows how you can get all sorts of bread baked in whatever container you have available. His approach is about as minimalist as you can get, and it's worth watching the video just to see him work. Besides, what's not to love about watching a white haired man wearing a Carhart t-shirt baking, lol. Dave gave me a few tips on how things might go if I wanted to do a whole wheat version using fresh milled flour. AZ monsoon has cooled things off enough to make baking more do-able, so I decided to go for it. I mostly followed Steve Gamelin's recipe, but adjusted hydration slightly (my whole wheat flour was way too dry otherwise). He does use 16 oz. of water in some recipes, so I went with that. Also, Steve measures by volume and not weight. Dave suggested something between 3.5-4 cups of flour, so I split the difference there. And the general principle was to only mess with the dough if I was going to be in the kitchen for another reason anyway. Ingredients:3.75 cups whole wheat flour (a mix of 75% hard white spring and 25% hard red winter wheat, but I suspect anything would work).16 oz room temperature water1.5 tsp of salt0.25 tsp instant yeast (Edit - while measuring flour for another bake, I weighed 3.5 cups of my fresh milled. It came in at 450 gm of flour.) Day 1. 07:40 a.m. During breakfast cleanup, I mixed the flour, water and salt, covered the bowl and stuck it in the fridge. (I love his mixing technique, he uses the handle - it works remarkably well!). 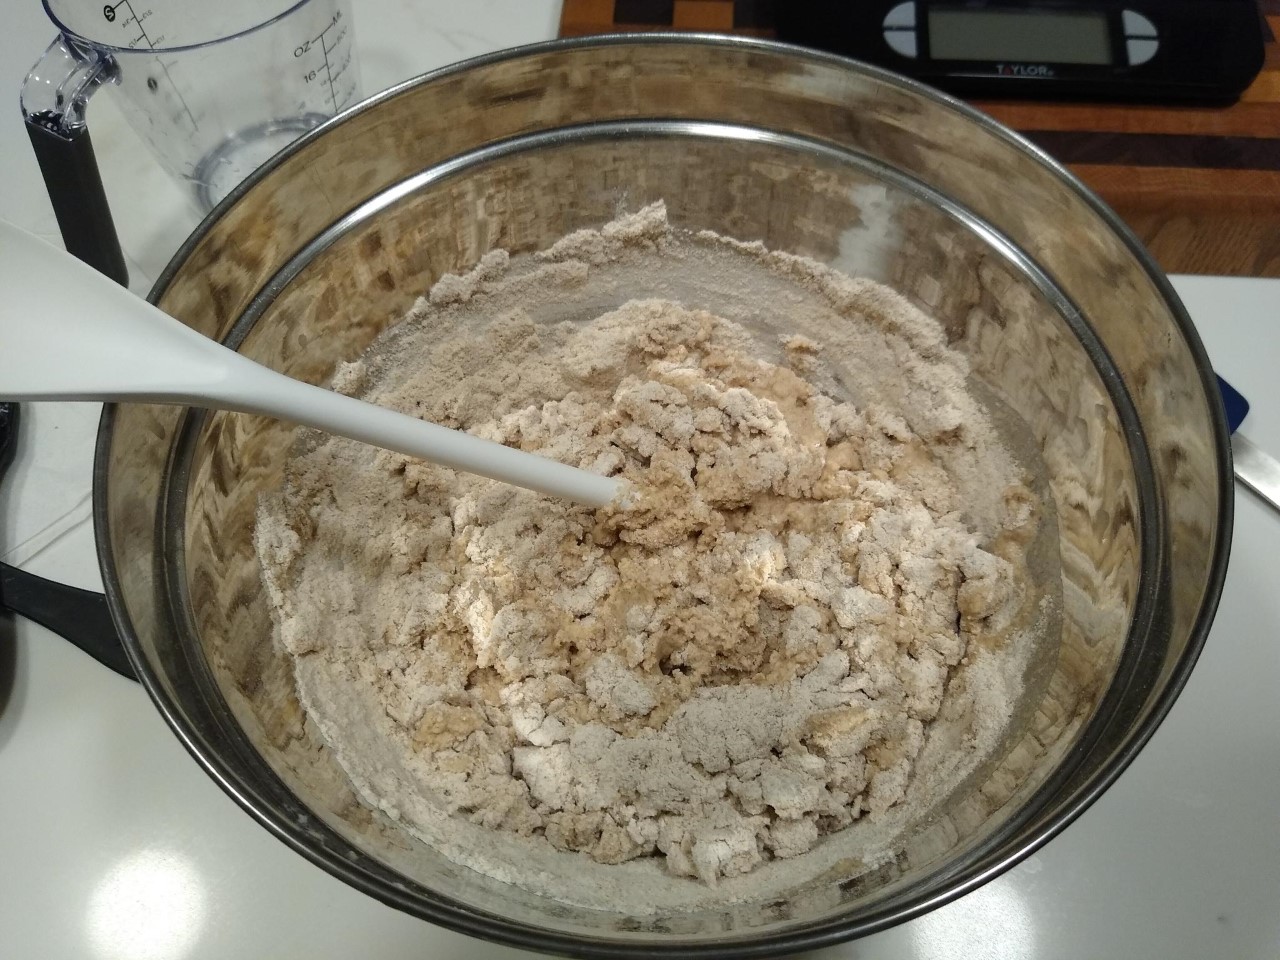 5 p.m. Starting to prep dinner, pulled dough out of fridge. Mixed yeast in by hand. Performed 4 S&F over the course of the next 2.5 hours, whenever I thought of it. (I couldn't help myself, and wanted to be sure the yeast was well incorporated.) 7:30 p.m. Covered dough back into the fridge. No signs of yeast activity at all, not surprised. Day 2. 5:30 a.m. Dough out of fridge while hubby is pouring coffee (yes, I am spoiled). The dough looks like it did right before going into the fridge - no bubbles, no change in size or texture when gently poked, nada. I stuck it into the microwave with the surface light on to warm things up a tad. After 2 hours, turned the light off as I headed to the pool to do laps, and ignored the dough. Dough fresh out of the fridge this morning:
  12:30 p.m. Checked the dough at lunch and voila - lots of bubbles, and about a 70% volume increase. I followed Steve's video example, using the spoon handle to degas and stretch the dough, then basically poured the dough into a 9X5 in loaf pan. I could see some reasonably good gluten development while I was stirring, which was nice to see. I'm not much on binder clips, the ones we have are way to hard for me to squeeze.... So I used some of these stainless steel clothes pins we have instead. They worked fine, though I did have to make sure the top pan was squared up correctly.
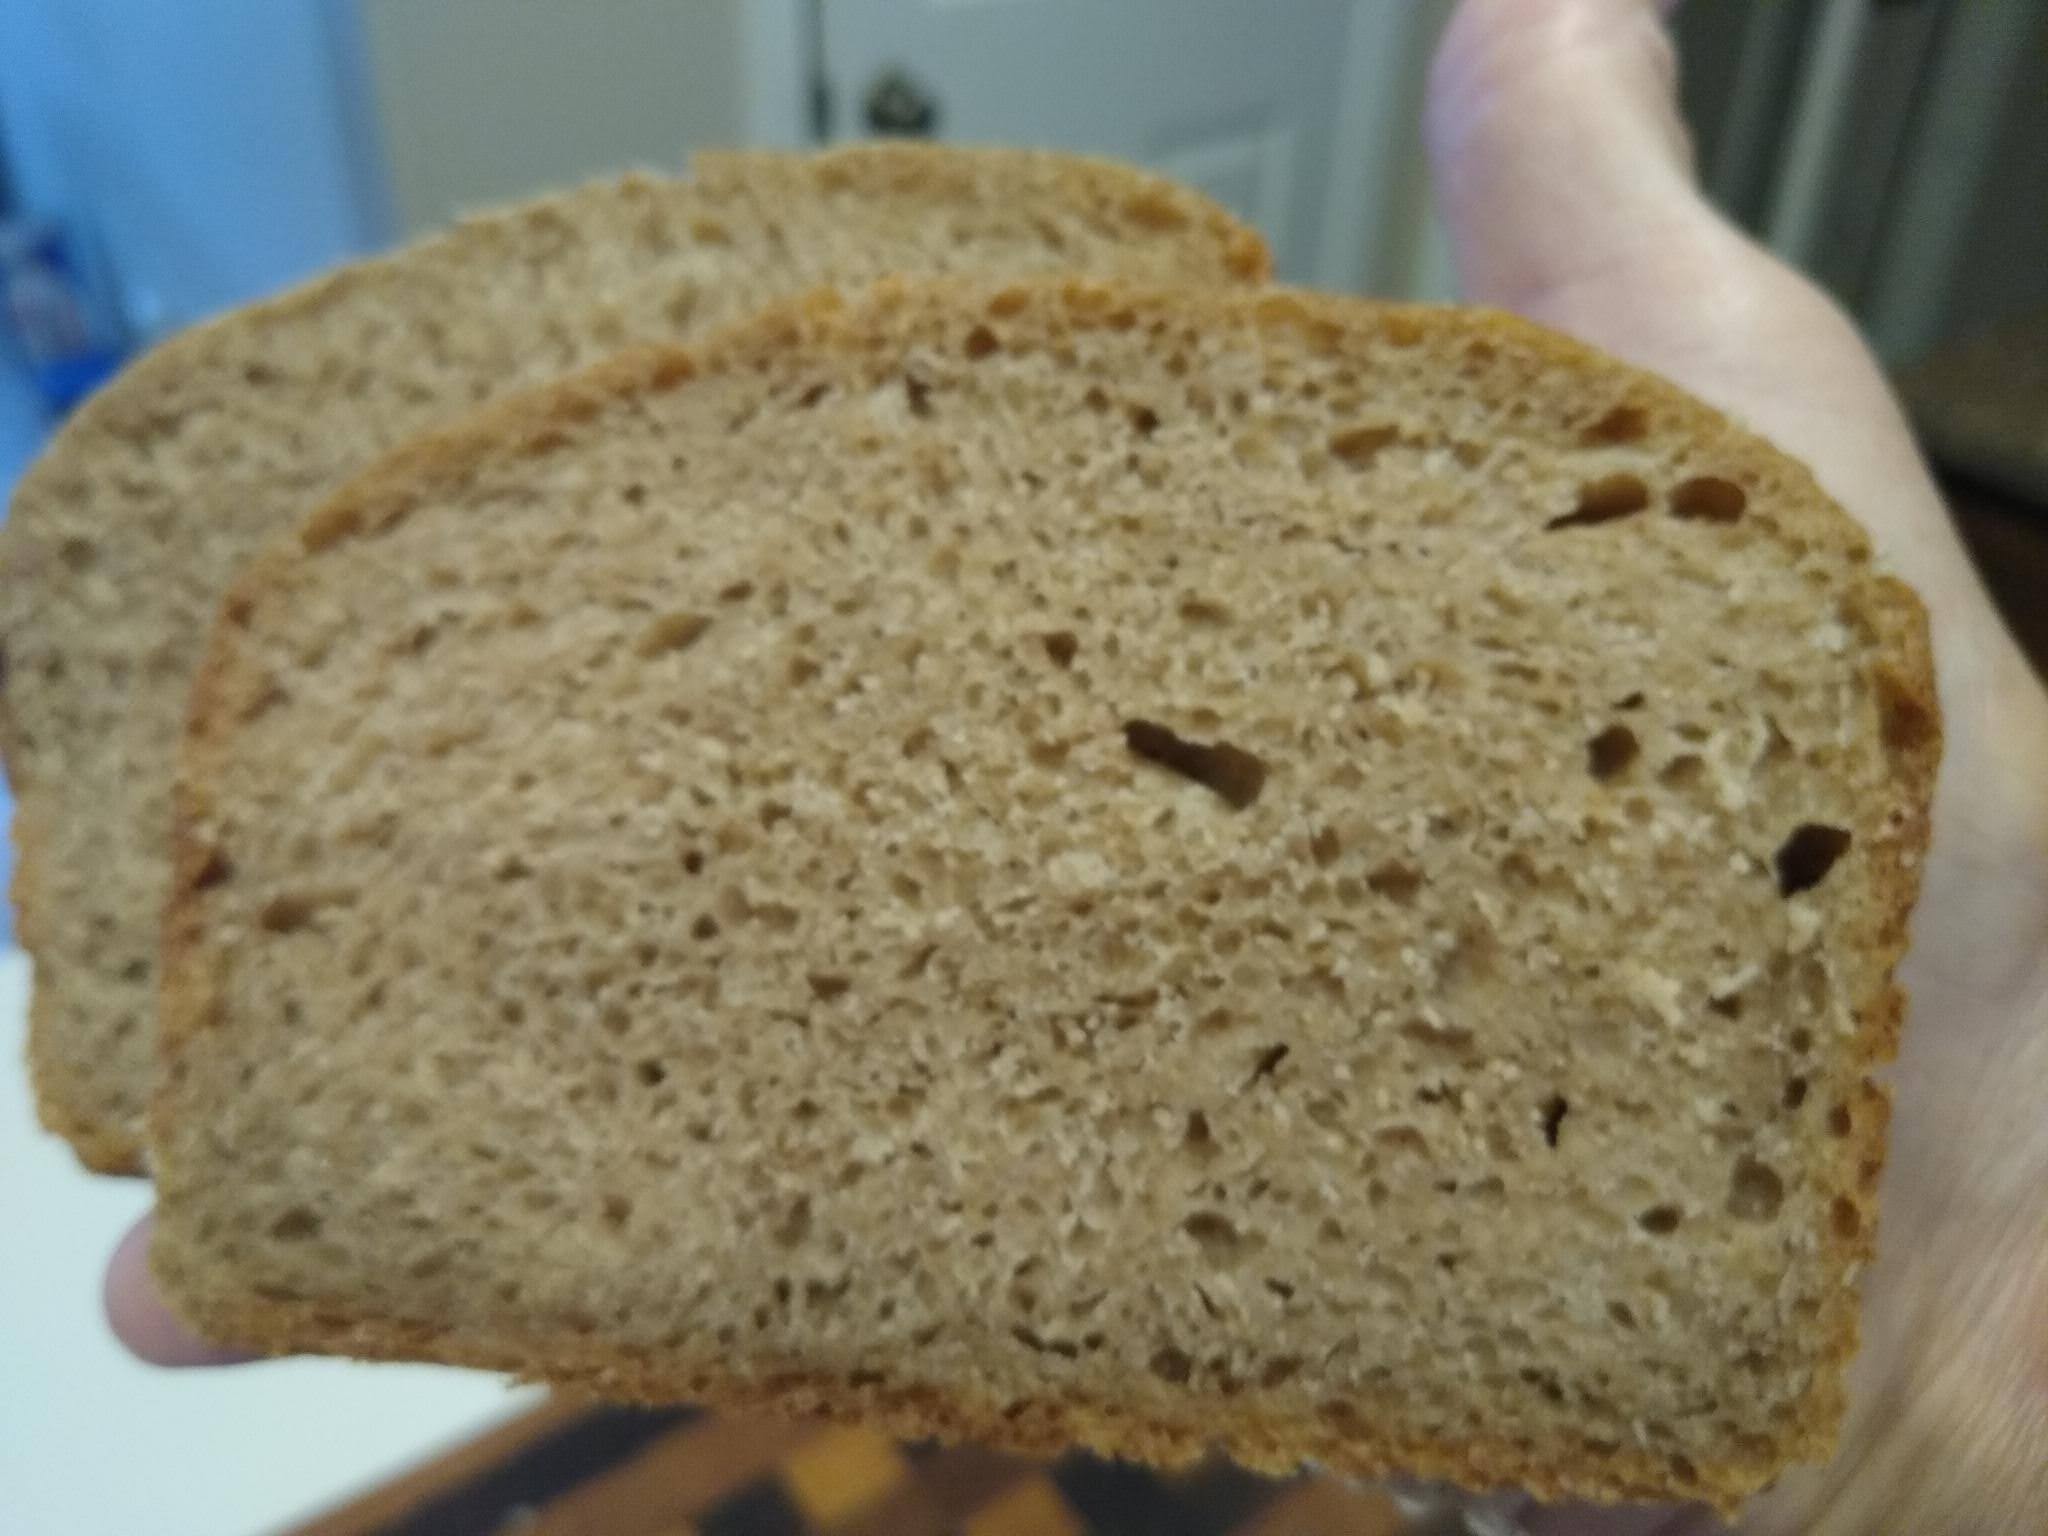
 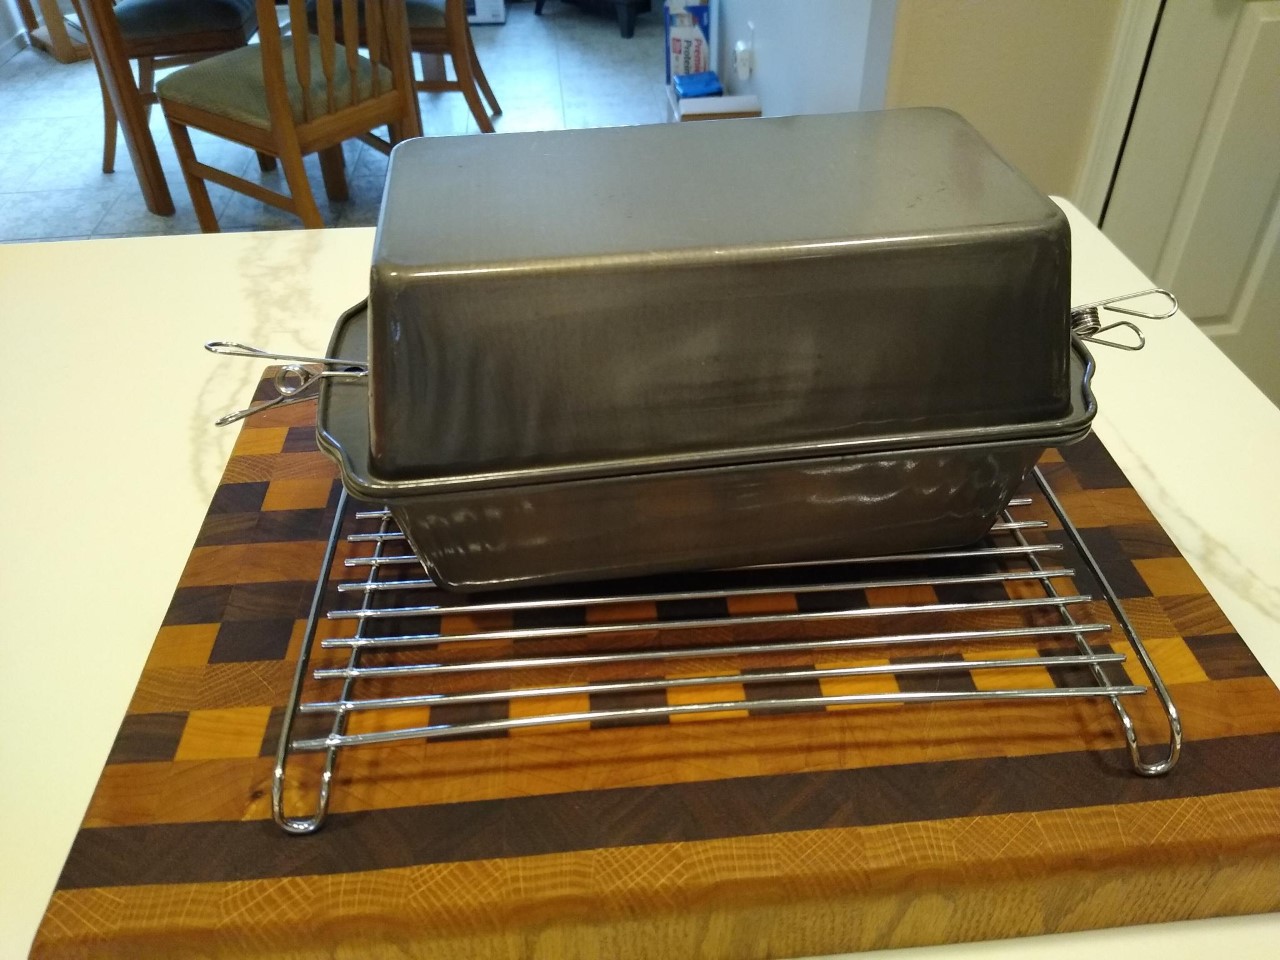 1:00 p.m. Preheated the oven to 400F. In his videos, he used to proof for longer, but now he recommends a 30-60 min proof. I split the difference. 1:25 p.m. After a 50 min proof, the bread was baked at 400F for 40 min as recommended. Cooling - I would normally have baked this just a tad darker, but wanted to do things as close to the recipe as possible. In hindsight, I think he bakes to a lighter color than I might for a lot of his breads. And next time I will use my 8 x 4 in pan. I used the 9x5 he recommends, but I prefer taller rather than wider bread.)
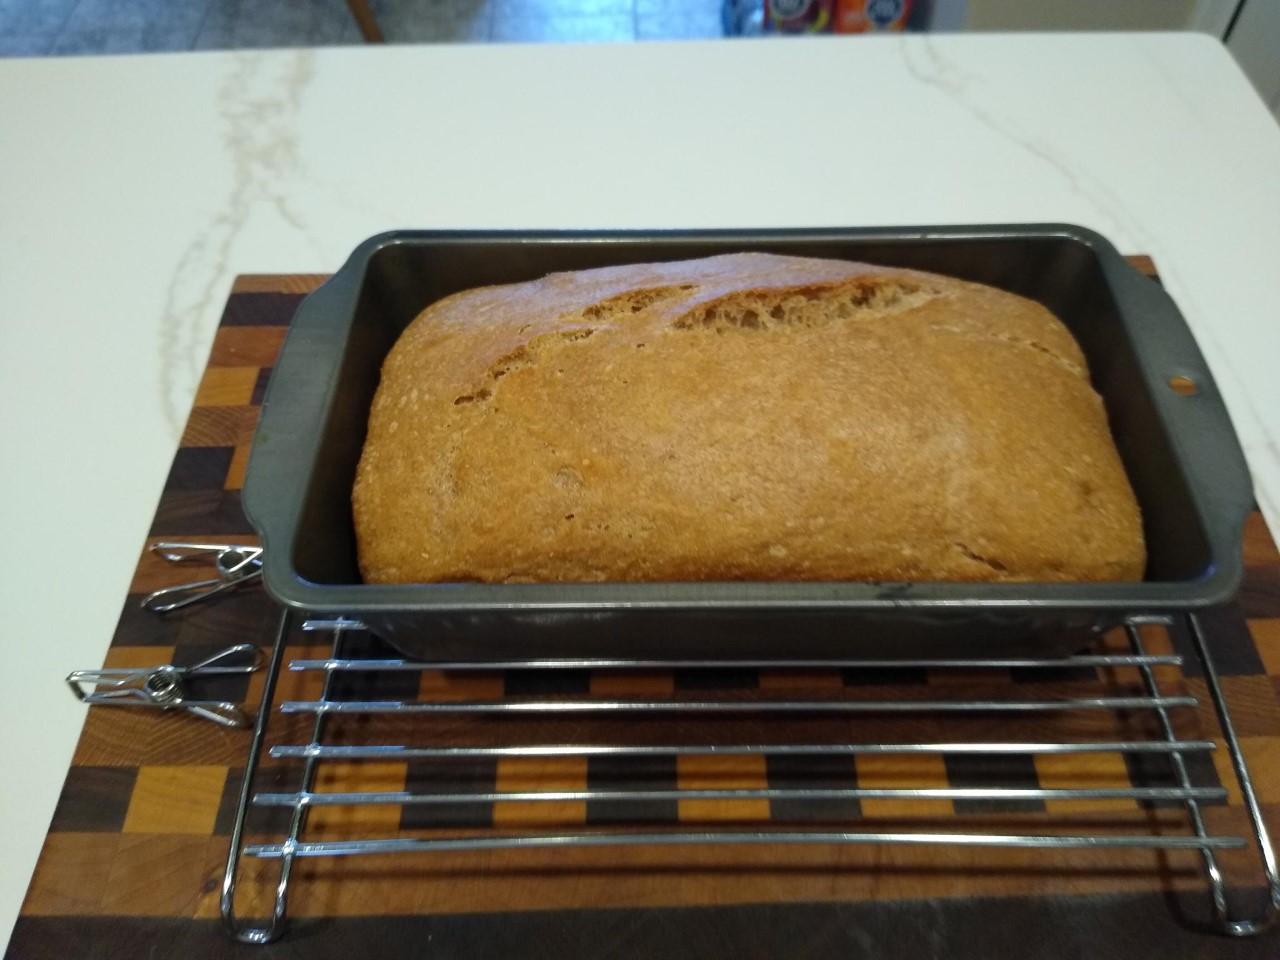
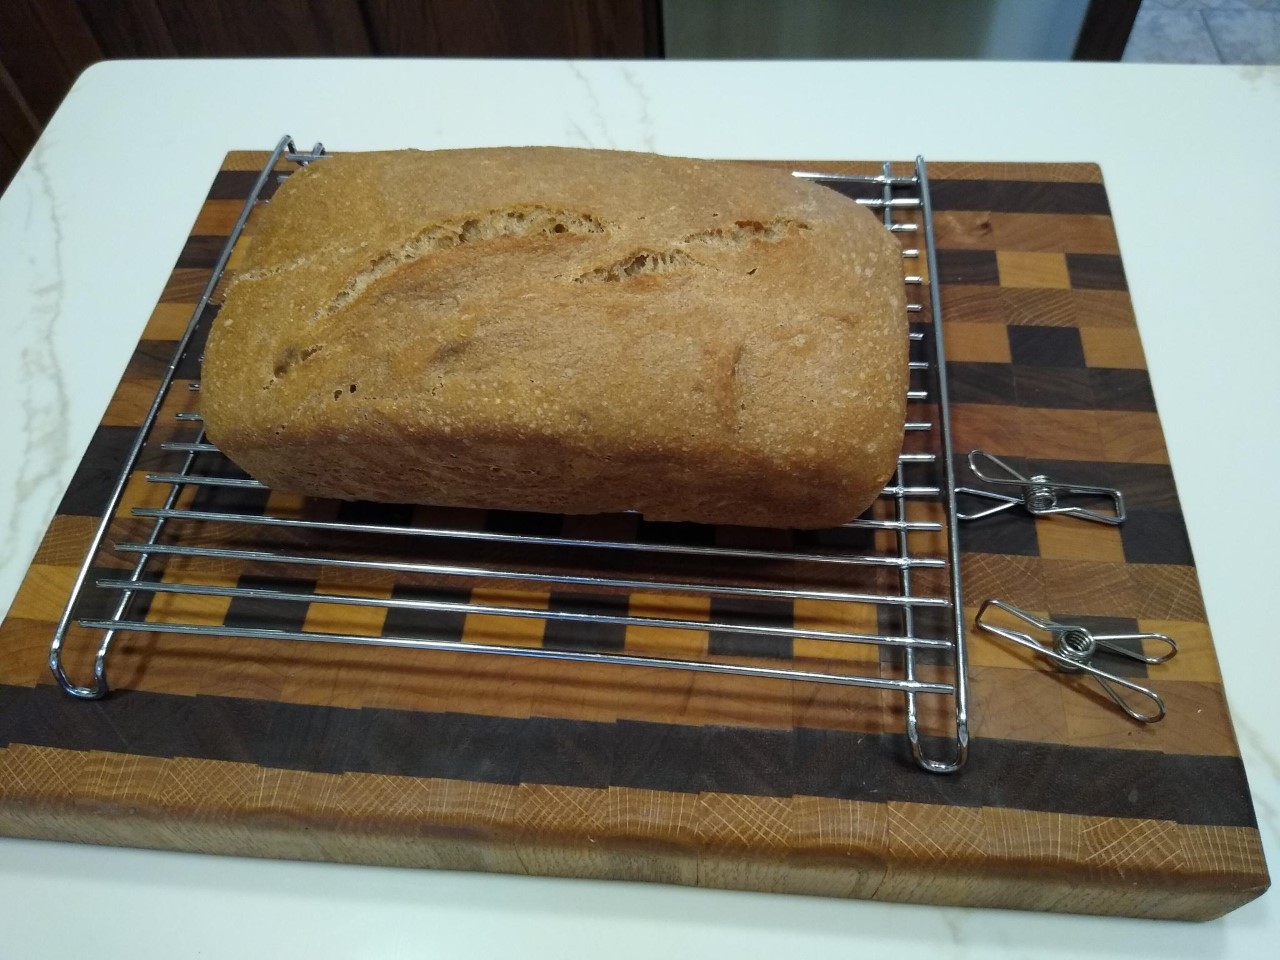 Thanks, Dave, for giving me the nudge. It was nice to learn something I incredibly easy I can do pretty much anywhere, and I'm pretty sure my MIL will tackle this once cooler temps make it to her area. Edit to add crumb shot, and refine ingredient details. A bit more dense looking than some of the recent sandwich bread I have made lately, but you wouldn't know it from the chew. It came out tender and moist, and you can taste the flavor of the wheat more than my SD bakes. Hubby liked it a LOT, with more compliments than he normally does with SD. I could see where this would be handy for any sort of travel that includes a place with a kitchen.... Put the flour, salt, and IDY in a Ziploc, add water when ready to mix, proof at your leisure whilst vacationing, and bake in whatever container they happen to have available. I had better be careful, this is going to wake the travel bug within.... 😁🚙
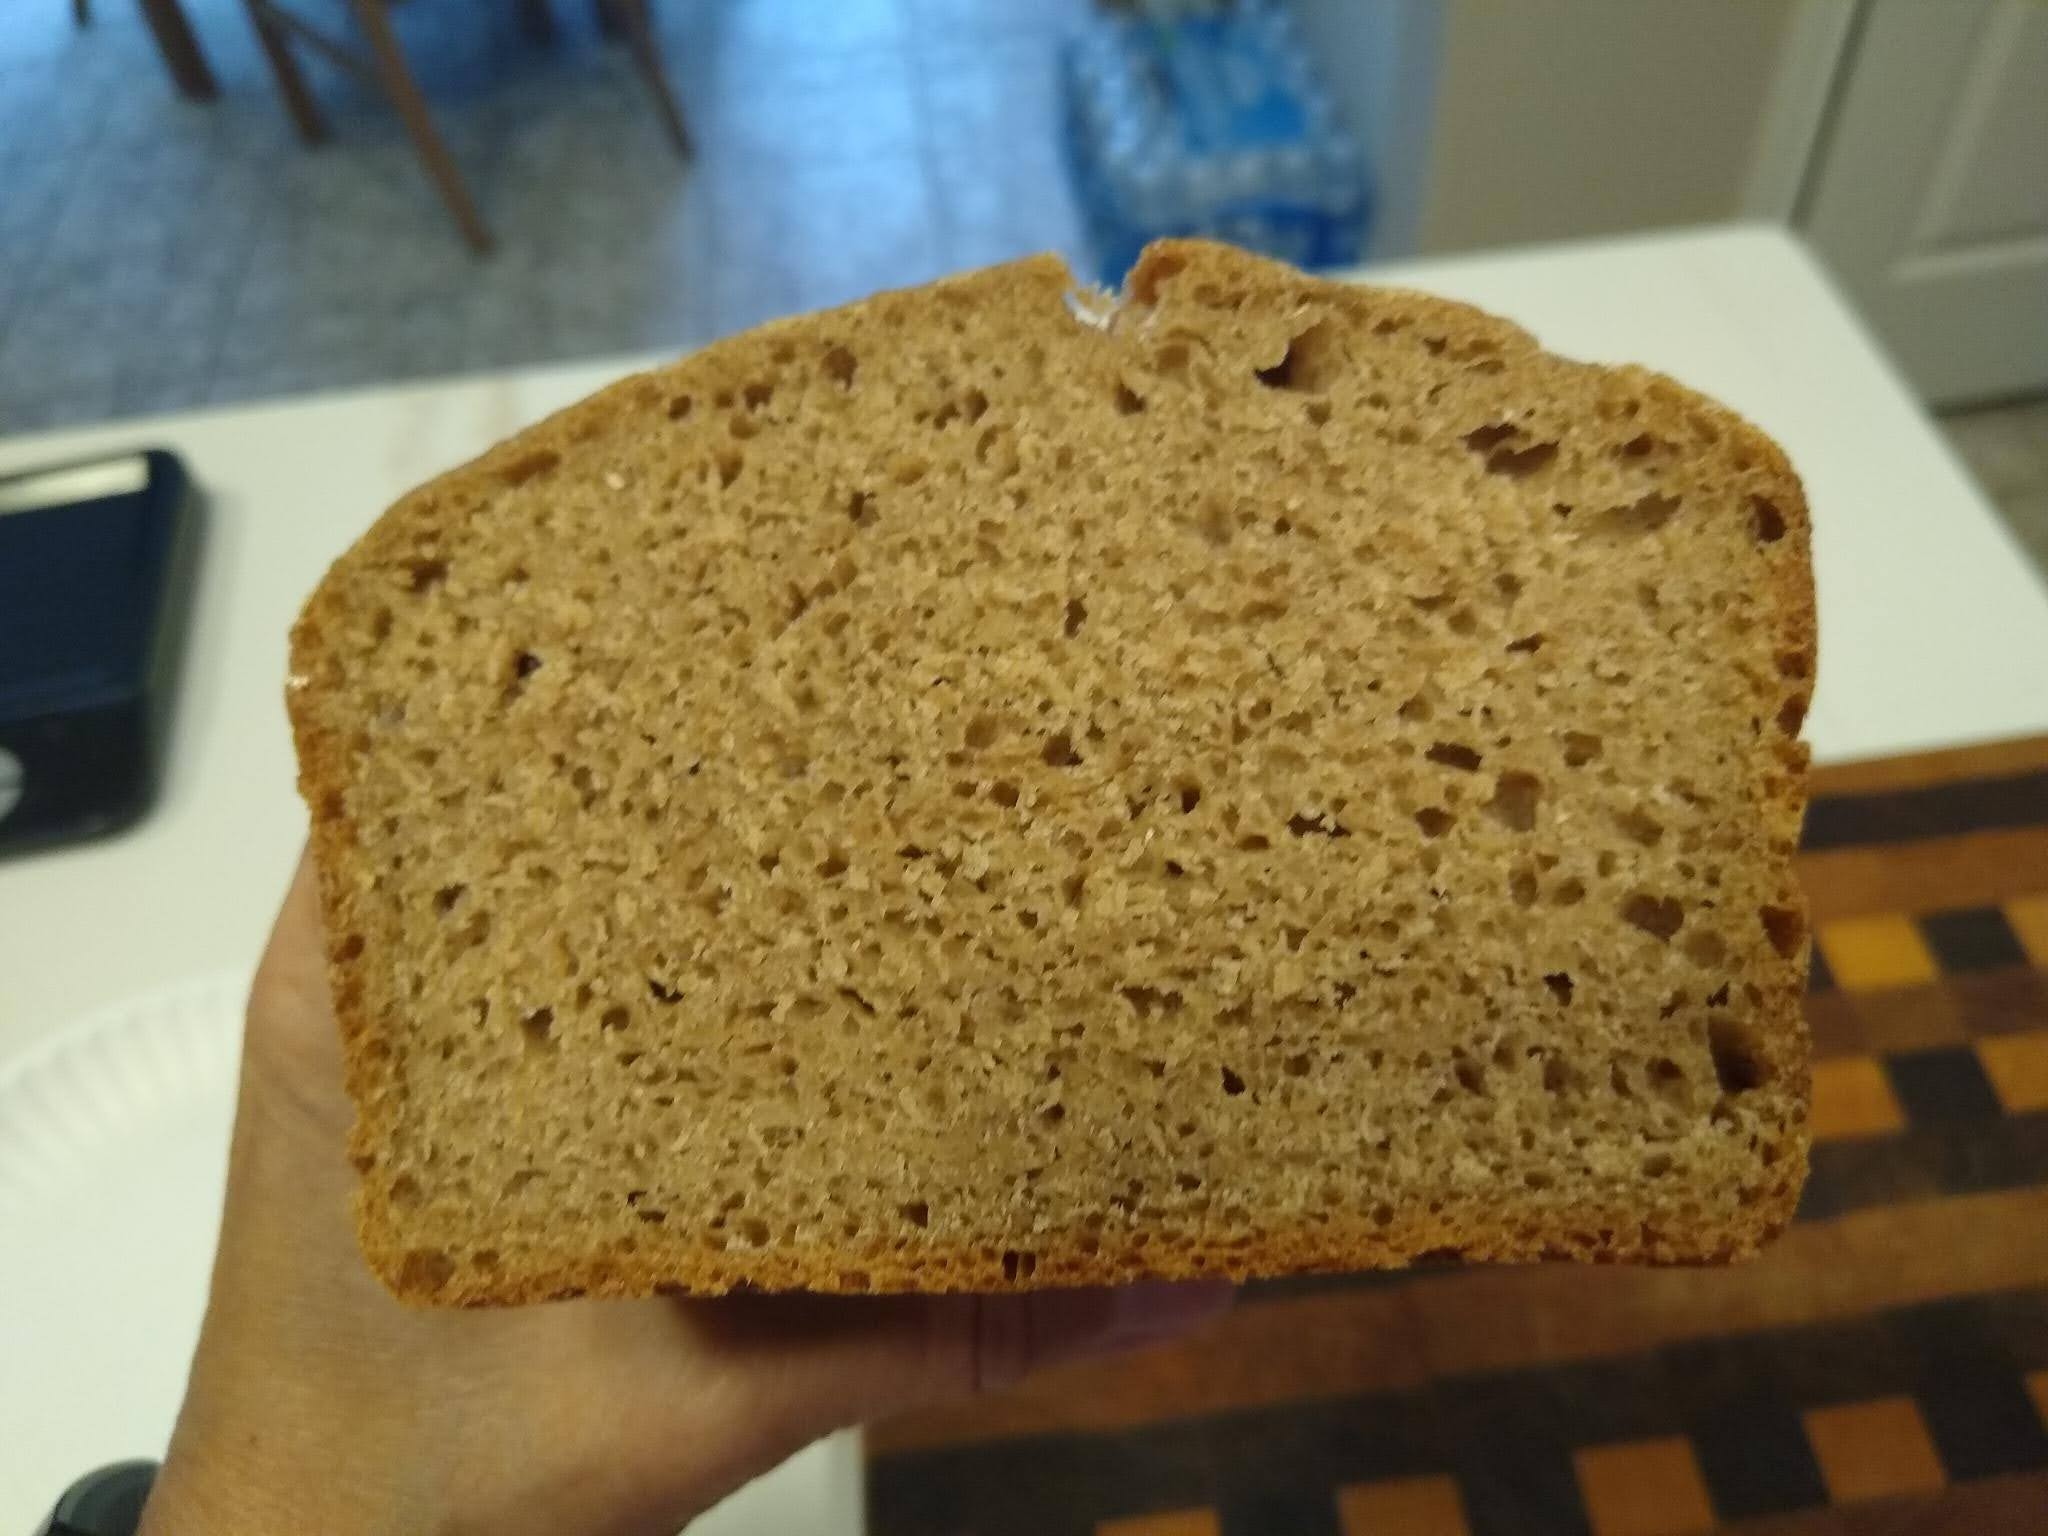
5 p.m. Starting to prep dinner, pulled dough out of fridge. Mixed yeast in by hand. Performed 4 S&F over the course of the next 2.5 hours, whenever I thought of it. (I couldn't help myself, and wanted to be sure the yeast was well incorporated.) 7:30 p.m. Covered dough back into the fridge. No signs of yeast activity at all, not surprised. Day 2. 5:30 a.m. Dough out of fridge while hubby is pouring coffee (yes, I am spoiled). The dough looks like it did right before going into the fridge - no bubbles, no change in size or texture when gently poked, nada. I stuck it into the microwave with the surface light on to warm things up a tad. After 2 hours, turned the light off as I headed to the pool to do laps, and ignored the dough. Dough fresh out of the fridge this morning: 12:30 p.m. Checked the dough at lunch and voila - lots of bubbles, and about a 70% volume increase. I followed Steve's video example, using the spoon handle to degas and stretch the dough, then basically poured the dough into a 9X5 in loaf pan. I could see some reasonably good gluten development while I was stirring, which was nice to see. I'm not much on binder clips, the ones we have are way to hard for me to squeeze.... So I used some of these stainless steel clothes pins we have instead. They worked fine, though I did have to make sure the top pan was squared up correctly. 1:00 p.m. Preheated the oven to 400F. In his videos, he used to proof for longer, but now he recommends a 30-60 min proof. I split the difference. 1:25 p.m. After a 50 min proof, the bread was baked at 400F for 40 min as recommended. Cooling - I would normally have baked this just a tad darker, but wanted to do things as close to the recipe as possible. In hindsight, I think he bakes to a lighter color than I might for a lot of his breads. And next time I will use my 8 x 4 in pan. I used the 9x5 he recommends, but I prefer taller rather than wider bread.) Thanks, Dave, for giving me the nudge. It was nice to learn something I incredibly easy I can do pretty much anywhere, and I'm pretty sure my MIL will tackle this once cooler temps make it to her area. Edit to add crumb shot, and refine ingredient details. A bit more dense looking than some of the recent sandwich bread I have made lately, but you wouldn't know it from the chew. It came out tender and moist, and you can taste the flavor of the wheat more than my SD bakes. Hubby liked it a LOT, with more compliments than he normally does with SD. I could see where this would be handy for any sort of travel that includes a place with a kitchen.... Put the flour, salt, and IDY in a Ziploc, add water when ready to mix, proof at your leisure whilst vacationing, and bake in whatever container they happen to have available. I had better be careful, this is going to wake the travel bug within.... 😁🚙 - justkeepswimming's Blog
- Log in or register to post comments
Your's came out better than any of my 100% WW loaves.
I love seeing bakes like this -- 100% home milled, no sifting anything out, no white flour added.
(p.s.: It looks like your 'Enter' key is not working. Or maybe you are hitting 'Tab' by mistake.)
And fwiw, the preview looked fine before posting. I went in to try to edit and the paragraph breaks were l there.... Chalking it up to computer gremlins. It's further affirmation that that laptop is on its last legs. ⚰️
Mary
That is a lovely 100% whole wheat loaf Mary and no knead to boot. I agree with you that the narrower pan would yield a nicer profile that is taller, but regardless it looks great.
Benny
I do enjoy experimenting, lol. Glad it turned out, and hubby enjoyed it too.
Mary