Hello all, many years a baker. I am toying with the idea of adding and investing in a commercial/pro type baking oven. I have a WFO, but I live in the great white north and have near zero interest in firing it up in the winter, as I am growing older everyday. My current interests are in artisan sourdough breads and I am using the dangerous preheated Dutch oven method with great end results.
My fantasy is to retire in the next few years and possibly make a few extra dollars selling some loaves for fun. I am having to do multiple batches in my home oven and grown tired of the lack of space and handling the hot DO's.
I have the perfect setup to add a oven in my Mancave/Garage, since that already houses my other food hobby devices, like a commercial mixer and meat grinder.
So i have looked a little at the Rofoc 40 and that looks like the near perfect solution until I look at them being completely sold out and unavailable until next fall... Which brings me to my 2 questions for my fellow bakers.
1: I am not opposed to something commercial used, since I have the space. With that line of thinking, what should I be searching for brand/type wise in a used oven? I would like to be able to do 1/2 dozen to a dozen 900g/2 lb loaves .
2: I am a handy/fix it/build it kinda guy for a living, I also built my own WFO. I want to see anyone thoughts on this. From looking at the Rofco type oven, the key to what makes it bake so well is the brick lining. With that in mind, what if I took my old spare olive green electric oven "Circa 1975" and turned it into the Franken Oven? Reline the shell with high temp insulation like I used building my WFO and then complete box in the oven space with cut to size Corderite stones? My thought would be two shelves lined with the stones, the sides as well as the back lined with the stone? Has anyone tried such a thing or seen such a Frankin oven? I currently use a Corderite shelf when I do pizza now in the house, but it doesn't cut the mustard for bread and why I use the Dutch Oven, but if I enveloped the entire space and preheated stones and misted with water for steam, I think it may work?
Your franken oven idea is worth a try based off of relative ease of creation and cost. People have done such a thing (I am not one of them). You will have to experiment with steaming methods to find the optimal solution. Personally I use a big inverted metal bowl that is very lightweight at home and never a dutch oven, and it works very well.
Are you using the inverted metal bowl on a stone?
Yes. I have also built a brick WFO and the indoor oven makes the bread look better. I did bake all year round and I live in northern Minnesota. I own a bakery now and so I don't bake at the WFO anymore.
So, are your results with the inverted metal bowl as good as Dutch oven? If so, I will give that a shot and not spend a dime yet. I have a LG range with a double oven in the house, so I can run two ovens with a stone in each and certainly bake at least 6 loaves in one a bake. Maybe even 8 loaves?
Can you post a photo of one of your loaves using the inverted metal ? Or send me a PM? Thanks
If you are very handy, and are comfortable with rewiring, another option is a countertop commercial oven, like a Cadco. I bought a used one that had some issues pretty cheap, took out the convection fan and the heating element ( which is circular ) and replaced it with a bottom element in the chamber. The gasket on mine was pretty old, so I also bought a new gasket, but even then, it did not keep in the steam, so I use a bar clamp to hold the door tightly closed during the steaming portion. I use Slyvia's steaming towel method, which generates tons of visible steam when I open the door to vent one third of the way through the bake. To me, the stones are only part of the attraction of the Rofco, the tight seal of the door is another factor. Otherwise, you could just buy an older Bakers Pride Countertop Oven and add a thicker stone. My guess is that the stones aren't all that needed as stones, but instead act as a heat sink to allow the temp to stay pretty consistent due to thermal mass. Meaning if you had another method to keep the temp stable, like a good thermostat, you would probably do fine with just one regular thickness stone.
Are you happy with your modified Cadco?
Hodgey, yes, I am pretty happy with the Cadco. I have never done a side by side comparison to a dutch oven, or combo cooker, but when I open it about a third of the way through, lots of visible steam comes out, so I think the steam part ( sylvia's towels ) plus a bar clamp to hold the door fully closed , is working well.
I couldn't find pictures. It's been years. I never had a dutch oven so that is the method I used. I never bothered to get a dutch oven because the inverted bowl worked so well (and because of the brick oven: my dad and I would bake 30-40 loaves once a month to fill our bread freezer when I was in college).
That’s one nice dad and some great memories made.
Here's a comparison test with photos: https://www.thefreshloaf.com/node/62265/cheapy-%E2%80%9Ccloche%E2%80%9D-side-side-trials
Thanks.
Another commercial option recently discussed on TFL is the Chandley Pico Oven. Cheaper than a Rofco, but I'm not sure how shipping and import costs compare.
Quite a few Insta bakers seem to be buying them. There is also a plus sized version too and they are stackable.
Much cheaper, there are quite a few Chinese bread ovens available now; Geremy (kendalm) on TFL bought one recently - check his posts.
Lastly, for a DIY extreme, check this post.
Lance
The Chandley Pico Oven looks like a awesome oven. I will check tomorrow on pricing and availability. Do you have any idea on the price Lance?
Yes, I was quoted 750gbp net of UK VAT.
Lance
Thanks Lance, That price converted to USD is reasonable.
Some how I missed the link you posted earlier showing the range conversion. That's the Franken Oven! Very interesting. I have to give that a better read when I get a chance.
When I begin looking at smaller counter top ovens online, there are a pile of Bakers Pride ovens and some priced reasonably for used models. I find the model PS18S 2850 watt model interesting. Does anyone have experience using this model, baking rustic sourdough breads? One other thing I was wondering is, does the shelf come out and also for anyone with experience with this oven, what are you doing for steam?
I had the earlier version, MO2T, and I had the 1,800 watt version. No the middle shelf does not come out, not easily anyway, there is an element right under it. If you removed the element, then perhaps. The main issue is that while it is not as vented as a gas oven, there is no real seal to the door - as a pizza oven, they expect the door will be opened and closed every few minutes. They also make a bread model, without the middle shelf, though it is rare to see it being sold used. I used mine primarily for pizza. It should work like a deck oven if you can live with the height issues.
Big Lots has steel bowls. I have one, but haven't used it in the oven yet.
https://www.biglots.com/search/?Ntt=steel%20mixing%20bowl
Three sizes: 3, 5, 9 quart -- $5, $7, $10.
I gave the inverted metal bowl A try today, with so so results. The loaves I did in the dutch ovens turned out perfect as usual. The one I did with the metal bowl over the loaf sitting on a preheat stone, ended up with burnt bottoms and not as nice of browning on the rest of the outer crust using the same time and temps as the DO loaves.
i did 4-2lb loaves today and it made me realize how nice it would be to have the proper oven. I also think my wife would be happier if I moved my entire process to the man cave, since the kitchen looks like a bomb went off.. Lol... I think I might bail on the franken oven and focus on the right commercial type bread oven, I just need to figure out what that is. I called and emailed the US distributor for the Chandley Pico oven, but haven’t gotten a reply as yet.
like I mentioned earlier, the bakers pride ovens appear to be plentiful used and reasonably priced, if I could be certain it will work for what my needs are. Anyone with baking bread experience, with a deck oven advice/knowledge, would be much appreciated.
I am beginning to think that the market is in desperate need of a affordable, small “ 5-10 loaf capacity “ hearth style oven with steam injection. I have looked everywhere and it seems they don’t exist with the exception of a handful of very expensive ovens.
My next step I think is to maybe be patient and wait for a Rofco 40 when it becomes available again in the fall. The other option I am going to leave open, is to keep looking for a affordable used deck oven.
I agree with the idea of affordable. I have trouble understanding the price of the Rofco - it does not have steam injection, and is really similar to a stainless steel electric smoker , except that it can go to a higher temp and has stones. You can find well sealed smokers that are durable stainless steel for under $600 - not sure why the better insulation and a few stones would cost more than a $100 more.
I would think that $1500 -$2000 would buy one kick A oven, with steam injection. They don’t seem to exist.
The Rofco oven comes close, wish it had steam injection.
My fantasy Oven.
Here it is, very close to the Fantasy oven, with a Nightmarish price tag though. It a bargain at $11,000 ..........LOL.. Gezz
Doyon 1T1 Artisan Series.
With restaurants going out of business left and right, shouldn't the market be glutted with used ovens?
yes, on eBay they seem to be a lot and very reasonable prices. For example, a three deck version of what I described as a fantasy, that you could probably do 60 loaves at a time for $4000. The problem is twofold. One, every single one I look at needs three phase power and a lot of it. Two, it’s enormous And would take up way too much space for what I have in mind.
I have to admit, if one of those ovens was close to where I live, I would have to go look at it and make a decision on giving up the space for it and to figure out a way to supply the power it would need. I take that back. LOL. The power is a real problem. Maybe I could buy a used three phase generator as well and take up my entire garage? LOL.
I think a smaller single deck pizza oven might be my answer?
checked with local/nearby restaurant equipment suppliers?
Instead of one commercial oven, how about adding two used home ovens/ranges to the man-cave?
In my area, they can be had dirt cheap at used appliance stores.
The only way I can get respectable results for my hearth style loaves is when I bake them in a Dutch Oven. That is the process I want to get away from. Handling 500*f pre heated DO’s is difficult if not dangerous. Currently, I am typically doing 4 2lb loaf batches in my home oven and would like to expand and get to a dozen loaves.
I have only one used commercial appliance dealer in my area, and have not seen anything “yet” in their inventory. I have a watch lists set up on both eBay and Craigs list.
I have been scouring the Internet and asking all kinds of questions everywhere about ovens capable of creating beautiful hearth baked breads. Like I mentioned earlier, everything I have found is ridiculously expensive and needs power that I do not have available. That all might be changing???
I may be on to what appears to be a nearly perfect oven for me, and may hit just about every one of my needs on my fantasy oven list. More details to come once I get more information. Can’t wait!
You can't wait, nor can I. Love to hear about it. BTW, I see a number of used commercial ovens on ebay, and while many don't require 3 phase power, they often require a significant amount of 240 volt power, and more importantly to me, take up a lot of space. Even a half sized countertop oven will take up a lot of space. BTW, the Moffat Turbofan offers "steam" injection on some if its models, and used ones are around a $1,000. IIRC, they even had a model with a regular bake element, so I assume it would work without the convection fan running.
Glad someone’s as excited as me! I will reveal details once I get hard costs back. I was hoping to get that information back before then end of the business day today, but that didn’t happen. Fingers crossed for tomorrow.
on the Moffat Turbo fan, I have read that a convection oven is not recommended for the type of bread baking I intend on concentrating on for this new oven. Thanks though for the information, I’ll take a look at them.
Yes, I agree , convection is not helpful, but at least one of their models with steam injection has a bake element, so I assume it can be used without convection.
I have clicked the spring out of a pen waiting for details. ? Tomorrow?????
i have disappointing news on my oven search . Here’s what happened. I reached out to the distributor of the Chandley Pico oven, to get more details and pricing. During our conversation about the Pico and how pricey it becomes with the shipping from the UK to the US, he mentions an oven he sells in a similar price range, without the horrific oversea’s shipping charges. The oven he was pricing me, seemed to meet all of my previously listed oven requirements, until I received the price.......... $5,800 + freight. Because he mentioned that it would be similarly priced to the Pico, I was thinking/hoping that it would be something in the $2500 range. Nope ?
The Chandley oven on paper, seems near perfect for my requirements. I am contemplating pulling the trigger on one, but I would really like to chat with someone who has one and used it, that could confirm its virtues. I have reached out to a member here who ordered one, but I haven’t heard back from them yet. The shipping alone for the Pico is $1000. all said and done I think I’d have around $3k invested on a oven I can’t see or touch ahead of time, let alone read about real world baking experiences. All of that has me hesitant.
I am beyond mystified that there is nearly nothing out there meeting my not so extravagant oven requirements? I think I could stack to the moon and back the options for ovens labeled “pizza ovens”. They’re everywhere, new and used alike at reasonable prices, which makes me think more about buying one and trying my hand at making steam in one?
My research to date says that three brands exist that closely meet my desired oven. The Chandley Pico , Rofco and the Haussler . I think the Chandley meets my needs best, but I need more information.
This oven has everything a home baker could want but alas it’s also over 5 grand, not including shipping. By the time taxes and shipping are figured in I think it was over $7,000. But I still want one...
I would need a lawyer for the divorce if I spent $7k on a oven. Very nice though.
Have you considered getting a wall oven and putting it on a rolling cart? It will be mobile, so you can store it in a less used space, you will have a range of sizes to choose from, you can easily pipe your own steam, you can trick it out with extra insulation and thermal mass, and I bet you can find a used one to experiment on for under $100.
That’s kind of where this thread started, and why it’s called Franken Oven. I am still not opposed to that idea. I started down this path really thinking/hoping a couple G would get me one really nice oven. That doesn’t seem to be the case.
I have lots of skills, so creating a Fraken oven is very possible and if I continue to strike out with finding the right oven at the right price, that might be the direction I head.
One thing I don't see mentioned when home bakers look at commercial ovens is that you need to make sure your current electrical set up can handle the power load. Commercial ovens have higher power needs than a home is set up to provide and frequently need their own circuit. Your home may be able to provide the power, but the wires may not be the right kind, or you may need another circuit. I would check with an electrician before you buy a commercial oven. It's hard to return them.
The reason I say this is because we just had to put new wires in because the existing wires for our AC were not the right kind, and we found out the hard way. So we had to re-pipe through the attic, cut a bigger hole in the AC handler, and run bigger wires, and attach the new wires at both ends. Also, as much as I want a commercial oven, our home circuit is not up the task. We would have to do more rewiring and that would entail ripping up part of a wall and crawling through a teeny tiny part of the attic that we can't really reach.
Thanks, My space that I would be adding the oven to is a garage with enough amperage to run welders, compressors and such. Also, I am a electrical type maintenance person for a living. Upgrading wiring is my bag :-)
If you read on, I am currently testing mods made to an old electric oven and it is looking more and more like I won't be needing to pull the trigger on a new oven since this is working pretty darn good.
There seems to be a lot of very knowledgeable people here, that are way more knowledgeable than me when it comes to baking equipment and the characteristics necessary to create artisan style breads. I really like the way my sourdough loaves turn out in the Dutch oven and is the results I am hoping to achieve with the next oven, whether it be a Purchased commercial ready to go oven or the Franken oven.
with the concept of the Franken oven in mind, I would love people to chime in with ideas and concepts that might be a winner when creating my own oven. I started this thread mentioning a old 1970s electric range that I have. Here is the what if.
what If, I made a completely sealed cordite chamber inside the old range. I have the tools and skills to cut the stones to the exact dimensions I would need. So the top, bottom, sides and back would all be fit tight and sealed with refractory caulk, then I could cut the front to fit tightly yet still be able to be removed and fashion some sort of handle so that I could then remove it, creating a sealed stone box. I would have to figure out how to create steam in that atmosphere and also how to relieve the steam. Maybe the steam generator could just be the wet towel method and the steam removal could be just taking the front door off and leaving it off for the rest of the bake, relying on the range door to keep the majority of the heat in.?
i’ll bet I could do that project for maybe Under a few hundred dollars? I’m just not certain it would be a winner? Thoughts?
A project close to my own heart - I am forever tinkering with my oven in a process of continuous improvement, but my bread oven is the house oven too, so I can't make major permanent changes or have a complex set up up and dismantling procedure that takes half an hour each way.
Assuming you have top and bottom elements, I think the three major shortcomings of a domestic oven are as follows:
To get over the first two problems is tricky. I did see a Wolf oven design that had a removable pizza plug in element that sat half way way up the oven and then the pizza stone sat just above it - something you could consider for a permanent design. You would then need dual thermostats - one for each element.
The other option is accept the badly placed elements and have plenty of thermal mass, especially in the bakestone - just look at the thickness of the chamotte stone in a Rofco!
However, I don't think the full refactory lining is a good idea. It will take ages to heat up and use loads of electricity. Also I am coming to the conclusion that the best lining material for an oven cavity is shiny metal, so it reflects the radiant heat back to the loaf. My oven has self cleaning top and sides and I am coming to the conclusion that this dull surface is giving me dull crusts.
So I would go with a really thick bake stone and leave the sides as existing metal, or even better, line them with stainless panels. At the top end, I am toying with a thck metal plate that sits just below the element. This will allow the heat to pass through and add more thermal mass.
Regarding steam, you need to have a controllable vent and seal all other gaps. Remember that steam is a gas and will get through the tiniest gaps; I have even had to seal the small holes in the cavity where the shelf guide rails fit! I don't think you will be able to seal a refractory cavity successfully.
For steam production, I think an external steam generator such as a pressure cooker is the best bet, but of course there are other solutions.
Lance
Thanks for the detailed response. I really would like to purchase a commercially made oven, that turns out amazingly baked loaves. If I were made of money, it wouldn’t be a problem, but unfortunately I am not. I am still holding out hope that I can find what I’m looking for at a somewhat reasonable price.
Do you really think preheat times would be that awful if I used the refractory box idea? I typically preheat my oven now for at least a half hour with Dutch oven ‘s.I would guess I could preheat the refractory box in an hour depending on the thickness of the stone used?
Well, every setup will have its heat up time, which will have to be determined empirically. I'm just not sure that the full refractory lining is the best way to go for the reasons I stated previously. BTW, I think you meant cordierite - cordite is some kind of explosive!
I would go for a thick, full size bakestone, 35-50mm thick. Firebrick/chamotte would be the cheapest material. At a pinch you could use 9x4.5x2" firebricks, maybe held in a frame to stop movement and minimise the gaps.
I've just done a tweak on my oven for this mornings bake. The loaves were baked on a 3/4" kiln shelf with grill pan covering top element for first 20mins. Oven heated to 225C convection for 1hr, then to 250C T&B. External steam injection for 2 mins. Oven vented after 20mins. Quite pleased with the result:
Lance
Lance, you should be pleased, that's beautiful ! Those are the results I would like without having to resort to Dutch ovens and I would also like to get 6 loaves done at one time.
I have to measure the available space in my spare ranges oven. If I could morph it into a awesome bread making machine on the cheap, then maybe I could settle only getting 3-4 loaves done at a time.
I am with Lance. I don't see a need for cordierite for anything other than what the loaves will rest on ( though you can explore other stones- such as fibrament- different stones have different conductivity, which is explored in more detail on pizza websites - https://www.pizzamaking.com/forum/index.php?board=49.0 If you want to experiment with storing the heat by loading a lot of thermal mass, firebricks are much easier and cheaper . my-attempt-replicate-rofco-using-convection-oven Of course, that approach may not work for multiple bakes, since I really replicated more of a traditional wood fired oven - first they build a wood fire to load the mass with heat, then after the fire is out, they cook as it cools down. If you wanted to cook multiple loads, like a Rofco, you would want an element below the stones to continue to add heat, or have a massive WFO. BTW, this is an interesting look at using thermal mass in an attempt to even out temperature swings - does adding mass even temperature swings in an oven I am also with Lance that one issue will be getting a good seal for the oven chamber. One of the impressive things about a Rofco is the videos where they show a number of loaves being baked, then they open the vent on the front door part way through the bake, and steam comes pouring out. IIRC, they did not add any steam, it is just so well sealed that the moisture from the loaves generated a lot of steam, and the oven chamber is very well sealed.
Looking forward to seeing what you come up with.
All of this that you’ve shared is very interesting and is beginning to make me think that with some modifications, my old electric range would do the job. Let me list what I think I know so far and see what you all think.
thoughts?
Somewhere at www.fibrament.com they suggest and talk about using both an upper and lower stone.
I would start with the existing elements and existing single thermostat and see how it goes before going to the expense and work of dual thermostats. I imagine that at the moment both elements will be firing off the one thermostat in unison.
Yes, seal every possible gap with high temp silicone. And check the door seal is good - replace if it's at all sub par. But you will want a vent that you can open after about 20 mins of steaming, I briefly open the door and run the fan for a few seconds, then shut the door but keep the vent open. Check out the Rofco vent as an example.
Also consider my idea of a metal plate (not stone!) that sits just below the top element. I used to have one, then stopped and now I've gone back to it. I take it out and sit it on the base of the oven once I've vented the steam.
And here's a shot of my steam delivery system inside the oven:
And this is an example of how meticulous you need to be in sealing the holes and gaps:
Lance
Again , with Lance, at least mostly.
Utilize the existing upper element and rewire/add a thermostat to be able to control upper and lower heat separately. Is the oven set up now that only the bake element comes on, if so, great you don't need an upper element. If both come on, use a metal plate, or stone, as close to the upper element to block the heat transfer to the top of the loaf. I am uncertain if the upper element comes on in the bake cycle or if it is just there for broiling? I will find out when I get it out in the garage this weekend. I'm uncertain what the typical operation of the upper element are as well. It is a 70's or maybe 80's electric, nothing fancy.
In most older ovens, the upper element only comes on when a control is set to broil.
All this has me wanting to quit my job and begin doing oven mods! I am thinking it’s time to get the old range out of the basement and into the garage and start tinkering.
My old neighbor was German and had some cool gadgets like a steam oven. Have you considered something like a Miele steam oven? I couldn't find as much information as I would have liked about the Miele ovens on their site, but while I was checking back on a Kaisersemmeln recipe that featured a cool steam oven, I distinctly hear the baker say that he is using the Miele combi oven at the 7 minute mark (linked below). It is clear from around the 8 minute mark that it is, in fact, the combi. Miele also makes a non-combi steam oven, but I think it's relevant that this guy used the combi in the video. It would be nice to know if the fan can be turned off (usually they can't in a combi), but the convection may not be as bad with humidity. At any rate, this is another lead for you to look into.
https://youtu.be/O4VTF7tXAG8?t=420
I have a combi oven, and while some people have gotten good results- check out Anova Precision oven, mine tops out at 440 and the convection is on all the time, so I have been looking at other alternatives.
I am going to try & get my Son in law to give me a hand this weekend and get the green giant out of the basement and into the work shop. I am not saying that I'm going to completely bail on the concept of a new oven, but this option is nearly free and worth exploring.
I will post as I make progress, but once the weather breaks here, I completely shift gears to outside activities which includes fishing, yard work, Wood Fired Oven for pizza and other WFO delicacies. My baking, for the most part is a winter activity, though I do occasionally like to bake bread in the WFO.
Please keep Franken Oven ideas, concepts and new oven ideas coming as no final plan has been made.
Do you have a door for your WFO - and does it retain heat well? Some suggest that you heat the WFO for pizza, and once it cools down to the 500's , you load it with dough and close the door and get steam from the moisture given off by the dough.
I do have a door. My oven retains heat extremely well. When I fire it on a Friday for pizza, it is still up to baking temps on Saturday.
The problem I have with the WFO for baking in the summer is, my life doesn’t allow for a lot of free time to bake bread. My summers are completely full with other activities that I enjoy, from yard work to grand kids and fishing. Pizza is something my entire family and friends enjoy, so I make time to prepare dough a day or two in advance and then make awesome pizza.
once I am no longer working, I will try to put more time into summertime bread baking in the WFO, but bread baking, particularly sourdough, is a winter activity for now, since it is so time consuming.
Understand completely.
it hit 65*f yesterday and the snow is nearly all melted. It will soon be pizza season!
I will confirm today wether or not the upper element comes on in the bake cycle. I read a post to this thread discussing adding a diverter to deflect heat away from the top of the loaves. If that element is active, can I just deactivate it, if it does come on in the bake cycle? Or would it be beneficial to be able to run that upper element? I would have zero problem adding additional control to that element if it makes sense to.
As a side note, I also have zero problem with full on customization/ potentially ruination of this oven. I think someone gave it to me years ago and Ive used it as a holidays, extra oven only over the years. Now I have a double oven LG range to take its place.
Yes you can deactivate it, though how easy or hard will depend on your oven and how it is wired. The only time you would want the upper element is if you think the bread is done but the color is too light, but that is usually addressed by increasing the temperature of the oven for the next bake.
Here it is, the green machine. Got her into the garage this afternoon. The upper element does come on with the bake cycle. If it really shouldn’t run while I am baking bread, then I will deactivate it, maybe put it on a switch? It’s the kind of work I do for a living, so it’s not a problem at all. On that note, I wouldn’t be opposed to making this oven mod also good for pizza. I know when making pizza, upper heat is important.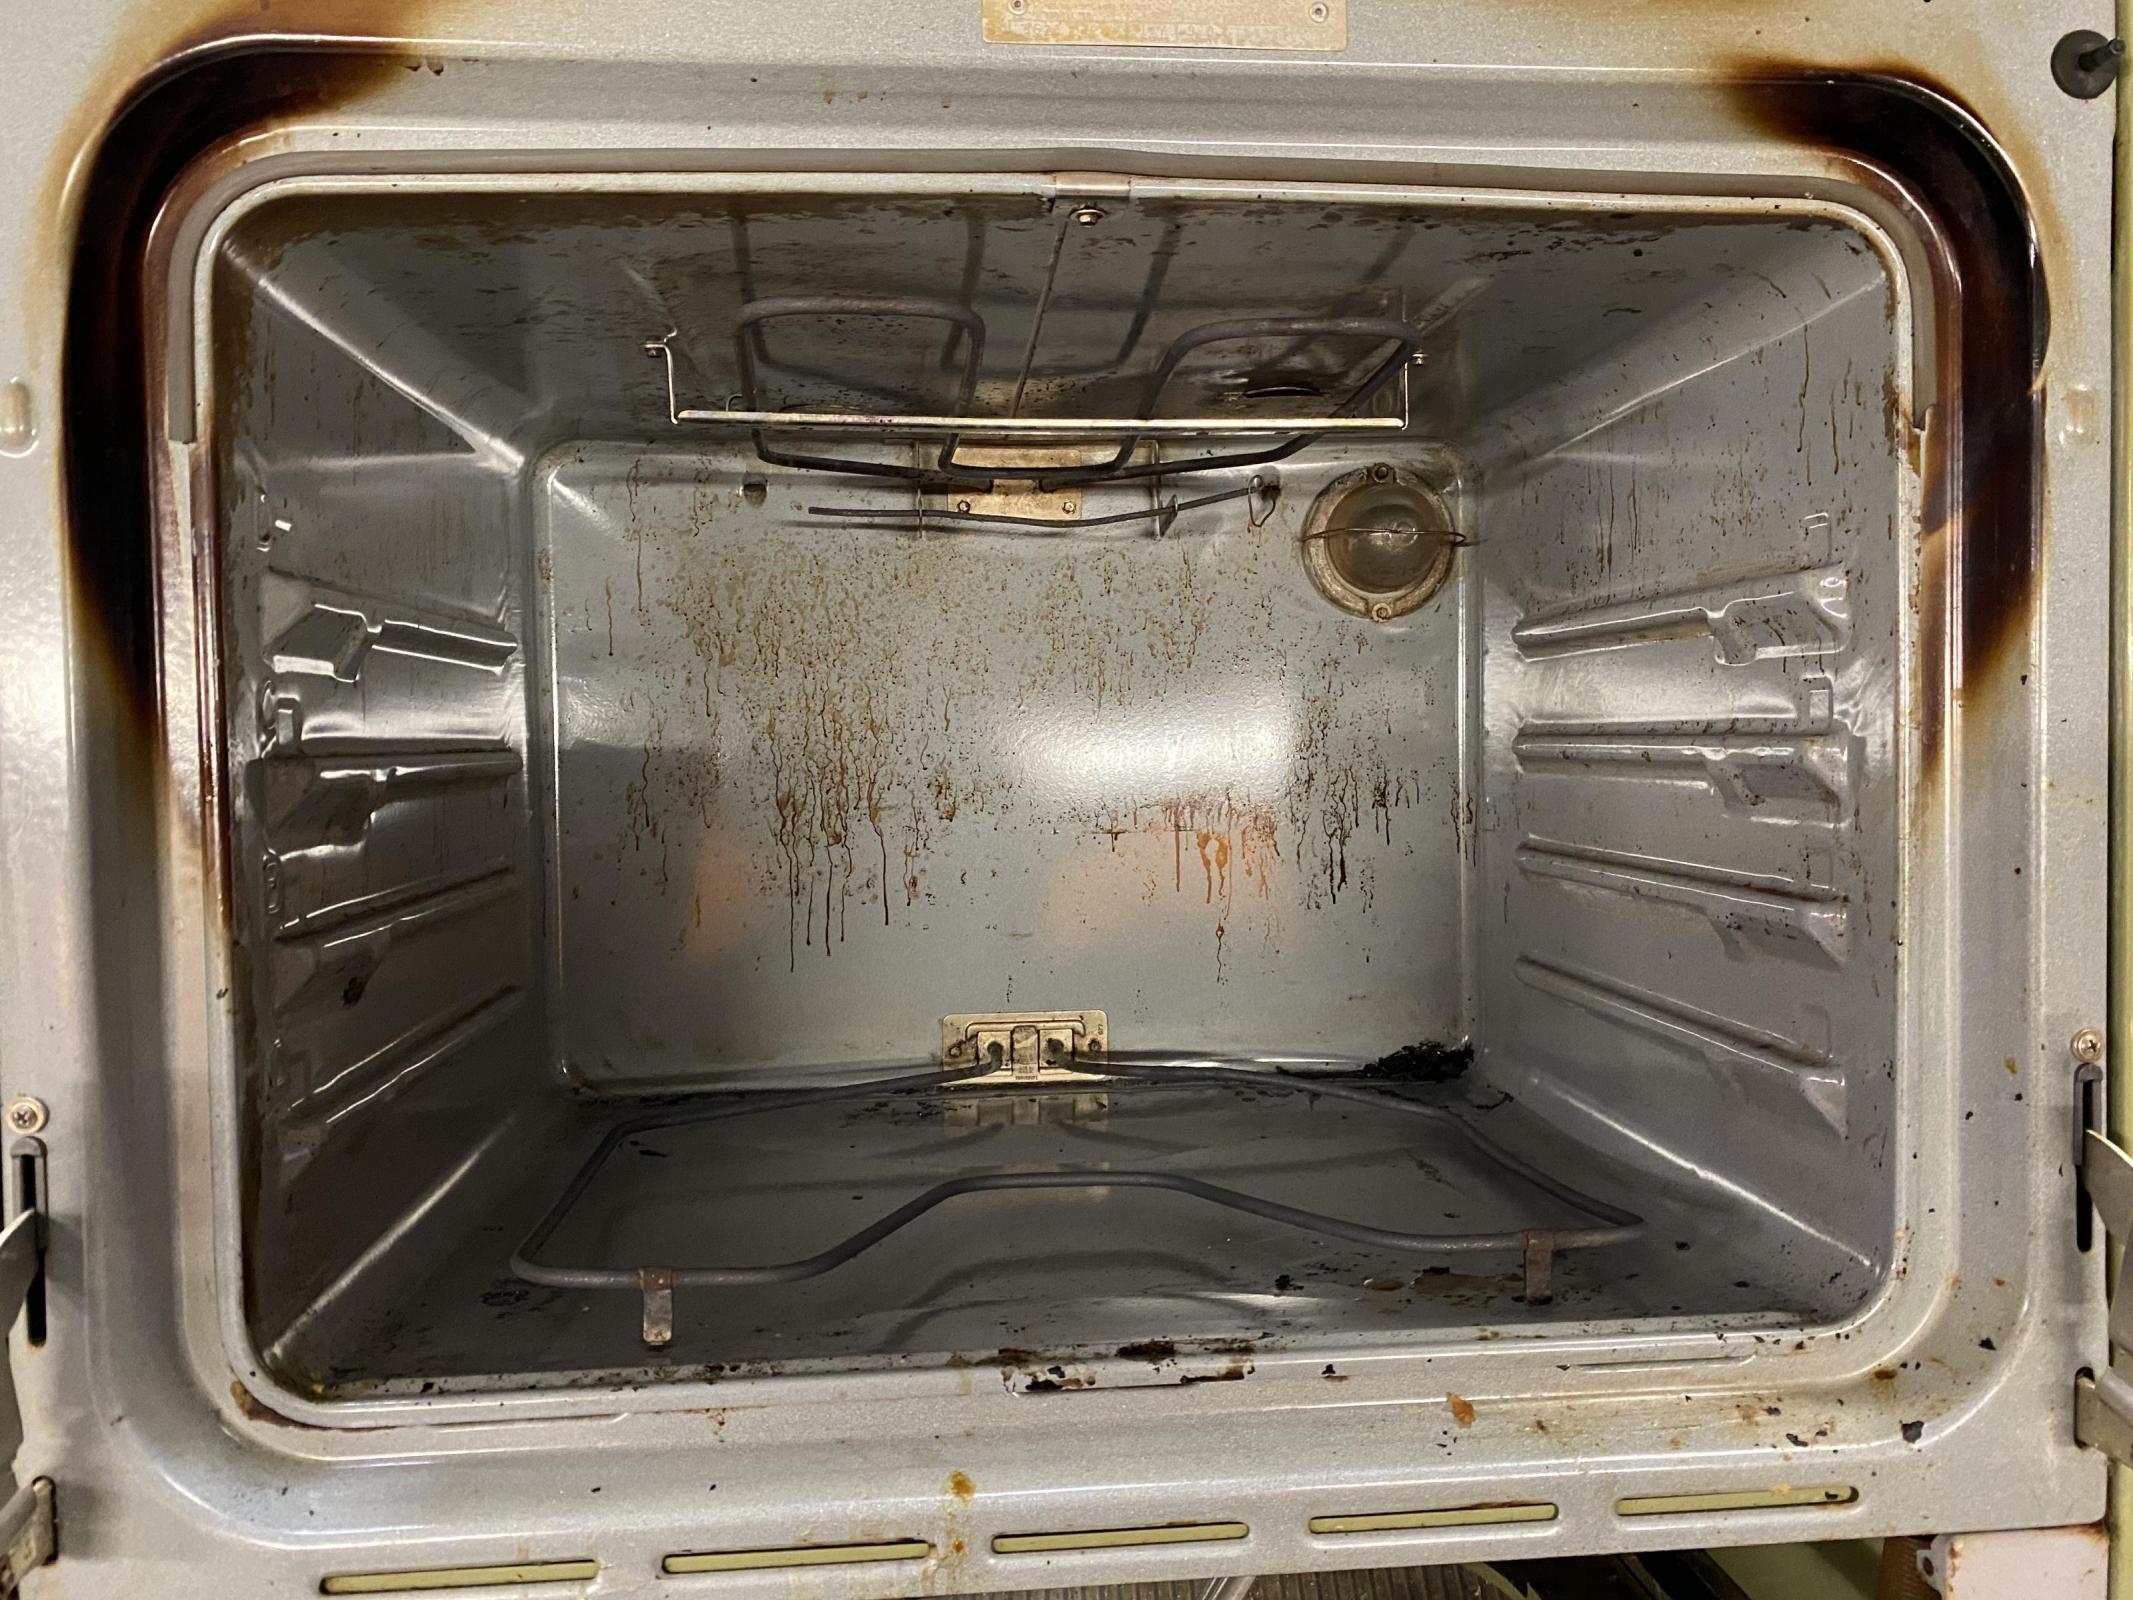
The good thing that I have noticed is, there are no penetrations in the oven cavity with the exception of the vent and a couple of small holes for the thermostat. Sealing those off will not be any problem. I am attaching some photos of the door gasket, it only does half of the door? Is it supposed to be that way?
besides sealing up the cavity and figuring out a way to create steam, what else do I need to do? Could I just fill the bottom of the oven with fire bricks, that I have on hand for thermal mass and then have a stone cooking surface cut to fit that would sit right On top of the bricks? Or should the baking surface be a distance above the bricks or the heating element?
I have a 18x18” one inch thick baking stone currently... The green machine oven is 18”x21”.
That bake stone sounds a good size and thickness. You might not need any more refractory in there. Just cut the stone to give some side clearance.
Keep both elements running and consider a steel plate on the top rung for the steam part of the bake. I just use the grill pan - not sure what that's called in American.
Re the seal, that's not good. Maybe it's designed to keep the heat in, given that heat rises, but it won't keep steam in. My oven has a seal that goes right round. The corners of the seal have metal hooks embedded which clip into slots in the oven. If you don't see any slots in the oven then it's probably as designed and you might need to consider a different sealing mechanism.
Lance
Lance, I will be picking your brain as I start this project. I have tons of questions, I’ll try to keep them just a few at a time.
Breadmaking isn't an exact science (some would like it not to be a science at all) and neither is the development of relevant equipment.
Most things are best developed empirically, often by trial and error, so start with the most basic setup and see how it performs and improve as necessary and feasible.
Initially just use your 1" bake stone, positioned so it is 8-10" below the top element. Fire up your oven at 260C equiv for 1 hour. Then drop temp to 220C and put your loaves in. You really don't want direct heat from the top element for the first 20 mins, so maybe that temperature reduction will stop it firing. Other options are to either shield it with a metal plate as I already mentioned or switch it off if your settings have the option for bottom heat only.
You will need a steamy atmosphere for the first 20 mins - Silvia's famous steaming towels might be the way to go initially.
Regarding stone size - again, just try it - if it works OK, then no need to cut down.
Pressure cooker: mine is 6l, but it's not critical, you only need to inject about 100ml water as steam. I think it was Danny who suggested a needle valve and it sounds like a good idea - you don't need or want any high pressure steam. I have a 1.6mm orifice plate fitted (must be at the pressure cooker end) and that does the job.
Yes I guess you can use the existing vent, but can you seal it 100%?
Lance
Lance, Not ever having done an oven mod, I’m looking to learn what I can and implement that knowledge into my oven. Since this oven is a blank slate and not needing to pull double duty to roast the evening meal, I have the advantage to learn, tinker, build and test at my leisure. I know there’s no step by step instructions, but you and others have already paved the way for me and know what works and what didn’t. I appreciate your help.
On keeping the steam in the oven, my chamber is tight and the only weak spot is the the door seal. I have this idea that I think will work well. The door center pultrudes into a mating recess on the oven where it seals against a pathetic door gasket. My idea is to take the high temp sealer and run a sizable bead around the entire perimeter of the oven recess. Then drape plastic wrap over the door covering the entire area that will mate with the oven where the bead of caulk is. Next spray the wrap with Pam and close the oven door. Leave it closed over night, then hopefully remove the plastic wrap and reveal a custom formed, hopefully tightly sealed gasket. Might work?
I have often thought about this approach for related applications.
It "might" work, but bear in mind there will be no give in the seal. Most big seals are designed with some give in them, eg V, U, hollow round/square, or use foam.
Also it will probably look messy and be a pain to remove if needed.
You can buy seals. I just searched for "high temperature sealing strip" on Ebay and got quite a few likely hits - mainly from China.
Also PM TFL member Geremy (Kendalm). He retrofitted a seal to his oven and will be able to tell you where it came from.
Of course thickness is the critical factor - it's no good having a tight seal at the bottom if the top is wide open.
Lance
This is the seal I bought, though for a much smaller oven. This is designed to clip in place, though you can use a high temp sealant to hold it in place. It is hard to see in the photo, but it is a triangle shaped piece.https://smile.amazon.com/gp/product/B002B7RNT6/ref=ppx_yo_dt_b_search_asin_title?ie=UTF8&psc=1 The other kind is a hollow tube, and that would probably work better - easier to compress and get a good seal.
Barry & Lance, I will have to check into a different gasketing angle than the caulk, though it gnaws at me that it would make for one really tight seal? The high temp caulks I have used in the past, remain pliable, so I may try my method as a test and then report back here.
Here’s todays progress. It’s really important for cleaning and storage in my garage, that things be mobile. So my grandson and I mounted ole Green to casters. I also got a tube of high temp sealer on its way.
The 18” x 18”x 1” baking stone is about an 1/8” too long, so now I will need to order a new one and keep this one for in the house or cut this one down a bit. If I opt to cut this one, would it be beneficial to have gaps front to back as well as side to side?
The small steps continue. I cut the baking stone down to fit the oven tonight and inserted a thin disposable aluminum tray for upper heat deflection.
Next step is figuring out how to generate a good quantity of steam. I have the word out to Family and friends to be on the lookout for a old pressure cooker.
Mother in law says she has a old Presto A403 that she is willing to contribute to the cause! ? Things are moving in a good direction.
Here's the latest version of my pressure cooker setup. It might give you some ideas.
Lance
Lance, did you have the drilled hole/orifice from the start or did you add that? Also, what did you use and how big of a hole? Is it a penny? One more question, did it work or does it need changed smaller or bigger?
Steam for ovens should be wet. Pressurised steam is dry. The only true way to have wet steam is to make it on demand, at atmospheric pressure. The trouble is that it's not as convenient and slower to transfer because it doesn't have much motive force due to lack of pressure.
My orifice plate is a compromise to reduce the pressure right down, but still have the convenience of steam stored and ready in the pc. I have checked the steam temp coming out (in a non heated oven) and it was 100C, so I think it's a reasonable solution.
So it was a fairly recent addition - part of my incremental improvement program ;)
I made it from 15mm copper plumbing pipe, annealed to make it more workable and cut into a circle. The hole size (1.6mm) was chosen empirically to issue about 60g of steam in 2 mins. I think it's about right.
Lance
Thanks for sharing all of that. It all made/makes sense to me. I hope to have a start on my steam generator tomorrow. I still need to gather parts and pieces for that.I need to have the PC in hand before I can do that and its supposed to arrive tonight.
There will be a work stoppage starting thursday, I’m heading to visit my brother for a week. I am torn between looking forward to the get away and the visiting my brother and wanting to stay home and tinker with my oven mod! LOL!!!!!
The (un?)healthy obsession!
A nice looking saw! Is that a dedicated stone saw or adapted? Diamond blade?
The saw works great, I bought it at Lowes Building supply 7-8 years ago when I was doing my WFO project. I don't think it was very expensive. It has a diamond blade and a water supply that can be adjusted, to minimize the mess. I primarily used it when fitting the used Quartz counter top together, to fit my project needs. It is only good for 1" thick items or less is the only draw back. For cutting my 200 or so bricks for my WFO, I used a Stone brand, commercial brick saw that was priceless! Made the project almost easy, it worked so well. Ok, easy an over statement, LOL..
Thanks for additional info on steam generator.
I just looked, its a Ryobi brand model, TC400. It was cheap and works great.
I have to say, I am really enjoying this project. I am uncertain why the heck I didn't do it sooner! It would have been great if I had started last fall, so I could have used it all winter when I do most of my baking. At least I got it off the ground now.
I have a little time before the wheels come off my free time and my baking, so hopefully I can get her fine tuned for full use next winter. I love fun projects and this fits that bill for me near perfect.
If it works as good as I hope it will, I will have saved a bunch of money, because I was seriously ready to pull trigger on buying an oven, they just don't seem to exist or if they do, they're awfully expensive. I believe there's a market for a dedicated home use, bakers oven with steam injection. The key being at a reasonable price "Below $2500 USD"
I think I am ready to give the oven a test run, I hope. I started a batch of baguettes today and would like to bake them tomorrow. I currently am testing the oven with nothing in it but the stone. The 1 inch thick 18“ x 18“ baking stone hit 369° in 45 minutes with the oven set at 500°F. It took around an hour and 10 minutes for the stone to hit 500°F.
I am going to add some photos for comment. I put some pieces of fire brick in between the oven element To serve dual purpose, one to hold the tray that I am going to use to create steam for this trial and also with the idea to add some thermal mass. Right now the oven is not cycling very often and holding the stone at the 500°. There is roughly 6 inches between the top of the stone and the bottom of the Heat deflector and about 8 inches between the top of the stone and the top heating element.
Just for reference, here is Dan's build, with parts list:
https://www.thefreshloaf.com/node/61210/external-steam-generator
Thanks!
I have dough ready to go into the Green Machine tonight and why I was doing a test yesterday. I am probably a week or two away from having the Pressure Cooker steam generator operational.
I had the oven & stone preheated for 2 hours. I took a aluminum cookie sheet and preheated it in the oven, while I had four dish towels rolled up and in a bath of boiling hot water. I took the aluminum heated sheet out and using tongs, I placed the hot wet towels on the sheet and put into the oven. I was not overly impressed with the steam made? I didn't have my steam meter calibrated "LOL" but it just didn't seem robust?
Did I do something wrong or were my expectations too high?
The Presto brand pressure cooker I have, has already drilled & tapped for 1/8" pipe. I found a 1/8" male pipe needle valve with a 1/4" compression tubing outlet. Is the 1/4' tubing going to be large enough to get ample steam to the oven? Or should I drill and retap the the hole in the PC and upsize everything?
It doesn’t take a large conduit. The steam is pressurized and will fill the oven in short order. My main concern is reducing the flow of steam. If the steam flows too freely, the pressure will become exhausted in short order.
I have a 1/4bsp valve on the pc which converts to 1/2bsp for the hose (mine's an ex shower hose), probably about 3/8" ID.
It all seems about right to me. Why dies your PC already have a tapped hole?
Here is a pic of what was threaded into the Presto. Maybe something is missing? It may have been for releasing pressure?
I don’t know about the fitting.
I assume you know, but want to be sure. To need to keep the pressure valve that came with the PC on the unit.
Yes, it has a pressure relief which I will keep in place. I just ordered a new one along with a new gasket for the old girl.
I just found it. It is the preasure regulator and looks pretty basic/simple weighted needle valve. I saw it refered to as the wiggler? LOL
https://www.youtube.com/watch?v=e-QTS4Ric74&t=3s
I wouldn’t operator the PC without the wiggler, it would be dangerous. I have a wiggler on mine. My PC also has a rubber plug that works as a secondary safety pressure release.
I believe Lances PC uses a pressure release that is located in the upper handle.
I agree, the wiggler is the primary pressure control system and must be employed. The overpressure plug is a safety device of last resort.
Lance
I will keep the wiggler in place then, I will have to find/buy one since this is missing that portion. Dang it! Does the wiggler just sit on top of the PC and attach? So its a loose part? Or does it snap on and stay attached?
So since I need to now drill and tap the lid, should I upsize to 3/8" valve and tubing?
Certainly I think that size of tubing would be beneficial. I think you can possibly get a 3 part weight to run the PC at 5psi which would be an easier alternative to the orifice plate idea.
Chris, on the towels and the tray, while the amount of steam at first seems pretty mild, at least when I did it, it keeps steaming the whole time, and when I open the oven, you can visibly see steam come out of the oven. If not, I wonder if you have it completely sealed.
The towel steam system worked great tonight! I did a test run of the oven today, because I am like a child waiting for Santa when it comes to projects like this.
I made a batch of baguettes using a poolish and a leaven. I am on to something here! What a amazing bread experience! The end product was better than anything that can be bought in any bakery where I live. Pictures will follow. The Franken oven is kicking some serious A.
I rushed everything about his bake. I should be packing for a week away, instead I’m raising baguettes and baking in my Franken oven. My wife says I need my head examined, but the butter and yummy noises quickly soon revealed that she was ok with my depraved choices.
in all seriousness, these loaves were better than any bread I’ve baked in my 30+ years of hobby baking.
Glad to hear it worked well - what did you do about a front seal for the oven?
I have not addressed the seal issue yet. This was just a dry run, to see how things would work and also to see if there was any difference between baking in this oven and my home oven. Everything turned out great, including the use of the wet towel method for the steam. Like I mentioned earlier, this was a rush job and things still turned out exceptionally well. When I get a chance to do another bake I will try not crowding the oven as much.
I baked four full size baguettes at one time, which I think was one or two too many. Yet still the results were excellent. I will be posting some photos later on when I have more time. Speaking of which, trying to post pictures here is a bit of a pain.
Here are some photos of the first ever bake in the Franken Oven "Still a work in progress". I was very pleased and things can only get better from here.
Nice, though it looks like the top element came on at some point - some crumpled foil under the metal pan that is above the loaves may help. but otherwise, pretty darn nice.
Barry, I plan on putting a switch and a relay in to disengage the upper element as I progress with the project, so I can turn it on and off when necessary. Even though the tops of the loaves set up early from the upper heat, they still had a great crust, very crispy.
Great first bake with the Green Goddess!
Lance
Thanks Lance, after this first trial working so well, I think things will be improving even more once I get all of the tweaks to the Green Goddess "LOL" finished. As I mentioned before, I have a week away, so project stalled until I get back.
I have on order a 3/8" 9.5mm fine control valve coming, along with Hight temp silicone tubing to run from the Pressure Cooker valve to the 3/8" ID soft copper that i will run down into the baking chamber. What would be the best location to bring the steam in? I have the flexibility to bring it in anywhere within reason.
Is right at the baking stone a good location, with a header spread across the back of the oven?
Well, you've seen my internal injection bar with 3 nozzles (and a small drain away hole at the end).
This connects up by a hole drilled in the side of the oven near the front, for access reasons.
Of course, you have access all round, so just come in wherever is easiest, probably at the side, near the back.
Lance
I am thinking about possibly building a round or roundish, steam release header. My thought is to surround the entire baking stone perimeter with copper tubing with holes drilled on top of the tubing, to release the steam? My thought is, that this would envelope the entire baking surface with the steam. Also, the stone is currently sitting on a oven rack that I can attach the tubing to, since I am making this oven a dedicated baking oven.
thoughts ?
Steam travels fast!
Also aim for stainless tubing - I found copper scaled up after a while in the heat and developed green deposits inside, which will spray out with the steam (in a small sort of way, but best practice...).
I ordered 3/8” OD stainless tubing today. I think I will have all of my components together by this weekend and maybe have a chance to tinker with the oven.
All of my supplies are here, I should be able to start building the header and steam generator tomorrow.
Not knowing the principals of steam and what happens to it, once it is released into a super heated chamber "500*F Oven" where is the suggested best place to release the steam? My slate is clean, so I can bring it in just about anywhere, in just about any configuration. Does it possibly not matter? Because it is about creating a moist environment, in a small enclosed space?
I am working on the oven today......Unless otherwise directed, I think I am going to run the header across the back of the oven at a height probably just above the top of the tallest loaves I would bake.
Hopefully Lance replies before you start. I think his header is located the same as your idea. The steam will flood the oven.
I suggest drilling the jets in an upward direction so that the spray is not directed at the dough. But that is a guess...
BTW - I expect to receive an adjustable 5, 10, 15 pound regulator this week. It is ‘t specifically for my Presto PC, but I think it will work. Mt present regulator is set to 15#. I want to inject at 5#. It is my thought at this time that high pressure steam is not ideal.
Danny
Just rec’d the adjustable wiggler for the Presto PC. It originally came with a 15# only. Called Presto and they told me that all Presto PCs used the same wiggler stem and that the adjustable wiggler would work.
I tried it (without baking) and the wiggler works properly at all weight settings. Visually the various pressures of the steam can be seen flowing into the oven. At 5# the pressure is greatly reduced.
Plan to bake in the next few days.
Hoping it improves the bake...
Looking forward to seeing your trials with the new regulator.
Yes, I think you're about right there. I spent some time looking at pictures of deck ovens and just about all of them have steam coming in through several nozzles at the back of the oven.
Make sure to have a slight slope on it with a small drain away hole at the lowest point of the far end.
Lance
I had a few hours today to continue on the Franken Oven. As I got into the mounting, bending and figuring I recalled a quote from @albacore / Lance
"Most things are best developed empirically, often by trial and error, so start with the most basic setup and see how it performs and improve as necessary and feasible"
So with that in mind, I rolled with some ideas and concepts that I thought might work well and be simple to configure. The photos should show my concept well of a single header, centered over top of the baking surface and well above the tallest loaf I would make. I drilled the steam ports in the 3/8" OD tubing small to begin with at .09" in between a 1/16 & 1/8" and figured I can drill larger if necessary. I drilled 5 holes on each side, staggered and above the center of the tube and pointing a bit upward. I plan on plugging the end of the tube with High temp caulk if feasible.
Everything is only dry fit for the moment until time allows me to continue working on it.
I plan on finishing up the final touches to Franken Oven this week after work as time allows. I would like to give it a try baking this weekend, since it is a long holiday weekend for me.
I understand the operation of my pressure cooker and it seems pretty straight forward. Once it comes to it's designed pressure, it will begin releasing pressure/steam via the Wiggler. So I am guessing step one is to get the PC to this point, prior to loading the oven with dough.
Steps beyond that, I could use some advice from those who have been down this road before. I did install a needle valve, so adjustment of the steam output should be good. I also know that typical steam duration is in the first 15-20 minutes.
Any help here is greatly appreciated.
Best to think of steam as three distinct phases: injection, steam stand and steam removal.
In a well sealed deck oven, injection might only last 5 - 8 seconds, followed by the steam stand of 15 - 20 mins, then the oven is vented by opening the vent and often the door too, to get rid of the steam quickly.
If your oven leaks steam, then that 8 seconds might need extending, even to the extent of leaving the steam running all the time at a low level - this is the basis of the steaming towels idea.
Also how many loaves you are baking will be a factor - a fully loaded oven will create some steam of its own from the dough moisture, but this will probably come too late to help with the initial "keep the dough surface moist" oven spring phase.
I am currently injecting for 2 minutes followed by 20 mins stand. I used to do just 10 secs, but I reduced the steam pressure with that orifice plate as I was concerned the steam might be too dry.
It's also a good idea to presteam for a few secs as well.
Lance
Lance, thanks for the detailed response, I will implement your suggestions and report back, once I give the old girl a test.
What did you think of the single steam tube concept and configuration?
It looks like it should work fine to me - nice and simple. Will you be able to slide in your element shielding tray above it easily without knocking it?
BTW you could probably get a stop end fitting to neatly close off the end of the pipe.
Lance
The shield slides in and out with no problems, I measured twice ;-) LOL..... On that note, I disconnected the power to the upper element, but plan on shopping for a proper disconnect switch, so I can just which it on and off as needed. Do you think that is ok, or should I leave it connected/working and kick my heat shield up a notch until I can get a switch?
Lance are you getting large blisters with your steaming method? I don’t and have no reason why not. The oven is loaded with steam.
BTW - the Presto 5, 10, & 15# regulator is due today.
Dan, what is the current pressure of the Presto PC you have?
The standard Presto regular is 15#. The one I ordered has 2 removable weights. Thus 5, 10, & 15#.
waiting on delivery man now...
I've only done the one loaf (that I sent you a picture of), Danny. Otherwise my loaves have not been blister orientated. eg I did an Approachable loaf bake and today was Seed Monster. I'll let you know when I next do a classic 20% wholegrain loaf.
Keep us updated on your new wiggler (!) or is it a jiggler?
Lance
I sealed up the oven vent hole, as well as the thermostat holes. I also thread taped all the pipe joints and put hose clamps on the silicone tubing connections. Geting very close to a steam test. Maybe tomorrow?
I read that the oven vents in electric ovens are there to facilitate even heating. If you check the very bottom of the oven door you will probably find huge vent holes. (When the door is closed, the bottom edge facing the floor is where the holes are located.
I don’t think oven leaking is a big issue for our setups. As Lance said, we can inject continual steam for 10 minutes or more if we wish. NOTE - in order to produce a continuing flow of steam the needle valve should be used to restrict the majority of steam flow. If allowed to flow wide open the pressure will exhaust in short order. Full steam is not necessary or desired.
The only thing is that if you are continually injecting steam, then you are cooling down the oven, so I think the goal should still be a well sealed oven prior to venting.
Danny, there may be another reason for the vent in normal oven running: getting rid of the steam created by any hot moist dish that you are cooking. Eg if you are cooking a pie you probably want a dry atmosphere to avoid soggy pastry. And also for safety reasons so that the user doesn't get a blast of steam when opening the door.
Lance
Good point about cooling the oven.
Having disconnected the upper element, I have concerns about cooling and more importantly, reheating.
Yes, I'm not sure you need to disconnect it. My current regime is to heat slightly over planned bake temp with grill pan in place, shielding top element.
When ready drop oven temp. Eg preheat 250C, drop to 230C.
After steam phase and when opening vent, remove grill pan to expose top element.
You probably just need something a little thicker than your disposable ali tray.
I bought a 30 amp 240v switch today and will install it this week. I plan on keeping the upper element turned on in preheat and post steam and off during the steam portion. The disposal tray is out and a heavier duty aluminum 1/2 sheet pan in for heat deflection.
Lance, Oven Cooling from Steam
I forgot about my Thermal Data log testing. My oven doesn’t cool down a whole lot when huge amounts of steam are injected.
See THIS LINK.
First test of the steam generation system seemed to go well. Take a look at the videos I hosted on youtube. Lot of steam was generated and released into the baking chamber, though i did not have the oven heated.
The steam tube did spit some water, but I believe that was due to me filling the PC with too much water.
https://youtu.be/xnoxNBZk-j4
https://youtu.be/UA7kuSqQEMA
I plan on giving the Franken oven "or Green Goddess as Lance called her" a test drive tomorrow since I am off of work for a few days. My 83 year old father has made a request that I have been struggling to recreate for years, New York hard rolls......... I am hopeful that the addition of the steam injection may help with my recreating a marvel of the baked goods world, that you just can't find many places outside of the NY/NJ metro area.
I plan on two different bakes, one is the rolls, hopefully in time for breakfast and another bake later, of four 750g loaves of Rustic Sour Dough. I will photograph and present my results tomorrow or Saturday. Does anyone know if I could do all four 750g loaves at once? My preheated 1" thick stone in around 17"x17" . Maybe to start, I will just do 2 at a time.
If anyone has tips concerning the NY Hard Rolls, please let me know. My plan is to use a version of a Kaiser Roll recipe listed from a book called "Inside the Jewish Bakery" The only issue I am having with the recipe is it calls for Malt Syrup, which I don't have and can't find locally. I am thinking of using molasse in its place?
I've seen malt syrup at homebrew supply stores and Korean/Asian grocery stores.
At Korean/Asian stores it may be labeled "brown rice syrup."
Don't use blackstrap molasses - the flavour is overpowering! Any glucose syrup? Or just make up a sugar syrup.
Lance
Homemade Kaiser Rolls (parve or dairy)
The classic New York pleated sandwich roll, homemade just like the used to do it at the bakery. Adapted from Inside the Jewish Bakery. Course BreadsCuisine American Prep Time 1 hourCook Time 12 minutesRising time (total) 3 hours Author Tamar MarvinIngredients
TOPPING:
what I wonder is why the sugar and the malt syrup? So if I supplement sugar syrup for the malt syrup am I using too much sugar?
Malt flour/powder is diastatic, malt syrup normally isn't, so the recipe is providing, shall we say, mixed messages anyway.
Unless you have diastatic malt flour (every baker should!), just leave it out. A teaspoon of a non-diastatic product won't make much difference.
I have non-diastatic malt powder, I will have to get the other.
edit: I have low diastatic malt powder not non
I made a batch of NY style hard rolls last night. They are going into the Franken oven shortly.
It took awhile to get here, but today was the first bake in the Franken Oven with the steam system fully operational. I am pleased with the results already and I believe things will only improve from here as I learn.
The first bake was a try at a Hard roll. I pre-steamed the chamber for 2-3 minutes prior to launch, then loaded the rolls and continued steaming for the first 5-6 minutes. Steam was definitely escaping from the door the whole time. Even so, the crust I believe turned out very good and nearly perfect to what I was targeting, which was a very thin, very crispy, egg shell like exterior. I preheated for an hour at 450 and baked at 425. Next time I think I will try pre at 475 and bake at 450.
See the photos below, I think I could have sold them on a street corner in NYC with butter and coffee and I think people would have liked them, but maybe not love yet. I will tweak the recipe to improve the crumb, but the oven I think preformed very well and achieved a great crust.
I am preheating now for another bake of 4 rustic loaves of Sourdough bread. Stay tuned!
I had to take a break in between baking the rolls and the sourdough loaves, so I shut the oven off. An hour or two later I went out and turned it on for a pre-heat. When I went back to look at it an hour later the oven was only 350°. I began troubleshooting and discovered the lower element was not getting hot. I Grabbed my ohm meter and tested the element and it is open and junk. It was very disappointing, as I was really looking forward to seeing how the sourdough loaves would turn out with the steam injection.
I’m guessing the element failure is probably just a coincidence and not steam related, since the oven is so old, but I still wonder? I also wonder if if may have failed during the roll bake?
What a shame, Chris - you were on a roll! (sorry about the pun!). I'd be surprised if it was steaming related. Can you get a spare?
Lance
On a roll............ LOL!
After some further investigation, I found that a portion of the element had actually begun to melt, so I am nearly certain it was not steam related. The serial number indicates that the oven was from sometime in the mid 70s. If it was the original element, I would say that was pretty good service.
I called our local appliance parts store and they have the element in stock, I plan on grabbing it tomorrow so I can do some rolls for Easter Sunday. My sourdough loaves turned out excellent in the Dutch oven‘s, but I was really looking forward to baking them in the green goddess. My time for sourdough baking is beginning to dwindle as the weather here is beginning to look good and warming up nicely next week.
New lower element is in place. I plan on making some more rolls for Easter tomorrow. I will give the oven another try then.
Burnt element.
I am going to consider this Sunday’s bake my first fully functional and successful. I am guessing the element failed during my first test bake, because the results were much better this time around. I made another batch of Hard rolls and they really turned out excellent. The recipe I was using called for heavy steam the first 5 minutes, so I poured the steam to them . Take a look at the video and photos.
https://youtu.be/bEd_q3jb1J0
Beautiful rolls. But the real test, IMO, will be free form artisan SD loaves. Hoping for huge oven spring and gigantic blisters.
I am testing the variable pressure wiggler. It will fit your Presto. I’ll post my findings in a few days.
Yes, agree Dan. That test got foiled with the element burn out. I plan on giving SD loaves another try this coming weekend in the goddess.
Just a thought, make sure your home outlets and breaker panel can handle the amps/wattage needed to run a commercial sized oven. You don't want to buy a $10k oven just to find out that your current electrical set up can't handle it. Some houses might not even have the right size wires, so definitely get it checked out by an electrician first. We were just putting in a new breaker switch and found out that the builder cheaped out and put wires that are too small to handle the AC unit, which is why it kept shutting off. So then we had to re-wire the AC unit to the breaker panel, right before summer time.
Thanks SO. Right now I am concentrating on the home oven modifications I am working on. Since things are moving in such a positive direction with little investment, that is the direction I am continuing to head for the moment. So no huge electrical modification necessary at this time.
Hodgey, see THIS LINK for the first 2 test of the variable pressure regulator.
Danny
The no pressure steam loaf trail had way more expansion. Hmmm
What was your no pressure procedure? Bring water to full boil with the valve wide open and no regulator/wiggler in place?
The regulator is left on the PC. But since the outflow valve is set to wide open, pressure buildup is not possible. The same results would occur if to put your outflow hose onto the pressure regulator stem of a typical PC.
Take a look atTHIS VIDEO.
That's a pretty simple arrangement, just open the valve wide open. So that is the method you used with the loaf labeled "No pressure steam"? It appears you had a major increase in oven spring. What percentage increase would you guess?
I just took another look at your tests. I wonder what the first test loaf would have looked like if you had allowed 5lb steam to flow for the full 20 minutes like you did in the other test?
May try that in the future. 5# for 15 min. The oven temp drop shouldn’t lower much, but logging will be necessary to confirm.
The odd thing about my oven. The breads baked thoroughly in 20 min. Other bakers report baking that same bread for 30-35 min. I have no idea why this is so.
~20-25% increase. But not sure that was a result of the steam. More bakes needed to confirm.
Keep us posted. Great information and thanks for sharing.
My SD loaves cooked in a Dutch oven are normally done in under 30 minute at 500*. I remove the lid at 20 mins and pull typically 5 mins later.
I think its a success! There of course is some learning to be done as well as tweaking, but all in all I think the Green Goddess has serious potential. I made 4 750g loaves plus a dozen 100g rolls. Everything turned of really well, with the following notes.
More Pictures to follow, I live in a zero high speed zone........... Wireless hot spotting, ugh!
Here are some more photos of my sourdough bake last night. 70% hyd 80% bread flour 20% whole wheat.
They look great, Chris! How long are you leaving the heat shield in place?
I'm currently doing 20 mins.
Lance
Thanks Lance. Like I mentioned in my previous post, there is a lot to learn and tweak here. The good news is, if the worst that happens is turning loaves out like yesterdays, its going to be ok.
I had the heat shield in place for the entire first 15 minutes during the steam cycle and removed when venting the steam after 15 mins. What I think I know now is, the preheat at 550* f was too much, the stone drifted up to 565* and was still above 540* when I removed the first loaf I baked. Next time i plan on preheating at 500-525*f . I was trying to mimic the process I use when using a Dutch oven. The Green goddess is not a Dutch oven, so I don't think I need to be that hot since the thermal mass of the baking stone is holding temp really well.
The other thing to note here also is, on the first loaf, after the 15 minute steam cycle, when I opened the door to release the steam, the loaf appeared to be nearly completely done in 15 mins? I let it go another 5-6 mins and pulled it and the internal was 210*f and the entire thing a nice golden brown. The bottom was just a bit too dark for me, but not terrible, just approaching char.
More testing needs done, but I'm very pleased over all with the results. Thanks everyone who has helped along the way and moving forward!
I baked five 600 gram loaves this Sunday for mothers day and they turned out great. I preheated for 1.5 hours and used 20% stone ground rye, 80% KABF and 75% hydration. I think this might be my last bake of the season, i will start again this coming fall. The oven and steam system are working great. I had the stone at 500*f after the long preheat. Lots of steam the first 15 minutes. These loaves were completely done in 22 minutes. The shape was a little different, since I bought a bunch of cheap hand woven baskets and lined them with a linen napkin. The basket were a bit smaller than my normal bannetons that will hold a 750g loaf.
I have blown the dust off of the Franken oven and doing my first sourdough bake of the season today. I am rereading the help I got here to refresh my memory as to the timing of steam application and such. I have 4-750g loaves ready to go in, I will post photos a little later .
Because of my many life's obstacles, I only have the time to commit to sourdough baking in the fall and winter months. My skills seem to suffer somewhat after a 6-8 month hiatus. I must start taking better notes!
Pictured here is my first bakes of the season. 70% Hyd 80-20 KABF & KA whole wheat. 1hr autolyse, 3 hours of stretch & folds every 30 mins and a 3 hr bulk at room temp. I then shaped and refrigerated overnight. 1-2 hrs out of fridge and into a 500*f preheated Franken oven. I presteamed oven 3 mins and loaded two loaves with full steam on for first 10 minutes. The first two batards I neglected to remove the upper heat deflector so the loaves are not as golden brown as I would have liked. The second batch of boules, I removed the deflector at ten mins and baked 20 mins total, the color is much improved.
I would appreciate any critiques or tips for improvement. The bottoms get darker than I would like, what can I do besides using a lower preheat temp?
Nice looking loaves. To lessen the browing of the bottoms, take a big piece of aluminum foil and crumple it, then spread it out a bit ( you don't want it completely smootth, then put it under the bottom stone. It will deflect some of the energy from the bottom elements.
Thanks, Good tip Barry, i will have to give the foil a try. Can you refresh my memory on how long you are adding steam during your bake cycle?
I forgot to add a crumb shot and will add it if i can figure out how to do it from an ipad????
My latest procedure, and can't say it is the best, is a variation of Slyvia's steaming towel. I use a modified small Cadco oven ( put in a bottom element on a PID controller, took out the convection fan, sealed the rest of the cavitiy, except one tube that has a plug in it. I preheat the oven, then put a towel that has been soaked in boiling water in a shallow metal pan, and leave that in the oven for 8 to 10 minutes, then when I open to load the dough, I see steam coming out. Then close the door, bake 1/3 with the plug in the tube, then take out the tray and remove the plug. I am normally baking a 454 grams of flour whole wheat loaf - that is 9 minutes with steam, and 18 minutes open.
My latest procedure, and can't say it is the best, is a variation of Slyvia's steaming towel. I use a modified small Cadco oven ( put in a bottom element on a PID controller, took out the convection fan, sealed the rest of the cavitiy, except one tube that has a plug in it. I preheat the oven, then put a towel that has been soaked in boiling water in a shallow metal pan, and leave that in the oven for 8 to 10 minutes, then when I open to load the dough, I see steam coming out. Then close the door, bake 1/3 with the plug in the tube, then take out the tray and remove the plug. I am normally baking a 454 grams of flour whole wheat loaf - that is 9 minutes with steam, and 18 minutes open.