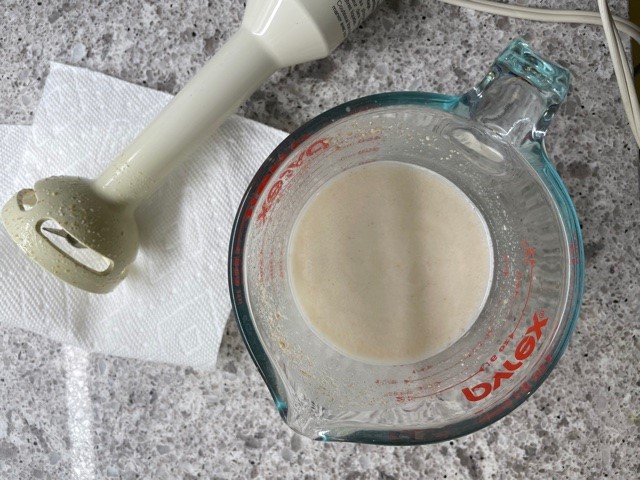
Our latest Community Bake (CB) featured Baguettes and was a hit. Those that actively participated learned to bake baguettes of Artisan Quality. It seems the natural progression from there would be Ciabatta, the Italians answer to the French Baguette.
Here is an excerpt from Wikipedia -
"Ciabatta was first produced in 1982 by Arnaldo Cavallari, who called the bread ciabatta polesana after Polesine, the area he lived in. The recipe was subsequently licensed by Cavallari's company, Molini Adriesi, to bakers in 11 countries by 1999. Cavallari and other bakers in Italy were concerned by the popularity of sandwiches made from baguettes imported from France, which were endangering their businesses, and so set about trying to create an Italian alternative with which to make sandwiches. The recipe for ciabatta came about after several weeks trying variations of traditional bread recipes and consists of a soft, wet dough made with high gluten flour."
IAll bakers of every skill level are invited to participate. Novice bakers are especially welcomed and plenty of assistance will be available for the asking. The Community Bakes are non-competitive events that are designed around the idea of sharing kitchens with like minded bakers around the world, "cyber style". To participate, simply photograph and document your Ciabatta bakes. You are free to use any formula and process you wish. Commercial Yeast, sourdough, or a combination of both are completely acceptable. Once the participants gets active, many bakers will post their formulas and methods. There will be many variations to choose from.
Here is a list of our past CBs. They remain active and are monitored by numerous users that are ready, willing, and able to help if assistance is needed. A quick browse of past CBs will provide an accurate picture of what these events are all about.
******************************************************************************************
SOMETHING NEW - Since many of the CBs grow quite large, it can become difficult to follow the progress of each individual baker. Things get very spread out. In an attempt to alleviate congestion and consolidate individual baker’s bread post, the following is suggested.
- Post all bakes in the CB
- Copy and paste each bake into a dedicated BLOG post
- Paste all bakes into a single BLOG
- You may copy and paste the link to your BLOG post in the individual bake post as a reference for those that want to view your progess and evolution.
All participating bakers that consolidate their bakes the a BLO.g post will be linked in the original post for all to see.
Links to baker’s BLOGs that have posted a compiled list of bakes for this CB
******************************************************************************************
If you haven't eaten Ciabatta, you are in for a major surprise. The flavor, texture, and ultra thin crust make any sandwich special. Please join us and post your good, bad, and ugly bakes. Many old timers are probably tired of reading this (It is a personal mantra of mine), BUT... "we learn more from our mistakes than we do from our successes".
The following formula and process comes from Jeffrey Hamelman's book, " Bread - a baker's book of techniques and recipes". It is also available in Kindle version on Amazon.
NOTE - since the Total Dough Weight in the spreadsheet below was scaled to 1000 grams you can easily change the dough weight by multiplying each ingredient.
For example you decide to bake a 500 gram loaf.
Simply multiply the flour(570) by .5 to get 285. Water 371x.5=185.5 (round to 186).
Let's say you want 1500 grams of Total Dough Weight.
Flour - 570x1.5=855 and Water - 556.5
Does this with each and every ingredient to resize the formula to fit your needs.
*********************************************************
Below is a formula from Michael Wilson.
In Italy Ciabatta is mostly a CY leavened bread and the standard formula as per Giorilli is as follows:
Biga with 80% of the flour:400g bread flour180g water1.3g Instant Dry Yeast OR 4g fresh cake yeast Rise at 61-64F (16-18C) for 16-18 hrs Final dough:All of the biga
100g flour
220g water5g diastatic malt
10g salt
- Mix using the bassinage method until silky smooth.
- Rise in bulk until double, cut pieces, shape dust with plenty of flour and let leaven until ready.
********************************************************************************************
Ciabatta con pasta madre biga *** SEE THIS LINK ***
(SD biga) submitted by Michael Wilson
Biga: 16.5hrs @ ~18°C
300g flour
125g water
30g LM (50% hydration), refreshed twice
Main dough:
75g flour
3.5g diastatic malt
7.5g salt
200g water
15g olive oil
84.8% total hydration
81% PFF
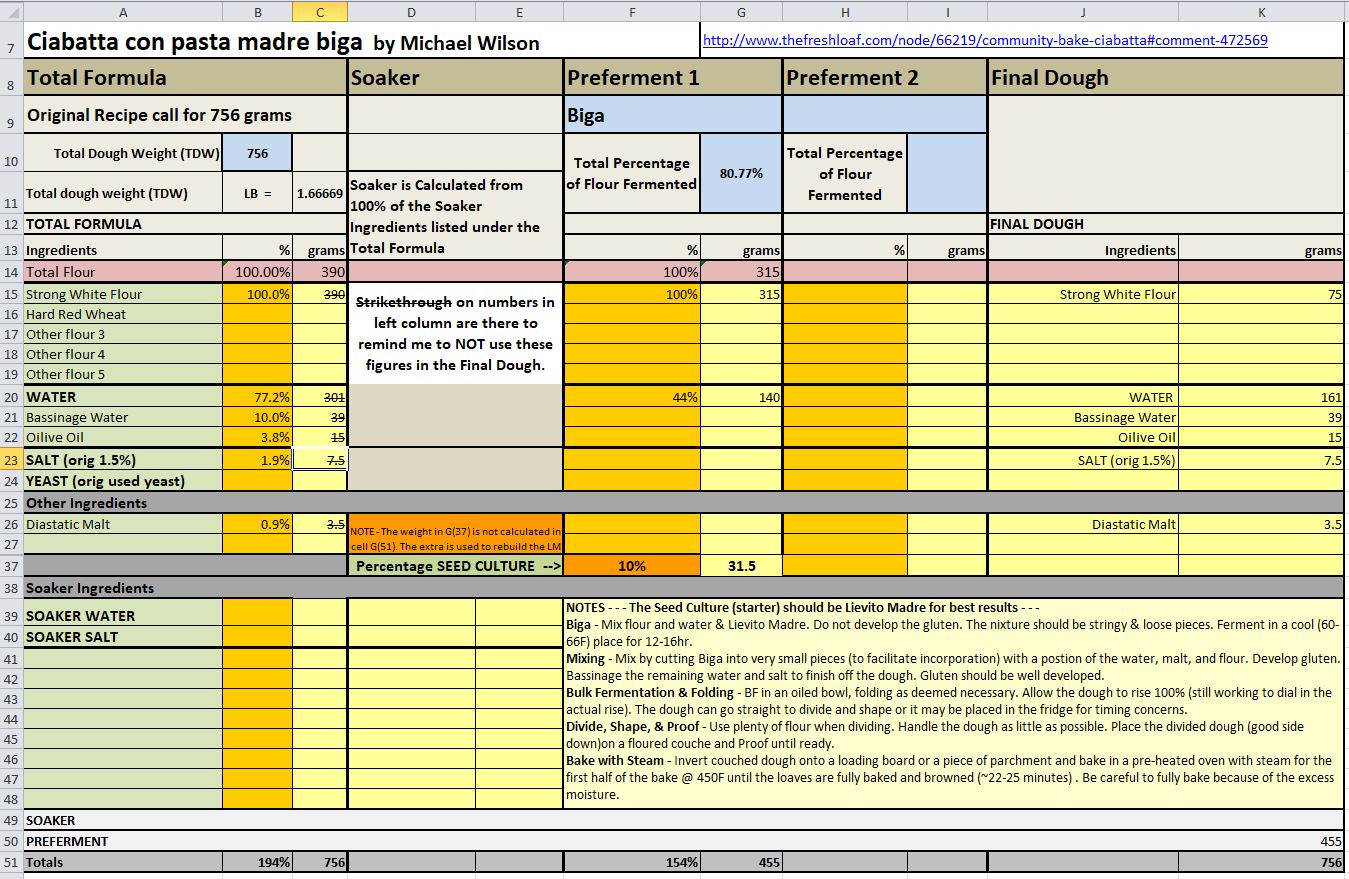
********************************************************************************************
While that is basically the standard approach, I am conscious that these authentic formulas don't necessarily translate all that well using American flours. With that in mind perhaps Craig Ponsford's formula is most appropriate. I'll see if I can track it down..********************************************************
******* PLEASE READ *******
Some of the Community Bakes get very large with many post. If a user replies to ANY post in the CB they will (by default) receive email notifications for all new replies. If you post a reply and later you find that the notifications to that Topic are more than you would like you can either (1) opt out or (2) recieve replies to your post only. See image below.
Danny
Ilya, it looks like you are steadily improving.
I am not familiar with your formula, but it seems that it is important to develop the gluten to the point where the dough is super supple, ultra smooth, and highly extensible. If developed enough the dough will remove from the mixing bowl in one piece, leaving the bowl basically clean. It will also remove from the counter in a single piece ehen lifted by hand. A dough like this is a joy to handle.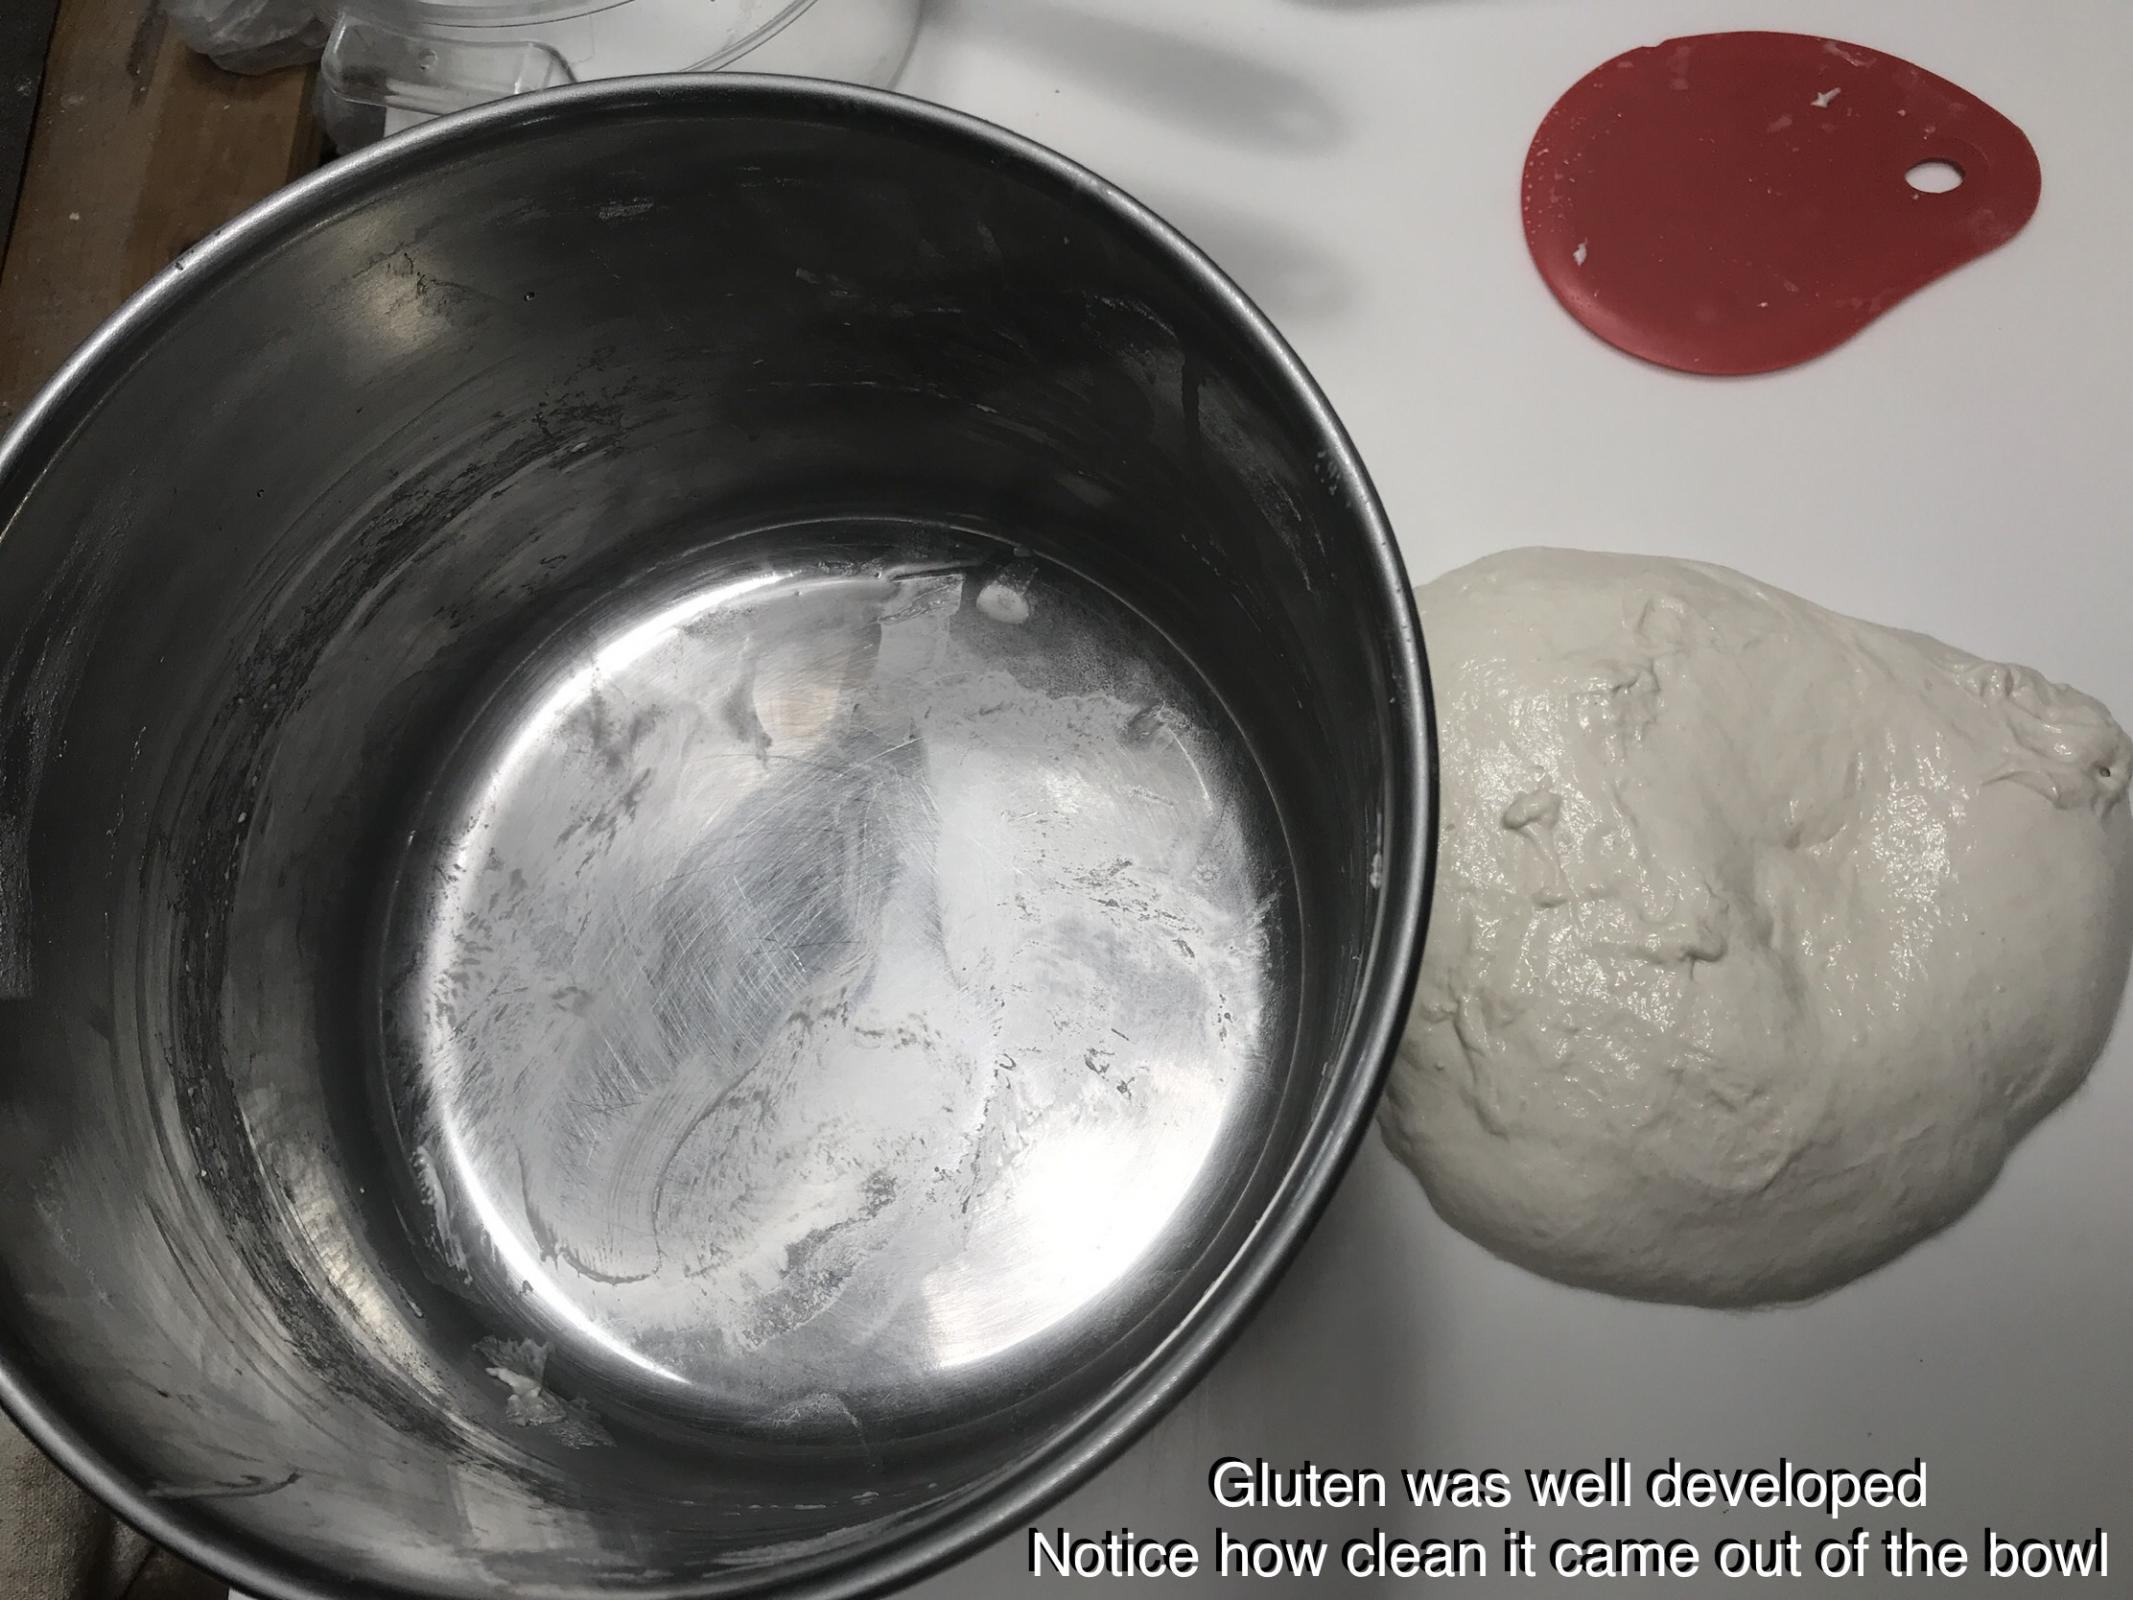 When my doughs turn out as described the oven spring is enormous. Because of the hydration the membrane of the dough is super thin. Unless the gluten is highly developed the thin skin (crust) and thin cell walls (alveoli) are unable to handle the gas. I speak from experience. See THIS BAKE.
Thanks Danny. The gluten was very well developed with slap &folds early on, and some stretch & folds during bulk. It was a lovely dough, smooth and light. It did remove cleanly from the container, but I had oiled it lightly, so not sure if it still counts. And yet - alas, no oven spring.
I hope you won't mind if I join in. Although I've been lurking for years (and by "years," I mean decades, haha). I've rarely posted and only very recently. Anyway, last weekend I made the Craig Ponsford ciabatta in Maggie Glezer's book. As I added my 1/384th of a teaspoon of yeast to the flour, I was thinking that this couldn't possibly rise. And it didn't. Not one iota. Not a speck. It didn't rise and collapse when I was sleeping or anything like that. It just didn't rise. However, the description also said the biga would soften a lot and smell aromatic, both of which did happen. I almost tossed it but then decided that with only a small amount of AP flour at risk, I might as well proceed and see what would happen. It turned out better than expected considering the biga was effectively just a long autolyse. I left the loaves on the counter to cool and when I came back from the grocery store, the family had torn into it and the only crumb shot I was able to get was of someone's sandwich.
The heel they saved me tasted quite good. The crust was crispy if a tad thick and the crumb had a slight bit of chew to it, but was still airy and soft. Some of the holes were too large. Honestly, I'm not unhappy with the ciabatta, but I am confused by it. I'm wondering what your thoughts are on why the bread worked out fairly well when the biga flopped so badly.
I should say that everything was done exactly as specified in the book; no modifications were made. I used my yeast within the last week and it performed perfectly, as it did here in the final dough. KAF Bread Flour was used in the biga and Central Milling ABC Plus was used in the final dough. The whole wheat was Bob's Red Mill and the rye was KAF Whole Organic Rye. If you have the time, I would appreciate any thoughts you might have on this. Thank you ever so much.
It looks like a great result to me! The Ponsford formula is discussed a few times earlier in this Community Bake thread. People here have linked to this page and this page, which show other bakers’ Ponsford ciabattas. Yours may be a bit darker than theirs but the instructions at the first link say to bake “until very dark brown.” They call for 35-45 minutes at 450 deg F. What was your bake time?
I noticed that this formula doesn’t solely rely on the biga yeast but adds the majority to the final dough. If your biga didn’t expand as much as expected, perhaps the gluten was more developed? If so, the stiffness at low hydration may have held back the biga’s rise. Earlier in the Community Bake, there’s been discussion of limiting gluten development by minimal mixing and leaving the biga in small barely combined shreds.
Again, it looks like a very admirable bake. Thanks for joining in and sharing your bread!
Welcome to the CB, and don't think for one minute that we'll let you get away with just a singular bake on this thread! Not just a show-and-tell forum, the CBs are also designed to help and guide others who have taken a step or two and toward a new bread or skill and want to improve through the group's interaction.
A silk purse from a sow's ear. Nice bake.
That looks really great to me, great bake.
Benny
Looks pretty good to me and according to the account of your taste testers, they agree. I’ve baked Craig’s Ciabatta before but I don’t remember the formula. Was the biga low hydration? If it was, when mixed properly (not nearly enough to develop gluten) the preferment isn’t expected to rise much.
I hope you continue to bake Ciabatta with us. Glad you joined in, you are now part of the gang :-)
Danny
Thanks, everyone, for the warm welcome and your generous comments :-) This forum has been a trusted reference for me for probably about 15 years and I've always been grateful. It's nice to finally thank some of you personally.
According to the formula, this biga is supposed to be kneaded and should triple in size in 24 hours, which hardly seems possible given the minuscule amount of yeast; however, the writers of the two blog posts both said it worked for them. I must have erred somewhere along the way. I think Tom M is right about the biga needing some breathing room. It was very tight and compacted, so I'll experiment with the technique in the pizza biga video.
To answer the other questions: It’s a stiff biga, but not ridiculously so. Mixing it by hand took a few minutes but was not s struggle. The book says the biga is 61% hydration, but it is 56% by my math (330g flour, 185g water). Total formula hydration is 80.5%. The first bake was at 450°F for 37 minutes. It was well-browned at 35 minutes but felt a bit heavy so I gave it a couple extra minutes. Next time, I will judge that more conservatively. I’m excited to have another run at this and will report back. Thanks again!
-AG
Well, now he's done it! I've violated the basic tenets that the very bedrock of the CB for Ciabatta rests upon. And I'm so so sorry. But what the heck...
Glass Bread/Pan de Cristal/Pa de Vidre is a close relative of ciabatta, so I thought I'd upset the ebb and flow here by posting today's entry. For those not familiar with it, the bread has its roots, best that I know, in the Catalan region of Spain. I'm not certain whether it can be purchased over the counter at a bakery or solely relegated to table service in restaurants and bars. It earns its name through the very thin and crackly crust that "shatters like glass" when cut or bitten into.
Our able Abel Sierra, a native of the region, introduced TFL to his version a few years ago. It is a near impossibility to wrangle this dough into anything that approximates something that doesn't look like an accident, although they may be better suited for those baguette type trays that I've been loathe to consider. Until maybe now...
Hydration for this bread can be an insanely high 110%-120% hydration, a neighborhood where I would never dare to tread. The hydration for my version clocks in at 95% and employs a combination of a biga and a levain, with an added boost of IDY. The dough mixes like a much wetter version of a ciabatta, and I still look and listen for the visual and auditory signals that the mix is done. The entire BF takes place in a mere 100 minutes with folds at 0, 30, & 60 minutes. And the dough will easily triple in size by then (in my warm kitchen).
At that point the real challenge begins, whereby after dumping the dough out onto a well floured counter, squared away, I double it over onto itself, Ciril Hitz style. Easy enough to divide, but if the divided dough comes in contact with the remaining bulk, It will rejoin itself to the bulk. Which is what happened on the parchment paper pictured above.
Once divided it is stretched onto a piece of parchment paper and without delay (no proofing), immediately baked. For those who can't take their eyes away from what is going on in the oven every minute or so, the bread will be disappointing. After initially plumping up, over the course of the bake it will pretty much flatten out. The nature of the beast.
To give this dough some added strength I relied on 90% Pillsbury bread flour with an assumed 12.9% protein and 10% KA WW at 14% protein. For a bread that should have a clean taste to it (think ciabatta or Bouabsa), the WW steals some of that. So the WW will be 86'ed the next time.
Bake 460dF for 13 min. with steam, 17 min. at 440dF after rotating loaves, 3 min. venting. Cool loaves upside down as there will be moisture released from the underside of the loaf.
If you feel that you've conquered the challenges of ciabatta, this just might be on your hit list. I dare you!
1200g total - 4 loaves
I have not conquered the ciabatta so the pan de cristal is not yet on my radar. Your version looks mightily fine though, and kudos to you for challenging yourself to a supercharged version of a ciabatta. Nothing wrong with adding this to the CB since they are quite closely related.
Alan, those babies look great! That’s my kind of crumb and the color of the loaves are “signature alfanso”.
I think you can safely put this bread in the “Spanish Ciabatta” category. This way, we won’t have to assess a fine for sneaking off the reservation. <LOL>
crazy! I have been wanting to attempt this recipe for quite some time. Should have done it while we had tomatoes from the garden to smear on it. The hydration seems daunting to me of all people! Your version came out great. Is it the sugar that crystalizes the crumb? Thanks for reminding me and posting the formula.
Mr Hamelman is used for coloration of the crust (just a generic from his book and not specific to this bread). According to Abel Sierra it makes the crust thinner and crispier.
It is a fantastic bread for bruschetta and for toast. My preferred slice is across the length of the bread as it is thin. For just dipping in olive oil, the standard vertical cut should suffice. In Barcelona, we found that the rubbing of the tomato on it, their way of eating it, just didn't entice us as much.
See THIS LINK for compilation of all of my Ciabatta bakes.
Dan’s Bake 8 - A good friend had a saying, “sometime chicken, sometime feathers”. Today I got feathers :-)
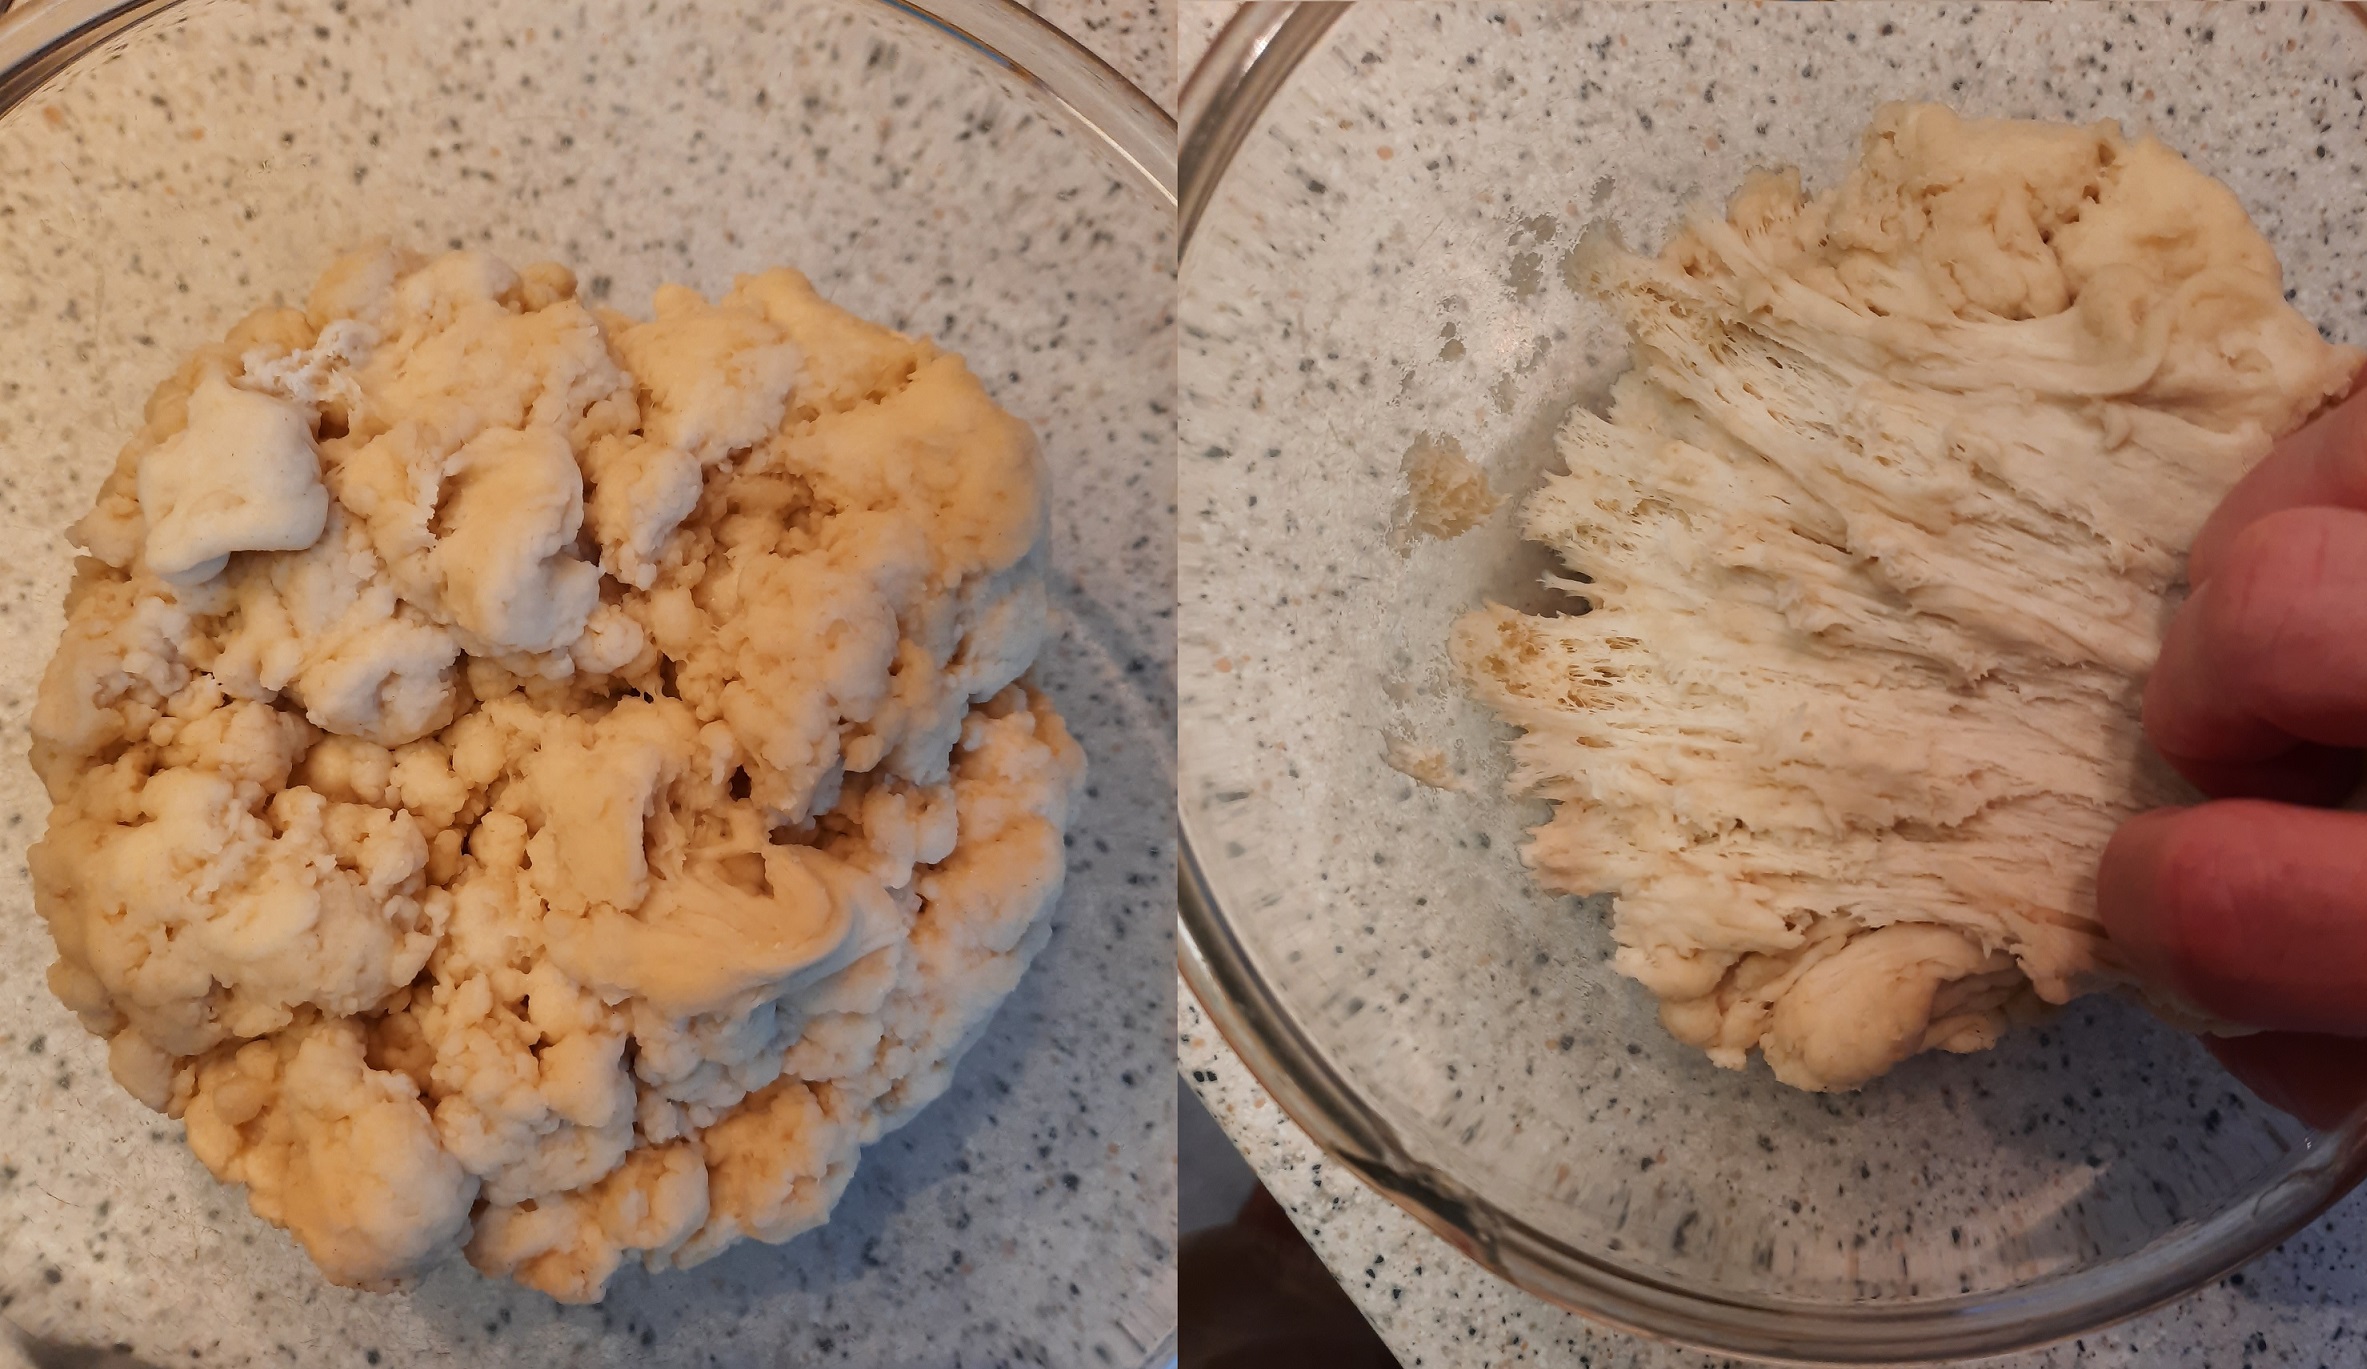
You probably guessed it, I baked Michael's "Ciabatta con past madre biga" AGAIN. Small changes have a way of making large changes. I THINK the problem starter when the decision was made to finished up the 16 hr biga ferment for the last 2 hr at 82F. The first 14 hr it rested at ~62F. I had hoped to bring a little more acidity to the bread, but the additional acid may have harmed the gluten. I really don’t know what else to think. I knew something was not right during the machine kneading. The dough refused to come together as it had in the past. I began to question if maybe I had mis-measured the water or something similar. After considerable mixing the dough remained slack. I ultimately added 20% more flour, but the dough never did look like the past bakes of the same formula. I was accustomed to super supple and extremely extensible dough. While in the mixer the dough never did completely smooth out. This bake will be valuable to me if the troubleshooting assumptions are correct.
The bread has a more acidic flavor, which was nice. And the sandwiches are killer. If you happen to have Olive Salad in your cabinet, give it a try. It is made for Ciabatta. Will if you read this, make sure you give it a go. You are guaranteed to love it.
Because of the weak gluten, the dough was unable to hold enough gas. The lack of spring and the crumb reflects that.
Danny, I think you are right about the degraded biga gluten. I had a similar problem a while ago when making pizza with LM. It hadn't risen as much as it should in the alloted time (ie the fire was nearly ready!) so I hiked the temperature and ended up with slop!
And I think my recent chiabatta bake suffered from degraded gluten. In hindsight, I should have fermented at 16C/61F, not 18C/64F, as well as for less time.
Having used LM a few times, I have come to the conclusion that it is a very difficult product to use: it is high maintenance in preparation (mixing multiple 45/50% refreshes is a PITA) and has no margin whatsoever for error in its use.
Of course when it works well it's great, (and others may not have my problems with it) but I think it might be a rabbit hole (as Alan woud call it) that I won't be rushing down again too hastily.
Lance
I abandoned Daniel Leaders formula that I used in my first bake (grossly over-proofed) in favour of Jeffrey Hamelman’s Ciabatta with stiff biga. The ciabatta was one of the five breads baked in Paris 1966, at the Coupe du Monde de la Boulangerie. The exceptional quality of the ciabatta helped earn the United States first prize. So, with those credentials, I had to give it a go.
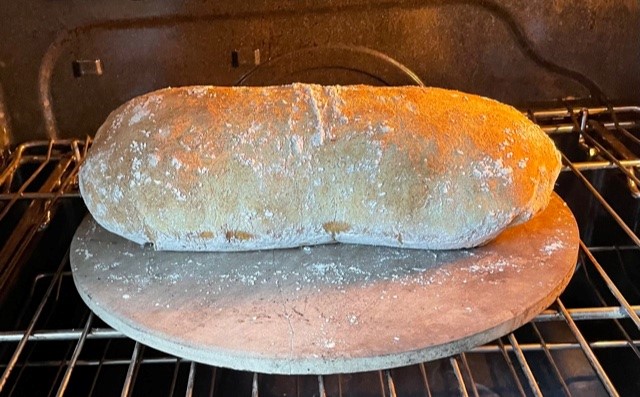
I used my mixer to incorporate all the ingredients and finished kneading on the bench. The bench scraper got a good work-out as the dough was sticky, being 73% hydration. My flour of choice for this bake was a white flour of 12.5% protein. Bulk fermentation of 3 hours with folds at 1-hour intervals. I gently fashioned a loose rectangle and placed onto my couche. I only prepared a single 510-gram dough, so I nestled the couche inside an oblong banneton for support. The kitchen today was a nice 24°C, so I did not need the proofer. The dough rose as expected and was ready for the oven in 90 minutes. It held its shape when I turned it out onto the peel.
Baked at 238°C/460°F in a pre-steamed oven, with steam for first 10 minutes of the bake. I lowered the oven to 230°C/446°F as the loaf browned. The oven spring was much better, and I was relieved that it did not over-proof. The result was more of a regular loaf profile though. How do I keep it more of the traditional slipper shape?
The crust is crisp and tastes sweetish.
Cheers,
Gavin.
Good looking ciabatta Gavin. Some of the bakers stretch their dough before baking with their hands. I forgot to do this and my ciabatta (also underproofed) ended up much more barrel shaped than slipper shaped as well.
Thanks, Benny. I shall remember to stretch the dough next attempt.
And with that pedigree, I should look into giving it a go myself.
A bit untraditional shaping for a ciabatta, but if it looks like a duck, walks like a duck, and quacks like a duck, it's a duck. Same holds true for here.
In the interest of not advising you to ruin the bread for the next run, you could stretch it out on its travel from the basket onto the baking peel. The method is common enough, either when it goes from shaping to a couche, or from the couche to the baking peel - my preferred method, although both are equally as effective.
If it is in a flatter slipper shape, you wouldn't have those beautiful slices anymore. It depends on what type of end product you want for the occasion.
Thanks for the tip about stretching the dough. I forgot on this occasion as I was so pleased the dough had good structure. I stretched the dough on my first attempt but it was over-proofed and collapsed in the oven. Looks like attempt #3 is looming.
Cheers,
Gavin
Nice looking slices, Gavin. Your bakes seems to validate the statement, “if you want your bread to rise up use a biga, if you want it to spread use a poolish”. This truth is being demonstrated more and more as we pursue this CB.
IMO, this crumb is better suited for sandwiches. Ideally, I would like to produce both your crumb and also typical Ciabatta crumb on demand, as long as the flavor can be maintained.
Please describe how your biga was made and mixed.
Yes, I think you're right about the rise theory.
The biga contained 20% pre-fermented flour from the overall formula. It was a stiff biga that was 60% hydration and 0.066% instant dry yeast.
BIGA instruction summarised: Disperse the yeast in the water, add the flour, and mix until just smooth. Cover the bowl with plastic and leave for 12 to 16 hours at about 21°C. I mixed by hand in a bowl.
What is your advice on a more open crumb? Is it just to raise the hydration or is there some other mystery that has eluded me thus far?
and don't mind being on the untraditional side (my specialty!) - use a levain instead of a biga altogether. Mixing in a liquid levain is about 1,463.7 times easier than trying to incorporate a very low hydration biga.
Here is evidence that you can get significant rise out of a levain based ciabatta although the holy-er than thou holes in this example aren't really open. But all the flavor and characteristics are otherwise there.
http://www.thefreshloaf.com/node/66219/community-bake-ciabatta#comment-472184 .
Edit: Just noticed that Tom M also called it out a few comments below this one.
whew. This thread is long!
i’m not sure if I missed a posting regarding using 100% wild yeast. I no longer use commercial yeast, and have spent this covid season converting all my recipes to sourdough starter.
Currently I’m working on a wild yeast version of Newfoundland raisin bread, but this CB caught my eye.
Glad to see you join in. Many of us are following the Italian method using a biga. The biga can be leavened with either sd or commercial yeast. It is a different process from our norm but the results have been good and getting better.
Hope all is well with,
Danny
The starter-based Ciabatta formulas that have been posted so far are Doc's Sourdough Ciabatta using a 60% hydration levain and Alfanso's Levain Ciabatta using a 100% hydration levain, unless I'm forgetting any other. Both use a kicker of commercial yeast, but small enough percentages that I expect you could leave them out without making other adjustments to the formula.
looks like my next bread bake will be a wild yeast ciabatta!
I will concoct my own recipe
Hey Diane, are you from Newfoundland as my partner is? I’m curious about this Newfoundland raisin bread, have you posted it anywhere?
Benny
Hi Benny,
I am a Brooklyn gal ...although I have been living upstate New York for several decades (Upstate as in on Lake Ontario border).
I decided I wanted to bake bread with more character, molasses, a bit of brown sugar, an egg, and raisins, if I feel like it. I found a couple of recipes with those ingredients in “newfoundland bread” on the Internet, one with lard (gag), so I decided to develop my own wild yeast recipe. I’m working through version two.
it has a fairly dense, slightly sweet crumb, slices beautifully. I’ve used it for sandwiches and also topped with slices of gjetost and a dollop of peach jam!
Certainly the antithesis of an airy ciabatta.
Why not? it makes no difference to me which side my bread is buttered :-)
Ah very good, well if you work out a good formula for your 2.0 version, please post it in your blog I’d love to see it and try it.
Benny
I will share the the final tested master recipe with photos.
Diane
I understand if you have religious/cultural reasons for avoiding lard but otherwise I would encourage you to give it a try. It has a neutral flavour and in my experience makes the best pie crust plus it is healthier than a lot of 100% vegetable shortening. Tallow on the other hand is a fat I avoid as it has flavour that is hard to clear from my palate. Lard might not be right for you but then again it could be better than you think.
Quite a few years ago I made ciabatta and so I thought I would remake the recipe I used then. So this is Rose Levy Beranbaum's recipe from "The Bread Bible". I doubled her recipe so as to give 2 ciabatta.
8:45 am mix the Biga. 100 g bread flour + 50 g lower protein flour + 0.4 g instant yeast + 118 g water.
This was hand mixed with wooden spoon for about 5 minutes, covered and left.
14:45 mixed the dough using my old Kenwood Chef and the K beater
272 g bread flour + 1.6 g instant yeast + 6.6 g salt and 236 g water. I mixed for 3 minutes on speed #6 but felt it needed more so mixed for an additional 2 minutes at this speed before lowering to speed #4 as per recipe. Dough came cleanly away from bowl. I scraped dough into oiled container and left to triple in size as per recipe.
This was supposed to take 90 minutes but it was cooler in my kitchen so it took twice that time.
18:25 shape. To do this I tipped dough out onto well floured bench, folded dough carefully one fold then divided dough. I was following the instructions also with shaping so just pushed the sides of the dough together and patted length to what I wanted. I then carefully flipped dough sideways onto parchment and pushed the the two ciabattas so that the parchment separated them and covered with large container. The oven was preheated with lava rocks and my pizza stone. After 75 minutes I carefully placed both ciabatta on pizza stone, poured boiling water over the lava rocks and baked for 5 minutes at 500 deg F then 20 minutes at 475 deg F, turning front to back half way through the bake. Internal temperature was 212 deg F so I turned off the oven and left for a further 5 minutes with door cracked open. before removing them. About 5 minutes later I decided bottoms looked and sounded a bit "soft" so I returned ciabatta to oven for another few minutes.
So once these had cooled I cut them. This one is very soft delicate crumb, not as open as I thought it would be
and the other - well, the mice could have an adventure here -holes that are probably too big, lol
Thin crust, soft crumb - great!
Shaping - well "Could have done better" - next time will try a better method as there is really not a huge amount of height in these. I should also have removed the parchment when I removed lava rocks halfway thru the bake when I rotated the bread.
The bread is as light as a feather though - so some good, some bad! I think hydration is around 80%
Leslie
I love the look of them, so delicate. And your crust looks crackly and paper thin, just as it should be. Table breads, made for dipping! I made a batch tonight and forgot to flip and dimple them before loading them into the oven. They're still baking, but I'm expecting some oversize holes, too. So what, they'll still taste great. Enjoy!
hopefully next batch will be better. I really didn’t put much effort into dimpling so will remember to do that
Leslie
this looks quite fine to me. Except for those, um, small holes in the last picture!
alan
lol, thanks Alan. I will have another go next week trying to get a bit more height. Happy with crumb but I need to probably dimple more firmly to discourage mice adventurism :)
Leslie
A number of us have been stopping the bulk fermentation at 50% rise and letting the shaped dough proof to 100%, but I checked Will’s posting of the Giorilli process and cross-checked elsewhere. BF to 100% is called for, then rough shaping by division and proofing until very jiggly/light. Maybe I missed it — is anyone doing this longer bulk?
I think Ciabatta should be bulked much more than the typical 30-50% rise. Since it is generally not shaped much or at all 100% (doubling) seems better.
OK I have ciabatta dough in the proofer so this is well timed. I should aim for 100% rise during bulk fermentation the, is that the general consensus, not that we must stick to consensus statements. ?
I should add that I am trying the same formula again with 100% hydration levain. I’ve used the stand mixer at low speed to help with building gluten early on as advised.
This dough is so silky smooth and so far a joy to coil fold. I’m uncertain how far I’ll push bulk though definitely more than 50% but probably not 100%.
Benny, I would think the strength of your flour will also have a baring on the degree of rise.
I am in the process of sourcing Caputo Manitoba flour. It is super strong.I am hopeful that it will handle the brutal fermentation that my SFSD must under go. We’ll see.
Yes Dan you’re very right. I’ve never pushed any sourdough in bulk to double, scary stuff LOL. Let’s see how adventurous I feel later tonight. I’ve just given the dough a 2nd coil fold. I used the mixer for mixing autolyse, then adding levain, then mixing at bassinage of salt, water and olive oil. It was a slow process since I didn’t want to push my KA mixer higher than 2. The dough I’m working with now is so supple and non sticky, very enjoyable to coil fold.
Benny, when a dough id highly developed sticking ceases. I think Doc can verify that.
what flour ate you using for the chibby?
Yes that is very very true, I never use the mixer so this is one of the first times I’ve really developed the dough early on and it really has a different feel. The recipe uses 19% whole red fife and 81% bread flour 13.3% protein.
Unfortunately I started this a bit on the late side and I’m going to have to end bulk earlier than I had wanted. So it will go into cold retard until tomorrow. I’ll give it some bench time tomorrow after work to hopefully catch things up before shaping and baking.
I’m starting a 50% hydration levain tomorrow morning for 100% levain ciabatta Friday. Please keep us posted, Benny! :)
Definitely Tom. I will post the formula if it turns out well enough. I’ll post photos whether or not successful.
Benny
Tom, what is your reasoning for building a 50% levain one day in order to build a 100% levin from it the following day? That seems unusual to me.
By 50% hydration levain, I meant a sourdough biga, and by 100% levain ciabatta, I meant 100% prefermented flour ciabatta. I wasn’t calling it a biga since it’ll be starter-based. Gotta work on my clarity.
I want to treat it like CY to minimize the sourness. After 24 hours in the fridge, I’ll raise the hydration and add oil.
So I made the Ponsford ciabatta again from Maggie Glezer's Artisan Breads again, but I did several things differently - not with good results, unfortunately. Except for the following changes, everything was the same as Bake 1:
1. Mixed the biga per the Vito Iacopelli video. It didn't rise much more than it did in Bake 1.
2. Knocked about 30 seconds off the final mix. The gluten was noticeably less developed, which was intentional. I was hoping it would result in fewer ginormous holes.
3. Coil-folded the dough during BF instead of using standard S&Fs.
4. "Aggressively" patted out the bubbles and folded the dough before portioning it, Ciril Hitz-style.
5. Forgot to flip the dough and poke it. This was unintentional and resulted in bigger holes at the top of the loaves.
6. I reduced the bake time to 35 minutes.
These breads were a complete disappointment. Nobody would ever guess these were from the same recipe as Bake 1. The taste is yeasty and bland. The crumb is soft, mostly lacking in random holes, and has no chew whatsoever. A hint of doughiness. Obviously, some of the changes didn't work out, but I can't help but feel that the biggest error was in stopping the mix early. The plan is to mix another biga tomorrow using Mulino Caputo 00 Americana flour that was delivered this afternoon. On Friday, bake day, I plan to revert to the original process from Bake 1, but am, of course, open to suggestions.
AG, before I read your comments, I was impressed with your bake. That bread looks like typical Ciabatta.
To tell you the truth, I have baked Ponsford Ciabatta a few times and it didn’t ring my bell. It has a great reputation, but taste is definitely subjective.
Caputo Americana is a strong flour. It will develop into a soft and supple dough when thoroughly mixed. At some point during your mixing, let the dough rest 10-15 minutes or so (in the bowl) and then continue mixing. If you are able to remove it from the bowl in one piece and the bowl is clean, it was mixed to perfection. What type of mixer do you use?
If you are using a biga (45-50% hydration) it should be mixed only long enough to wet the flour and not develop the gluten. After the fermentation of the biga is complete there will be barely (if any) rise, but the dough will take on a different appearance. It will look more cohesive.
I have had good success using Micheal’s formula, “Ciabatta con pasta madre”. It uses Lievito Madre for leavening, but you should be able to substitute commercial yeast. Using a typical sd starter may introduce excessive acid to the dough.
It is apparent from your post that you are aggressively pursuing great Ciabatta. If we can help in any way, please let us know.
Danny
Yes, sorry, I think my photo of the first few slices isn't truly representative. Some parts of the loaf looked decent but it wasn't uniform. I intentionally cut the mix short because there were too many huge holes in Bake 1, but it was clearly a mistake which affected the crumb structure and, I believe, the flavor. My mixer is an Ankarsrum. The typical mixer speed settings are a little different, so the cues you provided for the flour are great and I will rely on them for Bake 3. I'll give the Ponsford ciabatta one more try using your tips before moving on. I think I'll learn the most that way.
Lievito Madre is piquing my interest. Not just for ciabatta, but in general. I maintain a whole rye starter, in part because I don't love the smell or glutinous texture of wheat starters; however, my husband prefers a mild flavor profile, which just isn't a thing with whole rye starters, haha. After reading mwilson's posts on this thread, I thought that the Lievito Madre might suit my needs better than a conventional starter. It seems a little maintenance-heavy, so I need to kind of dig into the details and see if I can fit it into the rest of my life :-)
I appreciate the help. You guys are great.
You are right, the Lievito Madre is a lot of maintenance and requires a lot of flour. Here is another option that builds a typical sd starter that favors yeast over acids.
I am in the process of learning the Lievito Madre now, but it requires a fair amount of dedication. The sd starter requires dedication but LM, even more.
That process sounds a whole lot more reasonable! Thanks for pointing me in that direction. This stiff white starter doesn't seem like too much of a burden. (I sometimes feed my rye sour 3x per day when I want to take the edge off it.) I'll split off a bit of the rye sour and start converting it tomorrow. ??
-AG
I baked Joy Ride Coffee’s Ciabatta formula which uses a 100% hydration levain along with 19% whole wheat (I used Red Fife) and made it at 80% hydration. As I mentioned earlier I used the mixer to build gluten up very early on. This had the effect of making the dough the smoothest non sticky dough I’ve worked with.
I ran out of time last night and had to end bulk at 50% rise in the aliquot jar. This afternoon I took dough out of the fridge and after 1 hour divided into two. I folded the long ends in about 20% and then folded the dough and floured the seam transferring them into the floured couche. All seemed to be going well. After a 2.5 hour bench rest when the oven was heated to 500ºF I attempted to transfer them from the couche to the transfer board. This is when disaster struck. I think the dough is somewhat overproofed, not sure why since I only bulked to 50% rise, perhaps the final bench proofing time was excessive for this dough. Also perhaps the acid load was too high and the dough was getting proteolytic. So when I attempted to transfer the first ciabatta to the transfer board, it was very very stuck to the couche, this despite my flouring it at least as heavily and probably a fair amount more than I’m use to doing for the baguettes. It was so stuck that I have to use my fingers to pry the dough off the couche. It was bad enough that after using my fingers to disconnect the dough from the couche there was still some dough stuck to the couche. At this point I didn’t have much hope for these ciabattas.
Eventually the ciabattas were on the peel seam side down and baked. They baked with steam at 480ºF for 13 mins, then 420ºF for 15 mins without steam at which time they were quite dark, but didn’t feel like they were fully baked yet. I dropped the temperature to 350ºF and gave them another 5 mins to try to get them baked without burning.
Sad looking flat ciabattas, they would make good door stops!
I think when I try ciabatta again I will try with a biga. Beautiful hate giving up on a recipe that others have had good success but I’m not sure will work for me.
Image

Image

Image

Sorry that you ran into so much trouble, Benny. Thanks for sharing your experience nonetheless. They look like they could still be good to eat, albeit crusty.
Thanks Tom, it wasn’t my best bake that’s for sure. One of them is way to dark to eat by humans, I may feed it to the birds, although, we already have too many pigeons around downtown Toronto so I’m not sure I want to feed them.
Benny
It sounds like you hit a bump and the joy ride coffee ended up in your lap;-) Don't spare the flour on the board or the couche. It has happened to me and was difficult to get off the linen and I was hesitant to wash it off so I scraped and brushed. I am sure your next ones will be better.
Yes major lesson learned. I did hand wash the couche the dough had become absorbed into the fabric so badly I don’t think I had any choice. After overnight air drying there were small pills of the dough that were then easy to scrap off with the bench scraper. Now I’ll let it fully dry but I think the couche will be fine. Next use will require a ton of flour.
Catalana's answer to ciabatta.
Checked last year's notes and made some changes.
Unfortunately, these baked about 4-5 minutes too few, and should have been browner with a drier crumb. The takeaway is that the crust also didn't have time enough to truly dry, and subsequently it didn't have that "shatter"when cut or bit into.
However the process felt right to me and the shaping, with the wetted counter and wet hands proceeded smoother and was more predictable. No matter what, without more skill or some kind of sleeve or tray to place these on, they will aways have that freeform look to them. Still some merging of the loaves in the oven.
I figure that if I do this another dozen times I should have it down by then! Probably go for 100% Bread Flour, no rye next time...
Alan you wouldn’t know from the photos that the crust wasn’t crispy and wouldn’t shatter like glass. They certainly look really good. I’m sure you’ll have this down pat soon.
Benny
They look beautiful, Alan! Sure wished I could taste one of those.
This is really very similar to Benny's most recemt bake above, with 28% pre-fermented flour in a 100% hydration levain, the rest of the flour was cold autolysed overnight at 60% hydration and included 0.1% IDY and 1% diastatic malt. The levain and autolysed flour were combined (making a dough with 70% hydration which is a little wet to quickly develop the gluten and I will move to an 80% hydration levain for the next batch). After a few minutes of mixing to get the gluten development started, I bassinaged in the remaining water at about 25g/minute which is about as fast as it will absorb it without having the dough break. It still took a few minutes of additional mixing to get the development I was looking for.
After transfer to the bulk fermentation container it received two sets of folds 20 min apart then three French folds at about the same interval. When the aliquot jar said that it had reached 45-50% volume increase it was divided and shaped and put on the couche to counter proof for about 2 hrs (aliquot jar = 100% volume increase from end of mix).
Proof could have gone longer as the dough was quite robust and easy to handle - and from the look of the crumb I probably should have let it go longer (kitchen is cool today).
Oven cycle was 500°F for 10 min with steam, 10 min at 400°F with residual steam which means about 40% humidity in the oven, then 5 min at 20% humidity. I will leave it in the oven for another 5 minutes next time as it didn't sound done when I finally got around to checking (but it was too late to put it back in).
Crust is crispy, crumb is creamy, color is a little light but OK, flavor is great with the kind of sour I like.
This is a mild departure from my baseline with does not use a long cold autolyse, but it still needs work. I have tried a stiff biga a couple of times with less than stellar satisfaction. I like using the cold autolyse because I can do almost all the prep and cleanup in the evening, then get up and if the levain is ripe go straight to mixing.
The large bubbles at the top of the loaf could be better distributed so for anybody who has a suggestion about how best to do that I would be an attentive student.
So for next time - a lower hydration levain and more of the water in the bassinage, same BF (50% increase), longer proof, and more time in the oven.
Doc, your bake gives me hope that I can actually make a 100% levain work, but you are right trying to add the 100% hydration levain to the autolysed dough which was around 66% hydration wasn’t much fun and took a really long time to incorporate and build up any strength.
I may try your idea of an 80% hydration levain and recalculated the autolyse to compensate.
Despite your displeasure at the larger alveoli in the upper half of your ciabatta, the crumb does look quite good.
Benny
Once the tub of ciabatta dough is turned out and on the counter and prior to divide, Ciril Hitz pats it all down to "degas" the dough, as he says. But it may be to redistribute the gas, and not actually degas it.
The "common wisdom" is to move the proofed dough from couche to oven peel while inverting it, so top is now down. This is apparently another way to redistribute the gas.
See if you can upload a few slices to me please!
Doc, I’d be pleased to bakes those! I’m in the minority but golden brown suits me.
Your thorough and detailed accounts of each and every bake are an asset to our Community Bakes. Your persistence ain’t bad either :-)
Your consistent strive to perfect your breads is inspiring.
Weights in grams when not indicated. Levain maturity defined by weight loss equal to 2% of the weight of the added flour (6g in this case) which took about 12 hrs at ~80°F for a ~20:1 scale up.
Mix sequence and resulting dough temperatures:
Combine cold autolysed flour/water/DM/IDY with warm levain
Mix@speed0
64.0°F after 5min @speed0
Add salt during next 5 min
65.9°F after 10 min@speed0
Switch to speed 4
67.5°F after 2 min@4
69.2°F after 4 min@4
70.3°F after 6 min@4 including about 35g of water
71.3°F after 8 min @4 including bassinage of the remainder of 71g of water
72.2°F after 10 min@4
73.3°F after 12 min@4 (note that adding water suppresses the normal temperature increase associated with mixing; decreased viscosity that results from adding water also reduces the rate at which mixing energy can be coupled into the dough -a mechanical impedance mismatch if you like - which is why I want to reduce the hydration of the levain next time and hopefully cut the gluten development time).
End point temperature is very close to room temperature which is BF temperature.
end mix - good window pane
Doc, how would you describe the characteristics of the Final Dough once kneading is complete? I am interested in the double pre-ferment.
Question -
Have you thought about the outcome if the biga was used in the sd and the poolish was leavened with CY? The low hydration dough fermented by sd and it’s acids are key to that thought.
At the end of mixing, the dough texture was highly extensible and somewhat sloppy but not fluid. In the Cambro tub with wet hands it was easy to fold and it would stay folded though there was little strength immediately after completion of the mix. I will try to remember to shoot a video clip in the mixer right at the end; that will give you a better sense.
I presume that you are using "biga" to describe the autolysed flour that includes a small amount of IDY. Since it is refrigerated immediately after being mixed, there is minimal yeast activity overnight. Even when I use quite warm water (110°F) to activate the yeast and hasten the absorbtion of the water (which cuts the mix time from 8 min down to <5) the only evidence of any yeast activity is that the Stretch-tite over the bowl is puffed up perhaps 3/8-1/2" in the morning - the dough ball is not obviously soft, enlarged, or foamy in any way, it is just hydrated flour containing some mostly dormant commercial yeast. Until the dough temperature is raised by mixing to at least the mid '60's I suspect that there is little contribution from the yeast.
The levain is active overnight as it is in a warm place and because the expansion is about 20:1 takes 10-12 hrs to mature but even then it is just past peak volume and has generally begun to recede by the time it has lost the 5 or 6 grams of CO2 that is the measure of maturity.
Frankly, I don't understand the insistence on mixing the biga so dry and in a way that discourages gluten development, unless it is a consession to european flour. I have no problem with mixing the levain at 60% hydration which just makes the autolyse into what Benny calls a fermentolyse, but at 45-50% hydration the resulting biga is so dry that I wind up with insoluble lumps of flour that don't mix well and hang around until late in bulk fermentation. I have on my to-do list an experiment to return to a relatively short (20-120min) fermentolyse at a mid 60% hydration followed by gluten development and bassinage - just for comparison. At some point I suspect that the results will match an overnight autolyse of the flour that is not in the levain.
Doc, “ Frankly, I don't understand the insistence on mixing the biga so dry and in away that discourages gluten development”
I have been thinking about this. It does facilitate ease of mixing the biga into the Final Dough. It is not difficult at all.
Since the biga is retarded at 61-65F, it is basically an overnight fermentolyse.
“ At the end of mixing, the dough texture was highly extensible and somewhat sloppy but not fluid”. Does the dough remove from the bowl leaving it clean and in one piece?
in another post Abel recommended a super strong flour for the biga and a less strong flour for the final dough. He claimed the BF would be shorter that way, although I don’t understand that. Not saying he is wrong.
Doc thanks for your detailed outline, this will help me when I decide to try ciabattas again. I’m still so undecided about what formula to try next time, something along these lines might be a good idea with hybrid leavening.
Benny
DIving back into ciabatta after not making it for a long time reminded me why I stopped baking them. For such a simple looking pile of dough it was always more difficult than it appears. I always found the distinct smell and taste of well made ciabatta very appealing but difficult to reproduce at home. Thanks to everyones contributions here on the CB at TFL. I now see a path to making an authentic version. My preference is for slippers with large holes versus moon boots that need to be sliced to make a sammy with, so that is what I aim for. To each his own.
I did the Giorilli recipe with CY because like baguettes I prefer to use yeast over SD to get a thinner crust and lighter crumb. I find it more reliable and has a more wheaty taste. The new found way to make a biga(thanks Ilya) was a game changer for me and actually pretty simple to boot. The distinct ciabatta smell I was looking for was in the biga.
My first attempt that I will not be posting was a disaster. Sorry Dan. I used my Bosch mixer which really works well for the bassinage unless you start with too much water! The biga remained lumpy and the whole mess looked like bad cotton candy in the bowl with no cohesion. Then I put it in the proofing bowl I hadn't oiled it so that was the next mess. The bake was flat and ugly and had me thinking I should stick to baguettes. At the end of it all I did end up with some nice croutons
My second attempt went quite smoothly after making the adjustments of holding back enough water to knead a stiff dough until smooth and then drizzle in the remaining water. It held together really well and I think I could have added even more than the 80% water called for. I should have trusted the rounded 1/4 tsp of IDY in the biga but I added another when mixing and it moved too fast. From mix to the oven in three hours seemed too short also I think these are slightly underproofed and should have had more time during bulk and final proof. Divided into two pieces and did a lateral letter fold and was pleased with the shaping. I may try stitching it next time. Proofed top down on a couche and inverted and dimpled before baking at 450 for 28 minutes. My preference for ciabatta is golden brown but these needed a little more time to dry out.
I was surprised to see them split on the top but the crust was paper thin and very soft.
This bread had very soft crust and crumb was pleasant to eat on it's own but even better with a little pesto smeared on. It also made for a good PB&J. I was hoping for bigger hole so I will definitely give these another attempt but without the malt powder because the Wheat Montana AP I used is already malted. Thanks everyone for showing me the way.
Don those look great! The crumb certainly looks good nicely open, although you think it is underproofed it cannot be that under. I am hoping my next attempt will not be like my two previous failures.
Benny
The challenge for me is how to get a more open crumb after 12 minutes of intensive mixing in my Bosch. I was only able to get a couple of coil folds in before I ended the bulk so next time I will push that to let some larger bubbles form. I really like the flavor of ciabatta but they are an ugly duckling compared to baguettes.
I excluded the malt since most USA based flours are already malted, and yes, so can you.
For someone out of practice these look really good. Personally I find the crumb structure on these to just right. as you say, to each his own. And it certainly has sufficient height to make a sandwich with vertical slices.
My ideal ciabatta would be like the ones I saw in Italian bakery video where the dough was poured out of a pitcher onto a long hot steel and then slid into the oven as it was bubbling up. It probably has another name but when chopped in sections and cut in half it was used to make a thin sandwich. If there was ever a bread to shoot for an open crumb, ciabatta is it for me, so thats where I am headed of course.
I remembered a trick I used to use to cut Gosselin baguettes and it helped to handle to this ciabatta. I pour flour on the cut line and then pinch it down with the edge of my wooden transfer peel to seal the edge before cutting it. It is easier to handle this way and there is no fat cut line that tries to reattach to the main dough.
I am not for certain but I thought I could taste the malt that I added to this mix and it tasted sweeter. It seemed to make the small amount of yeast I used very potent. I will learn more after I omit it the next time.
Aha! So I've been using malt after all! Somehow I felt a wash of relief upon reading that. :D
An improvement on No.1, but no big holes. The formula was based on the yeasted Giorilli formula, but with 80% PFF, instead of 100%.
Having seen many bakes on here (including my first one) with blotchy mottled surfaces, I decided to do something about it and added 1% sugar and 1% skim milk powder to the final dough, as well as the 1% malt specified in the recipe. This has solved the problem - in my eyes, anyway.
My shaping was pretty "rustic" and has room for improvement! Although the crumb didn't have big holes (perhaps overmixed?) the bread was very light with high specific volume.
Lance
Lance, give these a 9.75. Like Alan, the crumb looks great to me.
The color is perfect, IMO.
Beautiful bread.
Lance, what temperature did you bake #2 with? I’d love to produce that color.
I wonder if the sugar and milk would have a negative affect considering the dough is wholly leavened with sd.
I like the golden brown color better than the russet brown for ciabatta. Glad to see another CY version to compare to. I am thinking of going back to the compass point folds during the bulk to see if that will lead to a more irregular crumb. That and less folds during the shaping to get closer to the slipper profile. Doesn't milk lead to a tighter crumb? Maybe not with such a small amount.
Don
To get Maillard products you need a reducing sugar and sucrose is not (until it is converted to glucose + fructose which as monosaccharides are reducing sugars). The milk brings lactose which works. And you can add half as much fructose instead of sucrose if you want to.
Redundant
Wow, I’d sure be happy with those Lance, very very nice!
Benny
Very nice! One note about the PFF: you suggested that using 80% instead of 100% diverged from the Giorilli formula, but Will's reformatted formula has 80% prefermented flour.
--Tom
Interesting about the PFF - I was working from the recipe at https://blog.giallozafferano.it/fablesucre/ciabatte-di-giorilli/
But I do think a 100% PFF dough has no margin for error; 80% does make more sense. If I ever persuade myself to use LM again I will probably go for 50%.
Lance
Ah, there you have it; we're working with two versions of the formula. I wonder if one is closer to the original.
As it happens, I just pulled a 100% PFF sourdough ciabatta out of the oven.
Well, while the oven was on for bake no.2......
This one followed a different recipe. There was an overnight yeasted sponge preferment, ambient for a couple of hours and then in the fridge. This 33% PFF preferment was 50% manitoba and 50% medium rye flour.
The main dough had some milk and sugar and a high yeast rate.
I think these actually had a better shape than my bake no.2, but a bit heavy on the flour as they were sticking to the couche like crazy!
Lance
Monster holes are not my thing, so what came out of your oven looks just dandy to me. Seemingly all of the characteristics of a ciabatta on both counts.
Thanks Alan and Danny; for what seems like a pretty simple bread to make, it has a surprising complexity!
Lance, if your are still keeping a LM, it makes a great Ciabatta using Michael’s formula. I like it much more than other formulas. Will be mixing the final dough for one in a few minutes.
I agree your third bake is also great. I like the shape of them and that crumb would be perfect for any topping you’d like to place on it.
Benny
Many thanks Don and Benny for your kind words. I was pretty fed up with ciabatta after my bake no.1! It's incredibly easy to produce a lousy loaf the first time you bake a style that's new to you, even when you think you have some general baking competence. But I do think LM is pretty capricious, to put it mildly.
It's easy to see how beginners can get disheartened.
Danny, oven was preheated to 250C/480F and turned down to 230/445 bottom heat with steam when bread went in. 15 mins, then vent and 5-8 mins top and bottom heat
Milk powder - not sure about reducing crumb size, but probably it softened the crumb, which I think suits the style - I don't want a ciabatta that gives jaw ache.
Malt + milk powder + sugar - maybe overkill, but it worked for me, so I would use exactly the same again - I really wouldn't want to produce another blotchy crust!
Lance
I thought it good to put this in a separate post. I know Doc and Michael are big advocates of well developed gluten. Historically, I have very much shied away from this for fear of harming the flavor. Not sure how future bakes of other types of breads will be mixed but for Chibby, it well developed gluten for me!
I took videos and photos of the dough while mixing. I thought it was important to share this with the gang. Ciabatta should have a thin crust and super thin cell walls. Completely developed gluten accomplishes this. Check out the images.
Dough was mixed in a spiral mixer. The loose dough piles on the top are from the dough that clung to the breaker bar and spiral hook.
Notice how the dough removed cleanly from the bowl and was removed in a single piece as a result of completely developed gluten. The dough is super slack (~90% hydration) but it is easily handled and not sticky. NOTE - these doughs use 4% olive oil. I think it helps to condition the dough in respect to suppleness and non-stickiness.
The dough was just removed from the mixer and has begun BF with the aliquot jar along side. My doughs have been too strong at shaping. Because of this the dough will not receive any folding. We’ll see...
My latest experience with flours for Ciabatta -
I have been using very strong flour for Ciabatta, also something new for me. I tried KABF and found the results inferior to Caputo American. This bake (not baked yet) is testing King Arthur Sir Lancelot (aka KA High Gluten). I have had good success with Caputo Americana for Ciabatta, but it is costing me about $3/pound. I can get KASL for $35/55 pounds. By the way, the images and video are of KASL flour. Caputo Americana looks identical at this stage.
Although the video below uses a spiral mixer, I am confident that a typical (KitchenAid, etc.) planetary mixer will achieve the same results.
For best viewing useTHIS LINK.
Very helpful photos and video Dan, glad you’ve posted them.
This batch incorporates the learning from yesterday:
28% PFF in an 80% hydration levain fermented 13 hrs @~27°C, the remaining flour was cold autolysed overnight and included 1% diastatic malt and 0.1% IDY. The water used to hydrate it was quite warm (110°F) but the mixing time was reduced form 8 minutes to a bit less than 5 min.
The ripe levain and the autolysed flour were combined for 10 minutes at low speed and made a dough of 65% hydration which was just right for developing the gluten quickly (after two minutes of mixing at high speed the dough was ready to start the bassinage of the last 131g of water).
The bassinage took less than 6 minutes (25 g per minute continues to be a good rule for how fast an 1800g batch of dough will accept additional water), and two more minutes of high speed mixing were enough to finish it. The dough was smooth and very extensible when transferred to the BF container. Four-way folds followed by French folds were delivered on 20 min centers until it was strong enough not to flow back into the corners. Dough was bulk fermented to a little over 150% of post-mix volume, then shaped into four ciabatta and proofed for 90 min at a room temperature in the low 70's. Each was inverted when transferring to the pans and two of the four were finger stapled. Oven cycle was 500°F with steam for 10 min, 400°F for 15 min, then 350°F for 10 minutes to get the right sound when tapping the bottom of the loaves.
Images below are all four loaves, three uncut, one cut. Crumb is much improved with uniformly spaced, moderately large holes, a crispy crust and a creamy crumb again though more elastic than yesterday which was slightly under-baked. The additional 5 minutes of oven time at 350°F did not increase the crust thickness detectably though in theory it should have thickened it somewhat.
{Late add: the crumb of the stapled and unstapled loaves was indistinguishable}
Really great bake Doc. The crumb and crust are awesome. Again thanks for sharing your methods with us.
Benny
Doc, you’ve got the crumb dialed in. I see you are still adding coarse salt to the crust. I keep forgetting to try that. I love salt. Most times truffle salt is added to the slice before eating with butter.
I Recommend you trying this Truffle Salt for a light sprinkle on a buttered slice. The flavor is signature... As a finishing salt it last forever.
Really nice!
-AG
I'm pretty impressed by the nice thin crusts you and others have achieved using levains. These are very nice looking breads. I'm curious about the flavor profile: do you find these naturally leavened ciabatta to be at all tangy or just a little more complex than the ones made with commercial yeast?
I use a levain to get the sourdough flavor, and I augment it with a small enough dose of commercial yeast to accelerate the process without contributing detectably to the flavor profile. At some point I will perhaps have time to delve into using LM as an alternative.
After a dozen other ciabatta formulae, I settled on a combo of levain and IDY. Lievito Madre seems like more work than I want to tackle.
Until this CB I had no clue that anyone docked/dimpled their dough before oven entry. Never did it, and may never do it, but your ciabatta looks just fine to me!
I haven't dug too deeply into Lievito Madre yet, but a preliminary look led me to think that it might be too ambitious for me right now. Dan suggested I try a mild white starter instead, so I am in the process of converting a bit of my rye sour. I think I will try a levain/IDY hybrid. You've all made such nice loaves that way. As far as dimpling goes, I'm not convinced either way, but I like to give the recipe author the benefit of the doubt, especially when its a baker of Craig Ponsford's stature. Yesterday I dimpled the dough and about half of them popped back up by the time I opened the oven door, so who knows. Thanks again for the guidance!
I like the crumb you are getting and the crust looks nice and thin. I am curious as to why the dimples are staying after the bake? Mine seem to level off with the oven spring. Maybe I am poking them less.
This was going to be 33% whole wheat, 80% hydration sourdough ciabatta with 100% prefermented flour in a 50% hydration salt-retarded levain. After some on-the-fly tweaks, it ended up 37% whole wheat. The remaining flour was all-purpose and I added vital wheat gluten for a 14% protein content.
The story on the salt is that I've been experimenting with salting my starters. 'Cause, I EAT my starters. Lately I've been salting them full-strength so that the "discard" goes straight into the microwave. I'm not sure if the bugs are salt-adapted or if it just didn't phase them, because it hasn't slowed them down appreciably. Even more recently, I've been keeping it progressively stiffer, and I've noticed really good things happening to the flavor of the microwaved sourdough--yeastier and well balanced with a milder tang. I'm not sure how much is the salt and how much is the hydration. I think it's both. Afterwards, I searched TFL and found old posts with information that yeasts are more salt-tolerant than lactic acid bacteria. Turns out that several years ago, Abe experimented with salting his, without mishap. It's apparent that as hydration is lowered, the salt concentration (at the same baker's percentage) increases. I estimate that 2% salt at 80% hydration is akin to 3.2% salt at 50% hydration. Yeast should be fine at that concentration but it likely impedes the LAB. So for today's bake the levain was 100% total flour, 55% hydration, and the full 2% baker's percentage of salt. I built the levain with a 2.2% salted 60% hydration whole wheat starter that was 1 hour at room temperature, 24 hours refrigerated.
I cut the 60% stiff starter into small pieces (10% of formula), added the water for a 50% hydration levain and the 2% total formula salt. An immersion blender made quick work of dispersing the pieces.
I poured this over the flours and shook to combine, but 50% hydration was still floury.
I added more water for 55% instead:
I left it at room temperature 1 hour, then refrigerated 24 hours. I took it out about an hour early to start warming up. Today I added half of the remaining water (100 deg F) and mixed it pretty easily by hand, squeezing it through a fist. Then I added the remaining water and 3.8% soybean oil. Oops, that became too liquid. I should have bassinaged the rest in more incrementally. After 6 minutes on the mixer, it didn't look like it was going to come together, so I added another 10% of a 70% hydration, salted, whole wheat starter. After that, it came right together and 3 minutes mixing later I had a nice cohesive dough which gave a windowpane. Thus the total formula ended up 37% whole wheat, 79% hydration. I took an aliquot for the jar and put them both in an oven with the light on. The dough temperature stayed 78-80 deg F throughout bulk fermentation.
At 30 min, stretch and folds, then 1 or 2 sets of coil folds every 30 minutes for the next 2.5 hours, then still more coil folds 45 minutes apart until the 5th hour of bulk fermentation. It ended up about 10 sets of coil folds and at 4.5 hours I did a lamin...stretchification. 7 hours into BF I saw 100% rise, so I slightly shaped it into a log and wrapped in a heavily rice-floured towel. I let it proof 30 min more, getting to 108% rise before I chickened out and baked it 450 deg F 20 min with steam and 10 without.
Here's the crumb shot: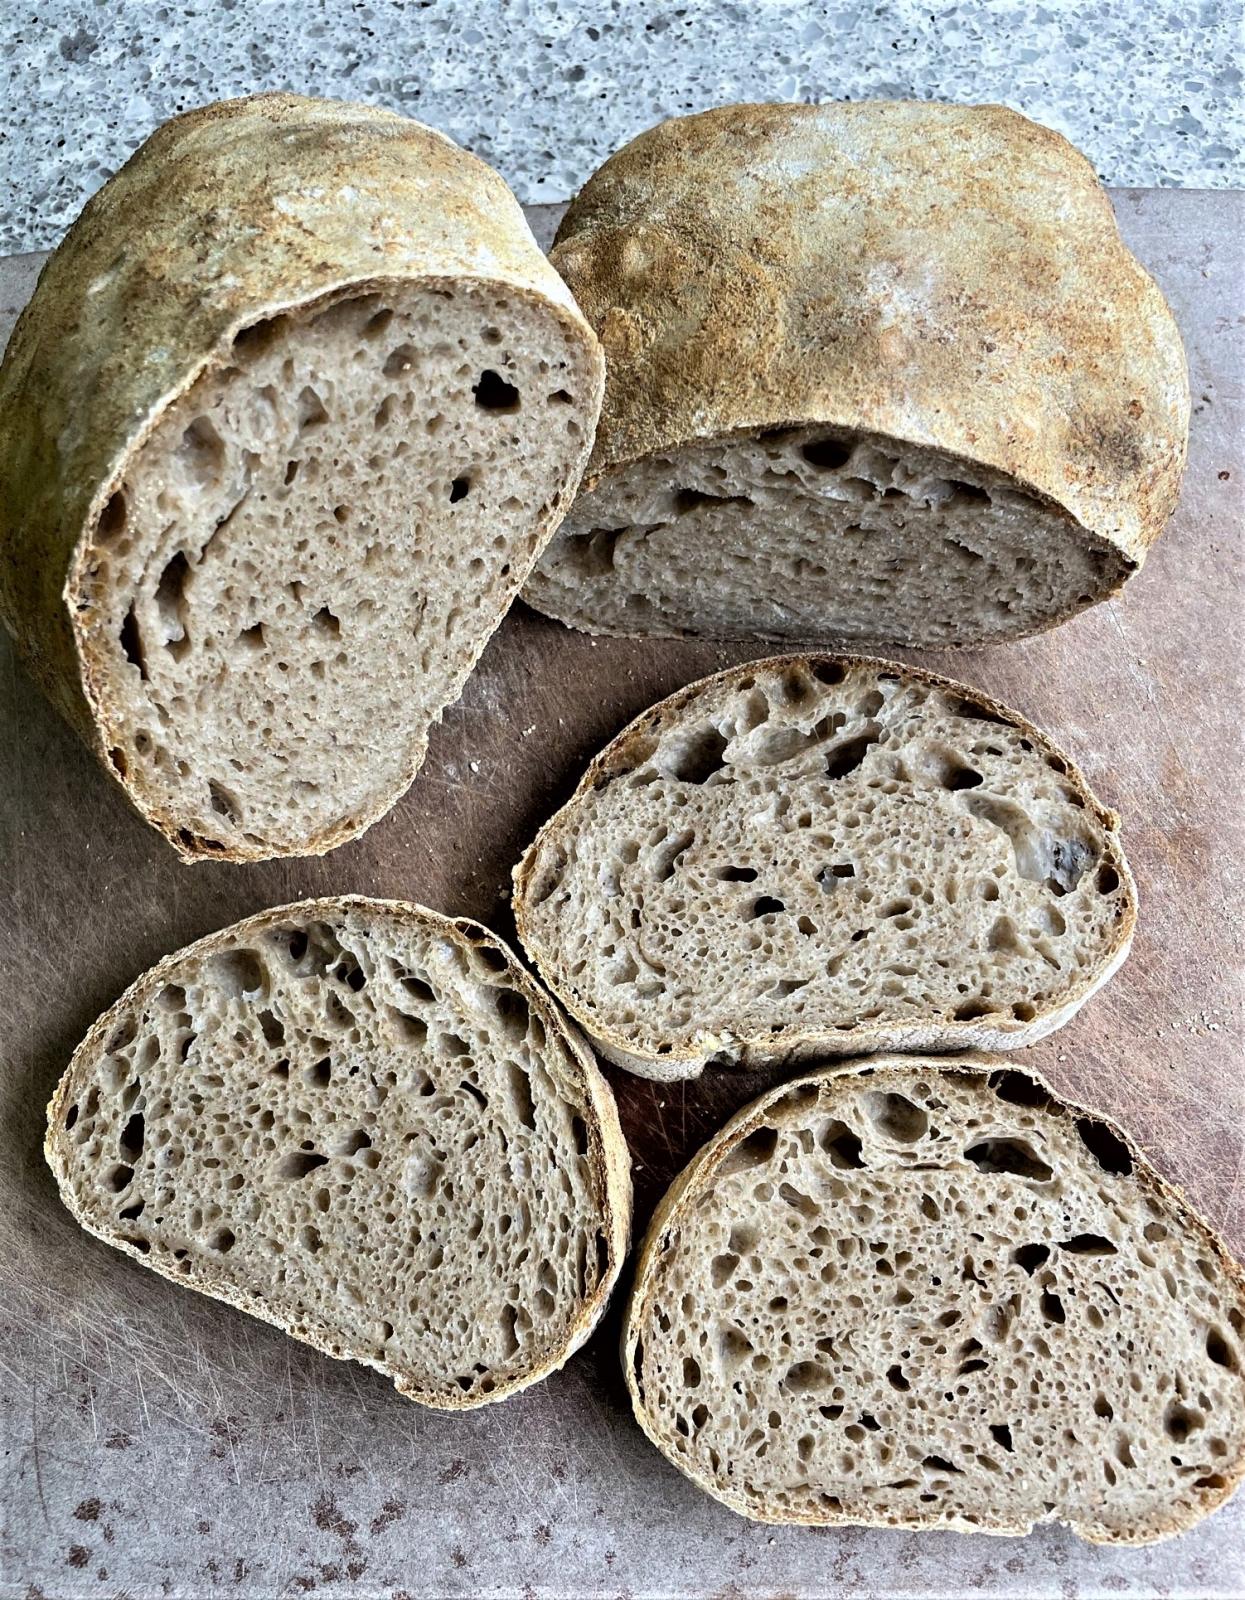
The flavor was a mild tang, maybe a bit fruity. The whole wheat wasn't particularly dominant but noticeable and I found myself missing the 20% sprouted white whole wheat with commercial yeast. So it was an interesting exercise but I think I'll go back next time.
--Tom
Very interesting observations about the insensitivity to salt. For the LAB and yeast that Gänzle studied (published paper here){original link has been repaired}, the upper limit for the LAB was 4% salt while the yeast was not completely inhibited until the salt concentration reached 8% NaCl. There are sensitivity curves on page 3 that show LAB getting a growth rate boost from low concentrations but taking a big hit at higher concentrations. However I would note that I have never been able to make the 4% and 8% numbers line up with the ionic strength values on the horizontal axis of the plot on pg 3.
I have used salt to slow down a starter that I was transporting from one place to another where I would need to feed it during the trip. It didn't take much to keep it under control and it came back to full strength after a couple of refresh cycles once the salt was omitted.
Doc, the paper was listed as deleted when I clicked on the link.
It wouldn’t be too hard to hit 4% on a stiff levain without changing the total dough %. 80% PFF in a low hydration levain should do the trick. I’m curious to give it try but likely not for ciabatta.
Try it now
And let me know what you see - expecially if you find that you have a highly salt tolerant culture.
I've just posted a follow-up on salt in sourdough fermentations here.
Today was my third and (probably) final fun at the Ponsford ciabatta in Maggie Glezer's book. I did some experimenting with Bake 2 that was not advantageous, so I largely returned to the technique used in Bake 1, which is the method detailed in the book. The only difference was that I changed flours to Caputo Americana.
DanAyo kindly offered some pointers on developing the Caputo Americana flour that I took to heart for today's mix. Everything proceeded according to expectations except that it took much longer to develop the dough this time around. The dough was considerably softer, which Dan told me to expect. However, by the end of the second fold, it was clear that this was a really lovely dough and I expected a great ciabatta.
Unfortunately, I made a fatal error when I divided the dough. After I turned out the dough onto the counter, I realized my bench knife was in the dishwasher and, looking quickly for a substitute, stupidly decided on a chef's knife. Of course, the dough pieces stuck to the knife and each other like nobody's business. To make a bad situation worse, I then placed those damaged strips of dough on top of the main dough pieces and, after the dough was folded, they were comfortably nestled inside. Why, you may ask, would someone bake damaged dough strips into their ciabattas? Fearing the answer, I've decided not to plumb that existential mystery ;-) Anyway, I could see those miserable little strips right in the center of the baked loaves as soon as I cut into them.
Six hours later, I'm still shaking my dang head, but realized that the crumb surrounding the thick doughy strips wasn't half bad. If I hadn't assailed it with the knife, these ciabattas probably would have been alright. My conclusions are two-fold: First, mise en place! Second, I've learned what I can from the Ponsford ciabatta and it's time to move on.
I think that is VERY nice looking crumb even with the inclusions. Log your lessons and pick a new destination.
I think I have concluded that for ciabatta the flour matters a lot, so once you have decided which flour you are going to use, stick with it until you have mastered it, then perhaps switch to a different flour. But then you have to work with it long enough to figure out how much you need to change your process to get the new flour to do your bidding. There are too many process variables to vary more than one at a time.
Despite the mishap they still look quite good. Don’t we always say that we learn more from our mistakes than successes? Based on that saying, I should know a lot about ciabattas, 0 for 2. You’re doing much better so far. I bet your next bake will be outstanding.
Doc and Benny, I appreciate the encouragement and will keep at it. You both turn out so many gorgeous loaves, one after another!
This my third attempt the Ciabatta community bake. I changed my approach and formula. I reverted to my regular flour of 11.5% protein and increased the hydration to 76%. 30% of the overall flour was fermented in a 60% hydration biga over 16 hours in the proofer.
The dough was very sticky to work. I don’t have a dough mixer, so I use my Thermomix to incorporate the ingredients and then turn-out onto the bench. I did not want to add any extra flour during the handling, so I mist the bench with water and kept the bench scraper and my hands wet. I folded the dough for 10 minutes before dumping into a bowl for 2-hour bulk fermentation, that includes a fold after 1-hour. I was worried at this stage as there was no discernable rise in the aliquot jar.
The final proof of 1-hour was on a couche supported by a couple of wine bottles. This gave me a flatter profile than the last attempt and more like a slipper. I inverted the dough onto a peel and then immediately into a pre-steamed oven at 238C for 36 minutes. Steam for first 10 minutes of the bake.
I’m disappointed in the crumb as I have some large holes near the top surface at one end. I hope to remedy this next bake by docking the dough before loading into the oven.
Overall Formula
Baker's %
g
White Flour
100
336
Instant Yeast
0.396
1.33
Water
76
256
Salt
2
6.73
Total Yield
178.396
600
includes 30g for aliquot jar
Ciabatta is going to be very sticky, the nature of the beast, so need to keep a bowl of water handy to constantly moisten your hands and fingers. Not much was around that.
A lot of the crumb looks really good, but the top-heavy holes...need to figure out why you are getting the inconsistent crumb. Overall a good bake.
See THIS LINK for compilation of all of my Ciabatta bakes.
You guessed it, Michael's "Ciabatta con pasta madre biga". The diastatic malt was upped slight to 1%, hoping to produce the gorgeous color of Lance’s bread. But not to be, color remained the same. Next time maybe milk or sugar.
A flour test -
Caputo Americana is a great flour for Ciabatta, but in my area it is expensive. Since I can get King Arthur Sir Lancelot (high protein) for 1/4 of the price, it was used for this bake. Good news, it handles and bakes up about the same as Caputo Americana! Great gluten. Not so good news, the flavor and crust texture doesn’t compete with Americana. Speaking as a flour snob, “flour makes a HUGE difference”.
Shaping is getting better, but reducing the size of the holes in the crumb is not gaining traction.
In an effort to reduce the size of the holes and at the same time temper the oven spring in order to lower the profile (wanted to slice bread horizontally for sandwiches), the dough was aggressively finger docked on both sides. My fingers pressed into the dough until they touched the bottom of the cabinet. Many dimples were made on each side. But it seems that Lievito Madre is such a powerful leavening agent that it rose anyway, leaving almost no signs of the dimples and produced super open crumb.
I am very pleased with the Ciabatta that has come out of my oven since Michaels formula (with LM) was used.
I have joined the ranks of Doc and Micheal when it comes to gluten development for Ciabatta. A Dedicated post on the subject can be SEEN HERE.
I’ve read where Michael sad that he didn’t stress about over-proofing when using LM. I am beginning to understand. This dough was BF to ~125%. The total rise upon completion of shaping was a whopping 280%, according to the aliquot jar.
Wow Dan, this is impressive, and the crumb is stunning. I think this would work great sliced horizontally, like you wanted!
I took a little break from Ciabattas, but will try again next week.
Dan I think you are closing in on your target now with each bake. I agree with Ilya, the crumb looks great.
The crumb looks great Dan. It seems to me that pushing the fermentation to the limits is where the ciabatta crumb is achieved. That is one strong mother to tolerate that kind of growth. How was the taste and chew with the HG flour? The crust looks thick like SD bread. Was it crispy and hard?
I am also in the well developed gluten camp for ciabatta. Letting the mixer do it's thing makes it so much easier to handle.
In our business trophy fish used to get hung on the wall. The middle sideways picture looks like a wall mount. Nice catch
Your best crumb yet, Danny - it looks great!
How many refreshes of the LM did you do?
Lance
These are handsome loaves!
accidentally double posted
I will have to see if I can get a dough ball at 80% hydration to blow up to 280% of post-mix volume and still handle it. The crumb is excellent and the dough looks very strong for being so wet.
you may wish to drop the amount of PFF in your formula, or the amount of seed LM in your levain if the LM is too potent. The holes in the crumb look good, if a little too much on the too much side of things!
BTW, I've got the same cutting board, but don't use it for bread. Just condiments and cheeses. Does that make me right and you wrong?
Nice one Dan - great job on the crumb ;)
Definitely has a high flavor profile to make up for its misshape!
Image

Slipper bread shouldn't look like socks;-) Something tells me that the loading didn't go smoothly!
that is a very funny comment!
Yes, I let the ciabatta loaves rise on a floured towel, like I do for baguettes, with the intention of rolling each over on parchment pieces, then loading it on the preheated baking sheet. did not happen! I should have realized that the olive oil was an important variable.
Dan said we should post all photos, the good, the bad, and the ugly, and that is what I did!!!
I Decided to use the ciabatta recipe from Eric Kayser’s Larouse Book of Bread. it has a 20% inoculation of wild yeast with a pinch of instant.
i’m gonna try this again :-)
Kinda cute ?
Oh we should definitely share good and bad, thus my sharing of my two poor bakes so far. Good that you enjoyed the flavour, better than my second set of ciabattas that I’d say I didn’t even like the flavour, they were too burnt tasting.
Benny
Diane, you may have started a new craze. Watch out if Instagram catches on :)
Danny, thanks for the instructions on how to opt out.
It looks like you have to post a new comment to get the opt out controls to show up.
Here's my new comment. :)
Murph
Murph, for your information and possible others. You can choose to edit any of your previous post in order to alter your choice to receive or not receive email notifications.
For this that are unaware of the ability to opt out of messages see THIS LINK.
I have never tried to bake ciabatta before but encouraged by this community bake I thought I would spend a morning on YouTube to watch a bundle of videos on the subject to see how it is done. I eventually settled on John Kirkwood's Sourdough Ciabatta Bread largely because it uses a sourdough poolish which I have often used before.
So with the poolish it became a fairly leisurely process over two days. On day one the poolish was put together late in the evening by mixing 200g each of flour, water and active starter and letting it sit at room temperature overnight. (I used 85% Dove's strong white flour with 15% home milled wheat flour).
Next day mid morning with the poolish bubbling away strongly
The remaining 140g water was stirred in and then 250g flour and 8g salt and machine mixed for 10 minutes. (Well I had to justify the purchase of that shiny new Ankarsrum mixer during lockdown).
"With the dough transferred to a square plastic box bulk ferment lasted 4½ hours with 4 coil folds in the first 3 hours. Proofing was 1 hour".
I did not have the recommended couche to hold the divided and shaped dough but I had found a clever alternative in a video by Buzzby Bakes who lays a sheet of baking parchment in a roasting tin and after spacing out the divided dough on it pulls up a fold between each piece exactly as you would do with a linen couche. The big advantage of using parchment paper is that at the end of proofing you just stretch out the folds to separate the loaves/rolls which can then be baked in the same roasting tin on the parchment paper and without handling them. I was able to cover the tin closely with a baking sheet to keep the steam in for the first 15 minutes.
My own feelings are, not bad for a first try. the crumb could more open with a longer bulk ferment but I am anxious now to have a go at ciabatta bake 2.
Alan, I really like the way they came out. The color is gorgeous. The smaller sizes are nice also. I would imagine the small amount of fresh milled wheat made for an interesting texture and flavor.
Isn’t it amazing how flour, water, and salt can produce such a varied assortment of breads?
Thank you Dan. I have usually avoided dipping my fingers into 80+% hydration dough but I actually found this ciabatta fairly easy to work with, maybe due to the reduced shaping needed for a sticky dough, so I'm looking forward to trying again.
Alan
Nice job with the shaping—looks pretty authentic to me. Thanks for joining the CB! Approximately how long were your bulk fermentation and final proof?
—Tom
Thank you Tom, I'm afraid those details were missed during my start/stop two finger typing.
What I intended to add was
"With the dough transferred to a square plastic box bulk ferment lasted 4½ hours with 4 coil folds in the first 3 hours. Proofing was 1 hour".
I will edit this into the original.
Alan
Very successful ciabattas Alan! I agree they are well shaped.
Benny
Thank you Benny. Getting ready to try again............
Alan
I tweaked my ciabatta recipe, Cut 4 slippers on four pieces of parchment. It has a very good taste profile, but, alas, not my favorite bread recipe.
And that’s why I love bread baking. There’s always another recipe.
Diane, the loaves look pretty pale. Is that by design?
If not, how are you baking them, temp, stone, length of bake, etc? If they are baked properly, a little malt should help, assuming you’d like them darker or more golden brown.
BTW - your profile image reflect your love of photography. Very artistic...
I did the Giorilli recipe again and committed it to memory because it was good bread the last time and I saw lots of potential for improvements with more familiarity. I really like the James Bond shaken not stirred biga and the simpleness of the yeasted version for it's ease of assembly. The goal this time was a more open crumb and a more slipper like shape. The biga had a half teaspoon of IDY and was used 16 hours later with little to no growth evident and still some dry flour between the shards of dough. I used my Bosch mixer and held back 80 grams of water and fed the biga in a piece at a time until a smooth dough was evident on speed 1 for about 5 minutes. The remaining water was drizzled in at speed 2 for another 5 minutes or more until a strong cohesive dough was achieved. A couple tsps of olive oil was added at the very end. Final hydration was 82%. Fermented for less than 2 hours with 2 coil folds in an oiled bowl. It had more than doubled when it was dumped on a well floured counter and gently stretched it into a rectangle with no folding. I floured the cut line down the middle and pinched it down with the edge of my peel before cutting it with a dough scraper. I did no folds or shaping but gathered it up by both ends and transferred them to the floured couche with a stretch to elongate them. Proofed for an hour before inverting and dimpling then baked at 450 with steam until done, about a half an hour later. I forgot to set a timer and may have removed the steam pan too early because the crust was more substantial than the paper thin crust from the last time.
Being a fan of ciabatta with large holes I was pleased with the crumb and wished I had sliced this one horizontally for sammiches. Strangely the other loaf did not have a crumb as open as this even though it was handled with the same care. The flavor was also less sweet than the first batch so I may add back in a portion of the diastatic malt that was omitted this time.
Don that looks amazing. That is the type of crumb I’d like to achieve with ciabattas and I’ve come no where close yet. So no shaping was used, I do like the shape you got as well, very very good baking.
Benny
I just stretched it out and cut it in half with no folding. Pinching down the cut line with a transfer peel to seal it before cutting it for the final shape. Really quite simple as ciabatta should be since they look like nothing special was done to them. I employed the KISS method and it worked well this time.
Great to see your success! A couple of detail questions: what scale was your dough and if still using Wheat Montana AP, do you happen to know the protein %?
I used 500 grams of Wheat Montana AP again. The protein is hard to discern from their label but I have heard it is less than 11%.
Then your beautiful crumb really calls into question whether we need a high gluten flour here...
Outstanding in all respects.
Here’s the brilliant part.
” I floured the cut line down the middle and pinched it down with the edge of my peel before cutting it with a dough scraper.”
I’m diggin’ the peel deal... super innovative.
Is it correct to assume that the peel pinched down the dough and sealed it, eliminating section of skinless dough that we normally get when cutting with a bench knife?
It’s a host of comments and tips like this that make the CBs so beneficial.
You can use a dowel or something blunt enough to compress the dough down before cutting it. It may spead open again when you bake it. I learned that from of all things a book https://www.penguinrandomhouse.com/books/309299/in-search-of-the-perfect-loaf-by-samuel-fromartz/
A good read for us breadheads!
All around beauties, the shaping is exquisite. Nothing more to say - wonderful bake.
The other side of the elongating - from your counter to couche. Vs. from my couche to baking peel. Both do the job quite nicely!
from The Sopranos was called The Bada Bing. Those were strippers and not slippers on display.
My fully proofed ones did not want to stretch during the loading the last time but this time doing it before laying them on the couche was fairly easy. I may go for a stones length slipper next time.
decided to become a musician after hearing this song...https://youtu.be/SKYVOubhqJY?t=60.
Sumpin' else Roy - I spent the first 39 years of my life in NYC and I never, never, ever heard anyone say fuggedaboudit. Occasionally in contact with some "rougher" family background types.
I was inspecting your gorgeous OPEN crumb Ciabatta. You definitely scored your goal. But here’s the funny part. I had to laugh out loud when I thought this. “I hate myself every time I make a sandwich out of this stuff” <LOL> I need to take a bath after eating...
You and Dan are crumbing it up - looks great !
Here's my first community bake post. I used a 66% hydration SD levain made with KAF bread flour. For the main dough I used Caputo 00 flour and some fresh milled durum flour.
Everything was looking peachy until I let the dough over-ferment since I was working and lost track of time. I never use my couche when making ciabatta but since I saw some other bakers had some great results I gave it a try. Well.....not a good idea especially since I didn't use enough bench flour and combined with the over-fermented dough I had some sticky issues. I had to cut off some of the dough but it still ended up pretty good.
The taste is pretty good. It's got a nice SD twang to it and it has that nice ciabatta crust and open crumb.
Sorry for the crappy photos but I didn't have time to do my normal photo shoot.
Ian, everything about your Ciabatta looks like SD. Not a bad thing, just a comment. The coloration of the crust and crumb and also the appearance of the crumb texture is what I based the statement on.
Tangy Ciabatta sounds tasty...
What type of Caupto “00” did you use”? I am excited about Caputo Americana. It enhances extensibility and also I also think it tolerates long fermentation. I am in the process of sourcing Caputo Manitoba. It seems it is not easy to come by.
I normally buy the stuff in the red packaging. I bought it a while ago and don’t remember the exact spec. I’ll see if I can find it in my Amazon records. I usually use it fir pizza but figured it was worth a shot for ciabatta and I was right.
White lettering on a red background is Saccorosso (translation: red bag). 13% protein. W 300/320. P/L .50/.60. 25 kg package.
Red lettering on white background is Cuoco (Chef), 1 and 5 kg packages. also 13% protein. W 300/320. P/L .50/.60.
So, according to the specs, it looks like the same flour.
http://www.mulinocaputo.it/en/flour
Oh, I'm also attempting ciabatta today using the same flour, the one strong 00 flour I can easily get. I'll report back. So far it was difficult to develop by hand with 80% hydration, but I think it's manageable in the end. But probably the most mess in the kitchen I've had with any bake.
It's the taste that rules, of course, and I've had my share of ciabatta and other higher hydrations stick to the couche. Sometimes not a pretty sight. All times a nuisance.
Last Autumn I ran some ciabatta with 2 type of tritordeum - that hybrid grain from durum and barley. One was a "type 150" and the other "type 65". In both cases the flour mix was 50/50. So I know that we can get a really nice ciabatta from a lot of durum, if you want to take that to a much higher percentage. Also was able to use plain old KA AP instead of a "bread flour".
As a lover of durum, you should try the higher percentages, and unless you get into another "sticky situation", I'll predict that you'll really like it.
alan
I will definitely try the higher % of durum next time. It is important to keep in mind that fresh milled durum tends to be heavier than the factory milled and sifted flour so adding too much could have a negative effect on the ciabatta but it’s worth trying. I mill on the finest setting with my Mockmill II and sift once with a #30 sieve. It gets a lot of the bran out this way. If I wanted to go crazy I could go to a #40 sieve but it’s a lot of work and not worth it in my opinion.
That's my favorite kind of crumb for SD. You normally work with more ingredients so it's nice to see your naked bread.
I do have trouble sometimes controlling my impulse to throw in more ingredients ??
Drip art!
Dropped the hydration on my pan de cristal formula from 94.5% to 89.5%. Just for research and scientific study, ya know. Saw no difference, but think I came across an "interesting" feature, at least in my bakes. The loaves that came out with some height typically did not exhibit as much of an open crumb as those that baked flatter. Observed a few times across several bakes. However, the true crust shattering feature on the very thin crust was front and center, and a modest reheat on the oven brought out the best in this phenomenon. Our neighbor, recipient of many bakes, said that this was the best bread I've made so far. N.B. She loves a very very crusty bread.
These will "forever" be malformed unless I can figure out a way to corral their shape on the peel. I looked into the baguette baking trays, but they are all perforated, and slack doughs will begin to adhere to the perforations. No thanks.
Yesterday baked my standard ciabatta - 100% hydration AP levain, 76% water, the 3% oil brings in another 3% hydration. With all of the water based manipulation and bowl scraping while mixing the dough, I'll add another 1% to the overall hydration now at 80%. I discovered a while back that I would rather eliminate the oil and add the extra 3% hydration to the water. But this time I didn't, and the oil was included.
Still a great bread either way, but I don't think it is any better with the oil than without. Delivered the big loaf to our same neighbors along with some pecan tassies that my wife baked yesterday. We shared them over a Zoom dinner last night.
Alan, “I looked into the baguette baking trays, but they are all perforated, and slack doughs will begin to adhere to the perforations.”
what do you think about placing parchment paper on the baguette trays, then adding your dough. OR, putting the dough on the parchment then transferring to the tray.
YES/NO?
but parchment paper is somewhat stiff and I can't imagine it conforming to the tray curvature easily with the limited amount of weight the dough would exert. Also, I suppose that the purpose of the perforations are to allow heat transfer, something that the parchment is already interrupting across the entire tray and not just the perforations themselves.
And I'm not gonna invest in any terra-cotta barrel roof tiles either! (although it did occur to me...)
I have one that fits 2 loaves and when I’ve used for baguettes in the past I would use baking spray and they worked pretty good. I will have to try with he ciabatta next time and see if it works or makes a mess.
“... but think I came across an "interesting" feature, at least in my bakes. The loaves that came out with some height typically did not exhibit as much of an open crumb as those that baked flatter.“ This may be particularly true because of the super high hydration.
That makes me think. Up front I’d think big oven spring, bit holes. But then sandwich bread comes to mind - big oven spring, small holes.
Considering cell size (open crumb) -
I wonder if the wetter dough isn’t weaker, thus producing more thin and delicate cell walls. The thin cell walls may be able to expand easier and/or coalesce more so that stronger cell walls.
Considering oven spring (height of baked bread) -
If any of the above holds water, maybe the weaker (wetter) dough is unable to rise as high because the cells coalesce during expansion and hinder the rise.
Throwing these thoughts out for discussion...
to be the case for wetter doughs. Being less stiff and more fluid and able to then stretch and expand in the oven. A thinner dough will react to the heat of the stone more than a thick one. I think that pushing the fermentation further than normal with ciabatta is one of the key elements to the signature crumb.
These look great. Love the pecan tassies as those are my favorites!
but in these days of drumming our fingers at home a little too often, my wife came across them. Really tasty, which is funny for me as I don't like pecan pie.
I used the remaining dough, which is a little like rugelach dough, to roll out, then paint with the goopy stuff, sprinkle with cinnamon sugar, golden raisins and toasted walnut pieces. Then rolled up, cut and baked. I like that even better!
Good thing you don't live in NY anymore or I'd be knocking on your door!
I wear a mask when I answer the doorbell or step outside my apartment. Can't quite remember why anymore...
ahead of me on the trail going up Hydration Mountain and already on the way back down. Did you plant the flag at the summit? "Because it's there" if anyone asks why. I am determined to break the glass ceiling since it seems to be a thang lately. When do you add the sugar?
3 or more hour pure refrigerated autolyse. Mixing bowl: incorporate - levain, IDY, sugar, salt. With mixer: small pieces of autolyse to incorporate. then bassinage, finally oil.
I'm more like an aging Billy Goat clinging to the side of Hydration Mountain, nibbling on the wild flowers and hoping an Eagle doesn't buzz me and knock me off my footing.
Unfortunately I had it backward and flagged a plant at the summit. Dang!
I just noticed that Little Stevie gave the Rascals induction speech for the R&R HoF. I'm a bit slow on the uptake...
Rock and Roll. I saw that too and realized the Sivio character he played wasn't much of a stretch for him.
I may skip the levined glass and count on IDY. I was thinking along the lines of the Giorilli framework but adding sugar, more oil and all the water it could take. Now that we are making water flow uphill. This sounds like a job for High gluten flour.
wow.. I've been away for 2 weeks and missed the start of this. Ciabatta was what got me into baking to start with and i've had some successes with a yeasted (poolish) ciabatta. looking forward to success in a sourdough version.
very creamy soft crumb
Nice looking slice there, James. What formula are you using? The color and look of the crumb texture looks super nice. Your crust reminds me of the “leoparding” on a good Neapolitan Pizza.
Those babies sire did blow up in the oven...
what flour did you use?
This is based on Reinhart's Poolish Ciabata recipe. it's CY with poolish and I use a 10% protein flour that's like AP on the stronger side. I use an addition of EVOO (added during stretch and folds) and adjust the hydration to the flour (on the lower range of Reinhart's recipe). Overnight poolish. mix final in KA mixer for a few minutes. 3 stretch and folds. final rest for about and hour. These here were baked in a over the grill stone oven (BakerStone) at about 700F. Thus the leopard spots. I get good results in oven with baking stone without the leopard spots.
I actually have to flatten the dough quite a bit before they go into the oven so they don't get too round and tall. the dough is definitely a very delicate "bag of bubbles".
I think there are a lot of interpretations of what ciabatta is or should be. In my versions, i look for a thin crispy crust (not an excess of flour on the outside). a creamy crumb that is light gelatinized flour exploded. No, they dont have a traditional slipper shape with the letter fold apparent. no, there are no lines of folded flour dusting on the outside. Mine is not a traditional rustic version. but it does have the very high hydration component and a crumb that is reminiscent of the traditional ciabatta.
Few things that i remind myself on each bake for ciabatta are:
1) don't over develop the gluten, it's rise too puffy, be too chewy and too tall. 2) make sure to flip the loaf for the bake otherwise the air bubbles will all go to the top. and 3) a properly proofed loaf will always bounce back, don't be afraid to flatten it. it will puff up like a pita bread (with the proper internal structure of a ciabatta, of course)
I'll have a go at this soon and document. i have not baked one of these in over a year.
James
James those look great, you’ve lived up to your handle here. Interesting that you don’t over develop the gluten, it seems that most are fully developing the gluten. Very impressive ciabattas you’ve baked.
Benny
and am interested in the low gluten development process for ciabatta. The first recipe I ever tried was Reinhart's Poolish Ciabata recipe and had decent luck with it. I'm a biga man now that I have acquired the Giorilli version. I wonder if anyone has ever deep fried ciabatta dough?
If this CB is like the last one then we are just breaking ground here and there is plenty left for you to build on.
Thank MT. I dont know i would say mine was "low" gluten. I should have clarified.. I used an AP flour, so the gluten development would be limited. I do manage to get window pane developed after my 3rd stretch and fold. I know that i have taken it further with up to 6 folds. and i think i preferred it more with just 3.
On biga vs poolish.. i think i'm just lazy as biga needs more work to mix into the final dough evenly. What's the advantage of biga over poolish? is it flavor or texture?
The aroma and taste produced by the biga seems more authentic to me. The method of making the biga that Ilya linked a video to is the key. Granted a little more care is required to work the biga into a smooth dough. I use AP flour and a Bosch mixer for making ciabatta. It does a much better job of incorporating the extra water than my old Kitchen Aide. The process is explained more in this post.
http://www.thefreshloaf.com/node/54556/90-biga-loaf-italian-method
And as we've seen endlessly in this CB and elsewhere, one size does not fit all. Great crumb.
I suppose if Sig. Giorilli and his clan were to review the CB, they'd have their faces turned away in horror of what's become of their beautiful ciabatta breads, and how sacrilegious can we get. We may try his and others' methods and looks, but ultimately once we make these, their look, feel and taste no longer belong to anyone but ourselves. Without change we'd all still be driving black cars that look like horse-drawn carriages.
It will be like watching Mr Baseball step up to the plate. Welcome, It's a tough crowd!
i'm feeling a lot of pressure here...
dup removed
Is what I tell my buddies when I'm in a crappy mood. Thats how ciabatta makes me feel. Its wonderful as a pizza crust but as far as a loaf goes it takes a lot of mental effort to find the the will to bake one of these ...
Just made some nice neopolitano pizza for my teens just now and fortunately I did find just enough motivation to turn one of the portions into this. Flavor is ok. Better than a loaf of wonderbread.
For all my CB Ciabatta bakes, see http://www.thefreshloaf.com/node/66311/community-bake-ciabatta
Have I got ciabattas for you!
Well-well. Didn't expect that, but I finally produced ciabattas! The bake that I mostly winged without much planning, and hey-ho, the best result by far.
I basically followed my previous bake almost exactly, except I omitted the oil, and maintained the originally planned weight of 800g total. Formula here: https://fgbc.dk/113c
The only major difference was the flour. I used Caputo Couco 00 flour, 13% protein, instead of my normal bread flour (12.3%).
Fermented the biga overnight (which must be approximately the right temperature), for ~13 hours. Then mixed the dough. Dissolving the biga and making the dough come together and develop the gluten was the messiest process of any bakes I've had. Using a hand mixer for the biga splattered half the kitchen with floury water, and trying to slap&fold this dough (even not at full hydration) created the stickiest pile of goo on my counter. In the end I figured out that Rubaud mixing was perfect for this dough, and it was all good. Then did 3 sets of stretch&folds spaced by 30 min, and then... I forgot about it! Hasn't happened before, but I got into the zone with some work, and just didn't realize how the time passed. In the end the bulk lasted around 6 hours (quite a lot of it was spent on the initial struggles to mix the dough properly). Surprisingly, the dough wasn't overflowing at all, it wasn't that hugely risen even. It was clearly jiggly and had some bubbles, but not as much as I expected after this length of time.
Anyway, I just roughly and gently divided and shaped the dough into two ciabattas, and proofed on a couche. And again it didn't seem like much was happening (I generally don't notice much change during proof time with any dough really, not sure what's going on), so I baked after 1.5 hrs final proof - 15 min with steam, 15 min without (and convection on for the last 5 min to gain some more colour).
And here is what I got - not very impressive, even a little split on top, but let's say I was going for rustic! And I did get some oven spring, which is a big improvement already.
[url=https://ibb.co/sjdn0Qb] [/url]
What was more exciting was inside!
[url=https://ibb.co/XCFhmsG] [/url]
[url=https://ibb.co/Lt89pgv] [/url]
Finally I got quite an open crumb! The crust is still a little crispy this morning, and not too thick. Tastes great too. Perfect for horizontal slicing for sandwiches (which is what I had for breakfast, with Camembert and some Polish ham).
In spite of your travails. Hand mixing ciabatta is a frightening prospect for me. Maybe a frissage (fraisage)? would be less messy than making a slurry of the biga. I am happy for your success.
Thank you! I am starting to think the biga is not worth the effort without a dough mixer. Using a hand mixer lets me avoid the physical pain of hand mixing the biga into the dough, but difficult to avoid the splatter! Could you comment more, how I could try frissage for this? I've never tried it.
I am not sure but smearing the dough on the workbench with the heel of your hand is how the biga might be incorporated. I want to thank you for posting the video about making a proper biga. It has become my go to method and I plan on using it for my next pizza dough as well.
Thanks! That also sounds like a lot of work, and difficult to make sure everything is completely smooth... I was thinking another option to try might be a food processor, maybe adding water little by little and blitzing would dissolve the biga properly. But also possible it'll be just flying around and not doing anything. Need to try it.
Yeah, that video was a game changer! I think a few people here found it useful, and I just couldn't have figure out how to make such a low hydration mix without kneading - and, hence, gluten development, without seeing it.
I agree with Don, Ilya those look really good. Will you make these again with the biga?
Benny
Thanks Benny!
Maybe I'll try again, just to be sure it wasn't a random lucky fluke! And hopefully I'll avoid the problems I had this time.
The same recipe and method as before with the hydration increased to 84% and a half teaspoon of malt added back in. My best crumb so far and it was from the loaf that didn't bake a high as the other loaf. I could still see some small specks of the biga about the size of a BB in the final mix that didn't get smoothed out but they weren't noticeable in the bake and did not affect the outcome. I was able to stretch these to the length of my 20 inch stone but they shrank a few inches while baking. The dough was quite delicate and the pinched seam from dividing it is the reason for the tighter crumb on one edge. I am having a bit of struggle with the new way of inserting photos so any help would be appreciated.
Image

Glossy holes = Happy camper!
Just the right size to slice and still fit in a toaster and not too much bread to overwhelm the filling. And by the way, inspite of the large holes, No lap was sullied in the eating of this sandwich!
Incredible baking there Don. That is really open crumb and thin crust, the glossy crumb is beautiful.
Benny
" it was from the loaf that didn't bake a high as the other loaf." I wonder if this effect is similar to what I found with my recent bakes of the pan de cristal. The loaves that rose more had the smaller crumb. The flatter loaves were more open. And perhaps the same with my own ciabatta. As I get the barrel effect, the crumb is tighter, which I'm in no way unhappy with. But still exhibits all of the other qualities of a good ciabatta.
Beauty.
After reading about your experience with your previous bake I found the same thing happened in my case. You would expect the taller loaves to have larger holes but the opposite seems to be the case. The folding builds structure for a taller loaf but the completely undisturbed dough is flatter with a more open crumb.
This new way of inserting pictures is a mystery to me.
For pictures, I use an image hosting website which provides BBCode, for example this one, but there is a lot of them: https://imgbb.com/
Just upload images there and paste code here (beware sometimes the code it generates also contains an ad link in the end, which I then remove manually).
Hi Ilya,
Yes I find that site is pretty good. I've created an account and I can easily see all my uploads. I have also used cubeupload https://cubeupload.com/ but they seem to have downtime quite often.
I always resize images to eg 550 pixel wide prior to uploading to get them the right size.
Lance
Oh I never bothered to create an account, but sounds like it's useful, actually! Thanks!
pasting and editing code. So am I to understand that the images I want to post need to be pre-sized and come from a host site? I'm afraid Idaveindy needs to show up on my desktop like the paperclip in Word.
It's really simple.
Go to https://imgbb.com/.
Select, or just paste an image - or multiple images.
Click "Upload". You'll get something like this:
[url=https://ibb.co/jVx8T61] [/url]
You need the code from the window on the bottom (I added a couple of spaces, so it wouldn't render as an image): [ url=https://ibb.co/Lz7TW6d][img] https://i.ibb.co/xSTn0Gq/IMG-20200119-163042.jpg[/img][/url]
That's just perfect! Light open crumb, crispy crust, all what is needed for a ciabatta.
I actually prefer a paper thin crust that is softer. The little bit of oil seems to provide that and they stay fresher longer.
To each their own - I would like it thin too, but still crispy. My last attempt was a touch too thick I think, but that's me being picky. But maybe next time I'll try with a little oil again.
I don't put oil into the dough during the mix. but i use it to lube the tub that i bulk in. Through the 3 stretch and folds, it keeps the dough from sticking and eventually gets incorporated. Seems to work well. i get a good shiny dough that has a thin crispy crust and a bit of the EVOO flavors throughout. Good with rosemary infused oil too.
Today I made a very presentable layout for my teens who are perpetually online and said 'hey guys ! look at this'. I then did hand-model presentation of each item and said Enjoy the Bounty.
My 15 year old then proceeded to get a frozen White Castle and headed directly to the microwave. oh joy
More for you...
Their loss I agree. That would be a very nice lunch but I can see teenagers turning their noses up at that. The ciabatta have a very nice crumb.
Benny
The community bake provided the excuse to bake a simple ciabatta recipe that a friend has been baking for years.
It is the exact opposite of my recent sourdough breads in almost every dimension: instant yeast, has no autolyse, uses sugar, is super rapid, no wholewheat, etc etc. Even for an instant recipe it is fairly minimalist eschewing the biga or couche or anything that would complicate the life of the home baker for whom the original recipe was intended.
Sometimes it is fun to try something radically different, and it reminded me of what was possible in bread baking.
The recipe then:
- Mixed as an all-in-one-mix; first mixed the dry ingredients (yeast, flour, sugar, salt) to ensure even distribution and then added the lukewarm water. Note: the original recipe calls for adding the salt after the dough was mixed, but went even minimalist than that with an all-in-one.
- Five minutes of stretch-and-fold (in-bowl) after mixing. More like an in bowl stretch and slap. After five minutes dough was still sticky, but there was some evidence of gluten formation and it was holding shape better. Original recipe says you can do machine mixing but should finish off by hand, and being minimalist again did everything by hand.
- Smothered top of dough in bowl with olive oil and let the oil run down the sides of the dough in the bowl. Coverred bowl and left until doubled in volume. This took around 1h 45min for me (RT of 23-24 deg C).
- Tipped out onto heavily floured surface and did a basic 'envelope' shaping. No couche. This is where I went a little wrong, should have gone directly onto the final tray rather than having to move it again and there was certainly some degassing and flatness caused by that.
- Baked at 200 deg C for 30-40 minutes until golden brown showed on top and base tap sounded good (took 35 min).
Since I was breaking all the rules we only waited 30 minutes for cooling before we tucked in with good butter which melted instantly. Soft crust, nice mouth feel, lovely salty taste. Certainly, a poor crumb compared to the true sourdough master pieces from the community bake, but for a low effort effort this was a surprisingly solid recipe.
That is a brave bake. Well done. By my calculation, this is 90% hydration dough that is way over my largest hydration attempts. Did the olive oil eventually get mixed into the dough or poured off?
Thanks for sharing,
Cheers,
Gavin.
Full process and photos here:
http://www.thefreshloaf.com/node/66463/my-basic-ciabatta
James
Lovely colour and shape!
Lance
Really well done, you live up to your name here James!
I like that color and the oven spring is quite impressive. I look forward to seeing your SD version.
The aim of today's attempt at Ciabatta bread will use Hamelman's 125% hydration liquid Levien, Vermont sourdough formula. The final dough hydration will be modified up a full ten percentage points to 75%. I think the liquid Levien will work well with the high hydration old slippers. (The traditional biga method notwithstanding) The plan is to bring the Levien up to room temperature for 1hr. then build the final dough. At that point, I will follow the same bulk/shape/retard procedure as with the baguettes. With any luck at all that should mean an 8 PM bake time.
Continuing to develop the salt-retard method: 83% all-purpose flour, 14% sprouted wheat, 3% whole wheat flour, 4% vital wheat gluten. Half of dough baked as ciabatta, half as pan loaf, 1kg dough each. Write-up here.
Hello everyone,
I would like to introduce myself to the group. I am a new member, I have baked bread at home for about two years. I have been working on my ciabattas in the past couple of months and decided to try the Giorilli formula (see earlier in this thread). I followed the formula to the letter, although I don't have the specific flour the recipe calls for, so I had to do it with plain old KA bread flour. The result was pretty nice, very soft and open crumb with a nice aroma. I have a couple of observations that I would like to share and discuss.
I don't have a mixer, so I hand-mixed the dough. Since the formula calls for real biga which is not a dough but more like crumbles, it was extremely difficult to fully mix the dough the next day, I couldn't quite do it 100% well, even though I first hydrated the biga with the water and kneaded it for a good 5 minutes, then added the remaining flour and kneaded again for at least 10 minutes quite aggressively. When I was doing stretch&folds during the bulk phase, I would still feel those tiny bits of unincorporated flour pieces with my hand. Luckily, they didn't show in the baked loaf. While I know that real biga is not supposed to be a dough, I wonder what would happen if I mixed it into a dough instead of crumbles. Would I get dramatically different results at the end in terms of taste and texture? I feel that if I mixed the biga better at the outset, creating an actual dough, it would be easier to incorporate it into the dough the next day.
I also suspect that this formula works better with mixers than with hand-mixing, for two reasons. First, because of the incorporation of the biga I said above. Secondly, the fermentation goes pretty quickly in this formula after everything is mixed, for the large (80%) amount of prefermented flour. Because of that, I think that the gluten needs to be fully developed right from the outset, before fermentation starts, otherwise we will have a lot of fermentation going soon after mixing without sufficient gluten development, and the structure will suffer. I find it quite impossible to fully develop the gluten at the outset in this formula by hand, because of the biga issue, and also because of the high water content. So, not having a mixer, I developed the gluten at the outset by hand as well as I could. It was not perfect, so I gave the dough 4 sets of stretch & folds at 20-minute intervals during the bulk phase. While the dough passed the windowpane test after the last fold, there was already so much fermentation going on that I thought I destroyed the small bubbles with the folds, which as a result merged into those enormous bubbles that made the crumb quite uneven. In my experience, developing gluten by hand via folds works better with ciabatta formulas that yield much slower fermentation because one has plenty of time to do the folds and fully develop the gluten before any fermentation takes place.
One more thought on the extremely large holes. Perhaps I should have docked the top of the dough with my fingers before baking. I have heard that docking is used to avoid excessive rise in the oven, but I wonder if it also works for evening out the crumb and braking those enormous bubbles into smaller ones. Any thoughts?
Peter
Image

Image

Image

Image

The Ciabatta looks great! I do think that poking the dough with your fingers would have evened out the crumb a bit.
Considering you don’t have a mixer, you choose a difficult method. Hand mixing Ciabatta by hand is challenging using any formula and method. Next time you may find another formula more suited to hand mixing.
If you bake Ciabatta again, post the results. We are curious to watch your progress.
Very nice looking Ciabatta!
Danny
Thank you for your answer, Danny. You are right, it is difficult to deal with ciabatta dough without a mixer! However, I think it is possible when the dough develops slowly. A few days ago I made a ciabatta with a hybrid method, using only 0.05% ADY and 5% sourdough levain. The bulk took 15 hours at around 68 F, plus a 2-hour final proof. The dough obviously had enough time to develop the gluten just by itself, although I gave it 4-5 sets of folds in the first 90 minutes or so, then it passed the windowpane test. After that, I left it completely undisturbed for the rest of the bulk fermentation. This is how it turned out.
Image

Image

Image

Wow Peter, that ciabatta is perfection to me. Gorgeous super open crumb and lovely crust. That was hand and time developed gluten without machine mixing, remarkable.
Benny
Outstanding! Benny said it all.
Great looking bread.
I'm with Benny & Dan. This is outstanding, especially without a mixer.
I appreciate the comments. That was the only ciabatta I made so far that had such a crumb structure, so I am far from an expert. Hopefully I can reproduce the same results again. I can only suspect that it turned out the way it did because of the fully developed gluten due to the long undisturbed fermentation. I literally left it alone for like 13 hours, and no shaping, just cutting.
The ciabatta bread that is !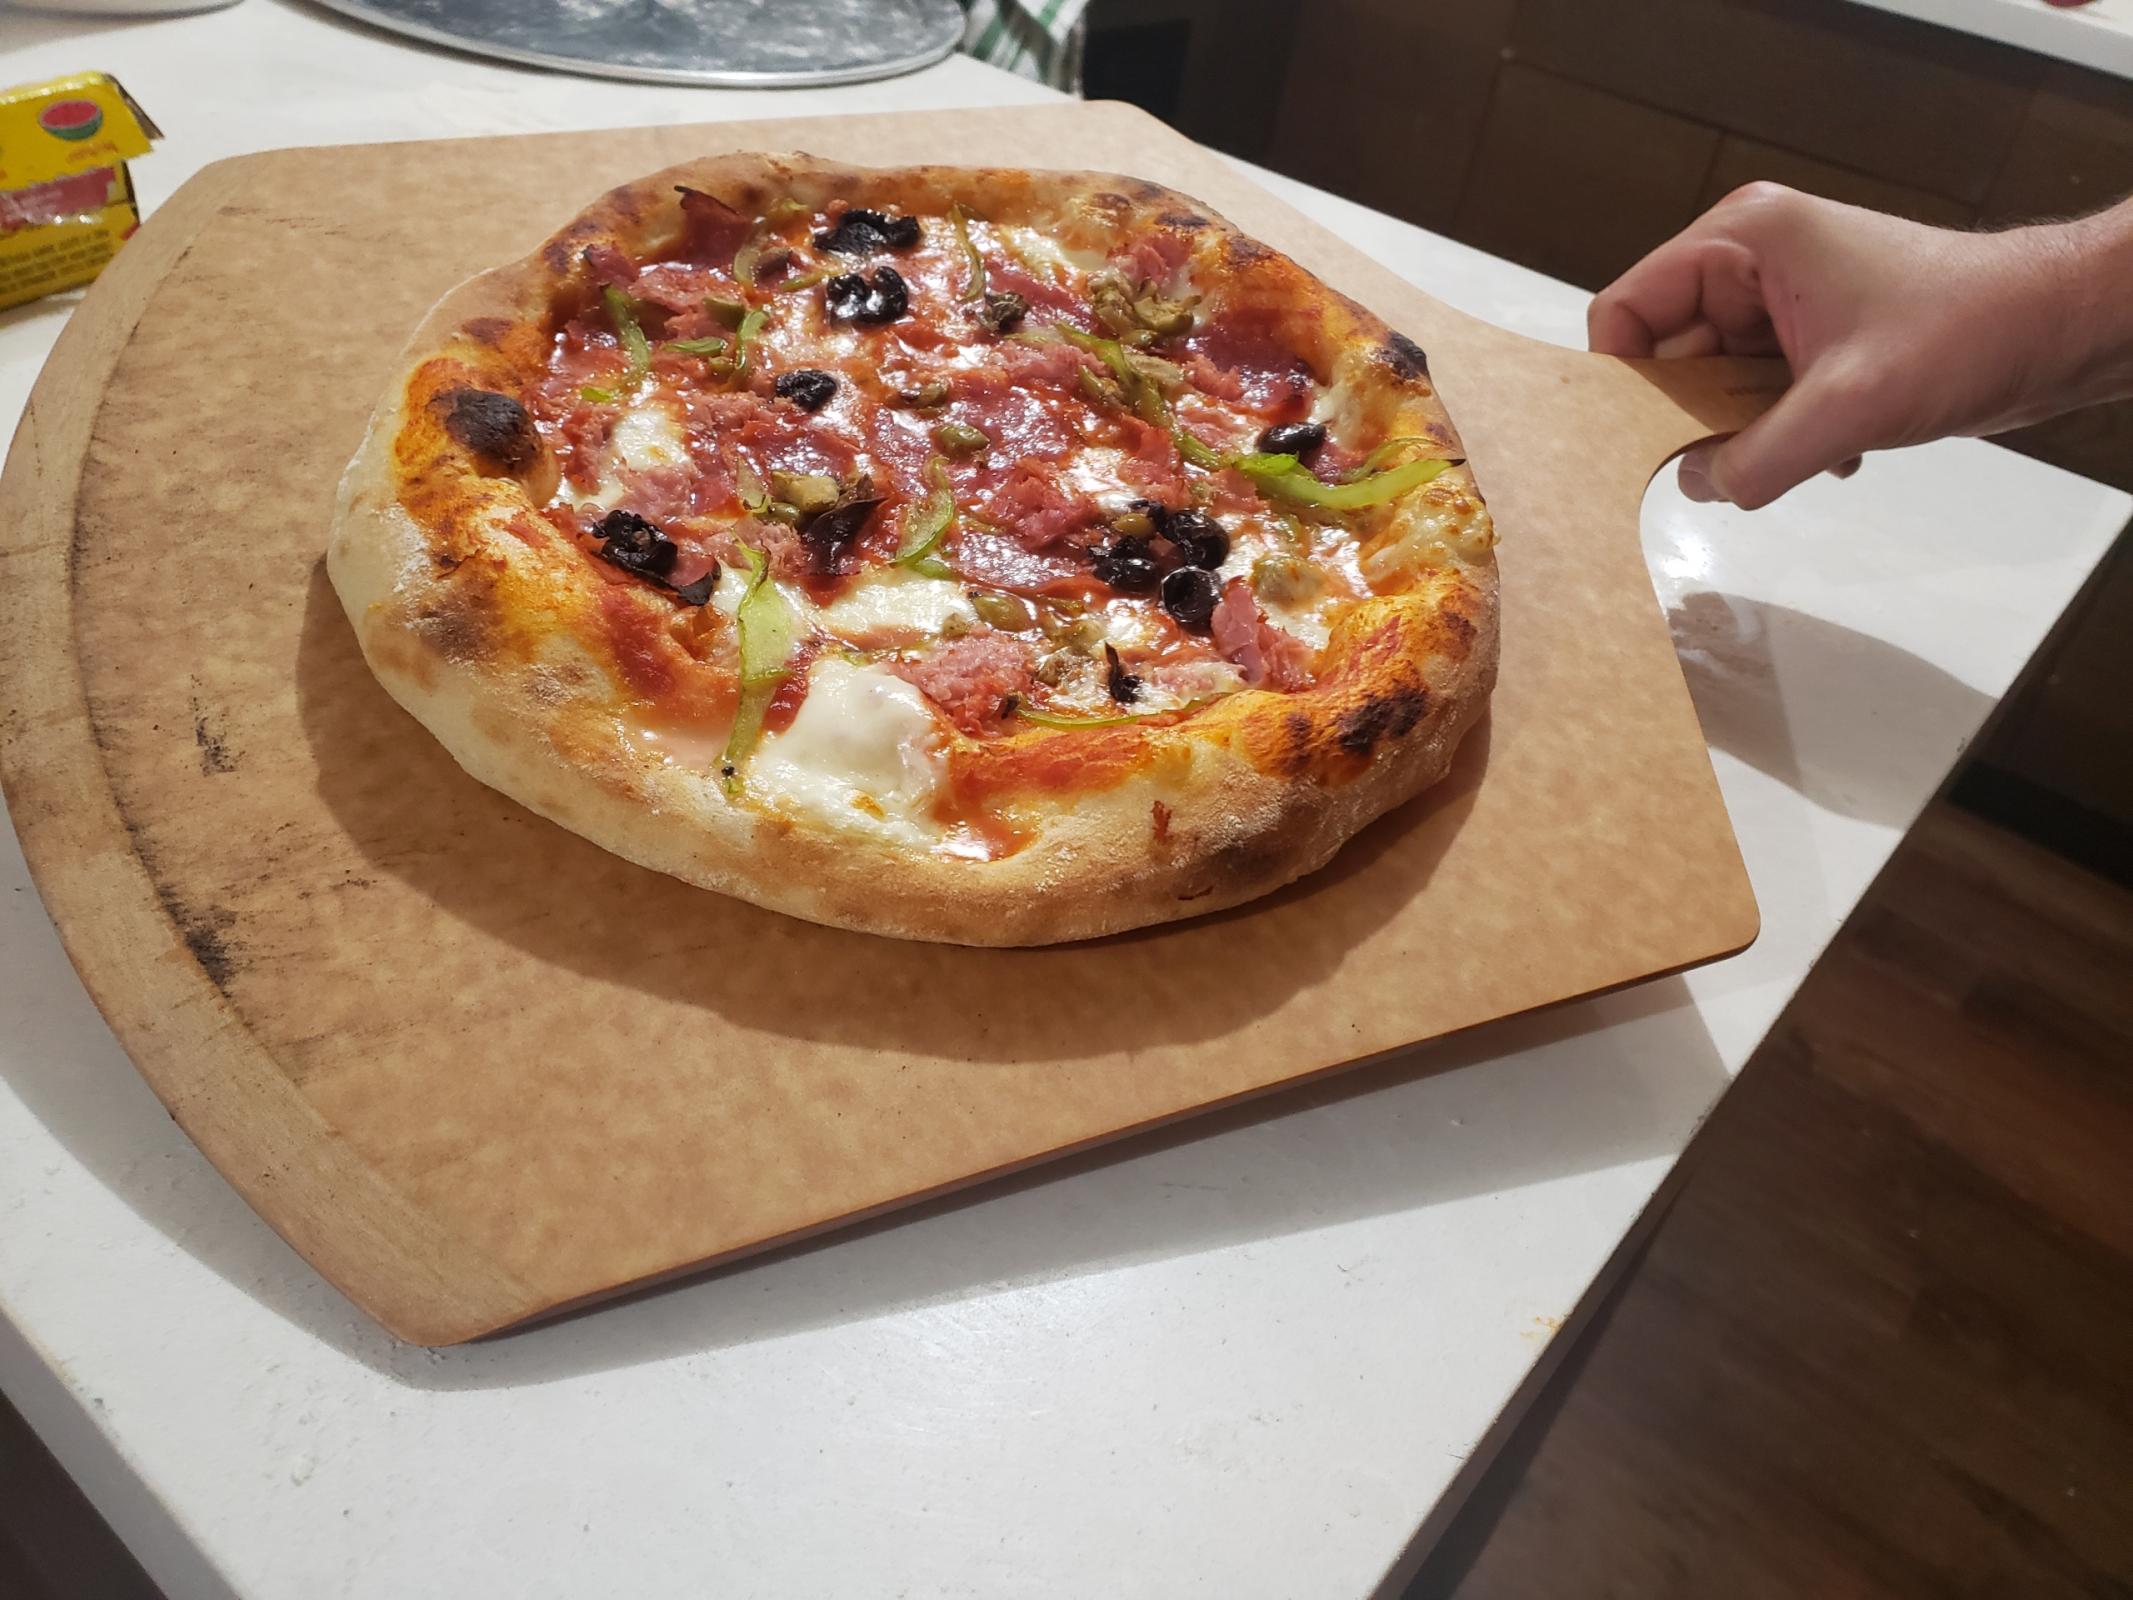
Hi all,
I made another ciabatta yesterday, this time instead of using 100% bread flour, I used a mix of 10% whole wheat and 90% bread flour. I need some help with the crumb.
This time, I shaped the ciabatta lightly by doing an letter fold, this gave it a nice cylindrical look, which I like. However, the holes in the crumb could be more thoroughly distributed. It had some really nice looking slices, but some other slices had large holes on top and a more dense center, even though I flipped it before putting it in the oven. First I thought I had over proofed it but it had an enormous oven spring, so I don't think that was the case. Also, after performing the last stretch&fold, I checked the gluten development, it passed windowpane, so I don't think that was the issue either. Should I have proofed it longer perhaps?
This is the formula I used:
90% KA bread flour
10% whole wheat
Overnight poolish with 50% prefermented flour
0.2 % instant yeast
15% active sourdough starter
83% hydration
2% salt
In the morning I hand-mixed all the remaining ingredients with the ripe poolish. Kneaded for about 10 minutes, until the dough was nice and smooth, all ingredients evenly incorporated. Then bulk fermented until doubled in size (3 hours), performing four sets of stretch&folds in the first hour. Then lightly shaped it, and final proofed it on a couche for 1.5 hours before baking.
Any ideas what could have caused the crumb to have large air pockets on top and a denser center, despite the fact that I flipped it, and the gluten development seemed fine, too?
Image

Image

Image

Image

Very lovely ciabattas!
Thank you very much Mini Oven! :)
I decided to revisit Ciabattas, and make them using a sourdough poolish. I think many of my previous attempts were underfermented, so wanted to push it a bit this time - and omitted the olive oil for no specific reason, except oiled the container and hands a little. Made a large (~40% PFF) 100% hydration preferment with a small amount of refrigerated rye starter, and left overnight, for ~16 hours. Then mixed the final dough excluding salt and some water, mixed and left for ~30 min to avoid dealing with stickiness. Then mixed in the salt and remaining water (final hydration 80%, here is the formula: https://fgbc.dk/1h1b), did slap&folds (the dough got quite strong very quickly - I guess from the gluten developed in the poolish?), then did coil folds every ~30 min, and left for a total bulk ferment of around 4 hours at 26°C. The dough was lovely and supple. I then divided into 4 small-ish pieces, and loosely shaped them into tubes, like preshaping baguettes. Proofed on a couche seem side down, for around 3 hours. They clearly grew in size, and passed the poke test.
When transferring onto the peel, gently stretched them (basically, took them by the ends, and they stretched a little under their own weight), and then baked on a hot steel with steam for 13 min, and without steam with convection until done.
Outside they are a bit ugly, all of them got split! Did I shape them too tightly? Or why would this happen?..
[url=https://ibb.co/KGypFbb] [/url]
Cut the smallest one while still hot, to have with dinner. Inside, the crumb is really nice, not super open, but soft and at least certainly not underfermented :) Not better than the previous attempt I made, but not bad. [/url]
[url=https://ibb.co/Msj69y4]
I can’t answer your question as to why they split, but I do like their rustic appearance. Is there any chance that the seam ended up on top? It doesn’t sound like it from your description but that would be a reason for the splits.
Benny
Thanks Benny! Good idea, but I don't think the seem could have ended up on top, I proofed seem-down (never tried that before I think, actually!), and then just transferred onto the peel without flipping... So unless I was really serious confused at some point and didn't even notice that, the seems are below.
They look great Ilya and I like the idea of the sour poolish!
Do you think stretching them under their own weight caused the gluten to develop in evenly? In a sense, created some natural “weaker” spots?
Yeah, I liked the polish a lot, very easy to make, speeds up fermentation on the day a lot with a big inoculation. Develops the gluten by waiting, and a nice flavour boost too.
I don't think stretching caused weak spots, it seemed they were quite even and nice looking before baking... But maybe it stretched the skin and added to the surface tension?..
OK it's been a long time since I last tried ciabattas. To summarize my poor efforts to date, the first failed because of my starter sluggishness and the second failed because of severe sticking to the couche. This time I ensured that my starter was nice and active (as it has been consistently since switched to a diet of whole rye) and I also made sure I used a lot of flour on the couche. Now, I realize that my couche is a cotton couche and not flax linen. I was sent the wrong couche when I ordered it last year and I should have returned it, but at the time I was raring to go with baguettes and didn't bother. If you guys says that there is a huge difference between a cotton vs flax linen couche then I may go ahead and order one. The cotton has been fine for lower hydration baguettes but even this time the dough did stick. I was able to carefully pry them off the couche using a dough scraper but of course the dough was still degassed more than I would have wished.
I made the Scott McGee ciabattas that Alan was kind enough to share with me. I no longer use my stand mixer for dough at all only wanting to hand mix, this is because it is making clicking noises which I'm sure indicate that the gears are going. Thus, I did not want to use a formula with a low hydration Biga which is more difficult to dissolve or add to the dough. I made these without any IDY.
These are baked darker than I would have preferred but I have to admit that I lost track of time as these were baking while I was making dinner.
I’ll post the crumb tomorrow when I slice them to have for lunch. They did have good oven spring despite the degassing so I’m hopeful that the crumb will be alright. 🤞
and I do adore the darker bake. It is a really nice formula. As you might recall, I also played around with an 80% PFF biga at 66% hydration and the final mix comes together much more rapidly (in my old KA mixer). And I like your barrel shaping, one after my own heart.
Looking forward to the crumb, which doesn't have to be so open as to allow mice or small children to slip through. My idea of ideal ciabatta is a crusty crust and an open soft silky crumb. So let's see where yours goes..
Alan.
Darn, I’m going to have to get a proper flax linen couche I think or use rice flour next time with my cotton couche. I think that the tears in the gluten matrix in the upper half of the crumb are secondary to my peeling the dough off the couche since it was stuck. I don’t think they were overproofed although that could explain the stickiness. But the crumb in the lower half of the dough doesn’t look overproofed to me, but I could be wrong. Anyhow, no luck with number three, they will have to be a number four or more until I get this right.
Addendum. Thinking about the dense center of the ciabatta, I think I know what happened. After bulk the dough was cold retarded overnight. The next day it was divided then shaped and left at room temperature to final proof. Unlike much slimmer baguettes, the inside of these ciabatta would take longer to warm than the inside of the baguettes, so I suspect that when I did the poke test for proof I only really tested the outside which looked well proofed while the innermost dough hadn’t had enough time to complete proofing so was underfermented relatively speaking. I might skip the cold retard next time, I don’t think I needed to cold retard to shape and I don’t require a more sour flavour from my ciabattas.
Finally I have ordered a flax linen couche and hope that my next set of ciabattas won’t suffer the same sticking issues, fingers crossed.
Benny
I think ciabattas have been my kryptonite LOL. Mostly the problem has been dough sticking to the couche. I now have a 100% flax linen couche. I used it once previously after seasoning it by rubbing flour into it and then baking baguettes and there was no sticking. With that experience it was time to bake ciabattas again. Using the same recipe but trying out Alan’s shaping as per his youtube video. I needed a bit more flour on the counter but other than that the shaping went well. Oh I did change a couple of things, no IDY was used and I decided to use a 76% hydration starter to match the hydration of the dough. I should have stretched the dough more during transfer from the couche to the peel.
A beautiful crumb, and the consistency of the two relative to each other is noteworthy. A little tougher to do when dealing with amorphous shapes. If all you want is to cut single round slices to serve, the roundness of the barrel came out ideal. I find it more attractive than a ciabatta that is relatively flat. That would also make it a really nice husky size for toasting and for bruschetta.
The stretching trick, not mine but Scott MeGee's, is to find that happy medium for a long stretch (if that's the plan) yet avoid manhandling and perhaps degassing the dough. A way to avoid more flour on the counter would be to use a thin coating of water as the medium between the dough and the counter. As we are dealing with an already very wet dough, the additional water shouldn't make much difference if some adheres to the outer surface. You'll still have to flour the couche, but perhaps you can get away with not quite so much raw flour on the dough as you might otherwise find.
I wish that he had more videos available, as I like his manipulation of the dough across the breadth of his activities.
Another in along line of bravos!
Alan
I actually quite like your method of shaping Alan, it skips the preshape and I think, allows a more open crumb. Given my plan to have one of these for dinner to make sandwiches, I should have stretched much longer. The bread had such oven spring that we could barely get the sandwiches in our mouths to eat.
I’ll have to try a non shaping bake at some point, I see so many bakers basically divid, then transfer to the couche after heavily flouring any sticky surfaces, rest, transfer then bake. I’m curious to see what the crumb would be like doing that.
Thanks again for sharing your recipe and the video you posted on YouTube.
Benny
blush with those slippers!
Got anything against olives?
"Tis the season to be olly..... Fa la la la la, La la la la."
:)