I've come across a few posts questioning what's the best way to create steam in a toaster oven (or counter top oven) because their dutch ovens do not fit in there. I asked myself, "why not start it in the dutch oven, stove top. then finish it in the small oven?" So, this was my experiment.
The tools:
-Lodge 3.2qt skillet/dutch oven cast iron set
-Breville counter top/toaster oven
- laser temp gun
The bread:
- Whole wheat sourdough (a la Sune / Foodgeek - Beginner's Sourdough Recipe)
"Those were the words... this is the experiment"
First I preheated the Lodge dutch oven top and bottom on stove top on high heat separately (I have a high output stove top, but i think any home stove should do). At the same time i preheated my Breville oven


My goal was to get the Dutch oven close to 500F. Using the laser temp gun I monitored on each side. I found that the sides where heating up higher than the center bottom because of how the burner ring is shaped. That is a good thing for this. I was actually able to get them above 500F.


626F is probably too high.. i let it cool back down a bit. But the plan is to use the deep side as the bottom as it will retain and conduct more heat. I will keep it on stove with low heat to maintain the temperature.


This is the scored dough loaded into the deep side. I've placed a double layer of foil and a parchment under it. my concern is that the bottom might burn due to the direct heating under it. A few spritz of water and the lid goes on.
Both the top and bottom start at 500F. I monitor the temp periodically and adjust the burner as needed.
Start: Top 500F Bottom 500F
5 mins: Top 360F Bottom 380F (increased heat after)
10 mins: Top 290F Bottom 430F (hindsight, this is too much)
15 mins: Top 250F Bottom 390F
20 mins: Top 230F Bottom 390F
Then.... the moment of truth...

HUGE oven spring! Look at that ear on that guy! Everything appears to be on track. The bottom was looking a little brown but nothing tragic. The problem is fitting it into the small oven with that ear now.
Small oven is preheated to 450F on bake which is the highest it will go. but i noticed that when i set it to 450F, the top heating element goes on as well. I played around with it a bit and concluded that under 450F the top elements do not come on in Bake mode.

Barely fits in there. Just to be safe i put a small piece of aluminum foil just over the ear. Baked for 30 minutes. rotating every 7 minutes or so. at the end of 30 mins, it wasn't quite dark enough yet, so i went on for another 5 with the foil removed from the top.
Here is it:

Great oven spring from the dutch oven segment. nice little blisters from the spritz and steam. Good shine. Ear didn't get burnt too much. (I do like that little bit of char). Overall big success!
Only issue I had, and it was my initial concern is that the bottom would burn. it did get a little bit too dark. but certainly edible. Nothing too tragic.

Lesson learned here is that I could have used another layer or two of foil under (i thought about sandwiching a few layers of foil , parchment alternating) and that i shouldn't let the bottom get above 400F on the stove heat. i think 360F is a good goal. I lasered the dutch oven bottom in the regular oven and it reads around 360F range even when set to 450F heat.
As this is an experiment, I baked another loaf in the regular oven inside dutch oven as we do. From the same batch of dough for comparison. Same 20 minute in the dutch oven, then uncovered for 35 minutes.

The one on the right is our toaster oven baby (dressed with a little more rice flour). The one on the left in the regular full sized oven. Overall very similar. The full sized oven one seems to have a bit more spring, but not significant. Both attained good color, good shine, and little blisters. The full size oven one had a nicer bottom that's not charred, but i think we can remedy that.
So, there you go. You don't need a big oven to achieve a solid sourdough loaf.
I will post a crumb shot when it's completely cooled down.
What a clever idea. Great results! I am interested in trying it though I don't have a temperature gun.
I think you can do it without a temp gun. heat both sides on high for 8-10 minutes. this should get it above 500. turn off the heat for a minute. then put it on simmer on the bottom pan. (keep the top on high, the top over 500 should be fine). Load the loaf. i think if you put the loaf on a longer strip of foil, you can use that as a handle to drop the dough in and take it out. I had to use bbq tongs to get the par baked bread out of the deep bottom.
having the bottom on simmer should keep the pan at around 360. maybe just a tad more than simmer. whatever setting you normally to maintain a barely boiling pot of water.
I actually think there's a good margin for error here. we're really just looking for the spring and the initial heat should provide much of that already. make sure you layer up the foil/parchment under the dough, so you don't burn the bottom like i did.
yeah.. it's a bit burnt on the bottom.
Super result, very clever, you’re the first person I’ve seen to start bread out this way on the stovetop and finished in the oven.
Patent Pending.... ;)
This is fantastic, very clever. What's to stop you from gently flipping the dutch oven over on the heat source after the crumb sets to heat the other side and avoid any burning?
I actually toyed around with a few ideas in my head... i have 2 dutch ovens. so i could actually heat the other one up and switch the loaf over after 10 minutes. I was also trying to work out a contraption where i can rotate the dutch oven while the dough is suspended in the middle and stays upright. But i think after this trial, I learned that we don't need high heat all the way through the first 20 mins. it's really all about the steam. I don't want to risk losing steam and moving the dough. maintaining above 300F should be sufficient.
INCREDIBLE
Congrats! Looks great!
The extra skillet that the guy used in that one video might help with not over-cooking the underside of the loaf.
You inspired me to get out my Lodge 3.2 combo-cooker and see which skillet matches.
The deep part of the combo-cooker fits/matches nicely in both a 8" or a 9" Lodge regular skillet.
If you cook on the lid/skillet part of the combo-cooker, you need the 9" Lodge skillet to match it.
I haven't duplicated your baking experiment (yet), so this is just a report on physically matching up the pans.
And thanks for the excuse to get a laser thermometer. :-)
Please do post back here if anyone does try to do this. Would love to hear about it.
I think my next challenge to follow this is to bake without having a toaster oven at all. just stove top dutch ovens.
If i have two sets, and i keep heating a top separately and rotating it out every 5 - 10 minutes, i should be able to achieve extended browning temperatures. I would lift up the loaf after the initial 20 minutes onto a short rack.
I made a no knead bread with sesame seeds this way (75% hydration, 12 hour ferment, cold proofed overnight). After pre-heating the combo cooker top and bottom for 10 minutes on medium high heat, I loaded bread straight from the fridge into the skillet part (for ease of loading without a sling) and spritzed top part with water. Being mindful of your burned bottom crust, I removed from the stove for a few minutes then returned to the stove on lowest setting and only steamed for 15 minutes. Here is the result after steaming. It's a little more cooked than picture looked:
I baked on the Breville "roast" setting, since this video suggests that sends less heat to top elements. I did use foil on top when it started to brown. Here are the results:
So I'd declare it a success! The bread opened up a little more than I'd like, but I'm not sure if that's a result of the cooking method. Maybe I didn't let the bread ferment enough to develop gluten, maybe I scored too deeply (since that seemed necessary in my previous countertop oven experiment). Crust was pretty good, but not as good as cooking in DO. Hard to tell exactly with sesame seeds. Either way, it was delicious.
Great job!
Looks like you really maximized the space usage in the DO and the Breville with that big loaf. You might be the only one complaining about the bread opening up too much where you scored it. Crumb looks great. How long did you bake (roast) for in the Breville? my total bake time was 20+35mins. I wonder if the bottom of mine got burned in the Breville vs just in the Lodge, since i had bottom heating only there.
I do notice your crumb to be a bit more open on the outsides than in the middle. (not that there's anything wrong at all there, really) but i think due to a larger cold loaf in a shorter covered bake time. if we can fine tune the heat and duration, i think you would have seen even more spring.
Very glad it worked out. great bread there.
James
I don't remember the amount of time in the Breville, maybe 25-30 minutes. Yes, next time I'll try a little longer in the DO.
The one problem with this method is it does heat up the kitchen quite a bit, which is the nice upside of the countertop oven. Just a minor complaint. :)
PS: this loaf was about 20% smaller (by weight) than I'd normally make in my oven.
This would mean a lot to some people I know! I reckon for a small loaf, you could even shorten stove time to 15 mins, minimizing risk of burnt bottoms.
I tried again with a ~30% whole wheat sourdough. This time I left the pot on the stove on the lowest setting for 20 minutes. After that, it took about 26 minutes in the Breville at 450/425 roast, with foil on top midway through. Here are the results:
This time I did have some burning on the bottom of the crust. I foolishly didn't check the bread after steaming in the DO, so I'm not sure whether it was the stove or the oven. One thing to note is that this bread had a little honey, which could have contributed to the burning, despite one layer of tin foil and parchment under the bread. In any case, you could barely taste it at all in the finished loaf. It was delicious!
That looks like a really good 30% ww. I also tried the experiment again, with initial intent to do the whole bake on stove top, using a small rack to hold up the loaf after the steam. But even on medium heat, the upper portion of the DO never got near 300F. Ended up throwing it into the oven after 10 minutes of that.i think the only way to do that is to have a separate DO that i heat separately and rotate two top portions to keep it hot.
Cia, as others have said, I think this is going to go down in the annals of TFL as something big.
Everyone should bookmark this because being limited to a toaster oven and stove-top is something that a lot of newcomers ask about.
[SALUTE!] ???
Every time I see this post I am re-amazed.
Have you considered a Silpat (silicone) Baking Mat cut to shape and placed on the bottom to prevent browning?
I've repeated this a few times with lower heat on the stove and achieve good bottom with no burn. Did not affect spring.
I think some kind of mat would be good if this is a regular thing someone does. I think Silpat would be a great option but have to be careful to keep temps under 500F to prevent damage. I used a few layers of foil and parchment and it works too.
my next experiment... Anyone ever try to steam a loaf before baking? The temperature would be much lower and may create a very thin crust but should still give good rise.
An extension to my experiment here, I wanted to make a SD loaf without use of a dutch oven, started on stove top and finished in toaster oven (small oven). My thoughts were #1, double boiler (max temp is just above 200F and only bottom heat) or #2 steamer (also temp just above 200F but surrounds dough).
#1 failed before it got started. I got as far as 5 minutes in the double boiler and realized that the dough is not doing anything. Well, some spreading and no rise. so I carried on with #2.
I was able to finish #2. but the results were not good enough to make this it's own thread, so I'll post my results here
15 minutes in I peeked and the loaf already looked fully risen, so i took it out. I think it might have peaked even earlier but I wasn't able to see through the condensation on the lid.
Interesting. good rise. even got a bit of an ear in this very moist environment which I wasn't expecting. I have had other forms of steamed buns before, they tend to form a thin rubbery "crust". i hoped that the bake in the oven will crisp it up. We do use steam to make crispy baguettes, right?
Into the Breville at 440F for about 25 minutes. I forgot to check on it and turn it. the top "skin" burned a little. It never crisped up. just dried out a bit. i think to have a better chance at that, i should have baked at a lower temp, burn off more of the moisture before turning it higher to crisp. This here resulted in a plastic like skin and a very spongy loaf.
The crumb was actually magnificent. super soft and bouncy. If I only cared for the crumb, this would have been a very successful bread. the photo shows some pinching on the bottom. this was due to my adjusting the shape after coming out of the fridge (turned it from a round boule to an oval/rectangular shape which i prefer. i use the bench scraper to pinch the sides in under the dough) and not an issue with the bake or proofing. Crumb is not unlike an oven baked loaf, just more delicate and moist (but not wet or gummy). Some might even say an improvement.
I think I do see some strictly steamed buns in my future (without trying to crisp it up). ~25 mins of steam is all that is needed followed by proper cooling.
Baked vs Steamed (sorta) pic. Steam didnt get hot enough to give it a full rise. but the crumb was great.
Your experiments give me hope! I experimented a few days ago with the top of a Schlemmertopf clay baker that I soaked prior to putting into the cold oven with the cold baking stone. Baked at 480F until I started to smell the bread - about 25 mins. I went comet viewing and took longer than planned. By the time I got back it was more than doubled and I didn't think the fridge would have helped. So I baked it right away. I absolutely loved the thin yet crispy crust. Will try again with a dough that is well prepared. The whole clay baker is too big for the oven.
I used to bake in a toaster oven and fought the battle of too-dark bottoms. I never found a satisfactory solution for the toaster oven.
Instead of a heavy Dutch oven I use one of these with an 8" circular baking stone on the bottom:
https://www.amazon.com/gp/product/B00OFUB64U/ref=ppx_yo_dt_b_search_asin_title?ie=UTF8&psc=1
I also use a Wisco convection oven which I got after my big oven conked out. That solved the problem of too-dark bottoms.
I got my hands on one of those to try and sadly it was too big for my oven. I’m on the lookout for another one.
Awesome experiment. I confess that I was thinking about doing that for some time, I didn't know that there were people doing that already.
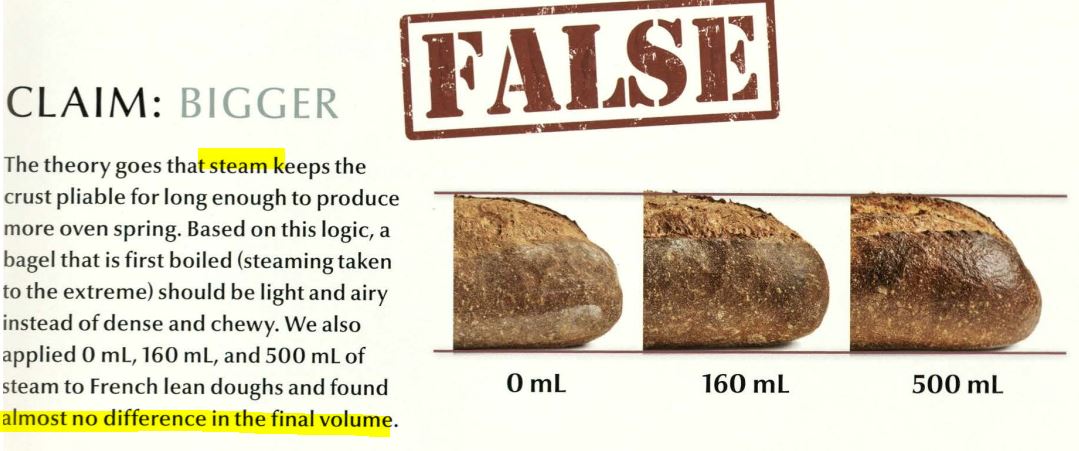
I'm suspicious that this whole talk that steam is important for oven spring is a myth. I did some research and there is indeed some evidence that not the steam, but the score plays a big role in the oven spring.
Doc. Dough made a experiment in a unscored loaf with and without steam. The oven spring was the same.
Now I am reading the "Modernist Bread", and it confirms that steam is not important for the oven spring.
I think that a nice experiment to be done is leave the lid with an opening, so the steam can escape. Or maybe just dont use the lid at all. Maybe we have to be extra careful with the burned bottom, but maybe it can work.
Thanks. I think use of steam is very much a proven method. But i think i see your point. the steam it self does not provide the oven spring. the heat does, as the spring comes from inside the crust. But what the steam does is it keeps the crust soft and allows for the crumb to expand. We see very often loaves that have too much top heat and expansion is restricted.
Steam also gives the loaf a shine in the crust and sometimes blisters. otherwise would create a dull crust. this was the case before i started baking with dutch ovens.
-James
The "Modernist Bread" is an extensive work with lots of experiments. It concludes that steam is necessary for a crispy and shiny crust, but it does not hinder the oven spring.
So I think that the score is much more important than the steam

But I havent done any experiment to prove that hahaha.