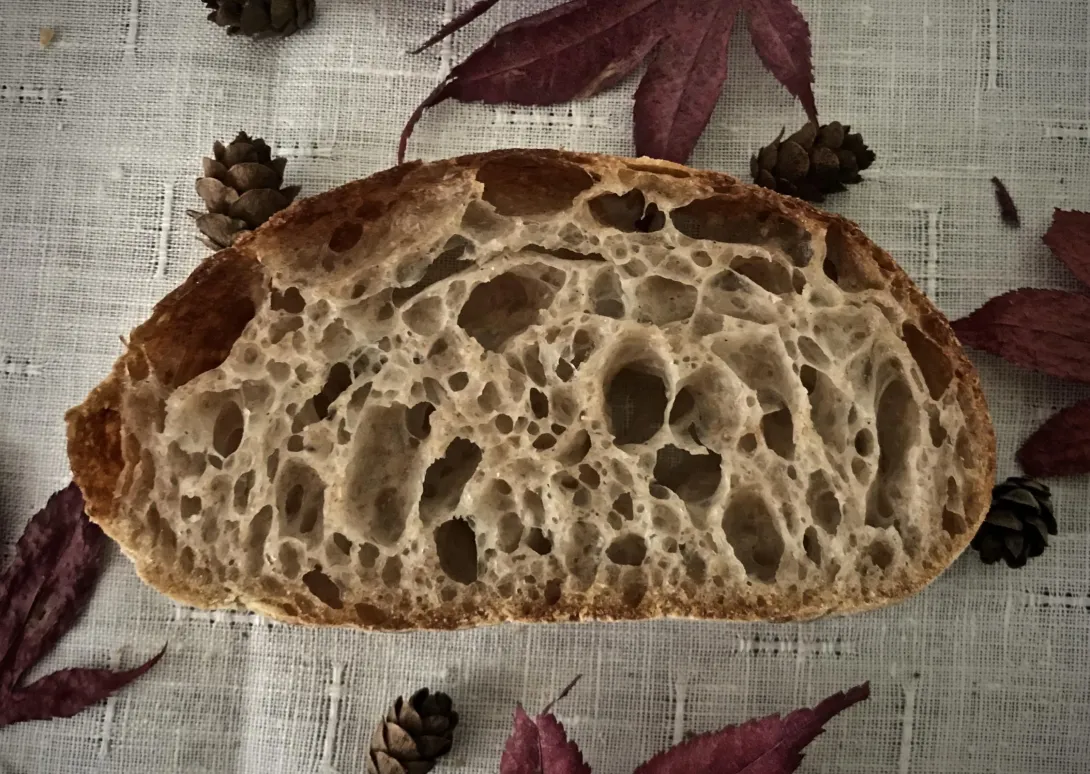
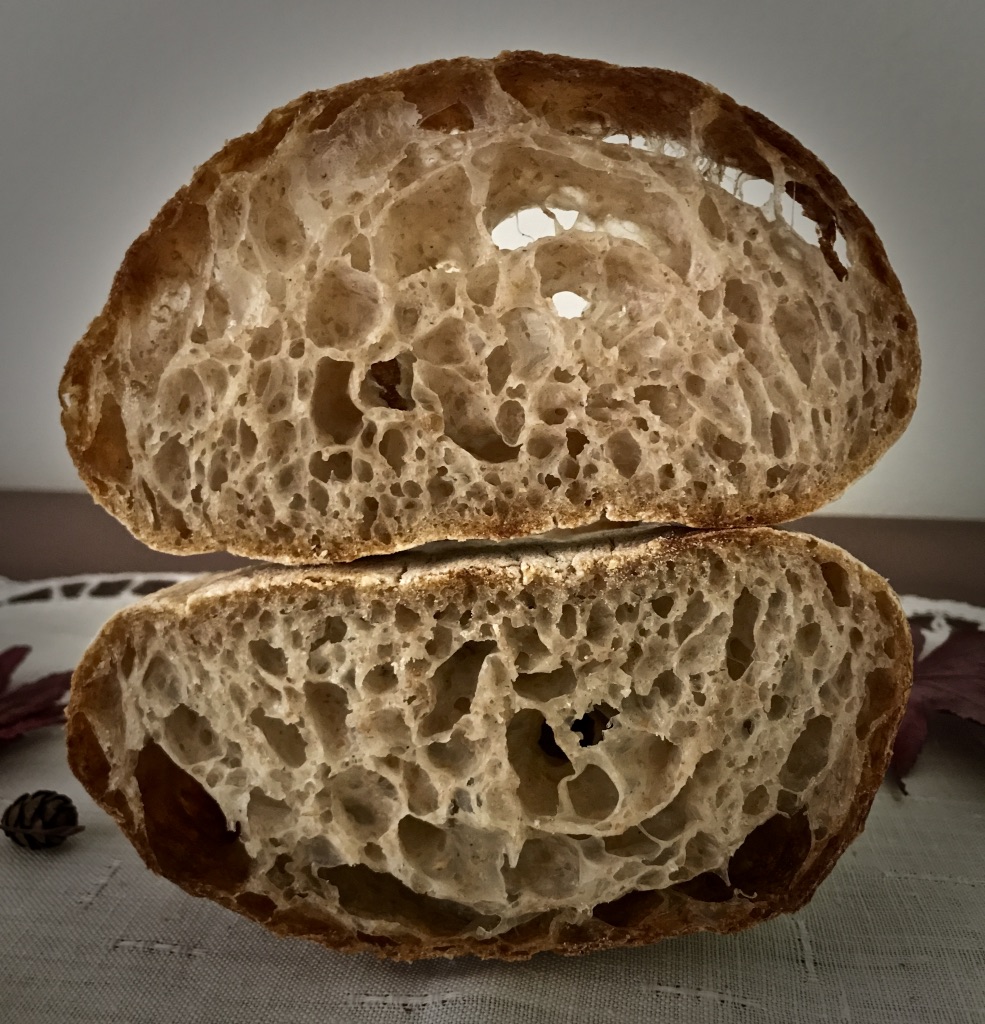
Many people wanted to get details how to make the bread with translucent alveoli walls which I have published in the community bake 50% wholewheat thread. So I promised to make notes about the process. However, this bread was not made with sourdough starter but rather with tomato and basil yeast water.
For those who don't like to read too much here are the major differences to what most of people usually do:
1.) Longer autolyse (this time 4 hours) at room temperature
2.) Extended bulk fermentation in the fridge for 18 hours
3.) Bread was shaped as ciabatta.
4.) There was almost no final proofing - just time needed to warm up the oven
5.) Staring baking temperature was 500 dF (260 dC).
This are by my opinion the differences which are not common in most recipes or traditional procedures.
The reason for 4 hour long autolyse is giving more extensibility to the dough caused by enzymatic activity of protease. Second reason is to hydrate well the bran particles so they will have less sharp edges and will not cut the gluten network so much.
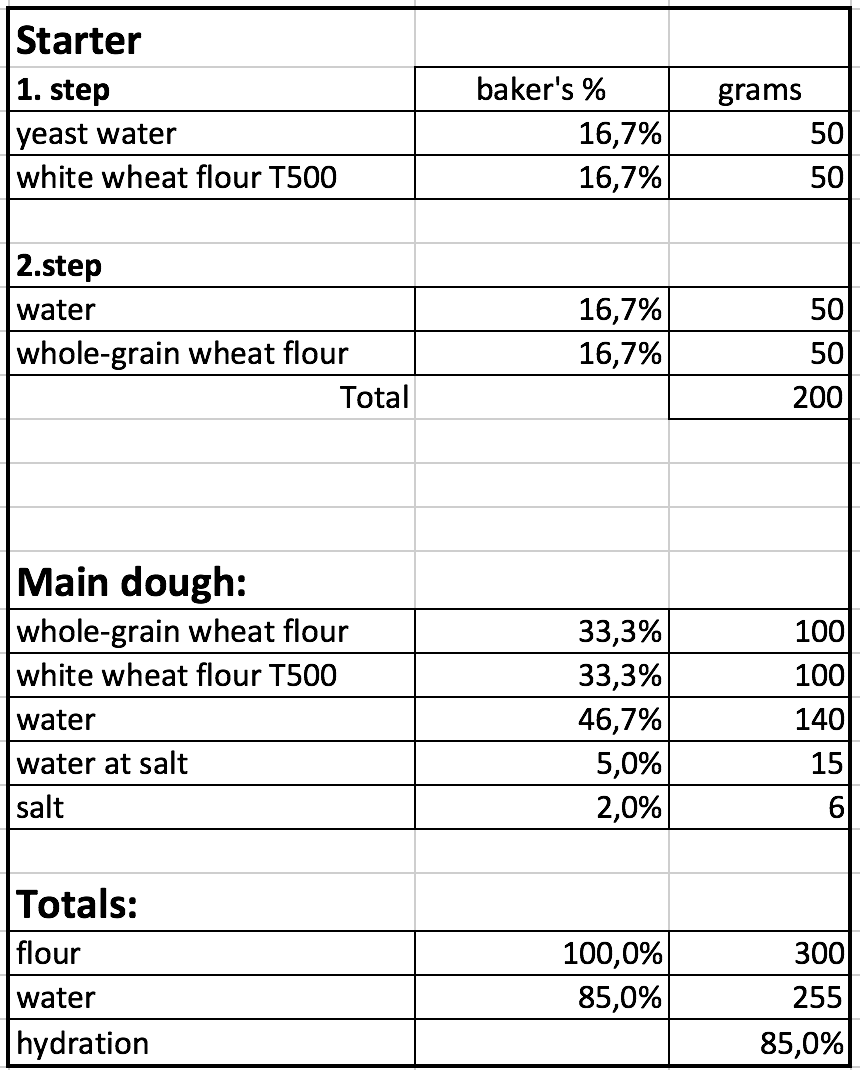
I made this bread only from 300g of flour mixture with 50% of whole-grain wheat flour and 50% of type 500 white bread flour with unknown protein content but estimated to be between 11 and 12%. Definitely with significantly smaller protein content than American or Canadian flours. The plan was to shape it as ciabatta.
The process is as follows:
1.) Two stage levain build: first stage with 50g of white flour T500 and 50g of yeast water. When doubled add 50g of whole-grain wheat flour and 50g of water (better if you use here yeast water again). The levain build will take about 5-8 hours.
2.) Mix whole-grain wheat flour and white wheat flour type 500 with 70% of water (70% of weight of flour for the main dough) and let it rest for 4 hours at room temperature.
3.) Mix levain and alutolysed flour with hand and develop gluten by using scoop & stretch method (rhubaud method of mixing). This usually takes about 2-4 minutes and as result you get a cohesive dough. Let the dough rest for about 20-30 minutes.
4.) Add 2% of salt and additional 5% of water (if necessary) in my case this was 15g. Incorporate the salt and water into the dough and repeat gluten development with scoop & stretch method.
5.) During the bulk fermentation make 6 stretch & folds at 30 minutes interval.
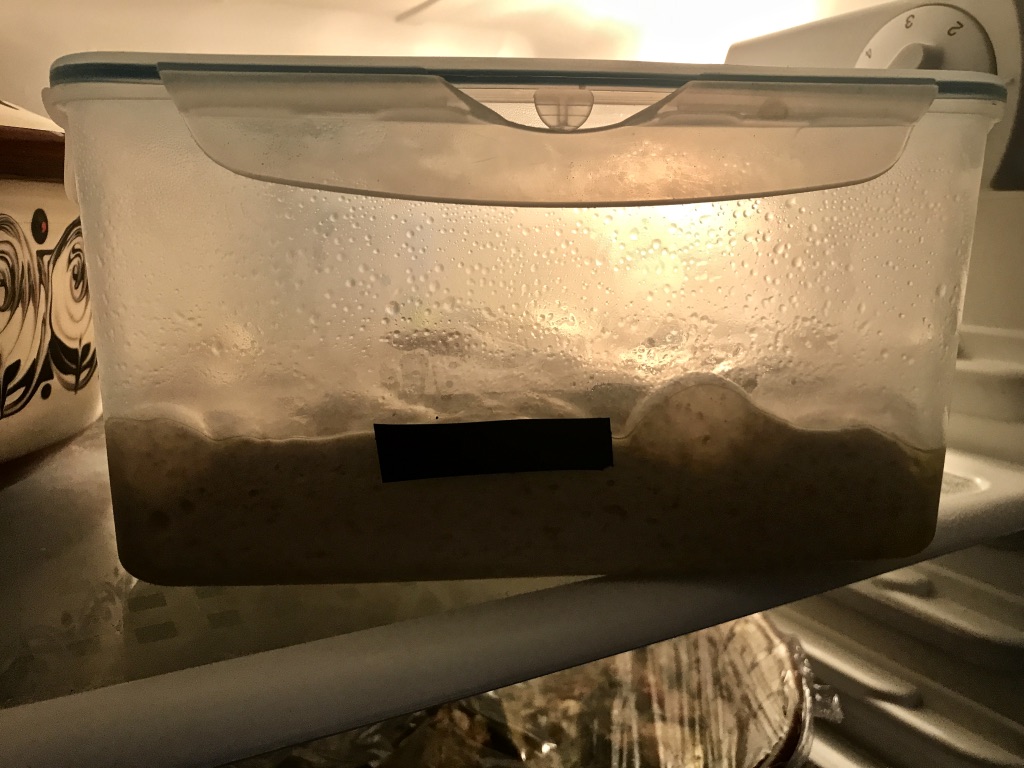
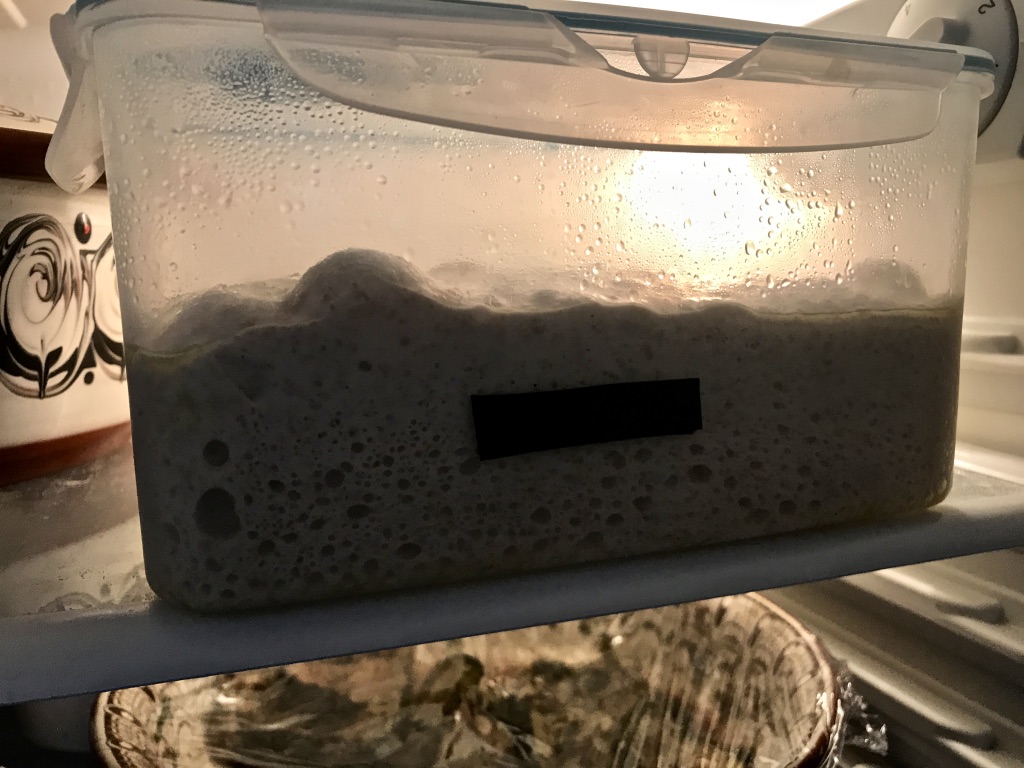
6.) When the signs of the dough are clearly visible: dough is well aerated, billowy, has risen for about 40-50%, the traces of previous folding are clearly visible at next folding then transfer the dough into rectangular container which is well oiled with olive oil and put it in the fridge for at least 12 to 24 hours. See the attached video.
7.) When the dough has risen nicely and one can see a lot of alveoli - after at least 12 hours, tip the dough out of the container and shape it as ciabattas. See the attached video.
8.) As this dough contains 50% of whole-grain flour it does not need a lot of final proofing. I just preheated the oven to 500 dF (260 dC) and baked the ciabatta in iron-cast skillet. No scoring needed! The temperature should be reduced to 430 dF (220 dC) after 8 minutes, uncover after 15 minutes of baking (from the start) and continue baking at 410 dF (210 dC) for 10 minutes more. Overall baking time for ciabatta is about 25-30 minutes.
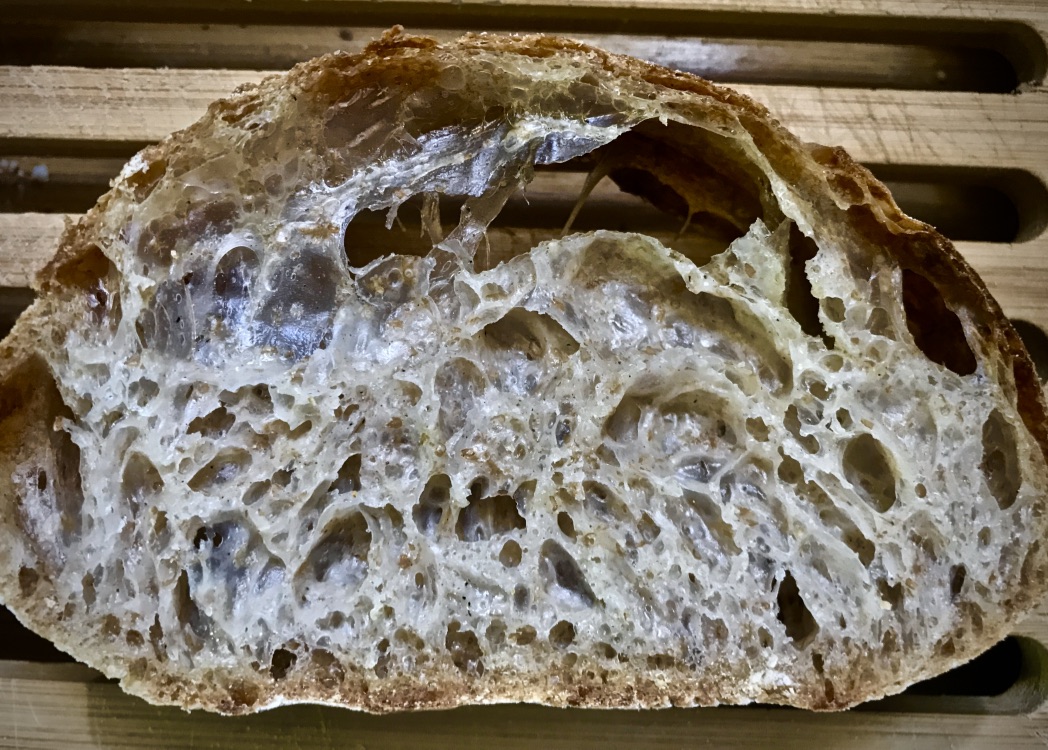
In the picture above one can easily spot the bran particles in the translucent alveoli walls.
I hope that the instructions are clear enough that you will be able to make such bread. Happy baking!
Joze
- joc1954's Blog
- Log in or register to post comments
A new twist on the 50/50 community bake! Well done and happy baking Joc
I am always trying to push the limits and achieve something new. I have learned so much from you Dab and other guys here at TFL. Without that this would simply be mission impossible.
Happy baking Dab!
Joze
You're inspiring me to develop new aspirations :-)
Tomato and basil yeast water sounds heavenly.
I think it is always good to try different approaches and new recipes. This one as it looks simple might not yield the same result with different flour. During my baking journey I have found an important fact that you have to fine tune your process to the baking properties of the flour if you want really to go to the extremes.
Happy baking franbaker!
Joze
crumb of even the heaviest of rye breads is so true. Now I have to change my recipe to some YW in theos weeks 50/50 bake! Really nice. Maybe put some int the 4 hour autolyse for the base SD
I am not baking a lot with high percentage rye flour dough so usually 50% of rye is the upper limit. My wife doesn't like pure rye bread very much so I am using just smaller percentages of rye in my breads. Never did a 100% rye bread with yeast water and as far as I know the sourness in the SD actually helps a lot when making pure rye bread. So maybe a combo of YW and SD would be good here.
Happy baking Dab!
Joze
woah, gaga, huh ???
Thank you kendalm!
In Slovenia we have a saying: "The bread is not made by flour but rather the hand" - not a very good translation. Some time ago I was trapped by impression that you need high protein content flour to get a very open crumb bread. So I thought that my local flours are not good enough as they are like American AP flours. Then I realized that I have to adjust the process of fermentation to the baking properties of the flour and that was the biggest breakthrough in my baking. Blindly following the recipes is good for the beginning but then you need to find out what you need to change to get same results.
In last months I was experimenting baking with a lot of different flours and I got excellent results by using the approach mentioned above.
Happy baking kendalm!
Joze
Thanks Joze. You did a great job of documenting the process. I will definitely be trying your method. I very much enjoyed watching you handle the dough. I have this post bookmarked for future reference.
Question - are you able to get that crumb on larger loaves?
Dan
I really liked this community bake and thanks for initiating it. This is for sure a great opportunity to see different approaches. In past I use Maurizio's recipe for 100% whole-grain bread but was actually never able to get same results just blindly following his procedure. I am baking with different flours and that requires slightly adapted process of fermentation. I will be very happy if you will try to bake following this recipe. Just keep in your mind that your flour will likely need different autolyse time. Actually the protease content in the flour vary a lot so you have to keep an eye on the dough during long warm autolyse. In this particular bake I would have to put the dough in the fridge at least 30 minutes before so the rise in the fridge would be higher. However, everything ended up good.
One of the problems with such recipe is that it has actually no definite time frame and all the activities are done solely by watching the dough.
Regarding getting so open crumb in bigger loaves I must say that it is possible but I have to bake in wood fire oven where I have a lot of heat supply from the hearth of the oven.
Happy baking Dan!
Joze
I'm bookmarking this. Thanks so much
hester
Wish a lot of success!
Happy baking hester!
Joze
and so encouraging! Thank you for posting this wonderful write-up. Definitely going to be bookmarked.
Enjoy!
I will be very happy if you give it a try. You can use SD culture instead of yeast water, the result will be the same.
Happy baking!
Joze
opens up with yeast water. A great idea to make this as a ciabatta.
I have just made a YW /sourdough loaf again too and love how open the crumb is. it spread this time so my shaping wasn’t as good, but a feather light bread.
lovely bake Joze
Leslie
I like to make the bread as ciabatta to get a bit more open crumb texture. I would like to bake more in my wood fired oven, but it takes me almost 3 hours to prepare the oven for baking. So I prefer to use electric oven and there I can get a very good results when baking smaller loaves.
The last loaf you posted in the community bake thread is very nice with a very nicely open crumb.
Happy baking!
Joze
Joze, what would you estimate your room temperature during the Coil Folds and Bulk Ferment? I am shooting for 40-50% increase during the BF. I am in the process of trying your bake and following your instructions as closely as possible. Since you mentioned your flour was somewhat weak, King Arthur All Purpose was used.
Your dough appears to have risen in the refrigerator. My frig is about 38F and the doughs seldom rise during retard. I just built a compact retarder so I can set the temp at will. Any idea what your frig temp is?
A lot of questions, but I try my best to follow instructions when I am baking a known good formula with detailed instructions. I would love to learn to produce an open crumb similar to yours :-))
Danny
The temperature in my fridge is about 9-10 dC at the level where this dough was rising. So if you set it to this temperature you will get the same temperature conditions. I think that KA AP flour was a good choice. Never baked with that flour but according to the properties it just fits well.
Happy baking,
Joze
Joze, since 5 - 60C (40-140F) is considered the danger zone for food, do you think your frig is that warm? Or do you use that frig as a proofer? Normally, especially with familiar breads, I bake from intuition, and my senses, but when duplicating a formula and technique (in this case a great one) I do my best to follow the instructions precisely until I gain confidence baking it. Unless you are pretty sure of the temp, would you mind placing a glass of water in your refrigerator near the location you retard the bread? Leave it a few hours and the read the temperature of the water.
I retarded thus far @ 38F for 8 hours. At that temp the dough will not rise or rise very little. The retarder was just reset to 9C (48F). I marked the container and will watch during the day.
Also, I’m interested to know your approximate room temp during the bulk ferment. I live in the southern United States and I see Slovenia is much more north. I set my proofer at 25C (78F), but I probably set that way too high. The dough behaved very nicely during the Coil Folds and BF. For the very last (sixth) fold the dough was just beginning to resist so 5 folds @ that temp would have probably been good.
I hope I am not asking too much. I am extremely impressed with your bake, and learning to produce results similar to yours would be an excellent achievement. Experience has taught me that time and temperature is as important to bread baking as any thing else.
Thanks for your help. I am eager to learn...
Oh! I was so impressed with your bake. I sent the link to Maurizio Leo, the originator of the formula.
Danny
Yes, the temperature is indeed so high (9-10 dC) as I am using this fridge most of the time for proofing bread and cooling beer :-) The bottom most shelf (where the boxes are) is about 6-7. I can decrease the temperature but now I am used to proof at this temperature and mots of the time my cold proofing is between 8-12 hours.
The room temperature is now about 25 dC, but if I want I sometimes proof outside where right now we have temperatures over 30 dC during the day. So if you bulk ferment at 25 dC will be just fine, it will take slightly more time, but don't worry about this. Actually there is no time frame for the bread, no fixed quantity for the levain so monitoring the dough is crucial.
Happy baking Danny!
Joze
Love the in-depth writeup and your results! Really nice work.
I am glad you like it. Slightly different approach which gives quite good results. In Slovenia the flours are not very strong so I have to work more on the fermentation process to get good results. Your 100% whole-grain wheat bread was my inspiration when I started to bake with SD some years ago.
Happy baking Maurizio!
Joze
I am in the final stages of the bread. It is definitely not nearly as extensible as yours. I have an idea, but want to hear from you first.
All 3 images are taken after removing the dough from the retarder. It went 12 hours @ 38F (too cold) and 12 hours at 49F. At 49 the dough developed nice aveoli as seen from the image taken from the bottom looking up.
When attempting to shape according to your video, the dough was not extensible at all. Did you rest the dough on the counter before dividing and shaping? If so, how long?
The dough is proofing on the counter now waiting for the oven to preheat.
Danny
Oh, I am too late with the answer due to time difference - it was 2:30 AM when you posted this message.
So answers: there was no resting period on the counter before dividing, I just took it out of fridge and start recording the video. I proofed the first loaf only for about 25-30 minutes until the oven came up to 500 dF, the other one had 40 minutes longer proofing period on the counter while the first one was being baked. The second one had not so good crumb as the first one which I used to take pictures.
By my opinion the problem with the extensibilty you would like to get can come from even longer autolyse or higher hydration. The hydration I have used was adjusted to the properties of flour used. Your flour could be even stronger although you used AP flour. During my experiments (not for this particular bake) I found that each flour is behaving and responding differently so you need to find out the optimum hydration and time for autolyses. I prefer to go lower with hydration and extend the autolyse as I like to mix the dough by hand what is very hard when you come to 85-90% hydration where a good mixer is required to go beyond this.
As I said the local Slovenian flours are behaving quite differently than the American or Canadian flours. In most recipes (worldwide, as there are no such recipes in Slovenia) for very open crumb I found 90%+ hydration, usually 100% and beyond. On the other side it is possible to make dough with 100% hydration with flour with only 9% proteins. I think that you must try with both options or combination of them in order to get more extensible dough.
There is a good chance that your dough got enough extensibility to get open crumb by following my recipe. The analysis of crumb will show what should be the corrections if any.
Looking forward to see the pictures of the crumb.
Happy baking Danny!
Joze
The bread came out nice, but fell short of hopefull expectations. I started a new bake this morning. My dough after mixing for autolyse is very dry, so I am upping the hydration to at least 88%. I also upped the autolyse temp to 80F. I plan to watch the dough with the intent of creating a slightly weaker version of yesterday.
I would like your opinions and welcome your crtique.
Thanks for your help.
Dan
I think you got it right and this crumb is very close to what you were probably aiming to. The flour you are using is obviously more thirsty and I would go up with the hydration as you already planned. The warmer conditions during autolyse will speed up the enzymatic activity as well. So now you have to find the sweet spot for your flour. I am sure that after some bakes you will have a very good feeling how the dough should look like and you will act accordingly.
I am very thankful that you run this experiment as I would like to be sure that the approach is repeatable with some adjustments due to different flour.
Looking forward for your next result!
Happy baking Dan!
Joze
did you use your starter or did you add in some yeast water? I love the shape of the batard - the bake has gone very well so I look forward to your next version ?
Leslie
I used my starter. I have never tried yeast water.
the light is on :) I made a tomato yeast water using fresh picked cherry tomatoes from my son's garden and a tsp of my apple YW as the starter. it started fizzing extremely well in a few hours at room temp and the tomatoes were all floating so I am well pleased with that experiment.
As contrasted with Dan's autolyse mine was very moist using joc's measurements so stuck with them. I used 100g unbleached arrowhead mills and 100g red fife. My YW levain doubled in just a couple hours but I waited to mix it all till the autolyse had completed the 4 hr mark. Was very easy to mix and didn't add more water when I added the salt as it was plenty wet. I used 2% salt at 4 g as I don't count the levain flour...seems always too salty to us.
Will start the first s&f in a few and keep you posted as to the outcome.
Dan I hope you will post your second attempt. I love the crumb on your first !!
Thank you joc for posting such a great and detailed report initially. I love YW. c
I like your detailed report and I think you are just doing the way I am doing it. Maybe the first attempt will not be the optimal one regarding the crumb texture, but I am sure that you can do it in next attempts with minor corrections. Every flour needs a bit of adjustment. I think that you have more moist dough as you are using yeast water which has less acidity as SD and thus the gluten is weaker. SD's acidity strengthens the gluten bonds. So when you are baking with YW you have to slightly lower hydration in comparison with SD. I think that was also the case with Dan's dough which was stronger. Of course the difference could be also due to the flour used.
I am really happy with your experiments, guys! I am looking forward for your results.
Happy baking trailrunner!
Joze
I have never made Yeast Water, but might like to try it. Does it produce different bread from SD starter? Can someone explain the difference between YW and a SD starter?
I have studied this subject from time to time in the past, but never found a source that would teach a complete novice to make it. Can someone provide a resource that I can study?
My second attempt at Joze’s version just hit the proofer. Some how, I messed up the weights of the flour, I presume. So, I relied on instinct to mix a dough that will be weaker than the last try. It looks better to me than the last attempt. It is more slack, similar to Joze’s, I think. We’ll see...
Dan
or I have found it to be so. Do a search for dabrownman's YW primer. Trailrunner maybe has posted something too.
You can also just cover some organic raisins with water and keep warm for a few days. It will start fizzing and you are away. You can add a little (a tspn or so perhaps) sugar to get it started but I am not sure you have to. You can use organic apples too, in fact almost any fruit. Mine is made with raspberries but at the moment I feed it with raisins, a few frozen (defrosted though) raspberries and/or some apple. I leave on bench for about half a day when I feed it then refrigerate. I re-feed about monthly. Trailrunner suggested some fresh orange peel and I find that has made it much better. Once your yeast water is up and running,, maybe 10 days or so later, You just make a poolish with equal amounts of flour and yeast water or just substitue some of your liquid with YW. My favourite at the moment is the combo.
It is just a fun additional way of making bread. I have used it in Abe's Swiss Farmhouse loaf too and that has raisins & pecan nuts in it - delicious!
Hopefully others will chip in with better info.
Leslie
Actually any fruit, vegetable or herb that is edible, can be used as the source of wild yeast. Now in the summer things are really easy. I have a garden with vegetables and fruits so there are really many possibilities. Here is the list of things I have used to make yeast water: (fruits first) blackberries, raspberries, strawberries, plums, apples, pears, figs, grapes,persimmon; vegetables - tomato, herbs - sage, lavender, basil, thyme. Could be a combination of them as well. I am now extremely pleased with tomato and basil YW which was very active in less than two days from the scratch.
So the procedure is very simple: use some ingredient like tomato about 50-100g , slice it, ad 10 leaves of basil with stems, add 500g of water and 50g of brown sugar or honey, normal sugar will do as well. You add 10% sweetener according to the weight of water used. Put it in a bottle with a wide bottleneck, cover, shake well several times per day and open the lid. 1/3 of bottle or jar should be free in order to have free space for gases. It depends on the "source" how fast it will start to fizzle. If you add a bit of old YW from previous batch it will speed up the process tremendously. Usually it takes 2-3 days but sometimes could be more, even 6-8 days with dried fruits like raisin or figs.
The YW is ready to use when start fizzing like champagne (see my video) - strain out the "source", use it as much as you need and feed the rest wit a tablespoon of brown sugar or honey and put it in the fridge. It need a teaspoon of sugar every 14 days or so to stay alive.
Ho do you use it: take 50 grams of YW and add 50g af arbitrary flour, wait until doubles, add again 50g of flour and 50 g of YW and wait until doubles. The second step will be much faster. Of course you can use nay arbitrary quantity of flour as required by your recipe.
Most of YW don't transfer the taste to the bread with some exceptions which are by my own experience: sage and lavender. Saying that I must say that tomato & basil YW seems that also transfers some smell and taste to the bread or pizza.
Sorry that I am speaking Slovene language in the video. This video was taken less than two days after I started the YW.
At the end of last year I have created a Facebook group for baking with wild yeast which is mainly posting in Slovenian language but we have also member from neighbor countries. We have a lot of group members who bake only with YW with great results.
For me I have not found a big difference in the texture of the crumb if I use SD or YW. YW is just easier to maintain, you don't need to feed it frequently, you don't throw away anything.
Right now I am experimenting with water fermented by crystals of water kefir and that looks a very promising leavening possibility.
Happy baking, Joze
Joze, you mentioned that you saw no difference in the crumb comparing YW to SD. Am I correct to assume that YW will not produce the acidic, “sour” taste that I so cherish?
Since I have been maintaining my SD starter at RT and plan to continue to do so. Do you see any benefit in me starting a YW?
I appreciate your opinion.
Danny
Oh! My second bake of your version of 50/50 has finished retarding and the oven is preheating. It looks better this time. It is airy, giggly, and fragile.
Since the first dough was too strong (not giggly, or extensible), I decided to increase the hydration and also lengthen the autolyse and do so at warmer (82F) temperature. The autolyse went for 6 hours. The hydration was determined by feel. It came to 100%. I managed 5 Coild Folds at 30 minute intervals, but elected to forego the sixth one because the dough looked strong. The BF took place @ 80F. Decisions were made with creating an extensible dough in mind. Then off for a 16 hour retard at 48F. The dough was shaped according to the video and then baked as instructed. I did use a stone and a Granite Ware cover.
By the way - these loaves are 360g a piece.
Notice in the image below how the skin was stronger (maybe drier) than the inner dough. I’m not sure what caused this. The dough was retarded in a sealable container, but I had to leave a crack in the top to run my temperature probes. The retarder runs between 85-90% humidity and there is a small computer fan that very lightly moves the air inside. Any thoughts on the skin?
Here is the first loaf. I baked them 1 at a time. It proofed at room temp less than the second. Since Joze mentioned that his second bake didn’t have as nice a crumb, I elected to place the second loaf back into the retarder for approximately 30 minutes.
Below is the second loaf. NOTE: I noticed the crust on the second loaf had nicer blisters. I think this is because the dough was colder than the first. Can anyone think of a good reason why I shouldn’t bake straight out of the retarder with no RT proof at all?
Thanks Joze, for taking the time to help. The breads came out extremely nice and I learned a lot from your help.
Please consider posting more topics on The Fresh Loaf. You have plenty of information that many of us would be interested in learning. If only you could teach us to produce 1 kilo breads like these in our home ovens :D Maybe when we get to heaven, each baker’s home will be equipped with steam injection deck ovens and a WFO to boot ;-)
Danny
The image below shows both loaves that were baked during my second attemp.
Danny, firts of all congratulations for a very good result. I am sure you are moving into the right direction and the results are confirming this. As it may look easy to make really open crumb the reality is a bit more complicated. Your second loaf has better crumb structure. You know exactly what was the difference so think about why this happened and try to make some conclusions from it. Each bake should be thoroughly analyzed and changes for next bake should be prepared which will be then confirmed or rejected. It took me quite a long time to understand what should I do and how the dough should look like in any of the phases during the fermentation process. Sometimes I retard the leaven (starter) for about 6-12 hours. Try also this option. So when it is at peek I put it in the fridge. The most important thing is that you find the right ratio between the dough tenacity (elasticity) and extensibility. Try to change the flour used and you will see how much the process is dependent on the flour used.
I am so happy that you made so big step forward. I will keep posting on TFL, be sure!. I will be happy if you will run more experiments.
Happy baking, Joze
Help me understand. “Sometimes I retard the leaven (starter) for about 6-12 hours. Try also this option. So when it is at peek I put it in the fridge.” What is your goal in doing this? It seems to me that once the starter peeks (or just begins to recede) the yeast population has been maximized in relation to LAB. If this is so, wouldn’t that cause the LAB to start out producing the yeast. Is your goal a more sour flavor or is something else going on?
One more question :-)). I think I am starting to understand that for extreme open crumb, it is important to develop the gluten network so that it is strong enough to contain the gasses, but not so strong as to hinder the expansion of the aveoli. Is this correct? Please correct me when necessary. I want to learn... “it is the truth that sets us free...”
Danny
1.) Retarding the starter - have no definite answer, but it helped. Discovered that by accident. There could be various reasons but I don*t want to speculate.
2.) You understood it correctly and you got the point. Consider that you would like to blow a balloon with strong walls. It will be very hard to do it. If the walls are soft you will need less force to blow it. The same applies here.
Happy baking!
Joze
I am thinking out loud...
If extreme open crumb is dependent upon the delicate balance between just enough strength to contain the gas, but not so much as to hinder the expansion of alveoli, might this explain the benefit of retarding the starter?
The starter for this formula contains 1/3 of the total flour. Retarding the starter would aid to further break down the gluten within the starter. The introduction of the “pre-conditioned” starter would help to purposely weaken the dough, allowing more expansion of the alveoli.
Does the above make sense and possibly explain the value of retarding the starter?
Dan
Here is my third attempt. I made an okra/basil YW, my first YW. and this is my first YW bake. I gave one away, so I was only able to cut one. The crumb is not nearly as nice as the first two, but for my first ever YW I am happy with the results. I did use 20% Crystal Malt barley as an experiement. It gave the bread a very distinct and nice flavor. Plan to experiement more with malted grains that are available at Home Brew Shops.
Dan
Hi Joze,
I followed your advice and made today some blackberry yeast water...after a morning bake of Maurizio SD baguettes community bake that Dan roped me in I went for a walk and picked loads of blackberries for me to have a go at yeast water and for my husband to make jam...
Are you going to make baguettes for the community bake...baguettes with YW...maybe next time for me...I see how it goes and thank you for sharing.... Kat
meh....looks like the ciabatta's I have always made as far as color and crumb. Have another batch started. My Red Fife evidently isn't as " wheaty" as y'alls since my bread doesn't look like WW. The fragrance is like pastry and the taste is lovely. Will look forward to more pics from Dan.
I am using my smaller of the two GW roasters to bake the ciabatta. I checked the temp in the dough after 12 hrs and it was 53 degrees ! I guess my basement fridge is responding well to my turning the temp warmer LOL ! I will post pics but it sure BLOOMED with bubbles overnight....now 16 hrs. I won't use olive oil again as I don't care for it to be on the bread so will go back to PAM in the container for bulk ferment. I dumped the loaves out and divided them and transferred them to floured parchment by gingerly picking them up and flipping them over. Everywhere I have read in the past suggests one should turn them over before placing in the oven so we shall see how that goes. I will place the 2nd loaf into the fridge when I put the first in the oven since you both comment on the proofing time being extended for loaf 2. I didn't double the formula so they are the same size as Joze's loaves. More in a bit . c
Caroline, I am no authority on over/under proofing. But do you think your dough over proofed? I really don’t know how to discern ill proofing by troubleshooting the crumb, but it seems to me that tiny loaf should rise high during the bake. It looks slack to me. What do you think?
I would love to find a good resource for troubling shooting crumb. Especially as it relates to over or under proofing. I know the crumb speaks volumes about the bread, but I don’t know enough about reading it :-( I’ve read time and time again, where a baker will ask for critiques of their crumb. Some claim it was over proofed and others claim it was not proofed enough. If anyone has a resource please reply.
Danny
I admire tenacity. I love where you said, “Have ANOTHER batch started”.
not sure but it could have been overproofed due to the dang refrigerator being so warm. I had turned it warmer on purpose in the distant past as I only store dry fruit and flour etc in it. I hadn't bothered to check the temp....duh ! Will definitely have it colder before I set this dough into it tonight. My dough was lovely to touch and extremely extensible while working with it . I also was not at all happy about all the olive oil. I will only spray lightly with PAM tonight when I retard. I also put the second loaf back in my good fridge upstairs while the 1st was baking. I was happier it with it as were you. So there you go. I think I will just dump it out and shape and place in the hot GW. Lots to experiment. Your loaves are lovely ! c
I have never seen a good resource for judgement of underproofed or overproofed loaf. I think this comes "automagically" with practice. Underproofed crumb has pretty much dense texture with some big alveoli. Sometimes there are many big alveoli and people think they finally nailed it. If the surrounding of the alveoli is more or less dense, than this is not an open crumb and it is still underproofed. Underproofed loaf exhibits cracks beside the scores, usually parallel to the bottom of the loaf as the crust is already formed while the loaf still wants to expand. So for right judgement one needs the picture of the outside and also of the crumb. Both will show the signs of underproofed loaf.
For overproofed loaf it is also imporatnd to see the outside in order to see how much the scores opened (if they opened at all), was there any oven spring, did the loaf collapse when scored, is the color of the crust normally caramelized or not. The crumb can be sometimes quite nice with more or less even porosity, sometimes you see big alveoli under the top of the loaf. So it is important to judge if there was collapsing during the bake.
It is also important to know the procedure, the timing and temperatures what might be very helpful in diagnosis. The most important thing is to take a close lookup of the photo and try to find the anomalies which will point to the right conclusions.
I hope this helps at least a bit.
Happy baking Danny!
Joze
It isn't ciabatta but it is wonderful in all other respects. I did 5 gentle s&f's about 20 min apart and then placed it in the fridge which I had turned colder. I developed nicely overnight and the temp in the dough this AM was at 52. So I need to turn it colder still. I turned it out and made one loaf and didn't leave at room temp at all but baked cold from the fridge as one large loaf. I did 12 min at 500 covered in a preheated GW roaster. then 15 min uncovered at 450. Was 212 when I checked. I'm not sure why it doesn't get a lot browner but I think that is the YW. I have seen that before with pizza crust from YW. Anyway the crumb is amazingly even and perfect. The bread is tender with a lovely crisp crust and the flavor is perfect as it isn't very sour ( unlike dan we are tired of sour) . So I shall pursue this as a " bread" not a " ciabatta'. I don't care about large holes so if they happen that's ok. This was a great experiment Joze and Dan as it got me thinking about all kinds of new things ! Thank you !
this is turning into another community bake following Joze's formula....I will have to get my act together and
have a go at this....that bread really looks amazing and so much like 'pan de crystal'......
Ha, Ha and as it is a ciabatta, I don't have to fret over getting an ear or not!!!! Thank you so much for sharing Joze! Bookmarked! Kat
I am still working on the recipe and I am testing slightly changes in order to confirm that the recipe really works. Yesterday I was thinking about asking for volunteers who would bake this kind of bread. But first I have to put together the instructions for which I am sure that will give the result.
I would be very pleased if you would like to use this recipe and report back the results. It looks like the instructions are no so bad that one could not make such bread. I agree that it looks like "pan de cristal", but in that bread the hydration is usually 100% and baker's yeast poolish is used. Here we have lower hydration what means that we can mix by hand and it is either 100% sourdough or yeast water leavened.
Happy baking Kat!
Joze
as I was reading the instructions again starting to plan to bake this later this week.
I also really like the idea that I can turn this potentially into little ciabatta buns for sandwiches with the benefit of being 50/50!
In the first step I really would like to try this with my starter rather than YW and this is purely considering time available at the moment...Once the figs on my tree are ripe I will give the fig YW a go with our untreated figs...
So, I gladly will be your volunteer, if you are happy to use starter rather than YW?
I am in UK and assume that the type of flour should be similar, if someone can make such a bold assumption...
I have never tried much anything more than 78% hydration so that will be interesting...
I can wait for your instructions but judging from this post I would use:
100g leaven (100% Hydration)
100g white flour
100g WW flour
6g salt
255g water (50g of that in starter) so probably start with 205g water and see what that does to my flour? Ha, ha...probably soup....
My dough normally hits the 40% around 3 1/3 hours at 25C which roughly fits the window you describe with the 6 stretch and folds.
My oven will take much longer to warm up 1 hour and 1/2 at least so I might take the dough out of the fridge like you said and just let it room proof for 30 min and start heating the oven much earlier....
Oh, I am very excited about this! Kat
Kat, the numbers you wrote are not correct. Here are the right numbers:
For starter : mix 25g of WW flour and 25g of bread flour with 50g of water and add 10g of mother culture.
For autolyse: mix 100g WW flour + 100g bread flour with 140g water what will give you 70% hydration and leave it for at least 4 hours.
You can mix your starter and also the flour and water for autolyse at the same time. If your starter will be ready in about 4-6 hours then you can do it at same time, of course this should be done in two separate vessels. :-) This is something you never heard before, but it works. Or just do it your way.
Main dough:
1.) mix autolysed flour with starter , develop gluten and rest it for 20-30 minutes
2.) add 5g of salt (2%) dissolved in 30g of additional water (double hydration) and develop gluten. With this additional water you will end up with 88% hydration. If you would like to be on the safe side than dissolve salt in 20g of water only and add 10g after you develop the gluten if you see that the dough is not too wet.
The dough should be pretty much wet and slack bit don't worry as it should be like that.
You know your oven so act accordingly.
Happy baking Kat!
Joze
and that makes total sense! I get easily confused with baker's percentages and also managed to confuse myself with the YW......I probably will try this on Thursday this week and let you know the result......Thank you for sharing. Kat
You can use SD or YW, they both give great results. Probably SD is even easier if you are not used to bake with YW.
Looking forward to see your bread!
Happy baking Kat!
Joze
Sometimes we don't see obvious things!
Happy baking Kat!
Joze
so it will be one of my first bakes after my holiday. Kat I look forward to your bake and Joze - it is a really wonderful twist to the 50:50 bake.
Leslie
where this will end as an exploration...
very curious where it will lead.....Maurizio was also looking at ciabatta using fresh-milled spelt in a recent post on IG and there were some interesting comments how this is approached by other bakers too, if you are curious...interesting stuff!!!!
https://www.instagram.com/p/BmOhNNDgON_/?hl=en&taken-by=maurizio
Also, I re-discovered my Natural Leavenings ebook from Matteo Festorazzi and he has some very interesting formulas using cold bulk after warm bulk for different versions of ciabatta breads with different flours as well as recipes using cold/retarded starters...... Joze's approach triggered my memory of having seen those but I totally forgot!
I try to give this tomorrow a go whilst also do the usual Champlain loaves...it probably will be chaos in my kitchen! :D Kat
Hi Joze,
this is such a fun formula and I posted under my blog as so long and bound to get longer as I have another bake on the go..
http://www.thefreshloaf.com/node/57055/my-go-jozes-version-5050-community-bake
So I thought this is easier as I will otherwise use too much space here? I hope this is ok.
What a lovely formula and thank you for sharing...I see this becoming a regular bake in our house for rolls for school lunches and burgers! Kat
I am so glad that you were able to reproduce the recipe and I am happy with you as well. You got excellent results. Congratulations!
Happy baking Kat!
Joze
and I forgot to say this in my previous post. My thinking would be to make an 'offical' thread for a community bake based on Joze's forumula...just a thought! Kat
I am very happy with this idea. More bakers will bake in different ways although they will be trying hard to follow the recipe. So it would be very interesting to see the resulst and compare them.
Happy baking Kat!
Joze
Hi Joze,
I baked today's second batch and my summary with photo etc is:
http://www.thefreshloaf.com/node/57055/my-go-jozes-version-5050-community-bake
I don't get the dough as bubbly as yours at the end of the cold bulk and I think this is to do with me setting the wine cooler to 6C rather than warmer.
So, I took a slightly different approach and allowed 1 hour room temp proof and 30 min once on towel...
This was something that Matteo Festo mentioned in his Natural Leavening book for his ciabatta as his formula has cold bulk at 4C for 12 to 24 hours and then let dough adjust for 1 hour to room temp. He also has a version with poppy in it which look interesting. I will try and maybe ask him on IG whether I can share his forumula but don't want to do this without consulting him for copyright reasons.... He also mentions that bulk ferment at higher dough temp is good for ciabatta ..28C, use of more leaven and as little handling as possible! I might try for another bake to aim for target dough temp 28C and also bulk cold at higher temp in wine cooler at 9Cish....
What do you think?
Thank you so much for sharing....Kat
I have adjusted the process to the flours which I am using. As I said at the very beginning this recipe is just a framework. There is a lot of possibilities where one can make amendments either in timing or temperature or doing a cold retardation.
I went further with my experiments and did a pre-dough (not a starter) and then a final dough and the result was awesome. I used low only 9,35% protein flour and fermented water with the grains of water kefir. This is a white flour type 550. A very good result for a weak flour.
Happy baking Kat!
Joze
You have given me a new set of tools to open up dense crumb with whole wheat breads. I used my sourdough starter, tweaked the recipe a little and came up with the most open crumb whole-wheat bread I've ever made. Thanks for all the insights and detailed write up. I credited you on my post: https://www.everopensauce.com/whole-wheat-ciabatta/. Any observations and comments about this bake, I'm all ears. Many thanks!
Wow.. just came across this and the pictures are fantastic..
Bookmarked.. will try.. will read through all the posts..
Very impressive..
Joze, is it necessary to use a rectangular container during Bulk Rise, and if so, why?
I'm planning on trying your method with my next 50/50 sourdough boule. Was wondering if I could do extended bulk rise in a bowl.
Joze, is it necessary to use a rectangular container during Bulk Rise, and if so, why?
I'm planning on trying your method with my next 50/50 sourdough boule. Was wondering if I could do extended bulk rise in a bowl.
It is not necessary, but is more convenient :-) When you tip out the dough from rectangular container the dough is "half" formed. I just flip half of the dough on the other half and cut rectangular ciabattas.
Happy baking, Joze
Thank you Joze for your post as well as this thread. This has a number of ideas for me to pursue by baking the wyw with the extended cold bulk.