So, I started trying to make PR's SF Sourdough and have been learning. My problems first started with shaping and a wimpy loaf.
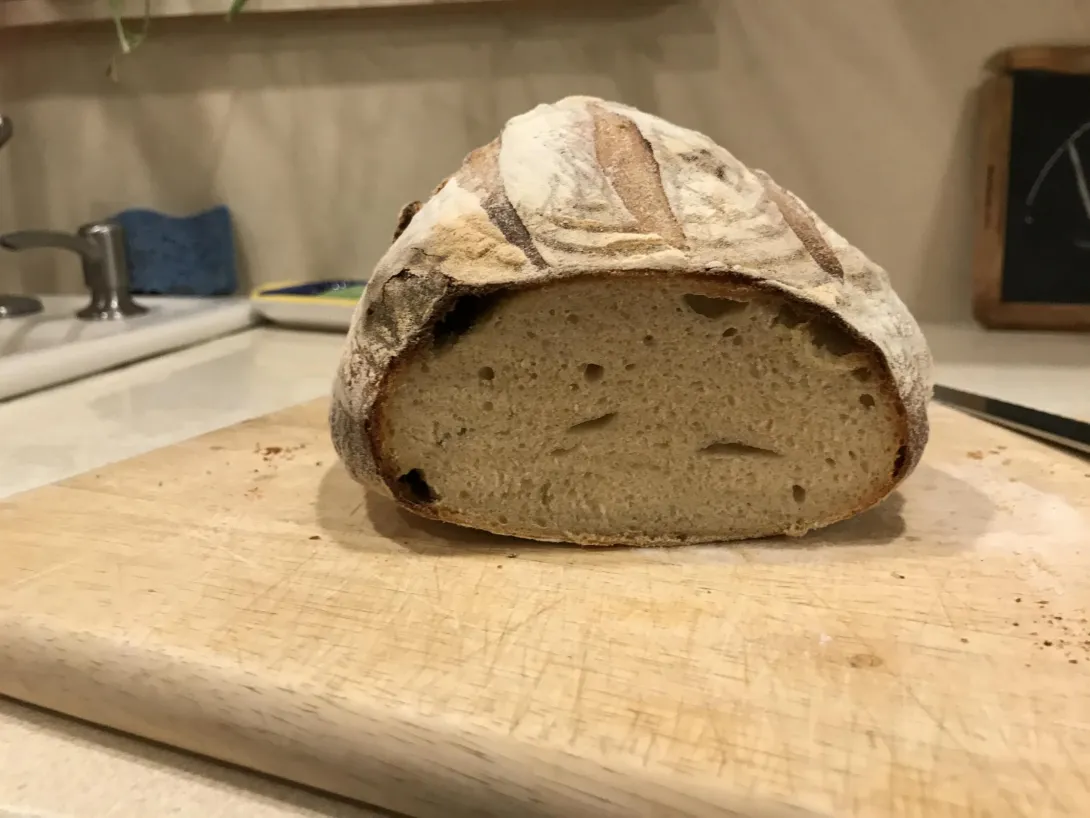
Today, I thought I had it. I had really good surface tension but the crumb came out dense. It has a mild sour to it, but I think I baked it too soon.
I let it proof for hourd after shaping, and every half hour gave it the poke test. When my last poke came back slowly with a small dent remaining I put it in the oven and baked it according to the recipe, snd this was the result. I only baked 1 of the 2 boules, the other is regarding in the fridge.
The barm I am working with is/was lively and yeasty.
with this loaf versus the loaf that you're final proofing in the fridge.
What's your actual baking process? Gas or electric? How are you introducing steam into the baking?
Electric oven- not using convection.
Stone and pan heated from cold, 1 cup boiling water poured in pan after bread goes in, with door shut in between. Misted walks every 30 seconds 3 times- quickly.
500 degrees first 13, 450 remaining 22 minutes.
We have similar process. I prefer to retard by cold-proofing for at least 6 hours as I find that it builds better flavor and crust. I bake electric on a stone as well, but at 425.
For your next bake, I recommend using two cups of just regular room temp water. I think one cup may not last long enough in a 500F oven. Right before the loaves go in, pour all the water quickly into the heated pan (without cooking your hand and minimizing heat loss). The initial evaporation blast then slows to a constant steam for 10-15 minutes - you shouldn't need to mist using this method.
Also, consider how you score the bread. Proper scoring may also affect how your dough "blooms" as it bakes... If you're going for a battard, you may need to score at an angle , and a little bit deeper (no more than 1/2 inch deep). Have you seen the TFL post on scoring bread? I refer to it every now and then as it is Excellent --- http://www.thefreshloaf.com/handbook/scoring
Good luck! It's okay to be frustrated... I've been self-learning how to bake bread for almost a decade! The first few years almost drove me crazy. :D
I meant 1/4 inch when scoring.
Definitely NOT 1/2 inch. That's just insanity.
First pat yourself on the back for a really nice looking crumb and crust. I mean really, look at that definition where the crumb meets the crust. It goes to show you are definitely on the right track. Now it's just a matter of dialing in a few details.
Here's my take. The air pockets (tunnels) where the crumb meets the crust were created by you, or should we say not removed by you. Forming that nice, tight skin tension forced little bubbles in the dough to connect with other little bubbles, and form into bigger bubbles. As you continued to create tension the bubbles traveled in the path of least resistance (from the inside to the outside) where they got lodged underneath that nice, tight skin.
I'd attribute the tunnels to overproofing but I'd expect to see a separation at the dome of the loaf. The adhesion looks good there and I do not see evidence of a collapse either. I do suspect underproofing, which also might account for the lack of grigne. This is what I'd try.
Make the bread as you have done before. I'd proof it about 30 - 60 minutes longer and I'd bake it in a dutch oven, ten with the lid on and 20 with the lid off.
Learn from the experience and try, try again. I'm sure the bread tastes really good, even if it doesn't meet your visual standards.
Jim
My fridge is kept at 37 degrees, and I pulled the second double food safe plastic covered banneton Out of the fridge at 7:36 AM. My bread has been proofing 6 hours and doing the poke test I felt the dough to still be a smidge sticky. I'm a little nervous because I have to leave at 4PM, which mean I only have another hour and twenty minutes left before putting it in the oven.
What would happen if I run out of time, de-gas it, and put it back in the fridge overnight and take it earlier tomorrow?
Bake it ASAP!
You can't de-gas it. Consider all this time you're dough has been fermenting -- you can't reverse time. If you start the proofing process again, you're essentially going to end up baking a large batch of your starter.
*your
Fine, the oven is warm anyway. I will bake now.
Recommendations for a dutch oven for bread?
I have 2 other batches of starter in the fridge, I can give it another go tomorrow.
How does one load more than one picture so I can show an inner slice of the bread?
FYI- I used a 9" banneton.
:) I'm holding down my thumbs for you!
A bit better.
Here are pics of my barm to cut bread.
Sorry, am getting a handle on uploading pictures to the forum.
How did it taste? Are you satisfied? Any lessons learned?
Well done! :)
It tasted good but still half dense with big holes.
Lots of excitement here! Getting better with each loaf! Great!
With the next loaf, I agree with letting the dough bulk longer before shaping. Those big bubbles in the crumb and the fine ones underneath indicate that the dough wasn't quite ready to shape or the dough could have been degassed more during shaping.
I also agree that tiny tweaks are all that is needed.
My first questions are about temperatures (room and dough) and how was the dough covered during the time in the banneton? The crumb speaks of temperature differences.
How does the bottom crust compare to the top crust in colour? If much lighter, try getting more heat under the loaf. Perhaps by lowering the shelf.
Here's this article that I came across years ago. Maybe it'll lead give you that "Aha!" moment.
"Breadmaking 101: How to Troubleshoot Bad Bread"
http://www.seriouseats.com/2014/11/troubleshoot-bad-bread-messed-up-loaf.html
Looking forward to your next bake! :D
http://www.thefreshloaf.com/node/19387/elementary-terminology-question
The color on the bottom looked good.
PR states "degas the dough as little as possible. Gently shape the dough into boules ...,"so I am very gentle- maybe too gentle. That was my analysis of the problem with the big air pockets, but Hammelman on YouTube also shows pre-shaping and then shaping, and he degases the dough more firmly than PR's book BBA suggests (at least that's my take on his words).
i cover the bannetons with linen towels, and I wanted to let them sit in the bannetons longer but my wife and I had somewhere to go.
I think I need to get a clear straight sided bucket that will hold twice the dough so I can be more exact on my bulk rise.
Above is the barm picture that disappeared above- after the seed culture and before the starter was created.
You can watch the picture coming in and wait until you can see all of it before inserting it.
Here's a video of my sourdough bread process. https://www.youtube.com/watch?v=QXpRKoehv_U
I hope you'll get something out of it. Maybe.
I've read the posts, and you said that you liked the flavor or your loaf. GREAT!
A lot of good advice above. One thing to add: Take Notes. Use your camera to document, and also take notes. That way, when you bake a great looking and tasting loaf, you can remember what you did.
Tyler Wood's dad, when Tyler was young and learning to golf, would make him say out loud what he felt like and what he did after a GREAT golf swing. Most often, we focus only on the failures. However, to duplicate a success, we have to know what we did so we can repeat it.
So, take notes, take pictures, take videos - who cares if anyone else sees them. You have them as a record of your work. My biggest stumbling block is not taking note of my flour combinations. This past summer, my family said, "That's the best loaf you've ever baked." For the life of me, I can't remember what percentages of my flour mix I used.... So, keep a record of everything.
From my own personal experience, and many failures (and I still mess up), what I notice is that you need to be more aware of your dough handling during shaping and your level of readiness to bake. If you expect your loaf to proof in 90 minutes, begin preheating your oven so that your oven will be ready in 60 minutes. That way, the oven will be ready when your bread is. I've over proofed many loaves waiting for my oven....
You are so close! Keep baking!
Markgo- nice video.
You shape and reshape, and re-fold when you shape, plus you don't cover your dough in the fridge, and then you go right from the fridge to the dutch oven, after scoring- which looks a little deep. This is a big departure from the directions I follow in Reinhart's BBA (I'm using the latest edition), but beautiful results.
I just did my last fold following the removal of the dough from my mixer. I plan on doing more de-gasing, and adding another stretch and fold and rest before shaping for insertion into my bannetons later.