My first loaf was an overcooked, imploded disaster.
I started this thread last week to get some urgently needed advice during the final proof of my first loaf. The paste wasn't rising as scheduled and I didn't know what to look for (still don't). People tried to talk me through it, but as you can see it overproofed. Bigtime.
I followed up by showing off the collapsed loaf I'd created. That turned into a very helpful discussion about the obvious mistakes I'd made, and I can't thank those first responders enough.
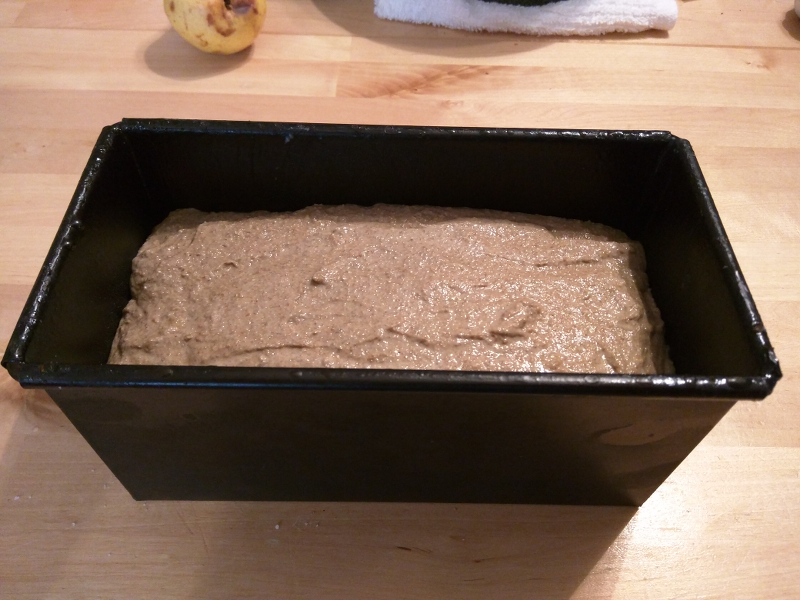
After my initial attempt kept me waiting around all day for the paste to rise, this time I wanted to try proofing in the fridge overnight. I've seen pictures of 100% rye pastes almost doubling this way, coming out ready to bake. It looks so convenient! So I mixed my final paste last night, loaded the pan, and stuck it in the fridge. I expected to wake up, preheat, and bake.
The night before:

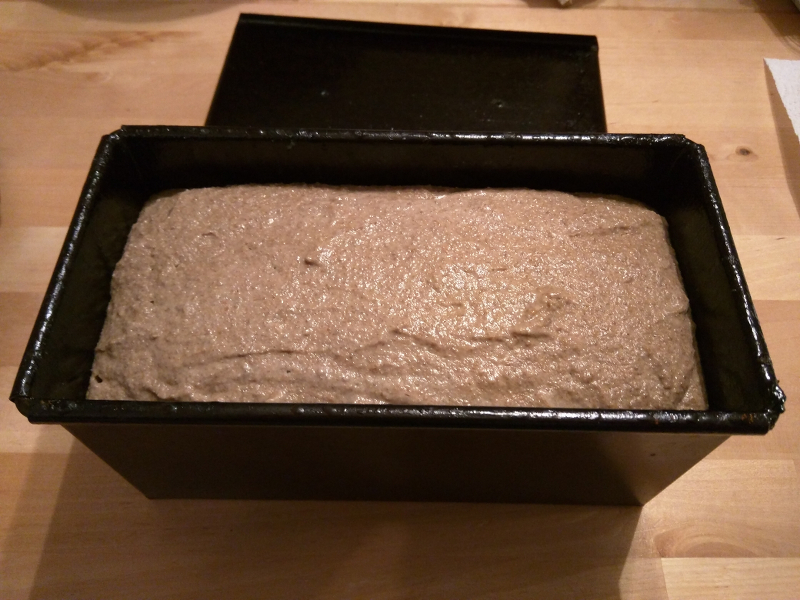
What I woke up to:
Welp, apparently my fridge is too cold for that method. According to my research, when a loaf drops below 40, the leavening comes to a screeching halt. So I left it out to rise at room temp. Shouldn't take long, I thought.
Seven hours later...
Finally, it went in the oven. Here are the adjustments I made between the first and second attempts.
- Went from 600 g to 700 g flour, because my first loaf had room to spare.
- Went from 20% scalded flour to no scalded flour at all, because this time I was following a process that didn't call for it.
- Went from 10 minutes at 500 + 2 hours at 350 (What was I thinking?) to 10 minutes at 450 + 1 hour at 350.
Most importantly, I pretty much halved the baking time. I've read that the internal temp to aim for is 205, and my first loaf was holding steady at 211.4 F - aka boiling point - for who knows how long.
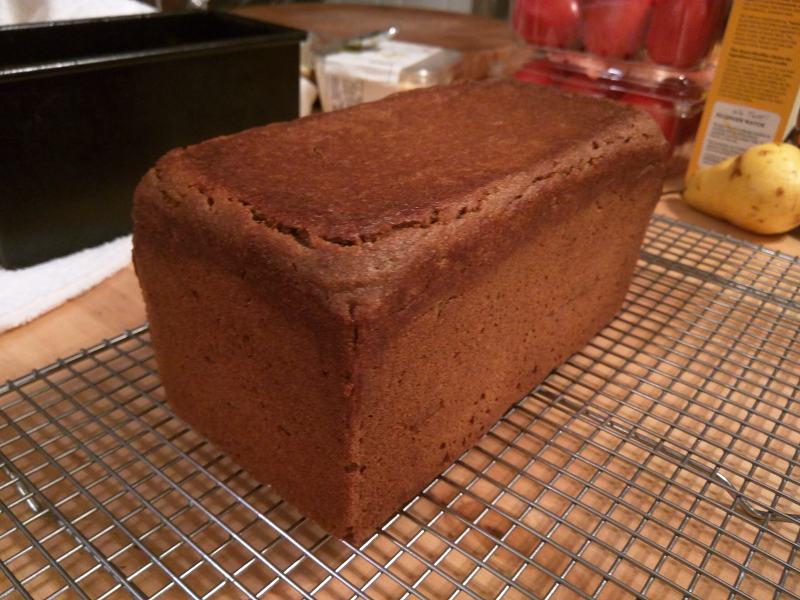
Let's see how it turned out:
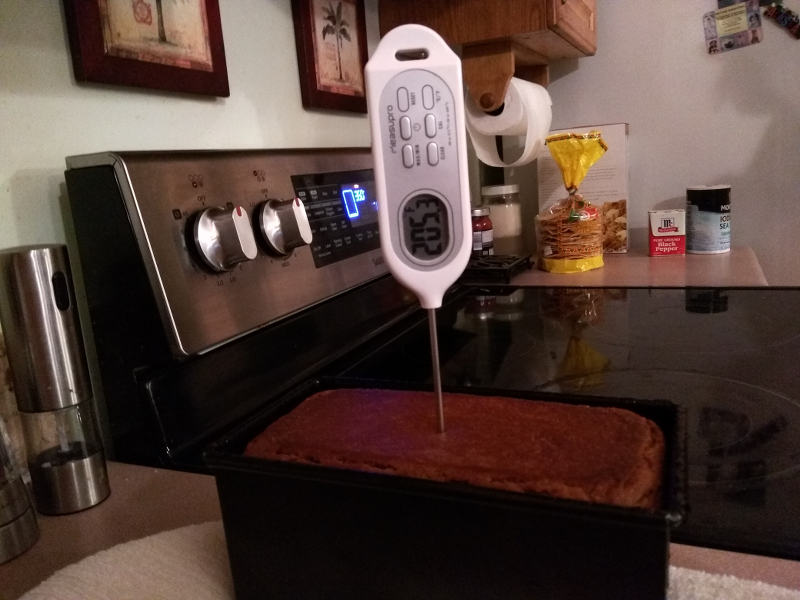
What luck!
To my surprise, the paste sprung up and completely filled the pan. As far as I know, that's not a bad thing, but there is cracking around the top of the loaf. Does that indicate that the pan was too tight?
Cooling:
I'll be cutting into this thing a little more than 24 hours from now. Maybe the crumb shot will shed some light as to whether or not the loaf was overly compressed. Until then, thanks for bearing with me. I feel a bit overzealous to be starting threads here as a complete and utter beginner, but I wanted to show some progress. Special thanks to Dabrownman, Mini, and Drogon for setting me straight!
and even before cutting, you know that it's sprung up and filled the tin so it's going to be very un brick like indeed.
I'll be making up some ryes tonight for baking tomorrow morning - one thing I've never checked is the temperature of the dough as it comes out of the fridge - that might be interesting to check.
Cheers,
-Gordon
I wish I'd thought to take my post-fridge temperature so we could compare. If I'd known that was the crux of why mine didn't look like yours, I would've stuck a thermometer in it when I got the chance. But it took me a bit of reading to find that out.
Fridge is set to 37. Put mine at the top, like you mentioned. But in the past we raised the temp from 35 because stuff was freezing (even at the top), so I wouldn't trust that appliance as far as I can throw it.
I suppose if your bake has ever been significantly delayed and your loaves seemed stuck in time, you'd expect the final temp to be sub-40. If you've always been super punctual on the other hand, confirming that your paste reaches a dormant temperature might liberate your schedule a bit.
For now I'll have to give up on retarding overnight, but I envy your scheduling.
To be fair, my timings have come more through necessity than working out precisely what's best... Mostly because my aim is to have all the breads baked before 9am then I can bag & box them and get them off to the shops (or me off to the markets!)
Also, as the bakery isn't a full-time job, I don't want to get up at silly AM... So I have perfected the art (ha!) of the overnight ferment and morning bake. (both sourdough and yeasted loaves)
So today - at about 3pm I made up the sourdoughs - wheat and rye - I'm only making 4 spelt loaves tomorrow, so I'll use that directly from the jar tonight.
So now I have 600g of rye starter that will be ready to use by 9pm. Same for the wheat starter. Starting at approx. 8pm, I'll start to mix & knead - the rye will either be made first or last. I may make it first as I'm doing something else before hand. It's literally a weight and mix operation - I use a danish dough whisk to stir the mix together. 600g starter at 150%, 600g flour, 390g water from the tap plus salt, caraway, malt extract and molasses. I dolop it into tins (which I don't oil/butter although they are expensive non-stick ones) weighing the tins to make sure I get the same in each (approx 540g each). I smooth the top with wet fingers but really don't go to town to level it, push it into corners, etc. it does that well enough on its own.
The tins get put into freezer bags and put on the top-shelf of the fridge
Tomorrow morning I'll be up at 5:30 and I'll take the ryes out of the fridge and leave them on the shelf while the ovens heat up. I'll be busy scaling/shaping the wheat and spelt loaves during this time but when done with those the ryes will go into the oven - usually the small fan oven but if I don't need it for the bake it'll be the bigger fan oven. Set to 250°C with a cup of water thrown in the bottom. 12 minutes then I'll turn the tins and reduce it to 200°C for another 20-25 minutes. I aim for 97°C,
Turn them out to cool and that's that - get on with other stuff.
One thing I've meant to do but not yet is change the schedule on Ryes to make & bake the same day - so start the levian build at 9am, mix the gloop early/mid afternoon and let prove at room temperature for a few hours (that's all it needs) then into the oven. That way I can get properly cold and "aged" loaves to the shop - however my customers like getting warm bread - even the rye - I tell them it's better left to go cold, but they obviously know best!
I do it that way when running bread courses though, although I make up the levian the night before and leave it in a cool place overnight, but not the fridge that way we can get it all mixed and left to prove and into the oven by mid-afternoon for them to take home with them.
-Gordon
You guys are getting adventurous. Would also like to know the temp. Rye paste tends to get brittle and stops stretching when it gets too cold, more so than wheat. The dough also tends to overproof when retarded.
no-one told me it couldn't/shouldn't be done, so I just tried it and the results were fine - so for the past 2-3 years that's what I've been doing! I'm making/selling 9-12 small rye loaves a week right now - it's getting more popular!
-Gordon
Final rye doughs won't stand retardation, for one simple reason: rye breads are based on a viscous gel of complex carbohydrates that are susceptible to degradation in the presence of amylase enzymes. Despite the fact that your formula calls for 40% prefermented rye in the sponge, which normally is enough to acidify your dough, the addition of malt (a primary source of the amylase complex) and long proof simply allow too much time for the complex carb degradation to occur. As a result, I suspect that even your second attempt, if it doesn't split internally like the first, will have ended up very gummy.
Instead of building your sponge during the day and proofing overnight, try ripening the sponge overnight and baking the next morning. I'm sure you'll get better, less problematic results.
Stan Ginsberg
theryebaker.com
I hope it's not gummy, but it's gotta be better than the last one, considering how much I overcooked that thing. In my book, this one's a win just for getting the internal temp right, so I guess my standards are pretty low, but thanks for the info. I won't be trying to retard the proof overnight again, seeing how it failed to rise this time. For my next loaf, I'll assemble the final paste in the morning as you suggest.
I haven't tried using malt yet, and the formula I tried this time wasn't 40% preferment. Perhaps your reply was directed at Drogon. But I'll assume your concerns about complex carb degradation apply to me as well because of the overlong proof - malt or no malt.
I'm a bit surprised that proofing in the fridge overnight is frowned upon. For this loaf I based my process on "Andrew Whitley's Russian Rye" from this website. Does he not recommend proofing in the fridge overnight?
I may have been tricked by a blogger.
I've baked a LOT (100+) different kinds of rye breads from all over northern, central and eastern Europe and never once have I encountered retarded fermentation -- refrigerated soakers, yes, but nothing spedifically aimed at influencing yeast, lactobacillus or enzyme activity. I have no idea where Andrew Whitley got his formula, but to me it's pure fiction. I also note that the blog doesn't show either a full slice or full cross-section, which suggests to me that there might have been internal tearing not unlike your first try.
Also, as for internal temperature, you only need to go up to 198F/92C or so, since starches gelatinize and set at around 195F/91C. In fact, for people who live at high altitudes, 205F is well above boiling, which could result in significant water loss.
Finally, you might try baking your next attempt at 460F or so for 10 minutes with steam and then reducing to 390 until the loaf reaches final dough temperature, somewhere around 45-55 minutes. Unless your dough is extremely dense, e.g., contains a lot of coarse rye meal, you don't need much more than that.
Stan Ginsberg
theryebaker.com
AIUI, His recipe is based on one he got while living, working & baking in Russia. He subsequently ran a successful bakery in the UK for over 25 years selling organic and sourdough breads. He now teaches baking and sells his sourdough starter and other baking equipment. I use his tins and have bought his book and am a member of the real bread campaign which he is a co-founder of, but other than that, have no connection. More here: http://breadmatters.com/ The bakery still exists and you can buy his Borodinsky here: http://www.waitrose.com/shop/ProductView-10317-10001-27871-The+Village+Bakery+organic+Borodinsky+rye+with+coriander+bread
His Borodinsky recipe is in his book; Bread Matters. The recipe I use is probably based on his, but I didn't originally get it from him, but I suspect from someone who might have been on one of his courses at some point in the past. I've also tweaked my version a bit to make the numbers easier to remember.. So fiction or not, it's been baked and sold for the best part of 30 years here. Make of that what you wish.
I've been sticking my tins in the fridge (at the top - just checked the temp and it's 9.5°C) for about 2 years now and it works for me. Demand is increasing. (to the point where I need to order more tins) They're not gummy at all inside, taste great and slice well. The malt extract I use is dead though. (non diastatic) so shouldn't contribute to the amalyse enzyme reaction and just add a bit of sweetness. If I remember, I'll bake an extra one through the week and get some close crumb shots - the ones for tomorrow are all orders so I can't cut one up.
Cheers,
-Gordon
And a culture he brought back in a pair of socks.
This is one time when 'LOL' really means "laugh out loud."
That was hilarious :-)
I will repeat: no traditional recipe I've ever come across calls for refrigeration of the dough, especially in high-percentage ryes.
The only advantage I can see to refrigeration is in scheduling; otherwise, all it does is (a) prolong the opportunity for the enzymes and microorganisms present in the dough to degrade it; and/or (b) increase the microorganism die-off, thereby weakening their activity during proofing and baking, since their activity slows at standard fridge temperatures (37F/3C), but die-off continues. At your indicated temperature of 49F/9.5C, yeast activity is at about 12% of its maximum rate and lactobacillius activity is about 17% -- significant numbers over prolonged periods, given the inherent instability of rye's complex carbohydrate gel structure.
I'm not saying it doesn't produce passable results, just that from a rye chemistry POV, it' doesn't produce a major benefit, either structurally or flavor-wise. Next time you bake a Borodinsky, try dispensing with the retard and go directly to proof, then compare your results.
Stan Ginsberg
www.theryebaker.com
He was worried that UK customs wouldn't let him bring it into the country.
------------------------------------------------------------------------------
That should be a comment to MonkeyDaddy's 'LOL' post. Gremlins, again.
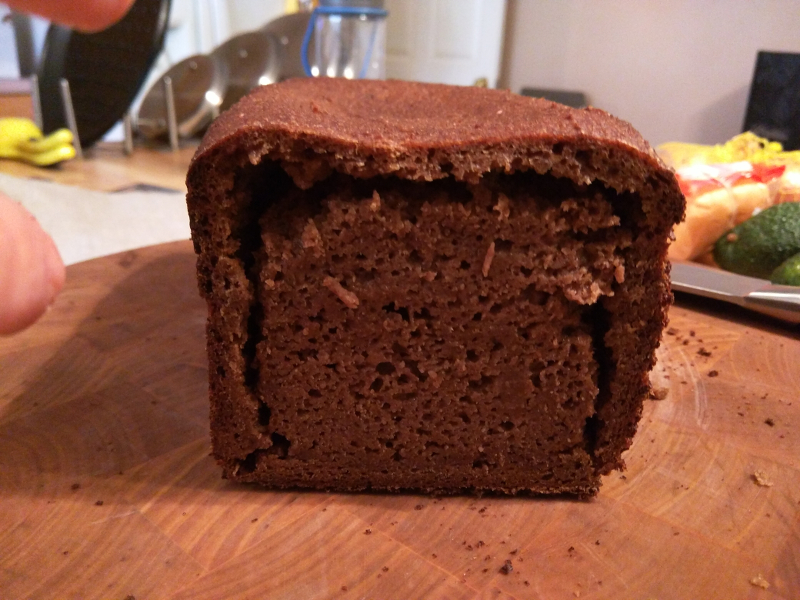
Waited more than 24 hours to cut into it.
It's still a bit gummy, isn't it? Any observations? Feedback is invaluable for me because I never ate high percentage rye bread before these loaves, so I've got nothing to compare them to. It's very soft and moist - not too sour for my liking.
Here's the process:
1452 grams total700 grams flour100% hydration Preferment:
- 100 grams starter
- 300 grams flour
- 300 grams water
Paste:Day One - Night:
Day Two - Morning:
Day Two - Night:
Day Three - Morning:
As I mentioned in the OP, retarding in the fridge overnight did not allow the paste to rise as I'd hoped, so instead of baking in the morning as planned I left it at room temp for roughly seven hours.
This is sooo much better than the first one. I'm gonna make open sandwiches later. Thanks everybody!
Oooh, I'd love a thin slice of that, toasted, and spread with a good wild boar pate... yummmmm!
I was about to say that using a 100% paste was the recipe for disaster (especially the recipe for losing the roof), but evidently you proved me wrong. I always tends to stay near the 85% hydratation because higher than that slicing is difficult, slices tend to crumble. Anyway adding some warm mash is always a win, the breads keeps moist much longer and the taste is sweeter.
Retarding the shaped loaf overnight worked great. No worries the enzymes were asleep too! Well done and Happy baking
Thanks for the kind words. I just hope I can replicate it. I'm very lucky that I stumbled onto an enjoyable loaf so soon.
Baking probably won't become a hobby of mine, but I can't overstate how much learning to make sourdough rye could improve my diet and daily life. Culinarily, it opens the gates to Eastern Europe, which I've been eager to explore. Sour shchi, here I come!
Lazy Loafer, I like your style.
Nicodvb, this bread doesn't seem crumbly at all. I have nothing to compare it to, but it's fairly pliable and easy to slice.
Having said that, I didn't choose to do 100% hydration for any well-informed reason. I simply read some posts by users who stated that preference, and they made it sound like there was no drawback.
If there are other downsides to this hydration level than just crumbliness, please let me know. I do wonder if I could prevent the gumminess entirely. Does anyone think I should I try a lower hydration level?
Thanks, Dabrownman! I'm relieved that retarding the paste didn't seem to ruin my loaf, but next time I'll proof at room temp.
Here's the plan for next time:
1350 grams total650 grams flour
100% hydration Preferment:
- 50 grams starter
- 300 grams flour
- 300 grams water
Paste:- 325 grams flour
- 325 grams water
- 38 grams molasses
- 12 grams salt
Day One - Morning:- Remove a jar with 25 grams of starter from the fridge for the initial feeding.
- Feed 25 grams of flour and 25 grams of water. Cover and leave at room temp.
Day One - Night:Day Two - Morning:
Changes:
Minus 50 grams of flour because this loaf sprung up and completely filled the pan. Still don't know how much that compressed it.
No retarding. Preferment will do its thing overnight (with half as much starter) and I'll proof in the morning.
Lowered the second oven temp from 350 to 325.
Any thoughts?
Looks great except for that dark moist ring just under the crumb. Not sure how it's forming but I might cut back just a little bit on the water. Reducing to 95% to see if it helps. If the loaf was covered while cooling, I might just uncover it then bag when completely cool for the rest of the wait before slicing. Perhaps too much moister got trapped while cooling. Another idea would be to include in the recipe a grain or seed that could absorb the extra moisture.
Flexibility looks good, crumb color, moisture (thinness -- amazing cut!) even crust colour and size makes for a fantastic looking loaf.
Mini
Thanks Mini. The crust is hard to cut through, and that's partly because of that gummy ring under the surface. It hadn't occurred to me that moisture might be the cause of it. Good to know that bagging the bread before it cools can cause issues, but I don't know if that applies here because I'm using linen bags. As for the hydration level, we'll find out if that makes the difference soon enough.
Today I baked my third loaf. And just before I made the final paste, I decided to try 85% hydration to see what difference that makes. Also, I tried 600 grams of flour again because my second loaf (700 grams) sprung up and filled the pan. Since my 600 gram loaf overproofed so badly, I didn't get to see the actual loaf size with oven spring.
The rise went well this time (about 5 hours). it did hit the lid of the pan during the bake, but only in the center. I want to fill out that pan more than this, so I'll be upping the flour again next time.
There's some major cracking. It looks slightly collapsed in the middle, but it had a nice shape until I stuck it with a thermometer. I look forward to settling on a formula so I won't need to do that anymore.
I used the same temps and cut 15 minutes off the baking time. So it was 450 for 10 minutes, then 350 for 45. Still hit 205 internal temp (was trying for 200 this time).
I'll cut into it Thursday morning. I've learned a lot from this discussion, and it would be nice to continue showing my results and soliciting advice, but I'm not sure how to proceed with that. I feel like I shouldn't continue posting loaves in this thread with no end in sight, since the topic was my second attempt. On the other hand, I don't want to start too many more threads about my simple bread. Maybe I'll explore the blog functions so as not to impose on the boards.
But I will be back with crumb shot, showing whether or not that dark ring is still there.
pan and let it dry out on the stone inn the turned off oven. Once completely cool the wrap in linen for 32 hours before slicing. This might help the wet ring problem......
And it beats having to use a hacksaw to get through the crust. After removing the loaf from the oven, brush the crust with boiling or near-boiling water. Then let the loaf cool as you ordinarily would. The hot water makes the rock-hard crust a lot more manageable without turning it into mush. Nor does it have a significant effect on the internal moisture of the loaf, so you don't have to worry about the crumb being more gooey than usual.
Paul
them from going hard as they cool but never thought of using water to make a hard crust come out of the oven more manageable.
while you're at it, like one for wall paper paste or a 4" natural. Best place to wet the crust is on the rack perched over the sink.
Thanks for the tips everyone!
Here's the crumb shot for my third loaf (which was 85% hydration instead of 100%).
Reducing the hydration level didn't seem to have any effect on the dark ring. Because the ring is less severe across the top (where the loaf doesn't touch the greased lid until it springs up during the bake) that makes me think I've been using too much grease. I've been coating the pan with bacon grease using a paper towel. To preempt your concerns, I cook bacon in the oven at a low temp and strain the rendered fat, so my bacon grease is relatively clean and mild.
I do have a picture of the greased pan from my second attempt, which had the same dark ring. It's hard to see how much grease I'm applying because I'm not going crazy with it, but I'll try using less next time.
Dabrownman, I'll consider drying it on the stone if it turns out to be a moisture thing, but since reducing the hydration level by 15% didn't seem to affect the ring that experiment hopefully won't be necessary. And I have been doing pretty much exactly what you suggest in terms of storage. I keep my loaves in a linen bags until the morning after the following day. Then all bets are off.
Pmccool, that's definitely worth a try. Thanks!
Mini, thanks for the brush advice. As a weird and minimalistic person who does not own a brush, I'll probably try to moisten the loaf without one. I don't have any spray bottles to spare either. I could try brushing it with wet cloth or applying warm water by hand. Alternatively, I could briefly wrap the loaf in a damp kitchen towel before letting it cool on a rack. Decisions, decisions...
Turn on the tap and quickly run the loaf from one end to the other underneath it. The tricky part is how to hold the loaf. I suggest use the rack over the sink and just toggle the faucet. Anyway....
I do see differences between the crumb shots. Big differences in the "rings." Look at the bubbles.... :)
Bacon fat didn't make the difference in crumb, but in my opinion, the more the better, esp. bacon! Everything tastes better with bacon. I tend to use butter and never worry about how thick or thin applied.
.