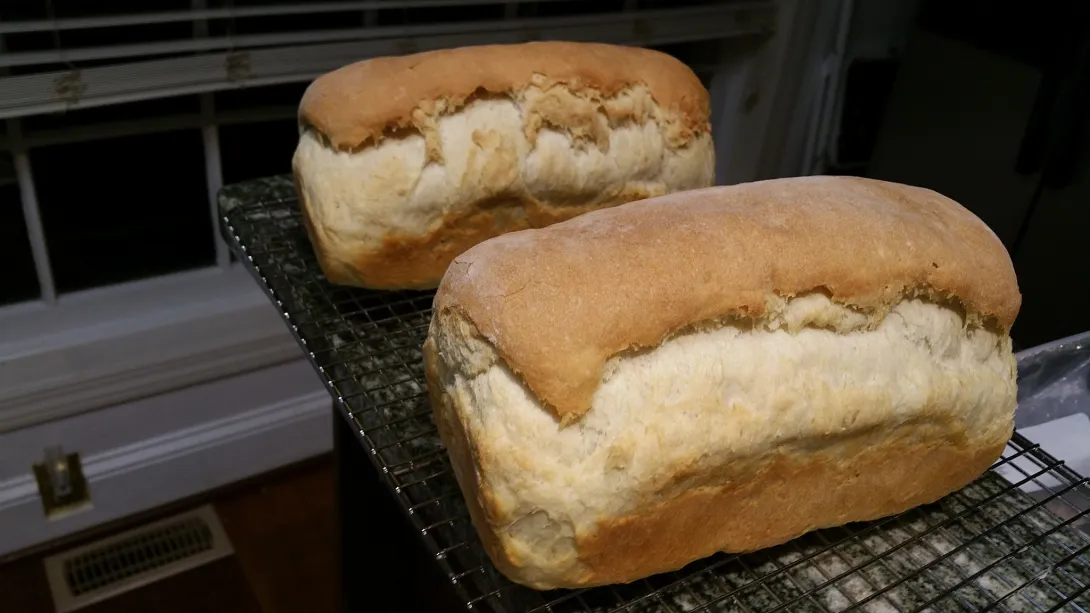
Recently my sandwich loafs turn out as shown in the photo. I am using the same recipe I had good success with before. Recipe uses one tablespoon of yeast. All ingredients are fresh.
I'm no expert, and I'm sure there's some people out there on this forum who could give a lot more insight into this, but to me it looks like you simply got a lot more oven spring than expected or desired and it ripped the loaf open after the outer crust section had already fully set, thus leaving an under baked new crust section along the rip.
Again, please refer to other for more insight as I'm not going to pretend to be the most experienced here, but some thoughts are that it does not necessarily have to do with the recipe it self on this. For example, it could be that your timing for proofing was different this time, it could be that the humidity this time was different, did you bake it in a different pan, maybe you were baking it at a different temperature or baking it right after something else and the oven was initially at a different temp than normal... What I'm trying to say is, the "cause" could be a lot of different factors that led to the crust ripping open during the bake like that.
However, in my experience, there are two main options for fixing this: 1) you can ignore the clock if it doesn't agree with the condition of the dough and make sure that the loaf is nearly completely proofed before you put it in the oven, and/or 2) you can slash the loaf, such as a single slash lengthwise down the center of the top to allow any oven spring to open along your planned line rather than randomly bursting out on the side like this (think store bought split top loaf).
The only other thought that comes to mind now that I think about it a bit more is maybe in the shaping of your loaf you ended up accidentally not putting the shaped dough in the loaf pan seam side down. If that were the case, it wouldn't be all that surprising if it opened up along the seam line of the dough and may help explain what happened here.
dried too much before baking? ...and didn't stretch with the oven spring? Does look under-proofed which might be related to turning off the house heating system, cooler rooms raise dough slower (all things being equal.)
However... did you cover the loaves during the final proof to prevent drying? Looks like it ripped at the edge of the pan where the pan prevented drying.
2. No scoring on top so split at the sides. Might also be tied in with Mini's idea that the top crusted over too quickly so escaping air couldn't come through the top of the loaves.
Thanks for your posts. No I did not cover the loafs while proofing. I checked the dough by presing one finger into the dough and it did not spring back. I did not score because this happens regardless.
For the next loafs I will extend the proof time in the pans and cover them. I will try scoring.
while proofing . Proof them in a tall kitchen plastic trash can liner and then don't forget to steam the oven so the skin doesn't set before the spring has sprung.- No worries
I really hate to be the one going off-topic -- and I don't want to get into an argument with those of you who believe otherwise -- but beware trash can liners, or at least make sure they are food-safe. Some trash bags even have pesticides in the plastic. There are large plastic bags that are food-safe (Glad makes some, sold not as trash bags but as storage bags, and clearly labeled a food-safe), and those are great for proofing as described above.
afraid of her own shadow - it isn't pretty but her Granny died from sticking her head in a nearly empty Cheetos bag - sad really, so she has an excuse .......and it wan't a pretty sight! I have to admit I prefer used trash can liners for proofing bags though. - until they get holes in them and won't keep inflated like a new one. I can't afford the expensive pesticide infused bags or those that mask those horrible trash can smells but - better safe than sorry for sure.
I am having a problem with baking sandwich loaves, similar to the initial post in this thread.
The loaf looks great in the oven, comes out of the pan nicely, but one side is bent in, or indented (the pan sides are straight), and the dough inside is unbaked.
From the large, unevenly distributed crumb. What's the formula and your process? I usually do 70-75% hydration, mostly AP/bread dough with up to 30% whole wheat. Mix in the KA mixer for ~5 minutes, 3 stretch and folds spaced 30 mins apart then leave it until the end of bulk, preshape, rest, shape, into pan. Sometimes I retard overnight, sometimes not.
These are 78% hydration, bread flour with 15% spelt. I mix by hand, no mixer, roughly 20-30 minute autolyse, then coil folds every 30 minutes. Total bulk ferment 4.5-5 hours. Scaled to 1100g for a 12”x4.5” loaf pan, bench rest for 15-20 minutes, then shaped into a long log, not a typical batard shape, because I’m trying to achieve a uniform, smooth top crust (instead of a dome in the center and short at the ends), then into the pans. I give them about an hour at room temp, uncovered, so they relax and fill the pan, then retard overnight in the refrigerator. Bake at 220C with steam for the first 15 minutes until nicely brown, about 40 minutes total.
It's got a different protein structure that modern wheat and tends toward slackness. How does the dough feel on the folds? How are you judging end of bulk? Does the dough feel strong? What happens if you preshape before final shaping - does it spread out or stay relatively the same?
Process sounds good, but I'd try to make sure you're building enough tension in the dough. As an experiment, drop the spelt and use your regular dough. Maybe drop the hydration back a bit to something in the low 70s (though I did a 90% loaf...). Oh and what's the temp of the bread when you're pulling it out?
This is a 90% dough (400g Cairnspring bread flour, 100g Yecora Rojo bolted). Baked at 425 for 20 mins with steam, 30 mins at 375 without. It's actually the tail end of the loaf... it was baked about 5 days ago :)
The dough definitely has that extensibility that goes with spelt, but there’s plenty of strength by the time I’m through with the folding. I judge the end of bulk partly by time, but I look for that “jiggle” in the dough, also.
The preshaped loaves keep their shape on the bench, they just spread out a little bit. I’m sure I would do a better job of final shaping if I used a lower hydration, or even just a smaller dough amount, because 1100g is a lot of dough to rassle into a cylinder shape, but I am trying to make a pretty substantial loaf for the maximum number of slices that can be gotten.
It doesn’t get baked long enough. You said it yourself so give it more time and maybe even remove it from the pan to finish baking until the side walls are firm.
I put the completely cool loaves back in the pan to see if I could figure anything out. All I can see is that the area just below the “muffin top” angles inwards, away from the side wall of the pan. Maybe the expansion of the bread, up and out of the pan, is too heavy for the base of the loaf?? Is that a thing? I will definitely bake longer and will also try putting back in the oven without the pan, for good measure.
There appears to be wet dough along the sides of the bread next to the crust. That would indicate to me that the loaf wasn’t baked long enough. Then with the weight of that wet dough being heavy, it will cause the side to collapse inward. Give it another 10 mins in the oven, then de pan and place it back in the oven for another 5-10 mins.
I'm with baking longer and lowering the oven temp. I see burning the bottom of the loaf which can't be good. Spelt does add sweetness to the dough and may be more sensitive to a hot oven. Either move the loaves up from the bottom heat, shield the bottoms or lower the oven temp and bake longer. Wait until the oven is preheated to put in the pans. It looks like there is too much heat under the baking loaves. More info on the oven and set up might help. How are the pans placed in the oven?
Spelt in the dough may require a shorter less risen final proof. I might try chilling right after shaping.
I am baking in a Nero oven, which is similar to a Rofco. So basically I’m baking on stone, not in a home oven. I can rotate the pans but can’t move them away from bottom heat.
Today I’m going to try the longer bake time and removing them from the pan for a final few minutes back in the oven, and with my next batch will try going right from final shaping into the refrigerator.
is around the stones, i.e. between the stones and the walls & door? Looks tight. Is there a difference in bottom crust color comparing those baked on the top shelf with the bottom shelf?
These are all great questions, most of which I cannot answer. 😝
I don’t know how much space is between the pans and the side walls or door of the oven. I have noticed that the middle shelf in the oven runs hotter than the top or bottom shelf (the picture in my last post shows only two of the three shelves). Because of that difference, I shuffle the pans around, mid-bake; top to bottom, front to back, changing which one is in the middle.
The oven is preheated for two hours at 230C but I don’t know the shelf/stone temp at the time of baking. I’m sure it loses some heat with loading, and the mid-bake shuffling.
There are no fans in the oven. The heat source is electric and of course the radiant heat from the stones.
And, the good news is that the advice to leave the loaves in the oven longer to bake, and to de-pan them and place back in the oven, seems to have worked! I hadn’t taken into account that these loaves are just bigger than my usual hearth loaves (1100g vs. 750g), so they just needed more oven time. 🤦🏼♀️
How does one know if you have enough dough for the pan size? For baked bread that appears to be well fermented, so neither under or over fermented, is the size of the loaf appropriate for the pan? Is it too tall and it won’t fit in a toaster? Is it too squat and just doesn’t look quite right? You’ll have to experiment, there isn’t one right answer because the the more whole grain, the heavier you’ll need the dough for the pan compared with all white flour.
heat source is electric coils under each shelf. I don't think those heavy shelves will cool down much after loading especially after a two hour preheat. Try 220°C.
Filling pan with the right amount of dough can be tricky and you have to judge the amount of rise to the type of dough put into the pan. Flours vary and so do doughs. Start out with a generalized amount for that particular flour (s), bake it, examine the cold crumb and change the dough amount until you get desired loaf for that size pan. Then write down detailed notes on the recipe. Include dough weight and pan size, temp, date, oven etc..
One usually gets the most rise out of 100% white wheat, which is often "the standard" and other flours fall in line with less volume. Less rise and volume mean more dough is needed in the pan for a proper rise and pleasing crumb. There are exceptions but that's the general way of things. The more whole flour in a recipe, generally the lower the volume.
Thank you, that was useful, especially that the last comment sort of reinforced the advice I was given, to bake longer and also to de-pan and put the loaves back on the hot shelf after done baking.
I do wonder how to know how much dough is too much for a given pan. Or maybe the right question is: how does one know what the ideal dough weight is for a given pan?
I'm no expert, and I'm sure there's some people out there on this forum who could give a lot more insight into this, but to me it looks like you simply got a lot more oven spring than expected or desired and it ripped the loaf open after the outer crust section had already fully set, thus leaving an under baked new crust section along the rip.
Again, please refer to other for more insight as I'm not going to pretend to be the most experienced here, but some thoughts are that it does not necessarily have to do with the recipe it self on this. For example, it could be that your timing for proofing was different this time, it could be that the humidity this time was different, did you bake it in a different pan, maybe you were baking it at a different temperature or baking it right after something else and the oven was initially at a different temp than normal... What I'm trying to say is, the "cause" could be a lot of different factors that led to the crust ripping open during the bake like that.
However, in my experience, there are two main options for fixing this: 1) you can ignore the clock if it doesn't agree with the condition of the dough and make sure that the loaf is nearly completely proofed before you put it in the oven, and/or 2) you can slash the loaf, such as a single slash lengthwise down the center of the top to allow any oven spring to open along your planned line rather than randomly bursting out on the side like this (think store bought split top loaf).
The only other thought that comes to mind now that I think about it a bit more is maybe in the shaping of your loaf you ended up accidentally not putting the shaped dough in the loaf pan seam side down. If that were the case, it wouldn't be all that surprising if it opened up along the seam line of the dough and may help explain what happened here.
Just some thoughts, hope they help
dried too much before baking? ...and didn't stretch with the oven spring? Does look under-proofed which might be related to turning off the house heating system, cooler rooms raise dough slower (all things being equal.)
However... did you cover the loaves during the final proof to prevent drying? Looks like it ripped at the edge of the pan where the pan prevented drying.
What is the room humidity?
1. A bit under proofed so too much oven spring.
2. No scoring on top so split at the sides. Might also be tied in with Mini's idea that the top crusted over too quickly so escaping air couldn't come through the top of the loaves.
Thanks for your posts. No I did not cover the loafs while proofing. I checked the dough by presing one finger into the dough and it did not spring back. I did not score because this happens regardless.
For the next loafs I will extend the proof time in the pans and cover them. I will try scoring.
BTW, the bread is still delicious.
Thanks to all for your insight and advice.
while proofing . Proof them in a tall kitchen plastic trash can liner and then don't forget to steam the oven so the skin doesn't set before the spring has sprung.- No worries
Happy baking
I really hate to be the one going off-topic -- and I don't want to get into an argument with those of you who believe otherwise -- but beware trash can liners, or at least make sure they are food-safe. Some trash bags even have pesticides in the plastic. There are large plastic bags that are food-safe (Glad makes some, sold not as trash bags but as storage bags, and clearly labeled a food-safe), and those are great for proofing as described above.
afraid of her own shadow - it isn't pretty but her Granny died from sticking her head in a nearly empty Cheetos bag - sad really, so she has an excuse .......and it wan't a pretty sight! I have to admit I prefer used trash can liners for proofing bags though. - until they get holes in them and won't keep inflated like a new one. I can't afford the expensive pesticide infused bags or those that mask those horrible trash can smells but - better safe than sorry for sure.
Happy baking
Hello all,
I am having a problem with baking sandwich loaves, similar to the initial post in this thread.
The loaf looks great in the oven, comes out of the pan nicely, but one side is bent in, or indented (the pan sides are straight), and the dough inside is unbaked.
Any ideas?!?
Image

Thanks!
From the large, unevenly distributed crumb. What's the formula and your process? I usually do 70-75% hydration, mostly AP/bread dough with up to 30% whole wheat. Mix in the KA mixer for ~5 minutes, 3 stretch and folds spaced 30 mins apart then leave it until the end of bulk, preshape, rest, shape, into pan. Sometimes I retard overnight, sometimes not.
Well, that could be, I suppose. I’m at a loss.
Image

These are 78% hydration, bread flour with 15% spelt. I mix by hand, no mixer, roughly 20-30 minute autolyse, then coil folds every 30 minutes. Total bulk ferment 4.5-5 hours. Scaled to 1100g for a 12”x4.5” loaf pan, bench rest for 15-20 minutes, then shaped into a long log, not a typical batard shape, because I’m trying to achieve a uniform, smooth top crust (instead of a dome in the center and short at the ends), then into the pans. I give them about an hour at room temp, uncovered, so they relax and fill the pan, then retard overnight in the refrigerator. Bake at 220C with steam for the first 15 minutes until nicely brown, about 40 minutes total.
It's got a different protein structure that modern wheat and tends toward slackness. How does the dough feel on the folds? How are you judging end of bulk? Does the dough feel strong? What happens if you preshape before final shaping - does it spread out or stay relatively the same?
Process sounds good, but I'd try to make sure you're building enough tension in the dough. As an experiment, drop the spelt and use your regular dough. Maybe drop the hydration back a bit to something in the low 70s (though I did a 90% loaf...). Oh and what's the temp of the bread when you're pulling it out?
This is a 90% dough (400g Cairnspring bread flour, 100g Yecora Rojo bolted). Baked at 425 for 20 mins with steam, 30 mins at 375 without. It's actually the tail end of the loaf... it was baked about 5 days ago :)
The dough definitely has that extensibility that goes with spelt, but there’s plenty of strength by the time I’m through with the folding. I judge the end of bulk partly by time, but I look for that “jiggle” in the dough, also.
The preshaped loaves keep their shape on the bench, they just spread out a little bit. I’m sure I would do a better job of final shaping if I used a lower hydration, or even just a smaller dough amount, because 1100g is a lot of dough to rassle into a cylinder shape, but I am trying to make a pretty substantial loaf for the maximum number of slices that can be gotten.
I have not been checking the final temp.
It doesn’t get baked long enough. You said it yourself so give it more time and maybe even remove it from the pan to finish baking until the side walls are firm.
Ok, good advice.
I put the completely cool loaves back in the pan to see if I could figure anything out. All I can see is that the area just below the “muffin top” angles inwards, away from the side wall of the pan. Maybe the expansion of the bread, up and out of the pan, is too heavy for the base of the loaf?? Is that a thing?
I will definitely bake longer and will also try putting back in the oven without the pan, for good measure.
There appears to be wet dough along the sides of the bread next to the crust. That would indicate to me that the loaf wasn’t baked long enough. Then with the weight of that wet dough being heavy, it will cause the side to collapse inward. Give it another 10 mins in the oven, then de pan and place it back in the oven for another 5-10 mins.
I will try the longer bake and the extra time back in the oven, out of the pan.
thanks!
I'm with baking longer and lowering the oven temp. I see burning the bottom of the loaf which can't be good. Spelt does add sweetness to the dough and may be more sensitive to a hot oven. Either move the loaves up from the bottom heat, shield the bottoms or lower the oven temp and bake longer. Wait until the oven is preheated to put in the pans. It looks like there is too much heat under the baking loaves. More info on the oven and set up might help. How are the pans placed in the oven?
Spelt in the dough may require a shorter less risen final proof. I might try chilling right after shaping.
Today I’m going to try the longer bake time and removing them from the pan for a final few minutes back in the oven, and with my next batch will try going right from final shaping into the refrigerator.
Sorry that my pictures show up sideways! 🤪
is around the stones, i.e. between the stones and the walls & door? Looks tight. Is there a difference in bottom crust color comparing those baked on the top shelf with the bottom shelf?
Preheat time & temp?
Temp of shelf when loading?
Where is the initial heat source?
Fan?
Curious to see how the new changes turn out.
These are all great questions, most of which I cannot answer. 😝
I don’t know how much space is between the pans and the side walls or door of the oven. I have noticed that the middle shelf in the oven runs hotter than the top or bottom shelf (the picture in my last post shows only two of the three shelves). Because of that difference, I shuffle the pans around, mid-bake; top to bottom, front to back, changing which one is in the middle.
The oven is preheated for two hours at 230C but I don’t know the shelf/stone temp at the time of baking. I’m sure it loses some heat with loading, and the mid-bake shuffling.
There are no fans in the oven. The heat source is electric and of course the radiant heat from the stones.
And, the good news is that the advice to leave the loaves in the oven longer to bake, and to de-pan them and place back in the oven, seems to have worked! I hadn’t taken into account that these loaves are just bigger than my usual hearth loaves (1100g vs. 750g), so they just needed more oven time. 🤦🏼♀️
Glad that the longer bake helped.
How does one know if you have enough dough for the pan size? For baked bread that appears to be well fermented, so neither under or over fermented, is the size of the loaf appropriate for the pan? Is it too tall and it won’t fit in a toaster? Is it too squat and just doesn’t look quite right? You’ll have to experiment, there isn’t one right answer because the the more whole grain, the heavier you’ll need the dough for the pan compared with all white flour.
Benny
heat source is electric coils under each shelf. I don't think those heavy shelves will cool down much after loading especially after a two hour preheat. Try 220°C.
Filling pan with the right amount of dough can be tricky and you have to judge the amount of rise to the type of dough put into the pan. Flours vary and so do doughs. Start out with a generalized amount for that particular flour (s), bake it, examine the cold crumb and change the dough amount until you get desired loaf for that size pan. Then write down detailed notes on the recipe. Include dough weight and pan size, temp, date, oven etc..
One usually gets the most rise out of 100% white wheat, which is often "the standard" and other flours fall in line with less volume. Less rise and volume mean more dough is needed in the pan for a proper rise and pleasing crumb. There are exceptions but that's the general way of things. The more whole flour in a recipe, generally the lower the volume.
https://www.thefreshloaf.com/node/63683/sinking-sides
Might be useful. :)
Thank you, that was useful, especially that the last comment sort of reinforced the advice I was given, to bake longer and also to de-pan and put the loaves back on the hot shelf after done baking.
I do wonder how to know how much dough is too much for a given pan. Or maybe the right question is: how does one know what the ideal dough weight is for a given pan?
I think your bread is over proofed. -