What is scoring?
“Scoring” is the word used to describe the cuts made in a loaf of bread before it is baked. Some breads are not scored. For example many loaves baked in pans are not. However, almost all free-formed “hearth breads” are scored.
When is scoring done?
Scoring is generally performed just prior to loading the loaves in the oven. French rye breads (pains de siegle) are sometimes scored right after shaping, before proofing.
Why are breads scored?
Intentionally creating a weak spot on the surface of the loaf prevents the loaf from bursting at weak spots created during shaping.
The type of scoring performed controls the direction in which the bread will expand during “oven spring.”
The pattern of cuts made, the angle at which they are made and the depth of the cuts influences the rate of expansion and the formation of an “ear” - a raised flap of crust at the edge of a cut.
The pattern of cuts can create a pleasing visual pattern on the surface of the loaf. While there are some very traditional patterns, for example for baguettes, the baker can use the scoring pattern to identify the type of bread or to create an unique pattern that identifies the loaf as coming from his or her oven.
The effects of scoring on loaf shape are discussed in more detail below.
What do you use to score bread?
The blade used to score bread is often referred to as a lame (pronounced “lahm.”) This is simply a French word with means “blade.” Breads may be scored with straight or curved razor blades, either held in the hand or mounted on a handle. Scoring may be performed with other sharp, straight blades, even with a straight razor. Some bakers prefer serrated blades.
For some types of scoring, a straight blade is preferred. Straight bladed knives are preferred for cuts made with the blade held perpendicular to the loaf's surface. This sort of cut is generally used for round loaves (“boules”). For other types of scoring, a curved blade works better. Curved lames are generally used for long breads like baguettes which are scored with cuts parallel to the long axis of the loaf.
Video on Choosing a Blade: http://youtu.be/vF7eFluzHXc
How are the cuts made?
The scoring stroke should be firm, rapid, smooth and decisive. For the beginner, it may help to take “practice swings” or to visualize the movements and totally focus one's attention before making the cuts. Understanding the functions of scoring and the effects of the variables described can help, but there is no substitute for experience. In this respect, scoring bread is no different from an athletic skill or any other art or craft. (Tourist: “Please, sir, can you tell me how to get to Carnegie Hall?” New Yorker: “Practice, practice, practice.”)
The cuts should generally be 1/4 to 1/2 inch deep. A wet, sticky dough requires a more shallow cut than one would make in a dryer dough.
Scoring a boule (round loaf)
The angle the blade of the knife makes with the surface of the loaf is important in determining how the cut will open up. If you want the cuts to spread equally from the cut and to open quickly, as is traditional with round loaves (boules), the knife should be held vertically – at 90 degrees to the surface of the loaf.
Video on Scoring a Boule: http://youtu.be/gnL7mvR9wFg
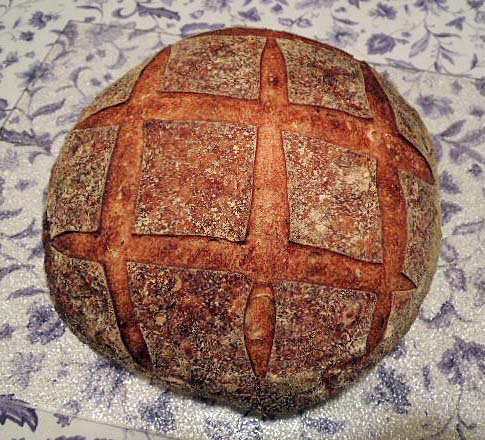
Besides the “tic-tac-toe” pattern, boules can be scored with diamond patterns, simple crosses or much more elaborate and creative patterns.

Miche scored with a diamond pattern
Scoring a long loaf (bâtard)
If you want the cuts to spread more slowly and create an “ear,” as is generally desired with long loaves (baguettes and bâtards), the knife blade should be held at a shallow angle with the surface of the loaf, at about 20-30 degrees or so. Many find using a curved blade helps make this type of cut. The blade is held with the concave surface facing up (away from the loaf). A flap of dough is created that will lift up to create an “ear” as the loaf expands and, by lifting gradually, slows the expansion of the loaf. This prolongs the time during which new areas of dough are exposed to the direct heat of the oven and results in greater overall expansion – a larger “bloom.”
Video on Scoring a Bâtard: http://youtu.be/UC5HLCWAyMo
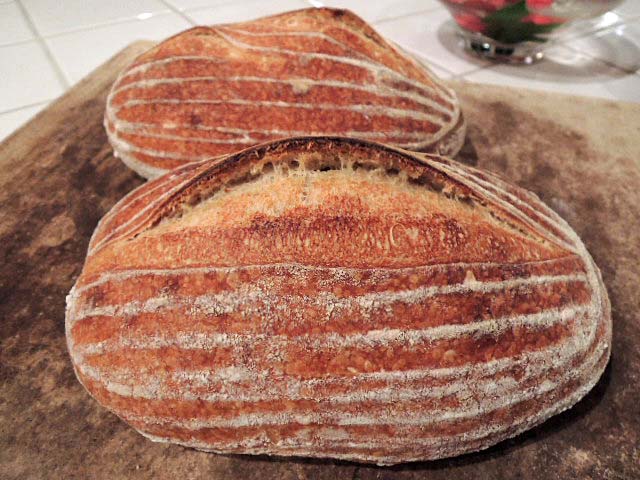
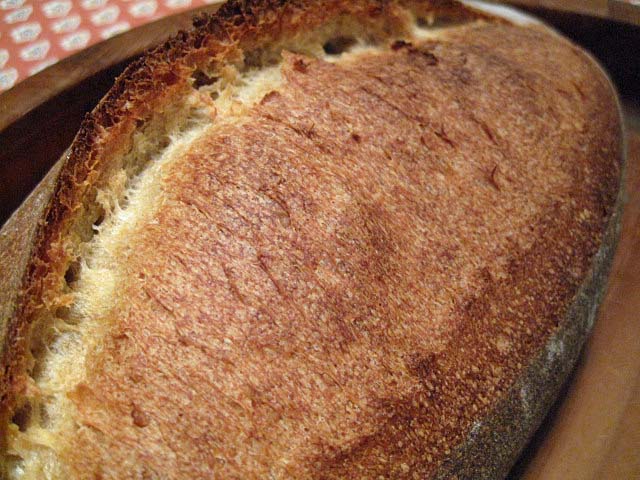
Bâtards
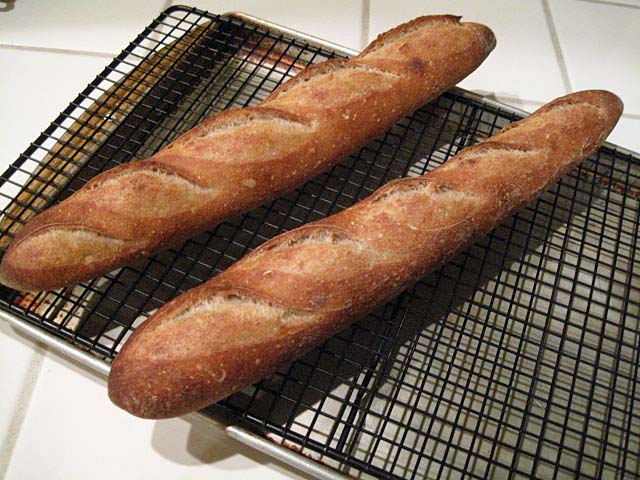
Baguettes
The effect of scoring on loaf shape
Michael Suas, in his book "Advanced Bread & Pastry," provides some information about how scoring patterns influence loaf shape. Scoring is not just to make a visually pretty design on the top of a loaf. It is also how the baker controls the direction in which the loaf expands. This impacts the shape of the loaf cross section (rounder or more oval), the height of the loaf and, for a boule, whether it stays round or ends up more oblong.
According to Suas, long loaves like bâtards and baguettes are traditionally scored parallel to their long axis. This may be a single long cut or multiple cuts that are almost parallel and overlap somewhat (for ¼ to 1/3 of their length, generally). This pattern promotes sideways expansion of the loaf, resulting in an oval cross section when the loaf is sliced.

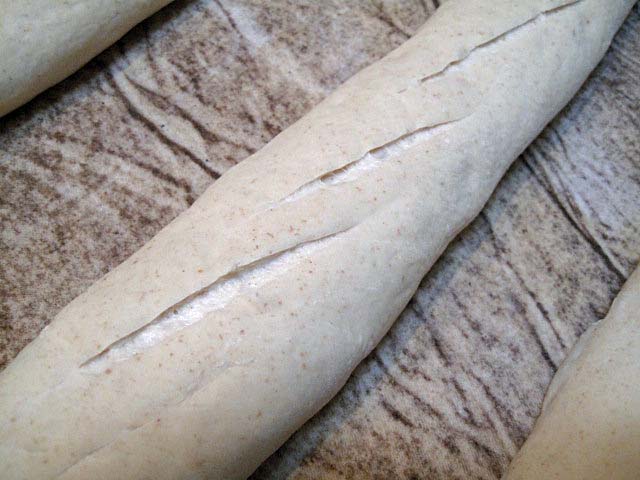
Baguette showing overlapping cuts, almost parallel to the long axis of the loaf
For breads with high-rye content which have lower gluten and less oven spring, the traditional objective is to encourage a higher rise in the oven spring resulting in a rounder cross section. This is achieved by "sausage" or "chevron" cuts.
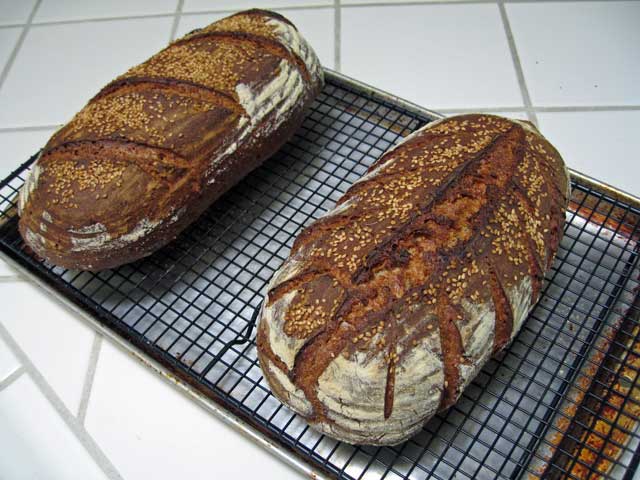
"Sausage cut" on the left. "Chevron cut" on the right.
Boules are scored in a variety of patterns with differing effects on how the loaf expands. The common "tic-tac-toe" pattern and a simple cross will direct the expansion upward. More complex patterns like diamonds result in a relatively flatter loaf.
One of most interesting effects is that scoring a boule with multiple parallel cuts encourages expansion at a right angle to the cuts. This results in an oblong loaf shape.
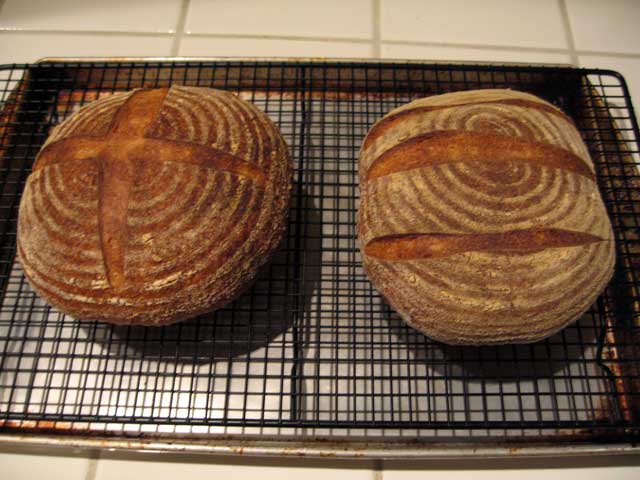
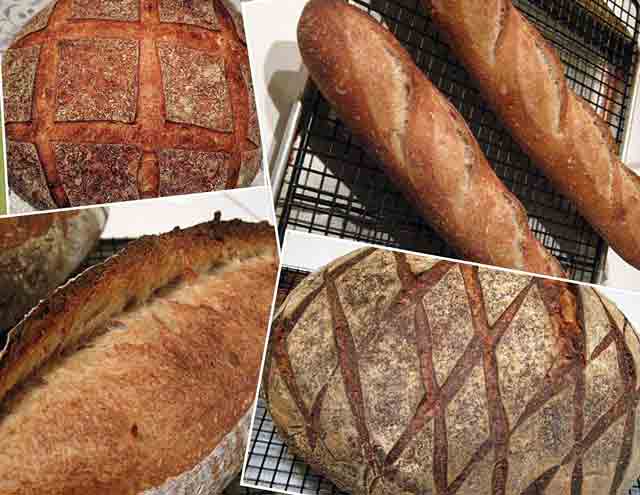
Two boules scored differently. Note the effects of the scoring pattern on the final shape of the baked loaves.
What's the point of an ear? Controlled bloom!
This topic is not about the auricular anatomy of elves (or Vulcans). It's about scoring breads.
Scoring loaves creates a visually pleasing pattern, and it helps control the expansion of the loaf as it bakes.
What Suas called "the classic cut" is parallel to the long axis of a baguette or a bâtard. The cut is made with the blade at a shallow angle to the surface of the loaf. The cut should be shallow - about 1/4 inch deep. Paradoxically, this shallow cut results in the flap lifting better than a deeper cut would, thus forming a nice "ear." Hamelman (pg. 80) points out that "a deep cut will simply collapse from its own weight."
The angle of the blade is important. "If the angle is not achieved and the cut is done with the blade vertical to the loaf, the two sides of the dough will spread very quickly during oven spring and expose an enormous surface area to the heat. The crust will begin to form too soon - sometimes before the end of oven spring - penalizing the development of the bread. If the cut is properly horizontal, the sides of the loaf will spread slower. The layer of dough created by the incision will partially and temporarily protect the surface from the heat and encourage a better oven spring and development." (Suas, pg. 116.)
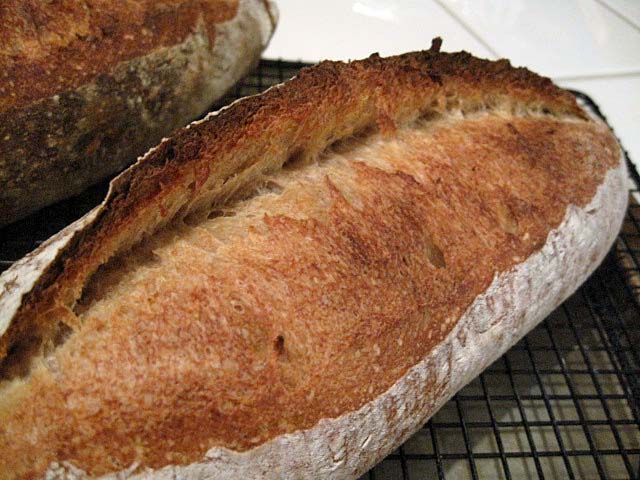
These photos illustrate nice "ears," but they also show that the bloom occurred slowly, as it should. Notice that the color of the crust in the opening has 3 distinct degrees of browning, decreasing from right to left. The darker part on the right obviously opened first and was exposed to the direct heat of the oven for longer. If the bloom occurred too rapidly, it would have a more even coloration.
In summary, in order to achieve an optimal bloom in baguettes and bâtards, one must attend to 3 variables when scoring them:
The cuts should be almost parallel to the long axis of the loaf.
The blade should be held at about a 30 degree angle to the surface of the loaf.
The depth of the cut should be shallow - about 1/4 inch.
Variable shading of the bloomed crust confirms that the desired slow but prolonged opening of the cut during oven spring occurred.
A final word
This tutorial focused on the mechanics of scoring, but the other steps in bread making impact the behavior of the cuts you make and the final appearance of your loaves. In fact, every single step, from your choice of ingredients and their proportions – your formula – to how you steam your oven plays a role in how your cuts will open. Your best looking loaves will result from a series of choices that are mutually dependent, where how you score a loaf takes into account the other choices you have made about the formula, mixing, fermentation, shaping, proofing and baking.
Happy baking!
David
- dmsnyder's Blog
- Log in or register to post comments
Thanks for your hard work making this guide.
David. Thanks for the scoring tutorial.
David,
Thank you for putting the effort into this post. It is very useful and much appreciated.
-Ed
Well, he used to practice medicine, but now he makes slasher films.
Very good work, David. We need to get you a deck oven with a built-in video camera so we can see the ears grow.
Glenn
...if you could start a bakery-café with table-top scoring performances. Sort of like a Benihana for bread.
Glenn
David,
Nice addition to your other tutorials. I especially like how you included the videos. Makes it easy to follow what you are writing about and then the photos round it off perfectly showing the final results. Once again a clear demonstration that a picture is worth a thousand words.
Take Care,
Janet
Nicely done tutorial David. The course at the SFBI left you with a set of valuable techniques. This is the best explanation plus visual for a technique that looks deceptively easy but can be cantakerous in execution...,
Best regards & Thanks Again,
Wild-Yeast
Hi,
I like how looks chevron cut .I should use , or not , a straight blade to do it?
Please be kind and advise.
Thanks
The chevron cut is made with a straight blade. There is a technique I saw used at the SFBI that I have not mastered. I don't think I even remember it well enough to discribe it, unfortunately.
David
Nice job David.
im sure lots of people will get some valuable knowledge out of your efforts.
i always thought it was pronounced Lame like someone who has an injury and not like Lamb. Also is it boule with the e sounding like "ey" and not being silent. What do I know?
"Lame" is not pronounced like "lamb." It's more like "lahm." "Boule" is pronounced like "bool." Actually, the final e is pronounced, but very, very softly. It is not really phonated, i.e., the vocal cords are not vibrated. The sound is more like "uh" than "ey."
David
This was, as they say, "a labor of love." I do hope TFL members find it helpful.
A point not made in the videos is that the speed with which I perform the cuts is approximately half that used by the professional bakers I have observed in person and on videos. I think my tempo works for us home bakers. It would be unacceptible in a bakery where hundreds of loaves each of several types are made daily. Those guys just fly!
David
Thank you for your effort, your videos are very much appreciated.
David,
These videos are wonderful. Seeing you actually perform the cuts was so helpful, and I learned a lot. I make mostly boules, and by watching your demonstration I was able to diagnose the problems in my cuts not opening up the way I wanted. Thank you so much for the time and effort you put into these. For sure, they were a labor of love. That much is obvious. We're lucky to have you here.
If the tutorial helped you improve your own scoring, it has been worth the work that went into producing it!
David
Hi David,
Thank you so much for you valuable instruction and insight! My scorings are okay, but I was wondering how you are able to really make your scorings pop out and the bread really open up broadly. In mine, the scoring patterns are clear may emerge slightly, but the bread usually does not open up too much. How do you manage to do this? (I attached two pics of my own so you know what I am referring to. I usually use a fish filet knife and cheese knife to score and cut at 90 degree angle to the table.) Would really appreciate your further help!
Thank you!
I think the answers to your questions have been covered already. Just one other point: I often see questions about how to get ears on a boule. Traditionally, ears are NOT expected or desired on round notes, only on long ones like baguettes and bâtards. So, how you are scoring now is fine for the shape of these loaves. How to score other shapes is covered in the tutorial. If you missed it, I suggest you read it again.
Looking at your photos, I wonder if you are achieving a tight gluten sheath when you shape your loaves.
BTW, I love your cutting board. Not just for challah, eh?
Happy baking!
David
Great insight and I definitely read your wonderful tutorial again. Interesting point regarding the gluten being too tight...perhaps I overworked the dough while shaping. LOL re cutting board—you are absolutely correct :).
Thank you for your great and appreciated help!
Sorry if I wasn't clear. My concern was that the loaves were not formed in a way that developed a good gluten sheath to support the shape of the boule and give you a smooth surface for scoring. I was NOT saying you over-developed the gluten or made it "too tight."
Viewing some of the great videos on youtube might help. Or take a look at the tutorial on shaping a boule I posted <gasp> ten years ago.
Shaping a boule: a tutorial in pictures.
David
David,
Thank you so much for your time and effort in posting these tutorials - what a great help they have been to me! If not for The Freshloaf and contributors like you, I would never have become a competent bread baker! Thanks again!
David, I'm just gasping at the awesome collection of breads. And haven't even gotten to the videos yet. Very kind of you to put that together. -Varda
Thanks David!
I have been striving to recreate the wonderful ears displayed on your loaves and with this tutorial, I now have the tools to get there!
Lisa
David
Hi David,
A note on convection vs conventional oven and scoring techniques. I am not sure what kind of oven you have and have learned during my time here that results really vary depending on oven and steaming...just to name a few of the variables....we know there are many...
Anyway, today was my day to attempt creating an ear on a batard coupled with a slower expansion due to the depth and angle that you said would create that effect.
Well, I got a superb ear but.....the coloration on my loaf was not in different shades such as yours. My conclusion being that my oven is a convection only oven and has it's own humidity built in hence I have to turn the oven off for the first 10 minutes of the bake in order for the steam to do its work. Without the direct and constant heat the crust does not show a contrast in color despite the fact that it does open at a slower rate. Those of us with a convection only ovens must employ other steaming methods to achieve such results if that be our intention.
Now that I know a bit about baking I was thinking about how it was when I first went looking for information on specific techniques. Your tutorial is wonderful due to how your formatted it all but if I was a newcomer and had a convection oven I would be dumbfounded with my results and would have no idea how to remedy the situation let alone know why it was happening in the first place. As a newcomer I did not know about all of the things we don't have control over due to the equipment at hand. I know differently now but thought it might be helpful if you were to add a footnote to your tutorial so newbies know their results may vary as it is impossible to include all the variables in one tutorial....I know it would have helped me to know the 'problem' lay in the oven I was using as it would have led me to find ways to remedy the situation rather than spending endless time trying to change technique etc.
One of the things I so highly value about this forum is that it has taught me what I was doing wrong AND it has given me solutions. Something I had never been able to resolve on my own.
Anyway, just thought I would toss that in. This is your tutorial but I felt is was worth a mention since your objective is to help new bakers discover techniques that will enhance their baking :-)
Now for me to find ways to preserve the heat so I can get the nice colors you have on your loaf :-) Me thinks I need my flower pot cloche.....
Take Care,
Janet
Ovens certainly make a difference, and I suppose I could state that as a generalization. I know it took maybe two years of trial and error before I arrived at my own current baking procedures. I bet, if I had to get a new oven, even one of the same type, I'd have to make some sort of accommodations to its peculiarities.
I don't have the experience with different kinds of ovens to provide specific advice for each. However, if some one is having a specific problem with the baking, we can collectively usually figure it out.
As to your own experience, I'm glad you got the ear you were after. The varigated coloration of the bloom indicates a gradual blooming, so, presumably, your loaf bloomed quickly. Do you happen to know when it occurred in the bake? I'd guess very early and pretty much all at once.
I have observed a number of my loaves through the oven door glass. I have been amazed by some that seem to bloom in stages with one early rapid blooming and another which occurs a good 12 minutes into the bake. My impression is that the second stage happens when the ear lifts up, exposing new surface area that hasn't been previously exposed to direct oven heat. So, if your ear lifts early, the bloom would have a more even coloration and would probably be less extensive. I wonder if there are small adjustments you could make in how you score that would give you more control over this.
I guess Glenn's offer of his jazzy digital video camera to tape inside my oven may be a good idea after all. That is what he suggested, isn't it? ;-)
David
I was thinking along the lines of a simple generalization too otherwise the scope of your tutorial could quickly become overwhelming. Not only for you but for beginner bakers. Too much information too soon can have that impact :-O. What you have done here is present a good starting point from which people can explore in depth if they so choose.
You are right. Today's loaf did 99% of it's spring in the first 10 minutes when the oven was turned off. This is pretty common with the method I use.
I baked with a conventional oven when I started baking bread a couple of years ago. Took me awhile to figure out the steaming piece and how to work with temps to get the results I wanted. I bought a Cadco counter-top oven last summer and, like you, had to figure things out all over again since the Cadco is convection only. I have tried leaving it on when steaming and turning it off. The turning it off method works the best but I am always trying new things so that may change too. Due to the high heat I use to compensate for the 'off' time tends to make things happen pretty quickly once a loaf is loaded onto the stone.
Take Care,
Janet
Your tutorials are much appreciated. I wish I could achieve the kind of ear you do so consistently. The only time that happens is when I bake my batard in "La Cloche" (the best method) and my boule in a cast iron D.O. My steaming method otherwise seems lacking. I preheat one cast iron pan and one aluminum pan (water added) with the oven preheating and then spritz the oven just before and just after loading the loaves onto the stone. I repeat this about 4 times in the first 8-10 minutes. Then at 15-20 minutes, I remove the steam pans and switch the oven to convection for the remainder of the bake, lowering the oven to the desired temperature (usually lowering from 500 to 460, per Hamelman's usual instructions). I recall you use a perforated tin, perhaps with lava rocks or metal fittings (?). At any rate, I finally bought a lame fitted with a double-edge blade (Breadtopia's model), which cuts very well. I also have begun proofing on linen, which dries even a high-hydration dough sufficiently enough to slash the loaves easily.
Long story short, thank you for all you have contributed to TFL!
Joy
After using the repeated oven spritzing for quite a while, I gave up on it. I didn't like the unavoidable drops in oven temperature with each oven door opening.
Have you tried Sylvia's method using towels wetted with boiling water?
Of course, steaming might not be the issue. If it is, you should also have dull (not shiney) crust. Otherwise, I'd look elsewhere.
David
I agree that the repeated spritzing with loss of heat isn't the best way to go; hence my use of the cloche and D.O. If I understand your last point, that is, if steaming is not working well (however that would occur), then the crust would be dull rather than shiny. Is that what you're saying? I'd have to revisit the results of my steaming techniques and see the results. Other issues might be failure to get a tight enough surface on the loaf, whether the surface is too wet, and so on. Oh I forgot to mention that I generally coat my sourdoughs with a mixture of seeds and a little sea salt, which means brushing the surface with water beforehand. In doing that, I have been slashing before the water goes on; otherwise the blade sticks something awful. Hope I'm making sense.
Joy
David, you're da bomb! Thanks so much for a very complete and helpful scoring tutorial! Just hope my dough is up to the task. Natasha
David, thank you for the reminder. I tried the towel technique and, by gum, it worked. I got that all-elusive ear on the batard and great tic-tac-toe bloom on the boule. Only thing is that it works best (per Sylvia) if the stone is at the very bottom of the oven. Doing that the first time with the towels, the bottoms of the loaves burned beyond desirable parameters. Next time I moved the stone up one notch. Lovely loaves but somewhat subdued bloom/ear. But it's much better than anything I've done. The best part of that is not opening the oven repeatedly and losing heat.
Thanks again, master baker!
Joy
Ovens are not all the same - not an original observation. I'm glad you are finding a method that works for you.
David
P.S. A disclaimer: "Master Baker" is an exhaulted honor and one that is bestowed on a highly selected few, notably including Jeffrey Hamelman. I appreciate the compliment but cannot pretend to that rank.
may we say "distinguished baker" (with your honesty and modesty most appreciated)?
Joy
Thanks for putting this together, David. I do many things well in my baking but slashing has remained a challenge and I think your explanations and the videos will help.
I'd love to have a " dough dummy" that I could practice on. I work in healthcare and we have a variety of devices and mannequins available to practice skills such as CPR or giving injections. That's what I need. Resusci-Annie, bread version, anyone?
Anyone have any suggestions?
I bought a tub of play-doh to practice on but the hydration :-) just isn't the same. Was thinking of making up a batch of throw-away dough with dollar-store flour just to practice...I could feed the baked results to the critters in my backyard...
I practice scoring on "real dough." The results were not always totally beautiful, but they were always tasty.
Another option is to practice on air. Make the strokes over and over, visualizing the loaf. Get used to holding your blade at the right angle and making the strokes smoothly and rapidly. It helped me.
The best option is to take a class in which you make dozens of loaves and have a professional baker critiquing your technique as well as demonstrating the proper technique.
David
I realize this is an old comment, but have a suggestion to those who are new to this site (like Me). Are you familiar with a product used to hold flowers called Foam Floral blocks?
https://www.dollartree.com/4-pc-Gentle-Grip-Green-Foam-Blocks/p1057/index.pro
These can be had cheaply at various stores and can simulate the drag texture you feel when scoring bread. The caveat is they are much more forgiving than dough, as they won't grab onto your blade of choice. getting the depth you are looking for is critical, however, and that is where these can really assist you. Remember, quickly, decisively and randomness is just another part of a great loaf - (you can tell that to yourself in case you make a mistake - it works for me).
Happy baking!
I've used many of the blades you mention in your tutorial for scoring. I thought I would share my new favourite: the ceramic paring knife. I always get nice scoring without the dragging that can happen with a less than perfectly sharp blade. I wonder if that is similar to your teflon coated tomato knife?
Thanks!
Again, thanks for this continuation of your scoring tutorial; it's very helpful. But, I'm now worried that someone will see me sitting on the kitchen floor watching through the (oven) glass to see the bloom. Baker's would understand, but regular people?
Tom C
I'm glad you are finding the tutorial helpful.
David
great tutorial david! thanks for sharing.
David
Thanks you David, your instructions and the updated videos have helped me understand what I am supposed to do. I'm going to go practice now.
David
Wow! Your love of bread making shines through. I learned so much!
Thank you so much for this lovely, in-depth tutorial. You have obviously put a lot of time and effort into this and it is greatly appreciated.
I'm glad you found the tutorial helpful!
Happy Baking!
David
Very useful tutorial. I finally got great ears, with the correct color gradient.
David
A great tutorial! I have been using a scalloped shape serrated knife made by Clauss with good results.
Can't wait to try these techniques on my next bake !!! Always wanted to acheive the famous "ear" score thanks for the lessons
Saw this and as I am trying to learn how to do the scoring, or slashing and what I need this has been very helpful.
Looking forward to trying out what I learn from the video, what was said, shown and your results in the photos.
The best results I have had are when scoring right out of the refrigerator and baking a cold retarded loaf. It also helps if there is a bit of a skin. I can’t seem to do anything with a warm high hydration loaf
Thank you for creating this excellent tutorial.