Hi,
I thought some detail on creating laminated dough for croissants etc may be a popular subject.
CROISSANT DOUGH
MATERIAL | FORMULA [AS % OF FLOUR] | RECIPE [GRAMMES] | RECIPE [GRAMMES] |
Strong White Flour | 100 | 600 | 1000 |
Salt | 1.3 | 8 | 13 |
Milk Powder | 5 | 30 | 50 |
Fresh Yeast | 6 | 36 | 60 |
Cold Water | 63 | 378 | 630 |
SUB-TOTAL | 175.3 | 1052 | 1753 |
Butter | 41.7 | 250 | 417 |
TOTAL | 217 | 1302 | 2170 |
Method:
- Mix the ingredients for the dough to form cool, developed dough.
- Put in a plastic bag in the chiller and rest for 30 minutes. Cut the butter into 4mm thick strips and put back in the chiller.
- Roll the dough out to a rectangle 8mm thick. Put the butter pieces flat onto 2/3 of the rectangle, and fold as below:
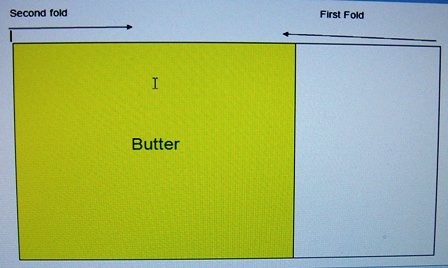
- Turn the dough piece clockwise through 90°. Roll out to the same size as before, fold as above, and turn. Repeat once more.
- Chill the billet for half an hour and give 2 more folds and half turns as described. This gives 168 layers of butter in the croissant dough. Chill again for half an hour.
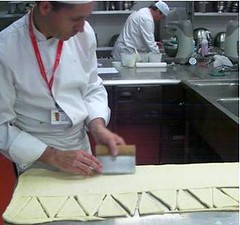
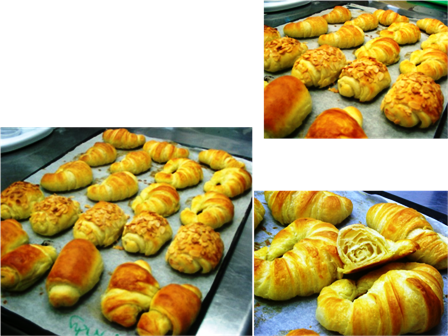
- Roll the dough piece out to 5mm and use a croissant cutter to cut out triangle shapes. Stack into piles of 6 and rest covered for 2-3 minutes. You can use a template made from wood, or, cardboard, to cut out the individual triangle shapes instead. Please see the video, at 1 min 35secs, for a brief view of the croissant cutter on the left of the screen.
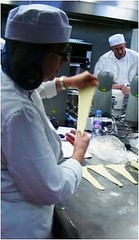
- Tease out each triangle, fold up the top edge and roll up tightly. Roll out the feet to pointed ends and move round so these feet join up to make the classic shape. See Vicki demonstrating this in the pictuure below. For Pain au Chocolat and Pain Amande, cut the dough into strips, 6 x 10 cm; cover with small chocolate chips, or a thin layer of almond paste, and roll up so the seam is well pressed down on the bottom.
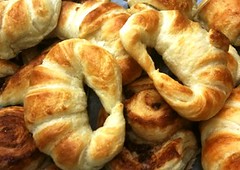
- Place on silicone lined baking sheets and brush with beaten egg. For the pain amande, dip in flaked almonds
- Prove at 38-40°C, 80%rH for 40 minutes.
Bake in a hot oven, 235°C for 12-15 minutes; a deck oven should be set at 7 for top heat, and 5 for bottom. No steam is used, and a damper is not needed.
[Almond Paste to make Pain Amande]150g Icing Sugar, 150g Caster Sugar, 300g Ground Almonds, 50g Egg, beaten, 1 tbsp Lemon Juice
Key Principles of successful laminated dough:
- 1. The dough should not be too wet. If the dough is soft, it will stick to the bench and the pin, and the laminations will quickly be ruined. If the dough is too tight, it will be difficult to roll out without the dough insisting on springing back. Some have advised that the dough need not, therefore, be fully-mixed. This is because all the rolling and folding will continue the dough development. My own thought on the matter is that the dough should be developed to the level allowed by the choice of flour used. So if a top grade flour is used, the dough should be mixed accordingly. If the flour is not so strong, it will not tolerate intensive mixing anyway; by hand, or, machine.
- 2. The best way to deal with dough which springs back is to allow extra resting time. Allowing plenty rest between turns is the first key principle to grasp. If you compare the folding process to working out bicep muscles in the gym, you should not go far wrong. Bicep curls would be repeated to the point where the muscle is so tensed up it cannot do any more. After a period of rest the same moves are repeated. The moves are designed to strengthen the muscle by continued work. But there has to be rest in between to allow the muscles to relax. It is exactly the same for the gluten-based protein fraction in the dough.
- 3. The other key principle is to be able to work cold. It is generally cold and raining here in the UK, but I am aware many who write on this site have problems creating cool enough conditions in the kitchen to lessen the burden of making these items; I wish I lived where it was warm too, don't you believe it! Here are a few options:
- Use a chilled marble slab, or, a refrigerated work surface.
- Use crushed ice in the dough, or chill the dough water for an extended period prior to dough mixing.
- A good trick is to chill the dough overnight. Give the dough 3 half turns, then bag and chill overnight. Waken up early the next morning, give the dough its last half turn and process from there. Bake off the croissants and serve straightaway for breakfast. You have just made yourself soooo popular with everyone in the house, forever!
- 4. What about the choice of laminating fat? Commercial croissants tend to be made with specialised and plasticised fats. This means the final product tends to be just a lot of air! Worse still if the fat is cheap, the melting point will be high, and the product will stick in the roof of the mouth [palate cling] These fats are not exactly renowned for their health-giving properties, either. So they are used on cost and performance grounds. As far as I am concerned croissants are made with all-butter. It is possible to buy a concentrated butter commercially. This is great, because all the water has been removed, so it means the butter block can be rolled out to a sheet, without it melting. Household dairy butter has a water content of 15-20%, so the problem with not working cold, is that the butter can easily start to melt, meaning the death of all the laminations you have worked so hard to achieve. So, performance-wise, butter is not the best, but for flavour, it obviously has no competition. I'm pretty sure concentrated butter is only available commercially; this is definitely the case for the UK and rest of the EU too.
- 5. Regarding lamination; due care and skill is the 3rd principle. I teach that croissant are given 4 half turns. Danish are often given only 3. Full puff paste employs equal laminating fat to flour used in the dough. This is usually given 6 half turns. The more turns, the more layers created. Above I state 4 turns gives 168 layers. Another 2 half turns works out as follows
168 x 3 = 504 504 x 3 = 1512. So many layers is incredibly difficult to achieve. Yet, to commercial bakers it is essential. The number of layers dictates the amount of "lift" in the product, giving greater volume to weight ratio! This affects product yield; well-aerated puff paste yield more products. Given these doughs use expensive ingredients, a baker cannot afford to miss out on achieving correct product yield.
- 6. In terms of volume and lift, it is important to explain how this works with yeasted doughs like these. When the product goes into the oven, the fat layers melt into the dough layers beneath, creating cavities between the dough layers. These cavities are filled with steam from the water content of both butter and dough. The steam exerts pressure on the dough layer above, causing the product to expand. See diagram below. So, it follows that the more layers, the greater the pastry will rise. So, what of the yeast? Well, the benefit is in terms of a first fermentation for sure, but it has to be achieved in cold conditions, as we have noted. This should mean the yeasts are far from worked through when the croissants are set to prove. Note the yeast level is relatively high. Any benefit has to be derived from rapid expansion as the croissants hit the hot oven. So, testing the dough for evidence that fermentation is slowing down is not a relevant test. We have no need for any sort of complex fermentation at this stage.

7. Lastly, oven treatment tends to be incredibly forgiving to croissants , so long as the oven is hot enough. Although, I think I'd be hedging my bets with items that were becoming tired and spent, in line with the notes just above. My practical classes last anywhere between 3 and 5 hours. 3 hours is really not very long to make these items with skill from start to finish; and the resting between turns really can be so crucial here. But I cannot think of a single class I have facilitated on this product where the students have been anything other than delighted by the tasks they have carried out, and the products they have made. It's the colour, and aroma; these items just look and smell great when they are baked. Fabulous!
See the photos attached below, and the link to the video below that.


Here's the video:
- ananda's Blog
- Log in or register to post comments
Thank you very much for a very detailed description of laminated doughs and the key points for a successful operation (which is no mean feat for a home baker if done well). I'd like to read through it and see if I understand it all.
MANY THANKS!
Shiao-Ping
Hi Shiao-Ping,
I've managed to lose this post twice in the uploading phase.
It's been re-written and re-formatted in between.
It's still not in the right place. Floyd's going to look later.
Well, I hope it is of use. I know it seems couched in commercial terms, but I think the same principles apply to the homebaker even more. Especially when you considered what passes for a croissant in the retail outlets these days. They are utterly woeful over here!!!
Best wishes
Andy
Thanks for taking the time to write this up. The video is great and I learned a few things. I think home bakers shy away from laminated dough because of the many steps and rolling of the dough. If you understand what it takes to get everything at the right temperature, things go much easier I think.
I'll have to read this again tomorrow when I can concentrate and give it a try. I must be about due for a good croissant.
Thanks again Andy for the great post.
Eric
Thanks for this informative post. My question is about the number of layers.
The first fold, with butter over 2/3 of the dough, should yield 5 layers (2 each where the butter covers the dough, plus the dough with no butter). Folded in thirds = 15. Folded in thirds again = 45. Final fold in thirds = 135.
Can't get to 168 unless I am misunderstanding something about the method.
Thanks, Sam
Number of layers refers to the butter Sam.
Thanks
Andy
Sorry, Sam, here goes for correct no. of layers; I'm 6 out!
incorporation gives 2 layers of butter, each fold is in multiples of 3; as follows.
For 4 half turns:
2 x 3 x 3 x3 x3 = 162
Then 2 more to give 6 and you get 162 x 3 x 3 = 1458.
I hope it makes sense to you now, and apologise for my error in the first place
Thanks
Andy
Hi Andy,
Thank you for the recipe and video. I usually make ham and cheese croissant and never make chocolate one before. I'm planning to try your recipe. I have one question about making chocolate croissant, what kind of chocolate is best to use for chocolate croissant, dark or milk chocolate? where can one buy the chocolate sticks like the one in the books? As a home baker, what is the alternative way to do, grade/cut the chocolate into small chunk spread on the dough and roll the dough?
siuflower
Hi Siuflower,
You should use a good quality plain chocolate.
We use it as small drops, or buttons. I understand this is a problem to the home baker, as these are not readily available.
When I first started make pain aux chocolats in a small bakery we used to buy small 50g bars of plain chocolate. The bars were 2 pieces wide, and very thinly cut; 2 pieces per item worked just perfectly. The bars in question were Bourneville. Given Cadburys have just been swallowed by Kraft you may be able to get this in the US now?
It's hard for me to advise if you live in the US, where to get small piece sized choclate from. I think this sort of chocolate is more widely available in France, and Continental Europe. Whatever, it has to be good quality.
Thanks
Andy
Hi Andy,
thank you for your detailed description. I'm getting ready to try this dough for the first time and I've looked at various recipes - they are all pretty different. I noticed that you use milk powder instead of milk. Is there a difference? Also, some say to let the dough double in bulk before refigerating, others - like you - don't but then refigerate the dough for up to 8 hours???? The other question I have is about the butter. All the other recipes for croissants speak about a butterblock, some incorporate flour, others just pound the butter into a block. Using thin slices of butter seems so much easier. Does it produce the same result?
Hope that's not too many questions. Thanks
Kirsten
Hi Kirsten,
you have asked some interesting questions, and I answer them as follows.
1. Milk or Milk Powder. No, it does not matter which you use. For ordinary doughs, using milk from the fridge would be a problem. However for croissant dough this is an advantage. The reason I like to use powder is that it makes it easy to alter the different formulae, and you can make personal choice regarding the richness of the product being made.
2. Allowed fermentation time. I very much concur with a long fermentation time. If you read the full post it does point out the numerous benefits of leaving the laminated dough overnight; not least that you gain huge brownie points with members of your family!!! You can easily do that the other way round by fermenting the dough for a time before incorporating the butter. HOWEVER, I do not agree with delayed refrigeration. By doing this you abide by key principle 2 above, resting the dough; but, what about your dough temperature, key principle 3? This is asking for trouble. The dough will be too warm to work with. Additionally, if fermentation is allowed to progress at an unchecked rate due to failure to control temperature, then the dough will be spent when you come to final proof: sorry, but the final product will be poor. This is what I was trying to draw attention to in key principle 6 above. I use fresh yeast, and the level is relatively high. This allows slow fermentation, and, therefore important dough rheology, but the dough will be active in final proof, not tired.
3. Butterblock. I don't really know what you mean here, I'm afraid. In the UK we buy our butter in 250g packs, which are indeed blocks. Commercially you can obtain EU Surplus butter in 1kg slabs. This has been concentrated to take out the water content; thus the butter is waxy and can be sheeted using a rolling pin, without it melting. I assume butter for the domestic market has a water content of 20%. This has big implications in terms of the fat melting as you attempt to incorporate it in the dough. You will have to experiment with your techniques. If you cut strips as shown in my video, you need to be careful how thick they are. Too thick and you end up with streaks of butter in the dough indicative of inadequate lamination. Too thin, and the butter will melt, and you will lose the layers, making rather nice brioche, but very poor croissant.
Hope this helps
Andy
I have tried to make laminated dough many times with great failure. Your instructions are great and have inspired me to give it another go. My question is can this dough be a sourdough? Or do you suggest sticking with a yeasted dough.
I know of three things that I did different in my failures. first being the monoslab of butter that was rolled between two sheete of wax paper. second being tempature of my dough and butter. one was too soft the other too hard...just made a mess. Third I think was rolling thickness.
Pain Amande is my dream.
Thanks again,
Faith
Hi Faith,
I am happy that this post has re-inspired you! I'll look at the points you have made and see if there are ways to prevent the same things happening again.
Flattening butter between 2 pieces of cling film, using a rolling pin, is actually quite a neat trick. Just make sure the butter is properly solid before trying to incorporate it into the dough. It tends to reach a melt stage quickly when flattening this way, so a period in the fridge may help prior to incorporation.
You seem to confuse temperature with consistency. Temperature should always be cold, see my note to Kirsten above. Dough should definitely not be soft, as you will quickly lose laminations. On the other hand if the dough is too tight, it becomes a ball-ache to roll out, and the dough will shrink back as fast as you roll it out. Butter is discussed above.
Yes, rolling thickness is important too. If you roll the dough too thinly, you lose the laminations; if the dough is too thick, then the butter does not distribute evenly in layers.
As regards sourdough, my main advice to Kirsten, above, and in Key Principle 6 of the initial post is that the yeast activity of the dough should be vigorous at the point you bake off the final product. To that end, you could use a portion of sourdough as flavouring agent if you like, but I would not recommend making these without yeast; this is plain wrong to me. I am a natural leaven and pre-ferment obsessive myself...however, a time and a place, and...a product for that matter. These are yeasted and made from a straight dough. The secret is to achieve an element of gentle fermentation at cold temperatures, with plenty of resting time for the enzymes to really get to work and make all that dough rheology happen. Personally, I think this makes the use of sourdough wholly inappropriate, and it is not a flavour I would be looking for either...why go to the bother of incorporating all that lovely butter??
Keep it simple, allow plenty time, work cold, keep to the formula and you're there
Best wishes
Andy
great infromation and I will do a yeasted version. Yes you nailed all my previous problems, that butter goes so soft so fast. I now have a large piece of solid surfice countertop that was removed for a sink hole. It will hold cold real well and I was thinking of using that to help keep my butter from going to fast. This piece is small enough to fit the fridge...this time of year it can go outside to cool.
Thanks Faith
... for taking the time to answer all those questions. It made some points much clearer - especially the importance of the yeast activity at the end. Here in the States it's much harder to buy fresh yeast so I substituted 15 grams of dryed yeast. Hope it yields the same results - it was just a guess on my part.
The butter block - it's what Faith was talking about in her post: Butter rolled out between wax paper instead of pieces of butter. I guess you're saying it doesn't make a difference as long as it is the right thickness.
I made my dough yesterday using your formula and have done three turns so far (each time I chilled it for an hour in between). The dough seems of a nice consistency and was fairly easy to roll out. I want to bake the croissants Sunday morning. My question is: can I leave it in the frigde until then and proceed like you suggest - doing the fourth turn in the morning or will the yeast be too tired? Also in another recipe I read that you can make your croissants the night before, put them in the fridge, take them out in the morning, proof for an hour at room temperature (is that even necessary?) and then bake. The advantage of course being that you can lie in bed a little longer ;-) What do you think about that?
Thanks again,
Kirsten
I think the instant yeast you use should be 1/3 the quantity of fresh.
yes to your comment on "butterblock"; great idea, maybe it might catch on over here??
I think one day in the fridge would be better; if I read your post correctly, you will have used 2 days up, yes? To that, I would say it depends how cold your fridge is? Commercially, chilled units tend to be reliably cold, whereas domestic refridgerators can struggle to hold products less than 10*C. You really need to be below 5 I would suggest, for the timescale you envisage.
Yes, it is possible to make the individual croissants and proof them overnight. I have a very large cautionary note to add to that. Commercially, there is a great chilling unit available, known as a "retarder". It holds finished product just above freezing point; say 0.5*C. Humiodity control is fantastic, so raw products do not form a skin on the surface. This is your major problem and one you have to be able to deal with. If you can find a way to proof your croissants very cold, and not have a skin form, then you will be fine. If not, you'll probably land up with the "d" word [disappointed], and it's not a great place to be if everything has gone well right to that point, and you see it all go pear-shaped right at the end. Just a cautionary note, this, ok?
Let me know how you get on; photos are always great to see.
a note to everyone: I've made Caraway Rye bread today and will put this up as my next blog topic.
Best wishes
Andy
Hi Andy,
I'm happy to report that everything worked out and that my croissants came out great - at least I and my family thought so. The crumbshot doesn't reveal layers but the croissants were still light and full of flavour. We also loved the pains aux amands. I spread the paste over the whole rectangle. Not sure this is the traditional way but it certainly tastes wonderfully.
Thanks for all the advice. I'll definetely make them again
Kirsten
Hey Kirsten, splendid effort those, well done.
I disagree; the lamination is abundantly clear on your croissants; I'm sure you all had a great breakfast! You can make the Pains Amandes as a single piece like you did, or, you can cut out individual strips and roll them up around the filling. It does not matter which method you choose.
Fancy a go at Caraway Rye now?
Best wishes
Andy
Those look great!!! Nice job. I hope to get to mine this week and give it another go.
Thank you, Amdy and Faith! We had the left over croissants this morning and they are pretty good justed heated up in the oven for a few minutes! Then I had to bake Hans-Joakims Schrotbrot to make myself feel better about eating so much butter. I highly recommend it if you like rye bread with lots of grains. http://www.thefreshloaf.com/node/15531/schrotbrot. (Sorry Andy, I'm just not a big fan of molasses, or caraway really). Soon it'll be time for hot-cross buns though and I'll give your recipe a try.
Good luck with the croissants, Faith!
Kirsten
Hi Kirsten,
How did the schrotbrot turn out? Any photos? I seen a few very positive comments about Hans Joakim's loaf on here; I should take a look and give it a go myself. I've done a similar soaked grain idea with Andrew Whitley when we were running the North European Baking courses. If you don't like caraway or molasses then my recipe above won't be much use. You could actually take out the flavourings and make a pretty good Polish-style Rye bread perhaps?
Anyway, just to let you know my recipe for Hot Cross buns is very soft. You have to use strong flour if you want to work at this hydration. Also, I cannot envisage mixing it by hand. It takes quite a lot of mixing to work up to a dough. Hope this helps
Best wishes
Andy
Hi Andy,
the Schrotbrot is lovely - especially wirh butter and honey. I don't have a good loaf pan for it, so I always end up with two slightly small loaves instead of one big one.
Thanks for the bun warning. I used a recipe from "The Bread Book" by Linda Collister before which I liked. She only uses half the yeast and butter. No shortening in her flour paste. It'll be interesting to see the difference. By the way - do you have a good recipe for Chelsea Buns? Hers didn't taste like the ones I remember from when I lived in the UK.
Best wishes
Kirsten
Hi Kirsten,
Recipe for Chelsea Buns below. It's ok. In fact it's lovely and tasty, but the dough tends to be quite soft. It may be as simple as knocking back on the hydration: 56% water + 10% egg, when there is such high levels of fat and sugar looks like the root of the problem. The other thing putting me off is that this recipe uses shortening: butter would be som much nicer, methinks!!! So it eats lovely, but there is a tendency to loose the classic layered swirl. I have a couple of references you could look up which I would say are worth chasing: Elizabeth David's English Bread and Yeast Cookery pp482 - 484. I have used Peter Reinhart's recipe for Sticky Buns/Cinnamon Buns?? from Bread Baker's Apprentice - sorry no exact reference as my copy is in college, and I'm on holiday. Yippee!
CHELSEA BUNS
For the dough
MATERIAL
% OF FLOUR
GRAMMES
Strong White Bread Flour
100
1000
Sugar
20.3
203
Salt
1.6
16
Shortening
17.2
172
Egg
10.3
103
Milk Powder
4
40
Water
56
560
Yeast
6
60
TOTAL
215.4
2154
Oven: 200°C for 15 minutes
Method:
Decant onto wires, dredge with brown sugar and leave to cool. Or, glaze with stock syrup, or, pipe on lines of fondant icing.
I think the Schrotbrot looks fantastic; I agree with you totally about the tin. We made thousands of Rye breads every week at Village Bakery, and consistently bemoaned being unable to source tins which were tall and narrow to do justice to these amazing breads. So sweet, is my guess.
Final word; enriched doughs like croissant and hot cross buns and chelsea buns really don't like yeast: high sugar, fat, spice, dried fruit, egg all conspire to stop yeast fermentation. So all the "right-on" advice about not using high levels of yeast in bread is fundamentally WRONG for these types of products. Hence you will see my Hot Cross Bun recipe uses a ferment; this is solely to ensure vigorous yeast activity in the face of adversity!
Hope the ideas above will work for you; best wishes
Andy
Hi Andy,
thanks for your quick response - writing up a recipe and coming up with references all during your holiday. Shouldn't you take a break from bread?
I just ordered the E. David book from the library. I have read but not tried Reinhart's sticky bun recipe. Maybe I should. I will let you know how my Chelsea bun endeavour will turn out. Thanks also for the final note about yeast - that was very enlightening. Too bad I can't come to your classes ;-)
Enjoy your time off
Kirsten
It's one of the recipes I hold on our Virtual Learning Environment for students, known as "Blackboard", Kirsten.
So it didn't take me long to do the post.
Anyway, I'm definitely off from today; we're going north to celebrate, as I'm 45 today!
I hope you enjoy the Elizabeth David book; it is a true classic, though not just as a recipe book. She was a great writer; maybe Nigel Slater is reaching for similarly dizzy heights? I was given his book on vegetables for Christmas, and am loving tucking into that.
Best wishes
Andy
Happy Birthday Andy, All the best to you on your special day!
Faith
Thanks Faith,
Great to hear from you; we went North to Western Scotland; cold, snowy and sunny too!
Have you made the laminated pastries yet?
Best wishes
Andy
Happy Birthday from me too! I hope you have a great day in the North (north of Northhumberland is seriously north!!!)
I love Nigel Slater too. I've got several of his cookbooks.
All the best to you,
Kirsten
Hi Kirsten,
Well we went to Oban in West of Scotland; that is in the North; sunny and snowy too.
Best wishes
Andy
Hi Andy, thanks for your clear explanation. Since I've been following your instuctions I haven't lost butter along the way anymore ;)
I have a question for you: what would happen if instead of folding the dough in 3 I rolled it along the shortest side? Woudln't this yield even more layers?
Hi Daisy_A and nicodvb,
For the croissant template, make a triangle 12cm across the shorter top edge. The other 2 sides should be 16cm. Heavy duty card is adequate, but it's best made out of cheap wood such as mdf offcut.
I took the measurements from our cutter in College yesterday. To me the croissants made using this cutter are always too small, so you may want to make a bigger template. I teach my students to compensate for small size by rolling the dough out slightly thicker than I would normally recommend. So long as the triangular pieces are covered and given sufficient rest, they should still stretch and tease out to enable a well-constructed final shape.
Nico, I'm sorry, I don't really understand what you mean. If you can clarify this, I will come back to you.
Sorry for the delay; I've been snowed under dealing with External Verifier for baking courses [given very good feedback on this], and marking a tonne of HE assignments. Also keeping my head down avoiding the fallout from other posts here!
All good wishes
Andy
Hi Andy, sorry: I didn't realize that you answered (sometimes TLF's notifications get lost).
What I meant to say is that I was thinking something like this: if folding the dough onto itself as you described creates 168 layers, won't i get even more layers rolling the dough on itself, rather than folding it? Just like when you form the croissants in the final step.
If I understand the theory correctly rolling should be equivalent to folding in many smaller pieces.
Does it make sense?
Hi Nico,
So, 162 layers x 2 = 324 layers...is this where you are coming from?
There is much discussionabout how many "turns" to give all laminated dough products.
For instance, Andrew Whitley thinks croissants should only have 2 half turns!!!
Given that he is teaching in a "home" environment ,with students working deliberately by hand, using ordinary dairy butter [organic, yes], I think I understand that.
You are quite right here: the theory is the more layers, the greater the lift. Aeration is caused by pressure from steam causing each layer to rise. So, the more layers, the more lift. When we get to full puff paste, unleavened, I advocate 6 half turns, which is 1458 layers!!
But croissants have a lot less fat, and they have yeast. To me the recipe is designed so that 4 half turns works best.
Do you know what really matters in the end? Just how good is your technique?? If you think in terms of the full puff...1458 different layers in a piece of dough about half a centimetre thick! Creating this takes a lot of skill
All good wishes
Andy
unfortunately ;-(
So croissants need less lamination than ordinary puff paste because it's leavened. It makes perfectly sense!
Hi Nico,
Yeast is to confer furhter lightness yes; but the real key is the reduced fat content. The more fat, the more care needed for lamination, and the greater number of layers to achieve that distribution, and to increase the level of aeration...Yes?
Best wishes
Andy
Hi Daisy_A,
If the butter makes up 41.7 of the total 217 in the formula [flour = 100]
It follows that the fat makes up 19.2% of the formula.
So...the croissants are 80.8% fat free!!!!!
BTW, they are not sweetened either, so why not just think of them as part of your savoury repertoire.
Good to hear of your success; keeping to the key principles does make them fun to make, not a burden.
Best wishes
Andy
Hi Daisy_A,
The chiller cabinets in my bakery kitchen are not retarders, as such. But they do run good and cold, and are not stretched, in terms of over capacity!... Basically each student could expect to have their own dedicated unit just for a 1.7kg billet of dough and 400+g of butter. They run about 3*C max.
You have the right idea. Work as cold as you can, BUT, don't allow the dough to freeze. Additionally, the butter needs to be cold enough to avoid any melt issues, but soft enough to avoid any overly large pieces which will result in yellow patches in the final laminated piece!
Any help?
Best wishes
Andy
Hi Andy,
This a very good tutorial on lamination. I wanted to
read it before making some puff pastry earlier this
week so as to refresh my memory on the technique.
It's been years since I made any and wanted to know
if there's been any new innovations I wasn't aware of
and confirm that I still remembered the process.
Although your article concerns croissant dough the
technique is the same for puff (other than the folds) and that's what I
wanted to relearn. From the looks of it I think I should
be OK, but I'll see how well I did once I bake some
off. The formula I use is based on Healy & Bugat's
recipe for feuilltage in 'Mastering the Art of French
Pastry' . If I get the lift I'm hoping for my intention is
to use it for some classic French fruit tartes as well as
some savoury items.
If I don't get the lift I suppose I'll have a lot of really good pie dough. Thanks for the refresher course!
All the best,
Franko
Hi Franko,
Glad you found the post and that it was of use to you. TFL is so busy now with site traffic that posts quickly go by, often without being noticed now. I posted just last night, and that seems to be off the map already, and it's only just over 12 hours since!
Anyway, are you making "full" puff pastry wher the fat is equal to the flour?
If you do, then I recommend using the French method shown in the video as the best means to incorporate the butter. Your paste will then need to be given a sequence of 6 half turns in order to incorporate the high level of fat properly and give more layers for extra lift. I take it you are making an unyeasted dough?
Best wishes
Andy
Hi Andy,
No kidding about TFL being busy! I wonder if it's because folks are on vacation and have extra time to spare. Whatever the cause it makes for a very dynamic and interesting site.
In answer to whether I'm making a full puff: yes it's a full puff using only butter that has 8% flour worked into it. It is not a yeasted dough. I've made yeasted tart doughs in the past but a true puff to me uses lamination as the sole leavener or it's something else. I've always used the English method since I find it easier to keep the edges aligned squarely. Maybe next batch I'll try the French method but this dough has been made already. When I began the roll-in the dough was at 42*F and the butter/flour block was at 60F . This seemed to work well , but I had to work quickly because of the room temp. My one concern is that it will need at least another fold from the info you sent. It presently has 972 layers..if I remember correctly and I'm not sure that's enough. Here's the tricky part, I cut the pad up into pieces about 1-2 lbs and froze them. I guess I could thaw a piece the day before I want to use it and give it another turn . What do you think?
Thanks for your time Andy, it's much appreciated.
all the best,
Franko
That would work fine Franko.
Agreed, puff paste does not use yeast.
To me French method allows you to get the butter to the edges of the dough better than the English. Better coverage being essential when you have so much fat.
Not sure what you mean with the layering no. 6 turns gives 1458 layers of butter; see above in the thread
BW
Andy
Sorry I wasn't clear re: the layering # . I made my puff pastry before reading your article on it. I put 4 x half fold (or what I call a 3 fold) and 1x 4 fold total on the dough.
ATB,
Franko
Hi Andy,
Well I finally managed to get around to test baking a few pastries with the puff paste I made over the last weekend. I did give it another 3 fold and rest before actually using it. There was an issue with trying to get the heat and time right for the pan that I was using, but I think an investment in a good heavy sheet pan should help solve that.The first item I made was a Chausson aux pomme/apple turnover. I pulled it out of the oven a little early as it was colouring a bit much and I still had to give it 30 second glaze under the broiler with confectioners sugar. Unfortunately it wasn't fully baked. I had a bit more dough left from the piece I was using so I made 3 smaller versions of the same item. These turned out much better and were properly baked. There's just no substitute for the flavour of a full puff pastry! The dough was very flaky, shattering when I bit into it . I think it has pretty good lift for an all butter paste. What it may lack in lift compared to a paste made with a commercial roll-in shortening, it more than makes up for in flavour. Another few days and we should have enough raspberries off our cane for an 8-9 inch tart.
All the best, and thanks for your advice,
Franko
Franko these look delightful.
I meant to ask you whether, commercially, you have access to concentrated butter?
We can buy what is known as "Intervention Butter" in the EU, for manufacturing purposes only, to a maximum of, I think? 30 tonnes per annum?? The butter is great as it comes in 1kg slabs, approx 1 1/2 cm thick. This can be sheeted directly through the pastry brake, as it is really quite waxy: water content is <0.5%!
It's a bit of a garish yellow colour, but really can't be beaten..for either performance or flavour.
Best wishes
Andy
Hi Andy,
is it the butter deprived of all water and caseine? (we call it "clarified butter"). I did it at home several times :-)
Thanks Andy
Intervention butter is a new one on me. While it may be available, I've never heard of it till now. Most commercial puff in Canada is made with what's called SPS or special pastry shortening. It's a 100% fat made from approx. 35% oleo stearine and 65% cottonseed oil. I'm sure you have something like it in Britain. I understand it was developed for the baking industry during the war because of rationing. I think the stuff is ghastly and refuse to eat anything made with it, but it's cheap and does a good job as far giving lift. Intervention butter sounds like a much better alternative to SPS. Unfortunately in our shop we don't make any puff, or pastries of any kind for that matter , it all bakeoff product that comes in frozen. When I started with the supermarket chain I've worked for for over 20 years we did almost everything from scratch. Over the years that's become less and less, primarily in an effort to keep labour costs down. Too bad really, as it's a lot more fun when you've got a large variety of stations to work at.
All the best,
Franko
Hi Nico,
The process to remove the water is not heat treatment, like clarified butter...yes that is also the phrase used in UK.
I don't know how the fat and water are separated, but I think it's done chemically.
Best wishes
Andy
Hi Franko,
Very useful post on speciality fats. Highly plasticised fats with a high melt point is what has bee adopted for puff paste industrially. Total gack, as you say; but the lift is obviously phenomenal.
I've got mixed views about all the speciality fats now produced. From a health point of view, many of them are hard white fats, previously hydrogenated, almost certainly too high in saturated fat content. So, not the healthiest, although they are function specific, which can be a great advantage.
But, of more personal benefit, is that these fats are vegetable-based. I've not eaten meat, or, animal fats for over 25 years, although that does not extend to dairy, or to fish. Not sure I'd be that inspired by having to use fish-based oils mind!!
For flavour: got to be butter everytime, I'm with you on that
Andy
Hi, Andy
I am sorry, Andy. R.cubebaker is my son's. I forgot to log out my son's before I post it to you. I am very sorry that I messed up your great blog
Thank you for sharing your wonderful croissant-fomula and method.
I actually tried your croissant before, the butter merged in the dough. but they were very tasty.
I tried your croissants again, yesterday, it turned out well. They are still imperfect, but I will continute to practice. I used cheap butter, the crust was not as much crispy as the one I used French style butter.
I usually use this.
I also decreased the amount of water down to 53%, and I added 10% sugar as to 100 % KA bread flour, too. I heard that your flour is kind of special. It may be the flour absorb more water and sweeter than KA bread flour, I wonder.
I put the dough which is finished 3rd fold, and rolled to make a rectangle shape a little bit in a freezer for a couple hours. then I tried to roll it until I could cut the triangle shapes. It was little difficult. I warmed the chilled dough with my hands to make a rectangle shape before cutting it into a triangle shape.
The taste is great. Next time, I will use Plugra butter.
Thank you again, Andy!
Akiko
Never mind about the posting error Akiko
The lamination in your croissants is superb.
Best wishes
Andy
Thank you for your thoughful words, Andy.
Your recipe is great!
Thank you,again
Akiko
Hey Andy!
What a wealth of information. I've scribbled 10 pages or so in my big black baking book.
With so many tips and pointers under my belt, all I have to do now..is make it work!
Thanks again for sharing this.
Freerk
Hi Andy,
Wow! What a goldmine of info on croissants - my favourite subject and pastry. I know this post was commenced in 2010 but stumbling accross it, I still have some questions in 2012.
1. Why does the recipe use milk powder instead of liquid milk? Is this an economic factor? And what would the effect be on the water/liquid content be if real milk was used? If using real milk in place of powdered, what would the volume be? Is there a difference between skimmed / 2% fat / full cream milk in the recipe?
2. When I roll out and trim my dough for croissants, snails/escargots and pain au chocolat, there are the trimmed pieces left over. Accepting that the ingredients for croissants are costly, can one re-cycle this left over dough? Piece it together and re-roll to stretch the production yield? Or will this compromise the laminating integrity and strength considering that it's bits 'n pieces stitched together?
I have inserted a pic of my croissant. I am trying to develop and achieve the "honeycomb" appearance of the crumb and although it's slightly evident near the centre I just don't seem to get it right! Is this a technique fault or maybe the flour we use here in Johannesburg South Africa? I am happy with the crust (very flaky) and the layers (happily I have a dough sheeter) but the interior still confounds.
Please help!!
Paul
Hi Paul,
Thank you for writing such generous comments.
Regarding milk powder I use it in place of milk for several reasons. These include:
http://www.thefreshloaf.com/node/12076/why-milk-powder-milk-bread-and-not-just-milk
I don't work in volumetric measuring at all; everything is weighed in grams/kilos; no exceptions. See comment above about why powder benfits here; you can choose your own level of enrichment and still keep the liquid content as constant.
Trimmings: So long as you keep them in good order, they can be added back into the next billet of croissant dough in the laminating process. Adding scrap back at 5-10% would be acceptable; exceeding this would impair the dough. At home, when using smaller quantities, I tend to put scrap pieces together and roll out into a rectangle which allows me to make a few Palmiers as little fancies to give to dinner guests, or put out as tasters at the Market stall.
There is no photo in your post, unfortunately, so I can't really comment on your last question. What I would say is to make sure you follow basic principles carefully. Use a formula you trust [mine above is well tried and tested, and I rarely deviate from it], use a good quality flour...not too strong and not excessively developed, but a soft flour is not appropriate at all. Work cold; rest between turns; construct your lamination with great care. If you do all that and then take care with constructing the products, and you should be home and dry. What oven do you bake in? Croissants bake well in convection ovens, but, as ever, I so much prefer deck ovens.
Best wishes to you
Andy
Great enlightenment.
Can you see this pic of the croissant now?? I am simply copy and pasting. Is this not the correct process for inserting pics?
My flour is a 60:40 mix of cake:bread. (Both flours -Eureka- are cold stone ground unbleached non additive flours.) The cake flour protein content is 11.02% and the bread flour content 11.22%. The unsalted butter has a fat content of 88%.
Here is the crumb structure pic:
I bake with a twin-fan convection oven (Piros ex Italy.)
Thanks again for all your guidance.
PaulZ
Not quite sure why the pic is not displaying?? Not simply C & Paste?
Hi Paul,
If you look in the FAQ section using the tab at the top of your TFL homepage, Floyd has posted instructions how to load photos. I use flickr as a host for my photos and then paste the flickr link in using html.
I now know where your problem is. Using cake flour is not a good idea at all. Ok, so the protein level maybe acceptable. However, the fine grind means that there is an excess of starch damage in the flour. This means that, once hydrated, the enzyme reactions converted starch to sugar [amylase] will kick in straightaway. This accounts for poor dough structure, which is why you are disappointed with the interior of your finished products. You should use all bread flour; problem solved.
All good wishes
Andy
Hi Andy!!!
Gee whizz! I just love this site and the brains that tap into it!
Thanks for the info re: the bread flour vs the cake flour. My only concern is that when I tried 100% bread flour, the rise wasn't all that good. Less rise than using 100% cake flour. However, you are advising 4 half turns and this may also solve some of the problem. (I currently roll it out 3 times to 6mm after each half turns, store in the freezer for 30 -40min between turns (as per Ciril Hitz method) and then roll out again to a 4mm working thickness ready for cutting and eventual shaping - into croissants, pain au chocolat etc.)
Thanks for all the guidance.
Here's the uploaded pic, eventually!
Bit late to the party, but thanks for the informative post, Andy. It's really helped clear up some lingering cob webs around lamination.
I have a question - if commercial croissant butter has less water than retail butter, would it make sense to add more lamination butter and less water to the dough to try and achieve a similar outcome?
What say you? Cheers.
Hi grind,
Thank you for your kind comments.
Yes, you could increase the fat level if you like. Fat level in croissant paste is generally accepted as being between 30 and 45%. If you go over 50%, then you may need for than 4 half turns to incorporate the fat effectively. There are bakers who use higher fat levels: Michel Roux Snr. for one, and I believe Julia Childs is another. But I stick within the percentages above, as I'm minded to think that more than 4 half turns is moving out of croissant territory and into puff pastes.
The water content is what you need to mix the dough. The flour I use, on a straight dough basis needs 63%. You may be able to reduce this to 60-61%, but it really depends on your choice of flour more than anything. I always use UK Strong flour [Organic, or non-Organic] for croissants.
Best wishes
Andy
Ok, I see what you mean about more butter = more turns. I've been using softer flour so the hydration is lower. A fine balance, indeed. The wiggle room is shrinking! Thanks again.
Hi Andy!
Great post you've got here. I've got a burning question. Generally speaking I think I have managed to get the techniques right (see my picture) but my croissants are never as light as I'd like them to be. I have eaten croissants sold in good cafes in the UK and also in Paris and what I love the most is actually the really light and crisp texture of those croissants. In short I am wondering if the protein content of the flour that I use would make a difference? I have always used all purpose/plain flour from Sainsbury's (student on a budget here) but I am considering switching to strong white flour. Also I'm not sure if I should develop the gluten more by extra kneading or incorporate bulk fermentation of the detrempe. I am always wary of over-developing the gluten because it'd make rolling out later impossible and the prospects of torn layers really doesn't appeal to me.
Anyway here is the picture of my last batch:
And here is the simplified recipe (By Hamelman)
A) Detrempe:12 g dried/instant yeast140ml cold whole milk140ml cold water42g melted unsalted butter, cooled to room temperature504g plain/ all purpose flour12g salt80g caster sugarB) Butter block - 280gI noticed that your recipe uses strong white flour. Any chance you could tell me the protein content of the flour stated in the recipe?Cheers and hope to hear from you soon!Kong
Hi Kong,
Thank you for your very kind words. I should also add that your own croissants look fantastic.
If you buy flour from Sainsburys, you should be able to find the Carrs Breadmaker flour on their shelves. This is the nearest home scale equivalent to the Special CC which I used at the time I wrote the post. Protein level is 11.7%; quality is high. I believe you would need to increase the hydration in your dough a little if you switched to a stronger flour. Secret is that the dough will continue to develop as you laminate....hence why you need plenty of cold rest between turns. But I think you have already figured this out. The photo of yours suggests beautiful attention to the fermentation details too.
All good wishes
Andy
Hi Ananda!
What do you mean by "a deck oven should be set at 7 for top heat, and 5 for bottom."
I use a gas deckoven & can set the temperatures (centigrade)i for for the top & bottom.
I'm from India & I'm really struggling at making croissants. Our ambient temperatures are way higher than the ideal 18-20°c & then there is the problem of of the ideal Butter. Here we can procure 80% fat only. However I shall persevere.
Thanks in advance.,.
Paresh
Hi Paresh,
I've no experience of using gas deck ovens, sorry. The electric deck ovens in the UK from Tom Chandley control the heat sources top and bottom using a range of 1 - 10 on each dial. The overall temperature of the deck is set with a separate dial.
Butter of 80% fat will work fine, so long as you can plasticise it cool enough to stop it melting.
Try chilling both your water and flour overnight in the fridge before you make the dough to keep it as cool as possible.
Best wishes
Andy
Hi Ananda,
Thank you for the prompt reply.
As for the temperatures, I preheat the oven @ 240c top, 200c bottom. I reduce to 220c top & 180c bottom after 5 minutes. total bake time 20 minutes. I get a fine golden brown colour.
The room temperatures here are 30-32C. Even after putting on the air conditioner the temperature doesn't go below 27C. This is probably due to the large room size. For the time being I shall have to learn to live with this.
Let me describe the process I use.
Day 1. The dough is made in the evening with ice cold water with some time in the refrigerator during the dough development stage. Then it is stored overnight in the fridge.
Day 2. Morning. 7 inch/18cm butter block is made between two parchment paper sheets. Then refrigerated. Then the dough is shaped/rolled out to a 10 inch/25.5 cm square. The butter block is place on the dough after it has warmed up so that it can bend without breaking. Then it is rolled to about 60 cm & 3-folded. This is the place I have problems. While rolling the butter shatters( I can see & feel this through the dough). Can you suggest something? I'm always worried about softening the butter as I believe it then incorporate into the dough. this has happened very often during my earlier trials. after the first fold the dough is placed in the refrigerator for about 30 minutes.
Hi paresh,
Yes, I've had this problem when the weather has been very warm.
It can be very difficult to produce a sheet of butter which is sufficiently plasticised without it softening and starting to melt.
If you can find a way to do this, you will succeed. But I'm not sure I can suggest anything else; it's about your own room conditions and finding a way to work with them.
Sorry i can't help you any more than that
Best wishes
Andy
Hi Paresh,
Try to work on the counter that cold on the surface such as cabinet chiller. After you work out the dough, you can easily put the dough on the chiller underneath.
Hi Andy,
Sorry to say bluntly but the photos of that chef and the final products look like bread croissant. They loose the flakey crust which actually the most croissant characters.