Sending this to Yeastspotting.

I have been wanting to make a tomato flavored bread for a while now, after quite a few attempts, I found
* The bread needs to have a very strong tomato flavor, otherwise it tastes oddly sour, sort of like spoiled food(at least to me). In order to get that intense tomato flavor, all of the liquid in this formula is tomato juice, AND I added some tomato pastes.
* WW flavor complements tomato very well, add depth to the sour/sweet note
* WW also makes the red color deeper, rather than light pink, which I love on my dresses, but not my breads
* With that much acidic tomato juice/paste in the dough, it's not a good candidate for sourdough. I have tried a few times, the dough ends up falling apart a little at the end of proofing, unable to rise very tall in the oven - small sourdough rolls would still be OK, but sourdough tomato sandwich loaves would be short and small. I finally gave up and make this loaf using dry yeast.
* Cheese/basil/garlic are classic matches to tomato for a reason - they are super delicious.
100% WW Tomato Basile Cheese Bread
Note: makes a 650g bread, using a 8.5X4.5 loaf tin
ww flour, 450g
instant yeast, 5g
brown sugar, 45g
salt, 7g
tomato juice, 284g
tomato, paste, 28g
olive oil, 45g
- filling
parmesan cheese, 30g, grated
basil pesto sauce
1. Mix flour, sugar, tomato juice, tomato paste, olive oil, autolyse for 20-60min. Add salt and yeast, knead until passing windowpane.This intensive kneading is the key to a soft crumb, and proper volume. The windowpane will be thin and speckled with grains, but NOT as strong as one would get form a white flour dough. For more info on intensive kneading, see here.
2. Bulk rise until double, about 90min @ 75F. S&F, slap to get rid of air, round and rise again until double, about 45min.
3. Round, rest for 15min. Roll out to 9X16inch, spread pesto sauce, then cheese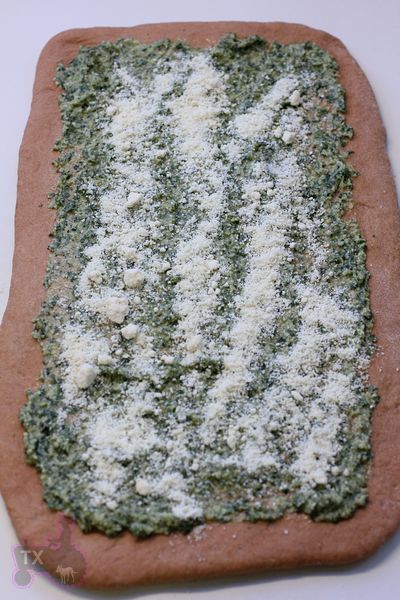
4. Roll up from the short side (i.e. roll along the long side), seal well. Cut along center, turn to let cut surface facing up, braid and put into oiled tin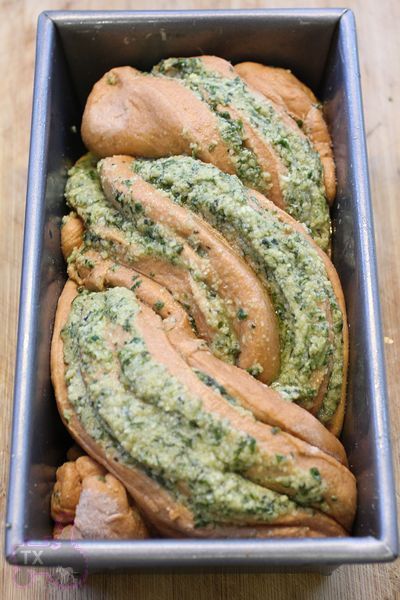
5.Proof for 45-60min, until about 1 inche above the rim 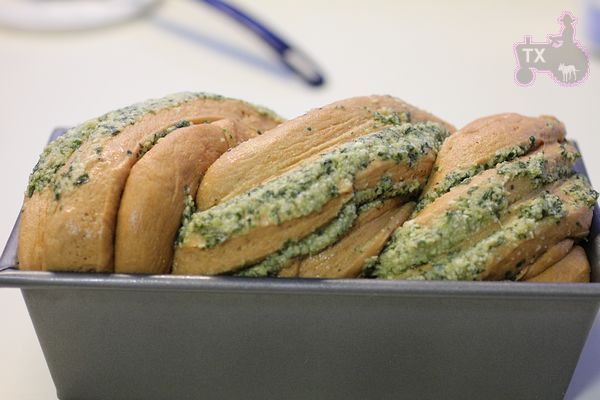
6. Bake at 350F for 35-40min, after 15min, start checking, cover with tin foil if the cheese starts to burn and the top brown too quickly.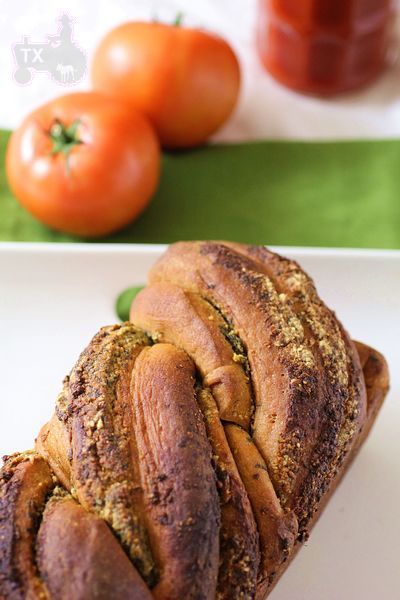
WW goes well with the classic tomato/pesto flavor combo, cheese just push it over the edge
I actually don't like to drink tomato juice directly, and it's a good way to use up the two big cans of tomato juice my mother unloaded to me. I made the pesto sauce as well, with fresh basil, pine nuts, olive oil, (lots of)garlic.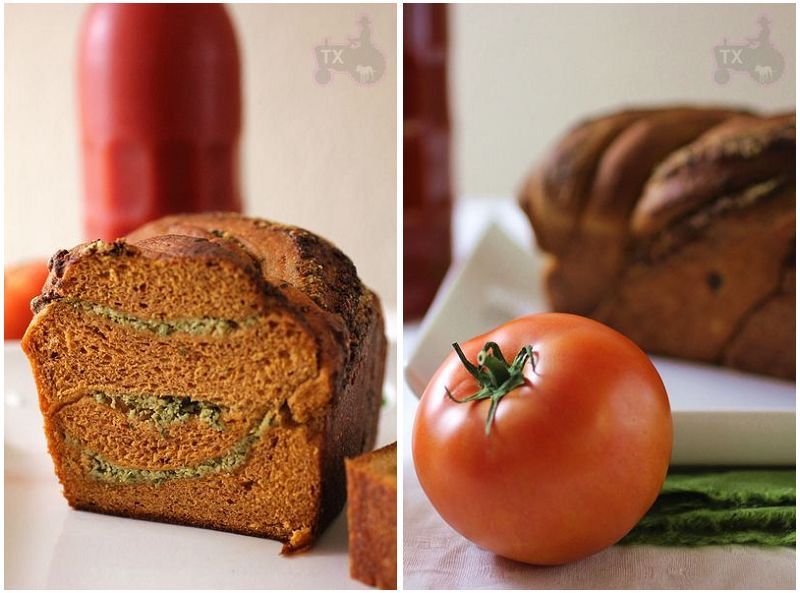
- txfarmer's Blog
- Log in or register to post comments
The crumb of the loaf is marvelous TxFarmer, truly a very beautiful loaf of bread you have crafted. I could see this going well with say, roasted chicken breast?
Exquisite work as always :)
Thanks arlo, it does make a great pairing with meat.
As always, excellently done… and a pleasure to read ;-)
Ron
Thanks Ron, haven't seen you around for a while.
I've become a lurker, but I try to keep up to date, even when hurricanes leave a foot of water in the basement, power surges damage PCs and telephones... :(
Ron
Replace the pesto with some olives, chunks of cheese and salami, and I'll bet you'd have a damned fine pizza loaf.
Thanks for sharing.
You are right, there are a lot of fillings would go well with this dough.
Oh, well done, txfarmer! It's really beautiful looking loaf. That combinations must've been the winner! It's a great thing your dislike of tomato juice actually helped creating this. A typical triumphant story of turning negative into positive. :)
One of my Japanese book on sourdough bread has a whole section dedicated to tomato-based dough. In her basic recipes, tinned tomatoes are the only liquid (except for small amount of olive oil) at about hydration of 68-75% bakers percentage. Her starter is about 50% hydration and she uses 50% of main dough flour. Admittedly most of the breads in that sections are focaccia, small rolls or breadstick-types, but there's one recipe for large loaf, looks a bit like coiled challah. (with lots of chopped olives in it.....just sayin'! :p)
lumos
Braided loaves don't require as much gluten as a sandwich loaf though. I have used the same dough for a braided loaf with good results, but not a tall sandwich loaf.
Very interesting bread txsfarmer. The crumb doesn't appear to be as open and light as your other pan loaves. I wonder if that has anything to do with the excess of acid from the tomato perhaps affecting the gluten negatively. However, that is a great flavour combination and beautifully presented.
Best,
Syd
Yes, the acidity does lower the gluten, so this bread is not as tall and fluffy as other sandwich breads, instead, it's moist and soft. Another reason is that it's 100% ww.
I like the shaping method you used for the tin, Txfarmer. Bet it's a tasty loaf. It reminds me of the Italian Tomato Breads we used to make at Village Bakery by the several hundred at a time!
Here's something to think about for those wondering about the possibility of doing this sort of bread with a natural leaven. Firstly, yes, the acid does have an affect on yeast activity, and it breaks down the dough structure too; hence lower volume as noted.
The VB tomato bread was flavoured with olive oil, onion, tomato paste, cumin, chilli and oregano, if I remember correctly. It was made using a white dough as pate fermentee, in quite significant proportion in the final dough. A bulky dough just over full proof levels was ideal. Ordinarily we would anticipate an 8 hour dough, held in the chiller after one hour ambient maximum. The yeast level in the final dough was quite generous, although Andrew Whitley tends to err on the cautious side when adding yeast to a dough.
We used to scale the dough at around 400g each and make batches of just short of 150 loaves. Each piece was stretched to a triangle shape and smeared with a mixture of tomato paste and chopped, re-constituted Sun-dried tomatoes. Then the triangle was stretched and rolled up like a croissant, to create a swirl of mix through the dough. We used other methods along the way, but that was the method that came to be adopted finally. The finished dough pieces were panned into small tins in straps of 16. Each strap fitted into a bread rack which held 10 frames nicely. However, we tended to avoid the bottom row, as the draughts at floor level held proof back too significantly.
One night when there were just 2 bakers on shift, Pino and myself, we found we had to make a double batch of Italian Tomato breads...288 of them. From pushing the button on the mixer to sealling up the rack covers on the panned loaves, that is about 1 hour's work.
Just as I slid the last strap into its place in the rack, Pino, who had mixed the dough, noticed a block of yeast sitting next to the empty bowls containing the original materials used to mix the dough!! We had managed to get all this way before realising we had forgotten the yeast in the dough!
What to do? Firstly we reached for a second thick plastic cover for each rack, then sealed them tightly as possible with the velcro straps. Next we wheeled each rack up as close as possible to the ovens, still being fired ready to bake off what we had recently prepared.
After 2 hours we opened up the rack covers and checked on progress. We had a process we called "topping and tailing", which involved moving the more proved loaves high in the rack to the bottom, and swapping them with the loaves lower down moving higher up. The frame in the middle of the rack stayed where it was. We re-sealed the rack covers tightly and left them in front of the oven a further 2 hours. Then we baked them off. With much care and tlc we produced loaves of the normal volume and quality.
Of course, instead of leaving production at 04:00, I ended up staying back about 4 hours to save the order. I explained to Andrew Whitley what we had managed to do, and then had to put an immediate qualifier onto my explanation. I could see he was mulling over the idea of omitting yeast altogether from the speciality loaves we made with the white dough [Wild Mushroom and Garlic, Greek Olive, Italian Tomato]. Fortunately he never did pursue that idea!
Best wishes
Andy
What an interesting story, nice save!
look of the loaf! Yum! This would be a candidate for cheese fondue!
Great Idea, when it finally cools down here in Tx, I just might...