I visited "De Zandhaas", a working grain mill close to Amsterdam. Together with two fellow bread enthusiasts we had a one on one with the miller. He gave us loads of really useful info on the local, regional, national and European ins and outs on grain.
For some time already I suspected that my shaping problems originate right at the start; it's the flour we have acces to here. And the miller made it a fact! Our local grains aren't nearly as strong as the Northern American varieties. We also learned that American grain is hard to come by around here nowadays, so no need to go hunting for it. The differences are so big that all formulas that originate in the U.S.A need serious tweeking over here. My friend joked that "now we finally know that our water hasn't more water in it after all" It certainly seemed that way every now and than with some formulas (especially this Filone that started this thread)
Loaded with information and of course the freshest of flours imaginable (the miller gave us some wheat germ to taste that was amazing) I returned home inspired. Whether it was a stroke of luck or a moment of genuine learning remains ro be seen, but I think I shaped, slashed my first more than average batard!
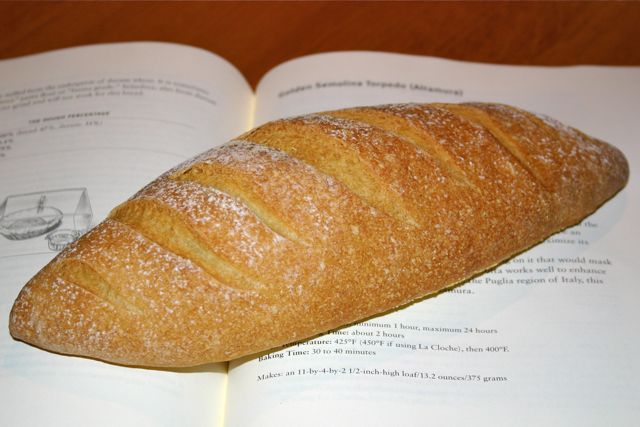
Meet my Golden Semolina Torpedo from the Bread Bible.
Thank you all for helping me get better. Sunday I'll post a wonderful recipe for a very local Frisian Sugar Bread that I think hasn't been posted yet here on The Fresh Loaf. Check it out!
X Freerk
---------------------------------------------------------------------------------------------------------------------------------------------------------------------------------------------------------------------------------
original post:
My latest Filone came out fine, but shape-wise it is just not what I'm looking for.

The mistake is consistent though; each time the loaf has a wonderful open crumb on the ends but gets denser in the middle part, and ends up looking more like a barbell than the nice sleek torpedo I'm looking for :-/
So; I 'destroy' the air pockets in the middle part of the dough during shaping, and leave the holes on the two ends intact, I guess.
After trying just about every possible way there is in shaping the filone, after watching numerous videos and studying breadbook pictures, none of them seem to be working for me, yet...
I know that shaping is a 'hands on' type of affair. My question to all you master shapers out there is; which shaping method would you suggest me to commit to? My guess, after fooling around with them all, is that choosing and practicing one method is my best chance to get it right fast.
I am more and more gearing towards the wetter doughs :-) Which of the methods of shaping would be the most logic for higher hydration doughs?
Am I too sissy in "punching down" before shaping? I tend to handle the dough as carefully as I can manage. I expect to see some irregularity in the baked loaf, but mine just goes haywire on me during oven spring! The more evenly the holes are distributed in the dough, the cleaner looking the loaf comes out, right? Am I too careful?
Maintaining surface tension is also proving to be a challenge with wetter doughs. Any practical tips?
I have been tweaking the Glezer formula a little in my last attempt.
Like a lot of people here I have found the dough it produces rather "gloppy" and hard to work with. I also found out that the dough becomes a lot easier to work with after the first proof with three folds. I have reduced the water percentage (following Glezer's somewhat complicated way of measuring out as little yeast as humanly possible) by subtracting the yeasted water from the amount used in the final dough, so a total of 1 cup of water, instead 1 cup plus the yeasted bit.
After that the dough did everything the recipe promised, so my guess is I might have been misinterpreting Glezer's instructions.
The taste Durum flour produces in it's loaves is so close to my "dream bread" I want to try out more with it. If you can point me towards other formulas and recipes I'd be very grateful!
Thanks!!!
Slugs are beautiful creatures. Sorry I can't help you more... are those rips or score marks on top? Maybe forgetting the scoring might help.
freerk,
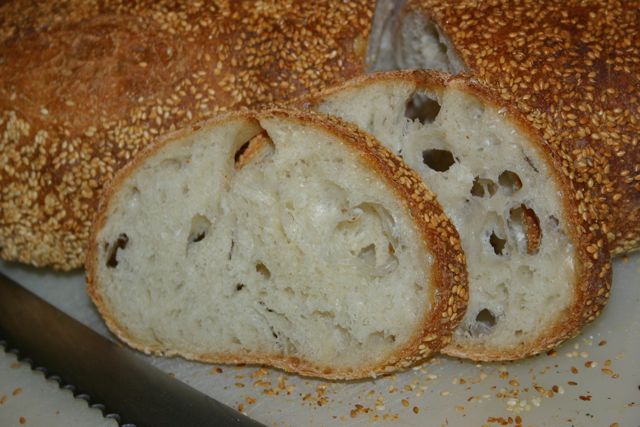
First off, the crumb looks nice as does the color and crust thickness. I'm not familiar with Glezer's recipes or instructions so I'm having a tough time visualizing your shaping method. Also, since I don't know what the hydration is I'll have to guess at its 'handleability'.
If you haven't already seen this video I did, check this out first since I use the same basic method for all hydrations. Basically every dough becomes easier to work with when you develop some surface tension on the outside. The trick is to always keep the sticky side away from the table until it's time to actually seal the seam.
So if I'm working with 69% hyd dough, when it's scaled the floured side is against the table or scale until I begin shaping. When I start shaping, (as in the video) the stickiest part of the dough is not face down (6 o'clock), but instead at about 5 o'clock so it's visible from the other side of the table. This is most evident in the olive bread portion of the video above. Picture rolling up a sleeping bag and making it tighter. When you'd get to the end of the roll, the seam is facing away from you making it possible to continue tucking it in tighter.
Every bread I make including baguettes (75% hyd) I shape in a similar manner and if I think the seam might become undone, I pin the seam shut with my fingertips like in the baguette video. You can see the same technique in the preshape, although I turn the dough around quickly to prevent it from sticking to the table. After I preshape the dough I give it a press into the table to seal the seam since they'll be resting 'seam up'.
Anyway, hope this helps.
-Mark
edit: One thing I forgot to mention that many people have a difficult time with. If you notice in both videos, my pinkies are constantly 'monitoring' both ends of the loaves. When I feel the ends are not becoming undone, they move to the outside and tuck the ends in. The amount of tucking controls the 'barbell shape' or lack thereof, and the pinky tucking keeps the ends in.
The Glezer formula asks for a 68% hydration. Although it's quite wet, after three turns in the first proof it comes out much easier to handle. Really helpful to see how you use one basic technique for most of your shaping! I have never really tried 'your way' of shaping, mostly because it looks so professional :-), but I'm gonna boldly go where I need to go, and just commit to it! So I decided to give myself a good practice with an easy dough this weekend, and to just concentrate on shaping. As a home baker I never really get a lot of shaping-practice but it's getting frustrating now; I need to keep the looks a little more in step with the taste! I understand your technique, keeping the skin always on the table, creating surface tension. It all makes sense! One question: sometimes I wonder if my work surface is actually working against me. It's wood, but doesn't give a lot of 'friction' even if I don't use any flour. Although I discovered that working perpendicular to the woodgrain gave me more friction, I still feel I need more. What would you consider the best surface to work with? And if you know of any tricks to create more friction on a wooden table, I'd love to hear!
Thank you so much for helping me getting better at this! Warm regards from Amsterdam FreerkFreerk,
You adjust the amount of friction you need for shaping by the (lack of) flour on the table, and the pressure that is used against the table. Since you already don't use extra flour, you use as little flour on the dough as you can (during scaling) and adjust the pressure downward. I'll explain that a bit.
When I'm shaping the olive bread in the first video I linked to, there's another point that I didn't mention that I think is pretty important. If you'll notice when I bring the dough into the view of the camera to shape, it's closer to the camera. As I start tucking in the dough to form the seam, I'm also simultaneously pulling the whole dough closer to me. This pulling does a few things:
-it keeps the seam off the table
-it creates surface tension
-it creates the downward pressure/friction that you're looking for
The pressure is actually a 'pulling pressure' that I'm creating by pulling the dough back towards me but also at a downward angle towards the table. If you fold up a damp kitchen towel, you can simulate the action while trying to keep the seam off the table.
If that doesn't make sense, let me know and I can post a quick video of me demonstrating on a kitchen towel. My wife found it helpful when I showed her that way.
I prefer a wood surface for the reasons you stated, but have worked on stainless steel, Formica, and other surfaces too.
-Mark
BTW I forgot to ask, what is the size of the loaf you have a picture of?
The Glezer recipe yields a 1.5 pound loaf. It has a very enthusiastic oven spring, and, when properly shaped :-/ and sprayed, it has a lot more volume than expected. That's my 'frustration'; I want to maximize this bread, and I know the final 'push' is in the shaping. It's actually quite amazing how clearly you're able to explain your technique. And it makes total sense! I'll be giving it my best try tomorrow (I couldn't resist preparing another preferment for another filone). I would love to see your towel video! I might actually videopost my attempt here tomorrow. Unless it's a total fail, of course :-) I really appreciate your help. Looking forward to ur towel vid! Freerk
I'll post that video this weekend, Freerk. Unless of course it's a total fail also.
-Mark
http://TheBackHomeBakery.com
Here you go:
After using a butcher block table to shape on for many years, I've started using a marble slab. I find the marble provides just the right level of friction and release, and I don't need to use much flour.
What temperature is the dough your shaping? Especially with higher hydration doughs, it's much easier to shape when the dough is still chilled from retardation.
I'm going to have to get some duram flour!
I haven't chilled my marble but I keep it in my pantry which is always pretty cool.
Most of my breads are sourdoughs, but when I use yeast it's only about a half or one tsp. In terms of timing, I usually make my doughs in the early evening and let them bulk ferment for a few hours and then stick the dough in the fridge overnight. I bake the next day whenever convenient.
You'll find retarding the dough has many advantages other than the fact that it is easier to shape the dough. Flavor, visible little bubbles in the crust, and good crust color.
I love your enthusiasm. Keep us posted on your progress.
As a matter of fact I retarded my last Filone last night, exactly for the reasons you mention :-) Yesterday night, after the first hour of rising, with three stretch and folds (one every 20 minutes), I put the final dough in the fridge overnight. This morning I let it warm up for about an hour, shaped the Filone, proofed it in the fridge again, and baked it in the late afternoon. The taste is great! And although there is a minute amount of yeast in there, the loaf always produces an astonishing oven spring. Unfortunately I can't really judge the crumb; this test-bake was all about Marc's shaping technique that I'm trying to learn. I did great on the towel, but had to call in the cavalry in the end to save my dough... The result is still very pleasing for both the eye and palate, but I did over-shape, so all my beloved air bubbles were nowhere to be seen :-( I am pushing it a little too much on the hydration front I am afraid. I want to go faster than I can. So this dough was around 70% hydration, and hard to handle, even when handling it cooled :-( Thanks for complimenting my enthusiasm! It seems to be contagious: a colleague I was working with last week proudly send me a picture of his first loaf, and a friend started on sourdoughs after I gave him some of my stiff starter :-) I'm curious how durum flour will behave in a sourdough formula. Tips or pointers appreciated :-) Greets from Amsterdam Freerk
Hey Mini! Yes they are, but after all these slugs I want a sleek torpedo!!!!!!!! :-) The crumb is indeed very, very nice. Open (all over), chewy, creamy and 'stringy' in a very nice way: when taking a bite it is the BREAD rather than your bite that decides where it will break. And it's strings always lead you back to that nice crispy crust (next time I think I'll give it even more water just before putting it in the oven, let's see how far I can go!) Stop me when I get too lyrical about the Durum flour.. The taste, the amazing oven spring, I love it! Especially the oven spring is amazing in this formula; the kind that brings a big smile to all of our faces at times. I know: taste over spectacle, but...hey, we all love a good oven spring! The dark spots are indeed the result of my poor scoring. Totally counterproductive: the little surface tension I managed to shape into the dough instantly went down the drain... Won't do that again, thanks for the tip! Dinner is being served here! X Freerk
Hi, freerk.
This is a wonderful bread. I've made it several times but not for quite a while.
As I recall, it makes a very soft, gassy dough that's a bit sticky. I didn't find it hard to shape, but you have to keep two things in mind: Be firm in stretching and tightening the gluten sheath and be gentle in pressing air out of the dough. This has been my interpretation of the "Iron hand in a velvet glove" adage, as applied to bread shaping.
As far as specific moves, there are many minor variations. All have the same end of creating a smooth, continuous sheath of gluten containing the dough. Hirtz is a master. Mark Sinclair is always a great model and teacher.
Scoring is a challenge with this high-hydration dough, but it can be done with a very sharp blade, an angled, shallow cut and fast moves without hesitation.
See this: Tom Cat's Semolina Filone from Maggie Glezer's "Artisan Breads" and this: Tom Cat's Semolina Filone from Glezer's "Artisan Breads"
Note that, for me, the crumb is certainly well-aerated, but not full of huge holes by any means.
Hope this helps.
David
Freerk,
David makes the point above about the need to slash without hesitation. I fully know the trepidation that creeps in when you're first going to slash -- it seems like the first cut is the weakest (isn't that a song?). In the golf world, it's the equivalent of driving off the first tee w/o a practice swing. So I've started keeping a potato around that I can slash a couple times before I slash my baguettes. It helps!
Yes, the Filone is quickly becoming my favorite, together with the Durum flour. The gringne in your pics looks delicious, the crust is exactly what I'm looking for. I slash with a razor. I need to adjust my angle I think, judging from your pictures. You make a very sharp angled cut, right? (reading back what you wrote, I see that is correct, YEAH!) I am firm with the dough when stretching and folding it, and try to keep in most of the air pockets while shaping. It's a "dynamic balance" I guess, and sooner or later I will figure it out. Shaping is where I am lagging most with this loaf.... Maybe I should just ask my baker around the corner if I can help him out in exchange for some "shaping time" :-)
I know how you feel, trying to get the shape just right and the crumb nice and filled with holes can be quite frustrating at times. I watch the videos over and over and practice as much as I can....
Joanne
Freek, I am so with you in the frustration of shaping. I have had everything going along fine until it all unravels at the shaping stage. I know even as I shape and bench rest the dough that it is doomed because it's not tight and it goes into the oven misshapen and crestfallen (well, the crestfallen part is me). Also, frustratingly, my experiments with slashing, steaming, temperature, and whatever mad things we occupy ourselves with :)) are compromised because I don't know if it's because of my lousy shaping or other factors.
1. What is the best makeshift surface one could come up with?? I ask because I don't really have a countertop to work with. It's either covered in cloth or is tiled with grooves in them. As such I end up using a silpat - yup, you read right, the NON-STICK surface so desired for so many other functions but not for shaping bread :)) As such my dough just slides around. I have learnt to do decent ones if the dough is not high-hydration but the wet ones are hell.
2.In fact, my greatest problem is the stickiness so I wonder if anyone else has the problem. I have learnt that barely wet hands are the best when it comes to folding wet doughs but that does not extend to shaping. I have used flour, oil (it has worked at times) and even water (!). Does everyone use flour? Is it just me/ my silpat surface or does the coating of flour not get absorbed into the dough anyway? Flour does not seem to work for me. Or am I not using enough??
And just to share, yes I would say marble is a good investment. Had the fortune to try it just once and it was a dream. Was told by a pro it's the best. That said,I think once you have the technique you can work on any surface.
And freek, you can try as others have suggested, refrigerating the dough. I live in a tropical climate and sometimes I have like a 5-min window to work on a stiffer, more well-behaved dough before it starts to 'melt' on me. And as someone else mentioned, other than ease in manipulation, a cold bulk/final rise also improves flavour and gives you greater flexiblity.
In fact - this is not for you but anyone else who might have problems - I have found out through trial and error that dough temperature is fundamental with sourdoughs. I think it can't be highlighted enough. Temperature is my greatest challenge.
I love watching these bread-shaping videos. They make it look so easy heh heh. Everyone has their own method but in the end I think it boils down to the same thing. One video I enjoyed was this posted by Marie-Christine (if you havent checked out her blog, you should!). The baker has a very nice slow and relaxed way of going abt it, and what I appreciated is how he says to relax and adapt to your dough. Sometimes I am so nervous abt 'getting it right' (because I only bake once a week, if at all!) I have to remind myself to take a step back. it's like what bnom says abt slashing the potato first :))
Finally, I diverge, but does anyone else using makeshift proofing baskets have a problem of the fabric causing unslightly creases and folds? I use thick cotton but it still bunches up and adds ugliness to the already ugly dough. Will using linen (which is thicker??) help?
Thanks everyone
oops, forgot to post the link
http://www.farine-mc.com/2010/01/batardbaguette-shaping-gerards-method.html
Hi ww
Have you seen David's shaping tutorial? His use of markers provides a great picture of what we are aiming at when it comes to creating a sheath.
http://www.thefreshloaf.com/node/19346/shaping-boule-tutorial-pictures
You'll note he works on wood, with almost no flour when shaping. Gerard too is working on a wooden bench, though he uses more flour. (That whole series MC wrote is wonderful isn't it!)
Then there's the inspiring KAF videos to which LindyD provided a link recently:
http://www.thefreshloaf.com/node/21730/video-lessons-master-baker-jeffrey-hamelman
Again wood/little flour.
I use a beautiful board I received as a gift some years ago, which I had been reluctant to use as a chopping board, not wanting to spoil the beautiful grain. Once I started baking bread, it was the obvious choice, for shaping on. I use little/almost no flour, allowing the slight graininess of the board, to gripe the dough and assist me create tension.
So my suggestion for a makeshift surface is a wooden board. It need not be an expensive board, you could recycle a piece of a wooden wine box (if you can find a generous source) or similar.
When watching videos please remember you are watching people who have shaped thousands of loaves and who have developed a rhythm which allows them to work quickly. I'm sure there's something you can do with dexterity that others who are learning can't..... Shaping is not a race, better to work in slow motion and execute each individual 'move' well, that's why I like David's tutorial, unlike the videos (of course they are great too), each step in the process is obvious.
As for the cloth, I'm wondering if the bottom of the container you are using to proof in isn't too narrow, that there is simply not sufficient room to spread the cloth out without it bunching. Many people on TFL have written about old fruit baskets and the like that they use for proofing - do you have any charity /goodwill shops nearby where you could buy containers with a better shape? How about taking your proofing cloth when you go shopping and test a variety of shapes to see which dimensions work best with your cloth. I used plastic colanders cheaply purchased at an asian store before I was gifted some wonderful cane bannetons. I simply floured them directly (as I do my banneton) with a rice flour/AP blend and never had any problem releasing high hydration doughs. Even now with the very humid and hot-for-here conditions it hasn't been a problem. Establishing a good outer surface really helps with this.
Cheers, Robyn
I tried a variation of the olive bread from Tartine. I wanted to try baking under a cloche-like device. Lacking both, i improvised using a metal pot and a clay pot turned upside down as lids with the loaves baking directly on the stone. I must say i was impressed by the amt of steam a baking loaf generates. When i lifted the pots, steam was just blowing out of my oven. I think it is quite a handy method. For me, this was purely academic though. The diameters of my pots are too small - even taking care to subdivide the loaves, they expanded width-wise and there were accidents ;)
I also wanted to test if there was a difference betw baking under a preheated & non-preheated lid. However, after the first batch, I found out I could not hope to contain the baking loaves under the pots so abandoned them for an improvised lid using a disposable aluminium tray, worked great too. I THINK there is not much to be gained from using a preheated lid, seeing the amt of steam and oven spring I got. Given that a heavy and hot clay/cast-iron pot is not the easiest thing to handle, I would not preheat the lid if I were to go with this method.
Back to shaping. I think I've understood the technique. My problem really is the surface and the STICKINESS. In desperation, I even tried shaping it on the plywood study desk! But the dough just wants to stick onto the table. It is a highly hydrated dough - upwards of 75 % but I wonder if the stickiness is normal. It's like trying to work with a creature from the deep with suction pads that latch onto anything. But I bore in mind what you said abt using just the slightest bit of flour to create tension and worked with that. So in a way, even with less-than-ideal surfaces, I can try using flour to help me out.
perhaps I am looking for something too neat for wet doughs. Are your seams tight for wet doughs? Mine are shaggy-looking still. I still get quite nice oven spring and the tastewise it's good.
Daisy: what do you mean by undermixing?
Robyn: I tried something new yesterday! I used shower caps haha to line the bowls and it worked much better. I know, shower caps, what would the bread purists think. Linen is recommended because it absorbs moisture supposedly but for me the advantage of the shower cap is its thinness so it does not bunch up and lies quite flat instead against the bowl. My starched towels used to create too many folds. Also shower caps come rounded so I just need to tuck the ends sort of under the bowl. Used wheat and rice flour and it worked well. Shower caps - I already use them to cover the dough while proofing - who knew they had so many uses!
The sad bit is I broke my baking stone. I had placed it on a very very flat coaster to cool, and my brother-in-law's explanation is that during the cooling process, the fact that it was not evenly supported all round caused weight to be exerted unevenly along the sides and pulled it downwards, and it cracked as a result. Maybe I should put this up on another separate post as a warning to other bakers - assuming they don't already know ;))
thanks both for your suggestions!
Hi Feerk,
I would say that's a nice and tight loaf you have baked :) seems like you've put your shaping troubles behind you.
I agree that flours can be variable. Once i bought a packet of organic flour and maybe it was not aged sufficiently (read that flours must be aged for a while; freshly milled flours affect the gluten formation), my dough just spread and spread...
ww