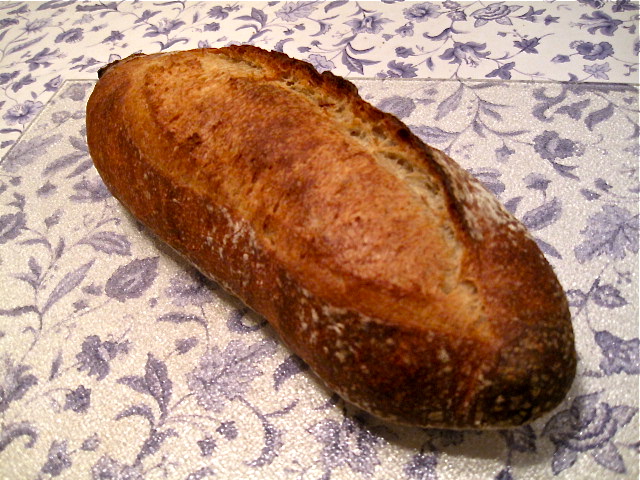
My San Francisco Sourdough starter from sourdo.com is now two weeks old. I made another pair of my San Joaquin Sourdough breads with it yesterday. I modified my formula somewhat. I used a 60% hydration starter fed with AP flour only. I increased the amount of starter by 50%. I used KAF AP flour for the dough. I used no added instant yeast.
|
Ingredients |
Weight |
Baker's Percentage |
|
Firm starter |
150 gms |
30.00% |
|
KAF AP flour |
450 gms |
90.00% |
|
BRM Dark Rye flour |
50 gms |
10.00% |
|
Water |
360 gms |
72.00% |
|
Salt |
10 gms |
2.00% |
Procedure
-
Mix the firm starter (1:3:5 – Starter:Water:Flour). Let it ferment at room temperature for 12 hours.
-
Pour the water into a large mixing bowl. Add the starter and dissolve it in the water.
-
Add the flours and mix to a shaggy mass. Cover tightly and let it sit for 20-60 minutes.
-
Sprinkle the salt over the dough and mix thoroughly using the “stretch and fold in the bowl” technique. Let it rest for 30 minutes.
-
Repeat the “stretch and fold in the bowl” for 30 strokes 2 more times at 30 minute intervals.
-
Transfer the dough to a lightly floured board, and do one stretch and fold.
-
Form the dough into a ball and place in a lightly oiled bowl. Note the volume of the dough. Cover the bowl tightly. Let it rest for 30 minutes.
-
Repeat the stretch and fold on the board. Reform the dough into a ball and replace it in the bowl.
-
Allow the dough to continue fermenting until the volume has increased 50%.
-
Cold retard the dough for about 20 hours. (The dough had more than doubled and was full of large and small bubbles.)
-
Take the dough out of the refrigerator and immediately transfer it to a lightly floured board.
-
Divide the dough into two equal pieces and pre-shape them into logs or rounds, depending on whether you want to make boules or bâtards. Cover the pieces with plasti-crap and let them rest for 60 minutes. (Give them a shorter rest if the kitchen is very warm. You don't want them to expand very much, if any.)
-
Pre-heat the oven to 500ºF with a baking stone and your steaming method of choice in place.
-
Shape the pieces and place them in bannetons or on a couche. Cover the loaves and proof them until they have expanded by 50-70%. (30-45 minutes)
-
Pre-steam the oven. Then transfer the loaves to a peel (or equivalent). Score them, and load them onto your baking stone.
-
Turn the oven down to 460ºF.
-
After 12 minutes, remove your steaming apparatus. Turn the loaves 180º, if necessary for even browning.
-
Continue to bake the loaves for another 15-18 minutes or until their internal temperature is 205ºF.
-
Turn off the oven, but leave the loaves on the stone with the oven door ajar for another 7-10 minutes to dry the crust.
-
Transfer the loaves to a cooling rack.
-
Cool the loaves completely before slicing.
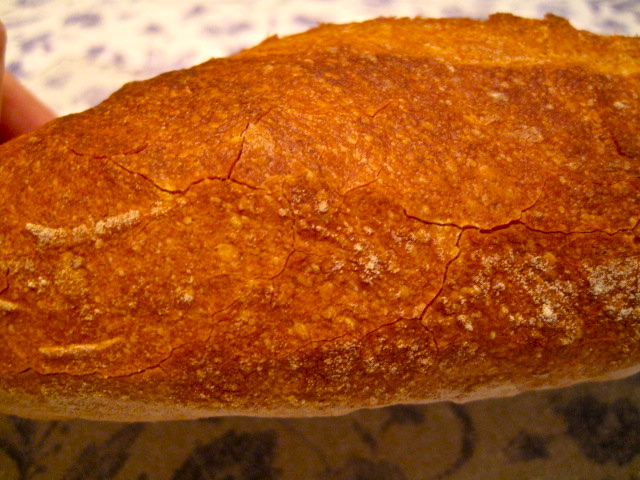
The loaves were already singing when I took them out of the oven. The crust developed crackles, which can be credited to the use of AP rather than higher gluten flour and the drying in the oven (Step 19., above).
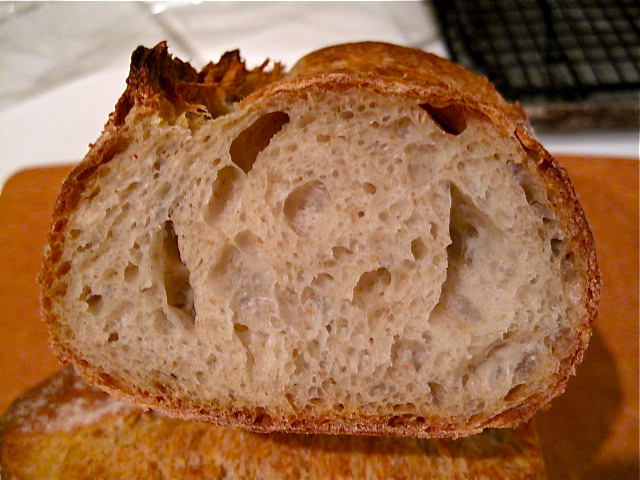
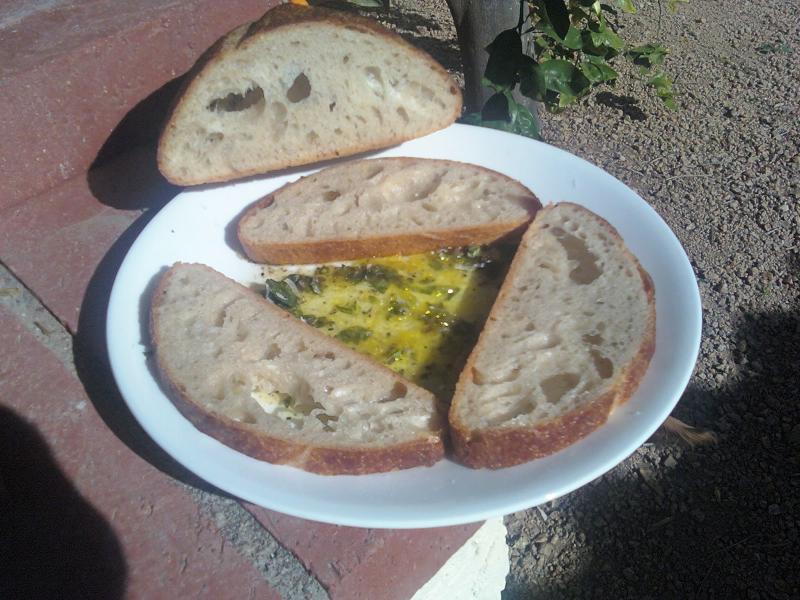
The crumb was nice and open.
The crust was crisp when first cooled and crunchy/chewy the next morning. The flavor was sweet and wheaty, like a good baguette, with the barest hint of sourness. This was po ssibly the best tasting San Joaquin Sourdough I've made. I think I'm going to stick with this version. Next time, I may use this dough to make baguettes.
David
Submitted to YeastSpotting
- dmsnyder's Blog
- Log in or register to post comments
in case there is residual water in there? Mine always looks totally dry.
BH
Hi, BH.
My skillet is usually dry when I remove it. I suppose I do so for two reasons: First, I don't know it's dry until I remove it. Second, the process of removing it, in effect, "vents" the oven to let out the humid air so the rest of the bake is in a drier oven.
David
As usual, your bread is super and your write up perfect. I didn't know that AP flour helps with the crackling crust and I love the crackling crust! I copied your post and plan to make this soon. Thanks for working out all the details to make it easier for me and I'm sure others too.
weavershouse
I hypothesized that the lower protein flour promoted the crackly crust after watching some of Shiao-Ping's bakes. I think I also read somewhere that higher protein flour results in more crunchy, chewy crust and lower protein promotes crisper crust.
If you do try the new formula, let us see your results.
David
Looks like you have perfected your formula and technique. The shaping, scoring, crust and crumb are all first rate.
Don
"Perfection" is an ever receding goal. I think I will continue to fiddle with the formula.
David
And as weavershouse has already said, we bakers out there benefit tremendously from all of your experimentations and variations. This is so much appreciated!
All your hard work is very much appreciated. I even learned how to pronounce 'Jan Joaquin' : )
Sylvia
Congrats, a beautiful loaf! Thanks for posting it.
Susan from San Diego
David
Perfect as usual David. But the burning question is the flavor. Do you think these are any better or different than those made with your other starter?
Eric
The flavor was outstanding. I changed enough variables so I can't say which contributed the most to the flavor. I suspect the increased amount of starter and the omission of the yeast played the largest role.
The sourness was really mild with no distinctive "San Francisco Sourdough" flavor, so I would be hesitant to attribute much to the starter difference.
It seems to me that, when I used Wood's SF SD starter before, it took a month to develop its distinctive characteristics. Meanwhile, it's making very good breads.
David
I am a huge fan of this recipe, and will be tagging right behind you
I'll make this variation sometime this week and report back!
I have a firm starter refreshing and plan on making another batch of SJ SD tomorrow, if I can squeeze it in before I have to leave for a concert.
I'm looking forward to hearing how the modified formula works for you. I know you have a lot of experience with the "old" version.
BTW, you have been honored by being the first to get a TFL reply sent from my new 27" iMac.
David
Oh, my....
I feel absolutely honored!
I used to be a Mac-fan all the way, but for the past 15 years switched to IBM - just because of compatibility with lab equipment. But I am a Mac at heart...
Nicely done, David!
Thanks, Susan!
And thanks for including it in this Yeast Spotting.
I did make this version again, and it had the same great flavor. The additional stretch and folds on the bench have resulted in a much chewier crumb, too.
David
Have you made any more loaves with Ed's starter? I do find these "sourdough mysteries", such as: will a starter keep or gradually loose its flavour once its environment is changed?, infinitely intriguing :)
By the way, David, did the starter come with any "maintenance instructions"? As I understand it, S.F. sourdough cultures are characterised by a certain ratio between Lactobacillus sanfransisco and the yeast candida milleri. I've read that Candida milleri is somewhat sensitive to the amount of acetic acid present and that lact. sanfransisco thrives best at ~ 30 - 32 dC. Since acetic acid becomes more dominant in stiff cultures at lower temperatures, is this fact reflected in the way Ed Wood's starter is propagated? One would think a liquid starter kept in a warm kitchen (or, as it were, bakery) would be the ideal growth environment for a typical S.F. style sourdough. Are there any instructions with regard to dilution/inoculation each feeding? Since lact. sanfransisco doesn't thrive in lower pH cultures, does Wood suggest using a very small inoculation to keep the pH higher for longer between feedings?
Considering the fact that an established starter has an extremely high amount of organisms, I'm beginning to think that a starter's "characteristics" can be maintained in a different location with different flours, as long as a certain feeding schedule is kept up. As long as the schedule is especially customised towards the particular strain of yeast and lactobacilli one wants to keep, I don't see why a S.F. sourdough can't keep its particular flavour even outside the S.F. city limits.
Hi, hansjoakim.
Ed Wood gives very explicit instructions for activating, feeding and maintaining the SF SD starter.
Without going into all the details, he is very cavalier regarding refrigerator storage with long intervals between feedings, once the starter is fully activated. However, most of his recipes call for two feedings at about 100% hydration (he gives volume measurements for flour and water) before mixing the final dough. He is also pretty specific about starter inoculation amounts and fermentation temperature.
I have made a couple more batches of bread since this one. One was a replication of the above formula with the same (good) results. The other was Maggie Glezer's sourdough challah, which had an outstanding flavor. (The appearance was another matter. I braided the loaves too tightly, I think, and they were indistinct in the baked loaves.)
I have not yet made a loaf really shooting for the authentic SF SD flavor, following Wood's instructions. Maybe next weekend. I've had a very busy couple of weeks and haven't had time to do every 12 hour feedings, keeping some starter at room temperature the whole time. I think that may help develop the desired flavor, too.
One insight I've just recently gained from thinking about Wood's instructions: He stresses temperatures to optimize multiplication of lactobacilli (warm) whereas I've been thinking more about the temperature at which more acetic acid forms (cool). I'm thinking that I need to do several (at least two) feedings of a liquid levain at room temperature before mixing a firmer levain to retard or just retarding the dough or loaves. More experimentation is definitely needed.
I have the feeling I'm reinventing the wheel, but, in the end, it will be my wheel!
This seems entirely consistent with your understanding, BTW.
David
Hi David,
Thanks for your interesting reply!
I absolutely agree with you. I'm getting more and more convinced that the authentic SF SD (which I've never had the privilege of tasting...yet) is a result of getting the right lactobacilli and yeast in the sourdough, and not of deliberately starving the sourdough the get "sourness". Reading the SD FAQ, there's been research showing that using more than 50% inoculation gives you a very acidic sourdough, where there is no trace of lact. sanfransisco. Since lact. sanfransisco is essential in SF SD, that observation rules out deliberate malnourishment (it sounds terrible, doesn't it?) of the culture to get sour taste.
In the same FAQ, it's stated that it usually takes at least two weeks of repeated feedings (at room temp.) to get a good "SF SD" culture. I think this also agrees with what you've written earlier: That the true SF taste takes a while to obtain, and that the tangy flavour was something you obtained a few weeks after you started the culture. A couple of feedings at room temp. before using the sourdough to bake breads would probably help get lact. sanfransisco a good foothold as well.
I'd be very interested in learning more about your ongoing experiment, so keep us updated David!
Another thought: To my knowledge, the most extensive scientific exploration of sourdough is the work developing the "Detmolder method" for rye. I don't see why the "3-stage Detmolder" method wouldn't have similar results for any sourdough culture.
I need to put Hamelman's write-up on the Detmolder method next to Wood's method for developing SF SD flavor. They have many similarities. If I had time (three days), I would apply a strict Detmolder method to my white SD culture. I bet the results would be fantastic!
David
Hi, will.
There are a number of factors that might be contributing to your problem, but the most striking thing to me is your starter. You may be starving it. If it is really 169% hydration, the yeast is going to run through its food supply pretty fast. It may not be very active by time you incorporate it into the dough, so it may not be fermenting the new flour well.
What's your actual mix (starter:water:flour) in the starter, and how often are you feeding it?
David
Hi David,
I made the San Joaquin a few days ago and it was delicious! Both the texture of the crumb and the flavour are amazing. I'm in the process of making this bread again because I wasn't quite happy with my work the first time (starter not in its best status).
Can you please explain why you suggest shaping only after retarding in the fridge? I learned that the dough is usually shaped first and then put in the fridge. What are the benefits of this "reversed" procedure?
Thanks!
Michelle
Hi, Michelle.
I'm so glad you are enjoying your San Joaquin Sourdough!
To answer your question: You have to know the history behind this bread. In summary, during the 1970's and 1980's, a group of younger French boulangers rebelled against the industrial baguettes that had been replacing the traditional baguettes in France since WW II. Presumably influenced by the teaching of Prof. Raymond Calvel, who emphasized the importance of a long slow fermentation to develop the flavor of bread, they introduced a cold retardation stage during bulk fermentation (before the dough is divided and shaped).
In 2008, a young Parisian boulanger named Anis Bouabsa won the annual award for the best baguette in Paris using this procedure. Janedo, a French home baker (born and raised in Vancouver, BC, for your interest) and member of TFL visited Bouabsa's boulangerie and learned about his method, which she then shared with us here.
Over the ensuing months, a number of us made baguettes using Bouabsa's formula. Jane and I began fiddling with it - adding some rye flour and some levain, and, eventually, leaving out the commercial yeast altogether. Then I started using this dough to make bâtards and, occasionally, boules. Thus, the San Joaquin Sourdough was born.
So, cold retardation can be implemented either during bulk fermentation or during proofing. The effects on flavor are similar but possibly not identical. The effects on dough handling are different. As you may have noticed, the dough retarded in bulk is much more extensible during shaping, for instance. This may be especially advantageous when forming baguettes. It may be less desirable when forming boules.
In addition, the two methods have different implications for scheduling your bread production. The method I use in the San Joaquin Sourdough works well for me when I want to mix the dough one evening and bake the next morning.
If you can get a copy of Suas' "Advanced Bread and Pastry," you can read a detailed analysis of both types of retardation.
I hope this isn't TMI for you. Again, I'm delighted you are enjoying the bread.
Happy baking!
David
Always enjoy understanding a bit more about the story behind it! I'll ask my local library to get a copy of the "Advanced Bread and Pastry" for me. Yes, the bread is great, thanks for sharing your knowledge!
Michelle
David,
Please tell me if this will work to make the 150g of firm starter for your recipe...or if I am crazy:
Will 17g of my 100% hydration sourdough starter + 50g of water + 83g of flour make your 150g firm starter?
You're the best,
Nick
Hi, Nick/
Your starter ingredients look correct to make a starter of the consistancy I use out of a 100% hydration starter.
I don't have sufficient data to determine whether you are crazy about anything else, but you are not crazy regarding your starter.
Happy baking!
David
Generally, a starter feeding should at least double the "seed starter." This is to give the starter enough food to get it really active. Since you added yeast, you obviously didn't have a problem with the bread rising, and there was probably enough flavor added.
How did the baguettes taste to you?
David
Hi David
I baked your San Joaquin SD a week ago. Fantastic result. And as you say, lovely flavours. Thanks for the recipe and write-up - this is yet another keeper from you, and one of my favourites.
Cheers!
Ross
David
IT APPEARS TO ME THAT AMOUNT OF SALT IN THIS RECIPE SHOULD BE 10 GRAMS AND NOT 10 MILLIGRAMS --- SOUNDS GOOD AND I WILL TRY IT SOON ---
TONY
But you don't have to yell. (Using all caps).
I've corrected the typo. Must have written too many prescriptions that day.
David
David,
I know I am going to stand out in the crowd when I say this but I wasn't crazy about how my bread came out. As always, I followed your fantastic recipe to a T. I was happy with the crumb, my oven spring was shocking, and the bread looked and smelled great, but there was this little thing with the taste...my bread virtually had none. Pretty weird huh? I tell you the truth, the bread was pretty void of any flavor. It was quite odd. And also, it was just a tad bit gummy, not gummy, but just a tad bit. With this recipe and technique I am shocked that this was the case. Maybe it's the rye? Maybe I just don't like rye? Actually that isn't true though, I love rye. I used Bob's Red Mill Organic Dark Rye Flour just like you did. Maybe I need to try a different Rye? Maybe I should substitute in WW instead? I don't know. Maybe I under baked it? Maybe I am crazy?
So, where do you think I went wrong? I posted some pictures so you can see what it looked like.
Thanks again,
Nick
PS You are the best!
Hi Boboshempy,
Well, your bread certainly looks superb!
It's true, as David says, that ideal salt content is down to individual taste, but I reduced the salt to 6gm when I baked this lovely bread, and the flavour was up there with the best I've baked. It's always worth trying adjustments such as David's suggestion to increase the salt, but in view of my result, I suspect the lack of flavour to be due to other factors. No idea what, though, especially if you've been baking other breads with the same flour and have not had an issue with flavour until now.
And like David, I had no 'gumminess' of the crumb with this one. Good odds that's related to baking time, I reckon.
Interested in the outcome if you do make adjustments and try this bread again. It's one of my favourites.
Re. flavor: This bread is a bit low on salt compared to many formulas. Your taste might require boosting it a tad.
Re. Gummy crumb: I never get that. Maybe you did under-bake.
Thanks for your kind words.
David
Thanks David & rossnroller,
I think 10 minutes more in the oven would have made a world of difference. I may also tweak the salt a little next time. I forgot to mention that I used KA Sir Lancelot flour and not KAAP. For some reason I have been liking the AP better and finding that it actually performs better across the board in recipes.
All and all this is a great bread. I had some more tonight with a Hungarian Goulash my girlfriend made and the combo was killer.
Thanks again,
Nick
Ahhhh ... Sir Lancelot is going to change things a lot. The dough will act like it has lower hydration. The crust will be thicker. The crumb will be chewier.
High gluten flour is great for bagels and breads with a predominance of low gluten flours, like ryes. It can help breads with lots of stuff that cuts gluten fibers like bran and seeds. But it is generally not recommended for the SJ SD.
David
David,
Could I use pumpernickel instead of dark rye?
Joe
Hi, Joe.
I've never tried it. It is more coarsely ground and might result in a denser crumb. Try it and let us know.
David
I have a batch of this dough cold retarding in the refrigerator right now, and I'm concerned that after 16 hours it hasn't budged from where it was when I put it in there :-/ My starter has no trouble doubling within 8 hours after I feed it at room temperature...I'm wondering if the cold retardation is stopping it in it's tracks (it's a brand new starter and it's never spent any time in the fridge until now). I was feeding my starter 1:2:4 every 12 hours at room temp and for this recipe, I took out 17g and fed it 51g water and 85g flour, which should have given me more than I needed, but somehow I only ended up with 145g when I weighed it out for the recipe. Maybe that's my problem?
This is my first foray into sourdough baking, so I'm sure there's a high margin of error, but I followed the directions for mixing and folding exactly, and it seemed to be doing alright until it went into the fridge. Am I doomed to failure?
Hi, Azaelia.
The refrigeration does slow down the yeast. I find that how much the dough expands depends on it's temperature and how active the fermentation was when the dough was put in the fridge.
In any case, if you follow the directions, you should end up with good bread. The dough not expanding in the fridge is not necessarily a problem.
David
Thanks for the reassurance! I went ahead and followed the rest of the instructions as written, and aside from my terrible shaping and scoring skills, the bread came out the best I've ever baked! I couldn't believe it!
This was my first SD so I was surprised by the taste...it was so much sweeter than I imagined it would be, with a slight tang at the finish. I'm so proud of my baby starter! :-D
Thanks for your help and for this amazing recipe! I will definitely be making this again!
Your loaves look good, and your crumb looks even better! Pretty impressive results for a first sourdough.
The sweetness comes with the long, slow fermentation. I'm so glad you like it!
David
Dear David
I am new to "forums" but old to this world. You look like a young fella so I must tell you after reading the number of hours involved in the San Joachin bread, I got tired. Gradually overcoming my laziness, the enjoyment that comes from baking, is coming back. I bake almost everyday but would compare my results to a used Studebaker and yours a Rolls Royce.
Thank you for your labor and generosity.
+Father Raphael
Welcome to TFL! And thank you for your kind words.
This bread involves many hours from start to finish, but little work time for the baker. That is one of its appeals to me.
David
David,
I made this bread recently, and was amazed at the texture and size of the crumb. This is the first recipe that I have tried that I would deem "advanced."
That being said, I wasn't sure if my dough was hydrated how it should have been. It seemed very wet, almost like a ciabatta dough. I had to use a liberal amount of flour when I was shaping my loaves and found that I had to be REALLY delicate lest the dough decided to glue on to my hands as I pulled them away. Sticky. After proofing them, they wanted to spread out like a pancake.
I must admit, I was surprised at the amount of oven spring these loaves had, but it did not completely take care of the bread's flat appearance. My boule and baguette did not look like some of the "fluffier" pictures I've seen posted using your recipe.
Any thoughts?
The dough is sticky. Lightly flouring your hands while shaping helps. Do your shaping in a way that your hands are in the briefest possible contact with the dough for each step.
This bread needs support while proofing. For long loves, I use a couch - either linen or parchment paper. (For the later, you don't take the loaves off the paper for baking. For boules, use a banneton. These keep the shaped loaves from spreading too much.
David
G'day David.
Just interested to know how you support your shaped dough during final proof on parchment paper?
I use parchment paper, also, with two blocks of wood paralleling the long edges of the dough as support. I have plastic covering the dough loosely enough to allow expansion during the proof and tucked under the blocks of wood so there is no contact between wood and dough, and a teatowel draped over the whole shebang.
If retarding overnight then baking straight out of the fridge next day, I leave the shaped dough, plastic and wood blocks inside a large oblong plastic container with lid on, and bung the container in the bottom of the fridge.
Both methods work OK, but are a bit makeshift and unwieldy. I don't have couches or bannetons, or any bread moulds - hence the improvisation!
So, I'm all ears!
Cheers
Ross
For two loaves, I cut the parchment to fit my peel. I fold it in the middle and place it on the peel with the middle crease pointing up and forming a "wall" at least as high as I expect the loaves to rise. This separates the loaves and provides lateral support for their facing sides. I place the loaves to either side of the crease. I dust the loaves with flour to keep them from sticking to the paper. Then, the outside edges of the paper and lifted, and a rolled up dish towel is placed up against these margins to support the outside of the loaves. Then the whole business is covered with plasti-crap or another towel.
When the loaves are proofed, I remove the towels and pull the edges of the paper outward. This collapses the center crease and pulls the loaves apart, leaving 3-4 inches between them. I bake with loaves on the parchment paper.
I hope this is clear.
David
I don't usually do more than one loaf, but when I next do two I'll try your parchment 'wall' - sounds sensible.
Don't suppose it makes much difference using rolled up dish towels or wooden blocks, but lifting up the outside edges of the parchment paper is simpler than what I'm doing with my plastic covering, so will go with you on that next bake.
Thanks to you, also, willsfca. Like you, I pull the parchment paper out when I rotate the bread at the end of the steam period (15 minutes into the bake in my case), and I also reuse the paper until the outside gets too burnt and brittle. Great minds, you know...or shared anti-waste philosophies, at least!
Like your idea of exposing wet doughs for the last part of the proof to firm up the surface area for slashing. I'll certainly give that a go. As I recall, Gerard Rubaud leaves his dough exposed throughout the final proof to develop a surface skin, so you're in good company with that thinking.
Cheers!
Ross
I first made this recipe about a week ago and it was a magnificent loaf, looking just like the other pictures--crusty, good rise and oven spring, great bubbles inside, lovely even browning of the crust, the works. Many compliments garnered at the dinner I took it to.
Today, disaster! Two ciabatta-flat loaves with crust that browned unevenly, almost burning over the air pockets underneath while the rest of the crust stayed paler than I like it to be. I'll toast it and eat it with soup or spaghetti or slice and make sandwiches out of it, but I'd like to know what happened.
Three things I did differently than last week: moved my oven rack and baking stone to the middle position of oven, made a double batch for two loaves instead of the one like last week and the fermentation phase was 17 hours in the refrigerator instead of closer to 21 like last week. Otherwise the dough handled the same. I proofed the loaves for 40 minutes, which was like last week, and slashed them longways down the middle, like last week.
So...what went wrong? I was so tickled that I'd found a sourdough recipe that worked last week and produced a lovely loaf. I'm greedy for more of last week's successes.
Just joined the site and have found it about the best place to find out anything about bread and your blog, among others, is especially fine. I wanted to try your formula to the tee but ran into several obsticales. First off, my sour starter of choice is a 1:4:4 half white and half wheat flour one so I had to make it a 1:4:5 after feeding it. Also I have no Rye so subed WW. Also used bread flour instead of AP. Next thing I know it is too late to get everything done and the dough in the frig for its 20 hour retardation. After 10 hours getting the starter right, l instead of 12, I had to retard the starter overnight in the frig instead.
I have never done the stretch and fold before but all seemed well the next morning after completing the several bowl and board development exercises required. 17 hours in the frig later, the dough had not doubled - it had just flattened out miserably. Worried, I took it out of the frig right then and there and went into salvage mode by warming it up. After an hour completing another stretch and fold, I shaped the flat dough and put the two shaped loaves in your unique parchment containment. I did this right on the peel, as you recommend, for the final rise so I wouldn't have to mess with it much to slide the risen loaves onto the baking stone later. I wrapped the whole peel in a plastic kitchen trash bag, as others suggested, to rise and got the oven ready to bake.
I heated the old GE up up using a Pyrex loaf pan half full of water along with a large cast iron fry pan that I filled with some granite rocks instead of pieces of iron that you wisely recommend. Next thing I know the house smells like bad rocks with really smelly feet that walked for several days in pig effluent and chicken manure. I get the rocks out of the pan and open all the windows to get the smell put of the kitchen. I re-fire Betsy and she is heading off to 500 degrees when all of the sudden the beast catches fire. I actually never saw the fire but the smoke was unbelievable. The smoke detectors went off, the windows went wide open again again and I ripped the aluminum foil off the bottom of the oven where most of the smoke seemed to emanate. Poor Betsy hadn't been over 350 degrees for a long time and most likely had not been cleaned even longer. Still, she somehow managed to make her own charcoal and put it right on the aluminum foil for easy extraction once the fire was restrained somewhat. Thank goodness my wife left the house after the first sign of awful rock smells, for her daily run and missed the smoke and possible fire completely.
Finally back on track and the oven an hour into preheat , I open the plastic bag to pull out the peel and there were two loaves that had pushed the towels restraining them and the parchment aside so they could get as spread out and flat as the second law of thermodynamics would allow. I read that spreading has happened to others and it wasn't so bad in the end but, as things were not quite going as planned, I left one as is and reshaped the other into a slightly taller mass of loaf that was half as long as the other. After a quick slash, into the oven they went with no further problem since they were already on the peel. I chucked a cup of water in the skillet, shut the door and hoped for the best.
Well, that is exactly what I got. Nearly explosive spring, great crunchy and chewy crust, tremendous crumb with large medium and small holes equally distributed and the taste was great. It was better the next day. I took pictures but don't know how to get them uploaded. It was so worth all the trials and tribulations. The odd thing was that both loaves looked the same inside and out with one being shorter and fatter.
Thanks so much for your great recipe David. I learned so much from you and site in just 1 day. New stretch and fold technique, autolayse? new slasher, new way to steam, new 1:4:5 sour, new long retard, and a new perfectly clean oven after I cleaned up the mess Betsy was in afterwards. I ate 1 whole loaf yesterday and the other today. I now have my sandwich and toast multi grain sourdough challah (Brachflachen Mehrere Vollkombrot), that I have been making incorrectly for 25 years, in the fridge after using these exact same techniques instead of the old 10 minute hand knead, shape after 2nd rise, put in a cold oven with pan of boiling water and bake at 350 for about 30 minutes. But, the old way never had any stink or smoky fires that I can remember. Alas, it lacked the excitement of something great and wonderful.
I have 1 question. Do you use Kosher salt? I use medium sea salt so I cut the salt to 5 grams thinking you did and I would rather have less salt than too much.
...and I can relate to many of the pits you fell in to. I, too, am a fan of San Joaquin Sourdough and have previous made that recipe and will undoubtedly make it again.
FF
that she has recovered from her ordeal. 500 degree bake and 4 hour self clean did wonders. Ain't she purty?
The best evidence I've yet encountered I must have put together a bullet-proof formula! LOL
I'm certainly relieved you were able to enjoy the bread after all your trials! I hope you saved a slice of one loaf for your wife.
I generally use sea salt. If you weigh the salt, all salts are the same. Of course, if you measure by volume, a tsp of kosher salt is a lot less NaCl than salts with smaller crystals. Almost all breads are made with close to salt at 2% of the total flour weight.
Thanks for sharing your saga. Welcome to TFL! And Happy Baking!
David
I can, with the best intention, pretty much find every hole one can fall into, large or small - without hardly working at it - long or hard. My wife got one slice only since she loves Oroweat 100% WW and is not partial to wild things like sourdough yeasts and husbands in the kitchen. Thanks for the salt info. After a couple of days ago I weigh everything out now. The reason I asked is that I thought my loaves needed more. My starter sure likes being fed correctly by weight too instead of starved like it was for years and years. Thanks for the welcome and keep those bullet proof recipes coming!
I think the loaves came out pretty good for the first try at so many new things and techniques.. Love to eat SD with olive oil, pecorino, pepper, fresh basil and garlic. Thanks David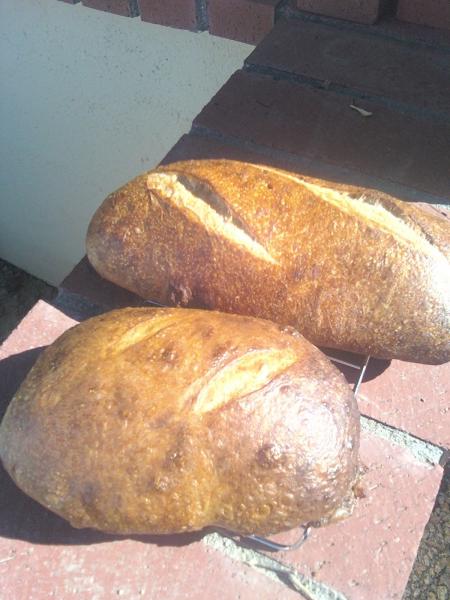
David
I've been "Norwitching" for the past month or so...
I am in a happy place with my current results.
Do you think I could use my local starter for this recipe.
I am loving the open crumb you got.
I'm almost there - but not totally. Any suggestions on how to get a fuller, consistant, open crumb?
Second time I've tried the recipe. A good bread.
Nice-looking loaves.
David
Hi, David. I am excited to read about this bread and anxious to start it this Sunday. My question is regarding steps 4 & 5. In step 4, am I to stretch and fold the dough 30 strokes as in step 5, and if so, what is meant by this? My only experience with stretch and fold is the letter style (spread out the dough on bench, pat into rectangle and fold the four sides in, turn over and place back in bowl) at 30 minute intervals. Do I do this 30 times, which seems overkill, or is there another way you are describing here?
Sorry if this is a silly question, and thanks in advance for your assistance. Lisa
Hi, Lisa.
The technique called for has been called "Stretch and Fold in the Bowl." My research suggests it was first published by Joe Ortiz. It is described also in some printings of Hamelman's Bread, although not in the one I have. Mark Sinclair (mcs on TFL) made a nice video of the technique which can be viewed here: NoKnead.html
The 30 strokes is really a maximum. The end point is when the dough is strong enough so additional folds result in it tearing, which you don't want.
Hope this helps.
David
Yes, it took 3 tries for success. It's all about timing.
2012-12-13 Thursday- I mixed the levain before going to work in a plastic container with lid. I carried it to Sweethaven that night.
Friday morning, I mixed the levain with water and flours, 60 min autolyse, then followed the SnF process as written. The oiled covered bowl stayed on the countertop until 16:30, then went out to the 41deg (and falling) shop overnight. I brought it back in on Saturday at 12:30 and let it reside on the countertop until about 1430, then I performed step 12. At 1530, I shaped a boule and a batard and covered as in step 14. I preheated my natural gas oven to 500 deg convection at 1720. Loaves on parchment, deep cuts and into the oven onto the stone at 1730 for 23 minutes, 3 ice cubes at 460deg. Persistence has paid off. Success! Holy Grains of Flour, this is good. The 7 minutes with oven off at the end sure did make for a crackling crunchy crust. Verra’ nice. Patience pays off. Served it with Lobster/Clam Chowder.
I'm glad you enjoyed it!
David
I do admire your dedication in developing the Ever-Better-Über-Mega-San Joaquin Sourdough.
I am (and remain) your faithful follower, munching happily on San Joaquin Sourdoughs,
Happy Holidays,
Karin
It gives me great pleasure to hear that you still enjoy the SJSD.
Happy Holidays to you and yours!
David
I'm one of your many fans as well, David. As a matter of fact, I just made the SJSD last week and it was fantastic. Every time I make it, I keep the whole dough as one big loaf. I struggled with the shaping a bit but it still turned out great!
Michelle
This olde world style of making bread is therapy for me. Work in the kitchen usually is. I am happy in my home. David, I do so adore you for creating this place where we can gather together and share our journey. I chose the semolina road for this batch.
AT this location, I am working in a limited kitchen and I improvise tools. Note rolling pin and box of pasta used to support loaves during final proof. My husband, in his wisdom, does agree that a good range is imperative.
2012-12-26 I grew yeast through the morning hours (as I finished the loaves above), both LG and Sweethaven yeast. (I have cultures growing in two locations and sometimes I take them with me.) At 1530, I mixed the 1:3:4 with Sweethaven yeast, to start another batch. This is a 3 day process, so starting ahead is necessary.
2012-12-27 Nice Sweethaven yeast growth at 1000 hrs. Mixed 360g Crystal Geyser water, 50g semolina, 200g AP, 250g bread flour, one hour autolyse, add salt, then continue as written. At 1530, the dough was developing nicely, had many bubbles forming and so went out to the cold (46deg and falling) shop.
2012-12-28 Brought it back in at 0800. Nice and puffy. Divided into 2 for baguettes. One hour rest, covered, then a bit more gentle shaping and onto parchment covered peal for final proof at 0920. At 1030, I saw some nice rise and preheated the oven to 500deg convection. At 1045 I put 3 ice cubes in the oven and made several diagonal slashes in the two loaves, then placed them on the stone and reduced heat to 445deg convection for 23 min. WhooHooHoo! The oven spring is delightful. Oh my…. Off the parchment and onto the stone for 2 more minutes, then 7 min heat off with door cracked open. Oh so pretty and oh so good! Crumb and crust not quite the same as when sing dark rye, yet still crisp with soft sponge chewiness. I took one loaf to the club with a crockpot full of smoked meats and beans. They enjoyed it.
I slashed the batard lengthwise (shears), then into a preheated 500deg electric oven, reduced to 460deg with 12 min steam (ice cubes), upper oven, then vent and turn for another 17 min, remove pockets and rolls. 11 min more for the batard (should have been 4). Awesome oven spring! The best yet. I think the levain formula is the one to use.
The filled pockets were delicious, crunchy and savoury. Though I overcooked the batard (on the phone with my daughter), it was delightful. The overcooked crust was uber crunchy, my husband said “It’s not overdone to me!” The sponge was chewy and flavourful.
Although I used my home-grown starter (whole wheat) that I've been nurturing for many years and dark (country-style) flour instead of AP. Taste and consistency are fantastic. Amazing crust too! It's very impressive that your breads have been inspiring others for so long. Thanks!
Meir
Your loaf looks wonderful! The crumb is remarkably open for a bread made with a WW levain and (presumably) high-extraction flour!
I'm glad you enjoy it.
David
I'm based in Israel, where the flour names and labelling are different than in N. America. The dark flour I use is basically a high-protein (unbleached) flour with higher ash/bran content (higher protein than the regular bread flour they sell here). It makes an off-white-colored crumb. It is definitely not whole wheat, so the open crumb is actually par for the course (assuming I don't screw up, that is). I use this flour as my go-to bread flour. Thanks again.
I made this recipe yesterday and used freshly ground hard red wheat and freshly ground rye. Everything seemed to go well until I sliced the loaf and saw the crumb. No big holes. The taste seems fine, as does the texture. Did the freshly ground grains cause this? Or ?? I don't have a baking stone so I used a cast iron griddle but I can't imagine that would affect the crumb.
I made this recipe yesterday and used freshly ground hard red wheat and freshly ground rye. Everything seemed to go well until I sliced the loaf and saw the crumb. No big holes. The taste seems fine, as does the texture. Did the freshly ground grains cause this? Or ?? I don't have a baking stone so I used a cast iron griddle but I can't imagine that would affect the crumb.
Your whole grain flours include the bran, which slices up the strands of gluten which otherwise form the walls of bubbles. Note that my SJSD formula calls for about 90% white flour.
David
Ugh. I did notice that the recipe called for AP, but thought I'd try the home ground whole wheat. Is there any remedy for the bran issue? Sifting perhaps? I have a soft white wheat that I could add, but again, it would be home ground and would still have bran, right? I'm told that mixing hard and soft wheat makes an AP flour. Thanks for any help or suggestions!
Sifting will remove some of the bran, certainly. You need to consult one of TFL's experienced home-millers for details.
Both hard and soft wheat have bran. The principal difference is in protein content. Soft wheat is mostly used for pastry, I think. AP flour is usually all hard wheat but a mix of Spring and Winter wheat. Hard Spring wheat has the highest protein/gluten content.
The difference between white and red wheat is that white wheat is missing a particular pigment that gives the bran a bitter/grassy flavor that some do not enjoy. I find that using pre-fermented flour (sourdough) and adequate bulk fermentation removes the offensive flavors. But that is yet another issue.
David
I did some research and found another possible easier solution: soaking the flour. Evidently Peter Reinhart is an advocate of this process. While I'm usually loathe to alter recipes, as you can see I'm already venturing into uncharted territory so I figured it's worth a try. What do you think?
cracked grains, rolled oats, seeds of various sorts. I have thought of this mostly as a way of keeping dry, hydrophilic stuff from stealing too much water from my flour. I have heard soaking flour softens the bran. That's logical, but I don't know if it really makes a difference in crumb structure.
I guess you are going to have to try it and show us the results!
David
Hi David,
I was wondering if you would mind commenting on what parts of your process here are most important for good oven spring. I often use a much simplified process that is great in all aspects with the exception of the oven spring so I'm keen to understand what's important to make this happen.
Thanks
The percentages you have listed next to your ingredients above, is that to help with adjusting for batch sizes? or might there be another reason, I’m not catching?
I love to bake and have been for years but I never got to the point of understanding hydration rates percentages of this or that. Not that I’m averse to that kind of approach to bread baking, but I’ve never really had to, I reckon...
Anyways, your insight old be helpful.
Blessings
Pat
Baker's math is really very simple, once you understand the basic concept. It is a way of documenting the proportions of ingredients. The total flour in the dough is arbitrarily set at 100%, and all the other ingredients are some percentage of the total flour. So, for example, if you have a formula with 600g of flour and 400g water and 12g salt, the formula would be:
Flour = 100%
Water = 400/600 = 0.67 x 100 = 67% (We say, "This is a 67% hydration dough.")
Salt = 12/600 = .02 x 100 = 2%
This information helps the baker in two ways. First, it allows you to scale the recipe up or down to make more or less dough, keeping the ingredient proportions the same. Second, it allows you to compare recipes, apples to apples. If you know one recipe has 20% whole wheat and another is all white flour, you have a sense of how the doughs will differ. That is more difficult if all you have is the weights of ingredients and one recipe makes 750g of dough and another makes 2347g of dough.
Hope this helps.
David