The Fresh Loaf

A Community of Amateur Bakers and Artisan Bread Enthusiasts.

JMonkey's blog

JMonkey's picture
JMonkey


I don't think I've every baked this much in a weekend, and, to be honest, I didn't intend to. All I aimed to do was bake for

  • The family that bought two loaves from me at the church fund-raiser service auction in November
  • The annual church dinner and talent show
  • My family's weekly bread

Er ... ok, I guess I did intend to bake that much. I just didn't realize it.

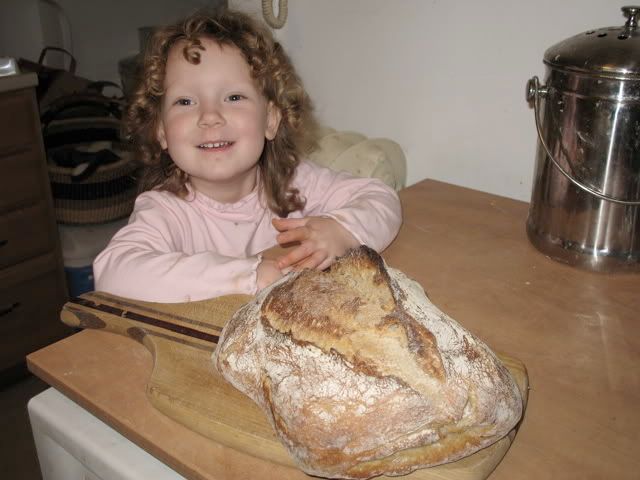
The loaf above is about to be delivered by my daughter Iris and I to a family a few blocks away. It's a loaf of Hammelman's 40% Caraway Rye (yes, I used white flour), though I made it a bit bigger (about 2 lbs instead of 1.5) and didn't bother with baker's yeast. I just let the rye sourdough do its work.

Alas, no pictures of the crumb -- that would have been rude.

The next loaf on the agenda was white sourdough.


I used the NY Times / Sullivan St. Bakery method, though I used sourdough starter instead of yeast, mixed it at about 72% hydration instead of 80% (if I go that wet, it always sticks like Elmer's), let it sit for just 12 hours before folding, and then went the extra step of shaping it into a boule. As always, it turned out well.

Again, my apologies for the lack of a crumb photo -- I snapped this shot at the church dinner, and a friend who saw me shooting it said, with a look usually reserved for that crazy old guy at the corner who screams about bugs and scratches himself: "Er, you take photos of your bread?"

I stammered something about it being for a bread message board, but I don't think that made me sound any less crazy. Cutting into the loaf and lovingly photographing the interior was too humiliating to contemplate at that point, much less actually perform, so I put the camera away. The crumb wasn't as open as the masterpieces that Mountaindog regularly pulls out of her oven, but it was light and open enough.

This morning was the big day. I had some rye starter left over, so I thought I'd bake a couple loaves of whole wheat 40% rye sandwich bread, in addition to my usual whole wheat sourdough sandwich loaves. Plus, I still had to deliver a loaf of whole wheat cinnamon walnut raisin bread to the auction family and, if you're going to make one loaf, why not make two?

Unfortunately, when I woke up this morning, I felt like someone had stuffed my head with very thick mayonaise. I courageously made the sourdough blueberry muffins my daughter had requested, but after breakfast my wife said, "We're skipping church, I'm taking Iris to her friend's birthday party and you're going back to bed." So I did. I slept until 1pm.

When I awoke, I felt much better (thank you, Mucinex!). Good enough to knead up three batches of dough.

The night before, however, I'd taken a sourdough pizza doughball out of the freezer and put it it the fridge to thaw, so, just before Iris and I left to go to the playground around 4pm, I turned on the oven. Iris ran - literally - all the way there (about half a mile - pretty good for 3 years old), and we made raspberry-raspberry jam muffins (there are no other ingredients, or so I'm told).

When we got back, I made this "heart-shaped" pizza for my wife. Aren't I sweet?


You didn't buy that line, did you? Actually, I fumbled a bit with the peel. A happy fumble, all the same.

After dinner, I popped the cinammon raisin loaves in the oven. Near the end of their bake, I started making a shaping tutorial video and got interrupted by the oven telling me to get those loaves outta there!


Here's Iris and I sprinkling cinnamon-sugar over the buttered loaves.

A couple of hours later, the rye was ready to pop in the oven (no photo -- I put them in the freezer before realizing I'd not taken a photo) and, shortly afterwards, the sourdough sandwich loaves, which rose very nicely.


Next weekend, I think I'll just stick to something simple like just one loaf. Of course, if you're making one loaf, it's not much more trouble to make two. Also, if I'm feeding my rye, I may as well use it somehow -- hate to throw some away ....
JMonkey's picture
JMonkey

As my wife was away in Washington, DC for a conference, there wasn't much time for baking, since I was alone with a three-year-old, an all-consuming (though rewarding) task if there ever was one. Nevertheless, I soldiered on, especially since I had a craving for Desem bread.

Alas, though I finally went for 85% hydration, I had no time to fold the dough properly. What's more, since I was pressed for time (I was needed to help put out a fire in the bathroom, taste chocolate treats made of wood and eat blueberry muffins with a baby polar bear, as all proper polar bears do) I never really kneaded it thoroughly in the first place. The result was as could be expected -- desem flatbread. Though tasty! Unfortunately, the Desem, knowing it had not risen to the occassion, was too camera shy for a photo.

Pizza, however, is another ball of wax entirely. This was pretty simple. I based my recipe on the sourdough pizza crust from Peter Reinhart's American Pie.


I used Arthur the whole wheat starter at 100% hydration, which made the dough about 30% whole wheat, and shot for 66-68% hydration. I also had to do a half-and-half mix of KA Bread Flour and KA All-Purpose, since I ran out of bread flour, and added 2 Tbs of olive oil. Also, instead of making four 10-oz dough balls, I made two 12 ounce dough balls -- I like a slighly bigger pizza than Reinhart, I guess.

Saturday evening, I kneaded it up lightly, folded it twice during the initial four hour fermentation and then divided it into two. One dough ball went into the freezer while the other went into the fridge. The next day, at 4pm, I took the dough ball from the fridge to warm up, grated the cheese (2 ounces low-moisture mozzarella, 1 oz feta, 1 oz parmesan), cut up the olives, sliced the turkey sausage, defrosted the sauce (I had some leftover a couple of weeks ago, so I just threw it in the freezer -- thawed out well! I highly recommend Reinhart's recipe for basic tomato sauce.), and roasted half a yellow pepper I found in the fridge, still fresh, over our gas burner. I set the oven to 550 F at 5pm, and then headed for the airport. When we got home with Aurora around 6ish, it took just 10 minutes to make the pizza and slide it into the oven. Bella! My first (successful) sourdough pizza!


Later that evening, I finished up the weekly whole wheat sourdough sandwich bread that is a lunch staple for our family. It rose well. Tasty stuff.

This weekend, we're having our annual church dinner at my homey Unitarian church -- I always enjoy it because it gives me an excuse to bake something I'd never bake at home because:

  • My wife and I are each trying to drop 15 lbs.
  • I'm kind of a nut about ensuring my family eats nutritious food, which means whole-grains.
  • Dammit, I bought a grinder and 200 lbs of wheat berries! I've got to use it!

Any suggestions for what might be tasty? I was thinking a big old brioche, or maybe that Artos bread from the BBA. Anyone made that before?
JMonkey's picture
JMonkey

Sorry that I've not been around much lately. My wife and I have been travelling quite a bit on the West Coast. We're contemplating a move to either Corvallis, Oregon or Providence, RI and have to decide within the next 10 days where we're going to spend what's likely to be the rest of our lives. So it's a been a bit stressful. We loved Corvallis, but haven't yet checked out Providence -- that's next weekend.

So, what better way to relieve some stress than the knead the bejeezus out of some dough?

I didn't take a lot of photos, as I couldn't find where we'd unpacked the camera until this afternoon, but I started on Friday with a big 2.5 lb. boule of desem bread. It turned out beautifully, though, once again, the crust was not so crispy.

I'm wondering, could it be the use of rice flour to dust my banneton that's the culprit? I love how effortlessly even the stickiest dough pops out of the banneton or couche with just a thin layer of rice flour, but since I started using it, I've gotten chewy, not crispy crusts, which should be happening at 500 degrees F in a cloche. Anyone else have this experience? I don't mean to malign the rice flour, but it's the only thing I can think of that I'm doing differently.

We took the desem to a dinner party, where it was mostly consumed. Then, Saturday night, we had pizza, which was lovely. I used the "whole wheat overnight crust" recipe from the King Arthur Flour Whole Grains Baking book. Next time, I want to try to stretch it out a bit thinner to the full 12 inches (it was about a 10 inch crust) because the pizza was a bit "bready", but I was terrified of tearing the dough, especially since I've misplaced the fabric for my Super Peel. I had to do it the old fashioned way, with a lot of semolina flour. Thankfully, it worked.

Then, this morning, I kneaded up a loaf of whole wheat caraway sourdough rye sandwich bread. It's derived from one of the test recipes that Peter Reinhart's been working on for his upcoming book (I can't wait) so I'd feel like a cad and a heel if I posted the recipe, but my version's got 40% rye, the rest whole wheat, salt, water, milk, butter, honey, a bit of sorghum molasses and caraway. I added the caraway and removed the yeast, since I figured, with rye sourdough, why not let it do its own thing?

It does it well. After 1 hour, it was nearly doubled, and I had to head to church. So I deflated the dough with a fold, and then put it in our unheated front room -- about 59 degrees. Three hours later, when I returned, it was tripled in size, but, luckily, not over-risen. So I divided and shaped it and then put it in my makeshift proof-box at about 80-90 degrees. Within 90 minutes, it was ready to go into the oven. Rye sourdough is amazing stuff.


For sourdough rye with no white flour, this is a high loaf. I was ecstatic. I was pleased with the color as well.


The crumb was uniform, but light. Perfect for a hearty sandwich. This is a loaf I'll be making again and again. Rye tastes great without caraway, but I've now discovered why they're partnered so often together. Delicious.

JMonkey's picture
JMonkey

This weekend was a long weekend. Presidents' Day, we call it in the U.S., and presumably, it's a day on which we celebrate the birthdays of Washington and Lincoln. I don't know this for a fact, but I'm pretty sure both presidents ate sourdough bread at some point, given the scarcity and expense of baker's and brewer's yeast. So, in their honor, I baked sourdough. And apparently, the sourdough beasts were having a party as well -- perhaps it was my rigorous application of an 85 degree F final proof? In any case, the sourdough critters were mighty happy over the long weekend.


On Monday, I made a couple of loaves of Five Grain Whole-Wheat Sourdough Sandwich Bread. I've never had sourdough rise like this before. And, wow, is it sour. I'm not sure what got the lactobacteria so excited -- the butter? the rye chops? the oats? who knows? -- but it is delicious, if, like my wife and I, you like sour bread.

Here's how I made it:

Ingredients:

  • 430g starter (at 60% hydration)
  • 560 grams whole wheat flour
  • 465 grams water
  • 18 grams salt
  • 27 grams butter (roughly 2 Tbs)
  • 170 grams mixed grains (cracked wheat, ground flaxseed, rye chops, millet, steel-cut oats) soaked overnight in 250 grams hot water

How I made it

First, I dissolved (as much as possible) the starter into the water. I then added the flour and salt, and mixed it up until I had a dough. I gave it a good thorough kneading of about 450 strokes, and then added the butter, which I'd cut into pats. I spread half on the dough, folded it over and then repeated it. After another 100 strokes, the butter was mixed in, so I then used the same process to incorporate the grains.

I shaped the dough into a ball and let it ferment for about 4 hours at 68 degrees. It probably tripled in size. Next, I did a stretch and fold, let it rest for 15 minutes, divided it and shaped it into loaves. I then put it in my makeshift proofbox at about 85 degrees F for 2 hours, after which it was just about spilling over the side of the pan.

A slash down the center and then 55 minutes in a steamy 350 degree oven.


On Saturday, I made another loaf of desem bread MountainDog has a beautiful post on her success here. As you can see, though, by the time I got around to taking a picture, there wasn't much left (and, darn it, the best photo I have is blurry -- ah well). In any case, I made it this time at 80% hydration, and was pleased to see that I got an even lighter loaf. Next week, I'll shoot for 85%. For some reason, the crust was not as crispy as it had been last week. Still delicious though, and a good keeper. Two days later, it's still fresh, which is pretty amazing for a lean loaf.


I had some leftover starter, so I took a bit of it, and built it into a wet starter for sourdough muffins. I played around with the recipe a bit. For starters, I doubled it. I also (in the doubled recipe) upped the salt a bit to 3/4 tsp, used brown sugar instead of white sugar, added 1 tsp cinnamon, increased the bluberries to 1.5 cups and only used 1 tsp baking soda for all 12 muffins. They really popped in the oven but, sad to say, they were a bit bland. Next time, I think I'll up the blueberries to 2 cups, use butter instead of oil, and up the salt to 1 tsp. I think I'll also use less hard whole wheat flour and more soft whole wheat flour, and go ahead and acidify the whole thing overnight.

JMonkey's picture
JMonkey


Well, I had mixed success with TomsBread's method. I mixed 450 grams of whole wheat flour with 388 grams of water (85% hydration) and just a pinch of yeast. I put it in the beer-cooler incubator at 85 degrees F for 3 hours, and than popped it in the fridge for about 15 hours. I then pulled it out, let it warm at 85 degrees for an hour, and tried my best to mix in 1 tsp yeast and 9 grams of salt. Wasn't easy, though, because the dough was very well developed by this point.

I then did a stretch and fold every half hour for a total of three, shaped it and let it rise for about 90 minutes. I forgot to slash the loaf, but I baked it in the cloche at 500 degrees for about 45-50 minutes, with 30 of those minutes covered.

The bread tastes great -- wheaty, sweet, a buttery after-taste with very little dry, bitter bran flavor. The texture is weird, though, which probably comes from my not mixing the yeast up well enough. Big holes in places with very dense sections elsewhere. "Fault lines" where the bread easily splits apart, as you can see on the lower left. I imagine thats from a layer of yeast that didn't get mixed. But I did learn that big (or moderately big) holes are possible and that 85% hydration doesn't have to mean flat bread. Next time, I think I'll try a combo of pain a l'ancienne with the NYT / Sullivan St. Bakery method. Mix up the full dough with cold ingredients and just 1/4 tsp of yeast. Pop it in the fridge for 12 hours or so. Then, pull it out, do three stretch and folds once per 45 minutes to an hour, shape and let it rise. Slowly.

Maybe I'll try it this weekend. If I do, I'll post how it went.

JMonkey's picture
JMonkey


Laurel Robertson, I owe you an apology. I pulled a loaf of Desem bread out of my oven about an hour ago, and, unable to wait any longer, just cut a slice to eat. Without doubt, it is the most delectable, fully flavored whole wheat loaf I have ever eaten. Why it took me this long to get it right, I don't know. But I'm glad I did. When I'm making dinner bread from now on, I'll be making this.

First of all, folks should know that I didn't use a starter made according to the methods described in The Laurel's Kitchen Bread Book, which requires 10 lbs of freshly ground flour. I'm sure you can make it that way, but there's an easier method. I just took some of my regular whole wheat sourdough starter, created a dough ball at about 60% hydration when I fed it, and left it in my chilly (55 degrees F) basement to ripen. I fed it once a day for three days, building it up each time, until I had about 200 grams or roughly 7 ounces of dough. On the final build, I increased its size by a factor of 3, and let it ripen for about 16 hours at 55 degrees, more out of convenience and necessity than calculation. If you don't have a whole wheat starter, it's simple to convert. Just take some of your regular ripe starter, and feed it in the following weight ratio of 1:4:4 -- starter: water: whole wheat flour. Refresh it two or three times like this, and you'll have your 99.99% whole wheat starter. (I won't tell anyone if you don't that it's not absolutely pure).

I screwed up my math in preparing the dough, so I ended up with about 38% of the flour as starter rather than the 30% I'd hoped for, but I'm not sure it would make that much difference. You do want a fairly large amount of starter, if I'm reading Laurel's recipe right -- somewhere in the range of about 30%. I also went for the customary 2% salt and aimed at a hydration of 75%.

Here's my formula:

  • Whole wheat flour: 100%
  • Water: 75%
  • Salt: 2%
  • 30% of the flour was pre-fermented at 60% hydration.
That worked out to roughly:
  • 220 grams starter
  • 260 grams water
  • 320 grams flour
  • 8 grams salt
I mixed it up and kneaded for about 300-400 strokes, until I could stretch a small piece of it into a translucent film (i.e. the "windowpane" test). As for consistency, I was aiming for dough that felt very tacky, but not exactly sticky. Then I formed it into a ball and let it ferment for four hours at about 64 degrees F (the temperature of my kitchen). It more than doubled in size and when I poked a wet finger into the dough, it didn't readily spring back.

Next, I gave the dough a stretch and fold, let it rest 15 minutes, and then shaped it into a ball. I placed it in a banneton (well-floured) and then used my makeshift proof-box to keep it at roughly 85 degrees for 2.5 hours. At that point, the dough had inreased about 75% in size -- perhaps it even doubled. In any case, I slashed it and put it into my cloche, which had been warming in a preheated, 500 degree F oven for about an hour. I had a slight mishap getting it into the cloche (I was a bit too forceful with the peel, and slammed the loaf into the side of the cloche, turning it over on its side. It mushed it a bit, but nothing serious -- the bake took care of it, mostly. You can see the dent on the bottom right of the loaf above.). I repositioned the bread and covered it. The bake was 30 minutes covered at 500, then 15-17 minutes uncovered at 450. I let it cool for one hour.


As you can see, the crumb does not have the huge holes one expects in white bread (I'm just about convinced that any "whole wheat bread" that has sports huge holes probably consists of at least 50% white flour), but, even so, the bread is not at all heavy or dense. The crumb is light and chewy, with a wonderful crispy crust. The flavor? It's tangy, but not overpoweringly so. There's a buttery undertone, maybe? The flavor lingers long in the mouth after eating. Really, the flavor is tough to describe aside from being complex and delicious.

Like I said, when I have company in the future, this is the bread I'll serve. Utterly delicious.

Well done, Laurel Robertson. And thank you.
JMonkey's picture
JMonkey


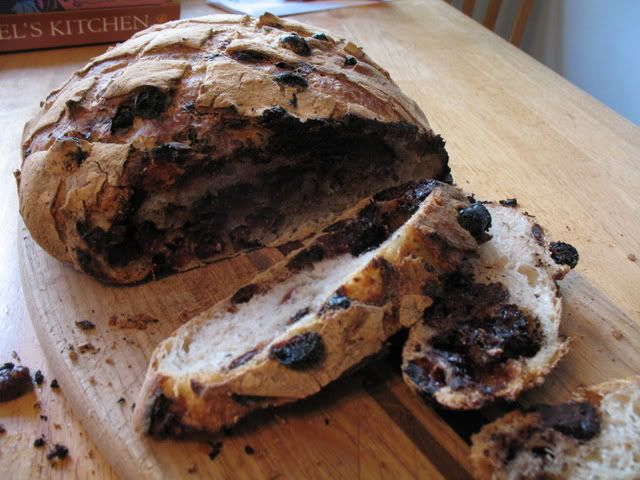
I've been wanting to make this bread for years, ever since I first had a bite of chocolate cherry bread from Zingerman's in Ann Arbor, Mich. I've tried making this several times over the past few months, all of them flops. Pancakes, covered in charcoaled chocolate (Yum-o!) were the usual products of my labors. Not this time. I finally got think I nailed it. Here's how I made it (note: These cups are Laurel's Kitchen-style cups. Don't fluff up the flour and spoon it in -- dig deep and let it settle.

Ingredients:

  • 120 grams or 1/2 cup active sourdough starter (100% hydration)
  • 340 grams or 2.25 cups bread flour
  • 8 grams or 1 1/8 tsp salt
  • 210 grams or 3/4 cup + 3 Tbs Water
  • 150 grams or 1 cup dried tart cherries
  • 125 grams or 1 scant cup big chunks of chocolate

    I've found I get more flavor out of my sourdough if I let the starter ripen at above 80 degrees. It's not necessary, though. Just make sure your starter is ripe. The night before, dissolve the starter into the water as best you can. Mix the salt with the flour (You can try using all-purpose -- I think all-purpose has better flavor and texture for sourdough, personally -- but I find that bread flour gives this bread the heft it needs to rise well despite the weight of the goodies). Then dump the flour into the starter slurry and mix it all up together until it's all hydrated. The dough should be very tacky and maybe a little sticky, but not super sticky. We're shooting for the texture of wet French dough, not ciabatta.

    Cover the bowl with plastic or a plate, and let it sit at room temperature (about 70 degrees F, more or less) for about 12 hours (anywhere from 10-14 should be fine). Once it's ready, it should look something like the photo to the left.

    Meanwhile, pour some boiling water over the cherries. If you can't find dried tart cherries (Trader Joe's sells them around Boston), dried cranberries will usually do almost as well. Let the fruit soak for about 15 minutes, drain and then place them on towels or paper towels to dry. You want the interior wet enough so that the fruit won't draw moisture from the dough, but dry enough on the exterior so they won't turn your dough into soup (it can happen -- believe me, I know). When the fruit is ready, mix it up with the chocolate in a bowl, and have it handy.

    Flour a workspace lightly, and then gently turn the dough out onto the board. With wet hands, lightly pat the dough into a rectangle. Stretch the dough to about twice its length, and then spread 1/4 of the chocolate cherry mixure in the center. Fold one-third of the dough on top, and again, spread 1/4 of the mixture on top. Fold the final third of the dough like a letter, and then turn the dough one-quarter. Follow the same procedure, and then cover the dough. Let it rest for about 15 minutes. Here's a photo sequence to show you what I'm talking about.


    Stretch and spread.


    Fold and spread.


    Fold again. Then turn the dough one quarter and repeat! Easy-sleazy. (That's the final product above. I skipped a few steps in the photos. It's well-established that stretch and fold only remains exciting and engaging for ... oh ... no more than three photos, I believe..)

    Folding the chocolate and cherries into the bread ensures that the vast majority of the goodies stay protected from the fierce heat to which you're going to subject the dough in order to get that lovely, crunchy crust we all adore. The yummy stuff is not as evenly distributed as it would be were it mixed in from the beginning, but uneven distribution is highly preferable to charcoal. Trust me.

    Now, after letting the dough rest for 15 minutes, gently shape the dough into a boule, and place it in a well-floured banneton. I splurged a while back and bought one of my own, but you can easily construct a makeshift banneton out of a bowl and a well-floured linen napkin.

    I like to let my sourdough proof in the makeshift proof-box you see to your right. I pour a cup or two of boiling water in there and close it up. It'll stay within 3-4 degrees of 85 degrees F for about 90 minutes. I then pour in another cup or two of hot water.

    After 3 hours, my bread looked like this.


    About an hour beforehand, I'd put my cloche in the oven and preheated it to 500 degrees F, but if you don't have a cloche, a dutch oven or oven-safe casserole will do. If you don't have that, just use your baking stone and steam the oven. If you don't have that, just put the bread on a baking sheet. Once the bread was scored, I baked it covered for 30 minutes, and uncovered for about 17-18 minutes, and then let it cool an hour (can you believe it?) until we dug in. I had a minor mishap with a bit of my bread sticking to the peel, thus the odd shape to the left. It didn't disuade us from gobbling it all up with 48 hours though.

  • JMonkey's picture
    JMonkey

    Now, I'll grant you, whole wheat soybean bread garnished with sunflower seeds sounds like a parody of something you might find in The Laurel's Kitchen Bread Book. And, in fact, you won't find it there.

    Well, not with the sunflower seeds, anyway. The original recipe calls for sesame oil and sesame seeds. My daughter's preschool doesn't allow peanuts, sesame or tree nuts (one of her friends there is deathly allergic), so I had to go with sunflower seeds. Yes, it sounds like 70's health-food hell, but truly -- I kid you not -- this sandwich bread is delicious. The flavor is very warm and it keeps for a long, long time.

    I love The Laurel's Kitchen Bread Book. Her book taught me how to make light whole-wheat bread; without it, I'd still be churning out high-fiber doorstops. But that doesn't mean I don't think her recipes can't be improved. She's a bit light with the salt (in grams, at least -- the volumetric measurements are on the money), for instance, so I generally add a tad more to bring it up to the 1.8 to 2 percent range, and I almost always add a pre-ferement of some sort.

    One other thing to remember -- if you're using cups, Laurel has a very heavy hand. Forget fluffing up the flour and spooning it in the cup. Dig deep and let it settle.

    Here's how I made this bread:


    The Night Before


    Take 3/4 cup or 150 g raw soybeans (roughly 2 cups cooked) and cook them overnight in a slow cooker in plenty of water. If you're brave, let them simmer in a big pot with lots of water overnight -- I'm not that brave. In the morning, mash up the soybeans well.

    Mix 2.5 cups or 375 g whole wheat flour with a pinch of instant yeast and 1.25 cups or 280 g water. Cover and let it ferment for 10-14 hours. By morning it should be full of bubbles.

    The Next Day

  • 2.5 cups or 375 g whole wheat flour
  • 2.5 tsp or 17 g salt
  • 1.5 tsp instant yeast
  • 3 Tbs honey
  • 1.25 cups or 280 g water
  • 1/4 cup of sesame or other oil (I used canola)
  • 2 Tbs lightly toasted sesame seeds (I used raw sunflower seeds)


    Break up the pre-ferment into a dozen pieces and mix it with all the other ingredients except for the seeds and the soybeans. Knead the dough until you can stretch a piece of it into a thin translucent sheet without tearing. This should take anywhere from 10-20 minutes, or 300 to 600 strokes. Once the dough is nearly fully kneaded, flatten the dough and spread half of the soy pulp on top. Fold the dough up, flatten again, and spread out the other half. Knead until all the pulp is well incorporated. Then, form the dough into a ball, put it in a bowl, cover it and let it rise. When it's ready, you'll be able to poke it with a wet finger and the dough will either not spring back, or will do so very slowly. Divide the dough, form two loaves, roll the loaves in the sunflower seeds and place into greased pans. Cover and let them rise until they crest above the edge of the pans. Slash the loaves as you like, and then bake at 350 (with steam, if you like) for about 50 minutes. NOTE: Laurel directs readers to do two bulk rises and then shape. Since you've got a pre-ferment, I don't think another bulk rise will do much for the bread, but feel free to experiment.

    Soybean bread wasn't the only thing I made this weekend, however. I also attempted a sourdough pizza using the no-knead technique. The dough was 1/3 whole wheat, 1/3 white bread flour and 1/3 semolina, with salt and olive oil. It was pretty wet -- about 72 percent hydration -- and had about 15% of the flour (whole wheat) in the starter. I let it sit, unkneaded for about 12 hours, folded it, and then put it in the fridge for the afternoon.

    Here's the first pizza. Turned out less than OK. Crust was chewy, not crispy, and the flavor was far too sour. The second pizza? Let me just say I'll never forget to re-flour my peel when making two pizzas EVER AGAIN. I had to set the oven on "clean" the mess was so awful, and, in the process of incinerating the mass of cheese, dough and tomato sauce that remained cemented to the oven floor, it set off my smoke alarm at 3am.

    I also tried to get the no-knead thing right for whole wheat: All whole wheat flour, 85% hydration, 1.8% salt, 15% starter innoculation. 12 hour rest, fold, shape, place in a well-floured (but not well floured enough) banneton and proof for 3.5 hours at 82 degrees F. Bake in a cloche, hot.

    Behold! The super sour pancake!

    But I wasn't finished. I still had about 1 cup of starter left over, and didn't want to throw it away. So I decided to make Sourdough Blueberry Muffins. The only changes I made to the recipe behind the link were to use a whole wheat starter, use whole wheat pastry flour and add 1/4 cup milk to get the right consistency. Not bad at all! Very light and not super-sweet with a simlar sourdough undertone to the sourdough waffles I made the week before. So the weekend turned out ... about 50%. Which I'll take -- maybe next week i'll get the no-knead whole wheat sourdough right. Sigh.

    Here's the muffins.
  • JMonkey's picture
    JMonkey

    Many, many months ago, when I first started making sourdough, I tried making sourdough waffles with some leftover starter.

    Man, was I disappointed. The flavor was nice, but the recipe said to expect some cool chemistry, and I saw none. What's more, these waffles were heavy and tough. Chewy. I like a crispy waffle with a tender, airy interior. Though the taste was good, these definitely did not fit the bill.

    Then, last night, after I'd set up the final build for today's weekly sourdough bake, I had a revelation. I was making a no-knead version of white flour sourdough (odd for me, as those of you who know me know that I'm a health-nut hippie crunchy whole-wheat kind of guy. But every so often, I get a white bread craving, and, besides, we had company coming over. So what the hell?), and I had some starter left over. I hate throwing the stuff away. Glancing over at the unkneaded dough that would essentially knead itself while I slept, it suddenly hit me.

    "Duh. You were using AP and whole wheat BREAD flour in the sponge for the waffles. No wonder it was tough. The stuff kneaded itself into bread dough!"

    Doh.

    So I went to the freezer, where I had a bag of leftover soft white whole wheat flour (i.e. whole wheat pastry flour -- I grind my own, but Bob's Red Mill sells an excellent whole wheat pastry flour. Their regular whole wheat bread flour? Not so much.) I figured I had enough starter and flour for a half batch of the recipe I'd used before, which made six waffles. Plenty for my wife, my 3-year-old daughter and me. So using the sourdough waffle recipe from the King Arthur Flour Baker's Companion as a guide, I whipped up a whole wheat version.

    What a difference pastry flour makes. These were the lightest, crispiest, tastiest waffles I'd ever had. And, they were 100% whole wheat. I promise, if you make them with whole wheat pastry flour, especially WHITE whole wheat pastry flour, no one's going to know the difference:

    Ingredients:
    OVERNIGHT SPONGE -

  • 6 ounces or about 1 1/4 cups whole wheat pastry flour
  • 1 Tbs sweetener (honey, agave syrup, sugar, maple sugar, whatever)
  • 9 ounces or 1 cup and 2 Tbs butttermilk
  • 2 ounces or 1/4 cup of active sourdough starter, preferably whole wheat, but not required. Should be the wet kind (i.e. 100% hydration.)

    BATTER
  • 1 large egg
  • 2 Tbs (1/4 stick) unsalted butter, melted
  • 3/8 tsp salt
  • 1/2 tsp baking soda

    Mix up the sponge the night before. Cover it and let it sit. The next morning, it should be very bubbly. In another bowl, beat the egg with the melted butter until light, and then mix in the salt and baking soda. Dump this mixture into the sponge -- if the sponge is acidic enough, it should jump when it hits the alkaline baking soda. Mix it all together and then spoon it into a hot waffle iron. You'll know your waffle iron better than mine, but it usually takes about 2-3 minutes. I judge by the volume of steam -- when it starts to dissapate, they're usually done.

    This recipe makes six traditional waffles. If you've got a Belgian waffle maker, I'm afraid you'll have to find out for yourself how many it will make, but no matter. The recipe stands well to doubling, even quadrupeling, and leftover waffles freeze beautifully, so don't worry about making too many. When you want one for breakfast, just pop it direclty into the toaster from the freezer. Delicious.

    If you want to use up more starter than I did, simply double the amount of starter and only add 1 cup (8 ounces) of buttermilk and 5 ounces (1 cup + 1 Tbs) of flour.

  • JMonkey's picture
    JMonkey

    Well, my first attempt with 100% whole wheat flour was pretty much a bust. But I thought I'd give it one more shot with sourdough and regular bread flour.

    Wow. As you can see, my daugther is proud of her work (she helped me mix, which, with this technique, is about 75% of the work):
    Sourdough bread

    I've never had an "ear" like that on a loaf, and I've never had such a wonderful, crunchy crispy crust. Here's a shot of the crumb:
    Crumb shot
    Nice and open, but without big "mouse holes." As for flavor, it was a mild to medium sourdough flavor, buttery with a slight tang and a long aftertaste. Crumb was chewy and light. Very nice.

    Here's how I made it. My formula:
    Final dough of 90% white bread flour, 5% whole rye, 5% whole wheat, 1.9% salt, 72% hydration.
    5% of the flour was prefermented sourdough starter at 100% hydration.

    Below are the actual weights of ingredients I used to get 1.1 kilograms of dough (strange, I know, but I was trying get the right size to fit my cloche): Mix together:

  • 569 grams bread flour
  • 32 grams whole rye flour
  • 12 grams salt
  • Dissolve 63 grams whole wheat starter at 100% hydration into
  • 424 grams water. Pour the water into the flour mix, and stir until it comes together into a dough.
    Cover and let it sit for 17-18 hours at room temperature.
    Flour a board copiously and then give the dough one stretch and fold. Wrap it in a well-floured towel or sheet of baker's linen and let it sit for two hours.
    Pre-heat the oven about one hour before baking to 500 degrees. Make sure that the covered pot, dutch oven or cloche is in the oven to warm up. I used a cloche. They're not cheap. With shipping, they'll run you north of $60, but that's a lot less expensive than most dutch ovens, which seem to run $175+ for a big one of decent quality. I was given the cloche as a gift and don't have a dutch oven or a big covered cassarole.
    Slash the dough if you like, though it may be too wet. Luckily, mine was perfect for slashing.
    Carefully open the container to flop the dough inside, seam or slash side up. Close the oven door and lower the heat to 450.
    Bake for 30 minutes covered and 10-20 minutes uncovered. (I baked mine for 15 minutes).
    Let it cool on a rack for about an hour.

    I don't make white-flour bread very often, but when I do, this will be the technique I'll use, though I may actually shape it next time. The dough had surprising strength and, after the fermentation, though the dough was sticky, it was by no means a batter. It kept its shape well. Amazing bread.
  • Pages

    Subscribe to RSS - JMonkey's blog