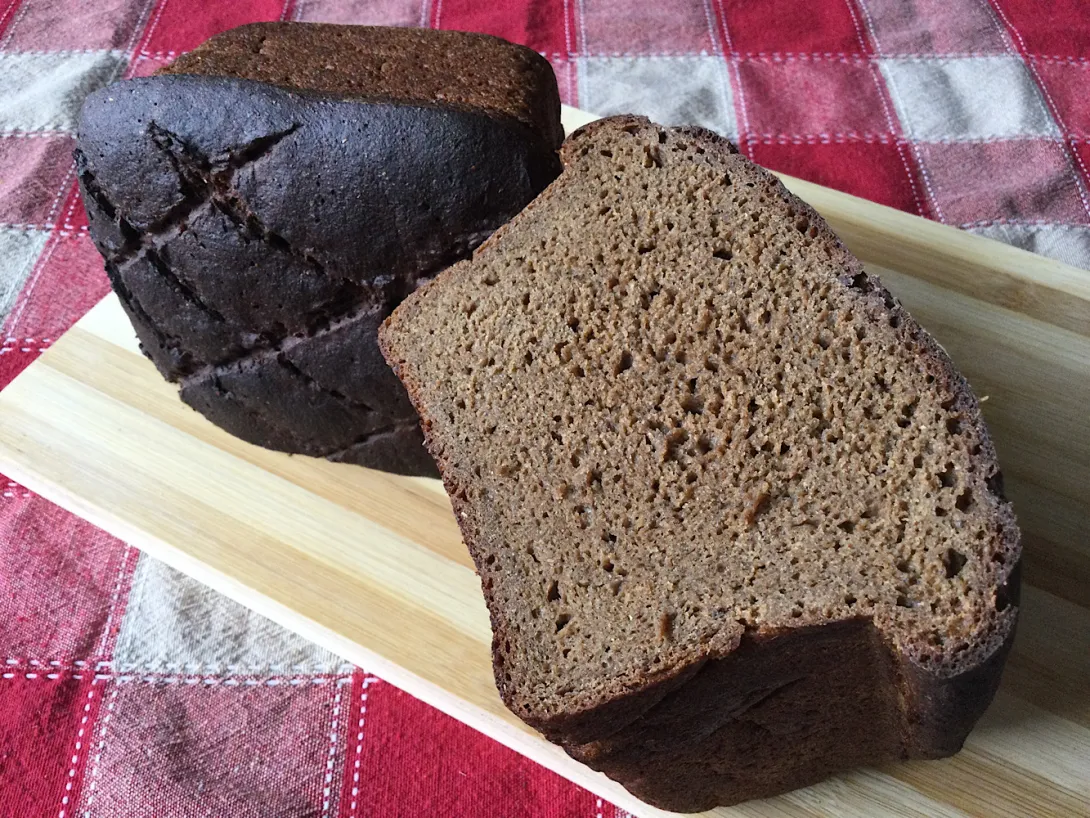
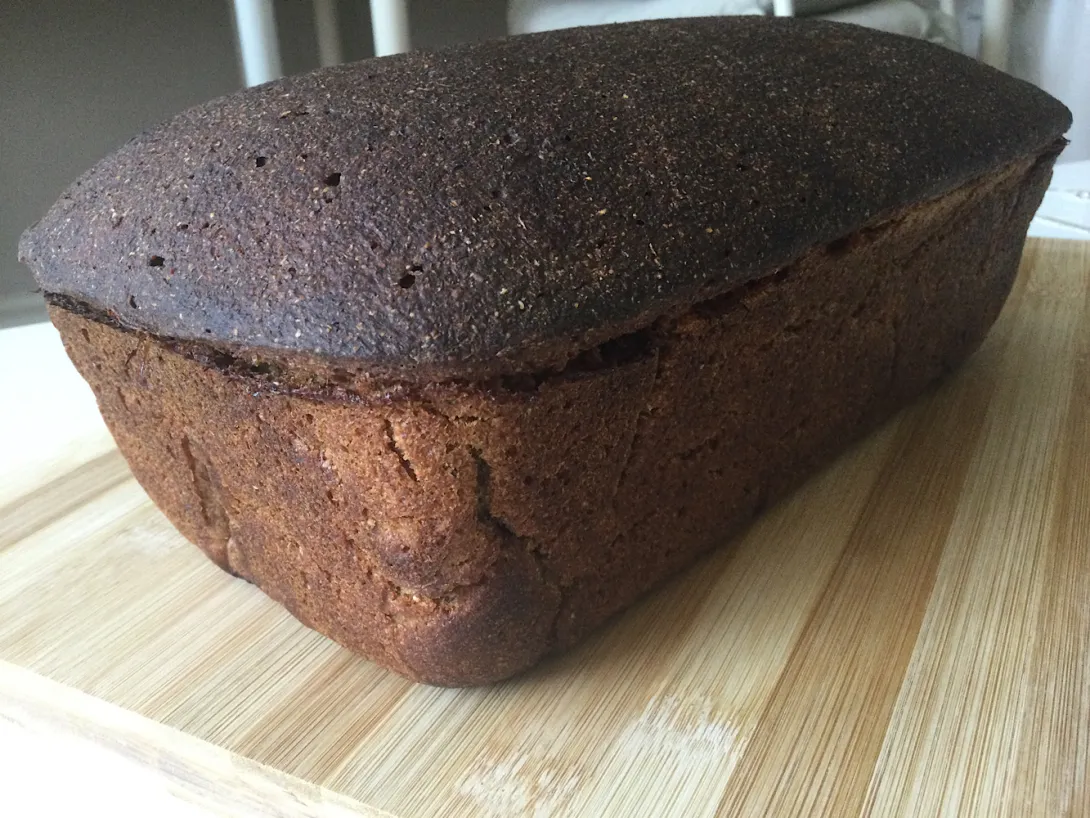
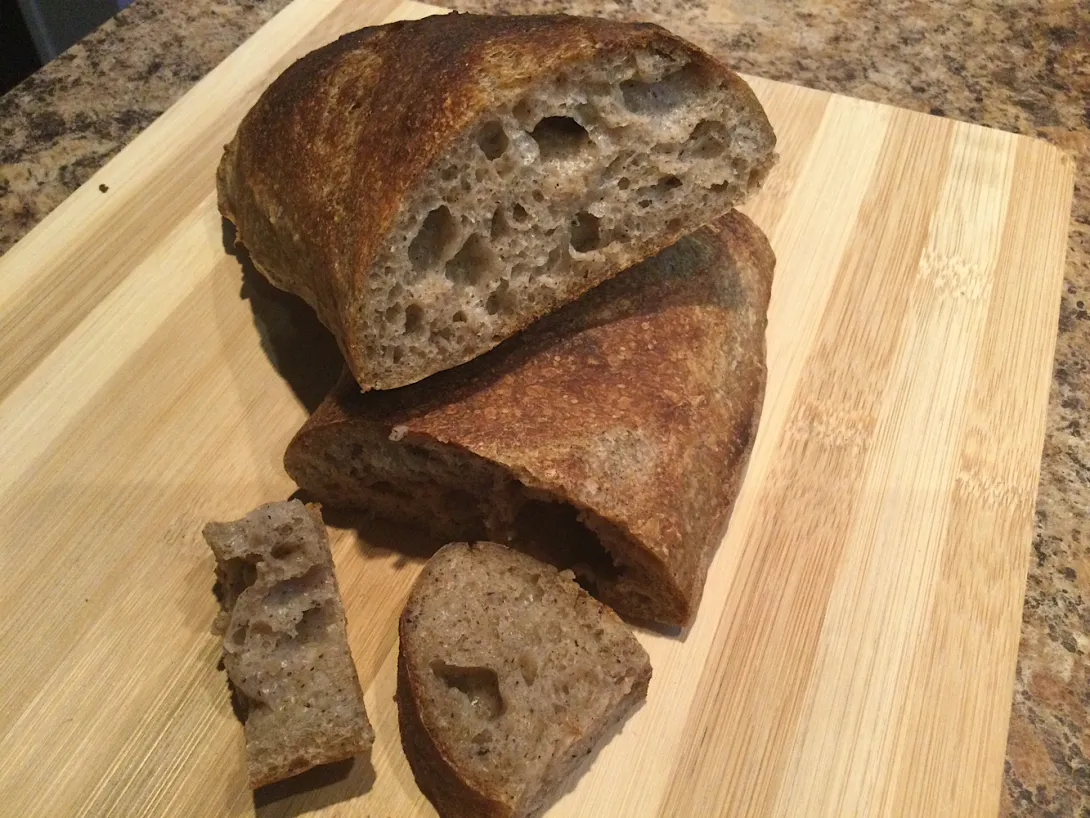
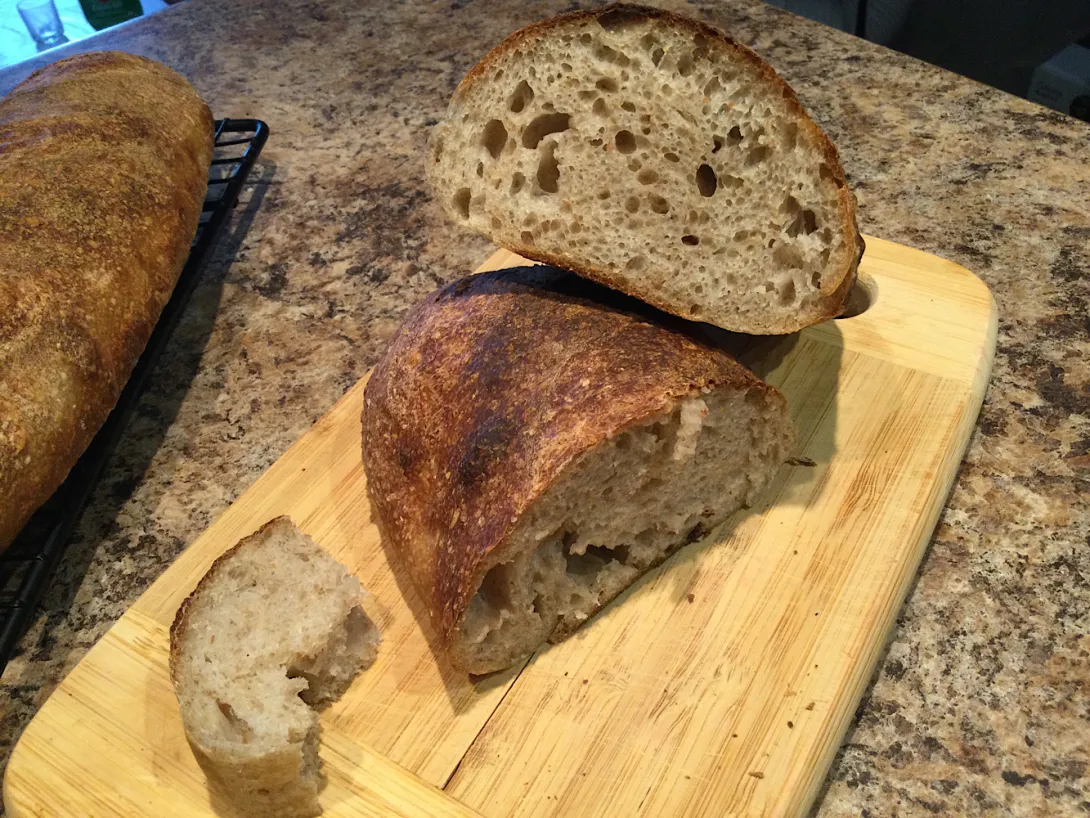
The Fresh Loaf

A Community of Amateur Bakers and Artisan Bread Enthusiasts.

happycat's blog

happycat's picture
happycat

Inspiration for A 100% Buckwheat Borodinsky

Dark buckwheat and dark rye are easy for some of us to confuse in a bulk food store particularly when we're masked up and only half paying attention. So what happens when you load up on dark buckwheat in your basket and then realize what you've done? They share some characteristics such as low usable gluten and gellability using scalds. So, why not try using buckwheat in some rye recipes? Since my mind is always playing around with things to see what happens, this seemed like a fun little adventure.

Changes from Borodinsky Recipe

I have previously made Borodinsky using the Rye Baker's recipe. I again relied on that recipe with the following tweaks:

  • I used 11g of unfed rye sour (really unfed, like weeks in the fridge after my previous baking binge)

  • I replaced all rye flour with dark buckwheat flour

  • I replaced 4g caraway/anise spice with 26 g black sesame toasted and ground
  • I used my homemade rye solod in place of the rye malt
  • I replaced sugar with honey

  • I added 3g diastatic rye malt to the final mix due to concerns about fermentation speed
  • when the 40-minute bulk ferment showed little progress, I extended it to 6 hours 

Process of Making the Bread

Here I toast black sesame and homemade solod. These will be the "spice" flavours for the bread.

Here I am assembling the scald... flour, ground solod, ground black sesame...

So, I left the levain out all night. I placed the scald in my proof box at 55c all night.

The next morning, the two items bore no resemblance to their rye versions.

The levain was not visibly fermenting. The scald was not a loose porridge. Both seemed a bit stiff still. I resigned myself to failure at that point. However, I decided to mix them up and let them sit for 6 hours as per the recipe.

Here you can see the result... it did not puff up smoothly like the rye version. Instead, it kind of puffed and cracked instead. I decided to keep going and see what happened.

Making the final dough... throwing in all that buckwheat and wondering whether it will work.

Here is the final dough ready for fermentation. To make it easier to detect change, I smoothed it with wet hands. Now that I am writing this, I think some of you sift flour over top and look for cracks... that might be easier!

Not much happened in 40 mins... so I let it go 6 hours. Yup. It was 1030 at night by this time. Again, you can see cracks, which I took to mean progress.

Here I've panned the dough and smoothed the top. My expectations were low... it was late and after a long day I was tired and needed sleep. However, curiosity kept me pushing it along.

After the same amount of recipe time, I was delighted to see the dough puffing above the rim of the pan! Maybe this was going to work after all. I wasn't sure how far to let it go. I saw some evidence of pinholes and it was getting quite late... or early next morning? so I decided to bake.

Here's the loaf out of the oven. Was it a brick? I'd have to wait. I wrapped it in a towel and put it on a cooling rack while I stumbled off to bed.

The following day around lunch hour I sliced through the loaf. As per usual, I sat and watched the sliced end as the crumb recovered from the knife, and the aerated holes all opened up again. Heavy loaf? Yes. Brick, no!

Taste, Texture and Reflections

The bread holds together nicely in a slice, or if you break a piece off a slice. It's not gummy. It has a nice firm but soft chew. There is a bit of a soft graininess or granulariy to the crumb I guess but nothing unpleasant.
The flavour really surprised me. It was like a light citrus, like a freshly-squeezed orange juice. Some zing but no edge. With more testing, the flavour bounced around between the citrus and an almost nippy cheese. But nothing really sour.

I expect this is the sour from lactobacillus from the sourdough interacting with the umami black sesame and solod and tempered by sweet honey.

This was a really unexpected result and it was a lot of fun due to expecting failure, nudging it along, and seeing what came out.

I have no idea where to go from here. I suppose I could increase the black sesame. I also expect a properly fed starter/sour would be different but I dunno.


happycat's picture
happycat


Inspiration

My wife asked for a bostock dessert for the holidays. A bostock seems to be slices of day-old brioche, brushed with simple syrup, spread with frangipane and almond slices, and baked again. A frangipane is almond meal with sugar, eggs and butter. 

In the past I had made her cousins of that dessert such as an almond croissant (same process but with a buttery croissant... too rich for us), and a galette des rois (the David Leibovitz version with an orange zest frangipane). I have seen some people put jam on their bostock, but that is taking it into bakewell tart territory. Might still be worth trying though as it would round out the flavour profile.

EDIT: fresh vanilla in the frangipane + freshly-grated nutmeg on the finished bostock really brought the flavours together for me. Highly recommended

Sources

I needed a brioche bread. I went with Benny's Hokkaido milk bread but I used honey in the levain, all AP flour, and I beat in softened butter (no melting).

https://www.thefreshloaf.com/node/69033/50-whole-wheat-hokkaido-sourdough-milk-bread

Both bostock sources were adapted from David Leibovitz. I riffed on his bostock but had no interest in using almond paste.

https://www.davidlebovitz.com/bostock-almond-paste-recipe-french-pastry-recette/

So I used his galette des rois frangipane instead and doubled the orange zest. Recipes for frangipane call for almond flavouring but I don't care for it or extracts in general. I left it out. Next time I would add something to compliment the orange zest. NOTE: freshly-grated nutmeg on top does the trick

https://www.davidlebovitz.com/galette-des-rois-kings-cake-recipe/

First, Start the Milk Bread A Few Days Ahead

Here are all the parts of the milk bread. From front left: Butter, dry ingredients, levain, tangzhong roux, wet ingredients.

I started early so I could build the levain over 7 hrs, then build the dough and leave it overnight, then cool in the fridge, then shape, then proof. and bake, then leave the bread overnight to make bostock.

Here is the milk bread dough after mixing. I ran it slow in the Kitchenaid. I added soft butter after a few minutes of mixing.  I ran it the 15 minutes to get the smooth dough.

Here is the dough after sitting out all night. Probably 14 hrs. I then put it in the fridge to cool and ease shaping. After making and eating pancakes (incidentally my best ever... not sure if it was because I used the egg milk wash from this recipe in them) I returned to work.

Here I've divided the cooled dough into 4 and shaped into smooth balls using the bun technique (make a flat square, fold in corners, turn over, then grab it with a claw hand and roll the dough bottom against the counter)

I rolled the balls flat into rectangles, letterfolded them, rolled them flat again, then rolled them up tightly. I placed them in a buttered bread pan. $4 from Dollarama.

Here the dough has proofed for 4 hours. I could've let it go longer for more loft. However, I want somewhat dense bread to soak up bostock syrup and support the frangipane,

Here is the finished milk bread loaf, glossy from the milk-egg wash. I let the loaf cool then bagged it overnight,


Next, Onto the Bostock

Now I had my day-old bread, I was ready for bostock. You can see the fluffy crumb here, and that the crust darkened more by the next day.

Here are all the pieces of the puzzle for bostock. From the top middle: Yellowish frangipane with orange zest, processed sugar, rum and eggs. Clear simple syrup with rum. Slices of milk bread. Sliced almonds. NOTE: I added 1/3 fresh vanilla pod to frangipane... improved the flavour. NOTE: I also tried with thinner slices of bread and preferred that more. 

Here are the bostock steps: brush generous amounts of syrup on bread, spread on generous layer of frangipane, add sliced almonds. NOTE: really soak in the syrup on the bread like Liebovitz says. Makes a big difference.

Here are the bostock after 12 mins at 425f. Glorious browning. NOTE: grate nutmeg over these before serving to tie the flavours together

Flavour and notes

The bread was delicious. Frangipane had a lovely fresh orange flavour I enjoyed a lot. Nice almond crunch.

I'm thinking to try some fresh nutmeg on top. I might tweak to add a bit more salt to the frangipane. I did throw some old vanilla pods (emptied) into the sugar when I processed into fine powder. I then strained out the pods... I got vanilla essence that way but I might put fresh vanilla in instead.

UPDATE: I made a second set. I added fresh vanilla (1/3 pod) to frangipane, very generously spread/soaked the bread with the rum syrup, and grated fresh nutmeg on top. Wow. That's the version I like!


happycat's picture
happycat

I was having fun with Borodinsky so I ploughed ahead with a black rye (not bad) and a Franconia and Auvergne from ryebaker.com. I'm pretty bummed by the results, particularly as I spent a lot of time sprouting, drying, milling rye and spelt flour.

I made a few steps that caused me problems:

  1. I got very focused on one thing (sprouting, drying, and milling a bunch of rye and spelt) and I tired myself out.
  2. I wanted to scald all that bran to soften it up but went with the recipe the first time... Franconia had a bit of bran chew my wife said she liked... I might prefer softer... with the subsequent Auvergne I didn't sift out the bran for the last stage because I was tired out and trying to make breakfast for two at the same time. It also had a bit of a bran chew to it
  3. I tried reducing water and fermenting time to improve gluten control in Auvergne but it didn't seem to help 
  4. I followed the temperature and times for Auvergne but it overbaked the crust (inside was still nice and moist)

Challenges and Options

  1. I can't seem to develop the dough very much... remains clayish
  2. I think sifting and scalding or soaking the bran would help, then integrate it with the dough
  3. I wonder if autolysing the non rye flour and developing its gluten first then mixing it into the rye and sponge might work better
  4. I don't really understand the complex baking steps for Auvergne... seems like a lot of heat for a long time. I would be tempted to cut 15 mins (5 mins per phase)

Franconia

Shaped loaves... but dough is more like the Borodinsky. No gluten strength. Had to handle with wet hands.


They spread out...


Firm slices, moist with a bit of grainy chewiness from bran but also a creaminess that I attribute to the fresh milled spelt. "Bread spices" are forward (fennel, star anise, caraway, coriander) with more anise upfront and caraway lasts the longest. Hint of sour. I look forward to tasting more of this toasted with butter or with cheese and prosciutto.

Auvergne

So much sprouting, drying and milling for this one. Sigh. Same issue with clay like dough. So I gave in and shaped it with wet hands and put it in pans. Ryebaker baked it as 2 boules.

It rose nicely and I cut the fermentation short by a half hour to avoid going too far.

Blah... These are overbaked. Crust is quite crisp (will probably soften once put into bags). Should've been watching to check its progress but I was tired and watching a chocolate making show on Netflix :p

Crumb turned out ok and it's moist inside. It's sliceable.

It's only been a few hours so it's too early to tell but a brief taste was a mild sour and... not a whole lot else. It didn't taste like the effort I put into it at least right now. I had expected creaminess due to the large amount of spelt, but not there right now. But it may be better tomorrow.

Conclusions

My instincts said to scald bran but I went with the recipe first. In the future, I would scald.

In terms of effort and result, Borodinsky seems to have the most payoff to me.

However, I have been slicing and freezing my black rye, franconia, and auvergne to be eaten during the holiday break. So maybe freezing, toasting and toppings will reveal more.


happycat's picture
happycat

Borodinsky the Sequel

A couple weeks ago I made a Borodinsky bread with sprouted rye kernels, homemade solod and toasted caraway. Delicious flavour, moist texture and tasted great with homemade mascarpone but pretty strong to eat with anything else.

The second time I do anything I like to change things around and start learning conceptually what happens. This often means I break something the second time around in order to learn from it going forward.

New Solod

Last week I made a big batch of solod and changed the process. First time, I malted rye, fermented at about 45C 12 hours, then saccharified at 55C for 12 hours. I dried it on low, then toasted. It smelled amazing throughout, a combination of sweetness and fermentation,

Last week I doubled both the fermentation and saccharification times, dried it fast and hot, and toasted it. It never had the same strong fermented smell, more of a hint of it. Same with baking.


Here are my solod and coriander toasting. I decided not to mill my solod until I needed it.

Varied Recipe

I kept the Rye Baker recipe for Borodinsky but changed some of the ingredients.

  1. Last time I sprouted rye kernels, dried them and milled them and used them as all grain flour. The bread was sweet and delicious. This time, I used dark rye flour from Bulk Barn. The bread was missing something. It was never bitter but it certainly had a hint of rye edginess. Conclusion? Sprouted is better. 
  2. Last time I used sugar. This time I used honey at the same weight. Not sure if I noticed a difference in anything. It might've softened the rye flour flavour
  3. Last time I used toasted caraway. This time I used toasted coriander. I prefer the flavour of caraway for bread on its own or with mascarpone. But coriander was fine when I ate the bread with egg salad on it. No conclusion on this one. Might try aniseed next time.
  4. Last time I did 100% rye. This time I subbed in 15% all-purpose white to make it a little more bready for slicing and chew.
  5. Last time my scald was allowed to cool at room temp. This time I maintained the scald at 55C for about 4-5 hours before letting it cool inside an insulated box. Not sure it helped anything.
  6. Last time I did not dock or slash the top and it kind of separated a bit. This time I slashed a diamond pattern and the bread was able to expand a bit more without popping its lid. Repeat or similar next time.

Breadier Result

While baking, the bread had a lot less intense aroma (vs the solod caraway of the last one). I think I messed up my solod. Perhaps drying it too hot and fast?

The bread texture was a moist but firm sponge that was strong enough for thin slices. It had rye and coriander flavours but nothing as intoxicating as the first. It held up nicely as squares for open faced egg salad. It tasted good with the egg salad.

I wanted to bake up some rye breads to use during the holiday break with a giant prosciutto and mature cheeses. This version may actually work better for that task than the last one.

A slice of the loaf...

Conclusions

I loved my first Borodinsky but the labour was a bit crazy. The second one is probably better for putting stuff on it. Interesting dilemma... superior bread with sprouted grain flour on its own, or lower labour bread that is not magical but also doesn't fight with toppings.

I also made a Black Rye from The Rye Baker site. I'll slice it tomorrow after noon.


happycat's picture
happycat

Why Borodinsky Bread?

I've been wanting to make a rye bread but was a little shy due to my concerns about heaviness and bitterness. I first encountered deli style rye probably at a diner when I was a teen. I wanted something darker, like pumpernickel I've had (although I realize it was probably a cheater pumpernickel using cocoa, coffee and molasses). For the past month, I've been incorporating some helpful scalding, sprouting and malting techniques into my ugly baguettes to develop those skills.

A week ago I decided to commit to a Borodinsky bread, a 100% rye from Eastern Europe. I've never eaten anything like that but mentions of the bread here and on The Rye Baker site piqued my interest. I liked the fact that it used scalds and malts (which I had enjoyed playing with in my baguettes) and was supposed to be sweet and floral. I followed the recipe on the Rye Baker with some tweaks of my own.

http://theryebaker.com/auerman-borodinskyborodinskiy-khleb-russia/

Sprouting Rye and Milling Flour

My first "tweak" was to use sprouted rye. I bought YuPik kernels and soaked and sprouted a kilo using old cashew containers. Sprouting took about a day and then I had to dry out the sprouted grain using my dehydrator. I then had to mill the sprouted grains. I used my handheld Porlex to crack up the grain coarsely, then my food processor to produce flour. I sifted out the bran and used an electric spice mill to turn the bran into powder. This means my flour was whole-grain and fine, which may be different from standard.

Sprouted rye kernels

Dried sprouted rye ready to be milled.


My fresh milled sprouted rye... this was a lot of work and made my wife wonder if I was a little crazy. 

Making Quickie Solod

The Rye Baker recipe uses red rye malt for flavour and colour, however another source insisted that fermented red rye malt (solod in Russian) was necessary instead. 

It turns out that making a quickie solod is pretty easy. I sprouted and malted rye grain (malting means allowing the sprout to be close to the length of the grain) and then put it in a ziploc and held it at 45 Celsius for 12 hours to encourage fermentation. I then raised the temperature to 55 Celsius for another 12 hours to encourage the enzymes to break down starches into sweetness.

Then I needed to dry out the solod, toast it for a couple hours in the oven, and grind it into a fine powder. During drying and toasting, my apartment filled with a wonderful warm aroma of sweetness, fermentation and rye.

Malted rye kernels... basically letting the sprout continue longer:


Malted rye after 12 hours fermenting and another 12 hours sweetening. Look at that gorgeous red!


My solod after toasting in the oven. Smelled amazing to me... fermented sweet rye:


Here are my hand milled solod and milled sprouted rye flour. After toasting in the oven, the solod grains were very hard and brittle. This means I baked out a lot of moisture... and didn't get much solod for the amount of grain I used.

Building the Sponge and Scald

The recipe has multiple stages. Day 1 you build a sponge for leavening and a separate scald that includes flour, solod, and toasted and powdered caraway for florals. You let them ferment 16 hours then on Day 2 combine them. You let that rise a bit, then you add the rest of the flour, salt and mix it into a dough, which ferments again.

Here are the ingredients for my scald... lovely colours:


Here's the scald after 16 hours:


Here's my levain after the same period. I used my trusty rye starter... it's always spongey, not bubbly:


Mixing the Sponge-Scald With Rest

The sponge and scald are mixed and fermented some more. This shot shows after about an hour of fermentation.

Forming and Baking

Mixing the dough was difficult... the hook made a fluffy porridge and a paste around the bowl. I kept stirring back together and mixing and even gave it a rest in the middle. However my dough never pulled together like The Rye Baker shows. Next time I may use the cookie batter attachment instead of the dough hook.

Here is my porridgy dough:

However, using a wet counter and wet hands, I formed the dough and folded it a few times then smoothed it into a buttered metal loaf pan from the dollar store. It almost felt like gingerbread dough when handled wet with wet hands. Certainly little to no gluten.

After an hour or so I was delighted to see the dough rise with the supposedly telltale pinholes in the top!

I brushed the dough gently with water and baked.

Finished Bread, Crumb and Flavour

The aroma from baking was intoxicating... it came in waves of sweet fermentation, caraway florals, and rye. 

I set the loaf out on a wire rack to cool overnight for 9 hours. I then bagged it until lunch time.

Looks like it tried to pop its crusty top... maybe I need to slash or dock next time.


When I sliced through the middle, I was delighted to see the expected cake-like crumb... it wasn't a brick!

Apparently I am supposed to wait way longer to let the flavours develop, so I will not freeze portions until Monday.

We had the bread on its own and toasted with butter.

This bread was amazing. It's a bit creamy, moist, and sweet with a lovely undertone of fermentation and florals from the solod and caraway. Toasted with butter, it was delightful. Extremely satisfying to eat.. we didn't eat much but enjoyed every bite.

At times it reminded me of the flavours I like in a good pumpernickel bread.

Earlier this week my wife seemed a bit worried about all the crazy stuff I was doing to prepare for this bread. There were many steps, particularly as I made my own flour and solod and milled them. But after eating the bread, she decided she wanted me to do it again, next time with coriander instead of caraway :)


Making this bread was quite the project. Along the way, I got to enjoy all kinds of amazing aromas from drying and toasting the solod, and baking the bread. Rye has so much to offer depending on the techniques used. I was very pleased to enjoy a completely different flavour and texture from Eastern Europe.

Despite the marathon, I'd love to do it again. But I need to make way more solod and maybe ferment it longer.


happycat's picture
happycat

Borrowing Mashing from Beer Brewers

In the last two weeks, I've played with "mashing" malted rye and buckwheat to produce a sweet scald for my baguettes. Mash is a term used by beer brewers when they add enzymes to their grains and keep them hot over time to break the starches down into sugars. My mash blended buckwheat flour, diastatic malted rye flour, and hot water, and kept it at 55 celcius for 20 hours. 55 celcius was the best my proofing box could do, and was also a good temperature to keep amylase enzymes active and not destroy them.


Malting Rye Kernels at Home

I made the malted rye myself by sprouting rye kernels, malting them (waiting for sprouts to grow to the length of the kernels), drying them with a dehydrator, then milling them into a flour. I also created a proofing box to maintain the 55 celcius. I used pink foam insulation, duct tape, and the dehydrator head with the heater and fan.


100g rye kernels malted (sprouted in 12hrs, malted in 36hrs)


Dehydrated malted rye kernels... I weighed them after dehydration to check that they weighed 100g again.


Preparing the Mash

Dark buckwheat flour, fresh milled rye flour, and rye malt with hot water added. The first time I used this technique, my ratio was 2:1 water to flour, which resulted in more of a slurry. The second time was 1.5:1 water to flour, which resulted in more of a porridge.


My DIY mashing box. The dehydrator top supplies hot air around its edges and has a fan in the middle that pulls air up to circulate. The little door in the front lets me see an oven thermometer inside.


After 20 hrs the malted mash was creamy and reddish.


The first time I mashed, the sweet aroma of buckwheat honey surprised me when I checked the mash at 12 hours and again after 20 hours. The consistency shifted from water, to white and creamy, to red and creamy. On my second try, I used less water and was amazed at the fluffy texture of the resulting porridge with aromas of buckwheat honey, apples and tahini, and with a similar shift in colour from white to red.


Put on the breaks: Denaturing the Enzymes in the Mash

To denature the amylase enzymes from the malted rye (and prevent a starch attack... meaning, the enzymes destroying the starch in the dough when the mash was mixed in) I heated the mash on the stove and it quickly transformed into a dark red roux-like paste. This gelatinization will also compensate for low/no gluten in the rye and buckwheat flours. Some of it caught on the bottom... but after a day in the fridge that part easily came off and tasted almost chocolatey. 


Making the Dough

When making the dough, mixing the autolyse, levain and porridge was a bit of a challenge. The second time produced a fluffy kind of porridge that took quite a beating in the mixer before it pulled away from the bowl.


Here are the three pieces of the dough: autolysed AP flour, 100% hydration rye starter, and the dark rye-buckwheat mash. AP was 70%, milled rye 15%, dark buckwheat 15%. 


After extensive mixing (7 mins + 15 min rest x 3 times) the dough had transformed from fluffy porridge into a stickier dough. The bowl was warm from the mixing so I cooled it with a cold pack. I put the final dough in the fridge for an overnight retarded fermentation.


Loaves From Low to Higher

I shaped my loaves as baguettes and it was a sticky dough. My first loaves were overproofed and a bit flat. But they still had an aerated crumb and delicious depth of flavour that delighted me. Initially not long from the oven, it tasted almost sweet and spicy like gingerbread. Ugly but tasty. I lost my jar of malted rye flour in a sad kitchen mishap, but the flavour of the bread over the following week inspired me to go through the whole process of sprouting, malting, drying and milling rye kernels a second time.


Here's my first bake. The overproofing was my fault... I zoned out on the couch. I was doing the poke test periodically but with so much porridge in the dough, I don't think it works well. Yes they were reddish brown... an effect of the diastatic rye malt enzymes freeing up sugar for browning.


My second set of loaves were also ugly, but twice the volume of the first try. My second try used less water in the porridge and also bumped my levain back up from 100g to its usual 130g. I also returned to my usual proofing time. 


Both sets of loaves had holes in their crust, indicating a breakdown of dough strength. Apparently sourdough acidity can protect against starch attack by amylase... (thanks calbeach!) so I will use that more deliberately next time.


Taste and Texture

DAY 2 

Had it toasted... light, crispy crust, creamy soft chew, and a sweet flavour with hints of spice and apple. Wow, very cool.

Next steps... I've ordered a few more kilos of rye kernels. There is so much potential in rye... so many flavours you can get out of it. I want to increase my rye amounts and shift more of my AP into fresh-milled wheat, farro or spelt. I'd also like to try more kinds of rye preparation, as per the Rye Baker's multi-stage recipes.

DAY 3

Further tasting notes on day 3: wow. I let my half loaf defrost on the counter and by lunch it was ready. Crisp crust, soft chewy interior, very sweet with a depth of flavours I really enjoyed. Paired with homemade kidney bean hummus with a spicy zing, it was soooo tasty. Definitely want to do more with these techniques!


happycat's picture
happycat

Pumpernickel Yudane

I decided to try a pumpernickel yudane sourdough baguette.

  • pumpernickel means freshly-milled whole grain rye kernels
  • yudane means a process of gelatinizing a portion of flour and mixing it into the dough. The portion is 20% of total flour weight with an equal weight of boiling water mixed in, then left to sit overnight. Gelatinizing the dough helps soften all the bran in fresh milled kernels, and gives a moist, creamy texture and soft chew
  • baguette means my low-fi version of Maurizio Leo's sourdough baguette, made in half lengths

My yudane is 100% freshly ground whole rye kernels. The rest of the dough is Canadian All-Purpose flour.

This is the third in my series of yudane experiments. I previously used toasted buckwheat, and before that, milled wheat. See the links below.

https://www.thefreshloaf.com/node/69147/yudane-toasted-buckwheat-sourdough-baguette

https://www.thefreshloaf.com/node/69116/yudane-milled-wheat-sourdough-baguette

Making the Yudane

I sourced rye kernels from Yu Pik, a packaged brand sold in 1 kilo portions on Amazon, where I have free shipping. I ground the kernels in my Porlex manual coffee grinder on its finest setting. I added boiling filtered water, folded it in, covered in plastic and left on the counter overnight. I then put it in the fridge for an additional 24 hours to see what effect an extended time might have. I have nothing to report there... would have to try a short and long and then compare.

Preparing Dough

My dough consisted of three main parts: a 30 minute autolyse of all purpose flour, a 100% hydration dark rye flour levain, and the freshly-milled rye yudane. NOTE: I reduced water by 100ml with no noticeable effect on the crumb... but the dough was less slack and easier to work with.

You can see here what it looked like after several 5 minute mixing sessions with 15 minute breaks:

Shape and Bake

Next morning, you can see how much the dough grew during retarded fermentation in the fridge.

I portioned, shaped and proofed the baguettes. Then I slashed them and spritzed with water before putting into a 500F preheated oven with a baking tray already in. I baked 25 mins at 475F.


Loaves, Crumb, Texture, Taste

Here you can see the finished loaves. They look lighter than I expected.

Crisp crust, soft chew inside, buttery texture. Slight tang. Flavour will probably evolve by tomorrow and with toasting. I will update.


I've noticed that the two fresh-milled flour yudane versions of my baguette have a more creamy texture than the buckwheat flour version. 


happycat's picture
happycat

Toasted Buckwheat Yudane Sourdough Baguette

Last weekend I made a sourdough baguette using the yudane method (20% flour from the recipe + equal weight of boiling water, left overnight). The yudane is added to the dough before bulk fermentation. I used fresh milled hard wheat for my first one.

Find that blog here https://www.thefreshloaf.com/node/69116/yudane-milled-wheat-sourdough-baguette

A yudane gelatinizes flour and traps moisture, creating a moist crumb. It also compensates for low gluten flours through gelatinization. To compensate for the water trapped in the gelatinization you can also increase hydration by adding more water as I did with this loaf. The gelatinization helps keep a high hydration dough manageable even when it is very slack.

This weekend I made a toasted buckwheat version because I have a lot on hand. I have toasted buckwheat for pancakes because I like the flavour, especially when maple syrup is added.

Once again this is a variation of Maurizio Leo's sourdough baguette recipe with low aesthetics!


Toasting Buckwheat

My dough recipe is 80% AP and 20% buckwheat. I measured the buckwheat out and toasted it in a skillet on high heat, mixing regularly until it was browned a bit. Here you can see before and after.

 After toasting....


Making Yudane

After toasting I made the yudane by adding an equal weight (200g) of boiling filtered water. Note that I should have let the flour cool first. I got flash boiling of the flour in the mixing bowl because everything was too hot. This resulted in losing water to steam, which I had to replace by weighing it all out again. 

I let it sit overnight. Next day I autolyzed the AP flour and filtered water for 30 mins with the yudane folded in. This was because this yudane was a bit dry (compared to the fluffy porridge I had with a milled wheat version with no flash boiling).


Mixing Dough

After autolyse I added salt and rye levain and mixed 5mins + 15 mins rest x 3.

This yudane had some bits that didn't fully integrate into the dough unlike last time.

Then overnight in fridge.

Next morning

Next morning dough had risen a lot in fridge. I scooped it out, shaped and baked.

A very slack dough. I bookfolded and coiled each portion, then did baguette shaping.

Loaves baked

Loaves were not as puffy as wheat ones. May be overfermenting / proofing. Slashing didn't work too well with slack dough. I was a little impatient and abusive in my dough handling which shows :p

Crumb shot and taste

Here is the crumb shot. Moist texture, sourdough tangy and buckwheat flavour. I'll taste again tomorrow as toast.

EDIT: Next day, the tangyness had calmed down. It had a soft chew I liked, a light sweetness, and a pervasive mellow toasted buckwheat I really enjoyed. To me it was like eating some kind of slightly sweet, spiced breakfast bread. Liked it a lot!

EDIT: By lunch next day, amazing aroma in the bread. Toasted slices were great. Had as open faced sandwiches with homemade chicken salad. I am so pleased with the tastes and textures coming out of this process.

EDIT 2: Given the huge ballooning of the dough in retarded bulk, I think I would have a more controllable dough if I reduced its temperature before the retarded bulk. Cold water to make the dough, or ice packs around the mixer bowl. The dough gets warm from the vigorous mixing. A more controllable dough would make it easier to shape and slash for less ugly loaves. I might also have too much water in these. I think it was 87% including levain, yudane, autolyse, and added water duing mixing.

Next steps

I bought some farro (emmer probably) and sprouted spelt kernels so I will try some more milling and yudane over the next few weeks.


happycat's picture
happycat

A Yudane Demi-Baguette

I was curious about yudane, a scalding method whereby you take 20% of the flour of your bread and treat it to equal weight of the water from your recipe at boiling temperature and let it gelatinize overnight.

This blog describes my experience doing it. I was very pleased with the results of using a freshly-milled whole wheat kernel yudane in a sourdough baguette. Crispy crust, fluffy crumb, creamy almost buttered flavour and texture with a mellow wheat flavour.

Recipe Source

I've made my own pale imitation of Maurizio Leo's sourdough baguettes weekly for a few months now. I use a 100% hydration dark rye starter. I had to tone down the dough hydration to make it manageable for me (reduced levain from 140 to 115g; reduced added water from 100g to 40g). To enhance flavour I used a 10% rye, 90% AP + gluten. Last week I also did a 10% atta durum blend in addition to the rye.

Hard Wheat Kernels Inspiration

This week, I found hard wheat kernels on sale at Bulk Barn and I bought a kilo to play with. I decided to use a yudane method to handle the fresh milled kernels and all their bran. Part of using yudane method includes increasing hydration to make up for the water locked into the gelatinized dough. So I boosted my levain up to 130g and my added water back to 100g. Since I was using a yudane, I eliminated the added gluten as well.

Grinding Kernels By Hand

Here's 100g of kernels or so in my Porlex coffee grinder. It wasn't too bad grinding out 200g of kernels while watching some TV. It didn't feel that long to me and I certainly wouldn't buy an electric mill for this amount.


Here's the flour post grind... lots of bran.


Making Yudane With Boiling Water

I added 200g boiling water to the 200g of whole grain flour to make a firm paste.


I covered the paste and left it on the counter overnight... a key yudane step. Next morning it was a dark, firm paste. 


Adding Yudane to the Baguette Dough

Making the baguettes I autolyse flour and water for 30 mins then add the salt and levain. In this case the autolyse was all AP.

I cut up the yudane paste and added it to the autolyzed flour and water + salt and levain from the recipe. Cutting it up probably didn't help. It took quite a beating to integrate it with the dough. Here's the dough after kneading with the dough hook on a Kitchenaid Pro (5 mins, 15 min rest, 5 mins, 15 min rest, 5 mins). 


Retarded Bulk Overnight in Fridge

I did a retarded bulk in the fridge overnight and turned out the dough. It puffed up quite a bit overnight. I divided into 6 x 318g portions and shaped and proofed on pieces of parchment with all the loaves tucked up against each other in a pan.


Baking and Cooling

Preheated the oven to 500f with the baking pan in. Slashed and sprayed dough and loaded 3 onto the pan and turned down to 475 for 25min bake. Kept second set in the fridge, then did them afterward. 

RESULTS: Loaves, Crumb Shots, Taste and Texture

The loaves look the same as the past despite having 20% whole wheat with all the bran, no gluten added this time, and hydration increased.


Crumb shot... looks similar to usual for past loaves. The texture was moist almost creamy with a nice soft chew to it that I like, and which is an improvement. Lightly crisp crust which is also an improvement. And the flavour... it's almost tasting like it's buttered. There's a nice whole wheat flavour but it's rounded and mellow. 


Conclusion and Future Direction

I like this version a lot! 

I think I might try a buckwheat yudane as well (lots of flour) and fresh-milled farro (kernels also at Bulk Barn). 

EDIT: next day, thawed a loaf and toasted thin slices for open faced sandwiches, My favorite bread ever... taste and texture, wow. I am a total convert to yudane.

-- David

Pages

Subscribe to RSS - happycat's blog