I've been baking for a few years now and I've managed to get good results with many recipes but a nice artisan-style no-knead loaf still eludes me. I usually bake out of Flour Water Salt Yeast by Ken Forkish. I have managed to get good results in every aspect of the bread but I cannot for the life of me get the nice, beautiful irregular crumb that is often found in an artisan loaf.
Things I've tried adjusting:
- Longer Bulk Fermentation (more gas in bread = more bubbled in crumb?)
- This one had basically no effect on the finished product
- Long Proof (more relaxed gluten = better oven spring?)
- This one just made the bread flatter as I expected but it was worth a try
- Short Proof (maybe the gluten was too relaxed and letting all the gas escape during the oven spring)
- Cold Proof (I heard it makes better bread and it did make the bread hold a nice shape and give a good scoring ear but the crumb still sucked)
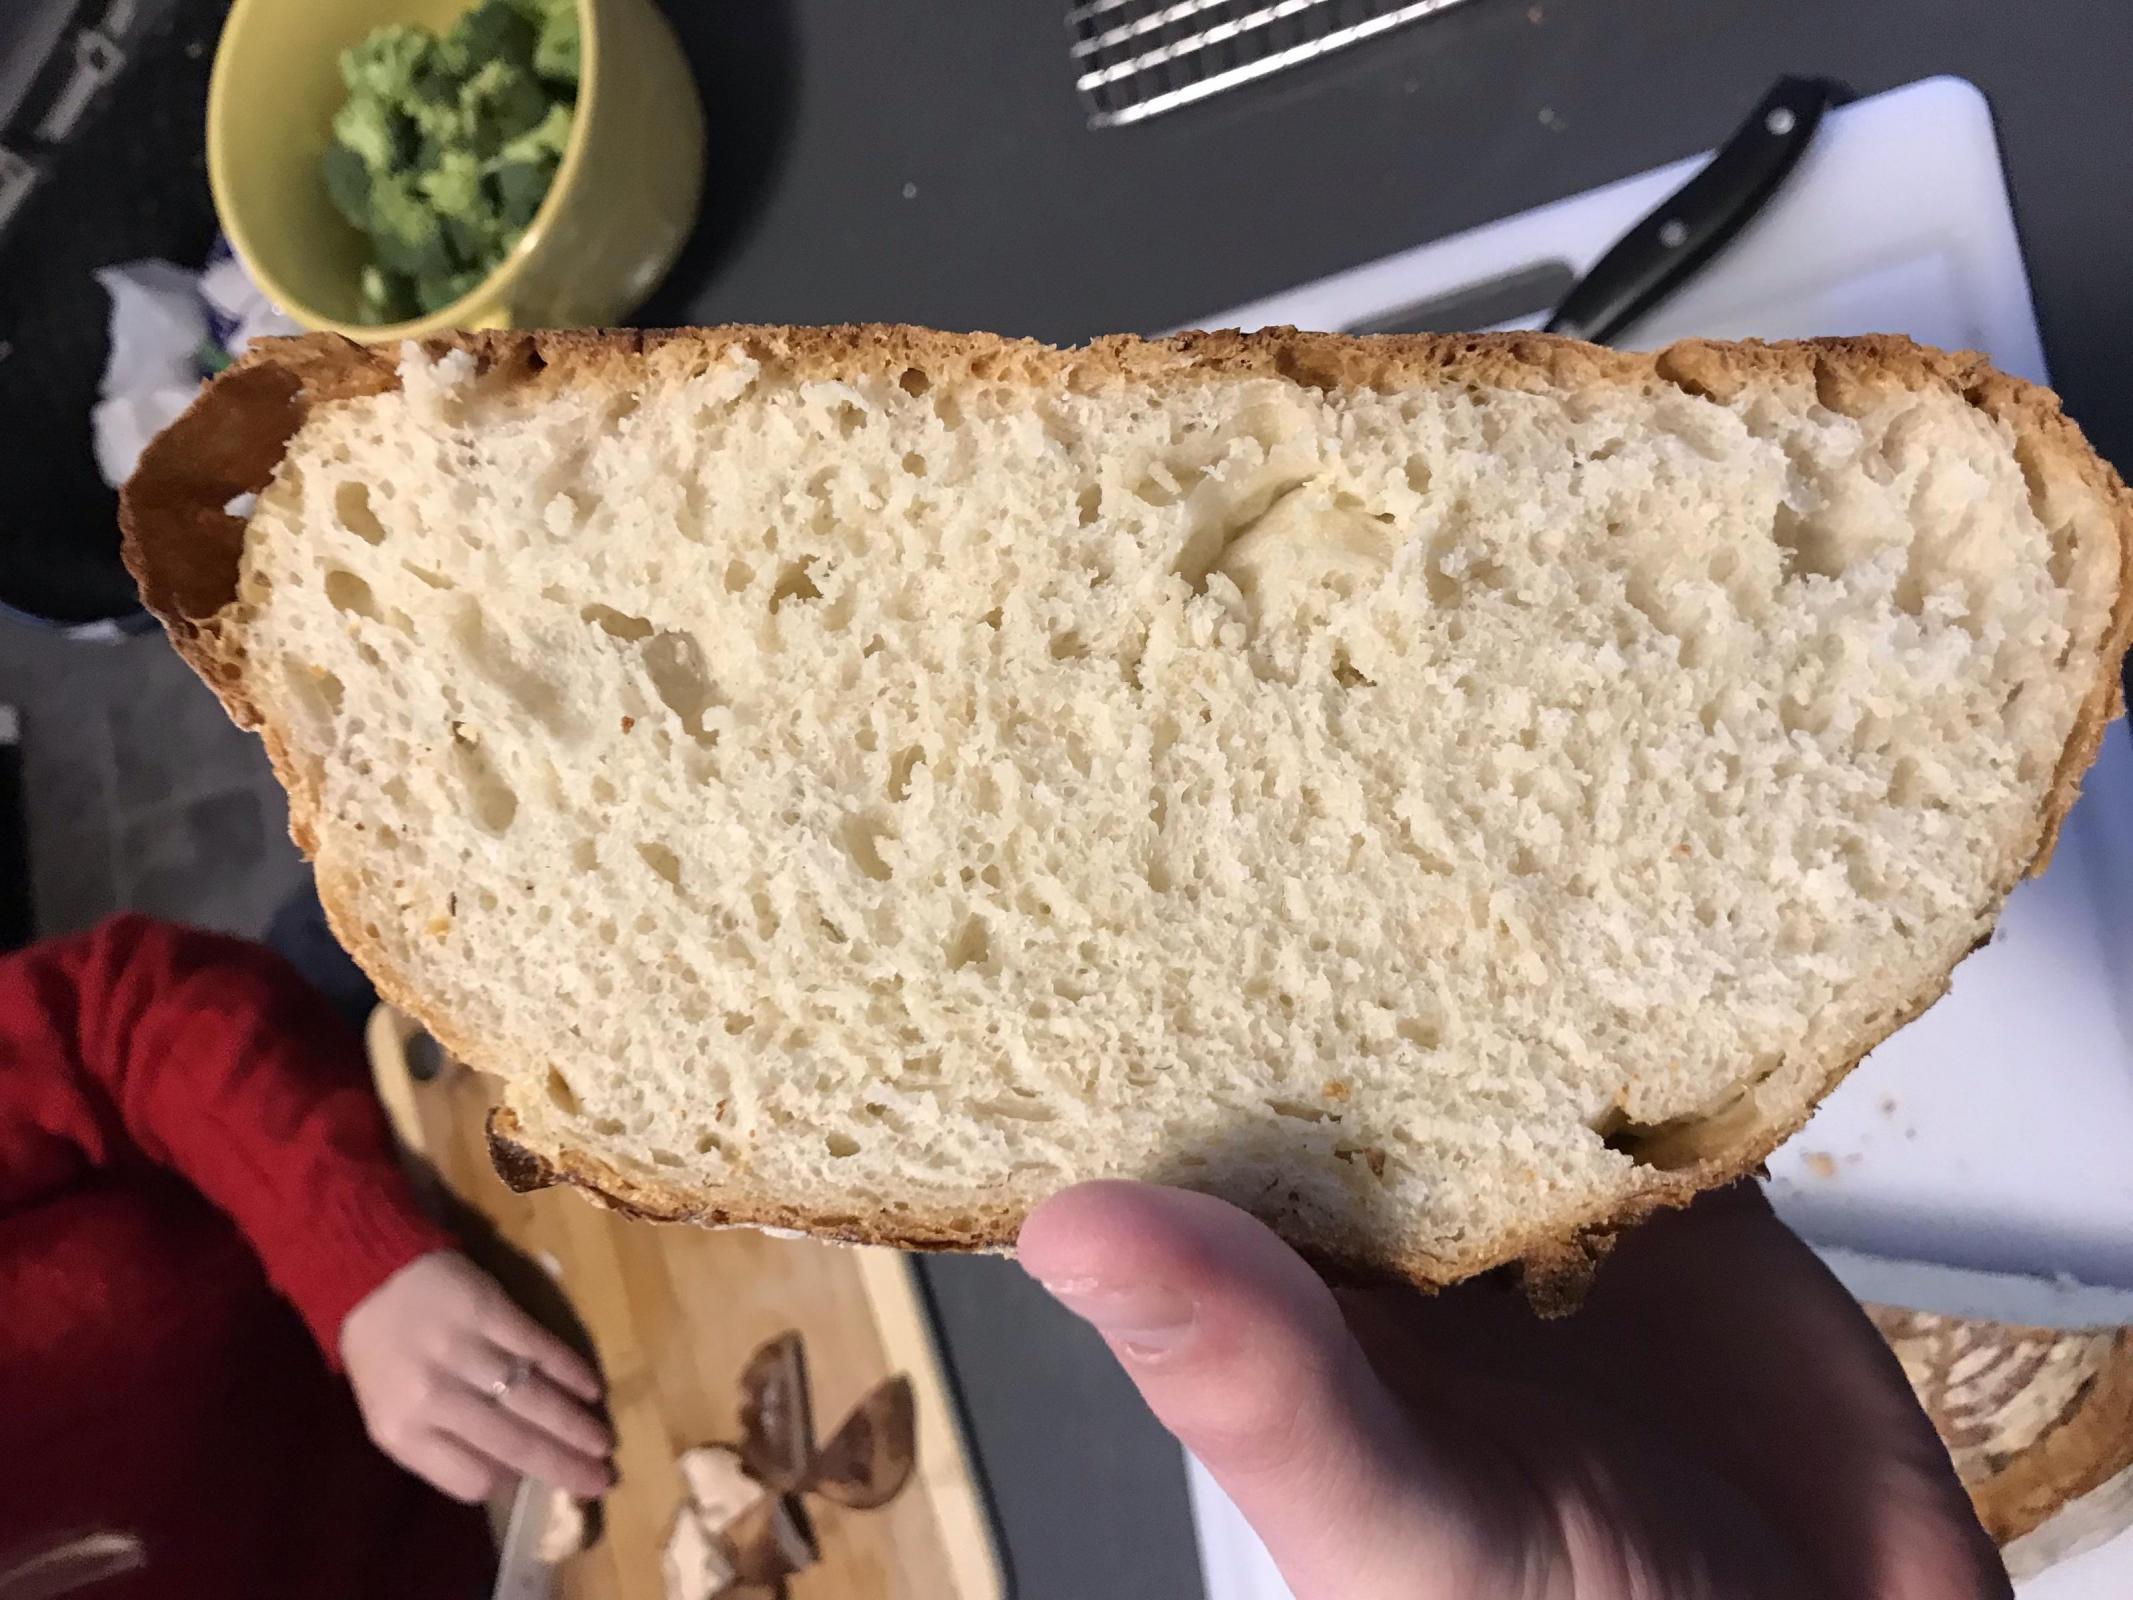
Here is a picture of the crumb my bread has:
EDIT:
I've been asked to provide more details so I'll go through the method for this loaf. I've tried several different methods and they all work well other than providing that nice open crumb.
This loaf was a straight white bread using commercial yeast:
- 1000g King Arthur AP - 100%
- 800g warm water (~84F) - 80%
- 22g Kosher Salt - 2.2%
- 4g Active Dry Yeast - 0.4%
- Autolyse the flour and water ~30 minutes
- Mix in the yeast and salt thoroughly, about 5 minutes. Form dough into an approximate ball shape and let it rest in a large tub (I have a 12qt Cambro tub for this)
- Fold 2-3 times during the first 1.5 hours of bulk ferment (I think I did three on the loaf pictured)
- Bulk ferment until 2.5-3 times it's original size. This particular loaf took a little under 5 hours to achieve that. (I should note that I've played with the timing here and going longer/shorter hasn't seemed to make a difference. I'm planning on significantly reducing this timing to maybe a 50%-75% rise next time as per the suggestion by a comment here.
- Once the dough is risen, plop it out onto a workbench and divide into two loafs. Shape each loaf and place into a banneton.
- Proof for ~1 hour. I've found my bread becomes properly proofed after about 45 minutes although I've played around with the timing to see what results it gives and I think that I have this step right timing-wise. I'm going to try proofing it much less (maybe 30 minutes, I'll play it by ear) if the bulk ferment changes above don't help.
- Put into a preheated dutch oven (heated for at least 45 minutes usually), cover, and put into a 500 degree oven. Turn it down to 475 right away.
- Take lid off after ~30 minutes, take bread out when it looks done. (Usually 20 minutes. I think I took this one out at 15 minutes because I didn't want as crusty crust).
- Let it cool and then eat it or give it away because you just made 2 huge loaves of bread.
I should also mention that the ambient temp in my house is a little under 70F and the final temp of this dough is usually around 75F when I start the bulk ferment.
Any advice or ideas are appreciated. Thank you!
Well, if you are willing to try something else to get that crumb, try this:
http://www.breadwerx.com/how-to-get-open-crumb-from-stiff-dough-video/
or this:
http://www.breadwerx.com/champlain-sourdough-recipe-video/
These links are very useful. I'll try to put some of this into practice next time I bake.
... maybe the kind of crumb you're looking for is not something that can come from this recipe? I don't know, I'm sincerely asking.
There are still several things you can try changing, but some of them are things you might prefer not to change. For example, what happens with different flour?
A few weeks ago I was working with a friend who asked me to help him improve his bread technique. As we were working through the process, I showed him my technique for shaping a loaf. His comment to me was “wow, that was fast - it normally takes me 15 minutes to pre-shape and 15 minutes to shape.” I suggested to him that he was over handling the dough and said it should take 15 to 30 seconds to shape a loaf. It turned out that this worked to improve his open crumb, but his seemed like an extreme case.
How long does it take you to shape your loaves?
-Brad
When I shape my loaf it looks quite similar to the technique used here
I do notice the volume of the dough between the end of bulk fermentation and when I have the loaves in the bannetons. Perhaps I just still need to work on gently handling the dough? I'm not sure how much more gentle I can be though...
All that aside, the loaves rise back to a good size during the proof so I don't think this is the source of my issues.
The technique in the video is pretty much what I use.
Forkish tends to push his fermentation to the edge. If you are following his times alone, your dough may be overfermented. If the proteins start breaking down (proteolysis) then the gluten structure may be collapsing. It is one of the most difficult things to learn the edge between enough and too much bulk fermentation. The fermentation rate depends on many factors, notably temperature, starter activity and maturity, grains used, etc. A simple experiment would be to back off your bulk fermentation to see if it helps.
-Brad
This could be it. My bread is slightly "crumbly" when it comes out of the oven. I thought this might be lack of gluten development but it could be caused by over-fermenting the dough per what you've said above. I will try cutting the bulk fermentation down next time I bake and see if it improves the result.
I’m with BreadForFun. The dough looks overproofed. I have been guilty of overproofing, as a matter of fact I WAS a specialist at that :D
Things started changing for the better when I terminated the BF once the dough increases to 30-50%. After you succeed to may want to push your BF a little more.
Dan
...of pre-shaping and 15 minutes of shaping, is actually 1 minute of shaping and 29 minutes of kneading. The dough doesn't know what words you use, it just gets worked or not worked.
What type of flour and water pH?
...and your geographic location?
I'm using the standard King Arthur AP Flour. It's a fresh bag. I'm not sure of my water's pH but it's unfiltered city tap water so probably in the 5.5-6.5 range. My geographic location is West Michigan.
tell us about it. Go thru the way it is maintained, stored and what it goes thru before use. Give as much detail (temp, amounts, times, etc) as you can. :)
This is actually a commercial yeast loaf, part of why this style of bread is making me feel like a noob because it's not even a fancy levain loaf. I updated the original post with a more detailed method. Let me know if you want more information!
And here I was trying to figure out how it I got so wired and wet with a sourdough starter.
First suggestion... drop back the hydration a bit ...or maybe not, are you comfortable with such a wet dough?
whoops almost forgot... let the flour and water autolyse longer, heck go for an overnight soak and forget the long knead with your kitchen temps!
Now skip step 3 folding once at the end of 1:5 hrs. Or when the dough has risen half way to doubled in volume. Then fold the loaf when the volume is doubled the original dough volume. rest about half an hour. Divide, deflate graciously, and shape. Then do the longer final proof inflating the loaf short of the desired size. While there is still a little bit of skin tension, score and Bake.
A cooler final rise is also in order to stretch the matrix slowly. Be sure to keep the skin from drying out while retarding and proofing.
If you want to up the hydration, try kneading longer after the autolyse adding water as you knead ( look also into slap and fold technique) to get the dough developed nicely. Then add a strengthening set of folds after the first 1.5 hours into the bulk rise. If one set , a fold from each side North, South, East and West isn't enough, do it again as long as the surface skin stretches without ripping. The dough will probably not require more folding unless you reduce the recipe yeast further.
The difference is not folding so soon into the bulk rise and reducing the hydration.
Lots of people mentioned insufficient gluten formation. I would blame the no-knead/fold technique. The videos I have seen on this technique usually show just a small number of folds and misrepresent the actual amount of work involved.
That size doughball will require considerable physical work in order to get the required amount of gluten built up. The fold technique is basically just a gentler form of kneading. You have to spend more time doing it than you would traditional punch-down kneading. I would guess that for that size doughball, you'd need 20 minutes of traditional kneading to get the gluten you want. This means you'd be spending more than that folding. You are probably not physically working the dough enough.
Another way to get great gluten formation in a wet dough is with a technique that I describe here:
http://www.thefreshloaf.com/node/58525/easy-kneading-technique
The short of it is that you only mix in a small portion of the flour with the water and basically create a batter (160% hydration or more). It's runny enough to whip with a wooden spoon and gluten will form in that readily. You build up your core gluten in that, then incrementally mix the remainder of the flour and gradually transition to your favoured kneading technique. The remaining flour has an easier time extending the already plentiful gluten chains in your core mass. You then proceed with bulk fermentation and proofing as per your recipe.
I've used this method quite a few times now and it makes wonderfully large open crumb when using a high hydration dough like yours. It's also much easier on the arms than traditional kneading. The amount of flour you are using actually requires a hefty amount of physical work -- a common oversight when making large batches by hand.
3 Cups Flour
1 1/4 tsp Salt
1/4 tsp Dry Yeast
1 1/2 Cups Water
Mix yeast, water, and salt. Let sit for about 5 minutes for the yeast to reconstitute then add flour.
Knead with dough mixer for about 2 minutes until sticky
Cover bowl with a towel and allow to sit for 12-18 hours (basically until it has doubled)
Place on floured surface (it will be very sticky) and fold 3 or 4 times to get rid of most of the air
Allow to rise for another hour or two (the dough should hold an indentation when poked)
Invert into a 4-5 quart pot and place in an oven preheated to 475F
Bake for 30 min then remove lid and bake for another 15-30 min.
The loaf on the left was All Purpose flour, the one on the right was Bread Flour (Strong Flour)