Hi All,
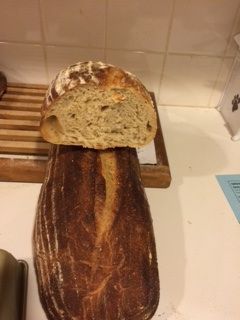
My double oven is still not here. The heating coil on the bottom is way off and cannot be fixed and the door on the upper one is off it's hinge. I couldn't wait to bake so flew by the seat of my pants in baking a four flour bread: AP, ww, Rye and Durum, w Durum and AP in the levain. It is a variation of Essential's Columbia. Very mild. Did 3 small and 2 larger loaves.
I had a bit of trouble w Sylvia's steaming method (my fault) and didn't get quite the oven spring as I'd have liked in the larger loaves. Not bad for a busted oven.
Taste is very mild and not at all sour (my husband's preference) and I sneaked in some good non-AP flours totaling about 45% of the total (levain included). He liked it... making progress w this Southern boy born and raised on Wonder Bread, yuk... lol. Hope proper oven comes soon. hester
How do you manage to bake like that in a broken oven I've no idea. How are you finding the durum flour? The great thing about sourdough is it doesn't have to be sour. With clever manipulation it can be tangy to mild. I must say I do prefer tangy which is what I'm trying to bring out in my breads. But when people hear sourdough they automatically think sour. I tell them it's just the process rather than the flavour it's describing.
If you can do this in a broken oven I really look forward to when your new one arrives.
Who is Sylvia and what's her steaming method?
thermometer for the lower one, but even then the temps are almost random.
I read here last week about Sylvia's steaming method; http://www.thefreshloaf.com/node/20162/oven-steaming-my-new-favorite-way
Tbh it didn't work for me as well as my lava rocks, why I don't know. And here's a link to someone that uses both. https://www.theperfectloaf.com/?s=steam
That will be my next trial, hopefully w new oven.
Also, I too prefer a tang. This last bake was an experiment to see if I could really eliminate the sour. I can. But i prefer it. So I'm going to start baking v small loaves, like the top one in the pic. So that when I'm tired of eating the bread I make for my husband, I can take out a loaf I made for moi.... w some whole grains/flours and some tang.
Thanks for looking.
hester
of mellow and balancing flavor. But the experts here told me if I was going to use it in a bread w other flours, in order to taste it's presence I'd have to have 20% - 25% of it in the dough. And someone else, helpfully suggested using it in the levain. So I did both, lol. I think it mellows things out and next time might use more retardation and a stronger rye flour for more balance and subtlety of taste.
There are breads that have been posted on TFL which use an all durum flour for the levain AND 100% durum for the final mix too - if you want to start approaching those levels of durum in your bread.
A lot of discussion on this specific bread was bandied about this past Spring on TFL and if you search for it by name, you'll see a whole host of references to, and bakes of it.
I've found that I can use any percentage of durum, right up to 100% with equally successful results.
2 variations on the Pane di Altamura that I tried and had a lot of success with, and to me a more robust flavor than a 100% everything durum, both sub out the durum levain for a rye levain. Give these a gander and see whether either might fit your bill. The first is all durum in the final dough and the second is a 60/40 durum/AP mix. The first of the two has the formula...
alan
Hi Hester,
I, and a cadre of others here on TFL, use the same basic method that Maurizio also uses on his Perfect Loaf website. What I do:
Meanwhile
At this point I redistribute the loaves by rotating them left to right, front to back. I find that the baking deck immediately above the lava rock pan is always "cooler" than the other half of the baking deck, and that ovens likely have warmer and cooler spots so I want to ensure that the loaves get equal opportunity to bake with the same heat.
Caveats:
I don't bother spraying the loaves with water as Maurizio and many others do. I'd rather not introduce water droplets directly on the surface of the dough.
There are a number of methods that folks do. This is just what I decided on and, which I find works best (so far) for me.
It may seem like a lot of "things" to do and be aware of, but after very few bakes, it is just second nature and becomes mechanical.
alan
explanation. I have plenty of lava rocks but won't be able to use any other pan if I use a 9" x 13" one. Oven not big enough. I have a cast iron skillet I can use for lava rocks and something else for the towels. Why does it have to be pryex? Can I not heat up water in a kettle, pour it over a terry towel in another baking pan and put that in the oven 20 min b/f the bake? Then when I load the loaves and douse the lava rocks I can add water to the towel pan. Seems to me it can be anything, not necessarily pyrex
No absolutes here. As mentioned, just what I use. Completely agree with your "seems to me it can be anything".
There are endless ways to skin a cat - or bake a bread! As I'd mentioned way back, there are plenty of "right" ways and probably plenty of "wrong" ways to do these things too.
And your perfect reply of heating the towel water up on a kettle is a great one. Whereas I was stuck on the microwave thang, I think your solution is superior. Thanks.
And that comes back again to why not do "this" instead of "that" concept. Hopefully we are all always learning and adjusting.
alan
Funnily enough bakerbits (a UK based shop) has given a yeasted Altamura bread recipe in this week's promotional email. OK so it's not the traditional sourdough Pane di Altamura but it looks like a good one to try and a nice introduction to a durum flour bread. Here it is...
RECIPE: ALTAMURA BREAD
Start midday the day before you want to bake
At lunchtime the day before you want to bake, start preparing your starter leaven using your fresh sourdough starter. Take 30g of your normal starter and mix it with 40g of water and 50g of Sfarinato in a small bowl, cover with a plate and leave to ferment at room temperature until early evening.
Now do a second refresh by repeating the first, this time leaving it overnight at room temperature for 12-13 hours. This then is your 210g Sfarinato starter.
To make the dough, mix the Sfarinato flour with the water and your starter then leave covered for 30 minutes (to autolyse). Next, add the salt and dried yeast.
If you have a mixer, mix on slow speed for 2 minutes until well combined, then for a further 8 minutes on a medium speed until nice and smooth. Place the dough into an oiled bowl and cover and allow to ferment for 3 hours.
To knead by hand, for the next hour, using a wet or oiled hand, give the dough a stretch and fold every 10 minutes. That is, with the dough in the bowl, put your hand down the side of the dough and pull it up and across the bowl, rotate and repeat a couple of times. Keep the bowl covered with a damp tea towel.
Flour your work surface and shape the dough into a boule (round loaf) and allow to rest on the floured worktop for 25 - 30 minutes covered.
Reshape into the boule by turning dough over and gently pull into an irregular boule, taking care not to knock out too much air and place onto a piece of parchment paper – these loaves are not perfectly symmetrical and so don’t go into a proofing basket. Prove for 2 - 3 hours at room temperature until fully proved - you can check this by gently pushing the dough with your index finger. If it feels firm it is under-proved. If it bounces back quickly it still has more to go. When it returns slowly then it is ready to go…If it does not return, but deflates and wrinkles then it is over-proved.
30 minutes before baking preheat the oven and La Cloche to 200°C.
Bake the bread inside the cloche for 25 minutes and then remove the cover and continue to bake for a further 20 - 25 minutes until golden brown.
Test the baking by lifting the loaf and tapping the base which should sound hollow.
Allow to cool completely before cutting.
Makes a 1200g loaf
Ingredients:
600g Sfarinato di Grano Duro flour (Durum flour)
440g Water at room temperature
210g Sfarinato di Grano Duro starter (see below)
12g Super-fineHimalayan Salt
1g Bioreal Dried Organic Yeast
(A large pinch)
CORRECTIONS AND CLARIFICATIONS
Just had a closer look and while it does use yeast this IS a sourdough. Want an all sourdough more authentic Pane di Altamura then skip the added yeast. I don't think it'll make much difference. Adjust accordingly.
I am wiling to try old and known recipes w my busted oven, will wait on any new recipe for my new oven. Should come this week.... Little concerned that a width difference of 1/8" is going to require some carpentry work......... we'll see.
Thanks for that recipe and pic.
h
When venturing into an all durum flour bread watch the dough more carefully. Durum flour degrades quickly and is less forgiving than normal wheat. I don't think missing out the yeast will make much, if any, difference. I've done a few Pane di Altamura and while some have gone well others haven't and once you miss that perfect proofing time things go south quickly. I laugh now but you should have seen me haha!
Really hope your new oven comes soon and it fits. Best of luck!
Hamelman also is very cautious about Durum. I mix everything by hand almost all the time. I prefer to 'feel' it out and can then get a sense of when to stop.
oven! Well done indeed!
Happy baking
My baking lapsed all summer for irl issues. Now the bug is back. So I persist. The top oven is just not usable w a door that won't close. The bottom one is usable, very imperfect, temps way way WAY off, but I'm not a perfectionist, so I just do it.
Thanks