
Member Omid posted an excellent and very comprehensive blog on Iranian Barbari bread which can be viewed here if you haven't seen it:
http://www.thefreshloaf.com/node/36357/persianiranian-barbari-bread
The result is a wonderfully subtle bread with slightly nutty undertones and a structure not too dissimilar to french baguette. End to end I was surprised at just how simple these were to make. They are well worth a go.
Recipe
The true recipe calls for a special flour called “ard-e setareh”, which literally means "star flour" but I don't have this and have never seen it in the UK. Thanks to Omid's comprehensive background info though I was able to select flour with a similar protein content of about 10-11%. Actually, I used a 1/2 and 1/2 mix of T55 flour and my ordinary generic bread flour and as it turns out that worked rather well.
For my attempt at this I only made enough to make 2 small breads. Using a domestic oven limits the length I can make the breads and I only have one rectangular bread stone so I baked them separately one after the other.
Flour (half T55 half generic) - 366g (in total), Water - 250g, Salt - 7g, Fresh Yeast - 1g
Process
I mixed the above ingredients according to Omid's description, water, then salt, then yeast then flour. Kneaded the dough gently for 5 mins then left to rest for 20mins. Formed a boule with the dough then left it in a plastic bowl with a smaller upturned bowl on top on the kitchen counter. Left it there to prove overnight. As I got up slightly late the next morning the dough had proved some 12-13hrs (rather than the required 11hrs) but it looked just fine, nice and bubbly.
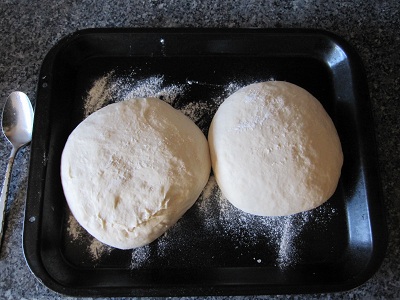
I split it into 2 portions of 306g each and formed each into a small boule and left on a tray, covered by a plastic bag for a further 2-3 hrs at which point they looked like this:
Whilst these had been proving I made up some "sauce" with just flour and water as per Omid's instructions and brought it to a gentle boil on the hob. Then left to cool. I experienced some difficulty here because when it was later cool, it was pretty thick and gloopy, almost set which was clearly not right, so I discarded 1/2 and put more water in it, re-heated and left to cool again and all was then well. The sauce looked like this:

Next stage was the shaping which traditionally requires Wheat Bran to be spread on the table first. Unfortunately I found that I had none of this so I used 100% Wholewheat flour instead and sprinkled this over a glass chopping board and placed one of the dough portions on it, gently stretching it out a little. I gently smeared the sauce all over it and then using my fingertips put in the characteristic grooves as below:

Then simply sprinkled sesame seeds over the top. Meanwhile my oven had been warming to it's top temp of about 240C with my bread stone inside. Now came the slightly tricky bit, transferring the bread to the stone whilst stretching it. Having tried this I have to say that the consumate ease with which the bakers do this in Omid's video clips is incredibly misleading ! There is definitely a knack there garnered from years of experience ! First attempts lifting the dough with plams face up were somewhat dodgy and hamfisted but I got the dough on the stone in the end. Later when I came to do the second piece, I did it with palms face down and that worked much much better. In fact after putting one hand underneath one side and lifting up, the dough stretched nicely by itself as it came off the board.
Into the hot oven it went for about 12mins and out it came like this:
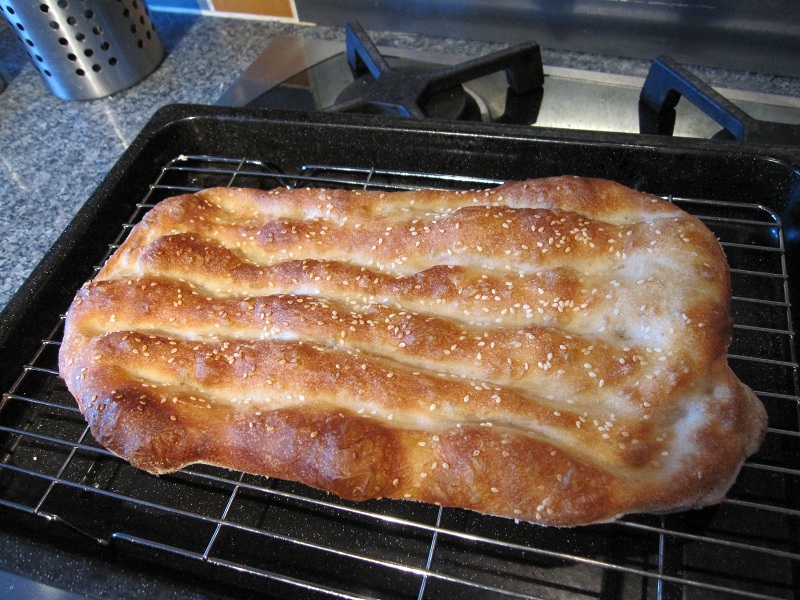
Looked pretty good to me for a first attempt ! Left it to rest for 5 mins then cut in half to examine the crust and crumb which looked like this:


As you can see the top crust was thin and slighly crispy, the base firm but not crispy and the middle soft and chewy much like a french baguette. I was very happy to see the crumb looking similar to Omid's ! There are numerous YouTube clips of other people's Barbari breads out there but many are not using the long fermentation and the crumbs produced are nothing like the above. So the long 11hr + 5hr fermentation really pays dividends I think.
Overall taste was subtle with just a hint of nuttiness presumably from the wheat flour underneath and the sesame seeds on top. Very nice indeed though I confess that I found myself longing for a bit of sea salt which I next time I shall sprinkle on top.
As an experiment, I treated the second piece of dough slightly different. I happened to have some hemp seeds to hand (supposed to be very healthy!) so I ground some of those and sprinkled them on top along with a few sesame seeds. It produced deeper nuttier tones than the first and whilst not wholly "traditional" was a pleasant tweak but again what I really wanted was sea salt on top.
Overall this is a lovely bread and is surprisingly easy to make. The long fermentation is well worth the wait to produce both flavour and crumb texture.
Many thanks to Omid for giving such a comprehensive explanation of Barbari bread and hope others will try this too.
- ElPanadero's Blog
- Log in or register to post comments
Looks fantastic. Excellent. Thanks for sharing. CAphyl
Very good i'm impressed a good write up on your take of a previous article that i had missed first time round, something i will like to try myself soon (cooler weather) 43 C here yesterday, and 41 today!
Kind regards Derek
Very tasty looking bread, one I think I should try out.
I have to try it.
Karin
Dear El Panadero, you have done a great job as someone new to the world of barbari bread. I am truly surprised at how well you executed this. You are a fast learner! Perchance, it was your pre-established knowledge and skills that made the bread easy for you to make. I have known newbies who are still having difficulties in preparing barbari breads after months of trials. You are officially a barbarian. Welcome to the tribe!
Omid
a lot of Fresh Lofians will be giving this bread a go after your and Omid's fine examples. Well done!
Hello ElPanadero,
Admiring very much, your bake of the barbari bread; it looks perfect!
:^) breadsong
.. we own a house in Iran, and if you've never been there, you'd love to see how this bread is made traditionally. On the street, with crowds in anxious waiting, loaf after loaf is cooked on hot gravel. As the bread is removed, special people sit aside who's job it is to pick out the hot gravel which they toss on the sidewalk. Even consumers are found grabbing the hot bread and bringing it to one of the designated tables for gravel picking. This bread is so delicious… I am really warm hearted to see it even exists here! And that crumb…
Hi tea berries ! what you are describing seems to me as sangak not barbari !! gravel being used for sangak ! ain't it