The Fresh Loaf

A Community of Amateur Bakers and Artisan Bread Enthusiasts.

ElPanadero's blog

ElPanadero's picture
ElPanadero


This bake was loosely based on Reinhart's recipe in his new book "Bread Revolution" however I wanted to tweak it for my personal tastes to make them more tasty and maybe just a touch healthier.  

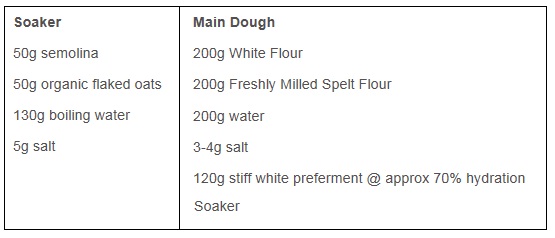
For this recipe I have used sprouted spelt rather than wheat. Here are my other changes:

Firstly I have used coconut oil for the fat for its superior health benefits (MCTs vs saturated fats in butters) and am pleased to say that the coconut taste does not come through due to the stronger flavours present.  This presents some temperature challenges as the oil is solid at room temp so it is necessary to warm it but not to the extent that it would hurt the yeast.

Secondly I have added a good handful of raisins which I pre-soaked overnight in Pedro Ximinez sherry, a deep, dark, treacle like sherry which is gloopy enough and tasty enough to simply pour over vanilla ice-cream (highly recommended!).  Purists amongst you might see this addition as unnecessary for a cinnamon roll, I just happen to love raisins in sweet buns.

Thirdly, to complement those taste tones I elected to use dark soft sugar for the filling rather than a lighter and more granulated sugar.

Very pleased with the results.  All I need now is a freshly made latte or cappuccino !

ElPanadero's picture
ElPanadero

Decided it was time for my first foray into the world of sprouting grains.  Rather than jump straight into a bake from PR's latest book I decided to conduct an experiment to firstly see if I could actually sprout some grains and secondly to bake some test loaves with different quantities of sprouted flour.  Here's how it went.

The Sprouting

Took a bunch of organic spelt grains, rinsed them thoroughly 2-3 times and then put them in a pot and covered with water.


They were left this way for about 5 hours after which time they were rinsed again and then spread out on my baguette trays thus:

I kept these in the oven (more for space than anything else) and with the oven light on to provide gentle ambient warmth.  Periodically I sprayed the grains with water to keep them from drying out.

There now followed a longer period than I was expecting.  There seemed little or no activity for 2 days.  The odd grain started to sprout but not much else.  I kept spraying and kept the grains gently warm and waited.  By day 3 things had improved greatly and by day 4 I was as far as I dare go since I didn't want to start malting the grains.   This is how the grains looked at this point:

This looked perfect.  Not fully sprouted but simply "chitted" as DA likes to say.

At this point I rinsed the grains once again and then spread them onto the special plastic sheets that came with my food dehydrator.  3 trays in all and there I dried them at 100 degrees F for a full 12 full hours.

When finished they were crispy dry, and I would guess they were probably drier than the normal organic grains that hadn't been sprouted.   Job done !

The Baking

For my experiment with this new sprouted flour I decided to make 3 separate mini-boules with slightly different quantities as follows:

Loaf A -   50g normal spelt, 50g white flour, 66g water, 2g salt, 1g fresh yeast

Loaf B -   50g sprouted spelt, 50g white flour, 66g water, 2g salt, 1g fresh yeast

Loaf C -   25g sprouted spelt, 25g normal spelt, 50g white flour, 66g water, 2g salt, 1g fresh yeast

Nothing special, just 3 simple loaves at 66% hydration, Loaf A being the "normal" benchmark.   I was put off doing a 100% sprouted flour loaf due to other people's reports of difficulties.  In the event, I honestly think I could have made one without any difficulty and I will try it soon.

The sprouted spelt berries went through the grain mill without incident, just like ordinary berries.   I mixed up the loaves and left them to proof and this is where notable differences began, as expected and as documented by others.   Loaf B, the one with the most sprouted flour, was clearly proofing ahead of the others and Loaf C was ahead of Loaf A.  I was pleased to see this, it meant my sprouted flour was good.   Here's a picture of the proofed boules where you can see the difference:

Thus I baked them separately in the order B, C then A as and when they were ready for baking.  They all rose in the oven just fine, no problems at any stage with dough structure.

The crumbs were all good and from the shot below you can see the slightly extra height of Loaf B, with the 50% sprouted flour in it.

The Tasting

My wife & I ate small samples of the 3 loaves in the order Loaf A, Loaf B, Loaf C.   All the loaves tasted just fine, however we both agreed that loaf B was the best tasting.  However, the taste surprised me.  I'm not sure what I was really expecting, perhaps too much from all the good things I have read.   Loaf B turned out to have the mildest taste of the 3 but at the same time it had it's own unique taste.  Regrettably I find myself hopelessly unable to put into any words what that taste was like.   I think I need to eat a lot more of it to frame a description.  Either way though, the 50% sprouted loaf was our preference.

Summing Up

Was it all worth it?   The jury is out here for me at the moment.  Yes the loaf tasted better with sprouted flour, but, it took some 4 days to soak, germinate and dry the grains and all that needed space in the kitchen that was frankly . . .inconvenient.   On pure taste alone, I would not make grain sprouting part of my weekly regimen, I would certainly do it occasionally but not religiously.  However . . .  if the additional health benefits and claims of sprouted grains are proven to be correct then I would certainly create my own sprouted flour for all my breads.  As mentioned in another recent thread though, I would not buy commercial sprouted flour because at this time it is so ridiculously expensive.  Therein lies a significant problem for the future of the "sprouting revolution".    Not everyone will have a grain mill or a food dehydrator at home to grind and thoroughly dry the grains.  It's a bit of a "faff" all round but if the nutrition and health benefits are there then it's worth it.

For those of you who have already sprouted your own grains, do you know how long the sprouted and dried grains can be stored for at room temp?  I understand than once milled it's best to store the flour in the freezer but I'd like to understand how long the sprouted/dried grains will last.  If I can make up a large batch and leave them in a sealed mason jar for weeks then I am much more likely to use sprouted grains.

ElPanadero's picture
ElPanadero


This was an "off-the-cuff" see how it comes out creation and the first time using a soaker for me.  Probably should have picked an established recipe but overall it came out ok.  More hydration would probably have given a better, more open crumb, but I wasn't sure how the soaker would fare.

Recipe


                Organic Oat Groats In                                           Flaked Oats Out

Cut whilst still a little warm . . .  should have waited longer but was keen to see how it looked and tasted.

Definitely some genuine sourness to the loaf but not in any way acidic or tart/tangy.  It smells nice but the taste is kinda odd to me.  At first there doesn't appear to be any remarkable or overwhelming taste but then flavours start to come through after a few seconds.  I had also intended to put sunflower and poppy seeds in during the folds but totally forgot !!  Doh!

Onwards


ElPanadero's picture
ElPanadero

Figured it was time I tried a bake in a dutch oven.  We have a Le Crueset pot but it is wide and shallow and thus not suitable.  After hunting around I figured I could use this steamer pot which was sitting in a cupboard.


Seemed ideal, plenty deep enough, round and with a lid.   Turned out to be really good.   The proofed loaf dropped in smoothly with parchment paper and the loaf rose very well.  I think I'll be using this pot quite a lot from now on !

The loaf I made was loosely based on Chad's Tartine Country Bread, however I wanted more wholewheat than his 10%.   I used a wholewheat starter and I also had a bag of Malthouse flour to hand (a blend of wheat, rye and flaked malted grains) so I threw some of that in as well.  So plenty of wheat in this loaf.  Hydration was about 70% and the crumb came out pretty well.

White Bread Flour - 350g

Wholewheat Flour - 100g

Malthouse Flour50g

Water - 330g

WW Starter (@100%) - 100g

Salt8g

Method

Autolyse (F+W+Y) - 30min

Added salt then rested - 30min

Stretch+fold every 30min for 2hrs

Shape and banneton

Retard in fridge overnight - 12 hrs

Rest 45min at room temp then baked 15 mins lid on, 25-30 mins lid off

I made a similar loaf to this last week and baked on a stone and it came out much flatter as the dough spread after being turned out.  The Dutch oven approach clearly offers side support and produces a nicer looking loaf imo.


ElPanadero's picture
ElPanadero

So I was browsing through one of my books looking for something new to make and the Tomato Sourdough looked interesting.  I'd seen it before along with a beetroot sourdough but always glossed over them thinking them to be somewhat quirky and simply strange for the sake of being strange.  How wrong was I ?!

Tomato Sourdough smells and tastes fantastic and will be a regular bake for me now ! It's delicious toasted and used for bruscetta with real tomatoes, fresh mozzerella cheese and basil.  It would also make great little side rolls or grissini for a cheese board. 

The other loaf here is a classic Levain De Campagne, a mix of white flour, wholewheat flour and dark rye.  Pretty much a standard sourdough but one I love to make for general eating.  Both loaves are made with a preferment built from white flour and since the book I'm using here is Emmanuel Hadjiandreou's "How To Bake Bread", the recipes are simple, no fuss, practical ones that will produce loaves in just a few hours.  You could of course adjust the quantities of starter, do overnight retards and so on to get more deeper tangy flavours if you so desired.

The crumbs as you can see above are quite "bready" and fluffy rather than having large gelatinised holes that are often seen with sourdoughs.  Using a higher hydration would help create the latter of course.  What I like about these recipes though is they produce some great tasting loaves that can be whipped up within a few hours and used on a regular basis rather than "show piece" or technical loaves that require a more attention.  These loaves tend to have a higher quantity of starter which cuts down the bulk proving time to a few hours.

Tomato Sourdough with Fennel and Caraway (mini loaf)

White Flour 200g, White Starter 150g (100%), Salt 3-4g, Water 100g, Tomato puree 20g, Freshly ground herbs 1-2g, olive oil 1g

Mix, S+F every 10 mins for 40 mins, proof 1hr, shape, banneton, proof 3-5 hrs till doubled, score and bake

I put fennel and caraway seeds through my grain mill here but you could equally use celery seeds or rosemary or any herbs you like.

Hydration here is about 63% and with the puree this makes for quite a sticky dough but it is workable and will eventually form a decent boule.


Levain De Campagne

White Flour 250g, Wholewheat 100g, Rye 50g, White Starter 150g, Salt 7g, Water 250g-300g

Mix, S+F every 10 mins for 40 mins, proof 1hr, shape, banneton, proof 3-5 hrs till doubled, score and bake

This bread is lovely toasted.

ElPanadero's picture
ElPanadero

From Daniel's "Local Breads" book, this was a recipe for Auvergne Rye Baguettes with Lardons but having no lardons or pancetta to hand, I chose to use a tasty Iberico Chorizo that I had been gradually working my way through. There's never a bad time to eat chorizo in my books!

The additional flavour of rye in a baguette appealed to me and as I needed to check the viability of my recently rescued rye starter, this seemed like a good bake to attempt.

The rye content in the recipe was 50g in 450g of white flour with the overnight preferment being made with white flour and rye starter. I chose to use all rye for the preferment so my overall rye content was higher. I diced the chorizo finely and cooked in a pan for 5 mins or so before draining the oil off.

With main dough hydration of 70% this made for a very sticky wet mass. I autolysed for 30mins before adding the salt, chorizo and preferment, then did 3-4 stretch and folds over a 2 hour period which helped to pull it all together. Daniel retards his shaped baguettes in the fridge for 12-24hrs but I chose not to do this as I knew the chorizo would pack plenty of flavour.

Resulting baguettes are very tasty indeed, and the chorizo is in fact not at all overpowering but rather a more subtle flavour running right through the bread (presumably from the residual oils that have soaked in). The rye element affords a lovely nuttiness which goes well with the chorizo. A nice lump of Spanish Manchego cheese and this is a delightful snack, definitely to be a regular bake.

ElPanadero's picture
ElPanadero

So my first attempt at 80% hydration baguettes went so so, produced lovely tasting baguettes but the crumb was tight with tiny holes (see below)


This time I lowered the hydration down closer to 70%, spent more time on the initial kneading, a little more time on the S+Fs (working till I could feel the resistance) and hey presto they came out beautifully.  The exterior has a lovely crackling crunch and the inside is soft and tasty.  I even managed to get nice "ears" with the scoring despite using a flat lame.

Thanks for those who provided advice on my first attempts

EP

ElPanadero's picture
ElPanadero

My first crack at this very traditional Spanish sweet bread.  Also known as "King Cake" this is traditionally served at Christmas.  I have some good Spanish friends coming for dinner in a week's time so this was my practice run.  It's not Christmas but hey,  some things are too good to only have once a year !

This is a yeasted dough infused with flavours of orange and lemon zests, orange blossom water, apricot brandy and vanilla.  The top of the "crown" is adorned with glace fruits, candied orange peel, stem ginger and flaked almonds and a sprinkling of sugar dampened with more orange blossom water.

The crumb is soft and shreddy, on the way to being like a panettone but sufficiently not,  so as to have its own identity.   It is usually served with whipped cream, nata, custard or other cakey fillings and in my opinion, being a bready cake, one of those is definitely needed.

I only used half the quantity of the recipe I used and was very surprised how big this came out.  Looks like we'll be eating this daily until it disappears !


ElPanadero's picture
ElPanadero

My regular baguette recipe (from my local Artisan Bakery) uses about 66% hydration.  This is my first foray into a much more difficult 80% hydration.  This was a real challenge and the results far from perfect, but the experience gained along the way is invaluable and worth the trouble.  I would say without any hesitation that these have been the tastiest baguettes I have ever made and the closest I have come to that genuine baguette flavour expectation.

For anyone out there wanting a first hand look at how the stretch and fold method develops the dough structure, this is a great way to see and "feel" it.  From the outset it all looks and feels hopeless but one has to have faith in the processes going on within the dough and if all is done carefully the rewards are very satisfying.

I halved the recipe on the Weekend Bakery site which I believe was adapted from a recipe here posted by Akiko, and I used T55 flour and fresh baker's yeast for my attempts.

Pre-ferment (Poolish) -   190g T55 Flour, 152g water, 3g yeast

Main Dough - 190g T55 Flour, 152g water, 6g salt, 1.5g yeast

Upon mixing the main dough I had what can really only be described as a rather thick looking cake batter.  Hard to believe anything could be done with it !

There then followed a series of 4 Stretch and Folds interspersed with 45 min rest periods.  The structure gradually developed over this period.

After 2 S+Fs the dough looked like this, sloppy but coming together:

Another 2 S+Fs and we progress to this:

Hard to appreciate from that picture but I could in fact lift all the dough out in one piece if I tried.

I split into 2 portions and pre-shaped, rested 10mins and then shaped as best I could.  This was a little more difficult than my usual 66% baguettes.  I popped then into a baguette tray (my oven dimensions prevent me from making a full sized baguette) and looking at them was more reminded of ciabattas than baguettes !

Normally I'm very happy with my baguette shaping but at 80% it's a whole new ball game.  Too little flour on the work surface and the dough wants to stick everywhere, too much and you can't get any purchase to tighten the outer skin.   What I ended up with wasn't very pretty to be honest.  Nothing like the surface tension I would normally achieve nor an even finish.   Next time will be better.

After a 30 min proof I was ready to slash and bake, but remembered that scoring would likely be hopeless in the current state.  One quick test slash was enough to prove this as the blade just dragged the wet dough.  So, into the fridge the tray went to cool for about 5-10mins.  This definitely firmed up the dough some and allowed for much better scoring.   Unfortunately, I only have a flat lame and for baguettes I should really invest in a curved one to create proper "ears".  I scored as best I could and popped them into a preheated oven (fan 240) with a cup full of water thrown in for steam.

The oven spring was pretty good and after about 25-30mins they were golden and ready to come out.

With a domestic oven I sadly can't get the kind of finish a baker's oven produces with dark crusty edges.  Still these looked 1/2 decent for a first attempt and the crumb inside was light and fluffy yet strong in its structure.  It could stand a good squeeze between my fingers and still spring back.

Compared to the source website results however, my crumb has much smaller holes.  This could well be the result of me being heavy handed with the S+Fs and / or in the final shaping which was a little awkward.   Nevertheless, the taste of these with just a little butter is fantastic.  Definitely a keeper for future baguettes.

For those of you who have mastered 80% baguettes I welcome your advice and comments on areas that I can improve here.  These are clearly worth mastering and putting in my repertoire. 

ElPanadero's picture
ElPanadero

I was pining for something sweet but not too unhealthy and whilst watching TV, saw a shot of beautiful Venice, a city that I have visited annually for the past 7-8 years, and this put me in mind of their wonderful Italian baking.  A particular shop there sells all manner of Biscotti type delicacies as well as countless other delights but I always now pick up a bag of their gorgeous Cantuccini's which are nutty, citrusy and pretty darn addictive.

Having looked through a number of differing recipes I decided to concoct something myself to achieve the flavours I wanted.  The addition of spelt here and the absence of any butter gave me the slightly more healthy element I was looking for and the zest and various extracts provided the citrus bite.

These came out very well, perhaps by more luck than judgement !  They have a pretty solid initial orange kick followed by the separate flavours of the cranberries and nuts.  The quantity of chocolate I added I think was too little so you might like to up that should you choose to make these.

Recipe

Method

Pre-heat oven  - fan oven 180 (200C, 400F, Gas Mark 6)

Prepare 2 baking trays with Baking Paper or Baking Parchment (not greaseproof paper !)

Blend eggs and sugar together, add in the other wet ingredients, then add the flours and baking powder.

If the mix seems too stiff at this point add a little milk until it smooths out.

Fold in the filling ingredients (fruit, nuts, chocolate)

Spread 1/2 mixture on each tray in a long rectangle about 1-2cm high.   Use a spatula dipped in water to smooth the top suface.

Bake in oven for about 20mins until the mass is golden brown then remove from the oven.

Turn oven down to - fan oven 160 (180C, 350F, Gas Mark 4)

Allow to cool for 5 mins, peel off the baking paper, then use a bread knife to cut diagonal pieces about 2cm wide.  Arrange these on the baking tray cut side up and bake again for a further 10-15 mins depending on how crunchy you like them.


Enjoy !   I certainly am !

EP

Pages

Subscribe to RSS - ElPanadero's blog