I haven’t started with my first breads as there isn’t much to tell you, so I am starting with the breads I baked this year.
First I started by cultivating my own sourdough starter. It is now a 100% hydration starter with a mix of 90% whole wheat flour and 10% dark rye flour.
I will try to write a different post on how I made the starter soon and to explain all the terms, utensils and about the baker’s percentage.
Today let’s just talk about the bread above, which let me tell you from the start, it’s not a success (I’ll tell you why, of course).
For this recipe I used a recipe for a white sourdough bread from the Weekend Bakery.

Time schedule:
Day 1: Make the preferment leave for 12 hours at room temperature to mature
Day 2: Make the bread
- Mix the preferment with the water and flour.
- Leave to rest for 20mins (autolyse)
- Add the salt and mix for 4 minutes
- Leave to rest for 50mins
- Perform 1st stretch and fold
- Leave to rest for 50mins
- Perform 2nd stretch and fold
- Leave to rest for 50mins
- Shape the bread
- Proof it for 150mins
- Bake at 230C for 45mins

Recipe for 1 loaf (aprox 65% hydration)
Ingredients for the preferment
For this bread a preferment is needed.
| Ingredient | Quantity | Baker’s % |
| Strong white wheat flour | 115gr | 100% |
| Water | 115gr | 100% |
| Sourdough culture | 15gr | 10% |
Method
Dissolve the sourdough culture with warm water (you shouldn’t feel the water when dipping your hand in) and add the flour. Mix until all the flour is wet. Cover with kitchen foil and leave at room temperature for 12 hours.
Ingredients for the bread
| Ingredient | Quantity | Baker’s % |
| Preferment | 245gr | 72% |
| Strong white flour | 340gr | 100% |
| Water | 180gr | 53% |
| Salt | 8gr | 2.30% |
Final baker’s percentage (including preferment)
| Ingredient | Quantity | Baker’s % |
| Strong white flour | 455gr | 100% |
| Water | 295gr | 64.83% |
| Sourdough culture | 15gr | 3.29% |
| Salt | 8gr | 1.75% |
For this bread I used an organic strong white wheat flour from a traditional British mill Shipton Mill.
Method for the bread
I dissolved the preferment in about 2/3 of the water and then added it to the flour. Mix and add the rest of the water until you have quite a weird and not smooth mass of wet flour coming together. Do NOT add the salt at this point.
I covered the bowl and left to rest for 30 minutes for the autolyse. The recipe calls for 20 minutes autolyse, but I couldn’t get around to the next stage after 20 minutes, as I was busy around the house. Anyway I don’t think it’s anything bad with a longer autolyse.
When the 20 minutes are up add the salt and mix for around 4 minutes. I use a Kitchen Aid with a hook attachment usually, but this bread in particular I kneaded by hand as the lil’ one was asleep and I didn’t want to risk waking her with the Kitchen Aid noise. I think I probably should have kneaded longer by hand, but I only did it for about 4 minutes.
Baker’s tip: use fine salt as it will be easier to incorporate it in your dough.

Transfer the dough to a clean greased bowl (I used an oil spray to grease the bowl), cover it with cling film and leave it to rest for 50 minutes.
When the 50 minutes are up you are ready for your first stretch and fold. If you are not familiar with this technique watch this video from the Weekend Bakery, that I find really useful.
I did my stretch and folds directly in the bowl, but you can either tip the dough onto a lightly floured surface or you can initially place your dough in a large rectangular container so you can do them directly in there.
Now cover the bowl again and leave to rest for another 50 minutes. Do another stretch and fold (the last one) and again leave to rest for 50 minutes.
It may seem like a lot of work, but it’s not really a massive amount of active work, you just need to have the time to take care of your bread. And let me tell you with this cold weather in London I had some time to bake ![]() .
.
After this final rest you need to shape your bread. Now shaping and scoring are still a mystery to me.. You can find loads of clips on shaping and scoring online. I shaped my white sourdough as a boule, here is a clip from the Weekend bakery on boule shaping. You can find another clip on both shaping and scoring of a boule here.
For this particular bread I did a very bad job at shaping and therefore the bottom came out with a massive number of cracks….The scoring though was not so bad. To score the bread I use this bread scoring tool.
I use bannetons to proof my bread, so I moved my shaped boule in a floured banneton, covered it with a tea towel and left it to proof for 2 hrs and 30 minutes.
You will need your oven to reach 230C so start pre-heating sometime after the proofing period has started, depending on your oven.
To bake the bread I use a 3cm thick granite baking stone, that needs at least 1h20 minutes in a 250C oven to heat up properly. However for this first time I only pre-heated my oven and stone at 230C for about 20 minutes, which was clearly not enough, as my bread was white on the bottom when it came out of the oven, cracked and undercooked.
So, after the 2hrs and 30 minutes of proofing, I tipped my bread on a baking sheet (that I use to transfer the bread to the oven..as I don’t have a peel yet) scored it with a cross and put it in the oven.
I also keep in the oven one of the trays, while it is pre-heating, so it gets hot hot. Then, immediately after transferring the bread on the stone, I add a cup of hot water to the tray below to create some steam and shut the door quickly.
I baked this bread at 230C for 45 minutes. To get a nice crust open the oven door 5 minutes before the baking time is up, to release some of the steam.
I didn’t need to reduce the temperature of the oven this time, because the pre-heating period was short, but usually I need to do it as my oven is really small and burns the top of my loaves.

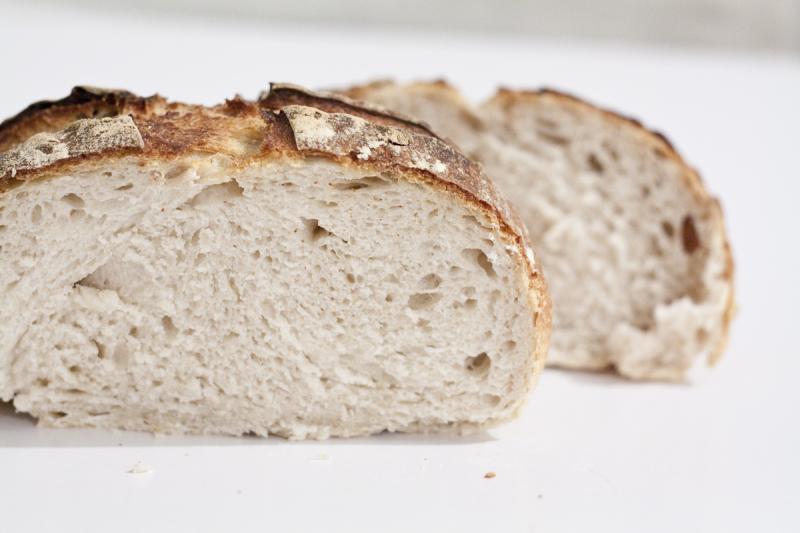
Resulting bread:
Because of the bad shaping and the short pre-heating time the bread came out with a very cracked bottom. Also, as the baking stone was not hot, it came out white on the bottom and undercooked. It was also a bit too dense (not sure exactly why..as it could be a lot of reasons..still learning), but smelled nice, had a lovely crust on top and was very tasty.
What do you guys think? Any comments welcome!
- Raluca's Blog
- Log in or register to post comments
and nice write-up.
Congratulations!
The shipton flour really makes very tasty bread, but don't expect the big holes as it is fairly low on protein.
Personally I prefer a good tasting loaf over a perfectly looking one. And who sets the mark?
You will get a slightly more open crumb with a well preheated stone though.
Happy Baking,
Juergen
I thought the flour might be to blame..as I used to use a stong Canadian one before and I did get bigger holes.
I will try this recipe with that flour as well to see what result I might bake.
Happy baking to you too!
Raluca