I almost decided not to bake this past weekend, but I activated some starter, thinking I might make some sourdough pancakes for breakfast Sunday. But, then, there was this starter, and I thought maybe I'd bake something or other. Well, I might as well have some fresh-baked bread for Sunday dinner, and it had been a while since I'd given a loaf to my next door neighbor who really appreciates my breads. I guessed I'd make some San Francisco-style sourdough to share.
I didn't want to be completely tied to the time-demands of my dough, so I relaxed the rigorous procedures with which I had been working to accommodate the other things I wanted to do. I expected the bread to be “good” but maybe not quite as good as last week's bake.
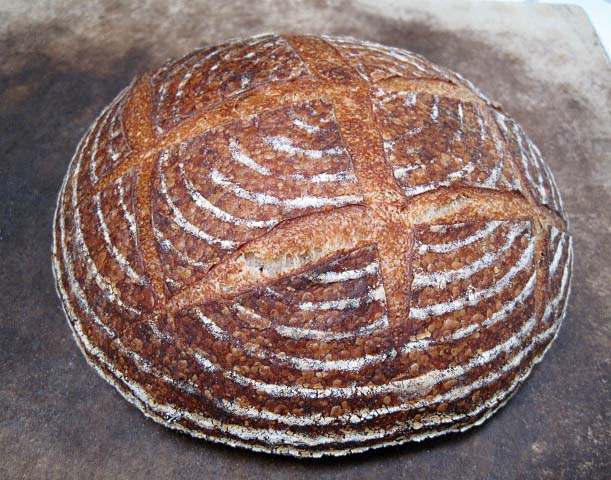
To my surprise and delight, the bread turned out to be the best San Francisco-style sourdough I had ever baked. So I am documenting what I did and hope it's reproducible. And I'm sharing it with you all. The modifications in my procedures were determined by convenience of the moment. This was sort of “a shot in the dark that hit the bullseye.”
So, here are the formula and procedures for this bake:
I started with my stock refrigerated 50% starter that had been fed last weekend. This feeding consisted of 50 g active starter, 100 g water and 200 g starter feeding mix. My starter feeding mix is 70% AP, 20% WW and 10% whole rye flour.
I activated the starter with a feeding of 40 g stock starter, 100 g water and 100 g starter feeding mix. This was fermented at room temperature for 16 hours, then refrigerated for about 20 hours. I then mixed the stiff levain.
Stiff levain | Bakers' % | Wt (g) for 1 kg | Wt (g) for 2 kg |
Bread flour | 95 | 78 | 157 |
Medium rye flour | 5 | 4 | 8 |
Water | 50 | 41 | 82 |
Stiff starter | 80 | 66 | 132 |
Total | 230 | 189 | 379 |
Dissolve the starter in the water. Add the flour and mix thoroughly until the flour has been completely incorporated and moistened.
Ferment at room temperature for 16 hours.
Final dough | Bakers' % | Wt (g) for 1 kg | Wt (g) for 2 kg |
AP flour | 90 | 416 | 832 |
WW Flour | 10 | 46 | 92 |
Water | 73 | 337 | 675 |
Salt | 2.4 | 11 | 22 |
Stiff levain | 41 | 189 | 379 |
Total | 216.4 | 953 | 2000 |
Method
In a stand mixer, mix the flour and water at low speed until it forms a shaggy mass.
Cover and autolyse for 120 minutes
Add the salt and levain and mix at low speed for 1-2 minutes, then increase the speed to medium (Speed 2 in a KitchenAid) and mix for 5 minutes. Add flour and water as needed. The dough should be rather slack. It should clean the sides of the bowl but not the bottom.
Transfer to a lightly floured board and do a stretch and fold and form a ball.
Place the dough in a lightly oiled bowl and cover tightly.
Ferment at 76º F for 31/2 to 4 hours with a stretch and fold at 50 and 100 minutes.
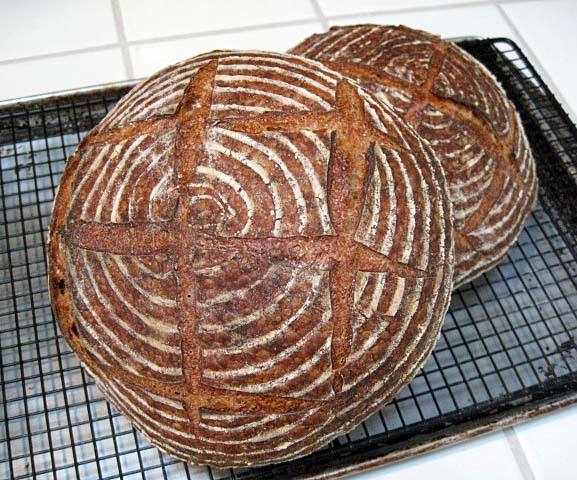
Divide the dough into three equal pieces. (Note: I had made 2 kg of dough.)
Pre-shape as rounds and rest, covered, for 10 minutes.
Shape as boules or bâtards and place in bannetons. Place bannetons in plastic bags.
Proof at room temperature (68-70º F) for 1-2 hours.
Cold retard the loaves overnight.
The next morning, proof the loaves at 85º F for 3 hours. (If you can't create a moist, 85 degree F environment, at least try to create one warmer than “room temperature.” For this bake, I took two loaves out of the fridge and started proofing them. I took the third loaf out about an hour later and stacked it balanced on top of the other two. I did one bake with the first two loaves and a second bake with the third loaf.)
45-60 minutes before baking, pre-heat the oven to 480º F with a baking stone and steaming apparatus in place.
Transfer the loaves to a peel. Score the loaves as desired, turn down the oven to 460º F, steam the oven, and transfer the loaves to the baking stone.
After 15 minutes, remove the steaming apparatus, and turn down the oven to 435º F/Convection. (If you don't have a convection oven, leave the temperature at 460º F.)
Bake for another 15 minutes.
Turn off the oven, and leave the loaves on the stone, with the oven door ajar, for another 15 minutes.
Transfer the loaves to a cooling rack, and cool thoroughly before slicing.
Note: Because these loaves were smaller than those baked in “Take 3,” the oven temperature was hotter , and the baking time was shorter. I also wanted a slightly darker crust, which this modification accomplished.
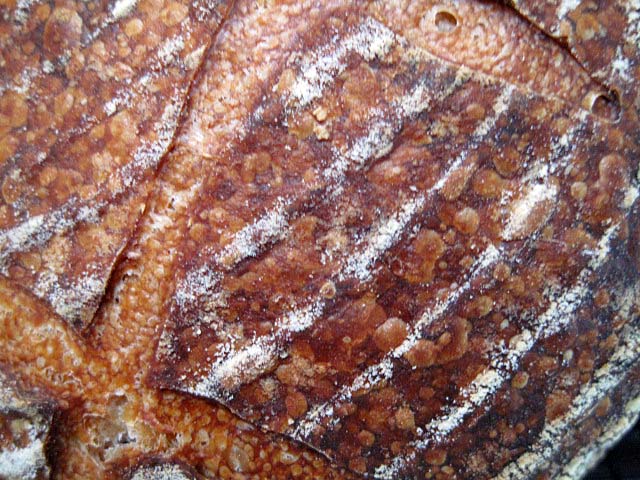
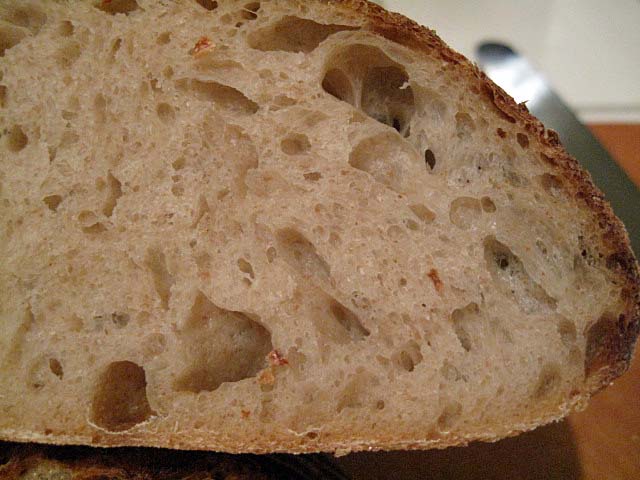
The crust was thick and very crunchy but not “hard.” The crumb was more open than my last bake. The crust had a sweet, nutty flavor. The crumb had sweetness with a definite whole grain wheat overtone and a more pronounced acetic acid tang. It had a wonderful cool mouth feel and was a bit more tender than the last bake.
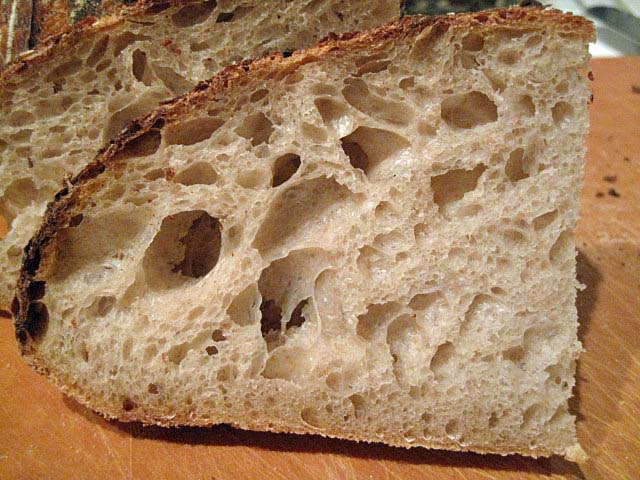
This bread was close in flavor and texture to the best tasting bread I've ever had which was a half kilo of pain de campagne cut from an absolutely huge miche in Les Eyzies, France some 15 years ago. It's a taste I've never forgotten and often wished I could reproduce.
I need to make me a miche like this!
David
Submitted to YeastSpotting
- dmsnyder's Blog
- Log in or register to post comments
David, as always your bread looks fantastic. Beautiful open crumb and perfect crust.
David
I'm working on liquid levain stage tonight.
I have never tried your technique of converting a firm starter to a liquid and back to a firm before, so I am anxious to see the final result.
You and Glenn and David G - all making this bread this weekend.
I'm really looking forward to a gala show and tell about Sunday night!
David
I just realized I am actually following your previous post where you made the walnut bread also, so I didn't refrigerate the liquid levain and instead just mixed the firm starter levain this morning. So I guess I won't have the exact results as you on this go around.
I have to decide if I should follow your 2 hour autolize or just the standard 20 minutes when mixing the final dough per your previous post.
Actually I now also realized the post I am following you wrote after this one I believe......so which one do you like better? or am I just confused? I'm sure either one will turn out good.
The method used in the earlier "ver. 4" post produced a slightly more sour bread, but the difference was quite small. Both were delicious. I'm betting yours will be too.
I'm making another batch myself this weekend with yet another minor procedural modification - skipping the liquid starter stage altogether and building the levain from a firm starter. The bread will be baked Sunday.
Happy baking!
David
I may have to wait until next weekend to do this. My refrigerator is on the fritz and I have to have it fixed on Monday. I'm afraid of what will happen if the temperature is too warm and then it has to sit out on the counter for who knows how long before being put back in to rest until I can bake it tomorrow night. I will certainly give it a go again when I can.
I've decided to give it a go tonight. I will follow your procedure up to forming the loaves and will put the dough in my smaller drink refrigerator to bulk ferment.
Tomorrow night I will form them into loaves and bake them.
I will let you know how it turns out.
Strange thing is that I didn't have enough firm Levain for some reason. I am pretty sure I followed your amounts exactly, but maybe I miscalculated. I just added a little bit of the original firm starter I had in the fridge.
Hi David,
The bread looks really good, and sounds very tasty from your description and comparison. A long and slow ferment of your starter must be important to achieving this.
By the way, I think you must have used 200g of your "starter feeding mix" in order to maintain your stiff levain in your procedure above?
Best wishes
Andy
I'm not sure to which step you are referring regarding my starter feeding. I think what I wrote was accurate. My feedings took the starter from stiff to liquid then back to stiff, for the levain.
If I missed something, please help me identify it.
Thanks.
David
Although Andy was cleared up, I'm still confused by the reference to "stiff starter" in the step to create "stiff levain". If I started out with a 50% starter, then thinned it to 100%, that's what I am adding at this step so it's a poolish, by no means stiff.
Anyway, trying this now as baguettes. I predict that thick or thin, the results will be excellent.
Otis
I'm afraid the post has TMI. I described my procedures from the point I activated my starter, but you should really start this recipe with a stiff starter that you then use to mix the firm levain.
Let us know how your baguettes turn out.
David
Quick thinking of you to note things down for us, David! Thanks for that.
2 hours autolyze? ... last time i've tried autolyzing that long (though i made dough water quite warm, don't know why) the final dough was very slack and seem to desintegrate. I think the key here is room temp water?
Absolutely fantastic results, David! i think you've achieved the flavor you seek, and beyond. I can sense the flavor from your description (amazing how sourdough seem to taste the same everywhere on this planet).
Maybe moon sourdough (lunar SD) would taste different? :) any astronaut?
see if the levain was in it. Simply flour and water... patiently waiting for David to add the lifting power. So there won't be much degeneration. Love that crust! Beautiful!
Thanks for the compliment, Mini!
I think it's useful to remind everyone that gluten formation occurs when the two component proteins are exposed to water. So this is occurring during the autolyse. Mixing after the autolyse organizes the gluten strands and promotes cross-strand bonding in a way that it can make cells to trap the CO2 generated by fermentation.
David
The 2 hour autolyse was to give me time to get to the Farmer's Market and the grocery. I find this long autolyse results in a dough that needs very little extra mixing to achieve excellent gluten development and a very extensible dough. It was not at all too slack or degenerated. The water I use is actually cooler than room temperature. You are probably correct that that is important.
David
Hi David,
no I hadn't followed your complete feeding schedule, my fault. Yes, it's clear now, as you've pointed out going to liquid, then back to stiff.
Sorry about that
Andy
keep 'em coming.
The top photo that popped up when I opened your blog tells it all, really. Such perfect, golden crust colour... I wouldn't want it any other way.
As Khalid, I was also surprised by your 2 hour autolyse period, because the starter you put into your final dough must be quite acidic after a 16 hour fermentation period. I would be skeptical and fear some gluten degradation along the way (especially so since you're using AP flour), but you manage to walk the line perfectly and produce magnificent loaves. Your mastery of the sourdough continues to impress! :)
I paid particular attention to your crust, David, because I've been struggling with mine lately. A little over a year ago, I moved to a new apartment and didn't bring my starter with me. To be honest, I felt like a break from bread baking, and focus on some other interests instead. I'm now back among the merry home bakers, with a new rye starter that's only a couple of weeks old. In my new apartment, I have a newer, larger and probably more heat efficient oven than the one I was used to from my old place. I didn't really think much about it at first, and baked the first few loaves at the same temperature that I used before (i.e. high temperatures, starting at 250dC and ending up at around 235dC). The resulting loaves sang when they were hot from the oven, but the crusts turned soft and unappetizing as soon as the bread cooled down. After some trial and error (and consulting Calvel, Hamelman and Suas), I ended up baking this weekend's loaves at a lower 220dC for a slightly longer duration, and the crusts are now exactly as I remembered them; crackly, crunchy and full of flavour. I was, and still am, surprised by the difference the baking temperature has on the crust; with my new oven, I need to bake at lower temperatures to avoid trapping too much moisture inside the crumb of the loaf. If baked too hot, the crust will start setting up too early (no matter how hard I steam, the crust set up too early), limiting loaf volume and trapping moisture inside the loaf - the excess moisture would soften and ruin the crust as the bread cooled.
With a some more practice and fine-tuning, I hope to someday approximate what you achieved here, David. Thanks again for the inspiration!
Hmmm ... Have you checked the accuracy of your oven's temperature? I wonder if differences in oven venting play a role in your need for a different temperature setting.
Anyway, if you have found the time and temperature that give you the result you want, the rest is of academic interest only. But, one wonders .... ;-)
Thanks for your kind words. Your breads (not to mention your pastries) have certainly inspired me! I'm looking forward to seeing more of them.
David
you may be getting pretty close to your hoped for SFSD with this version. What do you think? This was a fine bake for sure.
I could use your insight into the levain build. I have been refreshing my starter for 12 hours (at less than half the final levain build amounts) and refrigerating it for 8-12 hours, before building the final levain the next morning which only seems to take about 4-6 hours or so on the counter before it doubles again and ready to use at about 72 F. These times are much shorter than this version of your SFSD. I have also tried retarding the levain after the final build rather than the previous refreshment. That too seemed to help the sour of the bread but didn't seem to do much for the crumb openness.
Is your final levain collapsing in the last 16 hours it spends on the counter? I think mine would collapse if it spent that much time on the counter after the 2nd refreshment but I haven't let it sit that long to find out..
I have been using 70% AP and 15% eacb WW and Whole Rye as my starter feed which is fairly close to yours in the same % of water. I don't know if this slightly more whole rye and less WW would make much of a difference or not. Your crumb seems more open though. I'm going to have to try letting the levain build take longer, like you did this time and see if that helps. I found that your 3 hr - 85 F final proof with high humidity really helped the taste and brought out the sour of the bread remarkably. Your experiments are very interesting and helpful.
Nice bake David.
I can say that a younger starter will be less sour than a mature starter. I can't give you exact times. My starter has not collapsed in 16 hours at around 68 degrees F. But note that, for the final build, I use bread flour (12.5% protein). It has expanded 3-fold in 12 hours. After that, expansion slows down, but, obviously acid production continues.
The crumb structure is influenced by mixing (including S&F's) and bulk fermentation mostly. Dough handling can also make it better or worse. The main contribution of the levain to crumb structure is the acid, which strengthens the bonds between gluten strands. I think that's important, but very much secondary to mixing and fermentation in importance.
David
My bread baking has improved remarkably I would say, mainly because of your experiments, explanations and recipes. I missed the bread flour in the final build. Maybe my leavain wouldn't collapse afer 16 hours on the counter as I thought. I know it doesn't collapes after 12 hours on the counter and 4 in the frige after final build.
I will pay more attention to my handling of the dough and its gluten development too.
Thanks again
I'm monitoring the stiff levain performance carefully since mixing it--I think that's what you call the "final build" in your post immediately above: you're answer to dabrownman--I found the the stiff levain I mixed at midnight, more than doubled this AM at 6:00 o'clock; but by 9:00 o'clock it was beginning to collapse. Room temperature has been between 72°F and 78°F; it's spring-time in northern Florida. I know from past experience, that by re-mixing the levain when it peaks it begins to expand again. I remixed, and, true to experience, I'm now at 14 hours, and the remixed levain is still re-expanding.
I've suspected for some time that the way I maintain my starter, and build formula-ready levain favors yeast development. At best, the bacteria population in my starter is at survival levels. That's, perhaps' the primary reason I'm making this bake: to see if I can evoke more than a hint of sourness from my stock.
Given even a muted success, it won't become more than an ocassional bake. My wife sometimes complains a batch of sourdough loaves are too sour for her liking.
Nonetheless, I'm having fun. Stay tuned.
David G
It's so great to be able to get close to your idea of “perfect bread". As someone who does long autolyse regularly, I am not surprised that better flavor was coaxed out by the 2 hour rest. Great work!
David
Everything about this bread looks like perfection David! I am inspired. I am particularly impressed with the color of your crust, mostly because I have not been able to get that russety glow since I switched from electric to gas oven. Since I believe you cook with gas, I'd love your input.
I haven't changed my approach electric to gas with the exception that I now switch on convection after 10 or 12 minutes. My set up is a fibrament stone on the bottom rack, and then two alumunum pans preheated with lava stones on top rack. Just before loading the loaves I add a towel to one pan that has been dunked in boiling water, I add a second hot wet towel to the other pan just as I complete loading the loaves. I've never cooked with a gas oven before...should I have the steam pans below the stone? Is there some other adjustment you suggest?
I cook on a gas stovetop, but my oven is electric. Since I believe the crust color reflects the Maillard Effect, I can't think of why gas vs electric ovens should be different.
David
I haveused the same formula as there is no other variable besides the different ovens. I even retarded overnight so the mail lard effect should not be an issue. I'm greetingfood color on the bottom... Maybe is should just serve it upside down. Anyway I will try your sf sd and report results.
I really can't help you with gas ovens, since I have no experience with them. However, in general, if you want a darker crust, bake at a higher temperature for a shorter time.
See hansjoakim's reply in this topic regarding the adjustments he had to make with a change in ovens.
David
As hansjoakim said, I was sold as soon as that picture popped up. What a gorgeous loaf, David! And I love that you relaxed your schedule so you could pop out to the Farmer's Market, etc., and you still ended up with such a world-class result. I was trolling around trying to decide what to do with my active starter and I think I've just found it . . . thank you!!
Janie
If you do make this bread, please let us know how it turns out for you. I've continually tweaked this formula. Now, I'm interested in its reproducibility, both in my kitchen and in others.
One of the very satisfying attributes of the San Joaquin Sourdough has been that so many bakers have been so happy with their own bakes using my formula. I hope this sourdough has the same reproducibility.
David
I've got things underway and just did my second stage feeding (the 40g + 100g + 100g) this morning at 6. It was then that I decided to sit down and map out the rest of the dough schedule and realized that on bake day (Friday) I have to be away for most of the day! So I will have to tweak. I can either stretch out the second stage feeding and leave it in the refrigerator for an additional 20 hours or so, or stretch out the final build/stiff levain by refrigerating it. I'm thinking I'll do the former, which would be similar to refrigerating any active levain or starter for a day.
So . . . I'm sorry to not exactly replicate your schedule and test out the reproducibility, but I will report back on my unintended variation. And then I'll plan out another time to test the formula exactly as written. Thank you again, David!
Janie
Hi again, David. This beauty came out of the oven this morning, and I will happily sing its praises. I did have to make the change I mentioned in my earlier comment, but I don't think the end result suffered (although of course I didn't taste yours so I don't know). The 2nd stage levain was held in the refrigerator for 44 hours rather than the 20 you recommend. I took it out of the refrigerator on Friday evening when I got home, built the final stiff levain and then made the dough the following morning (yesterday). It went back to the refrigerator in its proofing basket and was baked this morning. I had to reduce the final proof from 3 hours to 2 hours, and even at that I might have overproofed it. Maybe you can tell by the photos. But when I took it out of the oven, it was weightless, which I love! Crusty and deep, rich coloring, beautiful blistering. The flavor was just as you described it, including the cool mouth feel of the crumb. It glistened inside. The holes were wildly irregular! Here are some pictures:
I also took 200 gms before I shaped it and baked a pizza last night - delicious!
I'll be making this one many, many times more -- thank you so much, David!
Janie
Looks like you nailed that bake.
Paul
Thank you, Paul! It's so nice to hear from you. Janie
That is one gorgeous loaf of bread!
The times I gave in the OP were more descriptive than prescriptive. Your schedule is not the same as mine. For that matter, my schedule isn't the same from week to week. We adapt. If the bread is good, whatever you did worked.
I'm really delighted you made it and enjoyed it.
Happy baking!
David
Thank you for your kind comments, David. Happy baking to you as well! We're all fortunate to have you on this site, generously sharing your formulas and skills. Janie
Just had to report back once more. I'm hearing a lot of "when are you going to make THIS one again?"!
When we are asked, "Why do you bake bread?" most cite some mix of aesthetic and scientific rewards, but a lot of the satisfaction has to do with nurturance. So when our family appreciates what we bake - especially when it's with some enthusiasm - it really touches us.
Thanks for sharing! That made my day!
David
I agree completely, David. It's the best side benefit to what we bakers love to do - to have others love the results! And want more! I'm happy to provide it.
David, just gorgeous, and I'm smiling thinking of you recreating a special loaf tasted long ago :) Beautifully done.
Any thoughts on which details may have led to the more open crumb? I'm wondering if maybe it could be due to a softening of the gluten during the long autolyse and the 85F final proof.
Julie
I think the more open crumb was due to several factors: 1) The dough was somewhat more hydrated to start with. This was due to very slightly higher hydration and the variable absorbtion day to day of flour. We've had rain, and the ambiant humidity has been higher. 2) I developed the gluten more fully. I had a very good window pane after the machine mix and still did two stretch and folds. 3) Fuller fermentation and proofing. I really thought I had over-proofed the loaves before I baked them, but I had formed the boules really tight, and the oven spring told me the proofing was spot on.
David
Those are stunning, inside and out.
I've always believed that it's better to be lucky than good (but that's because I'm not usually all that good, but sometimes I get lucky).
Glenn
You know, we Gemini have difficulty making choices like that. So we strive to be both lucky and good.
David
Hello David,
You really did hit the bullseye (one might even say a boules-eye?) with this beautiful bake! :^)
(a lovely bullseye flour pattern from your bannetons, too...)
I am so happy for you, that you baked a bread as good as what you remember from so many years ago.
Thank you for sharing how you made it - this looks and sounds like wonderful, wonderful bread.
With thanks :^) from breadsong
It is very good. I'm hoping to be able to reproduce it reliably. The procedure fits nicely with my usual weekend routine which makes it easier. On the other hand, it takes planning ahead. To bake the bread Sunday, you have to start by refreshing your starter Thursday evening.
I like "boules-eye."
David
Hello David,

I couldn't resist trying to bake this bread; getting underway late Wednesday evening, and then having the pleasure of tasting the bread with tonight's supper. We absolutely loved this bread and like Janie, I will be making this one again!
Thank you again for writing about your process.
Here is a crumb shot:
...mmm, this bread is really, really good!
:^) breadsong
I'm so glad you enjoyed it!
David
Hi David,
I've been meaning to tell you, I enjoyed some of the slices on their own, with no toppings at all.
It was delicious, just simply savoring the flavor of the bread.
Thanks again - I am so grateful to have baked this one!
:^) from breadsong
You are such a fine baker, your enjoyment of this bread is especially gratifying.
One of my criteria for "really good bread" is that it is delicious without topping and without toasting. This is one I could just sit down and make a meal of all by itself .... Well, with a bottle of wine on the side.
David
David, such a nice thing to say - thank you.
This bread and some good wine - sounds like a perfect pairing!
:^) breadsong
...of one of breadsong's loaves, I can attest that it was truly a joy to savor! We had it with Easter dinner and our guests raved about it, including a 13-year old boy who kept coming back to the bread board for seconds (and thirds, and fourths...) with wonder in his eyes. Thank you, breadsong!!! And thank you, David, indirectly!
If the loaf breadsong gave you was from my formula, I am doubly honored!
David
A David formula baked by breadsong! I am the one doubly honored!
Oh, both of you are so kind – thank you!
This bread was such a pleasure to bake, taste and share.
David, thank you so much for documenting and sharing what you did, to create such a flavorful loaf.
MC, thank you for your compliments on the bread (I’m delighted your guests liked it)!
From your *happy* baking friend,
breadsong
Though I'm late to the party...family has had a few this month and I'm next. I wanted to say what a gorgeous bake. The long autolyse sure paid off in more ways than one. It's hard not to pass a daily run to market for a fresh supply of cooking ingredients for dinner. The aroma, crust, color, crumb..all are hints of that goodness to come in the tasting you have described in this bake compared to the one in France. Thanks for sharing.
Sylvia
I appreciate your comments.
David
David,
I'm new to this site and am finding it very informative. Lots of sensible, often thought provoking, and helpful material - You are in all 3 categories for me.
Like many others it seems, I really love the look of your current version 4 SFSD and so, this morning, I have fed some of my starter with your suggested 70/20/10 mix and hope to bake bread in a couple of days time - I will let you know how I get on as I understand you like to know if your recipes are working for others - I have high hopes and will be delighted if I get anywhere near as good a result as yourself.
I have baked a few of Hamelman's levain breads in the past and note that most of his hydration levels are in the region of 65% with this % of white flour - I calculate that your overall dough hydration level is somewhere near 71%. Should I expect much difference in the doughs handling characteristics, or am I just thick (I'm from Newcastle- England and can be a bit dim sometimes) and have calculated incorrectly?
Regards, and apologies in advance if I am covering old or irelevant stuff.
Brian Hodgson
71% sounds about right.
The dough will be stickier after the initial mix, but it gets a lot smoother as it ferments with the stretch and folds. The crumb should be more open because of the higher hydration.
Looking forward to hearing how it works for you!
Happy baking!
David
David,
Despite my resolve to take a rest, and only bake the tried-and-true for our daily needs for a while, you've convinced me. I'm already into the process, and I've a couple of questions. I'm making 1.5 kg of dough, so I've scaled accordingly.
1. Using the three-build process I like, I'm converting some of my 100% hydrated, bread flour fed stock starter to a 50% stiff starter feeding it with your prescribed 70% AP 20% WW 10% Rye mixture. I've got a beautiful 150g ball of 50% hydrated clone of your stock in its third build, as I write. I intend to ferment build-3 for 16 hours at room temperature. I've assumed I can make the stiff levain immediately following build-3's completion, skipping your activation step (mine will be ripened and active), and 20 hour refrigeration you described in your post, which I assumed you did for scheduling convenience. However, now I'm wondering if I've missed some nuance. Am I ok doing what I've planned?
2. I'm now making all my lean doughs--currently 3 different sourdoughs, and baguettes-- using a single set of techniques, customized only in each dough's ingredients, hydration, machine kneading time, and manipulations. I retard bulk fermentation for all of them at 54*F, almost always for 15 hours--never less, sometimes more. Subsequently, I preshape and rest at 82°F for 1 hour, shape, and proof at 82*F also. I know you've read my K.I.S.S. posting; it's in that spirit I've standardized my process. Again, however, doubt has crept in. Do you see any show-stopping problems with this change in your process?
Years ago, my work took me frequently to San Francisco for more than a decade, I also lived in Montery, briefly, for two-plus years prior. I never went to San Franscisco without returning with at least one loaf, and usually more, of the city's signature bread. I've been following your quest closely. I'd all but abandoned any hope of every achieving even a whisper of likeness in my bread. I'm really looking forward to this bake.
Regards,
David G
P.S. I can incorporate any changes you recommend up to midnight tonight, when I'll mix the stiff levain.
Your modifications in my procedures sound just fine. I'm looking forward to your opinion of the result. In particular, I'm interested in your bulk retardation at 54 dF. In the commercial bakery, my understanding is that that temperature is preferred for "cold" retardation to my refrigeration at 40 dF. If you retardard the levain, bulk retard and then also retard the formed loaves, I would expect a very sour-flavored product. My one concern would be proteolysis, so your dough may be more extensible than mine was. You may end up with a flatter loaf. We'll see.
You are correct that some of my procedures are for convenience. This is true specifically for the retardation of the ripe starter and/or the levain. I start the process on a work day. My "day job" sometimes gets in the way of my baking. Frankly, I'm not sure how big an impact retarding the levain has. I do think it has some impact.
If you lived in Monterey "years ago," was that before the Mediterranean Deli on Ocean Avenue in Carmel closed? They sold the best San Francisco-style sourdough bread I ever had. In fact, when I was a freshman in college, my parents - may they rest in peace - arranged for that deli to ship me a loaf once a week for six months as a birthday present. I think that was the best present I ever got!
Looking forward to your results!
David
OK, I'm going ahead as planned, since it fits into my weekend schedule nicely, and you didn't give me any worries. I'll make the stiff levain late tonight, and I'll bake my weekly sourdough tomorrow (retarded overnight) in the AM. Tomorrow afternoon, after the levain has fermented 16 hours, I'll make your final dough, play with it in the early hours, and retard it in bulk overnight, baking late Sunday morning if all goes as expected.
I have very little experience with stiff levains, and what I have was in early times, so I'm on a fun learning curve this weekend.
Thanks again.
David G
David,
I remember the Mediterranean Deli! We went to Carmel frequently; one of my sons was in the Bach Festival one year, and we built a barrel-size bust of King Faruk at the annual Sand Castle contest too. I don't, specifically remember their sourdough, but I'd make a wager I've eaten it. I was attending the Naval Postgraduate School from mid-1967 until December 1969. I can say, with some certainty, I tasted just about everything the surrounding area had to offer as far North as Santa Cruz, East to Salinis, and South to Big Sur. I belonged to a group of like-minded students who, weekly, tried newly-discovered restaurants, delis, and cantinas. If all my children hadn't left the nest, settled, and had our grandchildren on the East Coast, I'd happily live there today.
David G
David,
I promised to let you know how it turned out - Not as good as yours - My skill level is perhaps not yet good enough to cope with such high hydration dough.
Everything went well until I turned the loaves out of the brotforms for baking, They sagged dismally - looked overproofed. Having said that, they recovered fairly well and puffed up nicely (Although a little ugly) after a few minutes in the oven. The taste (Both crust and crumb) is fantastic and I am encouraged to try them again but paying much more attention to the state of the dough rather than my timepiece - I will let you know if my version 2 turns out any prettier.
Brian
If you are new to higher hydration doughs, be assured confidence and competence comes with experience.
I'm glad you enjoyed the flavor. In the last analysis, it is the eating quality that counts the most.
Looking forward to hearing about your next bake.
David
I have the stiff levain (stage 3) fermenting today. Tomorrow I'll mix the dough, ferment, shape and proof. I think I'll bake one loaf tomorrow afternoon and retard another to bake Sunday morning to do a comparison. I still don't think a bread as light and open-crumbed as these appear can resemble "San Francisco Sourdough", but I bet it'll be good.
Glenn
I don't see how this bread would be harmed by lowering the hydration to 60-65%. I happen to like the lighter, more open crumb, even if it falls beyond the limits of "San Francisco Soudough." I have made one batch with a denser crumb. (I think I skipped blogging on that one.) It was very good, but not as sour as I wanted it. That had nothing to do with the crumb structure but with the fermentation schedule.
Anyway, let us know how your bake turns out.
I'm baking two new-to-me breads today. At least one looks like it's going to be a winner.
David
Hi, David,
My results are quite different from yours. I think the differences stem from differing starters, but I've not the knowledge to defend that "gut feel".
Beginning with fermenting the third build of my attempt to clone your stock starter I noted a difference from any previous experience I've had. The third build was at 50% hydration, and throughout the build cycle fed with your specified flour mixture. After eight hour wherein the ball volume exceeded doubling, the ball began to collapse. Nevertheless, it continued to ferment for another eight hours. When I stirred it down to make the stiff levain I found, although collapsed, the remnants of the usual gluten strand structure I experience in liquid levain builds. However, the ripe starter was exceptionally sticky.
The stiff levain expanded similarly, and likewise began collapsing after eight hours. I stirred it up, and, as I noted then, it began to expand again. It also was extremely sticky. It peaked again at the end of the second eight hours.
I mixed the dough (minus the salt) until well incorporated, and autolysed for two hours. Subsequently, I added salt, simultaneously kneading on speed 1 for three minutes (KA 600 Pro) and 5 minutes on speed two. The dough was sticky, but I didn't add any additional flour. I had used chilled water for the mix, and placed the dough in the refrigerator during autolyse to lower its temperature (62°F) to the planned retarding temperature (54°F).
After 1 hour I attempted to Stretch and Fold the dough, but it proved too sticky, and slack. I reverted to Slap and Fold, ala Bertinet, after about eight minutes it became more manageable. I returned it to its container. Subsequently I did 3 S&F at 40 minute intervals. It was returned to the refrigerator after each manipulation and remained until it reached DDT, at which time I put it in the wine chiller for overnight.
Sunday morning, I preshaped two loaves (735g each), and put them into the pre-heated proof box (85°F) for one hour, after shaping I put them into oval bannetons. Proofing completed in three hours (85°F). They were baked at 450°F with steam for 15 minutes; and finished in convection mode also at 450°F, for another 12 minutes.
Although doubled, their oven spring is considerably less than I routinely get with young, liquid levain.
The crumb, while closed, is well developed, and light. I normally loose 11% of dough weight baking sourdough loaves at similar hydration, and baking time and temperature. These loaves too lost 11% weight. The flavor is distinctly pleasant and wheaty. The sourness, while more pronounced than in young, liquid levain sourdoughs it only begins to approach my sense memory of long-ago San Francisco sourdough. Peculiarly, the sourness is most pronounced as an aftertaste, unlike the tang in my other sourdoughs.
Impatient (as always) I cut a loaf when it was still slightly warm. Both its crust and crumb were very chewy; so much so, I found it objectionable. However, Overnight, the dough transformed. It is still slightly more chewy than others I bake, but the crumb has dried further, the crust has softened, and the flavors are more present. Even the color is lighter.
I'm going to try this again--not soon, my wife's complaining about the freezer being over-filled. And I already mentioned her sour-sensitive palette--I will like make two changes. I'll build, and maintain a stiff stock starter for a few weeks before the bake, and follow David's routine closer than I did this time. I also will proof at 82°F, the peak temperature for yeast production. I like more oven spring, and slightly more open crumb.
David G
In spite of your struggles, your bread certainly looks good.
I would say your starter was super-active! It got sticky because the gluten was breaking down. I also found that, when I let my firm starter ferment for an extra couple hours, as I did in this recipe, it ends up very sticky. Yours was just more extreme. In your place, I think I would have refrigerated the starter before it collapsed. If I did the same recipe again, I might make the levain with a smaller inoculation.
I don't quite know what to make of how slack your dough was. Did it clean the side of the mixer bowl? If not, either you needed to mix longer, or, more likely, it was over-hydrated. I confess to being a bit confused by what you found. Is it possible you mixed up the ingredient amounts between the 1 kg and 2 kg columns in my table and used twice as much water?
I also see you retarded the dough in bulk, which I did not do. I'm surprised the bread was not more sour than you found it.
In summary, my suggestions would be to watch the levain and, before it collapses, either go on to the next build or retard it. I wouldn't just stir it down and let it ferment some more. It's "food" is getting exhausted. It needs refreshing with another feed. I guess this is another example of "watch the dough, not the clock."
David
When I build liquid levain, this starter triples before collapse at between 7-1/2 to 8 hours.
Thinking the long (16hr) fermentation of the 3rd build of the levain was sacrosanct to acid development, I let it go well past collapse without feeding. When the final step, stiff levain, also began to collapse after 8 hours, I stirred it down, but didn't feed it. I'm convinced that immobile yeast cells, during fermentation are slowly surrounded with waste product (alcohol, carbonic acid) rendering food less available, but not exhausted. Stirring the mix down homogenizes the mix, making remaining food more available. This was supported by the stiff levain peaking again just before making the final dough. However, its gluten, already weakened, continued to weaken further, evident in its slack structure and extreme stickiness after fermenting the second 8 hours.
When I machine kneaded the dough after autolyse, the dough cleaned the bowl's sides with the exception of a small circle of dough at the bottom center which continued to cling to the bowl. When I attempted the first S&F, as I described, I found it too sticky, and slack so reverted to, what I call "slap and fold". After the final S&F (total 3 done after the eight minutes of slap and fold) The dough's strength felt similar to previous sourdoughs.
However, when I turned it out in the morning to pre-shape, it was again sticky, and slacker than expected. It did shape OK, with excellent surface tension developing without tearing. Furthermore, it proofed in three hours which is nominal for this starter in similar doughs, and the proofed shapes held similarly, although they seemed slightly more fragile, and slashed with less resistance.
Despite my earlier comment re "food exhaustion" being a locale phenomena, its clear that at least some of the poor oven spring was due to lack of food for the yeast's final feeding frenzy.
Since posting my results, and asking for your critique, I've read Syd's, et al, comments on protease, enzymes whose stimulation and effects I've pretty much ignored, since it didn't seem to be a serious factor in previous breads I've been baking. If I understand what I've read the increased acidity (sourness) in my starter may stimulate greater protein denaturing which will contribute to weaker gluten structure. If I've got that essentially right, from a layman's point-of-view, adding flour either when feeding levain, of making final dough should dilute the pH of the mix, and slow the enzymatic effects? But then, it also seems to me the sought after sourness would also be reduced. I also read that small amounts of salt ( < 0.5%) will also inhibit protease activity.
Formula conversion: Trust me, David, I checked the math exhaustively. My 1.5 kg was precisely your formula to the nearest gram.
So I'm rambling. Enough with what if.
Here's what I'll do next time, probably within the next three or four weeks.
1. Build a stiff stock starter, using David's flour mix. and maintain it for 5 to 7 days at room temperature, feeding approximately every eight hours, and maintaining a fixed mass of starter; i.e., discard the same amount of old starter as flour and water added.
2. Subsequently, use David's two step process to develop a formula-ready stiff levain, feeding when necessary without discarding any starter.
3. I'll mix, autolyse, knead and manipulate the dough the same as this time, including retarded bulk fermenting, but I'll pay extra attention to early dough development, i.e., kneading and manipulation.
4. I'll preshape, shape and proof also as I did this time, but at 82°F which will slightly favor yeast development more than 85°F.
I'm also thinking I might add a tiny amount of salt to the week-long stock stiff starter if I begin to experience the same stickiness as this first time.
Thanks, David. I'm not disappointed by this first try, but, like your's, it's initiated a quest.
David G
I think your plan is sound. Just a couple points: I don't know the effect of pH on protease activity. I think time and temperature are more important. Lower pH, or more specifically, total acid, actually strengthens the bonds between gluten strands. That's one of the benefits of using pre-ferments when you are baking with low-gluten flours, as they do in France.
See my other comments below on handling sticky doughs.
David
David,
Thanks for your helpful comments. I have tried again, paying more attention to the dough than the clock this time.
As it happened, your timings were again (Within an hour or two) perfectly fine for my builds/levain and dough, I added an extra 25g of flour at the final mix stage as the dough was still extremely sticky and struggled to clear the sides of my KENWOOD mixer. I was expecting trouble during S&F's so I lightly oiled my bench which helped enormously (Do you prefer using flour on the bench instead?)
When I came to preshaping/resting I had to use lots of flour to stop the dough sticking to my hands - same again for final shaping, lots of flour needed and then into brotforms (4 x 500g - 2 boules and 2 batons.) Does this ever happen to you? I would not normally use more than the lightest dusting (None if I can get away with it) when working the dough on the bench so was very worried at this stage that I was compromising he dough's integrity.
After 2 hours proof at room temperature (20C) the doughs were nearly out of the brotforms and loooked in serious danger of overproofing - I did not fancy their chances of slowing down much in the fridge so I baked them immediately. Now for some good news.
The batards - which baked first - were fantastic. Despite collapsing a bit on slashing (I then spritzed them with water from one of my wife's old hair spray bottles - Well washed out I hasten to add) , using steam from hot stones in a tray under my baking stone, they immediately puffed up and looked marvellous although not as regular in shape as yours, quickly gaining just the right colour. After 30 minutes I transferred them to my smaller oven at 190C for a further 15 minutes to dry out a bit.
After letting my larger oven come back up to 240C I went to bake the boules - You will just not believe what happened next - Just as I was going to put the loaves into the open oven, my cat got in the way and I stood on her tail. The shrieking temporarily distracted me and I dropped the loaves half on and half off the baking stone. I managed to push/pull them back into position on the stone but they were not a pretty sight - After all that care and attention over the last two days I was so not pleased - Neither was the cat (Jess) all she wanted was some dinner.
I could scarcely believe it when the loaves rose like Lazarus from the dead and after going through the same process as the batards finished up looking almost like proper bread.
I gave the batards to my elderly neighbour, she will be entertaining her large family this Easter weekend, cos I know how much she loves my normal French Country Sourdough. The crust was still lovely and crisp - The 15 minutes drying out at lower temperature in my small oven I guess?
My wife (Katie) and I made our breakfast sanwiches yesterday with the sliced up "Lazarus" bread and it was fabulous taste (Though ugly) - I remember one of your very early comments about this being some of the nicest tasting bread you have made - I had to then try it on its own - Still fabulous.
I almost wish I had kept the batards for myself now - Looking forward to feedback from my neighbour on taste - But I will now have to make this again (Without the help of Jess.) I think I may reduce the hydration by a couple of percent as it is nerve wracking for me working with such wet dough.
Thank you so much for providing me with the inspiration to try this in the first place - I'm learning all the time.
Cheers, and Kind regards for Easter,
Brian
I don't have pets, so I neglected to include when to feed the cat in my description of the process. I can see this was a serious oversight. ;-)
I'm glad you liked the bread. A bake that turns out well after facing challenges - self-inflicted or pet-assisted - is somehow more inspiring to me than one that goes smoothly at every step.
In regard to handling sticky doughs: For very slack doughs, I do a number of stretch and folds in the bowl, usually at 30 minute intervals, and S&F on the board only once the gluten is moderately-well developed. (The S&F in the bowl was not needed with the SFSD.) On the board, I generally lightly dust with flour and also keep my hands lightly floured. If the dough sticks to the board, I free it with my bench knife. The key to handling sticky dough is handling speed. Make your fingers' contact with the dough as brief as possible. Using this combination of techniques, I have minimal difficulty handling sticky doughs and can avoid incorporating excess flour into the dough during fermentation.
This may be clearer if you watch the excellent video Jeff Hamelman made on Mixing and Folding. He is handling baguette dough which is not much drier than the SFSD dough, really. The link to the KAF series of videos is: Hamelman technique videos. View Video #2. The segment on folding starts 3:40 (min.:sec) into the video. Note the rapidity of Hamelman's movements when he is actually touching the dough, until after he has done the stretch and fold. Note how lightly he dusts the bench. Note, at 5:00 into the video, how he dusts his hands by simply dragging them across the dusted bench. You could also view Video #3 where Hamelman is dividing and scaling the dough with attention to how briefly his knife and his hands are in actual contact with the dough.
Oh, my! I just viewed this video again to find the pertinent segments. Watching Hamelman handling dough is like listening to Heifetz play the Bach Chaconne. No movement is wasted. Everything is important. What a master! You can watch this 1000 times, and there are still new lessons to be learned.
I hope this helps.
David
Brian, at least your cat didn't try to go into the oven....I have 5 cats and many times it is a juggling act to try and get my bread into the oven while yelling at one of my cats to not jump in the hot oven.
I've been following along on your SF SD quest, David, and thought it was time to jump in and have a go at this version. Quite a different procedure from my usual. We're enjoying perfect baking temps at the moment (24C in the kitchen), so anticipated keeping to your fermentation times - a rarity for me in any recipe. My breads seem to proof faster than recommended in recipes most of the time, regardless of ambient temp.
I mix by hand, so differed from you in that, but otherwise stayed with your directions. I was getting nervous about the relatively long autolyse and proof times, but went ahead stubbornly until it became obvious that I was going to end up with an overproofed loaf. Just had to delete Step 10 and reduce Step 12 to 1.5 hours. The finished loaf showed early signs of overproofing, so this turned out to be the right move.
I was impressed with the crumb structure. It was quite open, yet had a firmness to it, right from the start, that I've mostly experienced in commercial SD loaves. Unusual in my breads. Openness like this generally goes with a soft crumb. The crumb reminded me of a bread I used to buy often from a good local specialist SD bakery before I started baking myself, which they market as 'casalinga'.
Unfortunately, I have no idea how this bread tasted. I brought a shocker of a virus back from SE Asia (courtesy of Penang, hawker centre of the world, and I ain't talking about street food!). I had no sense of taste for 3 days, which coincided with this bread's shelf life. Terrible timing. Losing your sense of taste like that drains the colour from your world! My taste buds started to stir as I sliced the last of your bread, but were still too dopey to function properly.
Will have to give this one another try now that my palate is active again.
Cheers!
Ross
Nice open and moist crumb.
Sucks about the virus. I'm off to China in another week. Hope I fair better than you!
I made this bread over Easter weekend and have to say it was the first bread I've yet to produce in my new gas oven that I was pleased with. That said, the best looking loaf was baked in cast iron. Two loaves baked tented and untented had good color but no ears -- I still have more work to figure out the optimum set up.
I found the bread nutty, mildly sour (more the next day) and excellent, however it did not ring any Laraburu SF SD memories for me. I think so much of that flavor came from the crust and, at least in my attempt at your formula, the crust was not thick. Reinhart (in BBA) says the yeast strains in SF produced a thicker crust, so perhaps it's not replicable elsewhere. Still a very good formula that I will continue to work with. Thanks!
I'm not sure how the yeast strain would impact crust thickness. Do you understand this? I think crust thickness is influenced by steaming and oven temperature. Maybe others have more thoughts.
David
But I went back and looked at the quote and he's talking about local bacteria, not yeast, having impact on crust formation and flavor. It's still a mystery to me so I have started a new thread on the topic. Perhaps persons with more knowledge than I can shed light on the statement.
bnom,
I believe what you're referring to is the strain of sourdough culture that creates San Francisco sourdough bread.
Here's a site that explains it in terms that are way over my head but may be of interest to you.
http://www.nyx.net/~dgreenw/whatisthemicrobiologyofsan.html
Pattycakes
Beautiful scoring! Thank you for sharing. It makes me want to make it right away! I'll have to convert my liquid starter to a stiff starter first.
One of my favorites of your post is called "this miche is a hit" (not sure how to call that bread). I remember you said the miche requires a bold bake in order to acheive a caramel crust. Other than that, can you please tell us a bit about the differences in taste and crumb texture of this SFSD Take 4 and that miche?
Cheers,
Michelle
The miche is larger. The crust is thicker and crunchier. The crumb is usually more open. The flavor is different, but I don't quite know how to describe the differences.
David
I have been making the miche 1/5 less the size (because there are only the two of us) but for some reasons I have better success with the original recipe. I'll definitely give this SFSD a try. Thanks again.
Michelle
Hello David,
Need a bit of your advise. My room temperature is usually around 76-78F. I'm afraid if I leave starter mixed into levain out on the table for 16 hours, it will collapse (and I'm going to be out at work, so once it mixed in the morning, the earliest I can get to it would be around 10 hours later). Can I retard it in the fridge instead for a longer period of time (double the time) or do a mix of cold retard and room temperature fermentation? Correct me if I'm wrong, but such a long time is needed for the extra acetic taste for SF Sourdough - can this even be achieved by keeping dough in the fridge at all?
P.S. Going further back to your starter refresh phase. I've kept refreshed starter at room temperature (which was 78F) for 16 hours and then put it into the fridge - starter doubled during this time. Today in the morning, around 8 hours later, when I checked on the starter, it collapsed back to its original size. Is this normal or should I scratch and start from the beginning (and cutting down the 16 hour fermentation phase by a few hours)?
Thank You!
Yup. Watch the dough, not the clock. At your ambient temperature, I would expect the starter to ripen in 6-8 hours, if it is fed with already active starter. Refrigerating it overnight, or even for 2 days, will tend to make it more sour. It will still work fine.
If a starter totally collapses, I would worry about it being over-fermented. However, I have had that happen and have used the starter with very acceptable results. If it is healthy, giving it a generous feeding, as we do when we mix the starter with the final dough flour and water, perks it right up.
David
David,
Thanks a lot for all your help. Is there a resource somewhere that would show how temperature affects dough fermentation?
I have seen such charts, but they are for specified strains of yeast and lactobacilli. Yours (and mine) without a doubt are different from the ones in published experimental studies. What's important to know are the general relationships. Higher temperature speeds things up a whole bunch until it gets so high it kills the beasties in your dough. Beyond that, you can develop guidelines for your own starter, as long as you always feed it exactly the same way and keep other variables constant (like hydration). Above all, don't rely on anything so much as your own senses. In other words, "watch the dough, not the clock." And also touch, smell, etc. Some also taste, monitor with pH strips, etc.
Understanding the science helps you make adjustments to control your flavor profile, if you really want to be able to fine tune that. If you want to get to the next level of bread geek, invest in Michel Suas' Advanced Bread and Pastry. That is a book for professional bread and pastry chefs. It is by the founder and director of the San Francisco Baking Institute. Highly recommended.
David
David,
You are right of course about going by the feel/look, it's just seems like timing was/is a key to getting the taste you created and that's why I'm so stuck on it. I guess I should just accept that short of me buying a proofing box that can control temperature both ways (colder/hotter), I just won't be able to get to the same taste and should simply go on to baking my own bread based on your recipe and then adjust next batches to my liking (sourness)...
'Advanced Bread and Pastry' is on my to buy list. It's a bit on the expensive side for my liking, but I will eventually get to it.
Thanks a lot for you help as always!
well, I've done these loafs twice now. First time I tried to follow David's recipe to the letter, but ended up with over proofed loafs - one did not get any rise at all... this time I did long retard (15hours) and 2 and 1.5 hours final proof times. 2 hour proofed loaf was overproofed IMO, but still got a decent rise. 1.5 hour loaf had a significantly better rise. Next time I'll try 1.5 hours again and either straight from the fridge or 45min/1hour proof.
The top loaf in the 2nd photo looks very good. The other probably was over-proofed. Remember! Judge readiness to bake by the poke test, not by the clock. I recall you saying your kitchen is quite warm.
How was the crumb and the flavor?
Happy baking!
David
Hello David,
Finally sliced today's bread. Looks a tad more dense then yours? makes me wonder if 1.5 hour final proof has been a bit longer then needed... Good flavor - unfortunately I never had 'real' SF sourdough bread, so I can't say how much I'm off by. But both, my wife and me, are satisfied - beats similar breads from local bakeries. Thanks a lot for the recipe and your help!