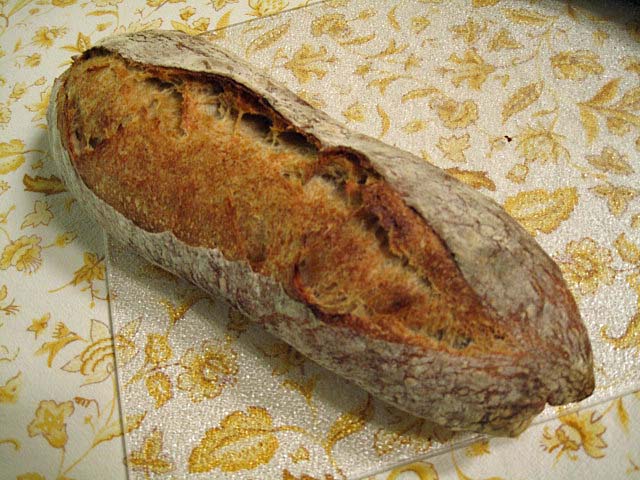
The "San Joaquin Sourdough" is my own recipe. It evolved through multiple iterations from Anis Bouabsa's formula for baguettes. Most of my deviations developed in discussion on TFL with Janedo, who first suggested adding sourdough starter and rye, and, then, leaving out the baker's yeast and making it as a "pure" pain au levain.
I have tried many modifications of ingredients and procedures. The current formula uses the ingredients specified below.
Those who have followed the evolution of this bread will note that I have increased the levain from 20 to 30 (baker's) percent. I have also switched from a 75% hydration levain to a 100% hydration levain, reducing the water added to the dough to keep the overall dough hydration about the same.
Originally, all gluten development was by the “stretch and fold in the bowl” method. I have added a couple folds on the board and lengthened the bulk fermentation prior to cold retarding the dough.
These changes result in a somewhat tangier bread. I don't think they have changed the crust or crumb structure noticeably.
I made two other modifications of my procedures for today's bake: First, I employed the oven steaming method recommended for home bakers by The San Francisco Baking Institute.
The oven is not pre-steamed (before loading the loaves). A cast iron skillet filled with steel pieces (nuts and bolts, rebar pieces) is pre-heated in the oven along with two baking stones. One stone is placed on a rack above the stone and rack on which the loaves will be loaded. When the loaves are loaded, a perforated pie tin filled with ice cubes is set atop the skillet. As the ice melts, water drips through the perforations and turns to steam when it hits the metal pieces.
I deviated from the SFBI-prescribed method in two particulars: I used only a single baking stone, and my cast iron skillet was filled with lava rocks rather than steel pieces.
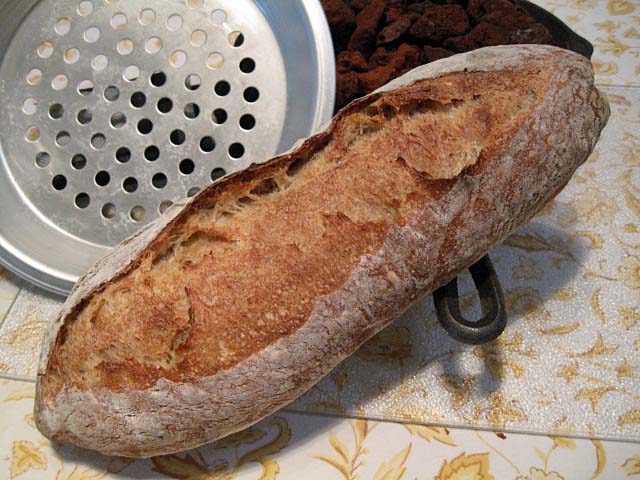
My second procedure modification was to open the oven door for a few seconds every 5 minutes during the final 15 minutes of the bake. This was to “vent” the steam rising from the loaves themselves in the hope this would result in a crust that stays crisp longer. It did result in less softening of the crust as the bread cooled. Methods to vent the oven and dry the crust during the last part of the bake warrant further exploration.
|
Ingredients |
|
|
Active starter (100% hydration) |
150 gms |
|
KAF All Purpose flour |
450 gms |
|
BRM Dark Rye flour |
50 gms |
|
Water |
360 gms |
|
Sea Salt |
10 gms |
Procedures
Mixing In a large bowl, mix the active starter with the water to dissolve it. Add the flours and stir to form a shaggy mass. Cover tightly and let rest (autolyse) for 20-60 minutes.
Sprinkle the salt over the dough. Using a plastic scraper or silicon spatula, stretch and fold the dough 30 times, rotating the bowl 1/5 turn between each stroke. Cover tightly. Repeat this stretch and fold procedure 3 times more at 30 minute intervals.
Fermentation After the last series of stretches and folds, scape the dough into a lightly oiled 2 quart/2 liter container and cover tightly. (I use a 2 quart glass measuring pitcher with a tightly fitting plastic lid manufactured by Anchor Glass.) Ferment at room temperature for 90 minutes with a stretch and fold after 45 minutes, then place in the refrigerator and leave it there for 21 hours.
Dividing and Shaping Take the dough out of the refrigerator and scrape it gently onto a lightly floured work surface. Gently pat it into a rectangle. Divide as desired or leave in one piece. To pre-shape for a bâtard, fold the near edge up just past the center of the dough and seal the edge by gently pressing the two layers together with the ulnar (little finger) edge of your hand or the heel of your hand, whichever works best for you. Then, bring the far edge of the dough gently just over the sealed edge and seal the new seam as described.
Cover the dough with plastic wrap and/or a kitchen towel and let it rest for about 60 minutes, with the seams facing up. (The time will depend on ambient temperature and how active your starter is. The dough should have risen slightly, but not much.)
To shape a bâtard, fold the near edge of the dough and seal the edge, as before. Now, take the far edge of the dough and bring it towards you all the way to the work surface and seal the seam with the heel of your hand. Rotate the loaf gently toward you 1/4 turn so the last seam you formed is against the work surface and roll the loaf back and forth, with minimal downward pressure, to further seal the seam. Then, with the palms of both hands resting softly on the loaf, roll it back and forth to shape a bâtard. Start with both hands in the middle of the loaf and move them outward as you roll the loaf, slightly increasing the pressure as you move outward, so the bâtard ends up with the middle highest and the ends pointed .
Preheating the oven One hour before baking, place a baking stone on the middle rack and put your steaming apparatus of choice in place. Heat the oven to 500F.
Proofing After shaping the loaf, transfer it to parchment paper liberally dusted with semolina or a linen couche. Cover the loaf with plastic wrap and a kitchen towel or a fold of the linen. Proof until the loaf has expanded to about 1-1/2 times it's original size. (30-45 minutes) Do not over-proof, if you want good oven-spring and bloom!
Baking Pre-steam the oven, if desired.
Slip a peel or cookie sheet under the parchment paper holding the loaf or transfer to a peel, if you used a couche. Score the loaf. (For a bâtard, hold the blade at about a 30 degree angle to the surface of the loaf. Make one swift end-to-end cut, about 1/2 inch deep.)
Transfer the loaf (and parchment paper, if used) to the baking stone. Steam the oven. Turn the oven down to 460F.
After 12-15 minutes, remove the loaf pan and your steaming apparatus from the oven. Rotate the loaf 180 degrees, if it is browning unevenly. Close the oven door.
Bake for another 12-15 minutes, then remove the loaf and place on a cooling rack. Check for doneness. (Nice crust color. Internal temperature of at least 205F. Hollow sound when you thump the bottom of the loaf.) If necessary, return to loaf to the oven to bake longer.
Cooling Cool on a rack for two hours before slicing.

David
Submitted to YeastSpotting
- dmsnyder's Blog
- Log in or register to post comments
I'm going to have to start doing more overnight fermentations to increase the sour in my levains. While I like the fact that my favorite - Hamelman's dual starter pain au levain - lacks a noticeable tang, I find myself wishing that my other sourdoughs had a little more 'san francisco' to them. I think your approach may be the answer to that problem.
Larry
Have you tried the "Vermont Sourdough with Increased Whole Grain?" If made with an overnight retardation after shaping, it's moderately tangy.
The sourest breads I've made have been ones where I cold retarded the levain overnight, or even for 48 hours, and also cold retarded the loaves. Including some rye or WW in the levain and/or the final dough will also make a sourer bread.
David
Interesting. I've never thought of retarding the levain except when I'm not using it. Do you allow it time at room temperature after the build before refrigerating, or do you retard it immediately?
Larry
I was reading through some older TFL posts yesterday and came across a list of someone's five favorite breads and your San Joaquin Sourdough was among them. I've been reading about that recipe for so long that I decided that this will be my week-end project. Your steaming method looks interesting. I have been using the water spritz and and covering with a pre-heated spritzed aluminum roasting pan. I have some laval rocks but haven't tried them yet. Maybe I should give this method a whirl. Edited to ask where you got the perforated pie pan?
Trish
Let us know how the SJ SD works for you.
I got the pan from Bridge Kitchenware (lames)
David
Very nice looking loaf, David.
If you switch to convection after the steaming apparatus is removed, doesn't the oven vent without opening the door?
Glenn
I think convection bake dries the crust better than conventional bake, but there is still steam released when I open the oven door while baking high-hydration breads.
It's clear that ovens vary in how much they vent. YMMV.
David
Love the crumb shot, can almost taste it! I seem to always be opening up my oven after steaming, trying to vent it more, it still hasn't helped my crust that much, just goes to show you how much steam is still present in the oven.
I know you love a little more punch in tangy flavor to your sourdoughs, do you feel you get it best using the 100% hydration levain? I finallly have the flavor/aroma, I love from my levain and it came through finally with my 100% starters...I just love the smell and taste :) If they made a scented candle...I would buy it 'lol'.
I ordered the perforated pie pan, ' I should have posted this on your other great blog about steaming, this was a little easier, it's been busy around here today'. Now I have about 20 pie pans, I've collected a lot over the years...but this is a first with holes, only because I couldn't figure out how to punch them neatly :P, I probably have almost as many steaming devices. I think I read about the method of steaming in the book but still can't get myself to collect nuts and bolts...I'll also use my lava stones 'lol'
Sylvia
So, San Joaquin is your recipe... hmm..Nice!
Great Bake david!
khalid
Hey David,
First, thank you so much for sharing this recipe it is the recipe I want to use if I am giving a gift or trying to impress a dinner party.
I got converted some whole wheat starter to a rye starter. I am thinking about using this starter for the recipe and just subbing the 50g rye added to AP.
Do you have any thoughts or feedback about giving this a try?
thanks
Bobby
Hi, Bobby.
I've done this before, and it works great. Just be aware that your rye starter may ripen a lot faster than a starter fed with AP.
I'm happy you like the SJSD.
David
Hey David,
Here's my first attempt at your San Joaquin
I was happy for a first try. I love the taste, and I will make it again with a bit of a more agressive sourdough. My current (soon to be ex-) favorite is going a little sluggish on me, so I'll be starting a new one tonight (another good excuse to use the nice rye I got today) The texture is amazing, moist, silky. I would like the crust to be a little thicker, like yours. I should have left it longer! I did leave it in the oven to "dry". I think a longer bake would have been a better decision :-) Thanks for sharing!
Freerk
I'm happy you enjoyed it.
I usually make this as bâtards, scaled to about 500 g. They bake in 20 minutes at 460 degrees F. The crust is usually fairly dark. It does tend to soften as the bread cool, unless you take special measures to dry the crust.
David
thanks for the great recipe! I baked this loaf earlier today and am so pleased with the results. the crumb is the most open I've ever made. This time I followed your recipe almost exactly except instead of rye flour I used farro flour. Next time I want to try to make the loaf with a higher whole wheat percentage. I was also going to try using bread flour instead of AP. have you made any SJs with higher amounts of whole wheat?
I am happy you enjoyed the SJSD.
I don't remember making it with more WW flour, but I believe others have. This will make the crumb less open and the hydration seem lower, because WW absorbs more water.
Using a higher gluten flour will also lower the effective hydration, but the crumb may be as open or even more so, and oven spring may be greater, assuming you develop that extra gluten well.
Anyway, if you do make those changes, please let us know how they turn out. With photos, if possible.
Happy baking!
David
Hi David,
i tried out the SJSD with a couple of those modifications. I halved the recipe above because I wasn't sure how it would turn out. I used 85 g whole wheat flour and 165 g bread flour. The crumb was still very open! The bread is really nice and chewy with a very mild sourdough flavor. I will probably try again with maybe 100g whole wheat and lowering the bread flour 150g. I probably should have left it in the oven longer because my crust came out really thin. Or maybe I was steaming the oven too much? Also my slashing was terrible...I really need a lame. I used a sharp knife but it was really sticking in the dough so I didn't get the cut deep enough.
It looks like the loaf kind of spread out. Maybe you need to work on developing the gluten a bit more and/or tightening the gluten sheath more during pre-shape and shaping. Probably it's more a shaping issue, if the crumb was chewy. Whichever, that's the issue with the scoring too. You need the tension from that tight gluten sheath to get your bloom.
Scoring deeper is definitely not the answer. With this dough, 1/4" is about as deep as you should go. And I don't see signs that you had too much steam.
All these comments are about fine tuning. It really does look pretty nice and tasty.
Happy baking!
David