Lesson Two: Putting Something More in Your Loaf

In lesson one we baked the simplest bread one can bake. It was made up of just flour, salt, yeast, and water.

As anyone who has ever looked at the ingredients on a store-bought loaf of bread knows, a lot of other ingredients can be found in loaves of bread. How those ingredients affect the flavor, color and behavior of your bread is the focus of lesson two.

We'll also bake a loaf to compare to the simple one we made in lesson one.

As one would guess, additional ingredients change the flavor of your bread. But many of these ingredients also change the behavior of your dough in ways that are not immediately obvious. Knowing a little bit about what to expect when you add a given ingredient to a dough will increase the likelihood of your experiment being a success.

Common Additional Ingredients

  • Sugars (sugar, honey, molasses). Sugars obviously sweeten and flavor the loaf, but bakers need to keep in mind the fact that they also provide additional food for the yeast. It is common to add a tablespoon or two of sweetener to a loaf of bread, both to feed the yeast and to add a touch of sweetness. But yeasted breads rarely contain as much sugar as one finds in unyeasted quick breads, largely because the added sugar interferes with the proper yeast cycle.

    Sugars also carmalize in the oven, resulting in the rich brown color of crust.


    Notice how the bread from Lesson One, which contained no added sugars, had a very pale complexion.

    Recipes for sugary breads, such as holiday bread, typically call for fewer and shorter rises. Long rises of highly sweetened doughs can result in beery tasting bread, typically not the result you are after when baking a sweet bread.

  • Fats (butter, oils, milk, eggs). Fats enrich and flavor the bread. They also soften the dough and preserve it: whereas a fat-free loaf of bread like a French bread goes stale after only a few hours, a loaf of bread with a small amount of olive oil or butter (like a sandwich bread) retains moisture and will stay fresh longer.

    Fats increase the bulk of your bread. Rarely do you get the kind of large, irregular holes inside an enriched bread as you do in a fat-free bread.

  • Different Flours/Grains. Different grains and types of flour impart different flavors to the bread. They also have varying levels of gluten and sugar: for example, bread flour is higher in gluten than all-purpose flour. Pastry flour is very low in gluten and is typically avoided in yeasted breads because it is incapable of forming proper crumb (the network of air pockets inside of the loaf).

    In most recipes, even those labeled "Whole Wheat Bread" or "Rye Bread", the specialty flours make up no more than half of the flour in the loaf. The remainder is, more often than not, plain old All-Purpose Enriched Unbleached or Bread Flour. The characteristics of regular wheat flour are hard to beat when baking, and a little bit of specialty flour can go a long way in changing the profile of your loaf.

    Whole wheat flour, rye flour, oats, rice, corn meal, mashed potatoes, and semolina flour are all common ingredients. They contain varying amounts of sugar and gluten, so experimentation and comparison are often necessary to achieve the desired result.

  • Other. There really is no limit on what you can add to a loaf of bread: herbs, cinnamon and raisins, garlic, cheese, nuts, dried fruit, olives, even sausage or preserved meats. Use your imagination!

"Homework" for Lesson Two

The recipe

We'll use the recipe from lesson one as the basis for this one, but we'll substitute milk for most of the water, add a little bit butter to soften it up, and add a touch of sugar. I also reduced the salt and yeast from two teaspoons to one teaspoon. When possible, reducing the yeast and increasing the fermentation time results in a better flavor (more on this in lesson three).

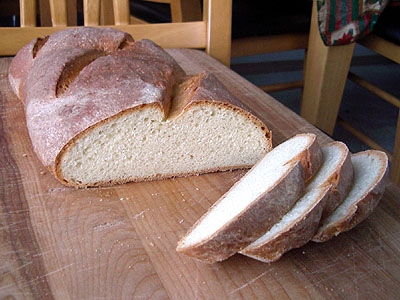
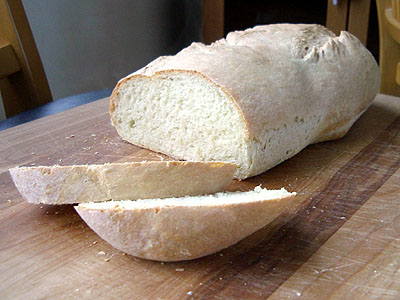
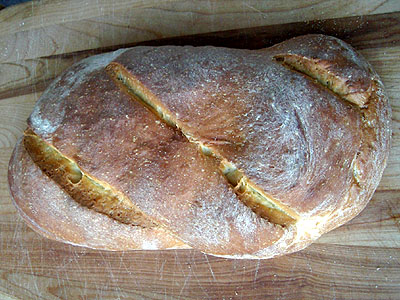
The result is a richer, softer loaf that makes an excellent sandwich bread. Typically I would bake a bread like this in a loaf pan, so that it makes nice, square little sandwiches, but in my example I chose to bake this one on a sheet pan so we can compare it to the loaf from lesson one.

2 cups all-purpose enriched unbleached flour
1 cup bread flour (or all-purpose flour, if you do not have bread flour)
1 teaspoon yeast
1 teaspoon salt
1/8 cup sugar
1 cup warm milk
2 tablespoons butter
1/4 - 1/2 cup lukewarm water

Mix the dry ingredients, then add the wet ingredients. Mix and adjust water until all ingredients are incorporated and the dough is capable of forming a ball. Pour the dough onto a flat, floured surface and knead for approximately ten minutes.

Return the dough to an oiled bowl and let rise until doubled in size, approximately 90 minutes. Shape the loaf and then let rise again until the desired size is reached, approximately another hour.*

Bake at 350 for 40 to 45 minutes, until when tapping the bottom of loaf the bread springs back and makes a hollow sound.

*Note that we're only letting it rise one time for this loaf. Because I added the extra sugar in there, I didn't want it to over-ferment and make the bread taste beery. It is low enough in sugar it probably could have handled another rise, I just didn't feel like risking it tonight!

Wrap up

As expected, this loaf was creamier, sweeter, and softer than the loaf we baked in lesson one. The added sugar also carmalized and resulted in a beautiful, brown crust.

A note on storage: sandwich breads like this are best stored in air-tight plastic bags. Paper bags will help keep the crust its crustiest and are better for storing French breads.

I stored this loaf in a plastic bag three nights ago. With a bit of enrichment and proper storage, a loaf like this keeps well for up to a week.

Continue to Lesson Three: Time & Temperature.

Feedback

Having made bread rolls before, I decided to skip Lesson 1 and start with Lesson 2. I mixed the yeast with a little warm water and sugar before I started, as was suggested on the packet.

What I learned:

My el-cheapo flour is not the best. Everything I've made with it (scones, cakes, cupcakes, whatever) has come out far too wet. I'm going to invest in better bread flour, and better flour for general baking.

Our oven, despite being new, cooks far too cold. The top is alright if you increase the temperature, but the bottom is always too cold. It took about 90 mins to cook, and the bottom never got to sounding hollow or being hard! Also, it stuck on the tray. Is it OK to use fanbake for baking bread, or is that sacrilegous?

It didn't rise after shaping as much as I would have liked, but I suspect it got too cold. I will keep a better eye on it.

I really like egg yolk glaze. I topped it with poppy seeds, and it worked really well.

user icon

AM I able to make this

AM I able to make this recipe with Wholemeal flour?


I was going to skip it and move on to lesson three, but I want all the experience I can get.  

We only eat wholemeal flour (wheat/spelt/rye etc) So will it make any difference if I make it with wholemeal flour?


Thanks

Thegreenbaker 

user icon

success first go! woop!

I made this loaf with wholemeal flour.

 It turned out lovely and soft. I was surprised at how soft the crust was.

Perfect for sandwhiches!

 At first I didnt like the texture and taste, as it was so soft and almost cakey but after eating it over th course of the evening (made4 it for dinner with friends) it grew on me. Now I cant get enough of it!


Yummo!


Amazing loaf!!

I just made this bread and it came out great.  I made it in a loaf pan and added half whole wheat for the white flour.  The milk really gave it an amazing texture (my regular daily bread uses just water) and, like Thegreenbaker said, the crust is so soft.  The one "bad" thing that ocurred was when I went to slash the loaf with was I assumed was a sharp knife (I purchased it before Christmas but all that chopping must have worn the blade a bit).  It dragged a bit but it didn't completely deflate it.  

 Thanks Floyd, this bread is wonderful!

user icon

Pale Loaf

Just took "lesson two" out of the oven. It's not even close to being as brown as the loaf in the picture. What do I need to do to correct this? Higher heat or glaze?

Thanks,

Trish in Omaha

user icon

Heat

Most likely, heat and time (both longer fermentation and longer time in the oven).

user icon

Thanks, Floyd!

T'm eating a slightly warm slice right now with some butter. Taste is great and the texture is good for a sandwich type bread. Trying the sourdough again this week-end.

 Trish in Omaha

Have you tried olive oil

I am now trying lesson two. I have been on lesson one for awhile because my daughter loves it. Now I have two questions. For the second rise, do I let it rise in the loaf pan or on the stone? and Have you tried using olive oil for the second lesson instead of butter?

Recipe by weight

Is it possible to convert this recipe to weights? It seems like it would be nice to have it in that format vs volumes.


Pretty Good

Good taste and texture. Dissapointed though that it didn't get as dark and mine seems a bit flatter (maybe only 1.5-2 inches high) but really wide. Any ideas on how to get it to not spread out? After the rise in the bowl I moved it to a greased cookie sheet (no stone with me right now) and shaped it some, but maybe not narrow enough? And then let it rise again... Any ideas to improve shape and color/crust? It was already pretty crusty and I was worried to leave it for any longer to get it to look more like the one in the picture...

First time baker

Newly wed, i want to impress hubby so I tried lesson 2 yesterday (for the 1st time in my whole 29yrs life), the dough didn't rise despite the yeast label says instant. I bake it anyway, needless to say it was flat, and crusty on top. Hubby ate it anyway, i guess he wants to be polite. Tonight, i tried with the traditional type of yeast and mixed 1tsp with 4tsp of warm water, the dough rise up - but nothing close to the size in the picture, despite of the lovely Dubaian winter (92F). The bread tastes lovely, the colour very close to how it should be (i glazed it with melted butter) - pitty hubby is travelling so he cant have it. I am hooked!

Thanks Floyd 


user icon

butter v. oil

Does vegetable oil work as a substitute for butter in baking yeast breads? I use it (or applesauce) in baking other stuff. I don't have access to butter or shortening.

Oil can be substituted for

Oil can be substituted for butter, with two caveats.  1.  The flavor.  You'll still get the moisture from oil instead of butter, but you'll miss the "buttery" flavor.  2.  Butter is about 80% fat and 20% water.  So depending on the amount of butter in your recipe, you may not be able to substitute oil for butter 1:1.

I made this yesterday

Hello!

 Yesterday, I baked my first bread Lesson # 2. My bread turned out so so...the bottom part was very burnt...and top was crunchy. I made only one change to the recipe and that was I added the egg yolk for glaze...except that I did everything accordingly. Also, some parts inside was slightly "under-baked"...and the taste was as my sister put it "flour-y" ..... Any tips on how to make it bake through completely? Thanks!!!

user icon

Burnt bottom

Deliciousbakery,

It sounds as though your bread is getting too much of a blast of heat from below, which could account for the charred bottom crust and doughy interior.  Try moving the oven rack upon which your baking sheet or pan or stone is resting up one level for the next bake.  That might give the oven's heat more time to penetrate, and cook, the loaf's interior before the the heat from below overcooks the bottom crust.  You don't say whether your oven is electric or gas, but both have the primary heat source, whether heating element or burner, in the bottom of the oven.  Hence, something close to the bottom of the oven will be more strongly influenced by the heat radiating up from below than it will from the heat reflecting off the oven's ceiling or walls, or from its contact with the heated air in the oven.

Now, if simply moving the bread up one or two levels in the oven doesn't cure the problem, it may be that your oven is in need of adjustment.  Before calling a service technician, you might want to purchase an inexpensive oven thermometer to see whether your oven's actual temperature is the same as the temperature that you selected.  If it is off by a significant amount, more than 25F, say; or if it shows radical swings between heating/non-heating cycles, you probably will want to have it adjusted.

Odds are, just moving the bread to a higher rack will do the trick.  Some recipe writers include instructions, such as "bake in center of the oven" or "bake on a lower rack".  Many just give a baking temperature and it is up to the baker to make adjustments for his or her equipment.

Best wishes for good bread in your future attempts.

Paul

Two questions

The recipe does not specify what type of yeast to use: traditional or "instant". Does it matter?

Second, could someone comment on the different results you get using all-purpose flour vs. bread flour? Somewhere I got the impression that the greater amount of gluten protein in bread flour traps bubbles better so bread rises more. Is that true?

This is a great site. Thanks!


user icon

Yeast and flour questions

rabbitrun,

This recipe will work with either traditional (I presume you mean active dry yeast) or instant yeast.  Since it does not mention proofing the yeast, which is typical with recipes based on active dry yeast, you should assume that it was written with instant yeast in mind.

In use, active dry yeast is usually mixed with warm water and allowed to sit for a few minutes before it is mixed in with the rest of the dough.  This "proofing" step was done to a) allow moisture to penetrate the outer sheath of dead yeast cells on each granule and wake up the live yeast cells inside, and b) demonstrate that the yeast was viable.  

Instant yeast is usually stirred in with the flour, then the liquids are added, and the whole is stirred together to form the dough.  The drying process during manufacture of the instant yeast kills fewer of the yeast cells in each granule, permitting the yeast to be hydrated at the same time as the flour.  Therefore the initial proofing step is unnecessary.

Bread flours (typically) have higher protein contents than all purpose flours and (typically) allow the formation of more gluten.  Bread flour will usually produce a stronger dough (hence the nickname "strong flour") than will all purpose flour.  Dough made with bread flour will be more tolerant of mechanized baking processes and will also stand up better to the gluten degradation from acid attack in sourdough breads than will dough made from all purpose flour.

HOWEVER, you can make outstanding breads with nothing but AP flour.  Most European flours have protein contents that are on a par with American or Canadian AP flours; some have even lower protein content.  It obviously hasn't gotten in the way of producing wonderful breads there.  Each flour has its merits and each has its limitations.

If I want to make bagels, or sourdough breads, or breads with substantial quantities of non-glutenous flours (rye/barley/oat, etc.), I'll probably lean toward using bread flour, since its stronger gluten offers some advantages in those breads.  If I want to make a European/artisanal style bread, I'll probably lean toward using AP flour, since it will be closer to (though not identical to) the flours that are in use in Europe.  Note that I live in the U.S.A.  I also have a tendency to use the flour that I have on hand and have learned that I can make pretty good bread with either type of flour, even though it may not match what the recipe writer intended.

I've learned that while ingredients influence bread-making, so do techniques.  In some instances, it is possible to vary other factors (temperature, time, process) to offset ingredient differences.  In other instances, the ingredients dictate outcomes (flavor, for instance) or process (high-percentage rye breads are a completely different animal than wheat breads).

Most of all, continued experimentation will give you a much better understanding of the differences than any of my blather, above.  Keep trying new things and let us know how it goes.

Paul 

Butter

Should the butter be soft for this bread?


TIA,

gary


crust too hard

I have been trying the lesson 2.  Problems  I have:

1.  The crust is too crunchy, even for a loafpan bread, top and bottom.  Inside always come out perfect.  Is my oven too hot.  Too much oil on the pan?  The pan I used is already nonstick, do you think I can forgo the grease part?

2.  Unless I glaze the top with butter, it comes out dull and dry looking.

3.  I form a loaf then let it second-rise on a greased pan then move it to a baking stone to bake.  Of course, it deflate during the transfer part.  Can I let it rise on a baking stone?

Any help is greatly appreciated.


Hello Friend, I'm relatively

Hello Friend,

I'm relatively new to bread, but I still use the three loaf pans I bought in Walmart or Target for this recipe.  I have yet to use any "non stick" methods, and the results have come out just fine.  The only thing I can say for sure was that while I was shaping the loaf, it had a thin dusting of flour around it.

I haven't tried glazing with butter yet, but I've used egg white a few times and it really made a nice, shiny crust without it being overly crunchy.

As for the baking stone; I tried letting a couple of loaves rise in one area, then transferring them to the stone, and I always get frustrated.  Plus, it's a good idea to have the stone at oven temp when the transfer is made.  What I've been doing is letting the final rise occur on parchment paper, then using the parchment paper, transferring the risen dough to the baking stone in one shot. 

I hope this helps!

Dave  :)

I always end up with cake!

Thanks for this wonderful tutorial Floyd!  I tried making this bread for a 2nd time, but the texture always tends to be too dense.  I wanted it to be quite dense, but not as much as it turned out...

I made it using the recipe above, but substituting Olive oil for the butter.  It was a tiny bit too sweet for me, so I shall reduce the sugar for next time, but I did like the colour this gave to the crust.  I wet the top of the dough slightly and rolled it in some sesame seeds before baking.

I got a bit distracted and let the dough rise for about 2 hours, but I did this in a bowl, so there wasn't much shaping required for my round loaf.  I've read on here that a wetter dough will produce more air pockets, but my dough was not dry by any means - any wetter would have made it quite awkward to handle.

Can anyone suggest how I might get the texture just slightly less 'cake like'.


Thanks


Sarah


user icon

Hi Sarah

Same recipe, try this:

Floyd writes in the instructions:

Mix the dry ingredients, then add the wet ingredients. Mix and adjust water until all ingredients are incorporated and the dough is capable of forming a ball. Pour the dough onto a flat, floured surface and knead for approximately ten minutes.

I suggest you try this:

Mix the dry ingredients, then add the wet ingredients. Mix and adjust water until all ingredients are incorporated and the dough is capable of forming a ball. Cover and let dough stand 30 minutes.  Pour the dough onto a flat, floured surface and knead for approximately three minutes...

That ought to do it.  I like your fine crumb though. Very pretty loaf and those seeds make it more so!

Mini

Thanks Mini!

I tried this again last night, exactly the way you described.  When I left the dough to rise (after kneading) this time it had a lot more air inside - it was perfect!!! 

Unfortunately, I then had to handle it to put the sesame seeds on, and during this process, the dough got quite deflated and I lost a lot of the air pockets!  So I added the sesame seeds (by wetting the top of the dough and lying it onto a bed of seeds) and then turned it over and covered it again - hoping for another rise - but it didn't rise much at all after this.  During baking there was also very little rise, and the bread was very flat.  However, even with this problem, the texture was still far better than before!

Thanks a lot for the advice, it really helped!  But I can't help thinking that I'm still going wrong somewhere.  I'm creating air pockets and then ruining them!


Sarah

Success!

Ok, I tried it again, but this time I went from the kneading, directly onto the baking sheet, so that I wouldn't have to handle the bread after it had risen.  It rose perfectly and the only remaining problem was how to get the sesame seeds on there.

I moistened the top of the dough and dropped the seeds on top.  I have to say, they did not stick on as well as when I had laid the dough on top of the seeds.  However, the perfect texture is more important.

Thanks again!

Sarah

I just attempted this as my

I just attempted this as my first loaf ever! It worked out quite well. I substituted buttermilk in place of the milk, as that was all I had in the house and I let it rise one extra time. That was more due to forgetfulness than anything, but it did turn out well. I'm off to find some more interesting recipes now!

yummy

Yay, I made this loaf, and it turned out fantastic.  A few things I will change in the future is that I would score a bit deeper, I am using a clean box cutter to be assured that it is quite sharp.  One other thing is that I cannot seem to be able to transfer (slide) my loaf off the cookie sheet onto the bread stone in the oven.  I think I need a bit more flour on the cookie sheet beofre I place it on for the last rise (I had to pick it up with my hands and cradeling it, I transferred it onto the stone, this did deflate the bread a bit).  I also cannot get the dough to look as smooth as your photographed ones, but it is rising very much up to expectations, and it is baking well, has a good consistency inside, and has a very crusty and yummy outside.  The bread is good enough to eat on its own, and my apartment smells wonderful.

My favorite version

I've been experimenting a lot with different recipes and techniques for making an everyday sandwich loaf. I decided it was time to revisit this recipe - it was one of the very first I ever made - but now that I'm more sure of what I'm looking for, I thought maybe it would turn out better.

I only used 1/2 cup of milk and replaced the rest with water (cost savings). I didn't miss it in the final result. I also used my KA to do most of the kneading, until the last minute when I would pull it out and pull it all together with a final knead. I made a sandwich loaf with one batch and hoagie-style rolls with another. I brushed the tops with water only. They turned out soft, tender, and delicious. This will definitely be my go-to everyday recipe. It's so easy to remember, too!

Poolish?

I'm having some friends over for a baking night, and I'd like to do something with a poolish, but that doesn't require 3 hours sum after kneading (so the friends can go home before 11:).  Could I do this recipe with a poolish?  Does anyone have another good, basic poolish recipe that, perhaps, doesn't rise twice?  Or is this bread sacriledge?  I'm new to this.

Thank you, Floyd; I've enjoyed lessons one through three, and look forward to the rest.

My first loaf

This was my first ever loaf and it turned out great thanks to the great recipe and instructions.

First attempt!

My First Loaf!

I am really excited about having baked my first loaf of bread today!  I forgot to score it until I'd baked it a few minutes, so it's a little cracked, but it was great.  The crust is very crusty, and the inside very soft.  I used olive oil instead of butter, but otherwise followed the recipe for the second lesson.  I'm so excited about this website.  Thanks for all the advice and clear directions!

Great recipe/lessons - Thanks

I just found these lessons yesterday afternoon. Baked this last evening.

While this is not my first attempt at bread baking, it is my most successful loaf; I am very pleased with the the way it turned out. I substituted one cup of whole wheat flour (hard red winter) for one cup of the all purpose.

I hope to try this again this weekend, but I want to bake it in a camp dutch oven. It might be too big for my dutch oven, so I may make two round loaves.

I also want to try using a little 7-grain flour. I have a bag of whole 7 grain mix, and I'm trying to figure out how to use it.

Thanks. Oh, and thanks for the great site!


Loaf baked flat - please help!

 Hi.

I just baked this loaf. The result was a flat circle, almost like a thick cookie. The flavor and crust were both great.  I used two cups white flour and one cup whole wheat (both by Bob's Red Mill).  When I scored it I noticed the loaf deflate somewhat.  Is that a big deal?

Any suggestions on what I did incorrectly?  I am very much a novice so any advice would be appreciated.  I plan on trying to get this recipe down before I go on in the lessons. 

Love the site! 

Overproofing

Presuming you included all the other ingredients in the recipe, it looks like you overproofed the loaf.  If you wait until the dough has fully risen before baking it, you'll get flat bread.

The next time, watch it carefully and bake it when it is around 80 to 90 percent risen.  Also, did you use steam when you baked it?  Do you have a baking stone, which was preheated with your oven?

Steaming the oven keeps the crust soft which allows the loaf to expand during the first few minutes of the bake (oven spring).

The important thing, however, is that it tasted great.  You've got a great attitude about perfecting your technique and the recipe, then tackling the next challenge.


Second Attempt - Still flat

Lindy, Thanks for your prompt help! I really appreciate it. I made the loaf again tonight with the same results. I am going to outline what I did in greater detail. Perhaps this will help you help me!

  1. Mixed active dry yeast in 1/4 cup warm water (107 degrees).
  2. Mixed dry ingrediants. Used 2 cups white flour, 1 cup whole wheat. Both by Bob's Red Mill.
  3. Added wet ingredients. Warmed milk in microwave for 30 seconds.
  4. Used Kitchenaid with dough hook for 10 minutes.
  5. Let rise in greased glass bowl for 90 minutes.
  6. Formed into loaf. Let rise again for 60 minutes.
  7. Baked in oven with steam for first five minutes.

What is my next troubleshooting step?  Should I purchase some new yeast?  Knead by hand?

I'm really enjoying this experiment.  Thanks again for the help!


user icon

Lizzy - two guesses

The first is that you might be watching the clock more than you are watching the dough.  If your kitchen is fairly warm, say 70-75 dF or more, a 90-minute first rise would more than double the dough volume.  Couple that with a 60-minute second rise and a) your yeast may have run out of food, or b) the dough was over-fermented and collapsed as a result.  The key is to watch the dough carefully. For the first rise, a doubling in volume should be sufficient, even if it only takes 45 minutes, instead of 90.  For the second rise, you want to bake the bread when it has doubled, or even slightly less than doubled.  That assures that there will be sufficient structure and some additional room for expansion while baking.  This final growth in the oven is called oven spring.  Pick a straight-sided container to use for fermenting the dough.  That way you can put a piece of tape on the side to mark where the dough should be when it has doubled in size.  

The second guess is that your shaping technique may require some additional practice to form sufficient tension in the outer skin of the loaf, which will help it support itself as it rises and bakes.  Rather than try to repeat the volumes of good advice on this topic, I suggest that you use the site Search function and use terms like shaping, or surface tension.  You'll come across written descriptions, photos and videos that go into detail on the how-tos of shaping.

One last thought: it may be that you need to be more gentle in handling the dough when you are readying it to put into the oven.  It's easy to knock a lot of gas out of the dough, which would also flatten the loaf.

I hope that these ideas are helpful.

Paul


Perfect!

I used whole wheat flour and the 'better for bread' flour that I inherited when my mom moved, and it turned out very well. The crust has a nice sweetness--perfect PB&J bread. Thanks!

par

Finally i got my first bread,

Finally i got my first bread, which is really tasty - my wife ate almost all of it in 1 hour!!

First time i got it really rise, i used different flour (lower quality), i also heated my oven more than 250 C.


It's my 5th bread in my baking history.

some notes to the formula -

some notes to the formula - this is EXTREEMELY wet dough


68 % of milk to flour + 32 % of water to flour (!!!!)


I had better success with less water, aprox 20 %

Wow!!!

This is a great recipe. Here is how mine came out!

I glazed it with egg white.

Here is the crumb.

It turned out great! Thanks for the recipe!

Now I wish I had taken a

Now I wish I had taken a photo of my first attempt.  I made an alteration to the above recipe and used honey rather than the sugar. (Same volume of wildflower honey that it says to use of sugar.) 

There was one problem that I had, and that was they yeast I had was old. (Use by March 2008) It worked, slowly.

One other thing: The crust was very crumbly, as if the dough was too dry.  I may have mixed in too much flour while kneading, since it always seemed too wet.

Is there anything else which could have caused this?

Joral

Comment viewing options

Select your preferred way to display the comments and click "Save settings" to activate your changes.