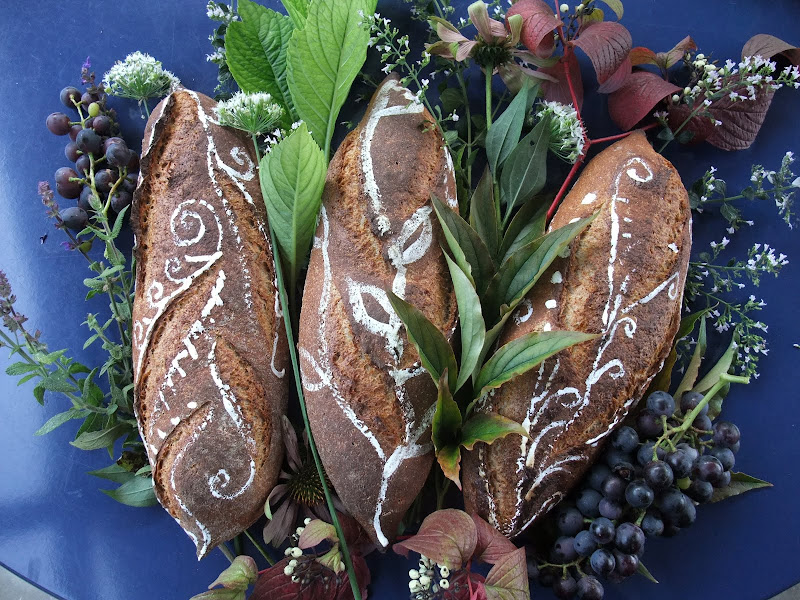
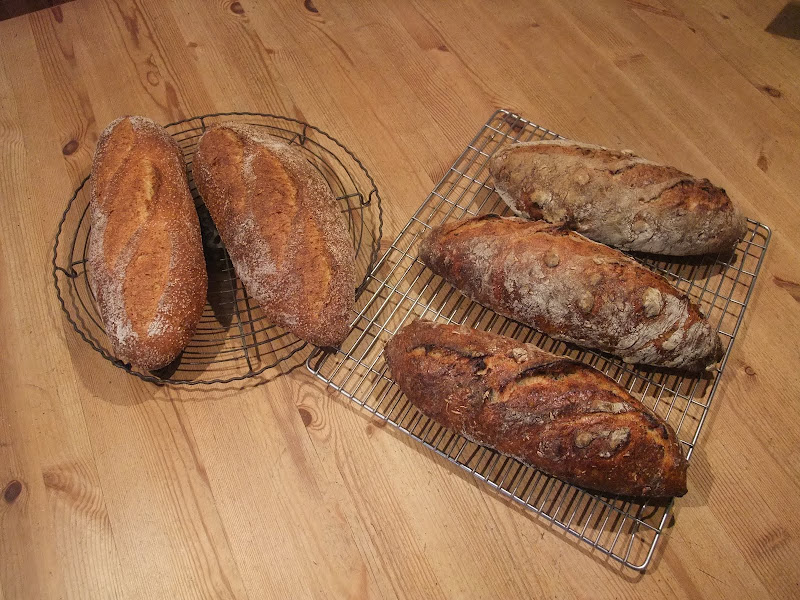
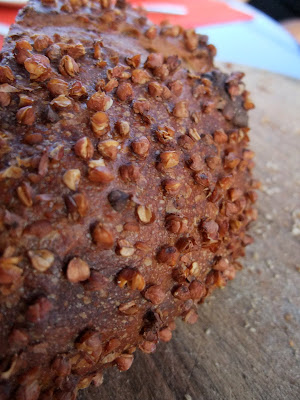
Submitted by Salome on November 4, 2009 - 9:55am

Potato Rye Bread


Finally... I've done it again. I must confess that I didn't get to baking very often in the last couple weeks. Of course I tried to bake every now and then, but most of the times just well known formulae like my potato-walnut-bread, or a simple white bread such as Hamelman's rustic bread, or something comparable.

I found it rather hard to fit the  baking into my schedule, as my days differ considerably and I always find myself busy when I'd like to bake.

But yesterday I realized that baking, even in the time expensive way I like and enjoy, can fit into my schedule. No miracles, it's rather simple: Sourdough in the morning, mixing in the early evening, first fermentation, shaping in the later evening and final proof in my not so cold fridge and then baking in the next morning before I head to the uni. (it was probably slightly to much proofed, but it didn't matter to much and now I know that I'd simply have to lower the fridge temperature for the next time and it should be perfect!)

The result is very pleasing! (excuse the not so good picture quality, my camera broke some time ago and as I'm not at home I can't borrow my sister's camera. Thus, the pictures are somewhat blurry and pale in colour)


The bread is pleasantly sour, due to the potatoes very "humid" and chewy. I was surprised to find out that it tastes pretty much like the bread I always wanted to copy from my favourite baker but I never managed to get such a moist crumb!As I'm not very familiar with my new oven yet, it charred on the bottom somewhat and I had to scrape some black off, but I really liked this smoky note in combination with the sourness!


Potatoe - rye bread

---------------------

Sourdough:

100 g whole rye flour

100 g water

35 g mature culture


final dough:

all of the sourdough

280 g boiled and peeled potatoes, cooled (I boiled them while I mixed the sourdough)

150 g whole wheat flour

200 g bread flour

200 g water

12 g vital wheat gluten

10 g salt

1 tsp (somewhat less) instant yeast


1. prepare the sourdough in the morning

2. in the evening: mix the sourdough, the mashed potatoes, all of the flour, vwgluten and the water and knead until everything is smooth.

3. autolyse for some time, approx. 30 min.

4. add salt and yeast, knead until smooth and well developed.

5. proove until doubled in size (I put the dough on the balcony (12°C) while I left the house and brought it back inside after I returned to let it double fully, it took me about four hours, I think)

6. shape (I divided the dough into two pieces and made boules out of them)

7. place them in a well floured linnen inside of a bowl (or proofing basket, If you got one) and let the boules ferment over night in the fridge

8. preheat the oven the next morning to full temperature, slash the boules, steam well, turn down to 230°C and bake for approx. 35 min.

9. let cool and enjoy!


i hope you all are doing fine. Even if I didn't write, I've checked in here regularily and followed your baking!

Salome


Submitted by Salome on September 7, 2009 - 5:24am

Autumn the third - Painted Bread


I have to confess that I'm not very busy these days. I've got a lot of free time because university hasn't started yet and in addition to that, I'm very limited in what I do because I've got some weird inflammations in my feet. And my friends are all working or have already started school or . . . I can't go and hike, I can't meet friends, but I still can bake! The more time consuming, the better. I'm keeping myself busy and happy this way. And my family well-fed ;-).

A freshly baked bread and some "colors" - That's what you need for painting a bread. In my case, it's Hamelman's "Rye Sourdough with Walnuts" but without walnuts. It's basically a bread made with sourdough, 50% whole rye flour and 50% high gluten flour. (in my case, normal bread flour with some Vital Wheat Gluten.) I tried a dark color and a white one, but the dark was not visible on the rather dark crust. For the dark one I just over-caramelized sugar until it was very dark and then added some water, let it cool and mixed it with egg yolk. The white is a corn starch - water blend.

I baked the bread as usually and started to paint with a normal brush as soon it was out of the oven. The crust is hot and makes the water of the colors evaporate. Nothing easier than that! After the "art work" was done, I baked it for another few minutes, no more than five. Et voila, a bread that will impress everybody.

The flowers and leaves are all out of our garden. I've been saying for the last couple days that the falls has come and here's now the proof. it is autumn. And it's beautiful.

Salome

Submitted by Salome on September 5, 2009 - 3:33am

South tyrolean Potato-Nut Bread and my own Pumpkin-Amaranth Bread


Isn't one of the best things to sit down with friends for a simple dinner? Last night we had two kinds of bread, butter, lots of cheese and a swiss style müsli, the Birchermüsli. I was so satisfied. And the others seemed to enjoy it as well. It always makes me so happy and proud when other people enjoy my baking and I think I'm very lucky that I've got such friends and family members who are willing to try new things. Howwould I be able to bake otherwise?!

After the Buckwheat Apple Sourdough I felt that autumn had come. Even though I'm very much a summer person, I decided to make the best out of it and bake some more seasonal breads. I made an old favorite again, the Potato-Nut Bread from Southern Tyrol and created a formula for a Pumpkin-amaranth bread. I shared the recipe for the Potato-Nut Bread a few monts ago on here and David has baked the Potato-Nut Bread a couple weeks ago and had very nice results.

The Potato-Nut-Bread is a very rustic loaf. The crust looks every time very wild and I always get a nice crunch when baking this bread. It has a good keeping quality due to the potatoes, which also make the inside very soft and tender. (If there weren't any crunchy nuts ;) .) This time, I even achieved somewhat of an oven spring, which I've found hard to achieve in the past. But probably I was just not doing it right, this is one of the recipes I started my sourdough baking with. From all the times that I've baked this bread, this time it was the most successful time! Yeyy! I might could have let it proof somewhat longer after the shaping though.  Don't be shy with the coriander - I think, two teaspoons is the perfect amount. (In the original recipe it's even two tablespoons, but then it's very overpowering.)

The pumpkin-Amaranth bread . . . is yellow! Sadly, I couldn't notice any pumpkin flavor. But the color is great, I think I'll bake with pumpkin again. maybe I won't blend it completely and leave some chunks the next time. The toasted amaranth provided a very tasty note! I was frustrated though because I forgot to roll the shaped batard in amaranth. Imagine how nice this crust would have been! Why am I so oblivious. . . I wasn't 100 %satisfied with the crust, it softened during the cooling. The bread was very light and pillowy.

Potato-Nut Bread from Southern Tyrol

Ingredients

Liquid levain

  • 80 g whole rye flour
  • 100 g water
  • 20 g mature starter

Final dough

  • All of the liquid levain
  • 400 g potatoes, peeled
  • 500 g bread flour
  • 250 ml water
  • 11 g salt
  • 2 tsp ground coriander
  • 100 g walnuts
  • 100 g hazelnuts
  1. Prepare the liquid levain the night before you bake.
  2. On the next day, cook the potatoes with just a little bit of water. Drain the excess water and let the potatoes cool somewhat. Mash the potatoes.
  3. chopp the walnuts and the hazelnuts roughly and toast the nuts until fragrant but not burned. Rub the peels of the hazelnuts off.
  4. Mix the liquid levain with the water, the potato mash and the flour to a shaggy mass. Let it autolyse for about 30 minutes.
  5. Add the coriander and salt and mix them into the dough. Knead in your mixer for at least 10 minutes. The dough is very sticky, don’t add any additional flour though! It does not clean off the sides completely.
  6. Transfer the dough to a floured board and, with well-floured hands, stretch it into a 14 inch square. Distribute the nuts over the dough, roll it up and knead for a couple minutes to get the nuts evenly distributed in the dough.
  7. Gather the dough into a ball and place it in a large, lightly oiled bowl. Cover the bowl.
  8. Ferment the dough until it has doubled and is puffy, with stretch and folds every 40 minutes. I folded the dough three times, it fermented somewhat longer than two hours.
  9. Transfer the dough to a well-floured bench. Divide it into two till three equal pieces. Pre-shape into logs. Dust with flour and cover with plasti-crap. Let the dough rest for 10-20 minutes.
  10. Form the pieces into bâtards and place them on lightly floured parchment paper. Dust again with flour and cover with plasti-crap.
  11. Proof the loaves until they are about 1.5 times their original size.
  12. 45-60 minutes before baking, place a baking stone in the oven and make preparations for your oven steaming method of choice. Pre-heat the oven to 430F.
  13. Bake with steam for 10 minutes, then in a dry oven for another 20 minutes. If the loaves seem to be getting dark too fast turn the oven down 10-20 degrees.
  14. Bake until the internal temperature is 205F. Remove the loaves to a cooling rack.
  15. Cool completely before slicing.

@ David, I copied and adapted your write down of this formula. Is that okay? I made some things differently than you. For instance I used a whole rye sourdough and I cut down on the hazelnuts. In my opinion, a total of 200 g is enough. The bread is still very rich on nuts.

The second bread, the Pumpkin-Amaranth Bread, I made up myself. I found a bag of organic Amaranth the other day in a shop and couldn't resist. On the same day, I prepared a roasted pumpkin salad and thought, that I could use pumpkin in an other way than just always seeds. I cooked some pumpkin pieces with a tiny amount of water and purreed it and stored it in the fridge until today.

Pumpkin-Amaranth Bread

Ingredients

Preferment

  • 100 g bread flour
  • 1/10 tsp instant yeast
  • 57 ml water

Soaker

  • 70 g amaranth, toasted until fragrant
  • 80 g hot water

Final dough

  • All of the preferment, in chunks
  • soaker
  • 240 g pumpkin, cooked and pureed, cooled
  • 250 g bread flour
  • 65 g water
  • 50 g amaranth flour
  • 4 g instant yeast
  • 9 g salt
  • optional: amaranth for a crust coating
  1. Mix the ingredients for the preferment the night before you bake.
  2. At the same time, toast the amaranth grains until they are fragrant.
  3. The next day, pour 80 ml hot water over the amaranth, let it cool of somewhat.
  4. Mix all of the preferment, the pumpkin puree, the bread flour and the water and let this shaggy mass autolyse for 30 minutes.
  5. Add the salt and the instant yeast and knead in a machine until the gluten is developed. Then incorporate the soaked amaranth (some hand work is probably needed).
  6. Let the dough ferment until doubled in size, with two folds every half hour
  7. Divide the batch into two equal pieces and preshape. Let them rest for about 10 minutes, then shape into batards. you might want to roll the loaves in amaranth grains to achieve an interesting crust.
  8. Let them proof for about an hour, until they seem to be ready to go into the oven.
  9. Slash and bake in the preheated oven (430°) on a baking stone with steam for about 30- 40 minutes

Salome (Happy not just because of her breads, but also because she passed the acceptance test for her school's Proficiency English course (aiming at the Cambridge Proficiency Certificate). Probably as well because I get to use my English here all the time. Thank you folks and keep correcting me!)

Submitted by Salome on September 2, 2009 - 2:55am

A bread I will never bake again. (100% sprouted grains)


100 % sprouted grains? 'Sounds great and interesting', I said to myself and printed the Recipe of Reinhart's Whole Grain Breads a couple weeks ago. This weekend I gave it a try.

I sprouted my grains as indicated. They all had cute little white tails and were pleasant to chew. I would have better kept them as a addition to my breakfast cereals instead of trying to make them into a bread.

"grind the grains into a pulp as fine as possible. If the grains warm up to much, let them rest for ten minutes and continue when cooled. A meat grinder works even better" - That's what Reinhart wrote. I should have been an english native to know what exactly a food processor is. I tried everything, and everything failed.

my kenwood mixer . . .

the mixer which normally fixes everything, the legendary bamix . . . mühle The bamix addon grinder . . .

even the kenwood grater . . .

and last but not least, in desperation, I tried it with a passevite.

I fought about an hour, ended up with my bamix. All the other things blocked because of this doughy/grainy mass. My bamix just got very hot, so I decided to call it for good, even though there were still some whole grains. I added yeast, honey, salt, water and Vital Wheat Gluten, then fermentation, shaping, proofing, baking, cooling, slicing.

The result of this struggle? My bamix is somewhat weird. The exchangeable blades are very hard to remove and to put on again. (I hope my mom won't find out.) I washed kitchen equipment for about an hour. And I've got a bread which is jar-muscle-excercise. It is light, but the grains . . . Flavorwise, it's just bread. seriously, I had much better whole grain breads. I don't notice an exciting difference trough the sprouting and because of the considerable amount of yeast added, no other interesting flavors emerged. Even my family noticed a "lack" in flavor compared to other breads I bake.

You wan't to see pictures?I know the bread looks decent, but before you try it: Think about what gear you've got.

Salome

Submitted by Salome on August 27, 2009 - 1:27pm

Buckwheat Apple Sourdough


We've got so many jars and tins and boxes and bottles in our house. I "digged" in our cellar and found an old jar of dried apples. Dried 1998, surprisingly still look alright. Found a bag of organic buckwheat flour which my parents brought home from the Bretagne, France some holidays ago. And found a glass with some kind of Estonian instant Buckwheat which our Estonian exchange student left here two years ago. Everything looked alright, smelled alright, felt alright, I decided: It's time to use it!

End of August - The fall is coming! What about an Buckwheat Apple Bread, that sounds good and seasonal. It just had to be created. That's where I came into play. I intensified the apple flavor trough some cider, which we had in our cellar as well, and added a little bit of pear honey as well. Rather easy, utterly delicious.

The apple and the buckwheat are not only on the picture a nice couple, I found that the light sweetness and the sour tang of the apple worked very well with the nutty buckwheat flavor. Especially the crunchy loaf had a very interesting mouth feel!

Buckwheat Apple Sourdough

Ingredients

liquid levain
100 g buckwheat flour
125 ml cider
15 g mature starter

final dough
385 g bread flour
15 g Vital Wheat Gluten
230 ml cider (start with 200 ml and add more cider as required)
12 g salt
a little less than 1 tsp instant yeast
1 tsp pear honey ("Birnel"), can be substituted by any sweetener
40 g dried apple rings, chopped
1/2 cup whole buckwheat


  1. Mix the ingredients for the liquid levain, put aside for 12 hours.
  2. pour some hot water over the whole buckwheat and let it soak for a while.
  3. In the meantime, mix the liquid levain, the flour, the Vital Wheat Gluten and cider and let it autolyse for some time. I let it sit for about 15 minutes, as long as it took to clean up after lunch. Watch out with the amount of cider added, I had to juggle a bit with some extra flour and extra cider until I found the right consitency, a tacky but not sticky dough.
  4. strain the buckwheat berries and let it drip off well.
  5. mix the final dough, but don't add the apple chunks and the buckwheat yet. Knead until the gluten is developed, then incorporate the apple pieces and about 2/3 of the buckwheat berries.
  6. Let the dough ferment for about 1.5 hours, with one fold after 40 minutes.
  7. Divide the dough into two, shape two boules. I rolled one in the leftover buckwheat berries and let it proof on the board, the other one proofed in a proofing basket.
  8. after the proofing, I decorated the second boule with an apple sign (Cut out an apple out of paper, mist the boule, place the apple on the loaf and dust the loaf now with flour. Take the apple paper away and in the oven it goes).
  9. Bake the loaves on a preheated baking stone with steam at 430°F, lower the temperature when the loaves take on to much color. (I finished baking at 400°, after about 40 minutes of baking in total)
  10. let it cool on a rack and enjoy plain, with butter or with a mild cheese.

Simply autumn, doesn't it look like it?

No other pictures of the "sleek" apple loaf, I gave it away to somebody who has borrowed me her car for my driver's license preparation a couple times. Of course I couldn't cut into it. ;)

Salome

Submitted by Salome on August 21, 2009 - 5:17am

Parade of favorites (including the third Yoghurt-Whole-Wheat bread)


Gosh, my oven was running hot today. I was basically all day busy baking, which is a real threat. I spent the last two days hiking, walking around 14 hours in total, so I didn't feel like real physical exercise, the dough-kneading was just perfect.

I was like a bee. Once again, I made a new sesame version of the Whole-Grain Oat crackers (250 g ripe sourdough, made out of 120 g oat flour, 120 ml water and 10 g culture, 210 g whole wheat flour, 9 grams salt, 40 grams sesame seeds, 10 g sesame oil and water as required [probably another 100 ml].) It's pretty easy, actually foolproof. I let it ferment as long as it suits me (this time it was about two hours), then I pressed portions of the dough in either sesame seeds or oats and rolled it thinly with a rolling pin, cut it in pieces and baked it at any oven temperature between 180°C and 230°C until the endges were brown. Et Voila, that's it.

I've made these crackers many times now, using whatever had to be used. Great for leftover sourdough, which has to be used - then I simply use the wheat-based sourdough and add oat flour to the dough instead. I simply follow certain rules, when I "construct" the day's crackers recipe. Like, about 30% of the total flour amount is fermented (sourdough), 2% of the flour weight is salt, the hydration is around 60+ percent . . . It has always worked fine.

Secondly, I baked some whole-wheat Pita bread for todays lunch. Again, this is a classic at my home. We stuffed it with vegetarian burgers (Split lentil burgers, another favourite!), lettuce, tomatoes and Tzaziki.

And last but not least, I continued with my venture into the perfect Yoghurt-Whole-Wheat bread. Unfortunately, the loaves overproofed somewhat during their final rise whe I retarded them in the fridge. (I was out, driving with my dad, getting ready for the driver's license exam.) Luckily they still didn't collapse, just the oven spring wasn't as nice as I experienced the last two times.

Yoghurt-Whole-Wheat-Bread #2

Preferment:
175 ml water
250 g whole-wheat flour (I always use home-ground flour)
1/8 tsp yeast

Final dough
550 g whole-wheat flour
30 g vital wheat gluten
17 g salt
1 teaspoon dry yeast
20 g malt
30 g butter
150 g yoghurt (I used 3% fat yoghurt)
300 ml water


I handled the dough pretty much like described in the last Yogurt Whole-Wheat Recipe. I let the preferment proof for about 12 hours at room temperature, let the remaining flour autolyse for about an hour, kneaded the dough well, let it double (2h), punched it down and let it double again (1.5 h), then, instead of shaping sandwich loaves I made two boules and had to retard them in linned bowls in the fridge (where they overproofed . . . So have an eye on your loaves, better don't retard them and don't go driving for more than two hours.). I baked them for about 40 minutes in 230° C with steam for the first 20 minutes, then lowered the temperature to 215° C for the rest of the bake.

Conclusion: The bread is tasty, but it's probably better baked in a tin at lower temperature. Although I did get a crust, it wasn't an extraordinary flavorful one. This dough benefits from the support it gets from a tin, this way it can become very light and fully proofed. As you can see on the pictures, the bread wasn't flat, but somewhat out of shape (shure, it's overproofed). The crumb texture is again light and pleasant, and the flavor is good! For instance with a piece of blue cheese . . .

What I'm gonna do: I'll keep this recipe in my recipe folder and take it out later again. Now I'm craving less plain breads again, maybe something with dry fruit, nuts, herbs? If I have a bread to often I get bored of it and don't appreciate it anylonger, that's definitely a sign that I should move on.

Very final conclusion: When I bake this bread the next time, then with exactly this formula, but in a bread pan. And I'll bake it at somewhat lower temperature, maybe something around 210°c? Or lower? This bread reminded me of another delicious tin bread, a recipe from Southern Tyrol. I'll have to get this out soon as well. It's a sourdough bread with rye and wheat.

Salome

Submitted by Salome on August 19, 2009 - 9:31am

The experiment continues: Yoghurt Whole-Wheat Bread


I liked the Buttermilk-Whole-Wheat-Bread which I baked just a couple days ago so much that I decided to continue with 100% whole wheat. The Buttermilk-Whole-Wheat-Bread was very soft and light, I have never seen a whole-wheat bread like this.

I adapted the recipe I used the last time. It was, for my taste, somewhat to sweet and it lacked a real crust. And I decided to substitute the buttermilk by a yoghurt-water-blend, because that's what I always got on hand here. (Whereas plain buttermilk is often hard to get.) And I increased the hydration by a lot. And I used this time a preferment, with sourdough - In order to get a deeper, less sweet flavor.

A lot of changes, you see. I wasn't to worried that anything could go wrong, because I think the reason why this bread came out so light is, first of all, proper kneading, and secondly, some acidic dairy products.

Yoghurt-Whole-Wheat-Bread

Preferment:
20 g mature culture
175 ml water
250 g whole-wheat flour (I always use home-ground flour)

Final dough
580 g whole-wheat flour
25 g vital wheat gluten
17 g salt
1 teaspoon dry yeast
20 g honey
30 g butter
150 g yoghurt (I used 3% fat yoghurt)
320 + 100 ml water


  1. I mixed the ingredients of the preferment and kept it over night in a warm place (I put it into the microwave, with the door a little bit open - this way, the light stays on and I get a temperature of ~81° F)
  2. The next morning, I let the remaining flour autolyse for an hour. (I mixed the flour with the gluten first, then with all of the yoghurt and 320 ml water.)
  3. Then I mixed the preferment and the flour-water-dough with the remaining ingredients (not the last 100 ml water though) and I kneaded it by hand using the Bertinet method for 15 minutes. While kneading, I incorporated another 100 ml of water. The gluten was perfectly developed, even better than the last time.
  4. first fermentation: until doubled, it took me about two hours. Then I degassed the dough very well and shaped it into a boule again.
  5. second fermentation: until doubled, it took me about 1.5 hours.
  6. I divided the dough into two pieces, preshaped them and let them rest for a couple minutes. then shaped them into sandwich loaves, rolled them in rice flour (I use whatever I've got on hand . . . coarse wheat, bran, oats . . .) and put them into bread pans.
  7. final fermentation: until the loaves reached well over the edges of the pans, about one hour.
  8. I slashed the loaves and put them in the 220° C hot oven and steamed well. After 20 minutes of baking, I took them out of the pans and baked them until done on a baking sheet. (another 20 minutes.) I covered the loaves with aluminium foil for the last ten minutes.

I think the bread had about as much volume as the last time, I'm very pleased with that. It has quite a sour flavor. It's definitely a good flavor, but for my taste it's somewhat to sour for being a sandwich bread. I will change something about that. The bread did well with the higher heat and I think that I'll bake this kind of recipe in these settings in the future. It still didn't have a crunchy crust, but that's not what I'm looking for in a sandwich bread either. I will reduce the amount of water somewhat, because it simply was harder to shape with a hydration of 86 % and the result wasn't significantly better. Maybe something around 75-80% the next time? I'm happy with the reduction of sugar though!

I think, the next time I'll bake this bread with a yeast preferment and simply add a little of sourdough to the final dough. Or should I include some whole rye for a deeper flavour? I'd like to experiment with some further additions to the dough, like soaked wheat chops or some seeds (incorporated in the dough when the gluten is developed). I'll do some more experiments, I promise!

Salome

Submitted by Salome on August 12, 2009 - 11:51am

soft like a pillow: Buttermilk Whole-Wheat Bread


I've packed all my stuff, cleaned everything, thrown so much out . . . I'm moving to Basel on Sunday and I'm getting read for it! Yeyy. That's why I stayed the whole day at home. I had to get all these rather annoying things done. Now my room looks very clean and rather empty. Well done, Salome!

Still, I had to make my day somewhat more fun, and a full day at home is perfect for bread baking. Unfortunately, I realized this just after breakfast, so I didn't have time to get my sourdough ready.

That lead to the first requirement: I wanted to use a yeast formula with no pre-ferment.

Secondly, I had some buttermilk which had to get used.

Thirdly, I wanted some whole grains - baking white bread is fun, because of all the nice holes you can achieve, but it always causes me bad stomach-sensations, because I end up eating to much. So, third requirement, a whole-grain recipe!

Tadaa tadaa: I found a nice Buttermilk Whole-Wheat Bread formula!

I just had this bread for dinner, and it is a big hit. You've got to try it, it's so incredible light, even though its 100 percent whole-wheat. And the dough is simply a dream to handle, I never had a whole-wheat dough that behaved like this.

But it requires an effort: I kneaded for 30 minutes by hand, using the bertinet technique. during the last ten minutes I added gradually more water, the dough was able to absorb at least 50 ml, I'd guess. After the kneading the dough felt very smooth.

The dough has to rise twice before it gets shaped. It's a pleasantly warm day today, around 75° F - maybe that's the reason why this dough rised so beautifully. It was a real joy to watch it. It rose as high as many white flour doughs do! First rise: ~1 h 45 min, second rise ~1 h. After shaping, I wettened the dough slightly and rolled it in coarse wheat.

The next time, I'll add less honey. (The bread is subtle sweet, which is tasty and you'd think that it's the natural sweetness of the wheat if you wouldn't know better. But I found something about this subtle sweetness disturbing, too.) And more important, I'll bake it at a higher temperature. When I checked the loaves after 30 minutes, it was still incredibly soft on the outside. So I gave it 10 more minutes at 230°C, in order to achieve somewhat of a crust. This worked, but I'd still prefer a somewhat crisper crust. Next time I'll start baking at 200°C, take the loaves out of the pan after 20 minutes and maybe lower the temperature if required.

The recipe is originally from Laurel's Kitchen Bread Book and got posted here on thefreshloaf.com. I did the version without a biga. (but I'm planning on trying it with a biga soon as well.)

Submitted by Salome on July 23, 2009 - 4:15am

"Herbstsonne" - a German Sourdough bread


I've actually never been much into white bread. I still like to bake it occasionally, to mix up my diet and to have new challenges in my baking, the breads I'm the most fond of though are definitely breads which include some whole grain, some seeds . . . which are overall somewhat nutritious. This is the kind of bread which I like the best as an everyday bread.

I think, the bread I'm about to introduce here, definitely falls into this category. It is a German Bread called the "Herbstsonne" (eng: autumn sun) because of its tipical scoring. I had again some problems with the bread's height, I made a very wet dough (therefore I adjusted the amount of water in the recipe below) and wasn't able to shape it well. I let it proof well, so when I scored it it deflated to much after my taste and didn't get an extraordinary oven spring. Next time, I'd probably bake it as it is or just score a cross in the middle.

Herbstsonne


liquid levain

30 g mature culture

165 g rye flour (I used a medium rye, something inbetween white and whole grain rye)

165 g water

soaker

33 g oats

33 g sunflower seeds

23 g flaxseeds

90 g water

10 g salt


final dough

all but 30 grams of the liquid levain

all of the soaker

166 g rye flour

66 g whole-grain rye flour

80 g water (adjust amount as required)

flaxseeds and oats

  1. 1. mix the ingredients for the liquid levain, set aside until it's ripe
  2. at the same time, mix the ingredients for the soaker, put in the fridge
  3. Mix the soaker, the liquid levain and the remaining flour and water together, knead in a mixer three minutes on low speed, then three minutes on somewhat higher speed.
  4. let the dough rest for 30 minutes.
  5. shape into a round boule (it's sticky!), if required, wet the dough a little bit so that the flaxseeds and oats can "glue" to the boule (roll the boule in the flaxseeds/oats mixture). Put the boule into a floured proofing basket.
  6. let the dough proof - I retarded it in the fridge: I kept it in the fridge for about twelve hours, and let it finish proofing at air temperature for about another two hours. I poked the dough and it reacted slowly.
  7. I dropped the dough gently on a baking sheet and scored it like a sun. (What I wouldn't do the next time, because it deflated the dough to much in my opinion.)
  8. Baking: 20 min at 230°C, another 25 minutes at 210°C, then I turned the oven off, opened the door and let the bread in there for another 10 minutes.
  9. Let cool overnight.

There's a lot of flavor in this bread! It's very moist, of course it's not airy like a white bread, but that's not what I was looking for anyway. I remember that it had a very good keeping quality the last time I baked it, which isn't surprising because of the soaker.


I used some slices for a sandwich today, which I stuffed with lettuce and a home made cottage-cheese-dried-tomato-spread. Yumm! (the spread is very easy. Take some spoonfulls of cottage cheese, cut some tomatoes (the kind in the oil) into pieces, add some salt and pepper, some basil if you've got it on hand, and a tiny bit of honey and mix it briefly. tadaa!)

Salome

Submitted by Salome on July 18, 2009 - 2:56am

Whole-grain Oat Crackers


Of course I had a look at this week's yeastspotting. And there I spotted this: Barley-Flatbread by Dan Lepard. It looks gorgeous, doesn't it? I've ever since I lived in Sweden for a year been fond of flatbreads, crackers, crispbread. There, crispbread or as they say, "Knäckebröd", is a staple food. They've got an endless variety and have it with every meal. Here in Switzerland flatbread exists as well, but only in a limited choice. I prefer to bake my own, so I decided that it's time again. I didn't follow Dan Lepard's formula though, I made up my own! I am very pleased with the outcome. I wanted that the oat-flavor really comes out, and I achieved this goal. I love the mildness of these crackers! They turned out wonderfully crisp and light. I'm sure that they won't last long, the next time I'll make double the recipe. (I always work with small amounts when I'm experimenting because I hate to throw things out.)

It's actually pretty easy. I think if you haven't got a grain mill at home or you can't get your hands on whole-grain oat flour, you could probably blend some oats so that it resembles flour somewhat. I used very coarse flour as well, so I'd say that should work. No guarantee though, I haven't tried it myself!

Whole-grain Oat Crackers

liquid levain 15 g mature starter 60 g coarsely ground oat 60 g water soaker 75 g coarsely ground oat 10 g whole-grain rye flour 75 g milk (I used skimmed milk) 4 g salt final dough all of the soaker all of the liquid levain 50 g of whole-wheat flour oats to sprinkle

  1. mix the ingredients for the liquid levain the evening before you bake.
  2. combine the ingredients for the soaker at the same time
  3. the next morning, mix the soaker and the liquid levain with the whole wheat flour and knead for about five minutes. Don't expect any gluten to form, it will remain a rather "grainy" ball. The dough is not sticky or tacky.
  4. put the dough into a small bowl, transfer it into a plastic bag. Let it rest for about half an hour in a warm environment. (In my case the microwave with the light on and the door somewhat open.)
  5. roll the doughevenly to around 3 mm thick. brush sparingly with water, sprinkle with oats and roll again, to around 2 mm thick. I used my old pasta dough machine for that.
  6. Place the dough on a baking sheet with a parchement paper. cut into rectangles as desired, let it proof uncovered for one hour.
  7. bake one baking sheet in turn in 230°C for about 12 minutes, or until the edges are brown. Turn the rectangles upside down after a couple minutes.
  8. let cool on a rack and store in an airtight box when they've cooled down.

Salome