The Fresh Loaf

A Community of Amateur Bakers and Artisan Bread Enthusiasts.

bwraith's blog

bwraith's picture
bwraith

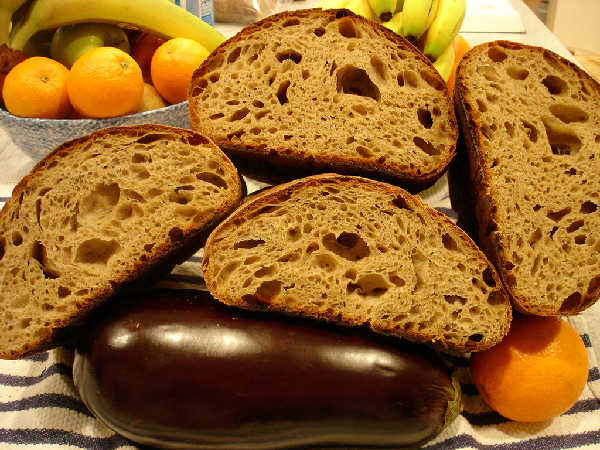
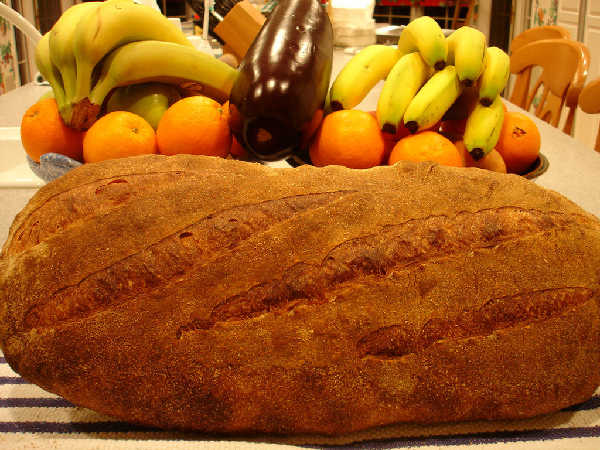
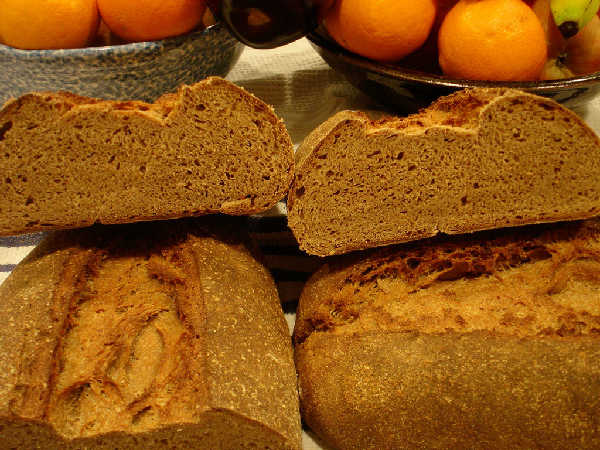
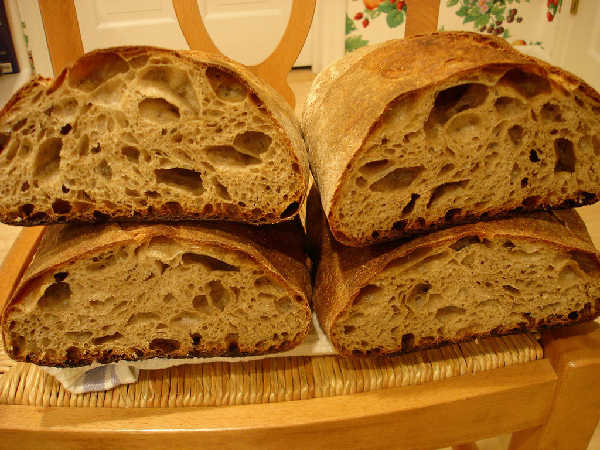
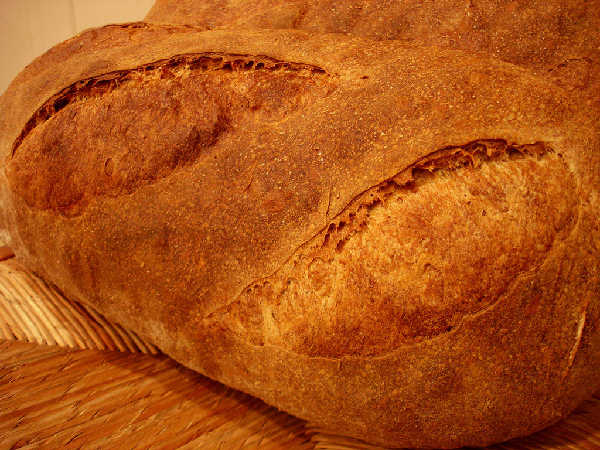
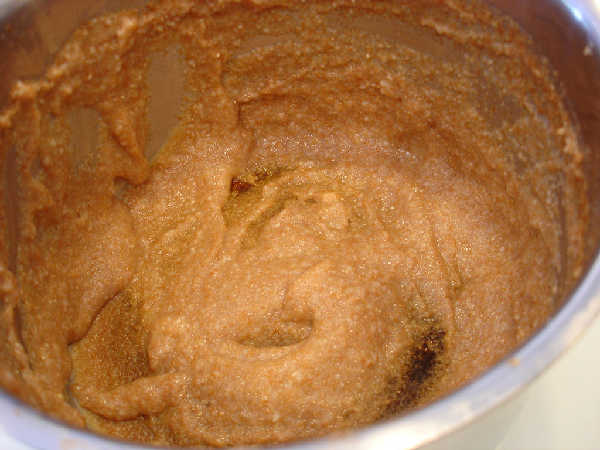
I thought it would be interesting to compare four different approaches to sourdough fermentation. I've baked four test loaves, each with 500 grams total flour (using a 50/50 blend of Heartland Mill Strong Bread Flour and Heartland Mill Golden Buffalo for a blended ash content around .85%), 72% overall hydration, and 2% salt. All loaves started with 18 grams 80% hydration white flour storage starter.

The difference in the loaves is in the fermentation method. In one loaf a direct inoculation of storage starter in the final dough (one-step method) was used. In the others a sourdough preferment was built and fermented for different amounts of time. The final loaf includes a spike of instant yeast.

Fermentation Methods Used

  1. Build final dough including 18 grams of starter, bulk ferment for 11.75 hours, final proof for 3 hours all at about 70F. (xls and html spreadsheets)
  2. Build a sourdough preferment constituting 35% of total flour and ferment until just doubled, about 8 hours at 70F. Soak remaining final dough ingredients overnight in the refrigerator. Mix preferment and soaker and bulk ferment for 3.75 hours at 70F then final proof for 4 hours at 70F. (xls and html spreadsheets)
  3. Build sourdough preferment same as in step 2 and ferment for 4 additional hours after it has doubled, about 12 hours at 70F. Proceed same as in step 2. (xls and html spreadsheets)
  4. Build sourdough preferment same as in step 3. Add 1/4 tsp yeast to soaker. Proceed same as in step 3. (xls and html spreadsheets)

The idea is to compare a long fermentation from an initial very small amount of starter to using a sourdough preferment that is immature (just doubled) or more mature (peaked). Finally, in the last one, the idea is to add in a spike of yeast to improve the rise in the case where a large, mature (35% of total flour and fermented until peaked) preferment is used.

In all cases, the final dough was shaped into a loaf when it had a little less than doubled during bulk fermentation.

Photos of the crust and the crumb from left to right:

Test Fermentations 1-4 From Left to Right - Crust

Test Fermentations 1-4 From Left to Right - Crumb

Comparison

Crust

I couldn't tell any real difference in the crusts. It's possible the first one was a touch darker than #2 even though both were baked at the same time. Maybe there was a little more enzyme action in it since the entire dough was hydrated at room temperature for about 14 hours.

Crumb

Although they are more similar than different, the crumb was slightly lighter going from 1-4.

For loaf #1, this may again be a function of the enzyme action, which may have in some way hindered the gluten development. Another explanation might be that I needed to fold #1 one or two more times earlier to improve the gluten development over the longer fermentation, as it did seem a little too relaxed at shaping time, relative to the other loaves.

For loaves 2-4, the more mature preferments did not hurt the gluten in this case. I believe the very strong flours contributed to the better results with the more mature preferments. The more mature preferments probably had a larger organism count than the preferment for loaf #2, as they weren't at the collapsing stage yet. So, with higher organism counts, higher fermentation byproducts, but very sourdough tolerant flour, the more mature preferments ended up with slightly larger loaves in the end.

The oven spring went in opposite order to the loaf volume, not surprisingly, which explains why the result after baking is not as different, but the overall loaf volume before baking was significantly larger for loaf #3 than loaves #1 or #2. In the case of loaf #4, the yeast clearly had a big effect on gas production before shaping. I did deflate it a little during shaping, of course. It again was significantly larger pre-bake than loaf #4, but after baking it was only a little bit larger. In summary, the loaf volume before baking increased significantly from loaf 1-4, but the oven spring, which was greater in 1 and much less in 4, offset much of the difference. Nonetheless loaf #4 had a noticeably lighter feeling in the mouth.

Flavor

All of the loaves were fairly mild in flavor. However, without a doubt, loaves #3 and #4 were more sour than loaves #1 and #2. Everyone who I had test the loaves was able to discern the more sour flavors in #3 and #4. There was some debate about the order of #1 versus #2 and #3 versus #4. My youngest son, William, noted a sweetness he seemed to like in loaf #1. I believe he may be detecting, once again, some effect of the enzyme action that was probably greater in that loaf, which soaked for so long at room temperature, and may have resulted in more starch broken down into sugars. My oldest son thought #2 was more sour than #1, which may be correct, given that it had a slightly longer total fermentation time. My son's girlfriend felt the order was 1,2,3,4 from least to most sour, but others had no opinion on #3 versus #4.

Comments

I believe the following are true, all other things, particularly the temperature and amount of enzyme action in the process, being equal.

The difference between #1 and #2 is minimal. You can do a one-step or two-step process timed for convenient stopping points, and the results will be nearly alike, provided that the preferment is not allowed to get very ripe. A two-step process where the preferment is allowed to ripen significantly more will have a more sour flavor.

The least sour result comes from a one-step process run from a very small initial amount of starter.

At some point, I would like to test out effect of temperature in a side by side comparison. I believe if you adjust the fermentation times so that the relative ripeness of the preferments is similar to the loaves above, that the results may not be very different from above. I suspect the slight favoring of lactobacillus versus yeast at temperatures around 65F will have a smaller effect on flavor than overall relative ripeness of preferments and final dough, but I don't know if that test will get done at my house any time soon.

bwraith's picture
bwraith

Home Milled and Sifted Wheat Montana Sourdough

Home Milled and Sifted  Wheat Montana Sourdough

My adventures in home milling and sifting continue. Most recently, I did fairly extensive additional test milling and sifting of Wheat Montana Bronze Chief hard red spring berries. In the past, I regularly used flour from two main sources: Heartland Mill, and Wheat Montana. Heartland Mill is a good source of hard red and hard white winter wheat flour and berries. Wheat Montana is a good source of hard red and hard white spring wheat flour and berries. After sending test flours from the milling and sifting session with Wheat Montana Bronze chief hard red spring wheat berries, I wanted to follow that with a "production run" and some test baking. I've already posted a fairly unusual "Reconstituted Mash Bread" made from Wheat Montana hard white and red spring wheat berries. The following is a more ordinary sourdough made from high extraction flour from the same milling session.

A spreadsheet in xls and html format is posted with the recipe and the sourdough timing. Additional photos are posted.

The formula is again much the same as previous test bakes. It consists of a levain contributing 15% fermented flour to total recipe flour made with equal quantities of sifted rye, sifted spelt, and freshly milled and sifted  "cream flour" from my milling session, combined with an overnight soaker of the remaining dough ingredients, which is the remaining "cream flour", 2% salt, about 76.5% water, and 1% malt syrup. The estimated ash content of my "cream flour" is about 1.1%, so it is similar once again to previous high extraction flours that I model after Heartland Mill Golden Buffalo flour.

The bread had some large and small holes, as the dough at 76.5% hydration was a little softer than I expected. As before, it takes some experience to learn the amount of water that my home milled and sifted flours will absorb. I slightly overestimated the amount of water in this case and ended up with a bread more reflective of a fairly soft and wet dough. The crumb was light and flavorful, which was expected, since I've had excellent results from Wheat Montana Prairie Gold and Bronze Chief flours in the past.

bwraith's picture
bwraith

Reconstituted Whole Grain Mash Bread

This is a recipe idea I've wanted to try since I started milling and sifting my own flour. My milling and sifting process results in a few grades of flour and bran, but in total they represent the entire contents of the whole grain. My idea was to process the different grades of flour in different ways, hopefully resulting in a better whole grain bread. In particular, I very much enjoyed the flavor and texture of the mash bread recipe from WGB by Peter Reinhart, which I blogged a while ago. This recipe is derived from the mash bread recipe and some other ideas in WGB, but it takes advantage of the fact that I have available various separate components of the whole grain flour. The resulting bread, made as described below, is very good, maybe my favorite whole grain bread so far.

I've posted a spreadsheet in xls and html format showing the recipe and sourdough timing. I'm not providing a whole recipe in the blog in this case. Since the ingredients will vary so much, and I used particular output from my milling and sifting process, it's more of an idea than a recipe. Anyone who tries it will have to carefully read WGB's mash bread recipe, look at my spreadsheet, and then make up a recipe to fit available ingredients and/or sifting equipment. I've also posted some additional photos.

To make this bread, I first simmered the bran and very dark coarse granular flour from my milling and sifting process for a few minutes. The idea is to soften the high fiber components of the whole grain flour. Then, when the simmer cooled to about 165F, I added "golden flour", which is higher ash content flour from the first and last siftings. I maintained the temperature at around 150-155 for a couple of hours to get a dark, sweet mash. The mash was refrigerated. Meanwhile, I fermented a levain of whole rye, whole spelt, and some of the whiter flour from my sifting process. In the morning I combined the mash, the levain, and all the remaining whiter flour from my sifting process along with some salt and malt syrup to make the final dough, which rose and was baked later in the day.

Admittedly, this is difficult to duplicate at home unless you have a couple of fine sieves and access to a coarse stoneground whole grain flour. However, a similar recipe should be possible by separating out the bran and larger particles with a fine sieve, simmering that, then adding some of the remaining flour to make the mash, then using all the remaining flour in the final dough.

Using store bought ingredients, another similar version could be to use store bought bran for simmering, a high extraction artisan flour (like Heartland Mill Golden Buffalo) for the mash, and white flour for the remainder. Yet another version might be to use store bought bran for the simmer, store bought wheat germ and white flour for the mash, and white flour for the remaining flour. Or, it would probably work to use store bought bran for the simmer, whole wheat flour for the mash, and white flour and store bought wheat germ for the remainder. All of the above are the same in spirit, which is to reconstitute the components of whole wheat flour in total, while simmering separately the coarser bran, mashing darker flour, and then adding lighter flour to the final dough.

Very roughly, the bran should constitute some 10-15% of the recipe, the dark flour added into the mash should be about 25% of the total flour, and the rest should be lighter flour. Wheat germ, if used, should total about 3% of the weight of flour. Evaporation and some mash left in the pan means you have to estimate the remaining water and flour in the mash, in order to then have the right amounts of flour and water in the remainder of the recipe. Another interesting flour to try in the mash, if you are going with a store bought duplication, is first clear flour. The character of the "darker" flour I added to my mash is somewhat like first clear flour.

Also, as in all the WGB recipes, you could easily make this a yeasted recipe by replacing my levain with a yeasted biga and adding some yogurt or other fermented milk product to bring up the levels of fermentation acids in the final dough.

The resulting bread has a soft, dense crumb, which is normal for mash bread. However, the unique flavor from the mash and the soft, spongey texture more than make up for the somewhat more dense crumb. The lighter color results from the fact I milled and sifted a 50/50 combination of Wheat Montana Prairie Gold and Wheat Montana Bronze Chief. The Prairie Gold berries are hard white spring wheat berries, which have a much lighter color of bran, resulting in a lighter color. I also prefer a mixture of white and red wheats, which results in a milder but not bland flavor that I prefer to either 100% red wheat or 100% white wheat. The more dense and soft crumb makes it an excellent bread for sandwiches or to use with tahini, peanut butter, honey, and so on. I had some this morning for breakfast, and it is one of my favorite whole grain breads, if not the all time favorite.

bwraith's picture
bwraith

In order to fine tune my milling and sifting process, I ran a series of tests at different mill coarseness settings to see which setting might result in the best separation of bran from endosperm. I then ran a successive reduction multi-pass milling and sifting process at what appeared to be the best first pass settings and sent samples of all these tests to CII Labs to see what some of the ash content, protein content, and dough rheology might be. I also sent in some samples of Heartland Mill flours to use as a reference, since these are the types of flour I would like to emulate with my home milling process. In fact, I use Heartland Mill Hard Red Spring Wheat Berries in all these milling tests.

The equipment and general process has been described in previous blog entries on home milling and sifting.

http://www.thefreshloaf.com/node/5518/home-milled-and-sifted-sourdough

http://www.thefreshloaf.com/node/5436/home-milling-and-sifting-two-more-tries

http://www.thefreshloaf.com/node/5357/home-milled-high-extraction-sourdough-miche

http://www.thefreshloaf.com/node/5427/home-ash-content-measurement

The processing is accomplished using a Meadows 8 Inch Stone Mill and a Meadows Eccentric Sifter, as well as a sieve shaker that can stack several 12 inch diameter stainless steel or brass sieves of US standard sizes.

The CII Lab results for the initial test of varying coarseness settings of the mill have sample descriptions such as "P1 open 1/3 turn 35-50". The P1 is just a label for the setting of the mill, which is listed next. At 1/3 turn, the mill stones are separated by about 1/2 a grain width. Similarly 1/6 turn would be about 1/4 of a grain width, and so on. The numbers at the end refer to the size of the sieves used. So, a sample labeled 35-50 went through a US standard number 35 sieve and was caught in the US standard number 50 sieve.

The CII Lab results for the second test start with a first pass with a 1/6 turn opening, which seemed to be a good setting to get good initial separation of bran from endosperm in the initial tests to determine the best first pass mill coarseness setting. The sample descriptions have labels like "P2a <70" or "P1 40-80m". The P2a is the label of the pass in the process described in the process flow chart for this milling session. The "<70" refers to product that went through the US standard number 70 sieve in the stack of sieve shakers used for all but the first pass.

On the first pass, "P1", the Meadows Eccentric Sifter was used. It has sifter sections specified by the mesh size of the screens in the three sections of the sifter. So, the "40-80m" refers to flour that went through the 40 mesh section and was caught in the 80 mesh section.It so happens that due to the wire diameters of the material used in the screens, the 26m section has about the same opening size as a US standard number 20 sieve, the 40m section has about the same opening size as a US standard number 35 sieve, the 60 mesh (not used in this session) is about the same opening size as a US standard number 50 sieve, and finally the 80 mesh screen has the same opening size as a US standard number 70 sieve. So, in order to simulate the use of the Meadows sifter in subsequent passes with my smaller sieve shaker that is just more practical for these smaller amounts, I used US standard numbers 20,35,50, and 70 sieves in the stack.

I also include a spreadsheet (xls, html formats) that summarizes the results of the milling session. On the "model" sheet, there is an attempt to model what would happen at other mill settings than the one I used, based on data from the initial runs at various coarseness settings and my guesses about how the subsequent millings would go. All of that may not be very useful, except to me. However, the "model" sheet also shows a summary of the basic ash content output of each stream from the process I ran.

The flour streams with ash content around 1% had very reasonable rheological properties, which makes sense, since I was able to make some very nice breads very similar to what would have been possible with Heartland Mill Golden Buffalo flour. The stream of lower ash content flour seemed to have low mixing tolerance, so I must have inadvertently separated out some important components of proteins needed to form good quality gluten. This tells me I can create a flour with an ash content of somewhere around .85% by mixing some of the other higher protein streams with the very low ash stream to get an off-white flour that is whiter than Golden Buffalo, yet still will create a strong enough dough. I suspect that using the lowest ash stream by itself might result in a dough that doesn't have the best baking properties, since the farinograph showed weak mixing tolerance relative to the other Heartland Mill products or my own higher ash content flours more similar to Golden Buffalo.

Additional Results From Wheat Montana Berries Milling Session (added 2/26/08)

I conducted a similar series of milling tests with Wheat Montana Bronze Chief berries, which are hard red spring wheat berries. I wanted to see if the process would go differently with the harder berries and if this would suggest changes to the process of the mill settings and sifting approach.

A flow chart of this milling session, very similar to the last, other than the addition of a fourth pass, has been posted. The preliminary report from CII Lab (now updated to final as of 3/6/08) is also posted. The nomenclature for the various passes is similar to above. However, the various tests of the "first pass" are labeled with letters. For example, a label of "PA 35-50 1/12 Turn" refers to a first pass test using a mill setting of 1/12 turn (1/3 turn is about 1/2 berry width in the separation of the stones, so 1/12 Turn would be a stone separation of about 1/8 of a berry width), and the 35-50 refers to product that fell through the #35 sieve and was caught in the #50 sieve.

The numbered passes refer to the multipass milling process in the flow chart above, which was used to create various grades of flour, bran, and red granular product.

I also include an updated version of the spreadsheet (xls, html formats) mentioned above that summarizes the results of the Wheat Montana milling session in two addition sheets ("WMactual" and "WMmodel"). On the "WMmodel" sheet, there is an attempt to model what would happen at other mill settings than the one I used, based on data from the initial runs at various coarseness settings and my guesses about how the subsequent millings would go. All of that may not be very useful, except to me. However, the "WMmodel" sheet also shows a summary of the basic ash content output of each stream from the process I ran. The "WMactual" sheet summarizes the actual results for the settings used, but it adjusts for the fact I removed some of the intermediate products to send in as samples for testing at the lab. The model is not exactly what I did, but it is a better description of what would happen if the intermediate samples had not been removed as I conducted the milling session.

Overall, what I discovered is that a finer setting on the mill seemed neccessary to get about the same breakout between "bran", "coarse red granules", "coarse white granules", and "cream flour", which is a rough way of describing 4 products that seem to be produced when I mill berries using a fairly coarse setting for the mill (1/6 turn of the screw from when the stones just touch, corresponding to about 1/4 of a grain width).

Also, I am becoming aware of the fact that there is a threshold effect in the mill setting that has a big impact on the separation of the bran and the yield of white granules that seem to then yield flour with the lowest ash content when remilled and sifted. Only the slightest change in the coarseness setting around the 1/6 turn setting for HRW or at about the 1/8 turn setting for HRS berries seems to make an enormous difference in the relative yield of "white granules" in the first pass of the mill. If the initial pass is too coarse, then result is much more bran attached to large granules, and if the setting is too fine, then the result is too much high ash content flour in the first pass, and less yield of white granules, consequently reducing any chance to extract lower ash content flour in the second milling steps.

I was also struck by the variation in protein and ash content of the berries sent in for testing. I'm wondering if there is a more accurate test or larger sample size needed for the grain in order to get more consistent results. The ash content and protein levels for the berries weren't as expected. For example, the HRS berries (Bronze Chief) from Wheat Montana should have had a higher protein content than the results on the tests show. Also, the HWS berries (Prairie Gold) had an inordinately low ash and protein content than what is normally said to prevail with this type of wheat berry. So, either the tests aren't revealing the true levels for some reason, or the wheat berries vary much more than I thought. Unfortunately, this will require convincing someone at the lab or another expert in this somewhat esoteric area to take a charitable interest in educating me.

Tempering may need to be adjusted for these berries, and I may have learned something new about the tempering time. First of all, it seemed to me that the berries milled as if they needed a little more moisture content. The amount of ash is larger overall. My sense was that the berries and the flour seemed dry. Although I added enough moisture to reach a moisture content over 14%, the moisture content tested at only 13.3%, which may have resulted from letting the berries sit for a little over 48 hours. The tempering period may have been long enough to allow some moisture to escape. Possibly these harder berries have trouble absorbing the moisture, which makes it more available to evaporate from the surface over a period of time. The lids on my tempering containers are probably not perfectly air tight, so moisture may escape very slowly over a period of time. Next time, the tempering for Wheat MT HRS and HWS berries will be conducted in two steps. First, enough moisture will be added to bring the berries to 14% moisture content. Then, in a subsequent step about 24 hours later, the berries will be tested and enough moisture will be added to bring the berries to around 14.5% moisture content followed by an additional 24 hours before milling the berries.

bwraith's picture
bwraith

As I conducted my home ash content tests during the latest home milling and sifting session, a sourdough starter was accidentally started. The home ash content test involves mixing 5 grams of flour with 100 grams of distilled water, stirring it periodically, and measuring the conductivity of the water until it stabilizes, about 24 hours later. All of that time was spent at about 69F, the temperature of my kitchen in the winter. I noticed a familiar smell, something like yogurt, that was reminiscent of the early stages of some of the starter staring experiments I have conducted in the past. The pH was measured and, sure enough it was around 3.4 for all the jars I was testing, even though the jars had various flours including Heartland Mill AP, Golden Buffalo, and whole wheat, as well as various flours from my milling and sifting experiment.

Since the jars appeared to have fermentation activity in them, I decided to give a try at starting one up. After stirring up the slurry in the Golden Buffalo jar, 20 grams of it was mixed with 30 grams of flour to form a fairly firm dough, which was then placed on a shelf above my coffee machine with a temperature of about 79F. It was left there for 24 hours at the end of which it had risen slightly in volume and still had a bit of a sour milk or yogurt smell.

The culture at the end of 24 hours (48 hours from when the first 5 grams was mixed with water) was fed again by taking 5 grams of the culture and mixing it with 22g or Poland Springs water and 28g of KA AP flour. It was placed at 79F above the coffee machine for another 24 hours, and the result was that it had doubled in volume and was beginning to smell more tangy and vinegary like a typical mature sourdough starter. The consistency was a little runny with small bubbles, but it clearly seemed a little closer to a ripe, healthy sourdough starter than it was the day before.

The culture was again fed the same way and returned for another 24 hours to the 79F shelf above the coffee machine. It had risen by about 4x, smelled like a normal sourdough starter, and had the usual consistency of a somewhat ripe firm sourdough starter.

I'm sure it is ready to be used to make some bread. After starting so many of these starters in the last few years in various experiments, I know what a healthy one is like. It went so smoothly, it seemed worth mentioning, as it is a little different from the usual recipes.

To summarize this accidental process:

Day 1:

Mix 5 grams of very fresh whole wheat flour (or maybe white flour, as the Heartland Mill AP smelled much the same, though less intense) with 100 grams of distilled water (saves any trouble with chlorine, alkalinity or other problems with water), stir, and let sit, covered, at room temperature (I imagine at 79F would work, too) for 24 hours, stirring or swirling periodically.

Day 2:

Stir up the water and flour mixture and take 20 grams of it and place in a clean jar. Add 30 grams of white flour, stir into a thick paste or a firm dough, and let sit at around 79F (probably room temperature would also work, though it might take several more days, depending on how cold it is) for 24 hours.

Day 3 and beyond:

Feed the culture by taking 5 grams of the culture, mix with 20 grams of water and 28 grams of white flour. Let sit for 24 hours at 79F.

Probably you don't need distilled water anymore, in fact it may not be needed at all at the beginning either. It may be good to avoid chlorinated water. I use bottled water without any problems, but my well water is surprisingly alkaline and it seems to have been the cause of some problems with starting starters I've experienced in the past.

The culture should be ready when it no longer turns runny after rising by more than about 3x and has large bubbles in it if you cut into it with a spoon. With the feeding above, it should rise by more than 2x in about 4.5 hours at 79F, about 5.5 hours at 74F, or about 7.5 hours at 69F.

It might take several days longer, but this worked for me faster than any method I've tried in the past.

I suppose it's just a lucky but rare event, but it seemed like every single jar in all these home ash content measurements I've been doing have a very similar smell after 24 hours. I wouldn't be surprised if any of them would have started up by just feeding them.

It's also possible that some sort of cross contamination with my active starter occured, except I did these by mixing distilled water poured from a container that I believe couldn't possibly have had any contamination from my active starters. Also, I only stirred by swirling the jars and didn't use any stirrer or whisk. I did use a fork on subsequent days, but that fork had been through the dishwasher and never used to stir my active sourdough starter. I suppose the jar I used may have somehow had some residue of an active starter in it, but I had recently thoroughly cleaned the jars used in these experiments with soap and hot water.

Anyway, I'd be curious if anyone else gives this a try and it works for them, if you're curious to try it. The things that's a little different about this method from what I've read about or tried in the past is the very high initial hydration (2000%) at room temperature followed by immediate conversion to a firm white starter at a fairly warm 79F. I wonder if there is some unexpected advantage to this method.

Bill

bwraith's picture
bwraith

Home Milled and Sifted Sourdough Crumb

Home Milled and Sifted Sourdough Loaf

The home milling and sifting adventure continues. My most recent effort felt like a big step forward in several ways. Tempering, based on some suggestions by proth5 in response to a previous blog entry, was explored. Multiple successively finer passes of the mill were used this time, including re-milling of the sifted results from various steps in the process. Home ash content tests were performed, to understand better the distribution of bran and outer seed coat particles across the various outputs of my milling process. The outputs were then blended to a desired ash content and a sourdough loaf was baked. Photos of the process are posted, as well as a video of the tempering system I rigged up at the last minute (this is more for entertainment, but it may have helped). A process flow chart is posted showing the steps followed to mill and sift this flour, as well as a spreadsheet showing the ash content analysis for the various outputs of the milling process.

Notes on the Bread

The recipe for the sourdough loaf is similar to that for previous blog entries except no whole wheat was used in the levain and the rye was lightly sifted through a #25 sieve to remove the larger bran particles. A levain was prepared with 15% fermented flour as a percentage of total flour in the dough. The rye flour was 5% of the total flour, and the remainder of the flour was the home milled and sifted blend from this adventure. The rye flour went into the levain. The hydration was 79%, which proved to be too high. I realize the water absorption is in between whole wheat and white flour, so I probably would have been happier with a hydration around 74%. The resulting dough was closer to a ciabatta dough than I was intending, but the bread that resulted was wonderful. I was using my brick oven for some braising earlier in the day, which forced me to refire the oven in an attempt to bring up the temperature. I mismanaged the heat a little, which caused the somewhat scorched bottoms of the loaves you see in the photos. The resulting bread had a much lighter crumb than previous attempts, showing that I was much more effective at separating out the dark from light components of the berry.

Tempering

Based on a great suggestion from proth5, I explored tempering the wheat berries before starting to mill. Proth5 added 2% water to the berries. Some discussion in "Wheat Flour Milling" by Posner and Hibbs suggested 14%-17% moisture content. A Delmhorst G7 Grain Moisture Meter was used on Heartland Mill "Milling Wheat (M2 product)" and found to have a 10.6% moisture content. I decided to split the recommendations of proth5 and the suggestions in "Wheat Flour Milling" and added enough water to the grain to bring the moisture content to 14%. In a later discussion with a representative of Meadows Mills (my mill is a Meadows 8 inch stone mill), 14% was considered a touch too high, and 13% was suggested as a reasonable moisture content for my mill. So, Proth5 suggestions were very good, but by then I had already added the water to the berries.

Concern for very even moisture distribution motivated a couple of strategies for tempering the wheat. First, an atomizer was used to spray the water a few grams at a time onto berries, stirring in between sprayings to initially do a good job spreading the water evenly throughout the grain. I then borrowed the rotisserie from my outdoor grill, and rigged it in my workshop to be able to mount a plastic container of grain on it. In order to rotate the grain for a few hours without putting undue strain on the rotisserie, it was counterbalanced by attaching some small, heavy vices on the counterweight, which was too small on its own. A video of the contraption is available, as it is hard to describe accurately, but easy to understand once you see the video. The rotisserie was used for a few hours until the wheat seemed fairly dry to the touch. It was then allowed to sit for about 30 hours before milling.

Multiple Pass Milling and Sifting

After reading some of the chapter on milling in "Wheat Flour Milling" and browsing through various diagrams of milling processes, I took a wild shot at doing what I could as a complete novice to approximate the processes in a general way with my Meadows 8 Inch Stone Mill, and a series of sieves stacked in a Sieve Shaker. The equipment is described in an earlier blog entry.

The basic idea was to first mill very coarsely to separate the bran gently from the rest of the berry, followed by sifting out the flour from the darker material, followed by re-milling and re-sifting the darker material to obtain more flour. True to the discussions in "Wheat Flour Milling", the whiter flour was extracted from the 2nd, 3rd, 4th, and 5th passes, not from the first pass. I was surprised to discover this, but the ash content results showed much lower ash content for passes 2-5, particularly for the flour extracted from 3rd and 4th passes.

Passes 1-4 were successive, meaning that the "coarse red material" sifted from the #40 or #60 sieve was re-milled and resifted in series. In pass 5 the coarser results of passes 2 and 4 were mixed, re-milled, and re-sifted. In pass 6 the very coarse, mostly bran output caught in a #40 sieve was re-milled and re-sifted.

A process flow chart is posted that shows the details of the milling and sifting procedure followed.

Ash Content and Blending

Six flours, two coarse red "products", and 1 "bran" were the final results of all the milling and sifting above. Home ash content tests were performed on all of those products, as well as on sample saved from some of the intermediate steps. A spreadsheet is posted showing the results of the ash content measurements.

The results show that the flour through a #60 sieve that looks very much like Heartland Mills Golden Buffalo has a very high ash content. It was the flour from passes 2,3,4, and 5 that went through a #60 sieve that ended up having lower ash content. The flour from pass 1 had an ash content of 1.4%, not that far from whole wheat. In earlier one or two pass attempts, the ash content was probably closer to 1.4%, which explains the almost whole wheat quality of the breads from my first two tries. The ash content of passes 2 and 5 was around 1%, a little lower than Golden Buffalo flour from Heartland Mill. The flour from passes 3 and 4 was lowest, around .7% and much closer to a white flour, which might be something like .55%.

In the spreadsheet I created blends of the various outputs, so that I could get the ash content desired. As it turns out, by combining all the "flours" and leaving out all the coarse red and bran products, an ash content around 1.1%, maybe a little lower but very comparable to Heartland Mill Golden Buffalo would be obtained. So, all the flours were blended to obtain the flour used in the bread pictured above. This bread was clearly lighter than previous attempts. The dough handled much more like white flour, created a satin smooth surface texture, and seemed strong and extensible. The yield was much higher than in previous attempts, 85% of the final products and 81.5% of the weight of the berries before tempering, yet the ash content was lower than flour obtained in previous attempts that only yielded around 65% of the initial weight of the berries.

Nutritional Editorial Comment

Sifting, as done here, does remove some of the bran, outer layers, and germ from the flour. However, since the ash content is around 1.1% and whole wheat is around 1.7%, it can be argued that around 2/3 of the outer layers is making it into this flour. So, although it is not a pure whole grain flour, it still has much of the material from the outer layers. By dusting the loaf with the bran, further fiber is added. As a results, this bread should contain a significant proportion of the nutritional benefits of freshly milled whole grain flour. For me, it's worth doing this to be able to enjoy breads with lighter flavors and textures closer to white flours, without much loss of the nutritional values and freshness of milled-on-demand flour.

A More Practical Approach (Maybe)

Many of you may immediately view this little adventure as very impractical - with good justification, too. However, it at least is an example of creating flour of various grades at home, a drastically scaled down version of what happens in a real mill, doable at home, even if a little too large for the majority of home bakers.

I believe a simple version of this could use one #60 sieve and one #40 sieve and a Retsel Stone Mill or other similar mill that provides good control of the coarseness of the flour output. If set to much coarser settings, multiple passes could be performed on the coarse results caught in the #40 and #60 sieves. The sifting could be done by hand, even in quantities up to around 2Kg, although it is a little tedious and laborious. Maybe only 3-4 passes would be done, to minimize the labor, but the results of running tempered berries through at a coarser setting, and then re-milling more finely the coarse results caught in the sieve and re-sifting should allow the extraction of a reasonable flour similar to Golden Buffalo, just as shown above.

Where From Here

Even with a sieve shaker, the sifting is the most tedious and time consuming part of this process. The milling for all the steps combined for about 2Kg of berries was probably only about 10-15 minutes. The milling goes very quickly. However, the sifting drags on for 20 minutes at a time at first. Later steps are quite fast, and the last couple of passes can be done more quickly by hand, given the reduced amount of product.

I've ordered a Meadows Mill Eccentric Sifter (Goetter, hehe?) to add to the burgeoning list of equipment in the workshop. My hope is that this will make the sifting take only minutes at a time, more comparable and well matched to the milling speeds. Of course, this is all massive overkill for home baking. Yes, massive, massive overkill, no question. However, it is a hobby pursued with passion that may not always make sense in practical terms. It is the beauty of the home engineering, the resourcefulness required, and the delicious freshness of the bread that all contribute to the enjoyment.

Another remaining nagging missing piece of the puzzle is a flour analysis tool that would allow more thorough understanding of all the outputs, such as protein content, moisture content, water absorption, and ash content. Maybe I've figured out the ash content using the conductivity method described previously, but it seems to take a good 12-24 hours to get useful results from it. I'd like to be able to get quick turn-around for these measurements, in order to optimize the milling and sifting strategies.

Update (1/28/07)

Loaves Made With Flour From Meadows Sifter

Loaves Made With Flour From Meadows Sifter - Crust

I received the Meadows Eccentric Sifter (see video) and conducted a milling, sifting, and baking session (see photos), as well as some home ash content tests to check out the results with the new sifter. The Meadows sifter is far faster than my original approach with a sieve shaker and produces 4 separations simultaneously with great ease.

The sieve shaker had some advantages, in retrospect. You could inspect the results easily and fine-tune the sifting strategy very easily and quickly. Also, very little product is lost using the mining sieves, which is valuable for the smaller amounts I tend to do each time. The Meadows Sifter kept a couple of pounds in it, probably in the nooks and crannies of the wooden sieves and some built up on the fabric sleeves used to transport the flour. The Meadows Sifter made it more difficult to inspect or change the sifting process, as the sieves are tightly bolted down with wing nuts on long threaded rods. You can open it up, but it's much more time consuming than it is to detach and separate the mining sieves.

In this milling session, I tempered the wheat to a 13% moisture content. The tempering process was shortened to only 12 hours as a result of impatience to test out the sifter. The first pass through the Meadows 8 Inch Mill was troublesome. The breaker tripped even though I had the mill set to a fairly wide opening of about 1/8 turn on the adjustment screw. After several tries, I was able to complete the first pass with the screw open between 1/4 and 1/8 turn. A while later, I tried running untempered wheat at 10.6% moisture content through the mill, and it also had a tendency to jam the mill. Since I really don't have the slightest idea what the right opening is for the first pass through the mill, I'm not sure what to conclude. On the one hand, the milling went very smoothly with wheat tempered to 14% moisture content for more than 24 hours. On the other hand, the Meadows representative seemed very clear that 13% moisture content or less was preferred for the Meadows Mill. However, when I used less moisture and less tempering, the milling seemed more difficult on the first pass. All subsequent passes were uneventful, even on the finest settings.

After completing the milling session, I ran some home ash content tests. Clearly the yield of lower ash content white flours was much lower. I believe this again had to do with using lower moisture content wheat tempered for a shorter time. The flours seemed more like my earlier attempts with the Retsel mill, where one or two passes with untempered wheat berries resulted in a flour much closer to a whole wheat flour.

The sense that the flours were darker was corroborated by the home ash content tests, which showed the flour coming the the #60 sieve had an ash content almost as high as Heartland Mills WW flour (I'm making my flour with Heartland Mills "Milling Wheat (M2)". Output from subsequent passes had an ash content close to 1%, whereas in my earlier attempt with 14% moisture content 24 hour tempered berries, the flour from passes 3-4 that was the whitest had an ash content of about .75%. I think this explains why my earlier one or two pass attempts made loaves that seemed so much more like whole wheat loaves than my more recent multi-pass attempts with well tempered 14% moisture content wheat.

In order to get a flour something like Heartland Mills Golden Buffalo, I had to accept a lower yield this time. The home ash content tests take at least 24 hours of soaking, so I used color and inspection of the flour, plus the knowledge that the middle passes would be lower in ash content to blend the outputs to get a flour of the same approximate "color" as the Golden Buffalo. My "high touch" method came out to have an ash content almost equal to that of Golden Buffalo, but my yield was only about 65% this time, whereas I had a lower ash content with close to 80% yield in my earlier attempt with berries at 14% moisture content and tempered for more than 24 hours.

The loaves were made without any diastatic barley powder this time, and the crumb had no hint of gumminess. The color of the crust stayed slightly lighter than before. The gluten seemed a little better this time, which makes me wonder if the protein content or quality from this session was slightly better. It's hard to say, because I reduced the hydration based on the previous results, and this dough may have behaved well just because of more optimal hydration. However, maybe the gluten quality is somehow improved due to the different ash content, tempering method, and sifting method.

The loaves that resulted were very good. As noted above, the crumb was a touch darker than the last one, which correlates with the higher ash content measurement. However, the crumb was still much closer to a white bread, similar to the last one, as opposed to earlier attempts that were clearly closer to a whole wheat bread.

bwraith's picture
bwraith

Below is a photo of my third attempt at home milling and sifting, which resulted in a flour very similar to my favorite "high extraction flour", Heartland Mills Golden Buffalo flour. The processes used on my second and third tries are explained further below. Additional photos of the process have been posted.

Home Milled Miche - Third Try

First Try

The first bread from my home milling and sifting project, blogged earlier, looked like a 100% whole wheat bread. Unfortunately, I still hadn't figured out a way to do home ash content testing, but from the results, a guess at the ash content of the flour that went into my first try might have been something like 1.4%. So, it had some of the darker material sifted from it and therefore had a lighter crumb than a 100% whole wheat flour might have produced, but the color and flavor was closer to 100% whole wheat.

Second Try

Home Milled Miche - Second Try

My second try was a little lighter but still closer to whole wheat in character. I allowed the sifting process to go on longer and used a couple of passes. After one pass through the Retsel mill at a fairly fine grind and then sifting through a stack of sieves (#25,35,45,60,70,80) on my sieve shaker, the breakout was as follows. A video of the equipment in operation is posted for fun.

Sieve SizeAmountpercentdescription
#2525g4%bran
#3542g6%middlings and bran
#4570g10%middlings
#60107g15%middlings and flour
#7063g9%cream flour
#8099g14%cream flour
thru #80311g43%white flour
total717g100% 

I then took the 219g caught by sieves 35,45, and 60, and re-milled them at about the same settings as the initial milling. The output of this second milling was then fed through the #60 sieve. The output was 53g of coarse material caught in the #60 sieve and 156g of somewhat creamy, grayish flour that went through the #60 sieve.

I then created a flour that is about 82% extraction by combining the all the flour that fell through the #60 sieve on the first pass with enough of the flour that fell through the #60 sieve on the second pass to constitute 82% of the total output. The resulting flour was lighter than on my first try, but the bread that resulted still had a color more like a whole wheat bread, although slightly lighter in color. The flavor was noticeably different, though. The second try had a flavor with far less of the grassy flavor of a whole wheat bread. Again, this flour was made before I had a way to test for the ash content, but I imagine from the color of it, that it was probably about 1.25% ash content. It was slightly darker than Heartland Mill Golden Buffalo flour. My second bread also had 5% whole rye and 10% whole spelt in it, as did the first one, so part of the whole wheat character of these loaves is caused by the addition of 15% whole grain flour.

Home Milled Miche - Second Try - Crust and Crumb

Third Try

I received my Meadows 8 Inch Stone Mill and decided to have another go at milling and sifting. Of course, the new mill works differently than the Retsel. The stones are much larger and turn much faster. I can't seem to get the grind anywhere near as fine as the Retsel will produce with just one pass. However, the Meadows mill is far faster, especially when re-milling flour. The Retsel takes forever to re-mill flour, and seems to heat up too much on a second milling. The Meadows Mill takes less than a minute to grind a few cups of grain, and re-milling the output takes only slightly longer.

I was happy to discover that for the amounts I would normally do - not more than a 5 pounds at a time, the flour was very cool coming out of the mill. In fact, it was noticeably cooler in temperature than the flour coming out of the first pass with the Retsel mill. I imagine that equation would reverse for much larger amounts, as the Meadows would heat up over time to a higher temperature, given the large stones turning at much higher revolutions per minute.

This time I went for about a 70% yield. I realize in retrospect that my first pass was probably too coarse, which resulted in only about 600 grams going through the #60 sieve and 323 grams caught in the #25 sieve, out of a total output of 1815g. I then re-milled the middlings from that sifting, and the output was 350g through the #60 sieve. One more pass resulted in an output of another 244g through the #60 sieve. The flour coming through the #60 sieve from this pass was lighter than previous attempts.

I did another sample of about 300g which was milled at the finest settings a couple of times. The result was a finely milled whole wheat, more like what would be done on a very fine first pass with the Retsel. The result was sifted through a #25 and 50 sieves to get 240g of flour, with only 15g of "bran" caught in the #25 sieve and middlings of only 40g. This was probably too fine. I'm slowly beginning to understand what setting of coarseness of the mill will result in a good distribution of particle sizes for more efficient sifting to get the flour desired.

The resulting flour was actually 68% of the total flour made during this session trying a couple of different strategies. This time, I was able to measure the ash content, at least approximately, using the home ash content measurement mentioned in a previous blog entry. The ash content is around 1.05%, maybe a little lower than Heartland Mills Golden Buffalo flour, which their site says is around 1.13% ash content and I calculated to be around 1.2 with my test, such as it is.

Resulting Bread

Home Milled Miche - Third Try - Crust and Crumb

A similar bread to previous attempts was made with this flour. However, I omitted the 10% spelt and raised the hydration to about 81% to compensate. I may have gone a little too far with the hydration, as I had some trouble getting the loaf to hold its shape well. Due to some unanticipated distractions, the loaf was about 20 minutes late getting into the oven, so it was also slightly overproofed. The result was therfore flatter than I would have liked. However, the crumb, crust, and flavor were all very good. I believe this loaf is very similar in most ways to country miches made with Heartland Mill Golden Buffalo flour in the past. The color is a little darker, but I believe that has more to do with the fact the flour is not aged, as the ash content clearly indicated that my flour was lower in conductivity than the Golden Buffalo flour and should therefore be a little closer to white flour than the Golden Buffalo flour. The texture of the dough and the general behavior of the flour while handling it seemed very similar to what I have experienced with the Golden Buffalo flour. By the way, the wheat berries used for this flour was Heartland Mills M2, which may be similar to the wheat berry product they are using to create the Golden Buffalo flour. Overall, I'm extremely happy with this result. The flavor and freshness of the home milled flour is a delight, and the prospect of being able to freshly mill a desired grade of flour on demand is pleasing.

Future Attempts

Now that I have a better feel for the right mill settings, my plan is to do a multiple pass approach, this time hopefully more systematically and with better mill settings. The outputs of the various passes will be saved and ash content measurements performed on each one. Hopefully, I can then make the process much more efficient and flexible. With ash content measurements available, blends can be created based on ash content of the final flour desired, and hopefully better yields will result for the same ash content, with better coarseness settings on the mill on the first and subsequent passes.

bwraith's picture
bwraith

Cream of Wheat Middlings

My home sifting project resulted in "middlings", a term I may be using incorrectly. What I mean by middlings is the stuff I sifted out that is finer than bran but was coarser and darker than I wanted for the flour being produced.

This output of my milling and sifting process had a coarseness similar to semolina or maybe a little more coarse. It was a fairly dark brown. I refrigerated it, thinking it might be useful for dusting a couche or some other purpose eventually. To some extent, I was hoping to discover some good food use for this part of my output, which should contain a fairly large nutritional content, since it has much of the darker, vitamin-rich outer layers of the wheat berry in it. My more whole grain oriented friends might be less disapproving of my use of less than 100% whole wheat flour in some of my breads, if I could show that the other parts of the whole grain are still being used. Also, my wife is more interested in whole grain nutrition, so she asked me to save it, probably also imagining some good use she might discover for very freshly ground outer layers of the wheat berry.

The nice thing is that I can see this output will be consumed nearly as quickly if not more quickly than the bread that was made from this sifting session. My whole wheat loving friends would be happy, since we would be eating 100% fresh ground whole wheat by eating the bread and having the cream of wheat middlings and bran for breakfast.

This morning it occurred to me that the "middlings" were a lot like cream of wheat in consistency, just browner. I decided to try making "cream of wheat middlings". I forgot to measure, but roughly speaking the recipe was 1.5 cups water, 1.5 cups skim milk, 0.5 tsp salt, 1.5 cups of "wheat middlings", and about 0.5 cups of "wheat bran", the coarsest output of my sifting process. I then brought it to a strong boil, dropped the heat to low, and let it simmer, stirring periodically, for about 15 minutes.

The resulting gruel was served with some milk poured on it, and some brown sugar sprinkled over it. My 13 year old son wolfed this concoction down with great delight, saying it was very good. I thought it was a great breakfast, more flavorful than cream of wheat and probably nutritionally much superior, and it would have significantly more bran fiber, for those who might like that aspect of it. I tried adding raisins to some of it, which I thought made it even better but my son thought detracted from it.

bwraith's picture
bwraith

Recently, I've been attempting to grind and sift my own flour. The grinding is straightforward with a Retsel Mil-Rite, an excellent home stone buhr mill or my new Meadows 8-inch stone mill. However, the mysteries of sifting the flour have been less straightforward. A subsequent blog entry will deal with my progress on grinding and sifting my own flour. The sifting project motivates the need for measuring the ash content of my flour.

Ash Content

Ash content in general is the percentage of inorganic matter in a sample of some material. It is used in many different ways to analyze agricultural products, at least, based on some cursory sampling of articles on the internet.

About.com says defines ash content as:

The nonvolatile inorganic matter of a compound which remains after subjecting it to a high decomposition temperature.

A traditional method for determining ash content is to place a sample of known weight in a furnace at high temperature (600F or higher) for a number of hours (12 hours, for example) such that all the water, volatile compounds, and organic matter either evaporate or burn. After that, the remaining material is weighed. Ash content is the weight of remaining "ash" expressed as a percentage of the original weight of the sample. The remaning mass will be the inorganic non-volatile compounds that were in the original sample.

Flour ash content in Europe is measured using a dessicated (dried out) sample  of flour, so the original weight of the sample doesn't contain any water. In the US, a moisture content of 14% is assumed (typical for white flour before it is dried out), so US numbers for ash content differ from the same European measure by the amount of water in the original sample.

An Important Characterizing Measure of Wheat Flour

Ash content is widely used in Europe to classify flours. When you see "type 55", for example, the 55 refers to the ash content, which would be 0.55% of dry matter in this flour. In the US, it is often available by searching a manufacturer's or supplier's web site for flour specifications (often hidden somewhere hard to find), or more often, by calling someone in their testing department.

Why Ash Content

The inorganic matter in a wheat berry is heavily concentrated in the outer layers, such as the bran, various seed coatings, and the germ. As you traverse from the outer coatings to the outer endosperm and then to the inner endosperm, the concentration of inorganic matter steadily drops.

During milling, the flour is ground, then sifted, then ground again, and sifted again repeatedly. When the milling process is complete, a large number of bins of product will result from very coarse to very fine, and from very dark to very light flours. The whitest flours will have less ash content, and the darker flours will have more ash content. At this point, various grades of flour may be created by blending the flour from the bins.

Ash content then summarizes how much of the outer layers made it in to the final flour, regardless of how it may have been milled, sifted, and blended.

The importance of measuring ash content was immediately obvious to me as I tried to mill and sift at home on my own. An infinite number of possible permutations of grinding and milling could be imagined. For example, I tried grinding very coarsely, then sifting, then grinding the coarser results of the sifting again, then sifting again. Another version was grinding very finely and sifting into more and finer sizes. I also tried grinding coarsely, then regrinding, then sifting. Of course, the possibilities are endless. In each of these cases, flour resulted that made good bread, seemed light in color, and fine in texture. The difference to the eye and the feel in the hand was not great between one and the other, at least not to me, a first-time home miller.

Measuring ash content of my results would make it possible to know at least approximately how much of the outer layers had made it into each type of flour resulting from the various grinding and sifting processes tried. Also, once a given process is adopted and used consistently, calculating the right blend of the various outputs of the milling process to achieve a desired ash content, depending on the type of flour needed, should also be fairly easy.

The Theory

Distilled water doesn't conduct electricity. However, if some salt is dissolved in distilled water, it will conduct electricity. The ions contributed by the salt are charged particles that will travel through the water in the field created by the voltage difference on the electrodes of the conductivity meter to create a flow of electric current. The higher the concentration of salt, the higher the conductivity of the water and salt solution will be. The diverse mineral content in the inorganic matter that makes up the "ash content" of the flour ionizes the water in the same way described above for salt. If the flour has a larger amount of "ash content" it will also contribute a larger quantity of ionizing compounds to water, increasing the conductivity. 

The Equipment

To measure conductivity you need a conductivity meter. In the field of water quality measurement, "Total Dissolved Solids" is a standard measurement, but it is essentially a measure of the conductivity of the water being tested. So, you can use either a "conductivity meter" or a "TDS Meter". In my case, I had obtained a Hanna 9813 pH meter a number of years ago, and it turns out it also had a conductivity meter function. However, it was easy to discover conductivity meters on the internet, by searching on terms like "Conductivity Meter", "TDS", "Total Dissolved Solids", "Water Quality Meter", and so on. One place I found was http://www.technika.com. Also searching on "Hannah Meter" might work, since that's the brand of meter I have that has both pH and conductivity meters, both useful functions for flour measurement.

You might wonder why a standard digital multi-meter wouldn't work. I tried to use one unsuccessfully. First of all, you would have to carefully mount the probes to maintain the same distance apart and total surface area exposed to the water. However, it gets worse. The DC current used by a digital multi-meter to measure resistance causes the ions to build up on the electrodes, so the measurement just goes higher and higher the longer you leave the electrodes in the water. Conductivity meters made for measuring water impurities use AC current to measure the conductivity so the above problem with an ohm-meter doesn't occur, have probes made of less reactive conductors, and are designed to maintain proper spacing of the electrodes.

The Method

I found a couple of papers on the internet describing methods of measuring ash content with conductivity. One was especially useful for home measurements and was titled, "Electrical Conductivity of Flour Suspensions and Extracts in Relation to Flour Ash." published in 1977 in the Journal of Cereal Chemistry. The method described below was derived from the discussion in this paper.

The method is very simple. Mix 100 grams of distilled water (should be distilled water to get good results) and add 5 grams of the flour to be tested in a container. Stir thoroughly to completely hydrate the flour. Periodically stir for about 12 hours. After the flour has settled to the bottom of the jar, measure the conductivity of the water. For the best measurement, allow the flour to settle on the bottom so there is clear water to measure. The clear water will have a higher conductivity than recently stirred and cloudy water. At first the conductivity rises, as the various compounds that contribute to the conductivity of the water dissolve, but at some point the conductivity will stabilize. In my case it took a long time, maybe 12 hours or so, for the conductivity to stop changing. The conductivity measured can then be calibrated by measuring flours with known ash content and fitting a curve of conductivity to the known ash content. In practice it looked very linear, so even a simple proportional relationship would give reasonable results, based on my admittedly minimal sampling.

         ppmuS/cmash %
hmap2150.310.50
home713850.551.05
hmgb4200.601.13
hmww4700.671.70
wrye5300.761.90

The table above shows measured conductivity in ppm, as the meter represents it for TDS or "Total Dissolved Solids" in parts per million salts for a hydroponic solution and also shows conductivity in the more standard measure of milli-Siemens per cm. I don't know the ash content, but based on some flour specification information from Heartland Mill, I filled in rough numbers and then used them to approximate the ash content of my "71% yield, fairly white bread flour" sifted from a couple of passes with my new Meadows 8 inch mill and a couple of siftings with a number 60 sieve in my new SS-100 Econo-Shaker sieve shaker.

The method in the paper heated the samples to boil them for a short period, then cooled and centrifuged the samples to create a clear liquid with the dissolved minerals in it. I didn't want to deal with boiling or somehow obtaining a centrifuge. OK, maybe you could put your jars in bags, tie them to some rope and spin them like Argentine "bolas", but I recommend patience. It was unclear what the effects of boiling were from this paper, but it seemed to affect the measurement in some unexpected way. So, my approach is to keep it simple and just wait for the conductivity and the flour to settle, even if it takes a while.

Summary

You can obtain a reasonable estimate of ash content by mixing 5 grams of flour with 100 grams of distilled water, stirring periodically for a few hours and then measuring the stabilized conductivity and comparing to the same measurement for some reference flours of known ash content. I proceeded to make one of my favorite miche recipes and found this flour to give very comparable results to Heartland Mill Golden Buffalo flour, which is of similar ash content. The difference is I can mill my own version of the Golden Buffalo flour and obtain it absolutely fresh when called for. In addition, measuring and recording the ash content of the output from the various passes of grinding and sifting should allow me to blend the outputs in the right proportions to obtain a desired ash content for recipes that may call for more refined or less refined flour.

bwraith's picture
bwraith

I've had a number of discussions with TFL participants recently about sourdough rise times versus temperature and inoculation. Temperature has a big effect on sourdough rise times, and sometimes a starter appears unhealthy, when it is really just rising more slowly because of low temperatures in the kitchen during winter. Also, recipes that used to work seem to fail during the winter, but the colder temperatures may be the cause. To adjust for cold winter kitchen temperatures, either the temperature must be managed actively (oven with pilot light or electric light, coolers with a bowl of warm water in them, and so on), or the percentage of fermented flour must be adjusted in the recipe, or much more time must be allowed for the bulk fermentation and proofing.

I constructed a table that provides (in hours) the doubling time, bulk fermentation time, proofing time, and total mix-to-bake time for various temperatures and percentages of fermented flour. The table has two sections, one for no salt meant for unsalted levains, and one for 2% salt meant for doughs or salted levains.

Inoculation, as used in the table, is the percentage of fermented flour contributed by a levain or storage starter to the total flour in a levain or dough. For example, if 50g of storage starter at 100% hydration is contributed to 225g of flour and 175g of water to create a levain, then the total flour is 250g (25g+225g) and the percentage of fermented flour is 10% (25g out of 250g total flour). Similarly, if a dough containing 1Kg of total flour is made by contributing the levain just mentioned to 750g of flour and 550g of water and 20g of salt, then the inoculation or percentage of fermented flour is 25%, or 250g out of a total flour of 1Kg.

The table is made to match up to rise times for whole wheat, high extraction, or generally high ash content flours I tend to use in my sourdough hearth breads. For pure white flour doughs and levains, the times tend to be about 20% longer, i.e. white flour rises a little more slowly.

Your starter may well be faster or slower than mine. If you build a test levain using a representative entry in the table, such as 10% at 75F, you can see how your starter compares to these table entries and then adjust your rise times and proof times up or down by the same percentage. For example, if you starter doubles in 80% of the time indicated in the table, then it makes sense to use 80% of the time in the table for other temperatures and inoculations also.

You can see from the table that the rise times vary over a huge range depending on temperature. Also, inoculations need to be changed drastically for long overnight rises, depending on temperature.

The strategy for maintaining a starter should also change dramatically if the temperature is 65F instead of close to 80F in the kitchen from winter to summer. For example, a 25% inoculation at 65F results in a 10 hour mix-to-bake time, which is a couple of hours before a levain would peak and begin to collapse, but at 80F an inoculation of only 0.5% results in a 10 hour mix-to-bake time. I've used this model at wide ranges of temperature and had reasonable results. The interesting thing to notice is that a 20g:30g:30g feeding at 65F peaks in around 12 hours but a 1g:100g:100g feeding at 80F peaks in around 12 hours, too. Or, if you look at the mix-to-bake time at 65F for a 10g:45g:45g feeding (10% inoculation), it's 12.5 hours, so if you feed that way at 65F the starter won't be getting to its peak and may be overfed if the feeding is repeated every 12 hours, while the same feeding at 80F will peak in less than 8 hours, so a 12 hour schedule will work well at that temperature.

This is simplified from my rise time models, so it doesn't include some additional adjustments for the dough consistency I make in my spreadsheets. Of course, this is a very rough approximation. All kinds of complications may cause these numbers to be different from actual results. So, it's just a guideline and something to think about, and it's biggest use may be as a learning tool or to just get in the general ballpark for rise times. For example, if your temperatures are very different from the ones the author assumed in the recipe, or if you just don't have an idea where to start with rise times for some recipe your trying, maybe the table will help.

Apologies in advance, if it turns out there is a bug in the table somewhere, but at least some of the numbers made sense after browsing through the table.

Pages

Subscribe to RSS - bwraith's blog