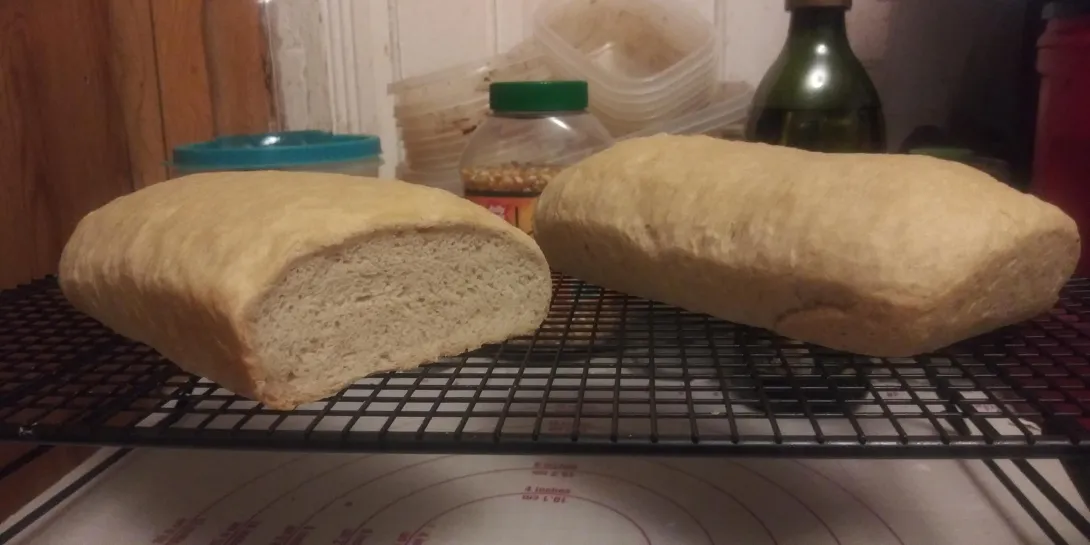
I just recently started attempting to bake bread. I've watched countless videos with measurements that are all over the place, and that picture is my fourth overall attempt with the same result. I try to find out what's wrong, but I find it difficult to understand anything I see or read, because I learn much easier in person. Anyway, here are some measurements for this specific recipe
2 cups warm water
2 packets of yeast or 4.5 tsp
2 tbsp of sugar
6 cups of all purpose flour
2 tsp himalayan pink salt
I let the yeast sit in the water for 10 minutes until it got all foamy, measured and sifted the flour into a separate bowl, added the salt, mixed that up, then gradually added it to the yeast. There was quite a bit of flour left over, but I felt apprehensive about not following the youtube video I was watching, so I just went with it and started kneading the dough for 8 minutes. It seemed alright after that, so I oiled the bowl and set it in there with a towel over it for an hour. I'm pretty temperature blind, so I couldn't say how hot or cold it is in my house, but I turned the oven on a bit and cracked the door to help it along. After the hour was up, I punched it down, cut the dough in half, then pressed both pieces into roughly 9x12 inch rectangles, then rolled them up, pinched the seams, and tucked the sides underneath. I greased a couple loaf pans, set a damp towel over them, and let them sit for half an hour, as the recipe says. Now comes the really confusing part for me. They had risen a little bit, but not much, so I let them sit a bit longer, but nothing else happened. I turned the oven on and off to get the area warm again, but still nothing. I could hear the dough making noise through the whole ordeal, but 3-4 hours later, still nothing. I decided to pop them in the oven anyway and that picture is the result. I'd really appreciate any answers or advice. I don't have the money to take a class or go somewhere else to learn this in person, but I'm trying to find anything I can, because I'm starting to like baking in general, but I've always been obsessed with bread my whole life. After four attempts with the same result, I'm running out of flour and mental energy
If it's store like yeast - that is kinda quick for it - the usual anyway. If cool temps are involved - things will take longer. All that means longer. I can't say about the increased temps. That will make a difference. It can work - but I wouldn't recommend it. Add a rise or 2 and see what happens. Enjoy!
This is a bit puzzling, since the yeast is good and the first fermentation went well. The recipe is fine, although it is more accurate to measure with a scale, using weight instead of volume. Converting the flour & water to grams yields about 67% hydration. But using a measuring cup can put this off. I can't really tell from the pic--are the pans standard size?
That leaves the flour. AP makes good bread, but I'm wondering if this flour is particularly low in protein. If you intend to buy more flour, try bread flour.
TFL members would tell you to go by the condition of the dough, rather than the recipe. This is something you'll have to learn. Look up "windowpane test" and "poke test" for starters. There are very good instructions here from Mariana and TxFarmer, among others, that can help. Search their names, check "activity" and look by subject. Sorry, I don't have the links on this computer.
Good luck, and don't give up.
We do say "watch the dough, not the clock" and that's usually good advice. But here you let it continue to rise and it didn't seem to. You didn't mention how much the dough rose before you deflated it (punched it down), but with your dough and yeast quantities it should have been off to a good start.
There seem to be several possibilities:
I'm not sure about the Himalayan pink salt - I haven't baked with it. My understanding is that it was laid down in ancient sea beds and then entombed by mountains. If it hasn't been purified during production, then it could have relatively large amounts of minerals that the yeast don't like. It's trace mineral contents might vary all over the map depending on where its mined and how its been processed.
Overall, a basic sandwich bread is usually very easy to pull off. I agree with the suggestions to start off with a basic recipe (e.g., from King Arthur) and see is that works.
Two more things I noticed from your pictures. One is that the loaves look very underbaked. It's true that such dense loaves should take longer to cook but still, they don't show any color on the crust. This may not have contributed to the dense result but it's something you should check - see if your oven is coming up to the intended temperature. Home ovens can be way off.
Second, you sliced the one loaf much too soon, before it had cooled down enough. You can tell by the way the center of the loaf has shrunk back leaving a projecting rim of crust. Again, this doesn't matter for your problem today, but for future reference it's better to let the loaves cool longer.
TomP
…TFL’s Webmaster Floyd posted lessons for the community. Here’s the first one. Your first loaf recipe is prefaced with a number of topics that might be helpful. They lessons are actually linked at the bottom of the home page.
Good luck on your future bakes,
Phil
You've received many excellent suggestions in this thread. However, I noticed one aspect of your technique that hasn't been addressed. You stated that you allowed the dough to rise for "3-4 hours" longer than the suggested time. That's way too long. I suggest that that you bake the bread after a shorter rising period. Perhaps the yeast was exhausted after the extended rising.
As Tom mentioned, you didn't say how much the dough rose the first time. I assumed "I punched it down" meant there was something to punch down, but maybe not. How much did it rise?
The other very peculiar thing I forgot to address was, "I could hear the dough making noise through the whole ordeal..." What kind of noise? I've only ever had silent dough. What about the rest of you?
Applying mental gymnastics, the level of yeast appears to be very high, nearly 6% fresh yeast equivalent.
If you are serious about baking at home, please do consider measuring by weight and not volume and I second the notion of developing a windowpane. For this type of bread it's important to not underestimate the necessity of gluten development and the energy required to achieve that, especially where high volume is concerned.
I would suggest using half the amount of yeast and kneading more in incremental stages. Look to achieve a dough which has bubbles under its skin.
Michael, I don't think the amount of yeast is high. Two packets are 14g. Converting cups to grams is not an exact science, but using 125g per cup would be 750g flour. The yeast would be 1.86%.
I came up with similar numbers. 14g yeast (presuming instant) and 720g flour (6 cups at 120g each).
I never saw anyone prescribe more than 1 packet of yeast for one loaf of bread until Paul Hollywood came on the scene. Many of his original recipes use 2 packets (14g) for 500g of flour!
In a bakery, with larger dough masses and better temperature control, for a lean dough 1-2.5% fresh yeast would be plenty. 3% would be high and any more than that would be crazy! haha!
1.9% (1.86% ~ 1.94%) instant is about 5% fresh yeast equivalent.
Did you know there are approx. 20 billion cells of yeast in 1 gram of instant dried! At 14 grams that's 280 billion cells! There are more cells of yeast in 1 gram than there are people on the planet! (Source: AI)
Using lots of yeast shortens the window before dough exhaustion. It's possible all the sugars were used up in the bulk leaving nothing left for the proof, this could explain a lack of colour on the crust. However the recipe does include additional sugar...
I asked Duck AI and Perplexity (my current favourite chatbot) to provide a recipe using 6 cups of flour and 2 pkts of yeast. The recipes were almost identical to each other and the one above. My intention was to ask if the yeast level was too high. They had similar responses. "Using 2 packets (about 4 1/2 teaspoons) of yeast for 6 cups of flour is on the higher side, but it can work depending on the desired outcome. Typically, a standard ratio is about 1 packet (2 1/4 teaspoons) of yeast for every 4 cups of flour.
If you prefer a milder yeast flavor and a slower rise, you might consider using just 1 packet (2 1/4 teaspoons) of yeast for 6 cups of flour. This will result in a longer fermentation time, which can enhance the flavor and texture of the bread.
If you decide to use the original amount, the bread will rise faster and may have a more pronounced yeast flavor. Adjusting the yeast quantity can also affect the texture, so feel free to experiment based on your preferences!"
Until we get more info from the OP, we can only surmise what the problem is. BTW, I looked up dough noises, too. 😊
Use weight (mass) measurements, not volume
Oven temp too low and baking time too short - the flour is hardly cooked
Possibly overfermented
Underproofed
In my own kitchen, a teaspoon of yeast can proof 6 cups of flour dough in less than 2 hours. Check your yeast. Use instant dried yeast for starting point.
Bread baking is highly repetitive activity. Guaranteed everyone doing it got failed attempts at some points. Start with flatbread, then move to milk loaf, then crusty bread.
I highly recommend any bread recipes at King Arthur Baking's website as starting point. Highly accountable, they will even answer to your baking questions
Sandwich bread is a pretty forgiving bread to make and I think you are further ahead than you think. One observation I would make is that it looks like you did not have enough dough in your pan and that is a reason they look so flat. There should be enough dough to fill the pan over halfway to start.
As for the first rise- the yeast works best when it is at a warm but not hot temp. Think of a warm summer day-80F. It is possible that when you turned the oven on to warm up the dough that it exceeded 125F and probably overheated/killed some of the yeast. Next time, put it in the oven with just the oven light on. That is warm enough.
Kneading-put "windowpane" in the search box and read up on how to achieve a windowpane when you make bread. That is actually very important in getting the best crumb for any kind of bread. If you are kneading with a mixer or a bread machine, it goes pretty fast. By hand, it takes a bit.
The second rise (or proof, as it is called) is something that is judged to be done when the "poke test" shows the dough is risen. It may be double or it can be 3/4 risen. Enter "poke test" into the search and be prepared for confusion as everyone seems to have their own interpretation.
I judge dough to be ready when I poke it gently and it still has some resistance but will indent and then the divot slowly ALMOST fills back in. You are testing the gluten network. At the optimal rise, the gluten strands are still strong and holding the bubbles in place with just a few of them popping but most holding (the resistance, slight indent and then filling in). If the dough is not quite fully proofed, there is a lot of resistance, no indent or it fills back in very quickly-it almost bounces back at you. If you baked it now, and sliced it, the crumb would be dense or even gummy on the bottom and almost normal looking on the top half, depending on how close to ready it was. Just wait about 10-15 min and re-poke. They can finish up proofing very quickly. Also remember, the warmer the environment, the more active the yeast (and the cooler, the less active, of course).
If the loaf is over-proofed, the indent will have no resistance, stay indented and maybe even deflate a bit. The gluten strands are very weak and not able to hold the bubbles. If you put this loaf in the oven, it will ballon up briefly and then start to fall. The bubbles expanded and popped because the gluten netting has deteriorated. The good news is that with a sandwich loaf,, you may be able to punch it down and let it rise again. It may proof quickly the 2nd time around so keep a close eye and get it into the oven immediately when it is ready.
The good news is that I think the crumb of your loaf actually looks pretty good for a sandwich loaf. It is evenly colored and it looks like the bubbles are evenly distributed and small. I think if you used either a slightly smaller pan or filled the pan a little more it may turn out taller.
So mix, knead to windowpane, rise in a consistently warm place until almost double, punch down and shape to fill the pan a little over halfway, rise to almost double (try a gentle poke test a few times) and bake 350-375F til darker brown than your current loaves. Let cool completely before cutting.
You are almost there!!
I agree with clazar - what temp did you set the oven during the first rise? I think you might have goosed it with elevated temp, got some good rise at first and then killed the yeast. It starts dying at about 140 degrees, so depending on the temp in the oven and how long you had it in there (I'm assuming an hour or more for the rise) you probably killed most of the yeast. All the comments and suggestions from FL are good ones, the most basic and important for your particular case are probably weight vs volume (once you use weight you'll never go back) and using the oven light (only) during proofing. I hope you have better success next time.
Terry
I appreciate all the helpful tips and advice from everyone. For that picture, the dough rose to almost double, and I keep forgetting to do the windowpane test. I'm also a very forgetful person in general, so I'll need to write all this down before I try again. I also need to wait until I'm able to get a scale, because I don't have one currently, and I just recently lost my job, so I'm trying to keep myself sane with baking, but bread so far has been really frustrating. Especially when I follow the recipe like I should, and it still doesn't turn out. As of writing this, I just took another two loaves out of the oven with the same result. The loaf pans are pretty standard too, but for some reason, I never have enough dough to reach halfway before proofing. If you guys are curious, the recipe I followed was from preppy kitchen on youtube, and it was his white bread recipe. For now though, I'm gonna take a bit of a break from this before I get completely burnt out and don't want to do it ever again
Edit:
I've been heating up my tap water on the stove using a thermometer, I have an older oven that I suppose might not be entirely accurate and it also doesn't have an oven light, I've been using the hyvee brand all purpose flour but did get bread flour recently, and the noise I heard was bubbles popping and gas escaping the dough I guess, but that's the only time that happened
Hi!
I test baked this bread three times in a row. It's delicious, so tasty that it is like a drug, addictive, but I really do not think it is that basic or that it is suitable for the very beginners with only a thermometer in hand. A bread baker needs three basic things these days: an infrared thermometer, a scale, and something to knead the dough with (a 14 cup food processor, a mixer, a dough kneading machine, or a bread machine).
The video that you refer to on Preppy Kitchen Channel to is overwhelming even to me, and I have been baking bread for years now. So, please, rest for as long as you need to, but do not give up on baking bread. Just find a better, more suitable for your situation at home, recipe. And test bake one loaf at a time, taking notes, so that you do not waste too much flour and yeast on it.
Judging by your description, you seem to have overheated the dough or maybe the yeast at the very beginning and that killed or exhausted the yeast and sugar. Dead yeast is very damaging to the bread dough, it affects its structure, weakens it, and it cannot rise. That is why your dough rose only to 'almost double' in one hour of fermentation at (probably) a very high temperature in the oven, which exhausted the sugars in the dough and then refused rising any more.
For your learning experience, I will show you the tricky places where this recipe might be misunderstood. It does contain way too much yeast for a beginner baker to handle and, on top of that, the not so common yeast, Active Dry, which requires very careful handling for it to work.
Ingredients
Please use measuring spoons and measuring cups. Scales are great but not that necessary, really, if you are careful when you are filling your cups and spoons and sweep the excess with a blade of knife.
YEAST. This recipe requires active dry yeast, which is a special kind of yeast that comes in round granules. Please acquire either Fleishmann's Active Dry yeast as Preppy Kitchen's host does or SAF Levure yeast.
FLOUR. The best all-purpose flour for bread in the US is either Hecker's-Ceresota or King Arthur brands. They will never fail you. Your brand might be OK as well, just make sure it is fresh, at least 6 months away from the best before date.
SALT. Please, use regular fine table salt which measures exactly 6 g per teaspoon. Other kinds of salt may weight more or less per teaspoon and that might lead to undersalting or oversalting dough and affect yeast performance, let alone the taste of bread. I do not know how well Himalayan salt performs in bread, how well it dissolves in bread dough, etc.
Tools
You do need special measuring spoons and measuring cups, to make sure they are standard size. The best thermometer for baking is infrared laser thermometer, you can get one for $16 on Amazon. It will accurately measure the water, dough, room temperature, and oven temperature for you, which is necessary for bread baking. The bread dough can be either a 'no knead' kind, or must be thoroughly kneaded, minimum of 30 min by hand which is rather exhausting. So a kneading instrument is necessary if you bake regularly. You might already have a food processor at home, a pasta roller, or at least a rolling pin. They can be used to 'knead' (develop) dough quickly, way quicker than by hand. 8 min of kneading by hand won't cut it, not for sandwich loaf anyways. Food processors knead bread dough in seconds, under one minute.
Method
(1) rehydrating active dry yeast
Active dry yeast is very sensitive to the temperature of water or else it will die and spoil the dough. It must be soaked in a small amount of water (pure water) for 10 min to awaken it, before using it. The water must be maintained at 100-110F during those 10 min. For that, fill a larger bowl with warm water and place a smaller cup with warm water and yeast in it.
Make sure that at the end of the process of rehydrating yeast the water is still warm enough. After rehydration, it can be blended with water of any temperature, but not hotter than 110 deg F.
Adding sugar to rehydrating water is not necessary and might harm active dry yeast if you add too much. The yeast granules have enough of their own sugar inside the yeast cells to awaken naturally in water. Per one packet, a tiny sprinkle of sugar might be added, but not a teaspoon and never a tablespoon of sugar, OK?
I test baked one loaf at a time, so this is how 1 packet of Fleischmann's Active dry yeast (7g of ADY) looks like after 10 min in 1/4 cup of 100-110 degree F water. Ready to work.
(2) measuring flour
There are two ways of measuring flour with a measuring cup. One is scoop and sweep and another is spoon and sweep. When you read other people's recipes you need to know how they measure their flour.
For example, Cook's Illustrated and America's Test kitchen bakers scoop flour from a bag with their measuring cup and sweep the excess of flour, so 1 cup of their flour is 150g. Preppy Kitchen's host recommends spooning flour into the measuring cup with a spoon from above (to fluff it up) and then sweep it even, so his 1 cup of flour measures 120-125g, 25% less flour per cup.
This means that the same recipe with 6 cups of flour measured differently will make two rather different breads which require different amounts of water and two different loaf pans to bake them. Scoop and sweep method gives you a giant loaf made from 1 lb of flour which requires 10"x9"x3" loaf tin, whereas Spoon and Sweep method gives you a small loaf made from 13 oz of flour which requires 9x5x3" loaf tin.
(3) mixing bread dough
Sandwich bread dough is rather wet and sticky when you first mix it. I usually knead bread dough in a bread machine when I test bake just one loaf. This is how it looks after just blending the ingredients, like a ball of mud:
This recipe required bread dough temperature to be 75 degrees F or lower (this is what Preppy Kitchen video says and the recipe in their blog). You cannot knead a very hot piece of dough, it will destroy it. So, I measured the temperature of the dough after three minutes of blending the ingredients and it was too high. So I refrigerated it for 20 min to bring it down to 70F before kneading it.
After kneading it, the dough becomes shiny and smooth, tacky but not sticky, and has visible bubbles of trapped air under its surface.
Its temperature again rose during kneading, so back to refrigerator it went for another 20 min to bring it down.
Basically, for this bread, I had to knead the dough 3 times: 3 min to blend, then 10 min + 10 min to knead, with 20 min of refrigeration in between and after kneading to keep its temp under 75F. Each time it would double in volume in the fridge during those 20 min. The dough spent its 1 hour of fermentation in the fridge! I cannot imagine having it in a warm oven during that time. It would kill the dough, for sure.
(4) Shaping and proofing.
John of Preppy Kitchen channel shows one way of shaping and proofing bread dough very well, so you can use his method. This is how proofing looked in my kitchen. I proofed at exactly 75 degrees F inside my bread machine and it took the dough 45 min to proof properly before baking.
The loaf made from 13 oz of flour, baked in a 9x5x3" pan
The loaf made from 1 lb of flour (it required more than 1 cup of water, of course, 1 and 1/3 cup of water).
(5) bake
John of Preppy Kitchen bakes his loaf very quickly at high temperature, so that it has a very thin and tender crust. I baked low and slow for a crusty loaf inside my bread machine, so it took 90 min of baking starting from cold oven.
600g loaf from 375g of flour (measured by spoon and sweep method)
750g loaf from 450g of flour (measured by scoop and sweep method)
Crumb
Best wishes,
m.