Hello!
To introduce myself, I'm a 54 year old former pilot who has stumbled upon "the world of sourdough" and baking perhaps ironically not as a great lover of bread, but more as someone who like to understand things. My wife suggested before Christmas break this year that perhaps we could learn to make bread over the holiday, so as the resident "researcher" at our house, I jumped in and started trying to figure out what to do. Here we are a few weeks later with our own starter (unnamed as of yet) and orders placed for a Sourdough Home and Proofing box, with 20 lbs of French T65 flour patiently waiting to be used (I ended up reading an article on how French wheat may be healthier for some people - my wife and kids all have Crohn's disease so we are trying to manage our ingredients so as to eliminate things that could potentially be a source of GI issues for them) .
I've baked a few loaves already with not-great results (organic KA bread flour was used up until this point). The flavor was mild and not very sour, but the bread had none of the large airy bubbles one sees from good bakers. I suspect I have a number of issues based on the reading I've been doing. I never realized how many variables go into sourdough baking and I think that's what has drawn me in - the desire to learn and understand the process and develop my own by figuring out how to control the variables. This is what led me to buy the Sourdough Home and proofing box - it became pretty obvious that my environment must be NOTHING like the one used by the person who wrote the recipes I initially have used, so I started researching ways to improve that, and well, here we are!
I'm still working on getting a grasp of all of the terminology, so please be patient.
What I'm looking for (I think) is a T65 based sourdough recipe that has thorough instructions to start from. I understand that I will need to adjust it for my environment, but I need something to use as a solid foundation to build from. My starter seems healthy (but went in the fridge yesterday after a week of daily feeding using the KA flour) and I will switch over to the T65 and begin using the "Home" and proofing box once they arrive. Ideally, I'd love to find a schedule/process that (for now at least) lets me do most of the prep work in an evening with baking happening early the next day. I'll likely bake primarily on weekends (prepping on Fridays).
FWIW, I'm is the US (southern Maryland to be precise) if that matters.
Thanks in advance for any advice! I'm happy to be a sponge, so if I've missed anything obvious, please let me know.
Cheers!
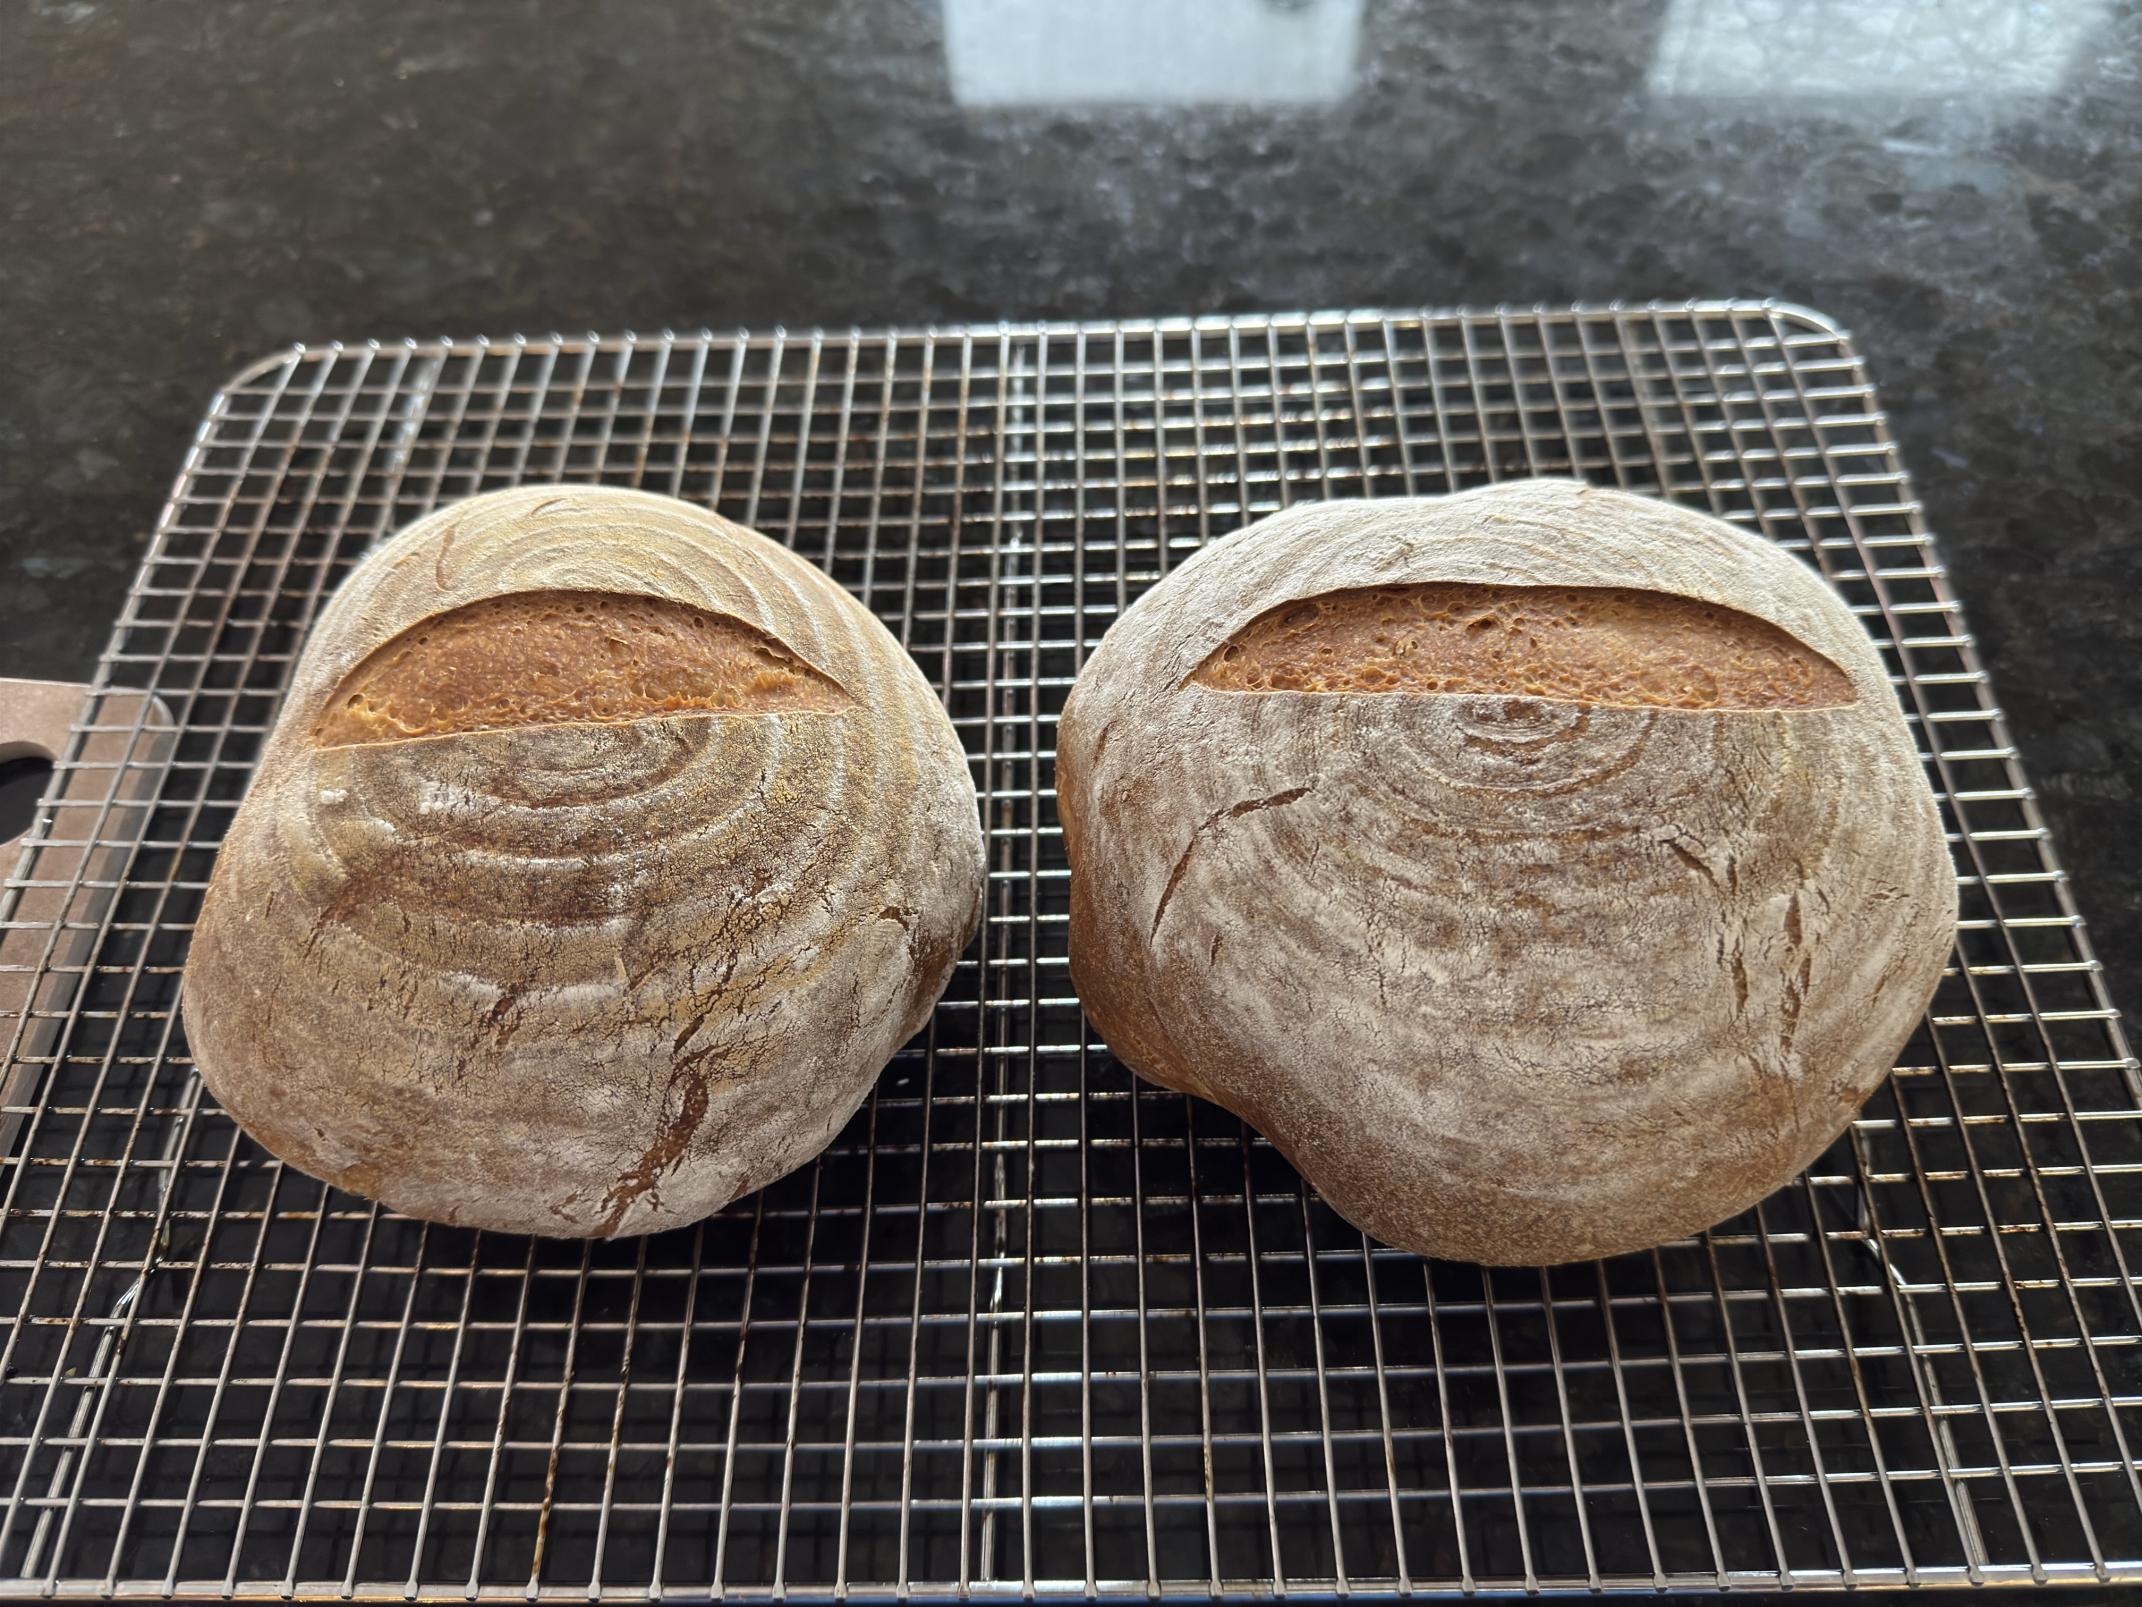
My most recent loaves (not great, but not terrible for a new guy!):
Welcome to the world of bread baking. I'm also a former pilot - I'm a tail-dragger (and glider) guy: I soloed in a J-3 and got my license in a PA-12. I would compare most home bread-making as closer to low-altitude VFR flight as opposed to IFR flight on ATP routes. This means that you want to pay attention to the ground, the nearby horizon, and the local weather. You can go the ATP route but as you know, that takes a lot of training and flight hours. It's also less fun.
All T-65 flours are not alike. I have some imported T-65 right now, and it has proved to be tricky to handle - if you use slightly too high hydration, it falls apart over time. The thinking here on TFL is that there may have been a poor growing season in that part of France and it affected the wheat. The miller isn't compensating by mixing in other wheats. If the hydration is kept low, it works fine.
All things considered, I suggest that you stick to standard US flours until you feel you have things under control. Think of your first long 3-leg cross-country. You needed to get a certain amount of experience in controlled conditions before being signed off for it. With bread you don't need to get signed off, and any disaster will have no real consequences, but it's a similar idea.
From the pictures I think that your bake looks pretty good. The loaves have a good height and the crumb looks quite decent. It didn't expand much in the oven, which suggests that the hydration was low and the proof on the long side. Or your starter might not be active enough yet.
Know that those large, irregular holes in the crumb you mentioned are not all that common, and many bakers don't really like them. You are more likely to be able to get them with a smallish loaf at a higher hydration. They are also affected by the shaping technique, and that takes a lot of practice.
Good luck and keep asking questions!
TomP
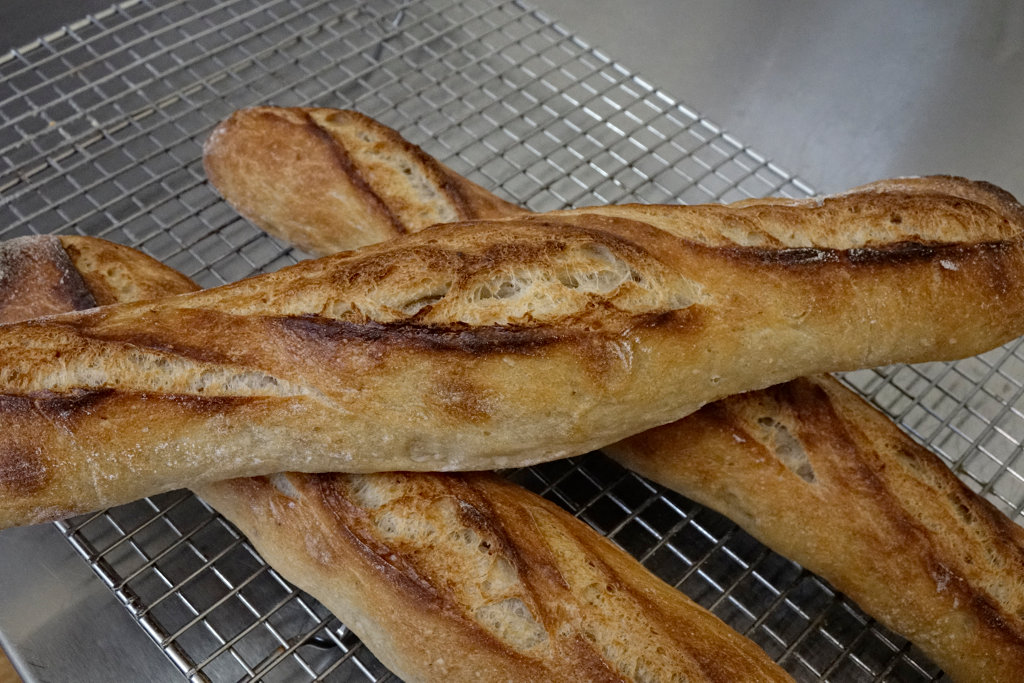
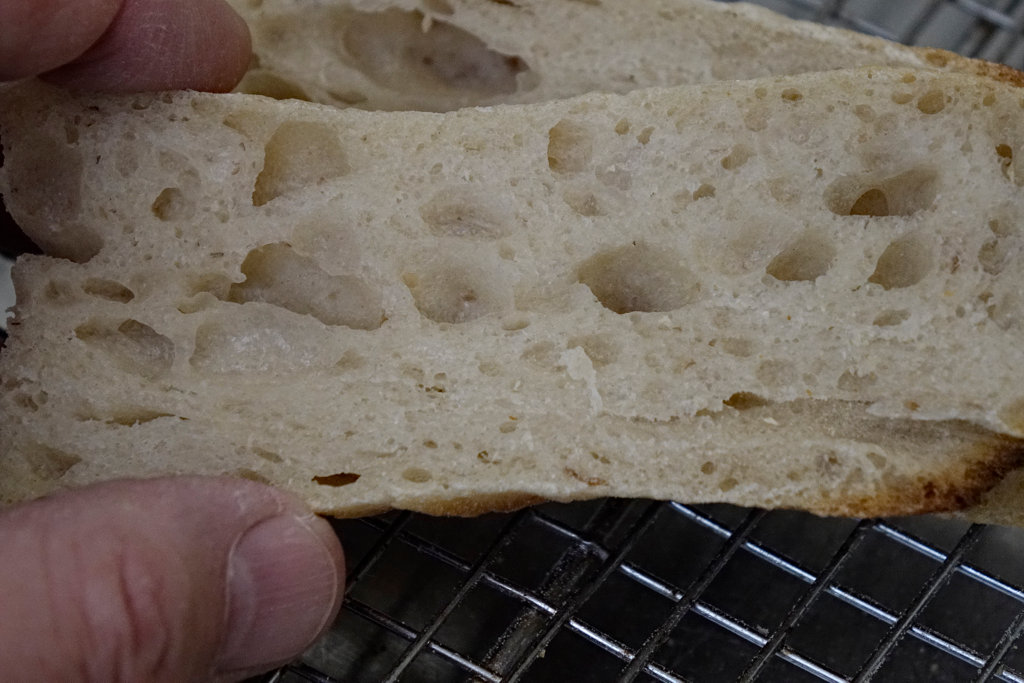
After that overview, I have used my French T-65 to make baguettes. I don't have a lot of experience with baguettes and mine are usually just so-so. Here is the recipe and process I used:
Recipe
--------
- 300g - T65 flour (100%).
- 180g - water (60%).
- 80g - starter (27%) (90% hydration, 80% KA bread flour, 20% atta,
a few grams rye bran).
- 6g - salt (2%).
overall hydration: ~65%.
Process
--------
- mix all ingredients, rest 40 minutes.
- knead/stretch. Rest 30 minutes.
- S&F. Rest 30 minutes.
- S&F. Rest 45 minutes or so. Into bulk tub. rest 1 hr.
- Coil folds in tub.
- Total bulk ferment time: ~6 hours.
- Divide in 3 pieces, 195g ea.
- Light preform, rest 10 minutes.
- Shape. I used the standard couche method to support the loaves during proofing, although it's a little tricky with only three loaves.
- Proof 45 minutes. Preheat oven 450°F.
- Bake on steel with initial steam, temperature to 425°F.
- Total bake time 25 minutes; 450°F last 10 minutes for more browning.
An all-white starter would have worked just fine, I'm sure. "S&F" means Stretch -and-fold. Exactly how you do them is not usually very important. Here are a few pictures of these loaves:
As an analyst you will find that you will produce most of your own data, and over time you will make sense of it.
My first suggestion is to get a sample of a known-good starter so that you have something to work with. Then scale your maintenance sample size to somewhere around 30g which is plenty big enough to make to make a lot of levain overnight and from that as much bread as you can handle. Feed your homegrown starter in parallel with your known good starter (btw the King Arthur starter is widely used as a place to start - no pun intended). There is a lot to learn from comparing starter growth behaviors.
Second, stick with the KA bread flour until you can routinely make a loaf that you like. Then you can begin to diversify your inputs. That will take a few months if you are baking a couple of times a week.
Third, T65 is a difficult flour to work with and is a challenge even for experienced bakers. Do not get discouraged but stay away from high hydration formulas until you can routinely make a good loaf at 65%. It is easy to overmix.
Lastly, don’t trust any advice until you have demonstrated to your own satisfaction that the underlying assumptions are valid. Sourdough baking is dominated by wives tales that sound logical but are not based on science. Read the journal articles, and study them to understand why. Many of the best are as old as you are. It is a new science by comparison.
Doc
Plus, since you're in the exploration phase of baking bread, keep notes of each bake. Include things like the formula, process steps, temperatures, results, etc. After you've accumulated a few months' worth, you'll probably be able to see some patterns emerge. Correlations between inputs and results will be more apparent. Some might related to environmental conditions, such as "Wow, fermentation is going a lot faster since things warmed up than it did when the weather was colder." Some might be process-related, like "Huh, most of the bakes I liked best occurred when I autolysed the dough." And so on.
Best of luck to you as you progress with your baking.
Paul
THANK YOU to everyone who has weighed in! Today has been a crazy day at work and I don't have the time at the moment to reply in the way you all deserve, but I will get to that as soon as I possibly can.
Again - THANK YOU!
I agree with previous comments regarding hydration when baking with T65 - keep it low, at least initially, overall 65 - 68%. Also, do as the French do, refresh your levain in 2-3 stages before baking and make your levain weight 40-50% of your main dough flour weight.
Here is a post I made last year about using T65 to make an authentic French style pain au levain - maybe somewhat advanced for you at the moment, but it might give you some clues:
https://www.thefreshloaf.com/node/74692/pain-de-tradition-au-levain
And add in 0.1% of instant yeast to your main dough - as permitted by French law.
Lance
Hello again, and thank you EVERYONE for the excellent words of wisdom! I took the advice to stick with the KA flour for now until I better learn what I'm looking for to get a good loaf.
I was busy last week preparing for our companie's annual offsite and Christmas party, so I apologies for not responding to your responses earlier. I was away between Thursday and yesterday afternoon, and I started to think of a plan last night to try to make a loaf "start to finish" in a day (today). I did my best to make decisions based on what I thought I should be looking for in terms of rise, etc. as opposed to just following the times listed in the recipe I used the first time (see above). TLDR: here's a few pics of the final result:
I'll post my notes on the bake along with some "along the way" pics in a separate post, but I'm pretty happy with my progress and would love suggestions on how to approve!
Thanks again!
2025-01-20 (7:00am) - HYBRID RECIPE BAKING NOTES
STEP 1 - Make dough (12:45PM)
STEP 2 (AUTOLYSE)
STEP 3 (BULK RISE) - Started around 1 PM
(5:03 pm):
(6:04 PM) Beginning of “Second Rise”
Pulled at ~7:40 or so (when internal temp was 206 - measured using Thermapen)
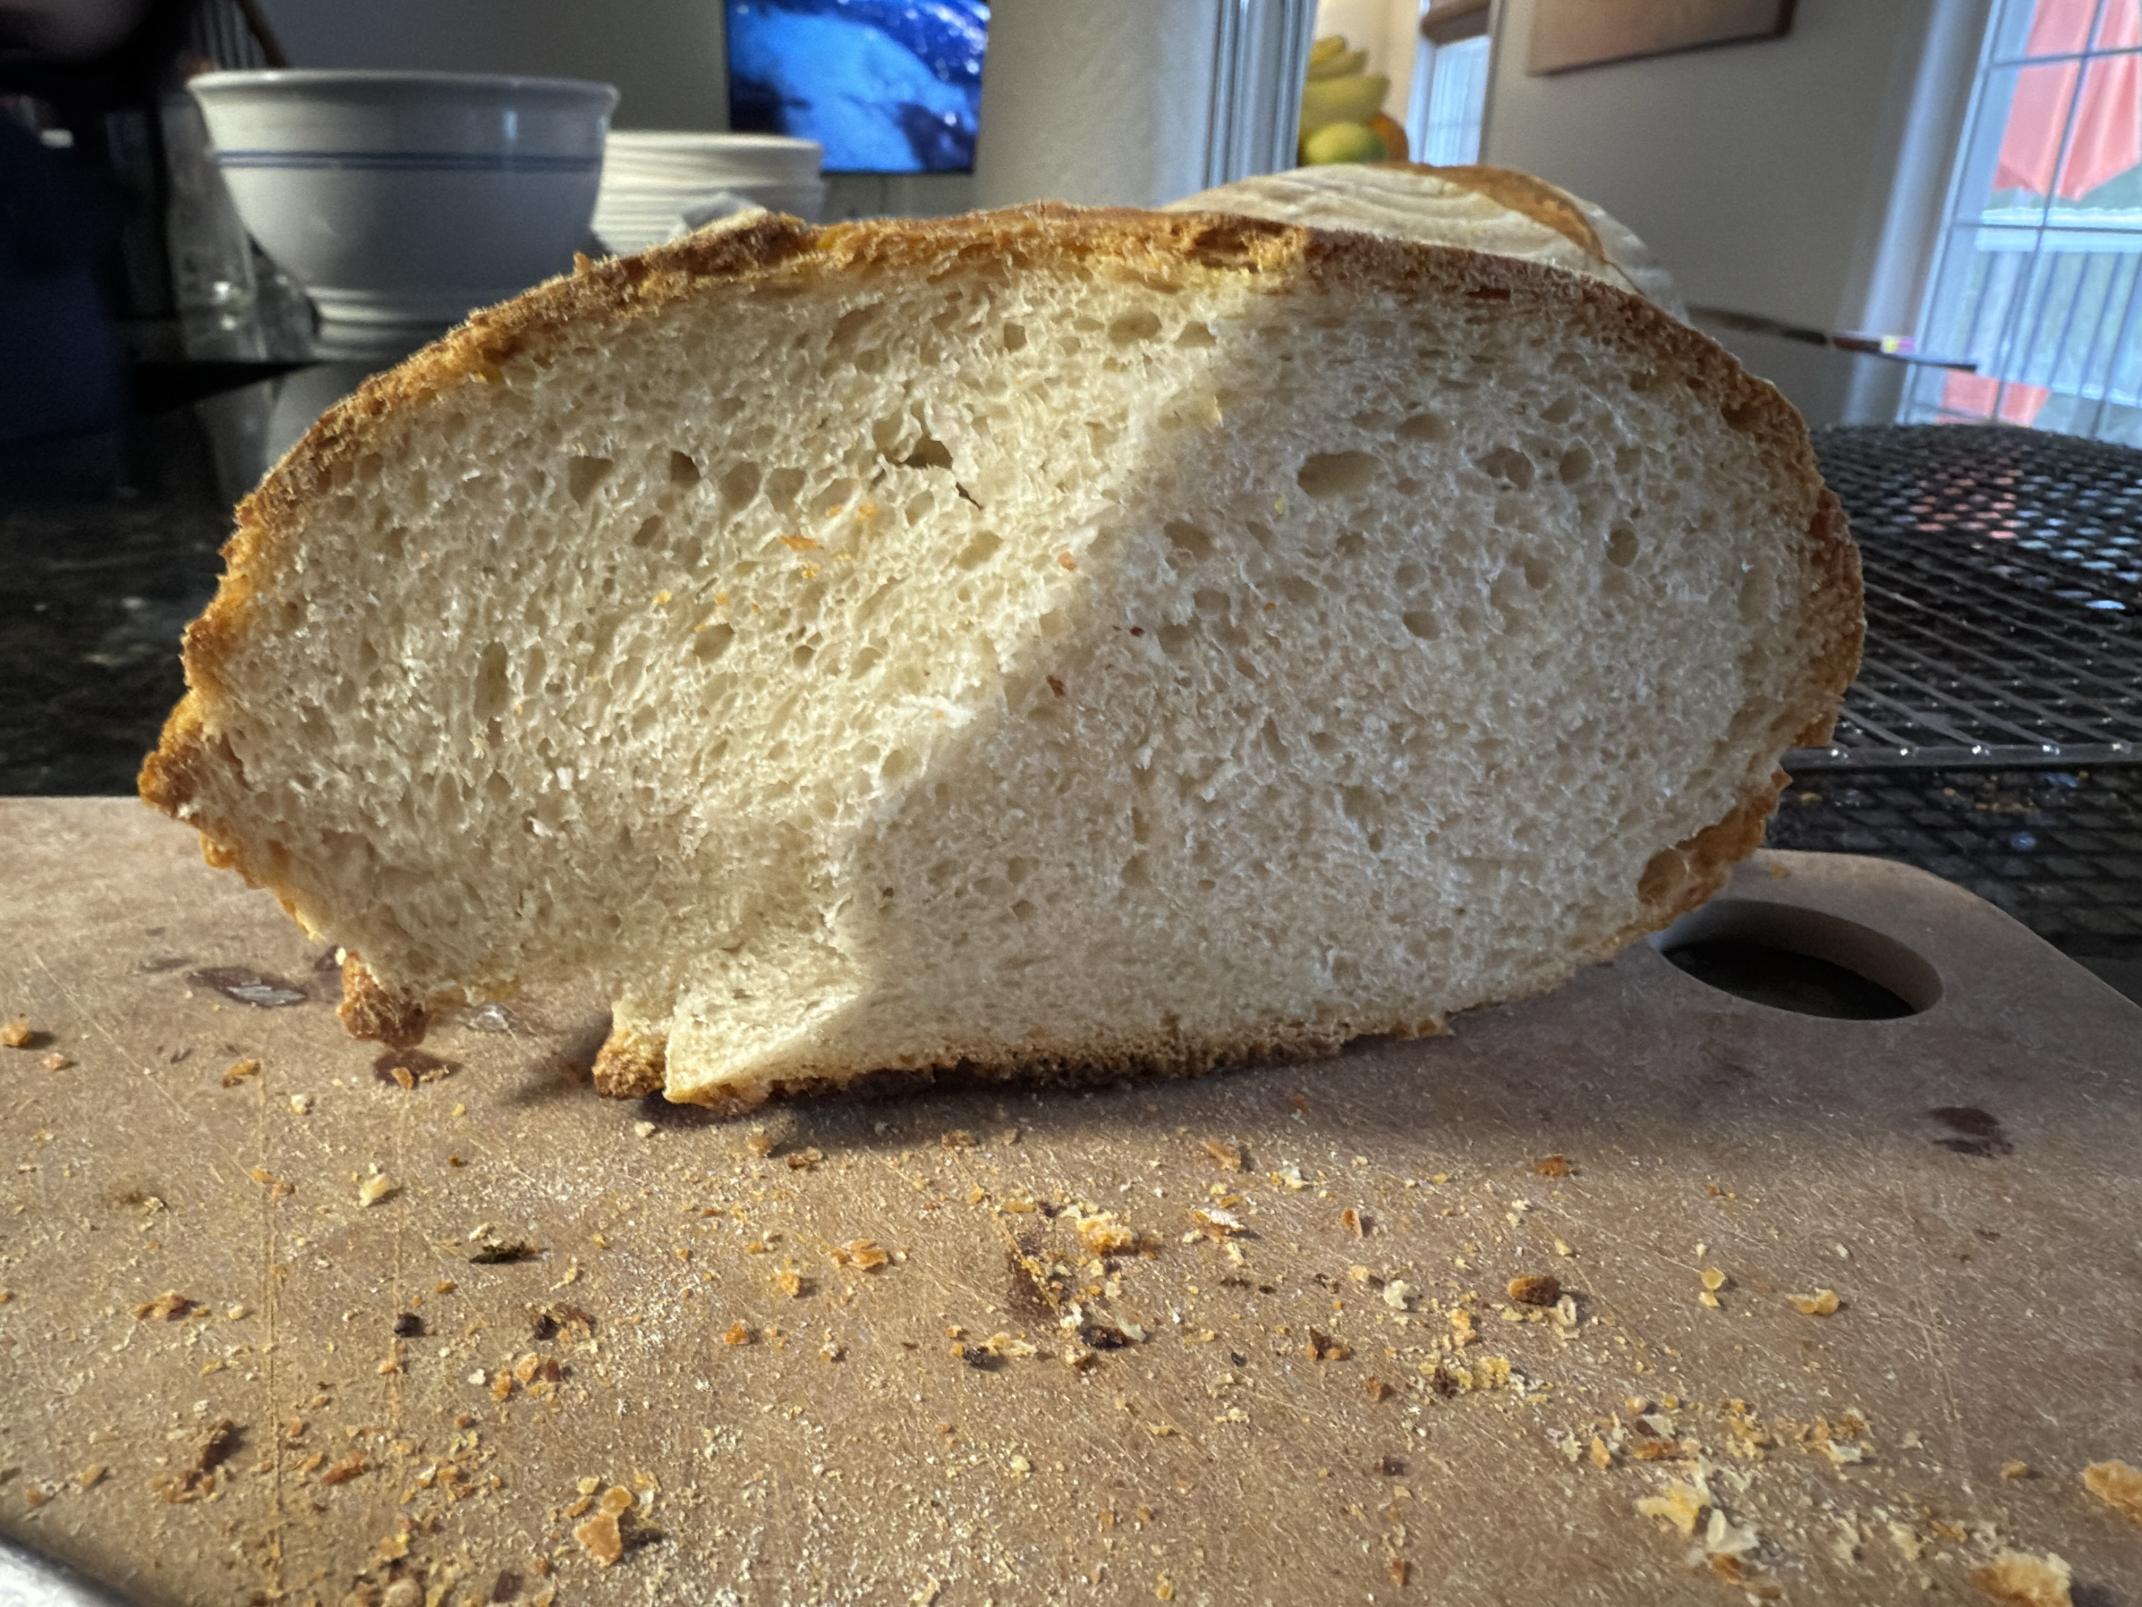
So, it tased very nice but isn't terribly sour (I personally don't care but people who want SOUR sourdough would probably be disappointed in that sense...). The loaf rose higher than the last one (it's not apples to apples since I halved the dough to make two loaves the first time but this time just made one big one) but it's more airy. It still lacks almost any BIG bubbles.
I would love to know how mine looks as compared to whatever is considered "ideal".
Thanks again for your wisdom and input!
So, progress. This time your dough was very dry (50% hydration: 250g / 500g flour) and that's why it felt stiff during the S&Fs). The bread flour would absorb more water than all purpose flour, making it even drier. Yet it still rose pretty well. Pores were small which is to be expected with the low hydration. The crust exposed by the opened score looks very nice and probably adds to the flavor.
You've now tried a span of hydrations. Go for a moderate middle ground, around say 62 - 65%. Everything you wrote about the process seems reasonable, except you didn't say how much old starter you used when you refreshed. BTW, it's better to measure flour and water by weight even for the starter. You can be more consistent, and more sure of its hydration.
Sourness is a whole other story. Some people make sour bread without any problem, others like me can't do it reliably. There is a lot of information out there about how to make bread more sour and much if it is contradictory or doesn't work for everyone. The most reliable way seems to be to retard the dough in a refrigerator. For myself, I like a little tang but not very sour. Don't worry about it for now.
You might want to try a loaf using all purpose flour, too. The dough will need a little less water and will be less tight, with a softer crumb, than with bread flour.
Thanks for your suggestions!
I baked another loaf yesterday/this morning and incorporated them. I used 300g of water this time (still with 500g of KA organic bread flour) instead of 250g and the dough was MUCH more like the videos - thanks! I'm going to make another tonight and may try 325g just to see how things feel and turn out.
A few other notes:
RESULTS
THANKS AGAIN for all of your help! If anyone has suggestions PLEASE feel free to jump in!
Congratulations on baking a fine-looking (and tasting) loaf of bread, and also on adapting to unexpected circumstances.
The tears happened because the loaf had a lot of rising potential, which is a very good thing to have. Tears will tend to happen at locations that concentrate stress, and the ends of scores can be such places. Any toughness would reduce tearing, not increase it.
Absolutely. I do it all the time. Shaping will be easier with the chilled dough. I usually let it warm up for half an hour or so before shaping but some people don't wait. The top surface of the dough may come out a little dried out, but not enough to cause problems.
If you chill a shaped loaf, you do want to keep it covered well. I usually proof my loaves free-standing, on a sheet of parchment paper supported by a plastic cutting board and without a basket or banneton. I cover them with a sheet of plastic wrap. Loaves can go right from the fridge into the oven if they seem to have risen all right. Note that dough can seem to shrink a little after a night in the fridge. This is fine - thing tends to contract when cold, and cold dough absorbs more CO2 than warm dough. The shrinkage can happen if the dough isn't producing CO2 fast enough to counteract any shrinkage.
The dough will keep fermenting in the fridge for perhaps another hour, so it's a good idea to put it into the fridge before it doubles.
You mention that the tears happen due to having a lot of rising potential. How do I fix them? It would seem there are two approaches: reduce rising potential (not ideal) or change something to allow more flexibility in the dough.
Is there something I should change to try to address the issue?
Thanks again!
You could reduce tearing by proofing longer. This is basically reducing what I called the rising potential - more of the rise would occur before baking - and the dough would soften and deform more easily. Or you could add more scores, which by opening would reduce stress concentrations other places. Or, if it turns out that you always get tearing in the same place, add several little scores running off the end of the main score at an angle. IOW, where the dough wants to tear, make some scores there.
You can also change the scoring pattern. Here are two examples among many other possibilities:
Got it - I had assumed the solutions would be in adjusting my dough mixture or preparation, but your suggestions not only make sense, but are also much easier! Thank you!
So, I tweaked things yesterday again based on what I've seen the first two bakes. In hopes of achieving a higher rising loaf that doesn't have cracks. This was another "all in one day" bake - I've decided to defer working on overnight proofing/retarding in order to better understand the level of sourness until I could work out the kinks in getting the basics right.
The factors I changed are as follows:
2025-01-23 BAKE #3
Here's the results:
I'm very happy with the results! Any more suggestions?
Great looking loaf. That crumb shows good handling with a nice creamy white colour and defined alveoli.
Thank you - beginner’s luck!
That is one beautiful-looking loaf. I don't have any suggestions because I don't see anything that's lacking. How was the flavor?
Well, OK, just one thing. Breads like these are usually baked to a higher temperature, even 210 deg F. Of course that's only a matter of preference depending on how you like the crumb and crust. Leaving more moisture in the crumb will tend to soften the crust as the bread sits around. You could experiment to see how you like it. Or if you are at altitude, you won't be able to get the temperature that high anyway (at 6000 ft altitude I used to bake to about 198 deg F).
Anyway, nicely done.
First, thanks for your kind words! The flavor is really nice. It's mild and not really sour at all but that was expected given I did it all in one day I guess... Thanks for the wisdom re: 210 vs 206 - I'll definitely try that on my next bake!
A question for anyone: I subscribe to Maurizio's newsletter (the guy behind "The Perfect Loaf") and he sent something today discussing winter baking and how it's easy to under proof bread. When I looked at the picture of the bread in question, I thought it looked BETTER than my most recent loaf, and this has me questioning exactly what I should be looking for / aspiring to.
Can someone perhaps point me toward a picture of an "ideal" version of sourdough crumb, preferably with some discussion of what is being shown and WHY that's the ideal?
As always, I appreciate all the help and wisdom!
This weekend I intend to begin experimenting with the T65 flour. I'll do some research today and make a plan to hopefully arrive at something edible enough to eat at least that I can learn and iterate from. I feel like I've started to understand more or less what I wnat to see & feel at the various stages of the process (what does the starter look like when it's ripe? What should the dough look and feel like after mixing? After autolyse? What shoukld it look and feel like after the bulk rise to not be over or under proofed?). I assume all of these factors will be somewhat different (maybe a LOT different?) using the T65 - is that a fair assumption or is it more correct to say I should be looking for similar results but may need to use different techniques and/or ingredient ratios to get there?
No, because there isn't any such thing. Even for one particular bread type, different people have different ideas of what they want or like. Some people like large cavities, some like a very open crumb not not with large cavities, some want a crumb that is less open. Some like their crusts darker (me), some lighter. Generally speaking, you don't want to produce a dense pancake or brick, or a crust that's too thick and hard (since it's too hard to bite through), or undercooked dough, or a bread that's too sour even for aficionados of sour.
Bread type and the flour used have something to do with it. E.g., using a whole grain flour makes getting an open crumb harder, and using grains without much gluten is challenging.
As for T-65 flour, lower the hydration to start out with. The dough will probably be softer and more extensible than what you have used so far. Handle it gently when you can.
TomP
Thanks for the words of wisdom Tom! I get your point regarding different strokes for different folks, but it sure would be nice if there was a bread-version of something akin to an AKC "breed standard" like they use for dogs but for bread! At least I'd have a better idea of what the consensus is on what to be aiming for before deviating towards my own preference...
I'm in the midst of doing a test I read to use here on the forum, using 100g of the flour in each of five bowls, and adding progressively more water (55g, 60, 65, 70 and 75g) and then doing the "window test". Time to test is in about 15 min - I'll see what happens!
Thank you!
This is a copy of the post text I just made in the original thread (not mine) where I found the hydration test I just used. If anyone could help interpret my results using the T65 I'd appreciate it very much!
Original post is here: https://www.thefreshloaf.com/comment/539478#comment-539478
Hello! I'm not the OP but I found this thread, and this test trying to figure out as a beginner how to use the T65 I bought (from lepicerie.com) to make sourdough.
I just did the test as described and I'm uncertain how to interpret my results. I'm posting my observations of each hydration level and hoping someone can help me understand what to use...
NOTES
55% - The dough feels somewhat dry like PlayDoh, but by handling it very gently I can coax it to stretch enough in small areas to pass I guess (I can see light through very thin areas). I DO NOT think I could much more than a few square centimeters of area that thin without breaking.
60% - A touch dry but more pliable and easier to stretch. I can definitely get it to a point where I can see through areas of it, and I can make larger areas than the 55% version
65% - The dough is a touch sticky but much more pliable than 55% or 60%. It's very easy to get to "see through windows" and they are quite large if I'm careful (i.e. if I move my fingers away from the section that's already see through and work the area just next to it I can make large "panels" or transparent dough). If I'm less careful it tears. at the thinnest spots.
70% - The dough is quite sticky and harder to work with because of that. I can get it to "see through" but the dough seems to lack the "bounce back" of the 65% (and less) versions. It's a bit runny feeling - like if I let much un-stretched dough hang it might begin to stretch out and fall off of the piece I'm working.
75% - Stickier and runnier than the 70% version. Very difficult to work with / stretch as a result.
So, bottom line is that I can get almost all of them to at least small sections that are transparent, but the two extremes don't seem very viable: the 55% feels very dry and stiff, and the 75% is so sticky and runny that I could barely get it stretched properly.
I hope my descriptions are useful for helping me choose - any suggestions please?
Thanks, and sorry to the OP for jumping into their thread!
Not all T-65 flours are the same. And there is a knack to handling high-hydration doughs that takes experience. Also, some flours (Including my own T-65 and T-80 bags of imported French flour ) make dough that deteriorates badly over time if the hydration is slightly too high. As in 58% hydration is fine, 61% in marginal, and forget anything higher.
So my advice is to start on the low side and if that succeeds, you can increase the hydration a small amount and see if that works.
I'll do that. Based on my test observations above, any suggestions on which hydration level to start with?
58% hydration - including the water and flour in the starter. Even if the dough comes out dry, you've already made drier dough and got a decent loaf. That number is based on several bakes with my flour samples and yours may act differently. Even so it should be a conservative choice to start with, I think.
As for breed standards, there are some but much less formal. Usually, people discover some kind of bread in a bread book or on line, and use whatever name the recipe used. They use the pictures from the book or web page as a guide. In the case of baguettes, there is a standard, it's even a legal one in France, and almost everyone has a mental image of a baguette - long and thin with a thin crispy crust, a soft creamy crumb having a range of pore sizes. There's an Italian standard for Altamura bread. But even then, the standards allow a lot of variation. Stick with the TFL site (or search through its history) and you will find many examples.
For testing flour, one important quality is how well the dough resists deterioration over time. With the sacks of T-65 and T-80 that I have, hydration is critical. If it's even a little too high, the dough loses strength over time and becomes nearly unusable. At a lower hydration, it can make fine bread. Simply being able to pull a window pane won't tell you about the behavior over time. You want to let your samples rest for hours or even overnight and then see how they do.
That's a bummer, because I didn't save them! The "test" said to check them after 15 min, so that's what I did. Then I threw them in a discard container to feed to my starter... And I don't relish the idea of using that much flour to run the test again. Ugh!
Regardless, thanks for you insight!
Do it right and there is no throw away. Simply - and I'll repeat - start with a little (a few grams) and enough water to make a thick batter - wait (however long it takes) to turn to almost water - repeat till it takes a day. After a few times it's ready - which means it's not a starter yet. That comes later. Enjoy!
I'm not sure I'm following your comment - my post was about a "window pane test" I was doing to try to determine the hydration percentage appropriate for French T65 flour. You seem to be referring to how to properly prepare a starter?
Can you elaborate please?
Call it a mistake - might have been another thread - who knows. Enjoy!
Go by the dough - it tells ya everything - and you get to eat it! Enjoy!
I used the same ingredients and amounts as the last one, but I changed two elements in the process:
The results are INTERESTING!
All in all I think most people would say this one is better, but I almost with there was a tiny touch less "chew" to it. Maybe I'll change my mind, but I sort of felt like it was putting up about 5% more fight than I feel like working through!
Looking good. Remember, there is going to be some variation from one bake to the next. Until you get familiar with how much there can be, don't be too quick to draw conclusions.
The appearance of the bottom makes me think the dough was on the dry side. The overall roundness of the cross-section looks underproofed to me - I can't tell which side is the bottom and which the top but the bottom should be flatter.
You didn't say how you used the rocks. I throw 12 oz of water on mine just after the loaf goes into the oven. Be careful not to spill any on the oven door or the glass might crack.
The crust not browning as much is probably just a matter of the oven temperature setting. A little higher and you would have gotten more browning. You can't expect to get the same oven dynamics with the rocks and steel as you did with the Dutch oven.
TomP
Ok. I did it!
I baked my first loaf with the T65 flour and it went pretty well! Here are my notes, explanations and observations...
I'll post a cross section pic in a few hours once it has cooled!
Welp, I will call this a success! Obviously I'll need to sort out the shaping & slash pattern stuff to get the loaf to be round as I intended, but I think the crumb looks beautiful (as an amateur opinion at least), and it tasted delicious. The crust is crispy but light, and the crumb is light and springy. I suspect it will let go of a touch of that springiness over the course of today (like the last loaf did). TBD.
All in all, the T65 worked out fine. I'll need to dial in the starting hydration by being more precise with my starter hydration, and by reducing the initial amount of water a bit, but I'm very, very pleased that it wasn't a disaster - I was very concerned going in to the bake!
I don't know what more you could ask for. Well done!
Well, next go-round I hope to shape it better for sure, but thank you!
That loaf had a lot of oven spring! You handled adjusting the hydration well in the end. No, it wasn't overproofed. The loaf would have risen much less in the oven, and slumped sideways more, it it were.
What's behind the "bean shape" is two-fold:
Thanks for the explanation! I had not intended for the loaf to be oblong - I thought it would be round. I wonder if I tucked harder/more at a point (or points opposite-ish each other) and ended up with more tension in the middle/waist? Or perhaps it's just as you said - it's all the score pattern I used...
A few questions:
I will try your suggestions next time and see what happens! Thanks!
You did fine handling the T-65, except that you don't know the final hydration. Keep it on the low side (60% or slightly less) until you know you have some margin to increase it. If the dough never strengthens as you stretch it, or if it does at first but later acts more and more like taffy (just pulling out without developing elasticity), the hydration is too high.
An asymmetrical score pattern will produce an asymmetrical loaf, no surprise there, especially with a lot of oven spring like you got this time. Create a symmetrical pattern to get a symmetrical loaf. You can use a cross on the top, arcs around the pole but not too close to it (you want longish scores so that there will be more length to open), a tic-tac-toe like pattern centered on the pole, or something else you can come up with.
Copy all - thank you for the clarifications!
From left to right are the remnants of the first five loaves of sourdough I've baked, the process of learning to make them having been documented (mostly) above! They go from first attempt at far left, through the T65 loaf I baked this morning at far right (#3 was popular!)...
Thanks for all the help and words of wisdom!
So I'm in progress on another T65 loaf and decided to push things a little farther than I have on the "hydration" front compared to previous bakes, just to see what happens and to see if I could get my dough anywhere close to the looser versions I've seen in so many tutorial videos. I also hoped that somehow using higher hydration dough might tamp down a bit on my MASSIVE oven spring issies I've had.
Ingredients & process (so far) are as follows:
PROCESS
The dough normally starts to rise fairly slowly then takes off over the last hour or so in the proofer. This time it rose quite slowly and never really "took off" at all. Even after being in the proofer for about an hour longer than I've ever done it before, it had only really risen to maybe 1.5x the starting height. Normally it would have been at 1.75x (or perhaps more) by earlier in the rise. I went ahead and put it in the fridge...
Later that night (maybe 2-3 hours after it went in the fridge) I decided to check it to see if it had risen any more (it usually does). It didn't look like it had risen any more, but HOLY MOLY the consistency of the dough seemed WEIRD! It had softened up to the point where it was on the verge of being "liquidy" - even moreso than at the very first S&F! When I tipped the proofing tub to the side you could watch the dough slowly smoosh its way over toward the edge due to the pull of gravity!
I thought for sure it was ruined, but I decided to let it be for the night and to check again this morning - no harm in letting it ride a while...
Well, by this morning it seems normal again I think! It's firmed back up again and has the look and feel of silly putty (more or less). SO WEIRD! So my plan is to let it retard a while longer and either bake it this afternoon, which would be about 8 hours longer than I have previously (~20 hours total in the fridge) or tomorrow morning (~32 hours total). Maybe it'll be a disaster - who knows! - but holy moly it's wild that just 25g more of water has created such a big difference!
I'll follow up with the final results once I complete the bake!
It sounds like you are right on the hairy edge of too much water. Remember how I said that with my sack of flour just a few percent makes all the difference? Good luck. If you can't make a loaf that holds together you can always bake it in a loaf pan.
TomP
I do remember, and I've been thinking of that the whole time! I agree with your assessment - at best I'm right on the edge, but this may be a disaster unfolding... lol. No biggie if it does - I'm learning every time!
Thanks for all of your help Tom...
Well, none of the changes changed the KABLOOEY factor all that much, but doing two cuts does seem to make things look a bit more like "I meant to do that" as opposed to "This loaf is not my child...". That said, I find the two slashes sort of fascinating: they were each made equally (as far as my ability/intent) and spanned the length of the batard on either side. The intent was to hopefully get sort of equally diameter-ed slashes and strips of un-cut crust. It surprises me that one opened a TON and the other basically not at all (except on the surface). I assume one or both of two things happened: 1. one side "ruptured" first and it was easier for all the rise growth to just keep going there, or 2. I made one cut deeper than the other...
Anyhow, it seems "presentable" but not nearly so pretty as some of my first loaves I made with organic KA bread flour.
So I've been getting consistently good results except for combatting massive oven-spring using the following recipe:
I mix the water, salt and starter together into a slurry then add the flour. Autolyse for 60 min then do three sets of S&F at 30 min intervals. Bulk rise to about 175% of original volume (~6 hours at 77 degrees) and then into the fridge overnight (~10 hours).
The main issue has been that even though I've been using 11" oval basket for final proofing, the massive height I've been getting from my oven spring makes the whole center of the loaf erupt, leaving the end result a sort of ugly mis-shappen tragedy. I had tried gentle stretching lengthwise but it didn't do much.
Today I decide to go YOLO on things. First, I pre-shaped into a longer form instead of my usual circle/boule-ish shape. Then I decided to give it a more aggressive "final stretch" to make it longer by about 30% than my previous loaves. I didn't bother with a basket, I just did a bit of "tucking" under the long edges to try to get some surface tension and left it for about an hour sitting on parchment paper on my peel. Finally, I tried to be more aggressive and strategic with my slash. I reasoned that if I started the cut closer to the long side of the loa that it would likely allow the whole top to open up like a flap, as opposed to the slash going only about 2/3 the length of the loaf ( leaving the ends un-cut) which seems to force the "eruption" rises from the center.
Well, here's the result!
Overall, I'm pleased! I have a little more work to do to make the ends more rounded and regular, but now the end result of the massive oven-spring is aesthetically pleasing as part of the loaf. Stretching the dough longer and slashing more strategically/aggressively definitely a big difference!
I'm all in favor of proofing the loaf free-standing because that's how I almost always do it.
Now that you are starting out with a log-like shape, maybe my earlier comments on symmetry will make more sense to you. Proofing longer will reduce the vigor of the expansion in the oven. Diagonal slashes across the top will promote opening upwards instead of sideways. Sometimes I've even combined the two, using one or two lengthwise slashes on the sides as well as diagonal slashes. Here's one example:
Here's another where I alternated diagonal scores from the side to the center:
How would I go about trying to get my crust to look more like yours?
Mine seem to be coming out flatter, with no shine, and with a darker brown as opposed to your golden brown color. I think I read that some (all?) of this has to do with the flour used, so perhaps this is just a down-side to using the T65?
Don't dust the loaf with flour after shaping or before baking. I proof most of mine covered with plastic wrap and that, I think, keeps more moisture on the surface. Don't let the loaf dry out too long at the end of proofing (if you uncover it for a time). Generate a large burst of initial steam, so there will be a lot of water condensing on the exterior. If you look in after a few minutes of baking and see that the surface looks wet and shiny, you will probably get some sheen.
Thanks for that!
So I don't dust mine per se - I sprinkle rice flour into the banneton as well as onto the counter top. So when I take the proofed dough out of my tub after the bulk rise (i do that in a sealed tub) I put it onto the rice flour covered counter top for shaping, and then ultimately it goes into the floured banneton. I don't think it normally spends more than an hour total exposed and out of the tub before baking.
I read over on Perfect Loaf that he uses an "atomizer" (sprayer) on his loaves but I don't recall the reason he said he does so - maybe it's this?
I have tried using an atomizer several times and it has never done anything for my loaves. I am surprised each time because it seems like it should. What I don't recommend is to try to spray the loaf after it is put into the oven. The hot air coming out of the oven door carries the mist right back to you, sometimes having turned it to steam.
I bake using a baking steel which gets preheated an hour or so. On a rack under that I have a heavy but shallow cast iron pan filled with rocks. After I slide the loaves into the oven I toss 12 oz of water onto those rocks. You have to be careful to not get water on the glass of the door, or to cover the glass first with a towel to protect it. You also have to wear a long oven mitt to protect your arm, and to keep your face away from the opening because a great cloud of steam will billow out. Shut the door right away to capture as much of the steam as possible.
Here's a picture from an old bake that give a bit of the feel of the sheen that I like to get (not that it always works out this way):
Interesting, thank you!
I'm already using lava rocks, although I dump ice cubes onto them as opposed to water. And I have a baking steel. So it seems the main differences are that I've been mostly using bannetons and I have not been using any plastic wrap over the dough during proofing. Well, and I'm using the T65 now.
I'm going to try the plastic wrap. Does it tend to stick to the dough? Do you put it on immediately after the dough comes out from the retard (assuming you do that)?
One thing that just occurred to me is that the loaves I made using King Arthur organic bread flour were much more golden and were shinier. I suspect the flour is at least a significant part of this...
No banneton time for the loaves I'm describing. I don't get much sticking of the plastic wrap unless the dough is unusually sticky, but it's almost always possible to persuade it to peel off. Of course, the dough or loaf has to be covered during a retardation too.
I don't think that ice cubes would produce the blast of steam that liquid water does. I don't know for sure if that matters, but I do know that with the water, you get condensed liquid appearing profusely on the loaf soon after generating the steam. Since most ovens leak the steam out, if that steam gets generated slowly (e.g., by ice cubes) the concentration of water vapor probably never builds up as high as with the initial blast from liquid water.
Got it - thanks!
I'm going to try your method (no banneton / use plastic wrap) and see what happens!
I think I forgot to mention that I slide the loaf off the cutting board parchment and all. I take the parchment paper out about halfway through the baking cycle, before it gets too scorched or too stuck to the loaf. It may stick to the loaf a bit but by that time the loaf should be sturdy enough to take a little handling.
So, things are progressing nicely and I'm learning good things along the way! Things are REALLY coming together... I figured out how to tame the massive oven spring: basically I'm stretching the dough out into a longer batard form. This ensures that no part of the loaf is so thick (from top to bottom cross section) that it has too much dough to go KABOOM. It's working out REALLY well and giving me more of the shape I wanted anyway, without the cracks or explodey areas.
A few other things I've been experimenting with: retaining moisture on the dough surface both by covering it in cling wrap whenever resting, and also by spraying the surface with atomized water before I put the cling wrap on. My loaves have been coming out a lighter, beautiful shade of golden brown (they were dull and darker before). The other thing I've changed is that I'm making an effort to be more gentle with my dough. It occurred to me that I have no baseline knowledge for what the "correct" feel of the dough should be when it is strong enough but not overly strong. I started on my first few loaves by rigidly following the recipe instructions and doing four sets of stretch and folds, even when the dough already felt tight. I would keep working tight dough to get through all of the prescribed sets and reps, but I recently started to wonder if maybe I was going beyond what is ideal. So I decided to try a loaf where instead of counting sets/reps, I worked the dough each rep just past the point where it started to give me a bit of resistance, and I only did three sets. That loaf came out really well as a combination of the new shaping and handling, so I guess I'm sticking with this approach!
The crumb on this one was a bit dense in the middle. Might this be because I worked it less?
Here's the loaf that just came out of the oven this morning. It's still cooling and hasnt been cut yet...
Those loaves are looking very good, all right. It's interesting about the color, isn't it? I like more golden-brown and reddish-brown shades more than dull brown ones. The crust color can also be affected by the amount of sugar left in the dough (i.e., not used up by the yeast), since the sugar tends to brown.
What you are coming to notice about folds and the folding schedule is closely related to the adage "watch the dough, not the clock".
Indeed!
By nature, I'm very logical and I typically app[roach cooking in a very regimented "follow the recipe" way. So this has been therapeutic to me, making a deliberate choice to go by feel, and to have to LEARN what to feel as part of that approach. From what I've learned so far, I feel like there's almost no other reasonable way to approach bread - there's just too many variables to have consistent success if you;re just following written steps & timing.
Yes, going back and re-reading them now that I've had a tiny bit more experience, they read a little differently and make more sense!
I truly appreciate your input and guidance!
I have another bake in progress that I'll have in the oven tomorrow morning. I may try a scoring pattern like these you've posted - thanks!
Here's an example of another symmetrical scoring pattern for a boule (I've been going through my picture archives from way back to try to find examples for you).