I always wanted to learn how to make croissants so, about a year ago, I picked up a recipe and thought "how hard can this be?". How naïve I was...
Today, about 60 batches and about 550 croissants later (I didn't eat many of them!), I've finally got a result that's both repeatable and one that I'm fairly happy with. I've read and experimented with many methods, watched endless videos, tried different butters, flours, yeasts, etc., and interviewed professional bakers in San Francisco.
Most of all, I've relied on the kindness and advice of this TFL community, and so I wanted to do my part and give back by sharing my key learnings and techniques I've picked up along the way, along with the method I iterated towards, with the hope that it's helpful to some readers here. Note about formatting: as you can see I've had trouble with the formatting of the below photos / text. Sorry about that...
First, here's how my experimentation began. Not good! More bread than croissant.
And here's what I've ended up with:

Credits: I've experimented mostly with the (original) Tartine, Dominique Ansel, Weekend Bakery, and Buttermilk Pantry's (excellently-written) methods. I've found most success with Buttermilk Pantry's dough recipe, but with different lamination dimensions and techniques. All of these are excellent guides and I owe a huge amount of my learning to them! I'd highly recommend reading these methods too.
Clearly, I will never get close to the leagues of the Chad Robertson and Dominique Ansel who – like presumably many people reading this blog – consider them personal heroes! 🙂I'm extremely grateful to all of the above who've helped me from afar via their books and videos.
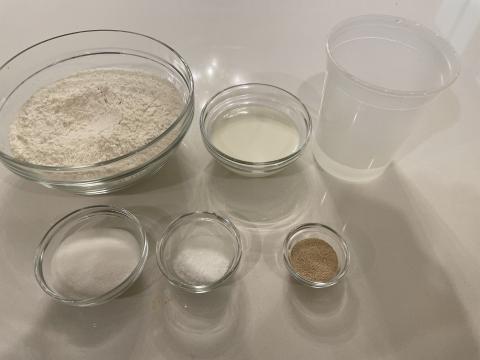
Ingredients:
Dough – using Buttermilk Pantry's recipe:
- 500g unbleached bread flour, protein percentage > 12% (I use King Arthur bread flour, 12.7% protein) + ~100g for dusting
- 55g white sugar
- 150g whole milk (lukewarm)
- 150g water (lukewarm, but lower than 100F)
- 8g active dry yeast (not instant yeast)
- 10g salt
Butter block:
- 250g European unsalted butter, with over 82% butterfat (I use Kerrygold, but Plugra is good too, see note below)
Egg wash:
- One egg
- Dash of whole milk
- Pinch of salt
Equipment:
- Necessary:
- Scales
- Heavy rolling pin (I use a cylindrical, not a conical, one)
- Lots of saran wrap
- A few sheets of wax / parchment paper
- Two small + one large baking sheet
- Brush
- Ruler
- Pencil / sharpie
- Ideal / nice to have:
- Standing mixer
- Bench scraper
- Water spray bottle
- Pizza cutter
- Ice packs / ice / bags of peas (for cooling bench)
Notes about ingredients:
- Flour: I’ve experimented with AP flour (11.5% protein, Organic Artisan Bakers Craft Plus from Central Milling, here) and also higher protein bread flour (12.7% King Arthur unbleached bread flour), in various proportions (e.g. 100% AP, 50% / 50% AP / bread flour, 100% bread flour). A higher protein content helps improve the strength and hence airiness of the crumb. That’s because the dough layers are very thin, and thus needs strength to hold the CO2 that's released through fermentation as it expands. In bakers’ online communities (including TFL), there’s a fair amount of debate about the optimal type of flour, but the consensus seems to be – on average – that a higher protein flour is better, and certainly produced better results for me.
- Yeast: I used SAF active dry yeast. To test whether it’s still active, mix a 1/4 cup of water with 1 tsp of sugar and 2tsp of the yeast. After ten minutes, it should be bubbly and develops a yeast aroma. If it doesn’t, do not proceed as the yeast is dead. Keep active dry yeast in the freezer.
- No levain: Many recipes add levain to the mix, including the original Tartine recipe and the Ansel method. I’ve never gotten results I'm happy with using levain, but those were in early trials and I may try again now that I have more experience. But in my conversations with professional bakers in San Francisco, it turns out they don’t use levains either (indeed, the method in the updated / new Tartine book doesn't use a levain).
- Butter: European butters (that have 82% or more) are essential here. The higher the fat, the more pliable it’ll be even at cold temperatures. That’s important because (a) it needs to be as malleable as the dough (to ensure good lamination), but (b) if it’s too warm, it’ll smush into the dough (more on this later). I’ve experimented with Kerrygold (below, left), Finlandia (below, center), Plugra (below, right), Whole Food’s and Safeway’s organic unsalted butters, and a few others. Kerrygold has persistently been easiest to work with, and I like its yellow color.

- Milk / water temperature: If you need to heat them on a stove / microwave to make them lukewarm, do NOT heat them past 100F. Yeast begins to die at 105F and, by 140F, will be completely dead. You won’t know it’s happened until the end of the process when you realize all your hard work went to waste, when they don’t rise…
Method:
- Day 1 (can be late at night): make the dough. Carefully measure and lay out all dough ingredients (mise en place), and mix in a standing mixer with the dough hook on low to medium speed for about six minutes. Times are approximate, because you should stop whenever dough begins to form a window. The dough should feel a little sticky.


- Line a small sheet pan with saran wrap, place dough on it, and cover with more saran wrap. Pat it down so it covers as much of the pan as possible. It’ll be tough to spread it completely rectangularly, but stretch it as much as you can (it’ll relax in the long rest it’s about to do). Now place in fridge overnight.

- Day 2 – make the 17.5cm square butter block: (a) get a piece of wax paper, and mark (with a sharpie) a 17.5cm x 17.5cm square. This will be your measuring guide for the sheets you’ll make the butter block with. Keep this guide, as it’ll help make future butter blocks too. (b) Get two more sheets of wax paper, line them up over the guide sheet, and fold sharp creases along the edges of the 17.5cm x 17.5cm square of the guide. You’ll now have two wax sheets with creased edges of the square. (c) Put putter on top of the first creased sheet within the square and then put second creased sheet on top of the first, lining up the creased edges. Flatten butter, but keep at least ~2-3cm away from the edges of the square. Then fold both sheets along the four creases, forming a closed square-shaped packet. (d) Using a bench scraper, carefully guide the butter into the corners of the square. Flatten the block into as uniform thickness as possible. (e) Put in fridge on flat surface for at least 30 minutes.


- Make the 25cm dough square: Remove dough from fridge. Lightly dust the counter, and place on counter (it may stick a little to the saran wrap – that’s ok). Roll out into an approximate square. Place on saran wrap, and cover with more saran wrap. Fold the saran wrap into a 25cm x 25cm square, and then mould the dough inside the saran wrap so that it fills the space all the way into the corners (you can use a rolling pin for this). You may need to pin prick small holes into the saran wrap to allow air to escape as you mould the dough into the corners. Flatten to get as uniform as possible. Place back in fridge for ~30 minutes to relax (as all the moulding tenses the dough, and it needs to be relaxed for the first lamination).


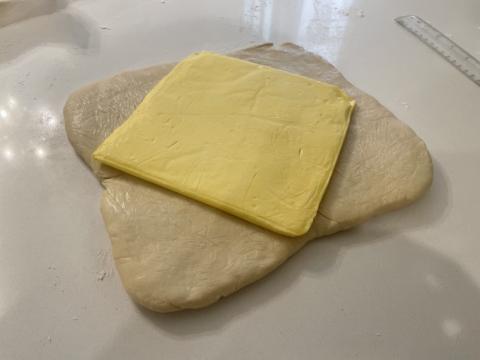
- Encase the butter in the dough: Remove butter from the fridge and wait a few minutes until it reaches the right malleability (see notes below). Remove dough from fridge. Dust counter and place dough square on counter, and place butter in diamond orientation above it. Fold corners to package the butter. Edges should not overlap – if they do, cut away and discard the extra dough. The goal is to get a uniform thickness of dough above and below the butter.

- First lamination: Lightly dust top of dough. Roll out (away and towards you) to 25cm x (about) 60cm rectangle. See notes below on “Rolling pin technique”, “Flour dusting during lamination”, and “Keeping the counter cold during / between laminations”. Cut the uneven ends so you’re left with a neat rectangle. Fold top third down, brushing away all excess flour. Fold lower third up, again brushing away all excess flour. This is your first “letter fold” and you now have three layers of butter. Wrap in saran wrap and place in freezer for 20-25 minutes (depending on the kitchen temperature – see note below “Freezer time between laminations”). Image
 Image
Image Image
Image Image
Image
- Second lamination: Lightly dust counter, and remove dough from freezer and place on counter. It should be very cold, but malleable. Rotate dough 90 degrees so the exposed edges are towards you. Roll to 20cm x ~70cm (see notes below). Again cut uneven ends and do a second letter fold, brushing away excess flour. You now have nine layers of butter. Wrap and put in freezer for another 20-25 minutes. Note: have a look at end pieces you cut – you should be able to see the layers quite clearly. Image
 Image
Image Image
Image
- Third lamination: Lightly dust counter, and remove dough from freezer and place on counter. It should be very cold, but malleable. Again rotate by 90 degrees, and roll to 20cm x ~70cm (see notes below). Again cut uneven ends and do a second letter fold, brushing away excess flour. You now have 27 layers of butter. Wrap and put in freezer for another 20-25 minutes.
- Decision point: If you want to / have time to bake the croissants today (i.e. ~4-5 hours later), then proceed. If you want to continue tomorrow, then leave dough in freezer overnight.
- Day 3 (morning) – rolling in preparation for shaping: Remove dough from freezer and allow it to warm up a little so it’s malleable (and hence won’t break while rolling). Dust surface, rotate, and roll dough out to 25cm x about 80cm (note this is the fourth time you roll the dough). This will take some effort, but don’t fight the dough (see “Don’t fight the dough while rolling” note below). Note that I say “about 80cm” because the precise height of the rectangle is less important (and it will depend on how much of the ends you’ve cut off during prior foldings). What is important is to get the other two dimensions right: the final thickness to ~5mm (try to do this accurately) and final width to ~25cm.
- Cut triangles: Cut straight edges using pizza cutter, and discard scraps (or keep them for a different recipe). You should have a ~24cm x ~60cm rectangle of 27 layer laminated dough. You’re now going to make triangles that have 10cm bases and are 24cm tall: On one (long) edge of the dough, start from a corner and make 10cm marks along the long edge. On the other (long) edge, start 5cm away from the corner, and make 10cm marks along the (long) edge. Now cut the triangles – you should get about nine or ten perfectly cut triangles, and each should weigh around 90g (Buttermilk Pantry's phenomenal write up has a very clear explanation of this).Image

- Pause and chill: At this point, if the dough isn’t still cold, stack the triangles and return to the fridge for ~20 minutes.
- Rolling: Take each triangle and, one at a time, do the following: lightly grip the base with the right hand between palm and fingers. Using left thumb above triangle and fingers below triangle, very gently lengthen the triangle. You should be adding ~3-4 cm to its total length. If you’re breaking the surface then your left hand is gripping too hard. Place triangle down on counter, and cut off a few mm from the base (your right hand likely smushed together the layers at the base and so, if you don’t this off, you won’t get a full honeycomb in the final product). Now brush off all excess flour, and lightly spray with water (will help the roll stick during proofing). Roll – not too loosely and not too tightly – from base. You should have 3-4 “shoulders”. Image

- Prepare proofing: Place on sheet tray on top of parchment paper, leaving at least 5cm between each (and edge of tray) to allow it to expand during proofing. Lightly brush with egg wash (see note below, “Egg wash”).
- Proof: I proof at 75F for four hours, but see note below (“Proofing”). Apply another layer of egg wash before the bake. Image
 Image
Image
- Baking: Pre-heat oven to 375F and set a rack in the center of the oven. Place the trays of proofed croissants in. Do not open the door during the first fifteen minutes. After 15 minutes, quickly rotate the trays to make the bake uniform. Continue to bake for another eight minutes (so 23 minutes total) or until they’re golden brown. They should have expanded by another ~30-50%.
- Cool and cut: Remove from oven, place on cooling rack for 5 minutes, before serving. To cut and view crumb, use a sharp serrated knife – move it back and forth without applying any downward pressure (the weight of the knife will generate enough downward pressure). Image

Learnings / notes:
- Temperature control:
- General idea: Nothing new here that you haven't read elsewhere! But temperature control is critical. If the butter gets too warm, it'll smush into the dough and you'll lose your layering. If it's too cold, it'll shatter and will unevenly distribute throughout the dough.
- Keeping the counter cold during / between laminations: This is very important if your kitchen is warm. Keeping the counter cold will keep your dough / butter cold during lamination, reducing the likelihood it’ll smush together and ruin the layers. So here are two methods you can use to cool your counter in between laminations: (1) take a trash bag, put in a bunch of ice, and a few cups of water, close bag, and leave on counter for ~30 minutes. (2) Fill a metal baking sheet with ice and water and leave on counter. Note: both these methods will create condensation on your counter, so wipe completely dry before flouring counter and doing lamination.
- General idea: Nothing new here that you haven't read elsewhere! But temperature control is critical. If the butter gets too warm, it'll smush into the dough and you'll lose your layering. If it's too cold, it'll shatter and will unevenly distribute throughout the dough.
- Butter:
- Making the butter block: While the butter doesn’t have to be at room temperature (i.e. spreadable), I’ve found it much easier to get into shape if it is. If it’s cold, then you can make it more malleable by beating it with a rolling pin, but this often creates a mess. If you are beating it, do it between parchment paper sheets, not wax paper which will easily break and make a buttery mess all over the counter…
- Butter needs to be similar malleability as the dough: This is extremely important. Malleability of the butter is a function of temperature: If the butter is too cold, it’ll shatter during lamination. You’ll know this has happened if you can see patches of butter through the dough. This will result in an uneven distribution of butter in the end product. If the butter is too hot, it’ll smush into the dough and you’ll ruin the lamination.
- How to know butter block is ready for lamination: While still in the wax paper, you can tell by (a) firmness and (b) malleability. Firmness: gently press on it – it should be as firm as the cold dough that’s just come out of the fridge. If it’s too soft, you’ve let it heat up too much so return to fridge for ~10 minutes and start again. (b) Malleability: you should be able to make 90 degree bends without any signs of breaking. If it breaks, patch it up (through the wax paper) and return to the fridge to set, and start again. Note: some methods suggest waiting until the butter and dough are the same temperature – this does NOT work as dough’s and butter’s malleability isn’t dependent on temperature in the same way.
- Be as precise as you can be with the dimensions, at least initially: When making the dough square and butter block, it’s important to keep precise measurements, as that will impact the relative thickness between the butter and dough you achieve in your first lamination. The butter block should be 17.5cm x 17.5cm so that it will fit exactly (in “diamond orientation”) within a dough square with 25cm sides. Pythagoras Theorem explains why those dimensions work.
- Make thickness of butter and dough as uniform as possible: When making the butter block, the dough square, and laminations, pay attention creating an even thickness. Variations in thickness of butter block will lead to an uneven distribution of butter during lamination, which will cause variations in the result.
- Flour dusting during lamination: Contrary to many guides out there, I dust my counter very liberally during lamination to prevent sticking. This is especially important if you don’t have time / ability to follow the below methods of keeping the counter cold between lamination. Using flour liberally is fine AS LONG as you brush away excess flour before folding. If you’ve worked quickly enough or kept the counter cold enough, the flour you used for dusting won’t really be “pressed into” the dough.
- Rolling pin technique: To start rolling, I like creasing the dough by lightly hitting it with the rolling pin to create horizontal indentations (see minute 3:23 of this video). This does two things: (1) makes the butter more malleable, and (2) creates ridges from where to begin rolling the dough. Both of these encourage even lamination. Then, I apply most of the pressure while pushing the pin away and towards, rather than downwards (which can squash the butter and dough).
- Freezer time between laminations: This varies based on kitchen temperature. The warmer your kitchen, the longer you want to leave in the freezer. As a general guide: if your kitchen is ~75F+, 25 minutes in the freezer is good. 70F-75F, 20 minutes. Less than 70F, 15 minutes.
- Don’t fight the dough while rolling: If it becomes elastic and refuses to stretch, you’re risking overworking it and ruining the lamination. In this case, just cover and place in fridge to relax for ~20 minutes, and then continue.
- Egg wash: There are many different egg washes out there (different proportions of eggs : milk : water: cream: salt: etc.). I’ve tried many and found that there’s very little difference. I just use an egg, pinch of salt, and a dash of milk works fine. But when applying, careful to only brush the “shoulders” and not the sides / edges, as that will inhibit expansion during proof / baking. Applying an egg wash before the proof ensures it’s less likely to dry during proofing.
- Proofing: I use a proofer (Brød and Taylor) to control temperature at 75F for four hours with a little water in the steam tray, but this really isn’t essential. That’s because you can proof in other methods, and determine when its ready more by appearance and “jiggly-ness” rather than a precise time and temperature:
- Appearance: they should be very pale and puffy, with the volume having approximately doubled. You should be able to see the layers separating as they spread out from the shoulders.
- Jiggly-ness: when you shake the sheet tray, they should move / jiggle a little like jello (maybe with a little more rigidity).
- If you don’t have a proofer: you can either leave in room temperature (covered with saran wrap) if your kitchen is quite warm, or in a closed oven with the light on and a cup of boiling water (whose steam will gently heat up the oven). Regardless of method, remember a few principles:
- Never proof above 79F, as the butter will soften and will begin melting into the dough
- The colder / warmer the proof, the longer / shorter it will take, respectively, and
- As a reference point, at 75F you can expect to proof for about four hours. Note this is longer than many other recipes but that's because – as Buttermilk Pantry's method notes – the yeast weight is lower in this recipe than others. For example, Weekend Bakery uses 11g of instant yeast, Ansel uses 12g of active dry yeast, and Tartine uses 2.5tsps (which is ~12g) active dry yeast.
- Timing (of the conventional three day method):
- Day 1, evening / night: make dough
- Day 2: lamination and rolling
- Day 3 (or day 2 at night): proof and bake
- For all you instagram lovers: To get a better honeycomb picture, allow the croissant to cool down completely (if it’s warm, the cell edges won’t be as sharp).
Thank you for the wonderful detailed process, I wish I can write up something like you did, i just started doing the 3 day process and it comes out very nice, flavour side! 3 days to make less than a day to devour!
Wow, this post is so detailed and helpful! I’m still in the first phase of this with a bread-like croissant…
Question - why is there no butter in the detrempe? Literally every other recipe I’ve seen contains butter in the detrempe. I read and re-read the buttermilk pantry’s method description, but the only clue I found is that she likes gluten in her dough (and I understand butter prevents gluten from forming).
Was this dough really hard to roll out?
Thank you.