I've been reading posts here for years, and I feel like I finally have something to share. I've tried out countless recipes and learned from all the discussions, so first off, thank you all for being such an inspiration and source for knowledge -- especially in the ways of sourdough!
For me, one of the biggest things I've been learning is how all of the parts of a bread recipe work together. Gluten formation, oven temps, fermentation timing, steam, adding/changing flours, shaping, hydration, baking method... It's all related.
Last year sometime, I started pulling documentation from previous bakes into a big spreadsheet with images, and my holistic understanding started to gel. My bakes became a lot more consistent, and I started to build up intuition about how far different variables could go and still produce a great loaf.
All of which eventually led to me trying to make a tool I could use to play with parameters and have the other aspects of a recipe update accordingly. It has proven to be super useful for me personally, so I thought it was time to see what other bakers think. I've been referring to it as makefast sourdough (not because it's particularly quick to make, but because it's aligned with the iterative/prototyping approach of my day job):
https://makefastworkshop.com/hacks/?p=20200515
So far, the dynamic recipe is focused on making bâtards and boules, but as I learn and get feedback from others, I hope to continue building it out to other forms (baguette, miche, loaf pans, etc.) and flours as well.
Feel free to poke around and change various parameters to see if it feels aligned with your own experience, and definitely let me know what you think! I'm hopeful that a simple interface like this could help new bakers more quickly build intuition about how to get the exact loaf they're trying to achieve.
Cheers,
Adam
--
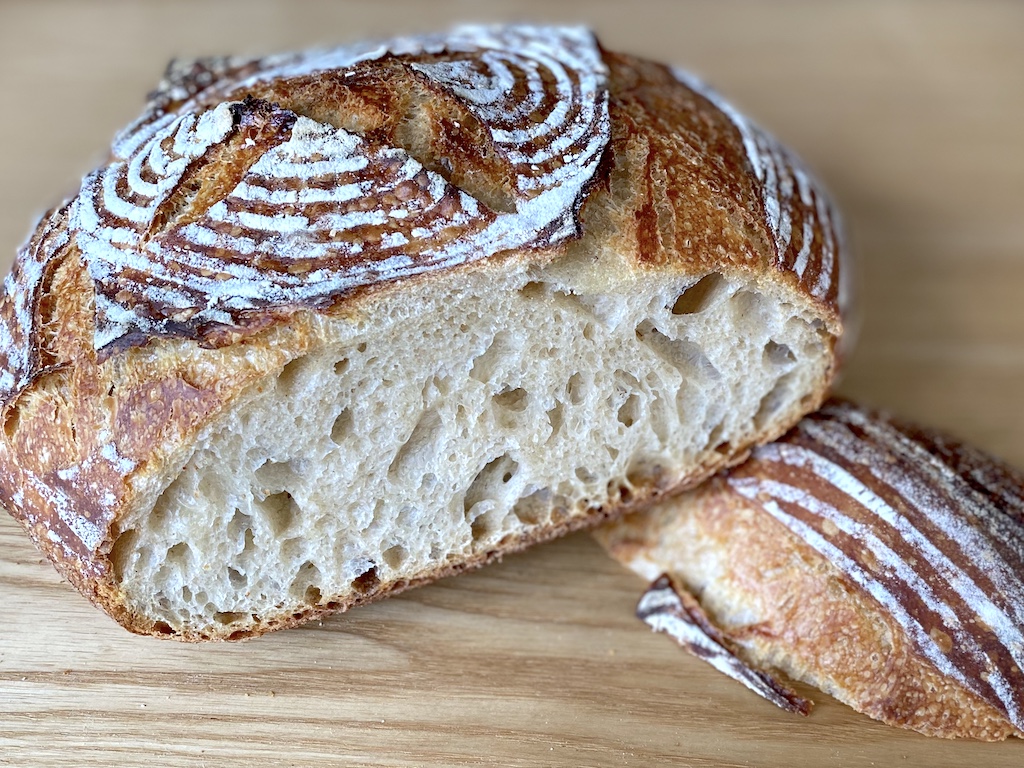
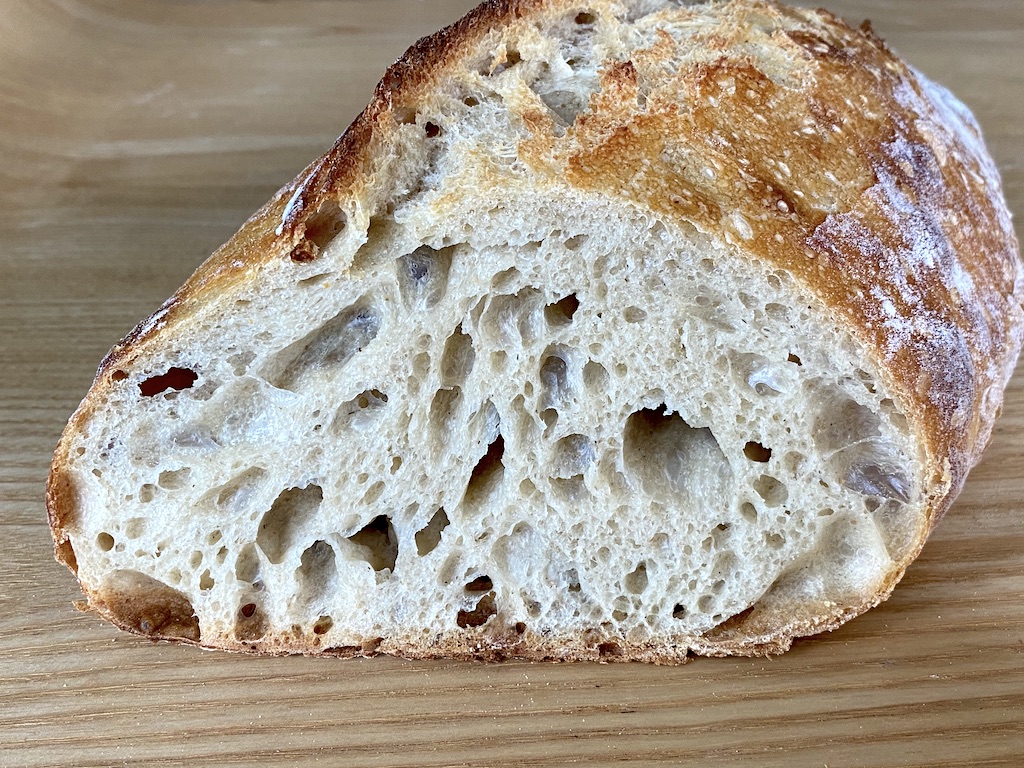
Here are a couple pics of what I baked with it over the past few days:
24hr Sourdough AP Boule w/ 4% Dark Rye Flour @ 68% Hydration - in Dutch Oven (recipe link)
24hr Sourdough AP Bâtard w/ 4% Dark Rye Flour @ 68% Hydration - on Baking Steel (recipe link)
Great job this. And tasty looking loafs.
I may have missed it in the write-up. For the recommended 12-16 hour bulk fermentation, I would expect it to be less than 70F to avoid over fermenting.
You might want to give your readers a range of expected times across a range of temperatures to help them understand the effects of temperatures. It's a point that most sourdough newbies don’t grasp early on when they still tend to place more faith in timings than they do in their ability to read the dough.
Overall, nicely done.
Paul
Thanks, Paul. That's great feedback. I've updated the page to be more explicit about temperatures.
The long bulk fermentation at room temperature is a trick from the Respectus Panis method. Basically, you start with a tiny amount of starter in the initial ingredients (for example, a 900g boule uses on the order of 7g of starter total) and then you can let it ferment at room temp for a long time -- which is great for both flavor and dough development, and doesn't need to take up fridge space. If it the bulk does happen to go quicker than expected (depending on starter activity), you can always add a bit less next time around or stop is sooner.
It looks interesting and useful. As someone else has said, you need to define "room temperature" and for it to be most useful you need to have temperature be an option that people can select, to allow not only for different room temperatures but also people using proofing boxes or the like.
I think overall, there is not enough description and illustration for a newbie to be able to follow the recipe and have success. I think it would be best if you clearly state this is not supposed to be a complete tutorial, and/or provide links, either to other sites or other pages on your site, to provide more guidance. I was mostly able to follow along because of the knowledge I already have, but you have to assume it'll mostly be relative newbies who will use a tool like this, and some of them will be clueless.
One thing I did not understand: the description of the "DIY dough loader" just left me scratching my head. Maybe I missed something obvious, but from reading that description I simply could not visualize the technique.
Thanks for the feedback. I'm continuing to adjust things, so every bit of information is helpful!
I've updated the temperatures to make things more explicit. I realize that some people prefer proofing boxes or fridge methods, but I'm aiming for something that can be done entirely at room temperature since that is more accessible and can also scale a bit easier when scaling up to larger batch sizes while still using a home oven. That said, warmer and cooler "room temperatures" (especially over different seasons/locations) can have a significant impact on fermentation times so I added a few notes in the instructions now to hopefully make that more explicit.
As for the DIY dough loader, that's something I've been experimenting with and I really need to take some time and document it much better (a couple pics would probably go a long way!). Basically, if you've watched a bakery slide in a whole bunch of loaves into a deck oven at once with a conveyor-belt-looking thing, you can mimic that with a flat baking sheet and a kitchen towel.
In short, you place a towel on top of a flat baking sheet (with the long edge of the towel hanging over the side), set the dough on top of that, and then by pulling on the edge of the towel you can "convey" it off the end of the baking sheet and onto your hot baking surface (stone/steel/sheet).
I'll make sure to update the dough loader description with better info and pics in the next few days.
I just put together an Instructable with pics and a quick gif to show how the dough loader I use works (practicing with bags of flour).
https://www.instructables.com/id/DIY-Dough-Loader/
Now that's an excellent explanation! Pretty creative idea, too.
I would think there's still a good chance the dough will stick to the towel and people will have some issues with either degassing and/or deforming the loaf as they unload unless they use a fair amount of flour or cornmeal or etc to prevent that. I don't think that's a huge issue but you did mention being able to avoid that as an advantage of this method. I wonder if a material other than a towel would be better at preventing sticking? Parchment paper comes to mind, but it would probably not be sturdy enough to last through very many uses.
This is a neat idea and a huge undertaking! Your tool still has many greyed-out options; I'm wondering if you've made progress but simply haven't updated the tool? I'm not complaining, I know the burden that combinatorial explosion brings.
Thanks for posting.
gb