Hi,
So I've taken a step back from sourdough and baking in general lately so just wanted to get some advice as to why this might have happened.
The dough is 75% hydration mostly strong white flour with about 50g of wholemeal. Autolysed with slightly warm water as its cold at the moment. Bulk fermentation over 3 hours with several turns each half an hour, the dough really came together and felt very taught, holding its shape nicely during a bench rest (30 mins) with minimal extra flour. Shaped into a boule and left covered in banneton for 6 hours; my timings are a little off as I started somewhat late in the evening. It had easily doubled in size, however, and felt ready to bake.
Turned out onto a hot baking stone and gave it 35mins at 230° with some steam at the start. You can see in other pictures the very top of the bread was starting to burst a little, despite my scoring. Oven spring was ok but not great. Left it to cool all day until I got home from work. Taste is good, not very sour but full of flavour. I would normally retard the final rise in the fridge but it has been cold, as I've mentioned.
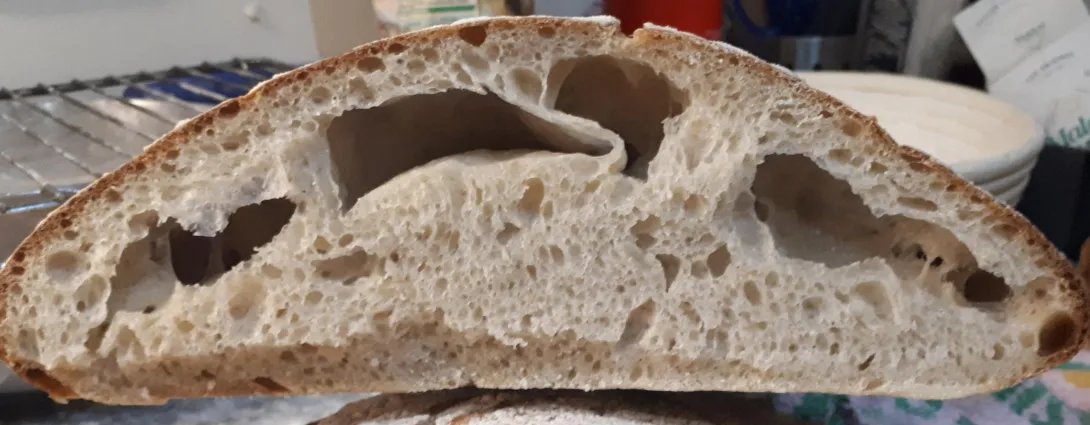
I've gone up and down with sourdough quality and know I need to be a little more scientific in measuring key variables etc but what might be the cause of such big variation in crumb? My initial loaves were brilliant, then the crust completely pulled away from the rest of the loaf, and now I'm at a halfway house, where the crust keeps the bread but there are huge pockets just below.
Help.
Thanks,
Anthony
"My initial loaves were brilliant, then the crust completely pulled away from the rest of the loaf ...."
In The Bread Baker's Apprentice (a great book, by the way), Peter Reinhart observes with regard to instant yeast that "Yeast will double its rate of fermentation for every increase of 17 degrees F (8 degrees C) ...." The opposite is true, also, i.e., a drop of 17 F (or 8 C) will mean twice as much time is required. This applies to instant yeast, but I always keep this comment in mind when dealing with a natural yeast dough (pure sourdough).
My question for you is whether your early bakes were during a warmer time period (perhaps the summer), and now that the weather has cooled with the onset of winter things need to be allowed to go longer for each step in the process.
Hi,
Thanks for the reply!
Yeah I'm sure the drop in temperature hasn't helped. But what would cause the great big vacuums near the top of the dough? Is it just down to needing a longer prove? One thing I thought it might be is my banneton, I find the top of the dough sticks to the cane banneton and there is some traction from the top of the dough as I flip it over onto the baking stone. Perhaps I need to try some rice flour. Thanks for your advice.
Anthony
A longer bulk fermentation will help develop the gas bubbles and network to hold them in place better. When my bread has the pattern of your bread (large holes near the crust), it generally is because I did not let the bulk fermentation go long enough. As for dough sticking to your banneton, try a combination of rice flour and whole wheat. For me that combo works the best. As you use a banneton more and more, you will need to add less new flour each time.
Yeah I only bulk fermented for a few hours, in Tartine its suggested four hours, then again his kitchen I imagine is quite a bit warmer? In this kind of weather how long do you reckon for the bulk ferment? How much increase in volume would you want to see before shaping?
The last time I baked a Basic Country Tartine bread the bulk fermentation took about six-and-a-half hours. I tend to go by the look of the dough more than the increase in volume. The volume of the dough certainly increases, but I notice more the other things that Robertson mentions (dough forms a uniform mass, releases from the sides of the container, holds its shape for a bit after a stretch-and-fold, and has bubbles along the wall of the container. (I use a Cambro tub for mixing and lift it to look at the bubbles on the underside too.) There is also the changing feel of the dough as the series of stretch-and-folds occur. I go in with no set time in mind but rather an approach that lets the dough tell me how things are going. Flexibility is important. That is part of the art of baking.
Hi,
Thanks for this. I too go by the dough and I used to use bertinet's method of kneading and I feel I understand the different stages of a dough coming together. After my last bulk it did hit those key areas you mentioned, and it is such a joy to see how it comes together with a little bit of turning and just time!
My main concern is those big pockets in the crumb, acknowledging this loaf is a lot better than the last. I wonder if I try bertinet's method again of mixing, kneading, two shapings then a 16 hour fridge rise, combined with the dutch oven will be any different in the final product. Thought I do enjoy the lack of mess with Tartine method!
Okay so this time around I extended the bulk to 4 hours and left it in a warmer place. Same method. After bulk it had easily increased by 30% volume and had some bubble formation on surface. 8 hour fridge prove then baked in a Dutch oven. I think it's a slight improvement on the last one but still some giant holes in the crumb. Any ideas now?
The thing is, if bulk/proving was too short then surely I would not have such large bubbles, and the flavour is more tangy so the process has gone on for longer than last time. Frustrated with these large holes wanted a more consistent crumb.
Dutch oven worked quite well first time around.
Anthony
Image

Could you please include the complete crumb shot including the bottom crust? It would be helpful. The bottom crust tells half the story.
Hi,
That is the loaf sliced in half from top to bottom, what other parts did you need to see?
Thanks
the bottom crust included in the crumb shot. It looks cut off or behind something in the photos. If the bottom burned or was too dark, that's important info and an easy fix. The first inch (crumb shot) above the bottom crust "speaks." The holes could be forming for a number of different reasons but more info may help to narrow things down.
Unfortunately I'm at work today however when I got home I will try to add more photos. Somewhat stifled by the 4 mb capacity....
I just wonder about two things, handling of the dough while shaping to burst any large bubbles (big bubbles only get bigger) and the oven set up and preheating. And do tell if you forgot the salt. :) Merry Christmas!
Edit after seeing crumb shot... Well, that solves it for me, it's more of a shaping thing, a little more degassing may help. Too gentle! You don't have to level the dough, just gently look and feel for the larger bubbles and poke 'em. Especially those on the front edge and sides when rolling up. Train your hands in the process to feel for hollow bouncy spots in the dough. It could be you were cutting the proofing short due to the big bubbles. :).
This crumb looks much better.
Thank you for the feedback, I add 10g of salt 40mins after autolyse. So you think I'm being too gentle, I guess it makes sense. Must be a fine balance between popping the gigantic bubbles and not levelling the dough!
Will be looking to make another loaf on Saturday!
Thanks