I joined The Fresh Loaf a week or two ago when I realized I was going to need help to achieve more open crumb. What a wealth of knowledge on this site!
Current Goals
- Decide on a 100% whole wheat sandwhich loaf recipe for my family and become proficient in making that loaf.
- Decide on a flavorful, beautiful, healthy, rustic, wild yeast, and open crumb loaf recipe that I can use to sell/barter in my community and become proficient in making that loaf.
I realize my dough handling skills and my experience working with wet doughs is lacking. So, I am trying to become comfortable with wet dough, otherwise, I find myself avoiding certain recipes out of fear of having too much trouble. Over the past few days I tried (with little success) to bake high hydration 100% whole wheat bread. 8 flying saucers later and I learned a lot, but, struggled to get the proofing and shaping right. Things got better each loaf, but, I have a lot more learning to do.
I am not focusing on flavor yet. Thus, I am using commercial yeast for now. I am going to switch to leaven soon though.
Yesterday's Bake
I wanted to make things easier on myself and also check to see if some of my intuition about how dough 'works' was correct. So, I decided to make a 100% bread flour recipe. I decided to make 2 batches of 2 loaves each, which worked out great, because each loaf was an opportunity to observe how small changes in the baking process impacted the loaf. For example, the 2nd batch bulk proofed much more than the 1st batch, so much so that I worried i over did it. Well... the 2nd batch came out better than the 1st.
Recipe (Made 2 batches, split each batch into 2 loaves)
Total:
Bread Flour 580 g (100%)
Water 406 g (70%)
Instant yeast 3 g (0.5%)
Salt 12 g (2%)
Poolish:
Bread Flour 193 g
Water 193 g
Instant Yeast (a pinch)
Dough:
Bread Flour 387 g
Poolish 386 g
Water 213 g
Instant Yeast 3 g
Salt 12 g
I mixed the poolish and left on countertop (house is air conditioned to 78 degrees). Loosely combined the additional flour (387g) and water (213g) for autolyse and left on counter for 30 minutes, then put it into the fridge until the poolish doubled.
The autolyse didn't have enough water and it the gluten developed into a very very very elastic stress ball. I had to work real hard (fingers and arms hurt) to combine the poolish and the autolyse. Then added instant yeast, followed by salt.
After 8 loaves of high hydration dough, I realized today's dough was going to be a different beast... it seemed like it was too elastic. To develop gluten, I kneaded it in the bowl, stretch fold, stretch fold, stretch fold for about 10 minutes, then I took a 10 minute break and did it again. I did this until most of the dough's stickiness was gone. Then I transferred the dough to a clean bowl. And did a stretch and fold until the dough ball got taught to the point of almost tearing every 30 minutes until I was ready to shape the dough. I think I did 4 stretch and folds with the first batch and about 7 with the second batch (the second batch went in the oven a lot later).
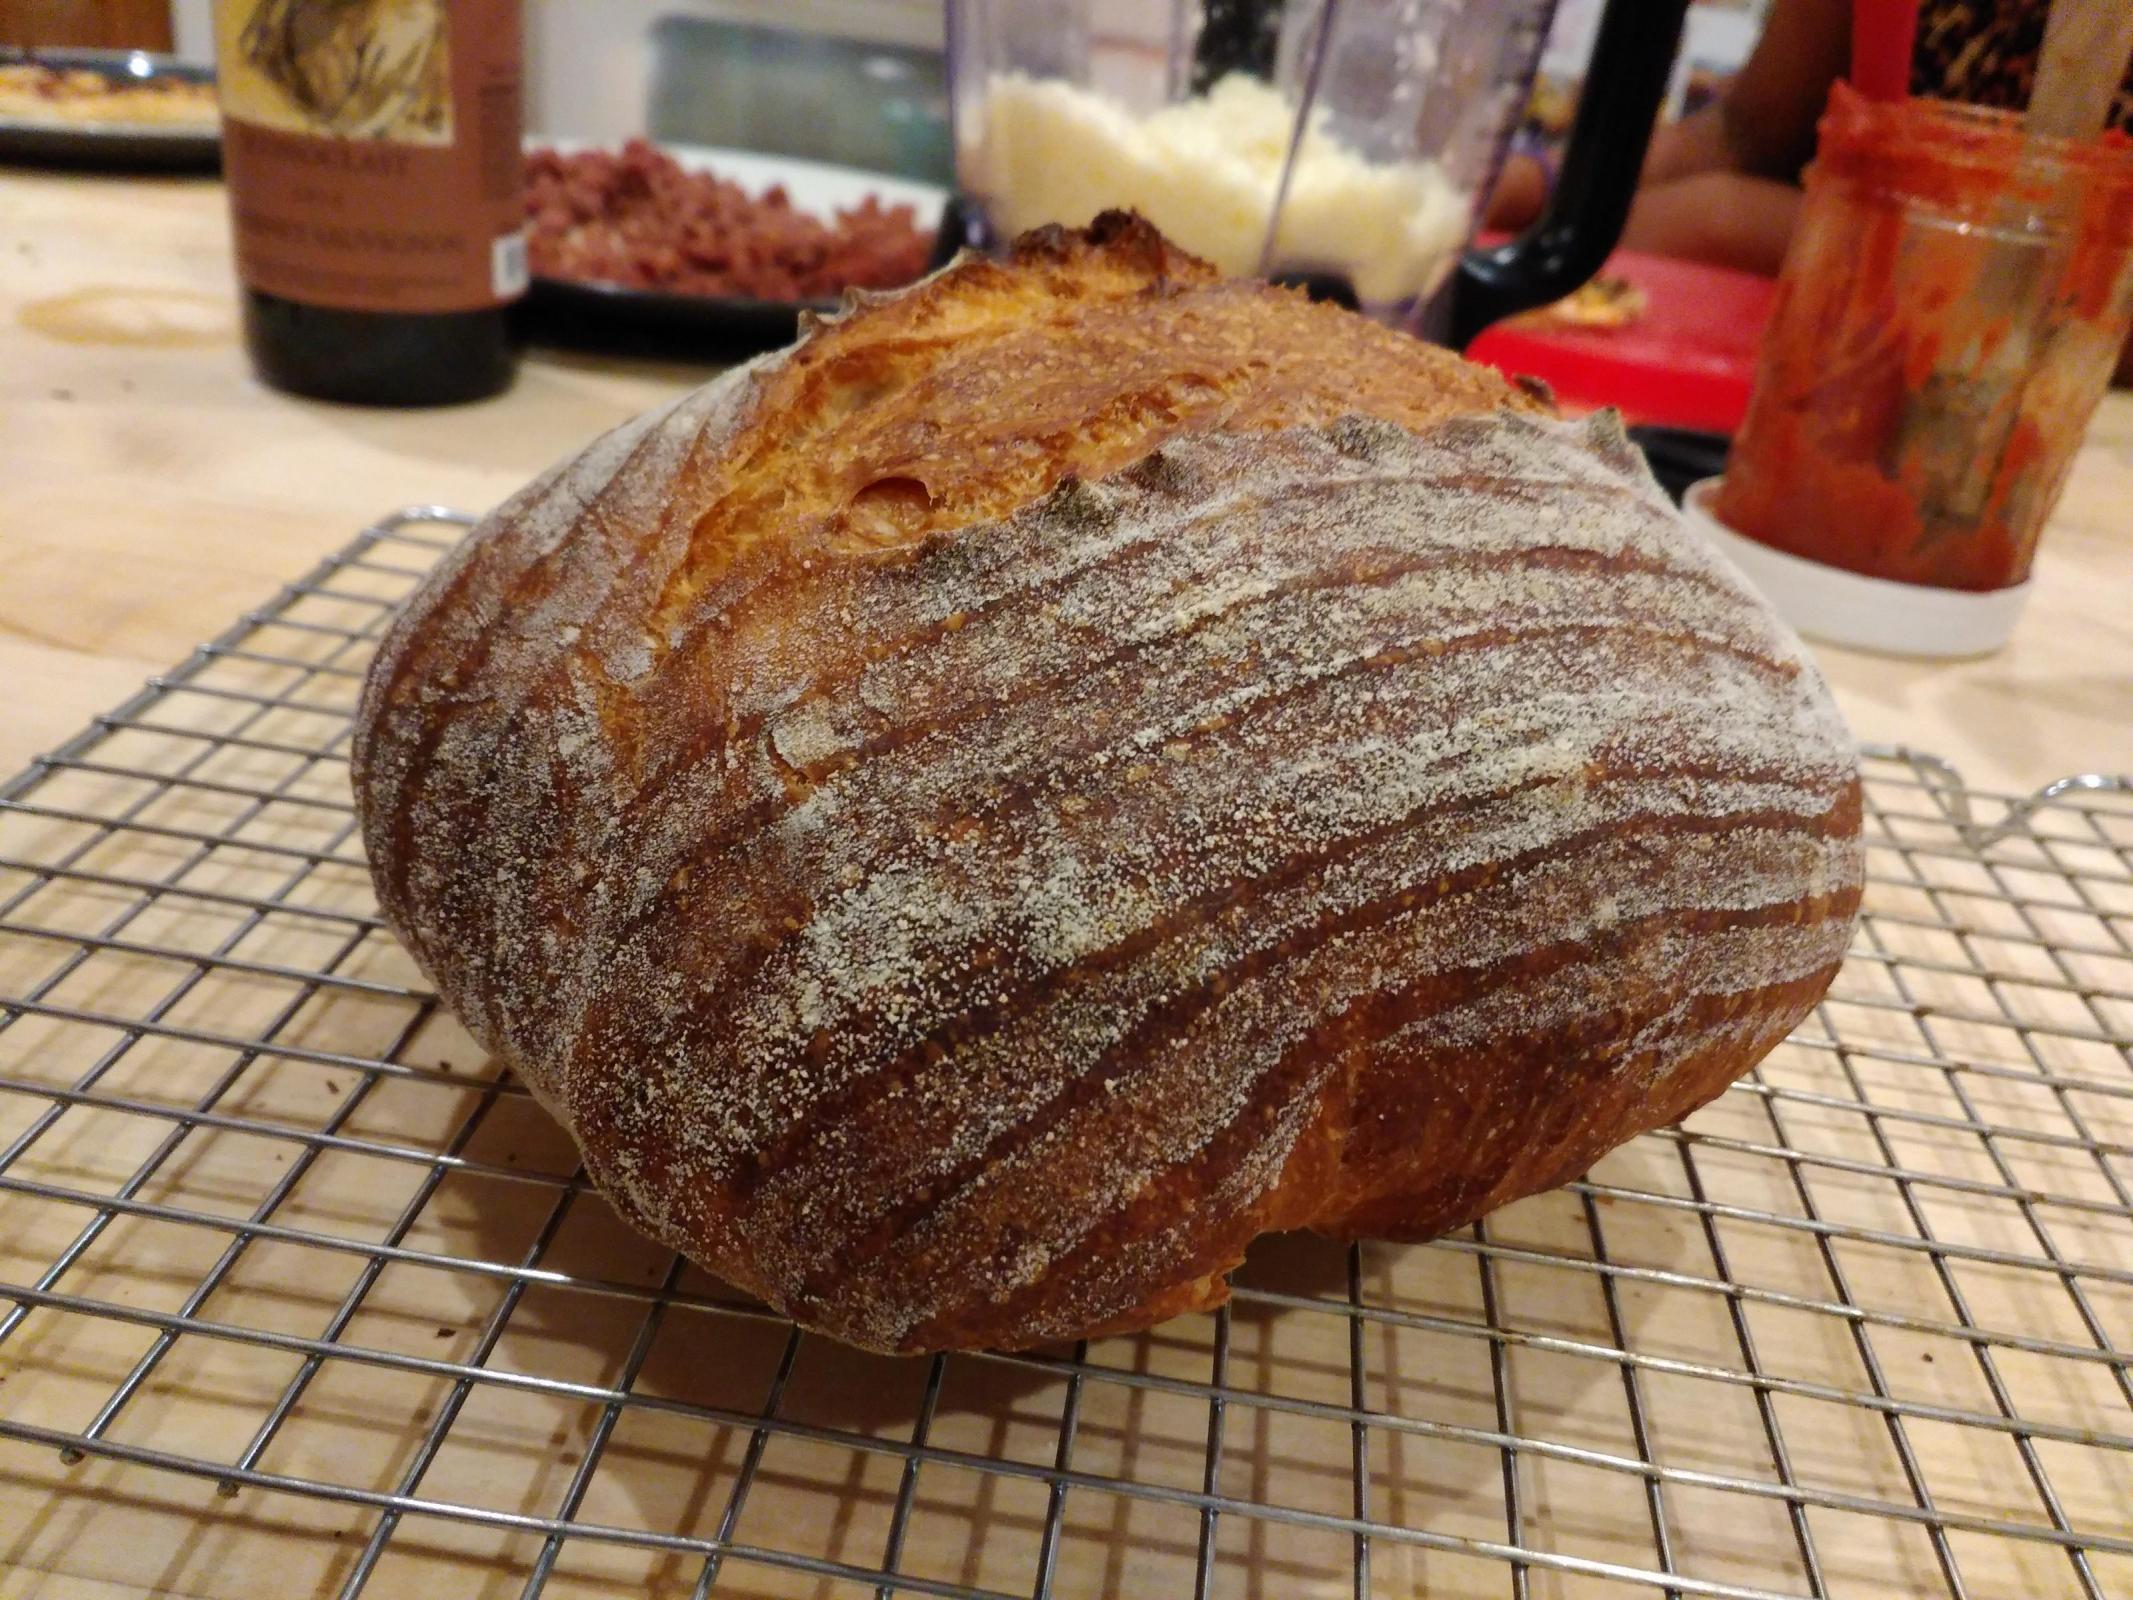
Baked in a dutch oven for 20 minutes covered and 10 minutes uncovered at 500 dF for first 10 minutes and 460 dF for last 20 minutes.
Photos


Post Bake Thoughts
- Weirdly, scoring the dough was much easier on the loaves proofed in my round banneton versus the oblong banneton. My round banneton has been used more and I think is depositing more rice flour onto the loaf.
- When I remember to dampen my hands first, getting the loaves out of the banneton into the dutch oven is working ok. I can tell after another 20 loaves, it will be easy.
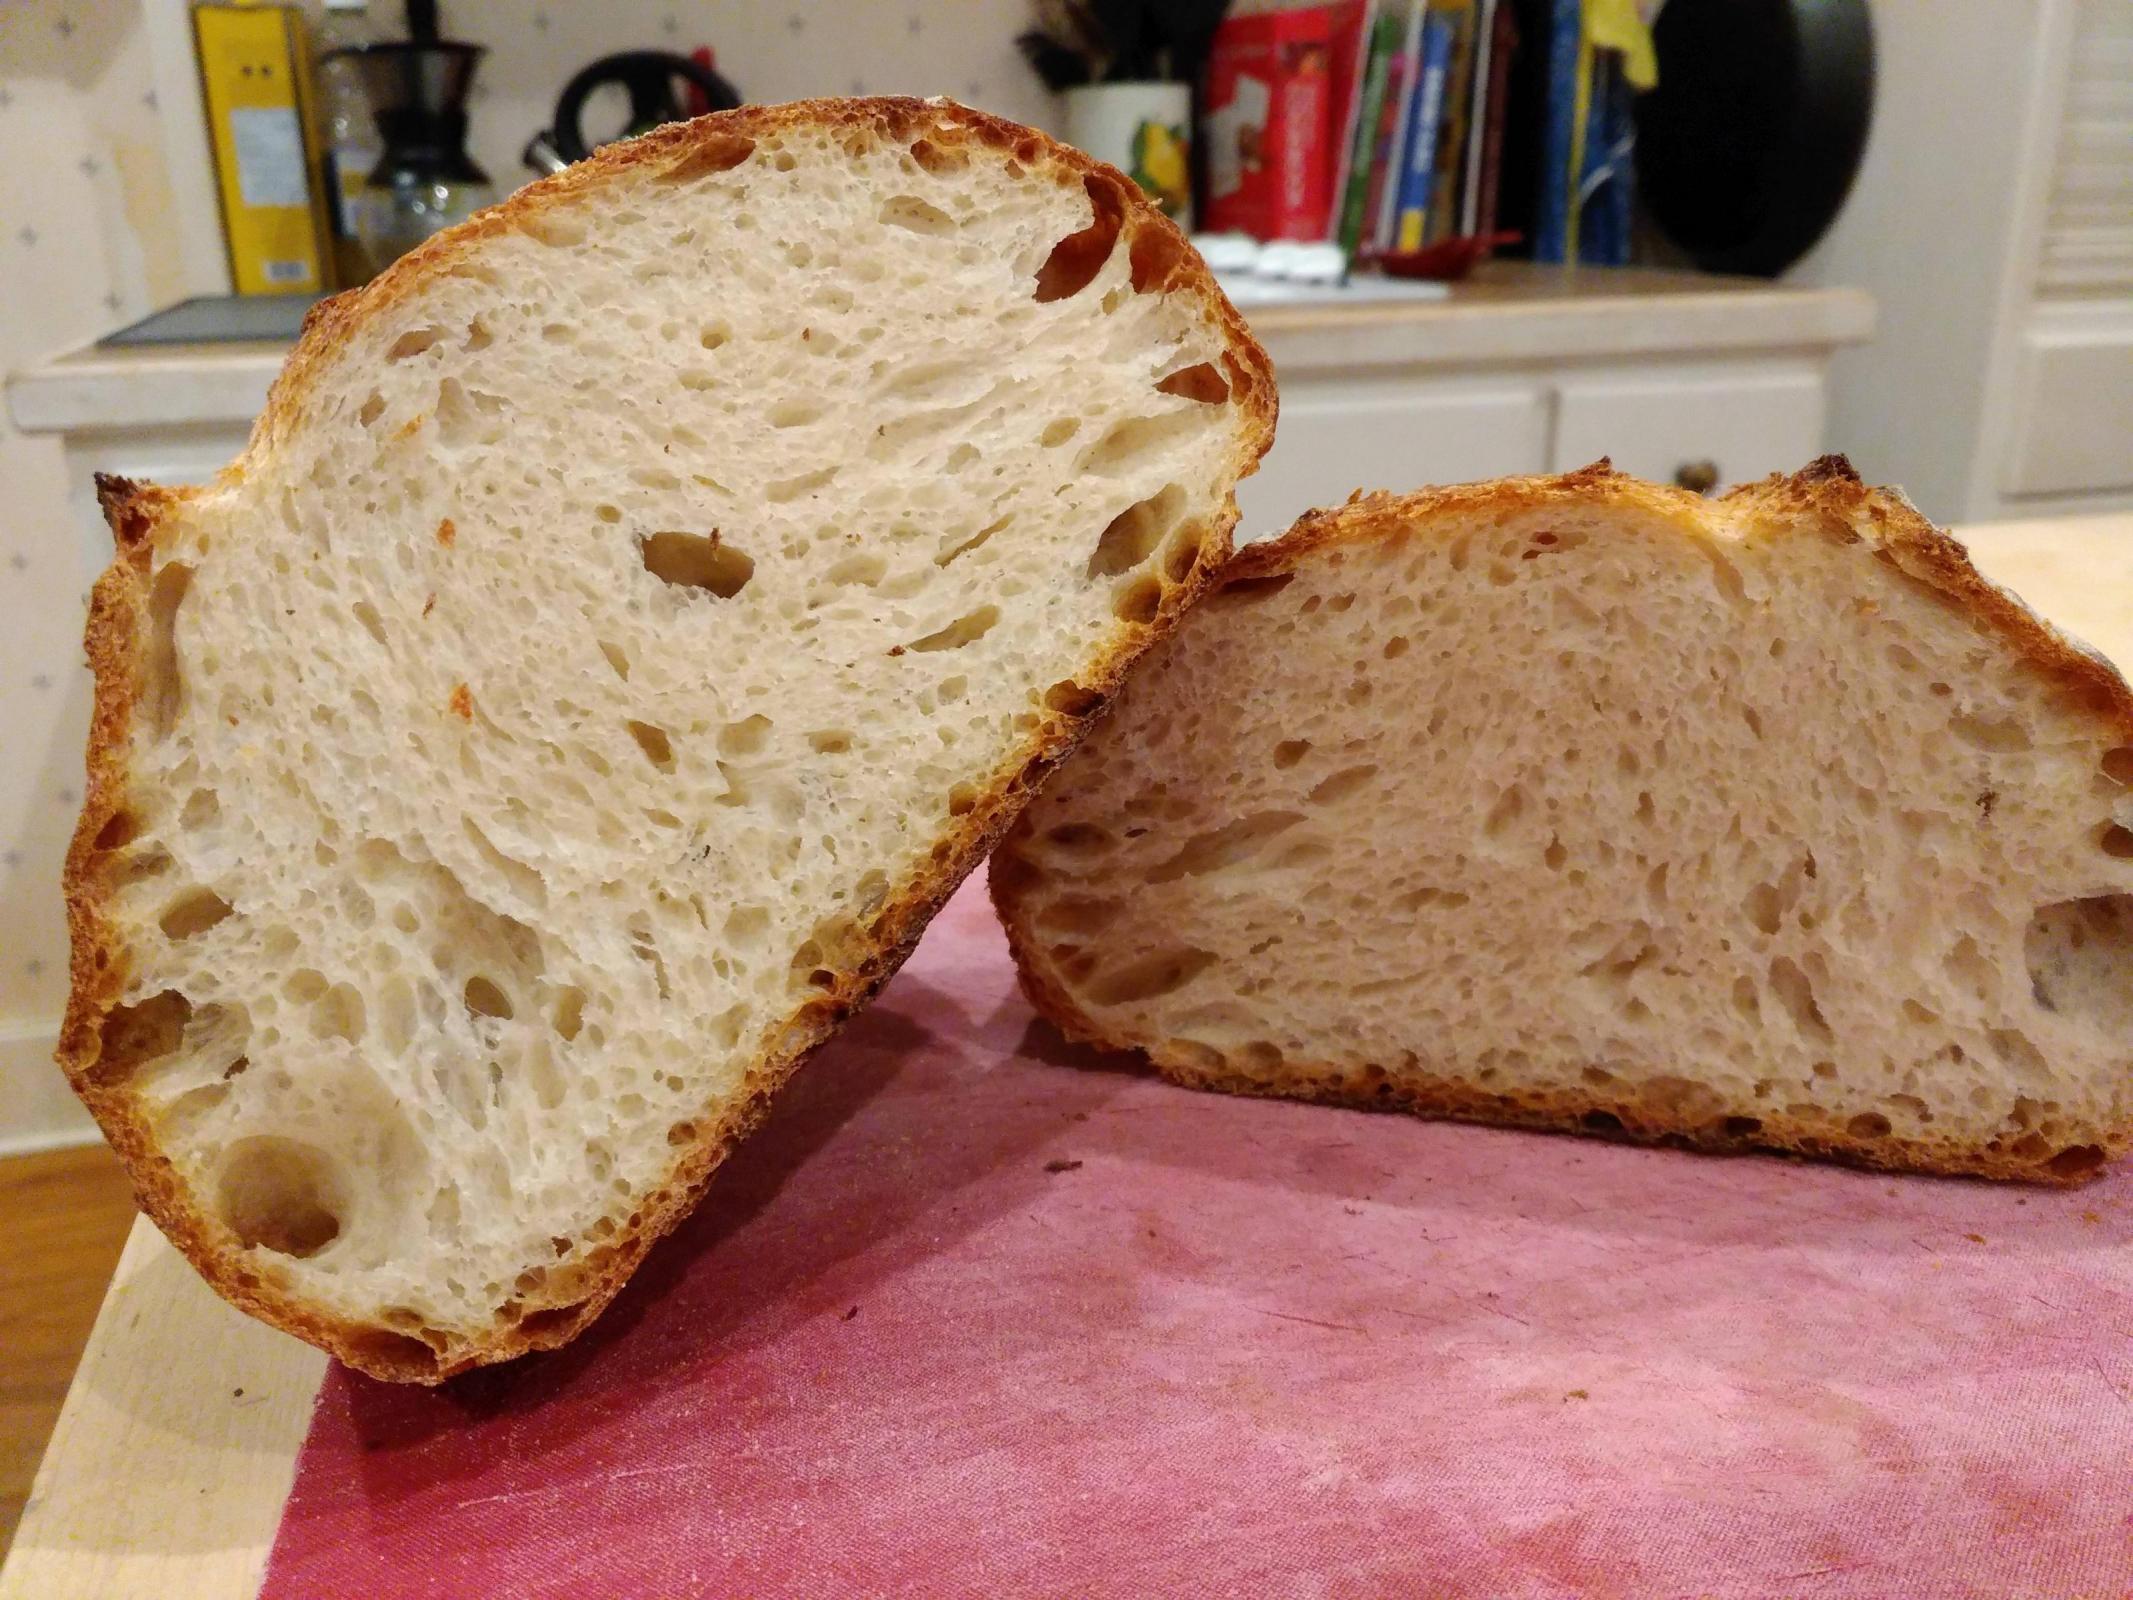
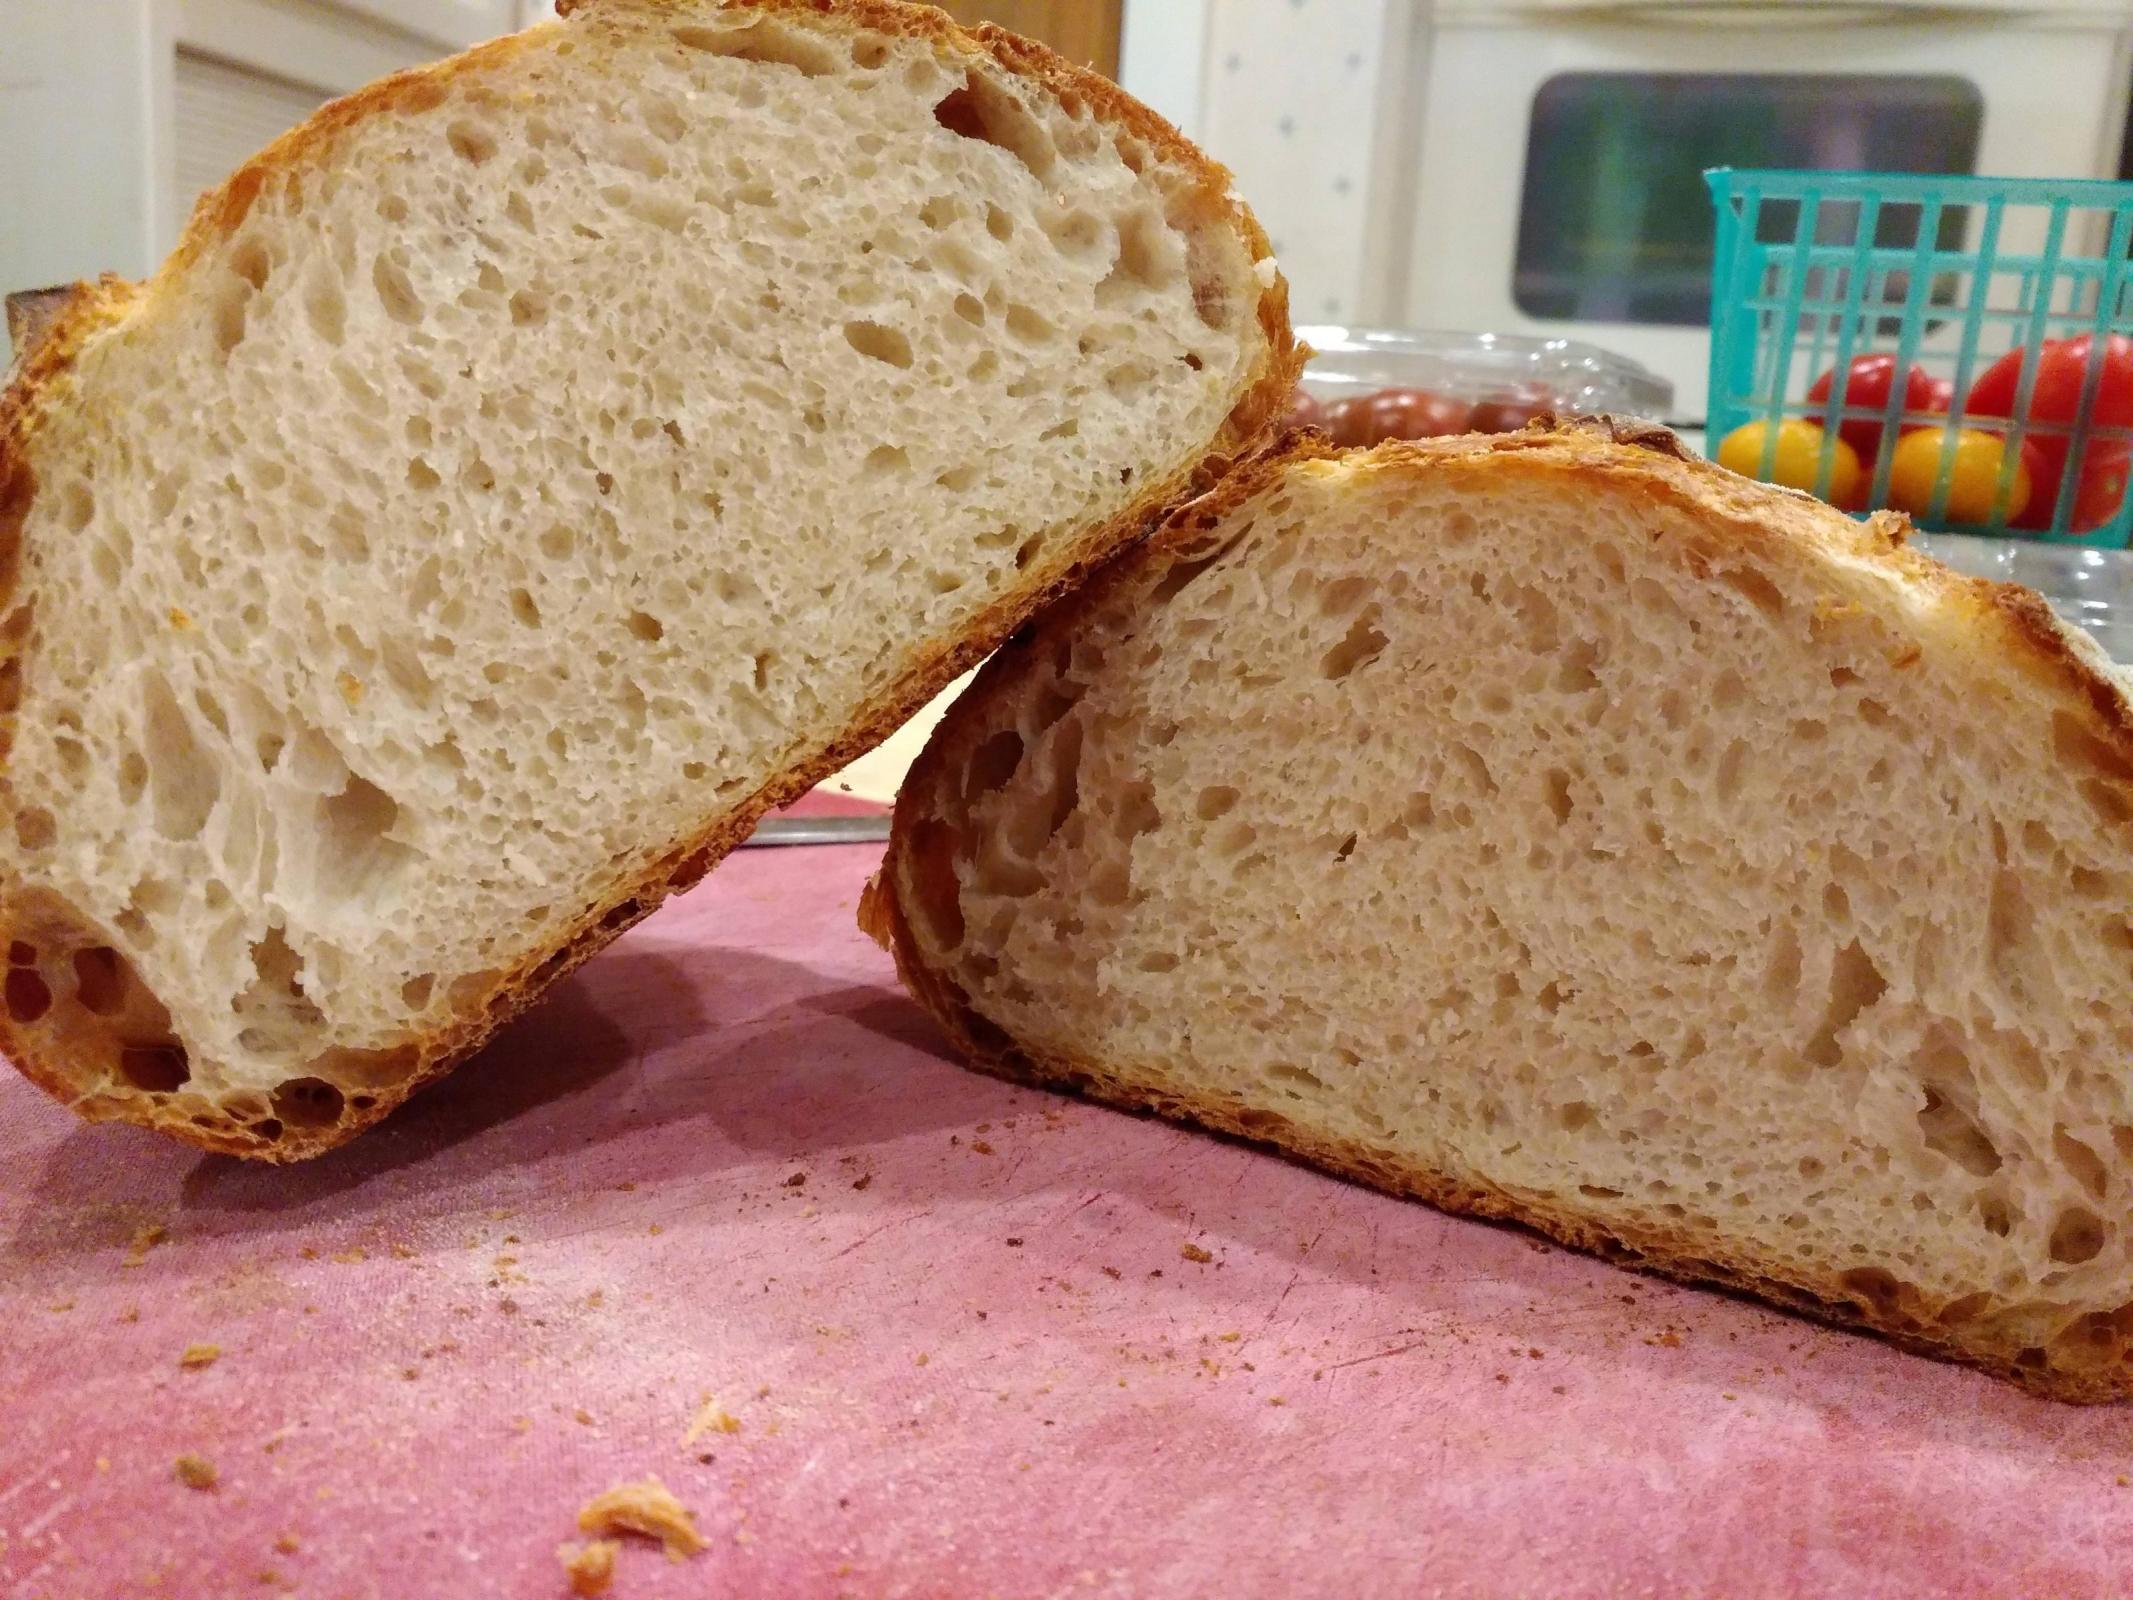
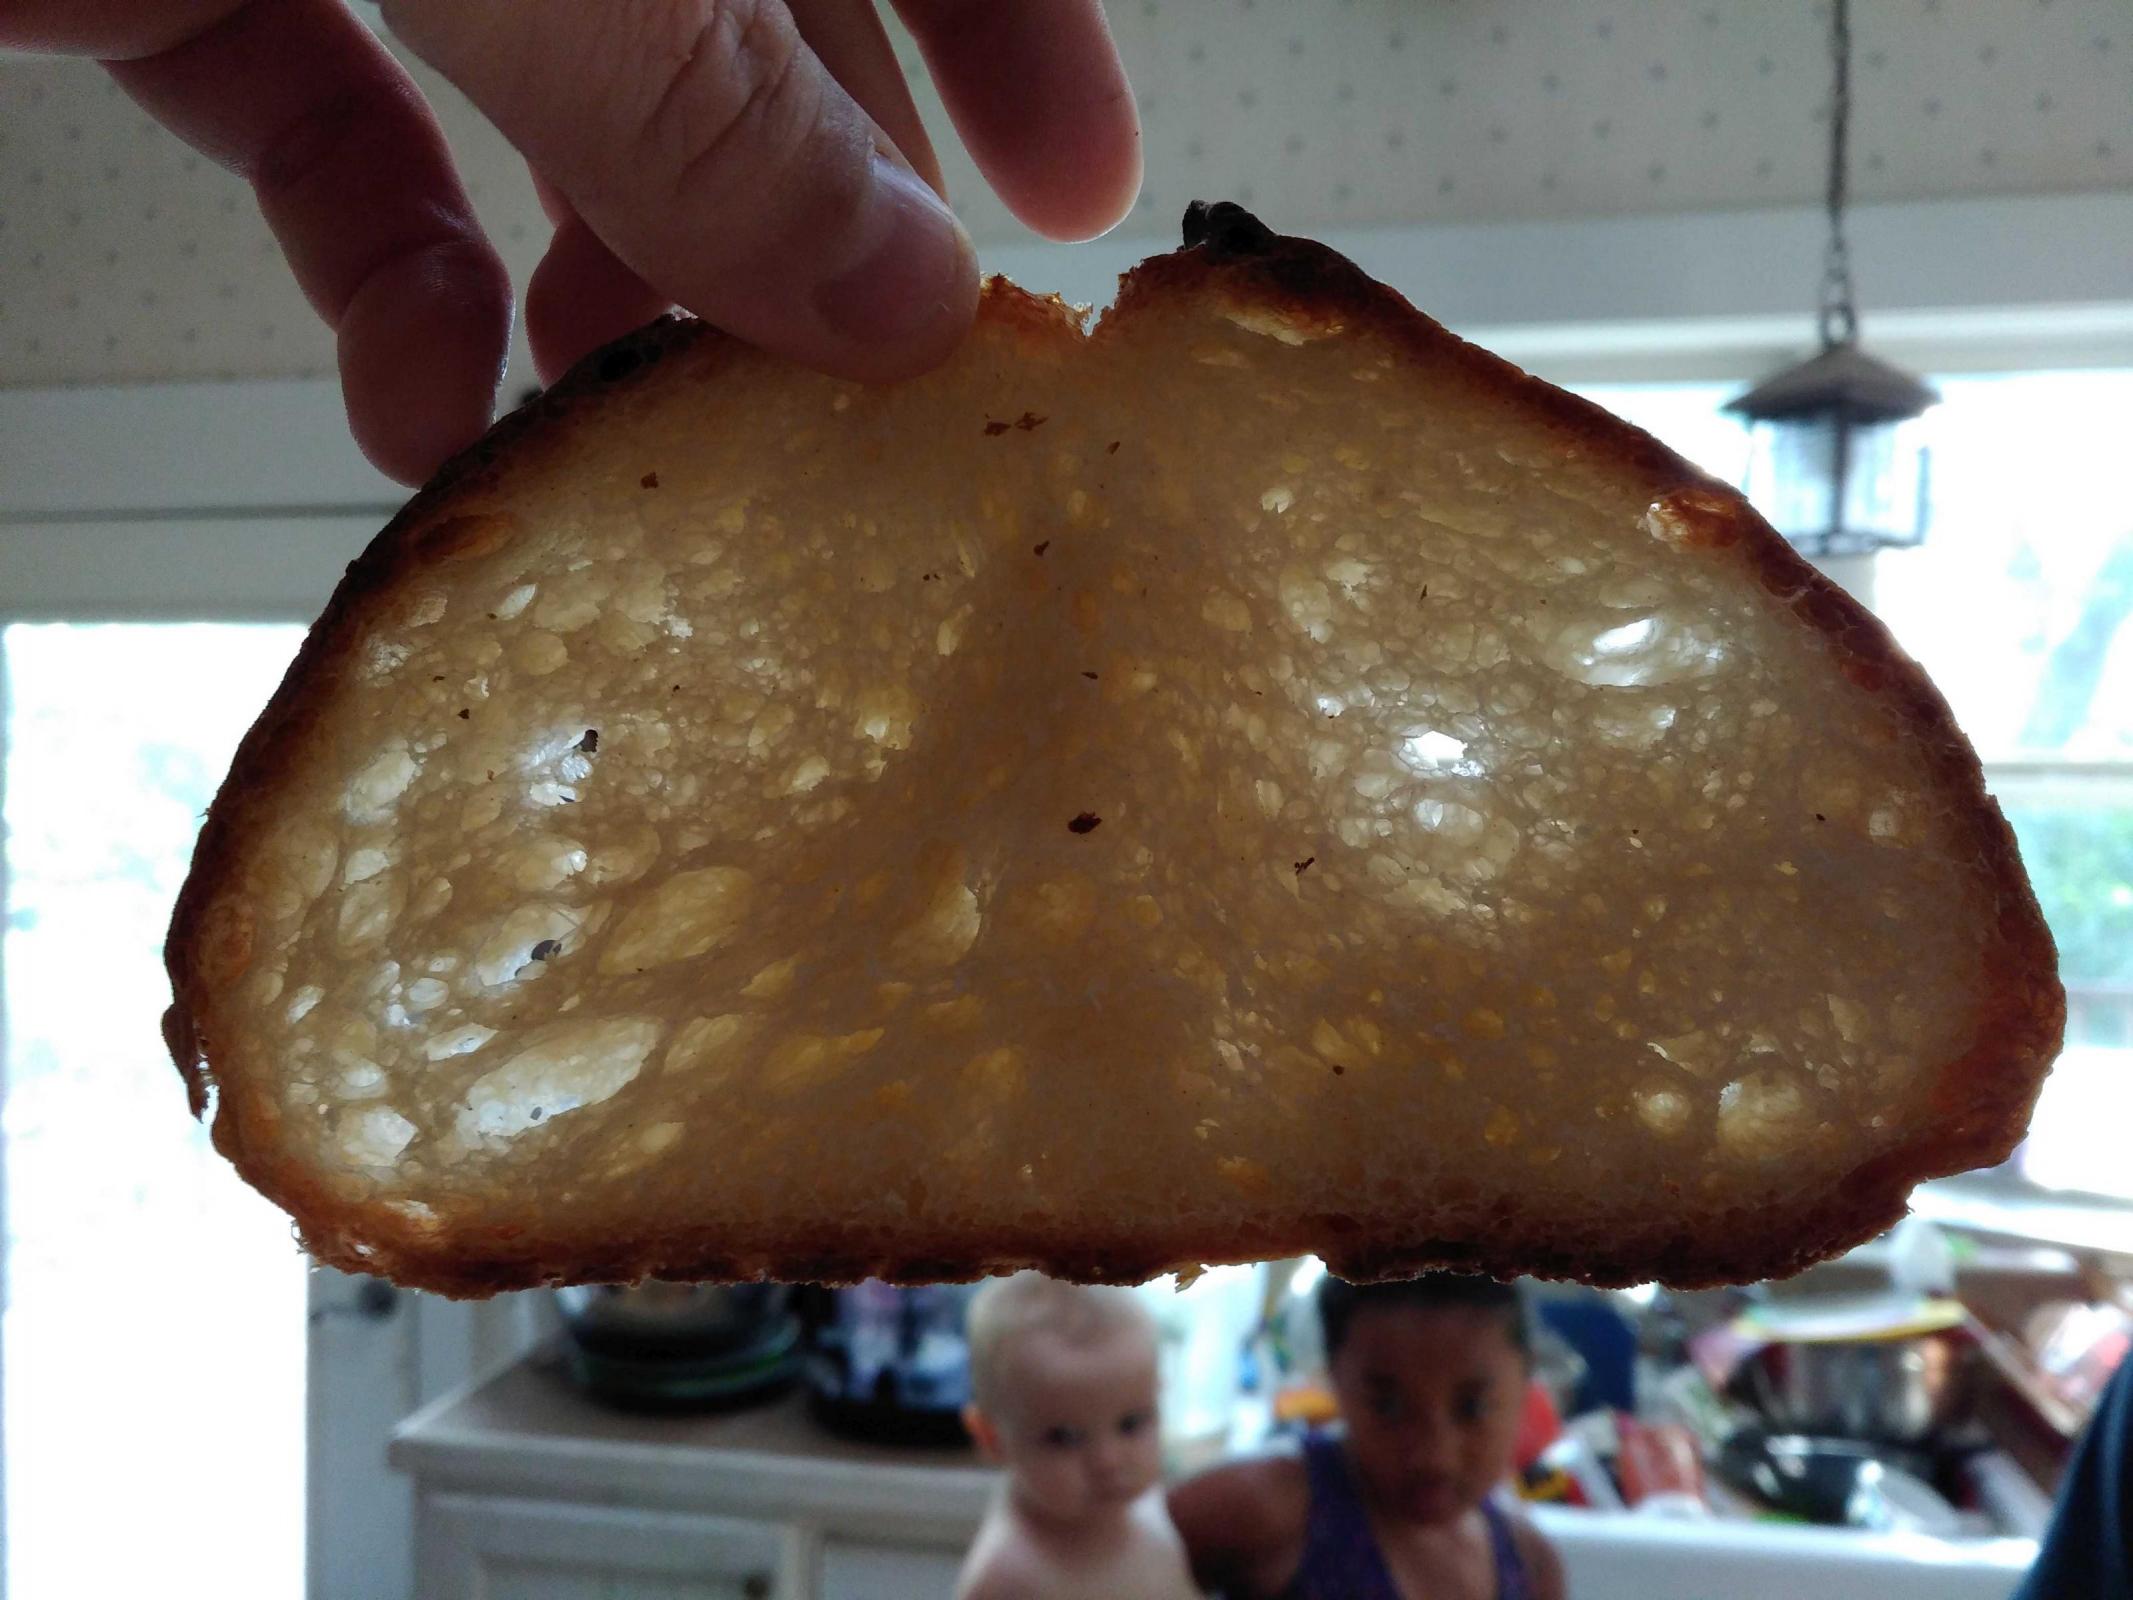
- If you look at the 2 slices of bread, one looks better than the other. The 2nd slice has a volcano formation in the middle of the loaf. Denser crumb in the volcano and more open crumb outside of it. This is because of the way I shaped the dough. I will no longer shape the dough that way.
- The 2nd batch had 20% more open crumb, those slices are from the 2nd batch. The 2nd batch proofed much more during bulk proofing. At the end of bulk proofing, the dough was pretty bubbly. But... this dough had so much more elasticity compared to my earlier high hydration doughs. I think bubbly is good as long as you have enough elasticity to handle it.
- I really think my crumb would have been even more open if I had upped the hydration by 10%, the dough was very elastic and I think it kept the air bubbles from growing larger.
- I wish I could do the entire bake again, but this time, let the final proof go even longer. I think this dough could have handled it without over-proofing.
- I wasted a ton of electricity keeping the oven preheated while waiting for the loaves to finish proofing. I need to figure out a more efficient way to do this. Probably, need to figure out how long preheating everything takes, then, work on being a better judge of how much time is left till proofing completes.
- texasbakerdad's Blog
- Log in or register to post comments
compared to the high-hydration, 100% WW sourdough doughs you were working with earlier. Interesting that the longer proof worked better for you, too. I baked a couple of oatmeal bread loaves with commercial yeast last month (the first with 100% AP flour, the second with 50% AP and 50% sprouted wheat flour), and commercial yeast ferments even faster in my kitchen than sourdough does. My son really liked those loaves, but they were way too puffy for me, even though I love oatmeal bread.
I learned yesterday that it takes 45 minutes for my oven to heat to 450F when my kitchen temp is 80F. That seems like a long time. Also moved one of my oven thermometer to the back of the oven, and learned that it's 20-25 degrees hotter in the back of the oven than it is in the front! I guess I should average the two temps. Thanks for your earlier comment about oven temp, because that made me think of moving my oven thermometers around some more.
"really interesting how different these doughs felt,"
Yeah, I was surprised too. I mean, I had baked this recipe maybe 10 times in the past and never remembered it being sooo elastic. Causes for the difference in feel...
I was reading the comments on a instagram bread picture, and the baker stated that he has recently been using his spiral mixer to mix all of the ingredients sans the leaven at a high speed. And then, once all of the gluten development is complete, he would mix the leaven in just enough to incorporate it at low speed. He said this has kept his leaven from working too fast (I'll post the instagram link below). And... this was from that baker who makes very very very open crumb 100% WW loaves. Anyway... that comment just makes me think that there is not a single right way to bake bread, and there are many improvements that even master bakers have yet to find. Another example of a very different bread baking process I heard about from my father-in-law yesterday, was about a very popular bakery in St. Louis Missouri, supposidly they bake their loaves to the extreme darkness, but instead of doing the bake with high temps, they bake for a really long time (24 hours) at lower temps. The result is a crust that is just as dark and caramelized as everyone else's artisan loaves, but with a crumb that is slightly caramelized too. Their crumb has a distinct flavor like no other bread I have tasted (coffee caramel-ish).
"season_adam@roastedstrathaven I’ve been adding leaven last second. Speaking to brock @tuscan_baker who does a whole fridge process I just adapted his mixing process to fit my requirements. Basically mix flour and water auto then add salt and develop dough fully on fast mix speed and after this incorporate leaven on slow. This means you’ll already have well developed dough and you can monitor the bulk knowing that only a minimum of folds if any at all is required"
https://www.instagram.com/p/Bk4eFbEFE1E/?taken-by=season_adam
" I baked a couple of oatmeal bread loaves with commercial yeast last month (the first with 100% AP flour, the second with 50% AP and 50% sprouted wheat flour), and commercial yeast ferments even faster in my kitchen than sourdough does."
Leaven is a big flavor component of the recipe. Commerical yeast isn't. So... if you are using leaven, you can't reduce the amount of leaven without impacting the flavor of the final dough, which makes leaven harder to deal with. Commerical yeast is easy, since it doesn't really add flavor, you can adjust the amount of commercial yeast from a pinch (all day rise) to 2 tablespoons (30 minute rise). My recipe called for 2 teaspoons of yeast, which worked out quite to about 4 hours until fully proofed. Also, with commerical yeast, you can do multiple rises... rise, punch down, rise, punch down. My understanding is that with leaven, you can only be sure of 1 good rise before the acid starts to inhibit yeast activity.
"I learned yesterday that it takes 45 minutes for my oven to heat to 450F when my kitchen temp is 80F. That seems like a long time."
Yes, that does seem like a long time. You might have answered this question before, but have you measured the temp of the oven 5 minutes after the bread has been loaded (by looking through the glass doors with a flashlight if needed). If you haven't done this, you should, you might find that the oven has dropped temp considerably. Also, I have been cooking my loaves at 500 dF for the first 20 minutes and then dropping to 460 dF. I am exited to bake the same loaves as you, I am befuddled with regards to your crust color, and I am interested to see if I get the same result or not.