This is in response to Trailrunner's questions on a mixing discussion over at Hansjoakim's blog here on a fantastic-looking crumb he has on his Hazelnut bread.
Lately I seem to get best results with a combo of warm shorter bulk ferment with frequent early folding and long cold final proof. No mixer, no kneading with flour, no repeated French-folding. (warning, this could change as soon as I read of a better method, so please take with a grain of sea salt!):
- Hand mix all the ingredients with a large dough whisk in large bowl (incl. salt)
- Cover and let rest (autolyse) for 30 min. (I know you are supposed to leave out the salt but I find it easier to mix everything initially if not using a standmixer)
- After 30 min. rest, use plastic dough scraper to fold dough onto itself in the same bowl, just like what Mark does in his video here. I count to about 100 as that takes me just about 3 min., and that has seemed to develop the dough well.
- Next round up the dough with scaper and place it into a clean, lightly spray-oiled lidded dough bucket - or for large-size doughs where I double or triple the formula, I use a big square clear plastic food service container with lid.
- Let the dough sit for 30 min. (preferably at 76F location), then do a single stretch & fold as per Hamelman: if dough is in smaller bucket, tip the dough out onto a lightly spray-oiled counterstop, stretch it out into a rectangle, and letter fold it onto itself once, rotate 90 degrees, letter fold again, and put it back in the bucket for another 30 minutes. If dough is in big square container, just fold it right in the container and turn upside down when done.
- Repeat step above 2 more times for a total of 3 folding sessions spread 30 min. apart. Then leave the dough to finish bulk-fermenting at 76F, usually for another 90-120 minutes until just doubled (my home-made starter is not that fast a riser).
- Next shape loaves, then I place the shaped loaves in a 45-50F location (my unheated mudroom) to retard overnight or 12 hrs min.
- After cold retarding I place the proofed loaves in my room temp (65F) kitchen while I preheat my baking stone for 45 min. and bake with steam right after that, usually the loaves are proofed enough after all that time retarding, and the oven spring is great.
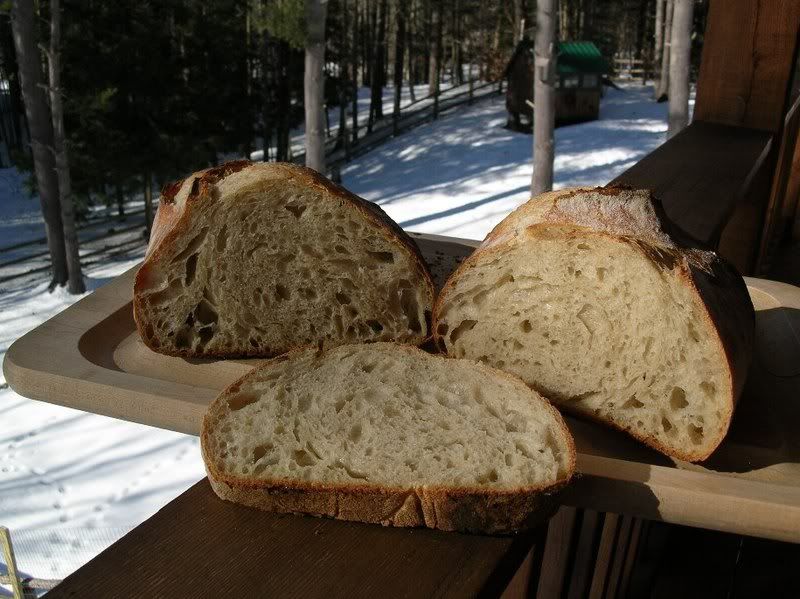
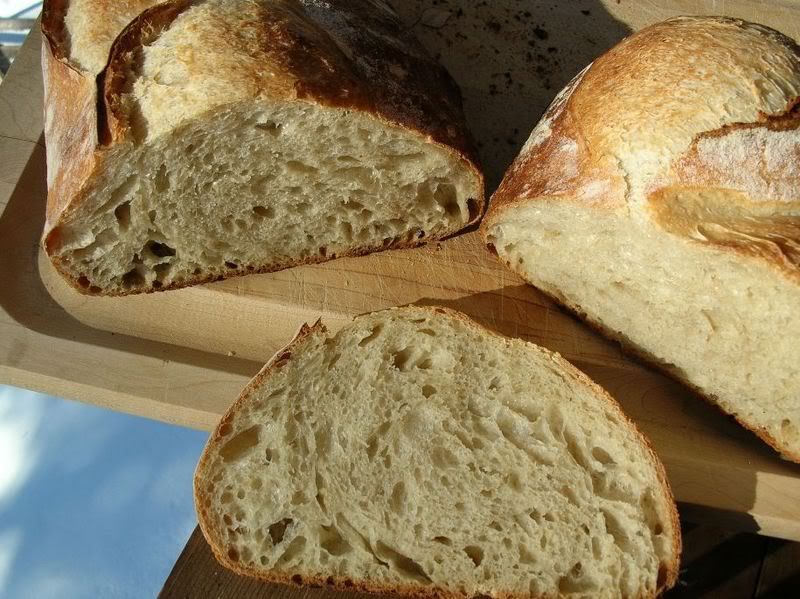
Here are results of a less slack dough (65% hydration pain au levain 10% whole wheat), not huge holes like you'd get with a very wet dough, but large enough and evenly distributed, and very flavorful crumb, chewy but not gummy:


I still need to try SteveB's double-mixing technique he describes here. If anyone sees any error in my ways with how I've been doing this, I'm all ears! I'm sure I'll revise this after I read Advanced Bread and Pastry, due in soon.
- mountaindog's Blog
- Log in or register to post comments
One more piece of info: Our house is cold this time of year with the thermostat turned WAY down, so I built myself a home-made proofing box very similar to the one SteveB made about 1/2 way down this thread here, but without the nice blanket he has. It has an inexpensive reptile lamp from the pet supply store mounted to top like Steve's that has a dimmer switch built-in to turn down the temp as needed, and a 120 watt incandescant flood bulb (it's a very large storage bin to hold multiple bannetons or dough buckets at once - I bake a lot at one time). I keep an inexpensive digital hygrometer/thermometer inside in an easy to read spot to monitor the dough during bulk fermenting - or final proofing, depending on what I am making.
GREAT well organized info. I am so glad to see this. I have a couple places that will meet the temp needs so I think I can manage this just fine. I am 4 days away from getting my Suas also ! c
Good Luck Caroline, and let me know how it works for you if you end up trying the steps above. I think my Suas is coming in on Monday, good timing as I just finished Hamelman and am halfway through Calvel.
Those loaves of yours look very tasty and the crumb is perfect. In response to your question in the other thread (you may have already had it answered), the 'Hamelman 20 folds technique' is in 'Bread', it's just part of a recipe, so it's hard to locate (p.249). Looks like you got the technique down anyway.
-Mark
Thanks Mark! - appreciate the feedback. I'll chime in with all the masses here to say your videos are really great! I don't think I ever would have been made aware of the "fold in the bowl" technique had I not seen you do that. It was also nice to see that you do your stretch & folds exactly as I do them (in your Kalamata dough example). Did you learn all of your excellent shaping skills at Baba a Louis in VT, or was it another bakery?
I'll look up p. 129 in Hamelman, thanks, I finished all the text, but I didn't read through every recipe yet, just the few I planned to make first.
I did some more experimentation over the weekend with different fermenting temps and times on the exact same dough, and I got interesting results that I'll post later on.
my typo, (thanks Susan)
Yes, all of my shaping practice came from Baba a Louis in Rutland. We didn't do any stretch and fold type stuff, so that's all new to me.
I checked out your profile here and saw you're from upstate NY. That's a beautiful area. I've done quite a bit of traveling through there having grown up in PA, gone to school at S.U., lived in VT, and done some rock climbing right in your area (New Paltz of course) back when it wasn't too busy.
-Mark
Yes, Vermont is next door and I have sisters there for over 30 years, spent many summers there growing up. New Paltz is close by too as you say and many of my co-workers moonlight in summer as climbing guides.
Over the weekend, I made a very large batch of Flo's 1-2-3 bread sourdough, that she and Janedo have tested to use up any amount of ripe starter - I used a flour mix of 15% WW, 3% rye, 82% AP, and the hydration is 71%. I mixed according the the steps outlined above in my blog post, except that rather than do a shorter warm bulk ferment, I put all the dough in a 45F location overnight for about 10 hours due to scheduling conflicts. Next morning I shaped about 6 boules as follows:
In all cases, times are based on when the loaves almost doubled.
Results: the best in terms of both open crumb, oven spring, and flavor were the loaves that cool fermented at 63F:
Close-up of crumb - the right one may be next year's Christmas card photo :-):
And below here is how the cold-proofed at 45-50F boule came out (left, with open crumb) vs. the shorter-time-span warm-proofed one at 80-82F (right, with dense crumb and flat profile). I was very disappointed with the flat dense loaf on the right, and it had a slightly off taste. Even the cold proofed one at left probably should have proofed longer as it was more dense in the middle.
Lesson learned: it is not easy to speed-up proofing of sourdough bread in home-conditions by very warm final proofing, at least not after a cold bulk ferment, that is probably the worst combination and the opposite has been better in my cases. I'm guessing the reasons are that the dough is too cold in the center after the cold bulk ferment to be able to evenly expand during final proof if done too quickly, where the exterior of the loaf will warm up disproportionately faster than the interior and start to break-down. The warm-proofed loaf here seemed over-proofed in that the structure broke-down before the air pockets had enough time to enlarge fully (or so it seems). Hence the flat loaf and tight crumb - there was no way I could have let it go longer, and any earlier and it would have been just underproofed and dense still.
Cold or cool final proofing of loaves, as long as they are left to fully proof to nearly double or double, seems to provide the best oven spring and open crumb under my home circumstances. I am not a chemist nor a physicist (so maybe a chemist/physicist-type can chime in and correct me), but it seems that with cold proofing over a long period, more gas can be produced by the sourdough culture and stored densely in the cold air pockets, so that when the dough hits the hot oven, there is more gas in that smaller space to expand out, creating larger holes than would be possible if the loaves proofed at a warm temp.
On the other hand, I still get equally great results from warm bulk ferment (but not too warm, 76-78F seems just right) followed by a cold final proof. The warm air initally expands the dough well and opens up large gas cells after it is mixed and folded at a warm temp., the cold temps after shaping help hold the shape well and as described above, seem to create pockets of dense cold gas that expands greatly the oven.
You aced those! And thanks for sharing. Very kind of you.
MD, thank you for doing the experiments and posting the results - you may have solved my current problem. I make Susan's sourdough loaf as my "go to" bread and for a while thought I had it mastered. Recently I made a batch of discard bread to share with neighbors and the oven was still slightly warm when it was time to let the sourdough proof so I turned on the oven light and put the container in. I fell asleep in my chair (senior thing) and the dough was way more than doubled. In spite of my doubts it got great oven spring so I decided this was what I should have been doing all along as my kitchen is quite cool. All of this introduction to tell you that the latest loaves have had open but "fluffy" crumb, not the big holes and shiny webs that I aim for. The flavor was missing too - fine for sandwiches but just not right. So next time I will go back to the long slow cool proof to see whether I can get my lovely bread back! Fingers crossed, A.