Chad Roberson's Tartine Bakery doesn't do chocolate sourdough (if they do, I haven't had the fortune of tasting it). We did Pane Cioccolata (chocolate bread) at Artisan III, SFBI, and it was very good. Everybody loved it but at the time I was thinking to myself if I were to make it at home I would make some changes for the following reasons:
First of all, I feel really uneasy about "double hydration" method, which is supposed to be good whenever you have any "add-ins" for your dough, be it dried fruits, nuts, seeds or soakers, or in this case, chocolate chips. The procedure is: you mix your dough with only 80 - 85%% of the recipe water in the first and 2nd speed as usual until a slightly [b]stronger[/b] than normal gluten development has achieved, then turn the mixer back to first speed, slowly incorporate the reserved water and finish off on 2nd speed, [b]then[/b], add the seeds and nuts (or whatever add-ins you have) in the first speed initially for incorporation, and finish off, again, in 2nd speed. The reasoning for this method is it is easier to develop dough strength with a stiffer dough than a wet dough and so the purpose is to build up the strength before you incorporate any add-ins. Because of the longer mixing time, the temperature of water you use with this method is lower than for other doughs.
I remember we mixed the dough for nearly 20 minutes in the spiral mixer. I am not confident that I could do such a long mixing time with the mixer I have at home. I always feel "traumatized," looking at the dried fruits or nuts being beaten up and chopped up while they try to be mixed in to the dough [b]after[/b] the latter's gluten structure has already been formed; it really takes time to break the gluten bond.
Secondly, after the dough was bulk fermented, it was scored [b]then[/b] proofed. One other type of bread where we scored first then proofed was rye bread. It was said that because of the delicate gluten structure in both of these cases, if you were to score [b]after[/b] the dough is proofed, you may destroy the gases that were produced. While this makes sense to me, I don't care for the look when it's baked.
Thirdly, the Pane Cioccolata formula we used at Artisan III has only 20% levain (in baker's percentages) and therefore it also has a small percentage of dry instant yeast (DIY). If I increase levain to 100% I wouldn't have to have DIY! Also, chocolate chips used were only 12% of total flour, I know my son would just LOVE more chocolate chips.
So here is my Chocolate Sourdough inspired by Chad Robertson's method all by hand (timeline as described in Daniel Wing and Alan Scott's [i]The Bread Builder[/i]) in my previous post.
[b][u][color=red]Formula for My Chocolate Sourdough[/color][/u][/b]
[u]Two nights before bake day - first stage of levain build-up[/u]
- 61 g starter @ 75% hydration
- 121 g bread flour (i.e. two times starter amount for me; I do not know what ratio Chad Robertson uses.)
- 91 g water
Mix and ferment for 6 - 8 hours at 18C / 65 F (depending on your room temperature, you may need shorter or longer fermentation time for your starter to mature)
[u]The morning before bake day - second (and final) stage of levain expansion[/u]
- 273 g starter @ 75% hydration (all from above)
- 273 g bread flour (I use one time starter amount in flour but I do not know what amount Chad Robertson uses)
- 204 g water
Mix and ferment [color=red]for two hours only[/color]
[u]Formula for final dough[/u]
- 750 g starter (all from above)
- 650 g bread flour
- 100 g cocoa powder (8.5% of total flours[color=red]*[/color]verses 5% in SFBI recipe)
- 86 g honey (7% of total flours verses 15% in SFBI recipe)
- 250 g chocolate chips (21% of total flour verses 12.6% in SBFI recipe)
- 433 g water (note: with every 12 g extra water, your total dough hydration will increase by 1%. If you wish, you can increase up to 5% more hydration. See step 10 below.)
- 1 to 2 vanilla pods (optional but really worth it)
- 20 g salt
Total dough weight 2.3 kg and total dough hydration 73%
[color=red]*[/color]Total flour calculation takes into account the flour in starter.
- In a big bowl, first put in water [b]then[/b] put in the starter. Break up the starter thoroughly in the water with your hands.
- Then put in honey; scrape the seeds from the vanilla pods and put it in, and stir to combine
- Put in all the remaining ingredients [b]except choc. chips[/b]
- Stir with a wooden spoon to combine for 1 - 2 minutes. ([b]Take down the time when this is done, this will be your start time.[/b] Starting from this time, your dough is fermenting. From this start time to the time when the dough is divided and shaped, it will be 4 hours; i.e., bulk fermentation is 4 hours. The preferred room temperature is 18 - 21C / 65 - 70F. You may need to adjust your dough temperature by using cooler or warmer water.)
- Autolyse 20 - 30 minutes
- Sprinkle half of the choc. chips on a work surface (spreading about 30 cm by 30 cm) and stretch or pad the sticky dough thinly to cover the choc. chips. Then sprinkle the other half of choc. chips over it; press the choc. chips into the dough so they stick.
- Gather the dough from the edges to the centre and place the choc. chip dough back into the mixing bowl.
- Start the first set of stretch and folds in the bowl by pinching the edges of the dough and fold onto itself to the centre (10 - 20 times). Rotate the bowl as you go. As the dough is quite stiff, you may need both hands for the folding. [b]The hand folding serves as mixing.[/b] I used my left hand to press down the centre, so my right hand can pinch an edge of the dough and fold it to the centre. As you stretch and fold, try not to tear the dough; only stretch as far as it can go.
- After 45 minutes, do a second set of stretch and folds. At the end of this stage, the dough will already feel silky and smooth. As the dough is quite stiff, its strength develops very fast. Be mindful that the bottom of the dough is [b]the right side[/b] of the dough; and the right side of the dough always remain at the bottom in the bowl.
- After another 45 minutes, do a final set of stretch and folds. As the dough feels quite strong, no more folding is necessary (unless you choose to increase total dough hydration, in which case, you may need one more set of stretch and folds).
- At the end of the 4 hour bulk fermentation, divide the dough to 3 - 4 pieces as you wish. Be mindful that the bottom of the dough is the right side; sprinkle some flour on your work bench, and place the pieces right side down.
- Shape the pieces - gather the edges to the centre, flip it over (so the right side is now up) and shape it to a tight ball with both hands. (As I find the dough is quite strong, I did not think pre-shaping is necessary.)
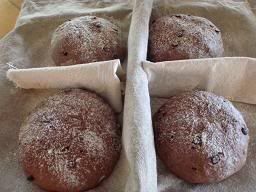
- Place the shaped boules in dusted baskets or couche, right side down and seam side up to encourage volume expansion. Cover.
- Proof for 2 hours in room temperature of 18 - 21C / 65 - 70F.
- Into the refrigerator for retardation at the end of the 2 hour proofing (minimum 8 hours; I did 18 hours).
[b][u]Bake Day[/u][/b]
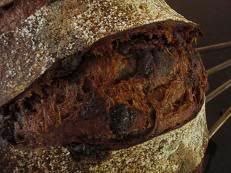
- Bake the boules cold for best result (ie, straight out of refrigerator). Just before baking, sift flour on the dough and score it. Bake at 190C / 380F (not higher due to honey) for 40 minutes. Once the dough is loaded onto the baking stone, steam the oven with no more than 1 cup of boiling hot water.
- Note: I find better result when baked cold. One boule was left at room temp while others were being baked, and it became quite puffy so when I scored, it deflated quite a lot and there was no noticeable oven spring with this bake.
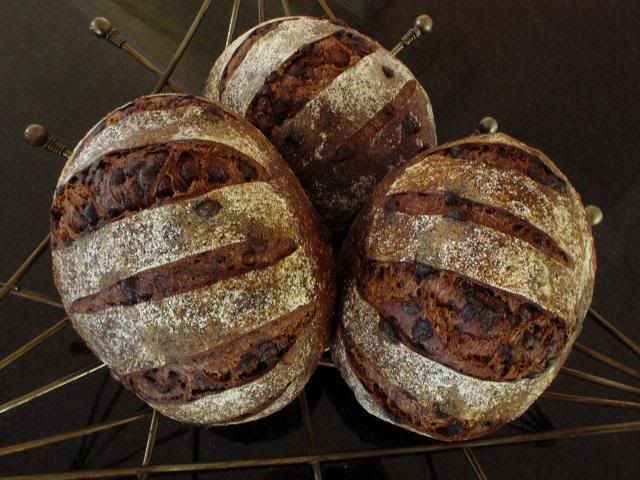
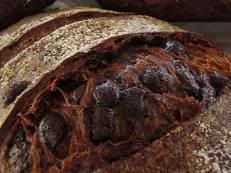
I sliced one of the boules and went down to the back yard to water the plants. When I came back up, my son said to me, Mum, the chocolate sourdough was [b][color=red]epic[/color][/b]. How I love his choice of words. Well, you know how to please a growing boy - make a chocolate sourdough!
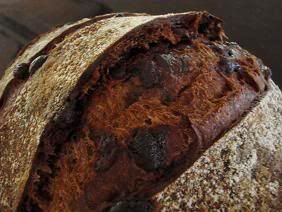
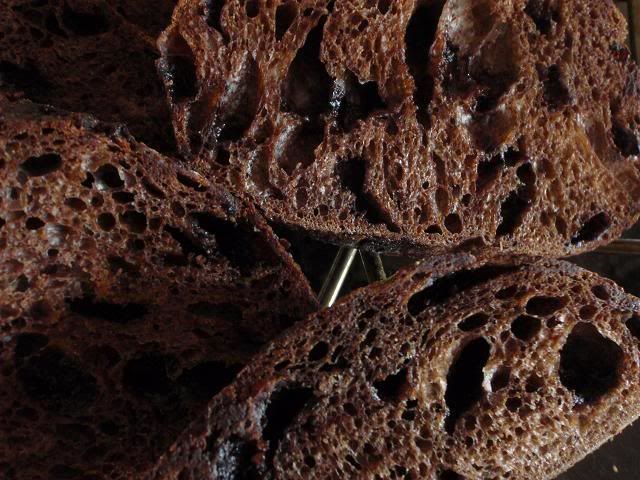
This is the first time that I made a chocolate sourdough - it is not sour at all because of the chocolate and honey, but it is very chewy. And the crust! Very crispy. The crumb? Very more-ish.
I don't imagine you find chocolate sourdough made this way in the shops - they would go bankrupt if they do - too much work (but absolutely worth the trouble for home bakers)!
Shiao-Ping
- Shiao-Ping's Blog
- Log in or register to post comments
Just beautiful!
And yummy-looking, too. Congratulations on yet another winner!
Susan from San Diego
Lovely to hear from you. The one chocolate sourdough (Pane al cioccolato) on the net that I like is from Elra's Baking [b]here[/b]; I found her rich dark chocolate color very sensual.
Shiao-Ping -
I always marvel at the pictures you include of your creations - it's bread but it's art as well. Lucky for you to have a son who understands this art is best appreciated in its eating!
I am just building my first rye starter, so soon I'll be venturing into a totally new type of bread. I don't remember Hamelman instructing to score loaves before proofing, but in re-reading his section on rye he indicates that in doughs with rye content in excess of 80%, he uses an instrument called a 'dough docker' which creates small holes without undermining the structure of the risen loaf.
Again, absolutely beautiful loaves of bread!
before proofing. But just in general I can't get past the gumminess of breads made with a high % of rye; that's the kind of[b] texture[/b] that I don't like in breads. When I was much younger, I loved caraways rye breads.
What is a "dough cocker"?
The link will show you some pictures of various types. They prick the surface of the dough, rather than create a single slash:
http://tinyurl.com/ol9l66
Larry
The link will show you some pictures of various types. They prick the surface of the dough, rather than create a single slash:
http://tinyurl.com/ol9l66
Larry
I have seen that before - with small round holes like this from David's blog (his Hamelman's 70% rye sourdough). I remember reading MC from her blog (farine-mc) that she doesn't care for the look. Oh, by the way, she recently wrote a wonderful story about a classmate in our Artisan III course, [b]Lumi[/b], a professional baker originally from Romania. Lumi was in our class where both I and MC attended. What a great story. This is the link to that story: http://www.farine-mc.com/2009/09/meet-baker-lumi-cirstea.html.
Do you have many professional bakers in the course that you attended?
Shiao-Ping
We did. Our class of 12 was about evenly split between amateurs and professional bakers. Most of the professionals, however, were there to learn about artisan type breads and did not bake them on a routine basis. But, watching them work with dough, you knew this was something they did on a daily basis.
Larry
Gorgeous loaves and photos, Shiao-Ping! I can just imagine the aroma!
Sylvia
... you posted this! I have made chocolate sourdough breads twice from recipes I found on the internet, and even though they had gotten glorious reviews from their bakers, they didn't convince me. They were o.k. but not great at all. Zingerman's (a very famous Michigan-based Delicatessen with fantastic breads) sells an excellent chocolate bread and I have wanted to recreate it. Maybe your recipe will give me something close to theirs. I'll certainly try it. As you know, your fruit bread was a great success and is now a constant in my household, so maybe this will become one too. My 15-year old son would certainly be thrilled!
My son will be 15 in November so they are similar in age. Try a bit higher hydration, say up to 75 - 76% total dough hydration, if you do try the formula so the crumb will be even more open.
Shiao-Ping,
I try to do this bread each Christmas with dried cherries. Mine has a slightly tighter crumb but your bread looks wonderful.
Meryl
Nice to hear from you. To add cherries (pre-soaked in say Kirsch) would be a great idea. I pre-soaked dried cranberries in Grand Marnier an a bit of sugar in the fridge a few days ago for this chocolate sourdough but completely forgotten about it. At the Artisan III course, our instructor added quite a bit of water into the final mixing of our team's batter and I calculated the total hydration would have been something like 77.5%. So it might be worthwhile next time if you make it again to try higher hydration. I definitely would.
Wish I was there!
Betty
i'm tempted to try it but i haven't yet ventured into sourdough. maybe one day...
Maybe my steps look too complicated? Sometimes I am tempted to just do outliine of the steps. A girl friend whose son plays tennis in the same school as my son, and who I had given one of the boules said,
I can remember in the old days people go to friends' house for tea and bring a cake or pie with them for dessert. These days I find people welcome a sourdough!
Hi Shiao-Ping. Looks great. Just wondering, is the end result as much like a chocolate cake as a bread?
I'm curious to try this one myself anyway, but it so happens I've been searching in vain for a tried and true sourdough chocolate cake I like the look of, so thought maybe this recipe could fill the bill.
I'm thinking of the banana bread I make - initially, it was to use up starter, but it's so damned yummy I now create starter especially! Anyway, this banana bread could pass as a cake or a bread IMO, so thought maybe your chocolate bread is similar?
This is a 100% sourdough; I mean, it is a bread, not cake. On of the main differences is in their crumb texture. With a sourdough, the crumb is very chewy which you don't get if it were a cake. The chocolate chips would keep those who have a sweet tooth very happy, and at the same time, people who DON'T have a sweet tooth would find it interesting too, I think.
I have been pastry bakers for years and had experimented on many versions of banana breads (and carrot cakes). How do you make your banana sourdough breads?
Thanks.
Shiao-Ping
Well, I hesitate to offer my banana bread recipe, Shiao-Ping, since you have experimented so much with the same thing and have established yourself as such a superb baker! However, while I am relatively new to sourdough bread baking, I am an experienced home cook, more than competent I think, and do trust my taste - this is a good banana bread based on the three times I've baked it.
Rather than take up space on this excellent thread, though, I'll point you to the recipe, which I posted on this thread on the Sourdough Companion site.
I'm VERY interested in any of your banana bread recipes that you consider truly excellent, however. The above is the only banana bread I've baked, and while I like it a lot, I'm sure it's not absolute state-of-the-art.
Cheers!
Ross
it is very interesting. I'd like to try it one day.
One of my most favourite banana breads recipes uses Earl Grey tea and I added orange peels. Many people who like to make quick breads seem to have a blind faith in oil or butter as a way of making the quick breads moist. The Earl Greay tea banana breads use tea as "hydration" (if I may use that word) and therefore cuts down the use of oil and the result is a very moist bread. To me it is a bit like the effect of some milk or juice when you make chiffon cake it allows you not to use so much oil and still achieves a very moist cake. I don't have the recipe by heart or on hand, but in memory it uses 4 or 5 tea bags which are made into a very strong tea of about 250 ml and it uses dark brown sugar too - do you like this strong Earl Grey tea and dark brown sugar combination? if you do, introduce another layer of flavor in very fine orange zest, then the rich creaminess of the very ripe bananas will be turned into something really light and delightful.
I've never heard of using tea as a moistening agent! That's something I'll try next bake. I'm not a fan of Earl Grey, but no doubt any tea would work as well in terms of adding mositure (albeit creating a different flavour).
Orange zest is actually an optional extra in the original recipe on which I based my current banana bread, but I haven't tried that yet, either. I imagine it will go well though, being in natural harmony with banana. I was also planning on adding a little cinnamon next bake, too.
Dark brown sugar adds yet another dimension - thanks for that suggestion!
So I started the recipe last night and then did all the work on the dough today. It was amazingly sticky the first time I did the S&F. I came back with a lot stuck to my hands. Then the second S&F I found the dough more "silky". Now, I did the S&Fs in my KitchenAid mixer bowl. Is that the same kind of bowl you use? Or do you use maybe a more wide and shallow mixing bowl.
I would love to see a video on how you do your S&F in the bowl.
After briefly mixing with a spoon when adding the flour/cocoa powder etc I put it in my mixer for a couple of minutes. It seemed so difficult to get a good dough with just a spoon, do you have some tips for that or is it going to be okay in the mixer?
Also, I wanted to clarify, sweetened or unsweetened cocoa powder? I used about 1/2 and 1/2 so we will see how it turns out tomorrow.
Last question for now, I don't have the rising baskets for the dough, so I used some rice flour and put one in a 4 cup pyrex measuring cup, one in a 8 cup pampered chef mixing bowl and the last one in a different glass bowl. Will this work or do I need to make the investment in the special baskets?
(1) My stainless steel mixing bowl is more wide and shalow than the KitchinAid mixer bowl. If you are doing a big batch of dough (as in my formula), the KitchenAid bowl may be too small to do S&F comfortably and effectively, unless you really make sure to stretch dough [b][color=red]gently[/color] from under the bowl[/b].
(2) Video? There is really nothing unusual about the way I stretch and fold the dough. With my left hand holding the edge of the bowl, my right hand lifts a corner of the dough from under the bottom of the bowl and folds the piece back onto the dough. Sometimes instead of holding the edge of the bowl, my left hand would gently press the left side of the dough, so my right hand can lift and strech, more easily, the dough from the righ side. One stretch and fold is what I call one stroke. After one stroke, my left hand gives the mixing bowl 1/8 turn counter-clockwise, so the right hand can continue to stretch & fold the dough on a different spot. Continue this until at least two full turns of the bowl; ie, 8 x 2 = 16 strokes are completed (more or less strokes depending on how well the dough strength has developed).
(3) Cocoa powder - I went and checked the bag that I used. It is unsweetened. Sorry but I thought unless otherwise specified, cocoa powder means unsweetened. If you had used 1/2 and 1/2, that would be fine, I think.
(4) Special baskets, or bannetons, won't be necessary. The way you did is just as fine. But are you sure you have dusted with enough rice flour? Because the Pyrex and glass bowls will not allow the doughs to breathe, I don't know if they will stick and be hard to turn out onto the baking paper. A safer way is perhaps using kitchen towels as couche. You simply dust flour on the kitchen towel and place shaped doughs on them. (Note: if you use rice flour, be sure to pat as much of it out of the surface of the dough when you bake; the rice flour can leave an unpleasant taste on the bread.)
Hope this helps.
That does help thank you. Maybe tonight I will remove them from the bowls and put towels under them. Do you put them in the towels and then back in the bowls? They will still have 24 hours completely undistrubed before I bake them tomorrow night. It will be a great end to the day after listening to tax law at a seminar all day!
I guess my S&F method will be tested in the shape and texture of the bread when it is done. I will try to take a picture and post.
... if my loaves are not free-standing loaves on a couche, I use bannetons or baskets, which allow the dough to breathe. It will indeed be a great end to a whole day seminar! Gee, I can't remember when was the last time I was in a conference like that ... what do they call it... an "off -site" meeting!
I will be fun to see how you go. Now I am excited too.
Okay, so how do you get it to not dry out? Do you put it all in a plastic bag?
Yeah, tax seminars can be boring, but sometimes interesting too. I am not optimistic about this one as it is put on by professors.
Thanks for all the advice
I normally wrap around it with kitchen towels to absorb some moisture before I put the whole thing into a big plastic bag (garbage bag, actually).
Shiao-Ping
Here are some pictures (If I did it right from flickr?)
It turned out really yummy. The crust was not too thick either, like some of my earlier breads, I think that can be attributed to an oven themometer I bought tonight. The bread rose just fine in the glass bowls with PressNSeal over top. The other I put in a colander with a cloth and rice flour. I forgot to steam the oven right at first! After all that work, ARGH. One I covered with a bowl, but didnt' get great oven spring off of it. I won't do the bowl trick again (it worked great for my regular sourdough).
The bread was delicious. I don't know if my texture/crumb was right, but it sure tasted good.
I am not able to see your pictures but I am happy to learn that they turned out yummy to your taste. Baking technique is not one-method-fits-all kind of thing. What works for other people may not work for our set-up at home. I had to experiment with my own oven many times before I could get the result I want. Some bakers get great oven spring although I have never tried it. Thanks for the update on your Chocolate Sourdough.
Shiao-Ping
... I am not being unkind but we've just had such hot weather lately.
Your crumb looks delicious!
Dear Shiao-Ping,
Oh my goodness! Your chocolate sourdough turned out so wonderful that I immediately started two more batches. There are so many people I want to give it to. My second batch is shaped and in the final proofing stage. Hope I can find room in the fridge for three more loaves. LOL.
I know you said to bake cold, but I'm assuming you do preheat your oven, right? Do you bake on a lower rack or in the middle? And lastly, did you mean two full vanilla beans or two inches of one? I noticed on the jar it said one inch of bean was equal to one teaspoon of vanilla extract. Around here vanilla beans are $11 per each or two for $20. Do you think vanilla extract would work?
Your formula for this bread was just the best gift for 2010 I could imagine, and it's only February!!!!! Thank you so much for sharing.
Syb
To bake cold, I mean the dough is cold, straight out of fridge, but the oven is definiately pre-heated to very hot. You can warm up your dough to room temperature before you bake if you prefer that way, but you'll have to watch the overall fermenatation time of your dough.
I bake in the middle of the oven as we want full heat impact.
And about vanilla beans, I meant one or two vanilla pods. (I am not sure if I am using the correct terminology, but one vanilla pod is about 15 to 18 cm long, about 6 - 7 inches.) They used to be expensive, but the prices have come down quite a lot lately as more people use them for their pastry making. It's about $3 - $4 a pod. You certainly can use vanilla extract, a couple of teaspoons would be fine.
Thank you for your feedback.
Shiao-Ping
Thanks, Shiao-Ping. I have six loaves in the fridge to bake this morning. Yippee!! Then I'm going on a bread run. My friends will be so excited.
Yes, the 6-7 inch vanilla pods are the same ones I was referring to. I bought mine at Albertson's, and the ones I price checked were Spice Islands and McCormick. I'll try calling around to Whole Foods and Central Market to see if they might have a better price. A $20 ingredient price for one batch is so not doable for me, as I plan to be making lots of this wonderful bread.
Best to you,
Syb
... on one vanilla pod. You'd be better off just using vanilla extract.
Shiao-Ping
Hi Sybram-
hope you don't mind if I jump in here...I saw this post about vanilla pods/beans and just wanted to add my two cents because I just bought some.
I too looked at Albertson's and the ones they had were, yeah, about $15.99 or something for 2. and they looked kind of dry.
Alas, I found 8 organic vanilla pods at Costco for $12.95. Not bad.
Just wanted to pass this along!
Thanks for chipping in.
Shiao-Ping
Yes, thanks for the heads up, Inlove.
Syb
THIS BREAD SOUNDS WONDERFUL --- I JUST NEED TO KNOW WHEN YOU ADD THE PRALINE ALMONDS, IN MY CASE I WILL USE PRALINE PECANS AS I LIVE IN A LARGE PECAN PRODUCTION AREA IN TEXAS, IS IT WHEN YOU ADD THE CHOCOLATE CHIPS ? --- YOUR INITIAL RECIPE INCLUDES THE ALMONDS AND THEN YOUR METHOD DOES NOT SHOW WHEN THEY ARE ADDED --- I WILL TRY TO SEND PHOTOS IF MINE TURNS OUT ----
TONY
Yes, I did add the candy nuts and the chocolate chips at the same time.
Shiao-Ping
I think "epic" is a very succint description for this recipe! I have made it five times since I came across this recipe in October '09 and it has been fantastic every time. One substitution (if you could call it that) that I really enjoy is chopping up part of a Trader Joe's Pound Plus dark chocolate bar and using that instead of chocolate chips. Thank you for sharing this delicious recipe!!
In the instructions above you highlight in RED to let 2nd build ferment for 2 hours only. So, I wonder, what happens after 2 hours because it is still a day away from baking day....
I am assuming it goes into the refrigerator to complete the fermenting cycle at lower temps???
My daughter is more than ready to try this one of yours too. :-)
(I left a reply on another one of your blog pages this afternoon asking about your S&F technique. I think the above answers that question. If I am correct what you are doing is the technique Dan Lepard uses in his book The Handmade Loaf for some of his loaves....Do you use this method for the stiffer doughs?)
Thanks
jc
After the two hours second build of the starter, I then folllowed the 15 steps procedure for the final dough. If your starter is strong and healthy, you do not need to do this 2-hour second build. You can go straight to the final dough.
Sorry that my description seems to be a bit confusing but I was doing an experiment with my starter.
Thank you for the explanation.
Your directions are wonderful! One of the reasons I love what you contribute is due to your meticulous descriptions of what you are doing and how you are doing it.
I am very new to all of this - especially the retarding of the final doughs in the refrigerator overnight or longer so I need lots of pictures and lots of descriptive words and you are a 'master' at both! I just needed a 'bridge' to get from the second build to the final build and now that I read the formula again I see how it comes together with that final retarding in the refrigerator.
My daughter is drooling just looking at your pictures. This loaf has been moved up on my 'to bake' list because of her mournful eyes....
Again, thank you for ALL that you contribute. You inspire me to try things I never before would have tried to do with doughs!
When you stretch and fold your dough, only stretch it upward to as far as it can naturally and comfortably go - if you have noticed a tear in your dough (no matter how small), you have gone too far, and you really don't need to for the build-up of gluten strength in your dough. Last night I was S&Folding this bread, below, that I baked this morning for breakfast. My stretch & folds were gentle and few (4 times, each time about 4 - 6 strokes only). You could almost say that the dough strength was developed by itself. It didn't need a lot of S&F's. I think in the past I tended to do too many.
Good luck.
Shiao-Ping
What an incredible looking loaf. Looks like it had a huge oven spring!!! Very interesting scoring pattern. I still can't score a loaf without dragging bits of dough. I just baked a loaf today - hanseata's German Flaxseed Rye - that she used a cookie cutter to 'score'. Worked great for me the first time!!! Think I will adapt that method from now on. :-)
Now that I know the 2 different methods of S & Fs I am experimenting with them. I have been afraid of not kneading enough and ending up with 'bricks' instead of nicely risen loaves but I am finding that there is a lot of leeway especially when retarding loaves overnight in the refrigerator. That is a new technique for me too.
Thank you for all of your help here again!
Janet
Came out good, but I think they could have used a bit longer RT proof before retarding. I used the Ischia culture which tends to be pretty mild.
Thanks for the recipe!
-Peter
Hi there, this recipe sounds amazing! I am a first time baker and I have been cultivating my starter for two weeks. I have been feeding 50 gr of it twice a day with 100gr of water and 100 grams of all purpose flour.
My silly question is: when you refer to the starter 75% hydration, what do you mean? Do the 50 gr of my starter count as water or is it just the H2O?
Do you think this is a reasonable first bread to make?
Thank you again!!
Flora