I wanted to get a sense of under and over proofing. I used a 70% hydration SD dough and shaped 6 baguettes. I baked them proofed at 0, 30, 60, 90, 120, and 150 minutes. Preheat to 550, down to 485 to bake with steam for 10 minutes, then remove the steam pan for an additional 10 minutes then remove the baguette and allow 10 minutes for the oven to regain 550. They were misted before they were slashed.
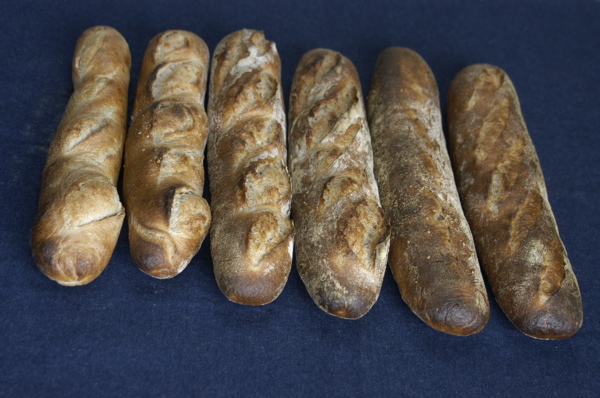
This was near to what I expected. On the left is 0 proofing and on the right is 150. With less proofing they tend to cinch in around the slashes and as the proofing time extends they don't. I mishandled the 120 a bit is why it looks worse than the 150, I think.
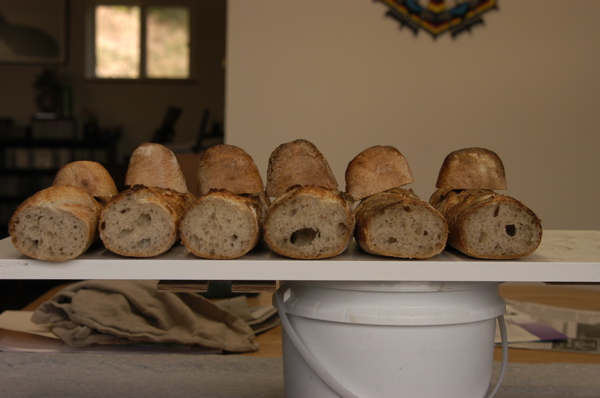
The 60 minute is the most round, the 120 again got rough treatment, the 150 bucks up better, but it's still not as round.
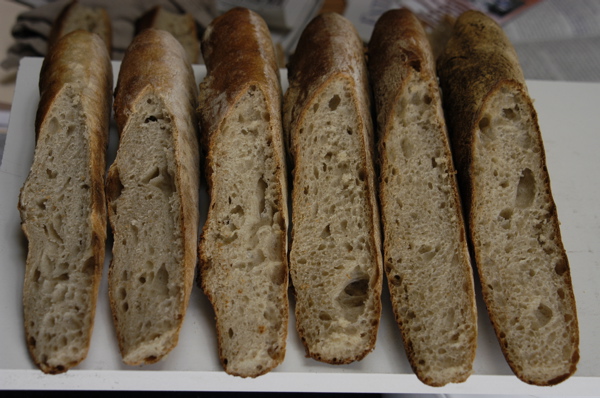
0 on the left, 150 on the right. I expected to see dense crumb near the crust on the underproofed loaves, but it surprised me that the 150 is really the only one without denseness near the crust. I don't know what to make of that. I wish that I had been more careful with the 120.
Anyway, for what it's worth, I thought I'd share.
:-Paul
Pablo,
Great post! From a slashing and oven rise standpoint, I would pick the 90 minute (4th from the left) version. Actually the crumb of all of them look pretty good. I'm really surprised the zero proof looks as good as it does. I'm also surprised that the 150 is as well browned as it is.
You are such a solid baker, I commend you for doing this research and sharing with us. It gives me pause for thought about the window of time I use for proofing. Lately I have been trying to ferment longer and proof shorter, in the order of 30-45 minutes with out regard to the amount of volume increase. Strictly a time/temp consideration.
Thanks Pablo, good to see you active.
Eric
Hi Eric,
although I'm still kicking myself for mishandling the 120. The dough felt and looked quite different at 120 than it did at 90 and I kind of figured "what the heck" at that point. It felt more like a squishy catepillar in the garden, no deep body to it any longer - definitely more liquid feeling. I slashed it while not really believing that I could get a good slash, and I didn't. I was much more careful with the 150 and it turned out OK. So, again, still kicking myself.
I was determined to bake them all the same amount independent of how brown they got. It seemed in the nature of the experiment. I think my oven is more casual about temperature than I would like.
Thanks for the comments and I'm glad that you got something out of the post.
Why are you going for the shorter proof at the moment? Oven spring?
FYI I was particularly pleased with this dough as it used a lot of levain. I have changed my starter management procedure and I refresh the starter 2xs a day right now. I keep the starter at about 80 % and I mix flour with the leftover from the refreshment down to 50% and throw it in the 'fridge. Then, when it's bake time, I made the dough with 565g 50% old levain and 565g 100% newly mixed and ripe levain and additional 430g flour and 290g water to get to 1850g 70% dough.
:-Paul
I 2nd all Eric had to say.
Betty
PS I miss your 'stache avatar !
there's a new avatar in the works, I'm thinkin'...
:-Paul
Very interesting experiment, Pablo. Really nice of you to take such trouble to share it with us.
--Pamela
Hi Pamela,
I hope it's useful. I learned a bit. Partly that it didn't perform just as I thought that it would.
:-Paul
and your experiment answers a lot of my unspoken questions about why the cinching happens, why my scoring disappears sometimes, etc. Biggest surprise is that the 0 turned out to be almost as good as the rest in terms of crumb.
Thanks for the post!
Patricia
It wasn't what i predicted either. It's also edible! I glad you find the post helpful.
:-Paul
For me the under-proofed baguettes were the most interesting, i.e., seeing how they just wanted to burst out of their scoring.
If is often difficult to judge when a baguette is properly proofed. I'm going to keep a closer eye on time and scoring results with my future baguettes.
--Pamela
Those photos are most interesting, so, as the rest of the gang has said, thanks so much for going through with the experiment and posting your results!
I was particularly surprised at how (seemingly) well-developed the crumb of no-proof baguette looks. The exterior looks a bit paler than the rest - is that due to the oven or the lack of proof? And what about the taste? How does the no-proof compare to perfect-proof and over-proof?
I tried to bake them identically, but I think my oven has a broad range of acceptable results for a given temperature. So the relative paleness of the first bake I THINK is more due to the proofing, but I can't say for sure. Another variable is where they get placed on the stone. The closer to an edge, the more likely there will be darkening. I don't always get them right where I want them off the peel. sigh.
Taste-wise I'm not very open to subtleties. Once I got done with the experiment and all we just started eating them and I can't say that any tasted different than any other, but we're still working through them. The denser crumb does have an impact on the "mouth feel". Perhaps I'll have an "ah ha!" moment. I'll let you know if I do.
:-Paul
In the first place, none of the baguettes has a wonderful crumb, compared to others Pablo has baked.
In the second place, while optimal proofing certainly contributes to optimal crumb, it is less important than optimal (gentle) mixing, optimal fermentation and good dough handling.
On the other hand, I think Pablo did demonstrate the effects of different degrees of proofing on how the cuts behave.
David
Hi David,
Maybe my next experiment could be identical dough and proofing with different handling. Certainly that would be easy to do as re: shaping. The Danielle Forestier method demonstrated on the Julia Child PBS video was pretty rough - she really slams the dough around in her shaping process, vs a much gentler approach like Dan DiMuzio recommends in his Bread Baking, An Aritsan's Perspective book, and many others as well.
It's nice that you reference a previous crumb of mine. That's kind of the point for me. Sometimes they come out great, and sometimes not so great. We often reference over or under proofing as a culprit and I wanted to see if I can isolate some of the factors so that I might start to approach some small amount of consistency.
When you say "optimal fermentation" that seems to me to have the biggest latitude. Often we stick it in the 'fridge for an extra 12 - 24 hours for some more flavour. It seems to me that there's a really wide window for fermentation. And then there's punching it down or degassing or turning or stretch and fold or just fold. What do you think? What is the ultimate goal of "optimal fermentation" I guess is a question.
:-Paul