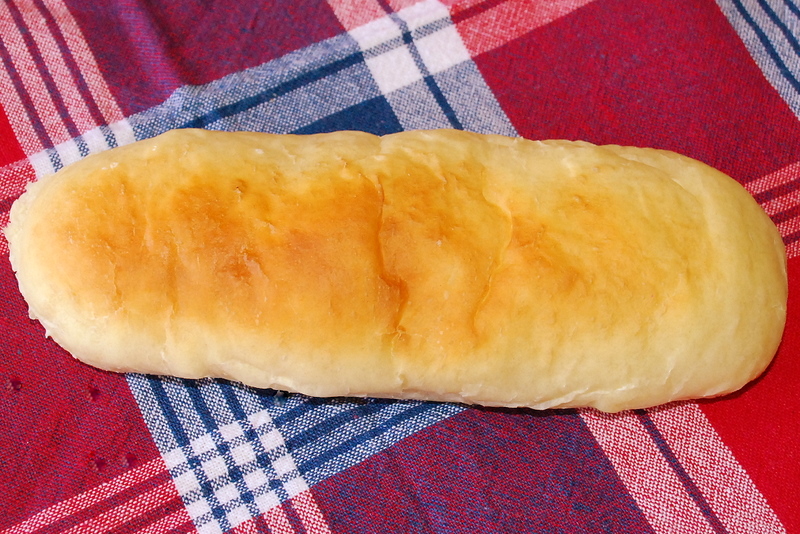
Thanks to the great video's by Mark, hamburger buns and rolls are super easy. We were grilling out Cajun sausages this weekend and I CANNOT get the tension right on the longer sandwich rolls. They are still better than what I get in the store, but there has got to be a way.These flattened slightly. Anybody? Mark? HELP!
Audra
Just form them like mini-batards and handle them gently. I score mine twice (two slits, one on top of the other) about 15 minutes before baking.
--Pamela
tried to handle them gently and they completely flattened. ??? Practice practice practice.
Audra
Audra, could your dough be too slack?
I have some pictures here: http://gallery.me.com/xaipete#100172
--Pamela
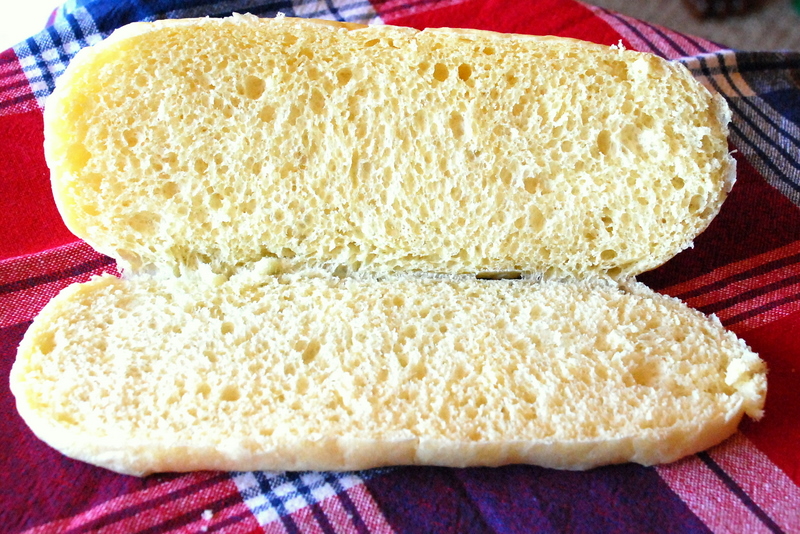
It is a very sticky dough till I knead and rise. I wanted these to be very light and fluffy so I keep the flour to a minimum. The hamburger buns come out fine. As I roll the balls around under my cupped hand, they tighten right up off of a sticky/ non floured counter. That is what I tried to do yesterday. I tucked them in just like Mark in his video, but they just never would get tight enough. I tried rolling like a snake, but they just got longer. I did not give up on the hamburger buns till I got them just like I wanted and I won't on these. The formula had ( half recipe size) 3/4 cup liquid, plus 2 T. melted crisco, 1/2 beaten egg and about 2 and 1/2 cups flour plus a little on the counter to get the kneading process started. And (if it helps) it has 2 T. sugar, yeast, and salt. Any help is appreciated.
Audra
Hi Audra. So you are working with just half a recipe, i.e., you just made 1/2 the original recipe? Are you weighing out your ingredients or using a volume measure? I'm thinking that maybe your dough is too hydrated, especially if you are using volume measurements. If your recipe works well for the hamburger buns, try making a whole recipe and using half of it for each type--maybe this will straighten out halving a volume problem. The only other thing I can think of might be the size of your Hoagie rolls. Maybe the recipe works well for a round hamburger bun but is too hydrated for a long Hoagie roll. I make pretty small Hoagie rolls as you can see from the link I sent you. I always weigh everything because I have found that volume measurements aren't very accurate. When I change the amount of the recipe, I use Baker's math to calculate how much of what I need--e.g., 1/2 an egg = 25 grams.
--Pamela
I do weigh the ingredients, but I do have the recipe written out in the "whole" size version. It is entirely possible that in my haste I forget to halve. I have done that before on other things. I liked the recipe for the hamburger buns, as well as my children esp., it is sooo soft and fluffy. Do you think I can add more flour to stiffen, or just find another recipe? I haven't had this problem. AAARRRGGGHH!
Audra
Didn't anyone tell you? Rolls are harder to make than hoagie buns. If you can do the rolls and burger buns, these should be a piece of cake. The preshape on a baguette is a hoagie roll shape. You've probably seen the baguette video but maybe check it out again. Just keep one side against your table and start rolling up the side near you. To keep it from sticking to the table, you can either flip it around like I do in the video, or use your finger tips to tuck that sticky edge in as you start rolling. Then as you feel like it's getting tight, stop and seal the seam and put it seam down on your pan to rise.
Depending on how resilient your dough is, you might need to preshape it (in which case it would rest seam side up), but for anything in the 10" range or below, I just go straight to final shape. The only time I'm using a preshape on something relatively short is when it needs time to come up to room temp like with the Anis baguette recipe.
-Mark
http://TheBackHomeBakery.com
I am going to try this again first of the week. Thank you for your help. I was hoping you'd check in yesterday. What I did was way too flat yesterday for what I wanted, so I split them and did the butter/garlic/ toast routine and no body knew that is not what I planned. I'll never tell. You are such a good teacher on the buns though, I get them too tall for some members of the family and they have requested that I mash them a little or cut out about 3/4 inch out of the middle. Boy some days you just can't win! ;) Thanks Mark, you are a life saver. I'll get back to the kitchen!
Audra
If you're getting your rolls 'too tall' you must be shaping them pretty tight. When I'm making them into burger buns or I'll be filling them, I do just like you said, and 'smash them down'. After they're formed into rolls, I let them rest (covered) for 30 minutes on a floury surface, then I smash them down with the heel of my hands (easier to do 1 with each hand), then put them on the pans for final proofing.
-Mark
Maybe my female hands being smaller than yours? I'm definitely not giving up. I have gotten very stubborn about this now. I have armed myself with my flour covered "super girl cape" , furrowed brow, and rolled up sleeves I march back to battle my new nemesis the evil sandwich roll!!! I gotta get a life! I'll let you all know the outcome. It may not be today though- no school today. Alabama had a snow flurry yesterday!! WWWOOOOWWW! Our couple of inches and no school will make you snicker way up where you are, but it has been 7 years since we've seen snow, so here's a snowball from our house to yours!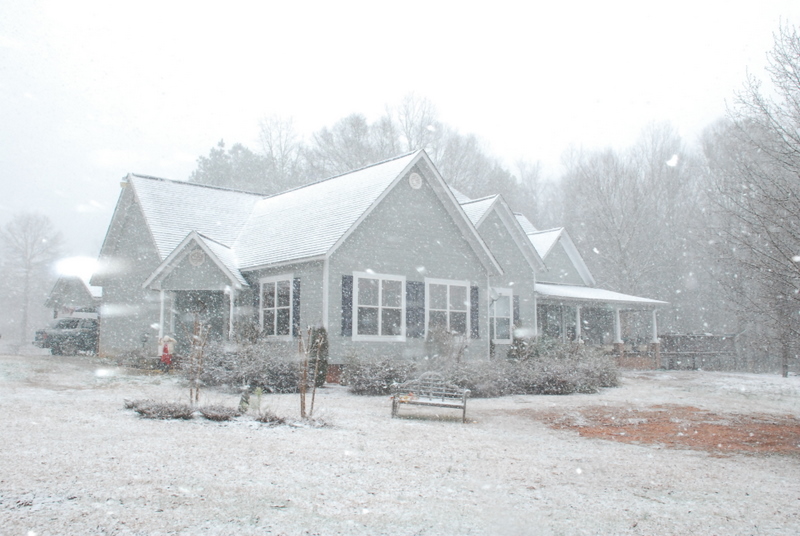
Ive been missing out on your pics...hope you post more on the front page blog...so I don't miss any more! Lovely picture!
Sylvia
I'd try adding a little more flour. --Pamela
But I am so glad they worked this time as hoagies. I think you Mark thought I had flipped my wig, since I could do buns but not sandwich rolls! Thank you all!
Audra
They look like little sliders! --Pamela
had of gotten a picture of the sandwich rolls. Jason already laughs at all the food photos that clog up my files. Oh well. There's always next time.
Audra
Audra,
Although your burgers appear to be round and not square, they look like they are sized like Slyders from White Castle. Your rolls look very round, not easy for something that small. Good job.
-Mark
edit: Pamela, you beat me to it.
that you even know about White Castle since your eating habits are so health conscious! --Pamela
Is that how you spell it? Slyders?
That's what I've been told. I believe it's a trademarked term. I only know about White Castle from all of the Beastie Boys that I listen to (about 5 references on 'Licensed to Ill' alone. I bet Floyd could name at least 3). Cause you know I went to school in New York.
Pheew. Glad I talked my way out of that one.
-Mark
Hey Audra, I have to say it...these are adorable....I bet the kids loved em!!
Sylvia
You should sell those video's! You are ( still) a great teacher. We don't have White Castle here but I have heard of them.
But me, I'm an ole' Guns and Roses gal myself! I'm glad were "grown up's" here, I hate it when I mention music and I get the old "Who?" from the kids! Emily thinks I'm a Believer was a song by Donkey on Shrek! When I told her it was by the Monkey's she laughed and laughed. They (the Monkey's) were on Biography last night and I could have proved it but dang her she was already asleep. Oh well....
But thanks on the burgers. They really did look better than the pictures showed. I cannot get my very very close-ups of food to show detail. For the love of God it's a 10.2 megapixel camera what does it take???I really admire those of you who can do those food pic.s that look like they are suppose to.
Audra,
I learned this from Wild Yeast Susan. Shut the flash on your camera off and turn the lights off in your house (doesn't work at night so well). If you only use natural light, your pictures look a lot more warm and lifelike. Sometimes you have to change the angle around from where you're standing or taking a picture to make it look better. This picture of a loaf of Finnish Rye is from Susan's blog page and the one below that is from Manuela's Italian Jam Tart post here on TFL. Both look like they were taken with the light behind and to the side, and maybe in the morning time too. Neither looks like they had any artificial lights on. Cool, huh?
Oh and by the way, I saw G-n-R back in the day in Philadelphia. Axel wasn't feeling too well that night, but I don't think that was too unusual for him.
-Mark
Pamela below, had some great tips and I will try to round up some extra lighting like you said and see tomorrow if I can turn out some better shots. Your bread, tart and her sandwich looks like you two take the money shots on the Food Network! I am baking tomorrow and maybe I can upload some better stuff. Maybe!
Audra
Just use the sun and the brightness of the snow outside.
-Mark
I too have suffered a lot of frustration trying to take photos of food. I also have a decent camera with a lot of functions and capabilities. I tried reading the manual a number of times, but I just didn't know enough to understand how to help myself.
Last week one of my kids, who knows about cameras and taking pictures, spent about an hour with me over the phone and showed me how to improve my results.
There were 4 things that she taught me:
1. Set my camera to something call "macro mode". I don't know if it is called that on every camera, but it is a mode that allows you to shoot objects at very close range. Macro mode shuts off the flash.
2. Adjust the exposure. Exposure settings run between -2 and +2. If you have a lot of natural sunlight, then you can go to the minus levels. If it is really cloudy outside and there isn't a lot of light, then you go to the plus levels.
3. Change the ISO speed. The goal is to shoot at the lowest speed you can. I'm able to shoot at 200 if I have decent light.
4. Hold down the shooting button half way so the camera can meter the light, then once it is metered (on mine I get a green light) finish depressing the button. I've owned this camera for 5 years and never knew that you weren't suppose to let up on the button after depressing it half-way--what a dummy I was!
Anyway, I hope this helps. I've been playing around with these settings and their various combinations. My pictures are *not* great yet, but they are getting better and I am able to shoot close up now.
--Pamela
Boy have I got a lot to learn about food photography. Thanks for all the info Pamela. That is a beautiful shot. I do very well on outdoors but indoors closeups are a whole different thing. It is so frustrating when my food detail doesn't come out well. My indoor lighting is poor. High ceilings and they are wood. That does not reflect well at all. I have a slave flash, but I think they only work when your camera flash does, so I end up time after time- either too bright or trying to edit in flash on the computer and that changes the tones. If I had time, I would love to take a class. Nothing fancy, just to get better shots indoors. My camera does have Macro, and I do try it, but with the high ISO I wasn't getting the results I wanted. I'll keep at it. Thanks for all your help. I am doing another run of rolls tomorrow, so I will try to practice.
Audra
What is the model number of your camera? I'll look at a pdf of the manual and maybe I can find the right settings for you. My camera doesn't even have an ISO setting that high. Also I often shoot on my ironing board--I'm not kidding--because I can move it around to a location with sun.
--Pamela
5. Zoom. Make sure you do not use the zoom feature.
--Pamela
I don't have to zoom so much, the photo won't take. It will just zoom in and out repeatedly, and not take the picture. I have tried different setting, and it still won't work for me. The camera is a Nikon D80. I got a package deal with the camera body and a 18-135mm lens from Santa! The camera I had before was simply a Sony Cybershot, aim and shoot model. Which did OK but didn't teach me anything. I thought how hard can this be? HA! Like I said, I do great outside, but inside is a whole nother matter. My indoor lighting stinks, but I have had good luck with the slave flash I got after I found out what a crappy flash the D80 came with.Should I just take the picture and "zoom" with the computer? Provided the picture is clear, we have pixels to spare. But I know that doesn't always work. I like the ironing board idea. I do have good windows. I have even resorted to taking food outside when nothing else would work for me. I hate to have to tell my hubby that I need an umbrella stand, a reflector, and a soft box to take pictures of my bread! I can hear it now! But he buys (what I call stupid stuff) for his hobbies all the time.
I have tried the manual that came with the camera. With a 6 and a 3 year old, I do good to read one sentence, before I get interrupted. Sometimes I wonder about my having children after 40 . I went to Books-A-Million to get a starter book, but got over whelmed and came home empty handed. I will try some different settings and move my lamps around and see what I can get going tomorrow while my dough rises. The weather is great for a cook out this weekend, and that needs bread. It has been crazy. Last weekend we had 5 inches of rain on Friday, we grilled out with a 65 degree Saturday, Sunday was the snow picture above and now it is 72 again. Go figure!
Audra
I'm sending you a message so we can continue this discussion off-list since it is pretty far off topic.
--Pamela
I will try to check it in a bit, so you don't have to hurry. It is bath time for the kids now. But if I don't get to tonight, I'll check in first thing in the morning. I didn't want you to think I didn't appreciate all you've done! Thank you again!
Audra
Audra,
I have the identical camera (D-80) and I love it. It has all the controls you could ever need which may be the problem. I'll lay out some observations first, then give you some pointers. First, let me say I have been a photographer for more years than I care to count and have been teaching digital photography to small groups for over 10 years. Digital imaging is fun but requires some base knowledge.
Looking at your burgers at the top of this thread, I see some things you may not understand yet.
First, the bright white color of the pan is affecting the over all exposure of the image. The computer in the camera sees all that bright white and wants to expose for it when the buns are actually the subject. There are changes you can make to compensate for this situation but that's for another day.
Secondly, look at the center bun in the second row. It is nice and sharp, well focused and exposed. The items in front of it and behind are fuzzy and slightly out of focus. That is called the depth of focus or depth of field. The focal depth can be changed by using a smaller F stop which will require a slower shutter speed. It would better for now to understand the concept and try to arrange your image to take advantage of this effect by choosing one bun and doing a close up on it. The focusing rectangle in the center of the screen measures the light at the spot it is on and sets the focus, when you press the shutter button half way down. You should practice composing your frame, move the focus point to the place you need to be focused, and hold the button half down, continuously, until you are again framed and then take the exposure. Think about how it would be to take a picture of 2 loaves on the deck banister outside setting a foot apart. You would focus on one loaf and while still holding the button half down, re frame the shot and press the final amount to take the exposure. I hope that is clear.
If you want to take a picture of a whole pan of bread, shoot from above so all of the bread is roughly the same distance from the camera. Otherwise, there will always be something in focus and everything in front of and behind will be less sharp. Sometimes that is a desired effect as the item in focus tends to draw our attention to that spot.
The ironing board is a good idea. I use a lazy susan (small s) for some things to rotate the object and find the right angle. Buy yourself a small tripod. Hand held images are less sharp. You can select the Macro mode on the camera and move in some. Zooming some will also let you stay out of the light. If the shutter will not trip you are to close for the settings. Make sure you know how to turn the flash off and force it to fire when you want to. It's a good flash on the camera when you know how to control it.Remember this all in reference to daylight photography. Flash is another subject.
That's enough for today. Floyd will be grinding his teeth at this being off topic but there enough people who could use help with I figured I would give it a shot. If you have specific questions, please send me a message on the system and I will be glad to help.
Eric
classes. The white pan issue clears up a question that has been bothering me. I noticed when I take a bright background shot, it flashes white on the review. Too much contrast?
I do have a tripod I can steal off of the kids telescope, so that can be an easy fix.
I noticed the colors are all off on my indoor shots. Outdoors, everything is crisp and sharp and the colors appear true on the final picture. Indoors, things look umm yellowish. We have fluorescent lights?? I would have thought they would have shown up bright white in the pictures. Bread with its warm browns and buttery tones show up nothing like they are in person. Maybe the white balance is in the wrong format?
I posted to see if Floyd will break this whole food photo section off the hoagie bun topic. If not, I'll ask you by message. Thank you for your help.
Audra
Audra,
Most modern digital cameras have some ability to change into a white balance setting for indoors, lit with incandescent bulbs or florescent tubes. Your D-80 also has the ability to set a custom white balance. You can probably get by with using one of the pre set white balance modes. You start to run into color issues when there is a combination of light sources falling on your croissant. For our purposes, using the flash solves all of those issues, even in combination with the overhead kitchen light. The on camera flash will deliver true colors and if you avoid a situation where the flash bounces straight back at you there won't be much glare.
The flashing white on the screen means there is no detail in that area. In your case with the white pan, that would be expected. If you were using a white fine linen napkin in your shot and it was flashing like that, the computer in the camera is telling you you are over exposing the image and missing the details. You could reduce the exposure by any number of ways to include a full range of details.
Eric
Floyd will be grinding his teeth at this being off topic
Nah... Clearly there is interest in this topic here and the conversation has naturally gone this way, I'm fine with that. The original poster is participating in the discussion, too, so you can't even be accused of threadjacking.
If you turn into a photography zealot who manages to turn every question about yeast and flour into a discussion of apertures and F stops then, yes, it'll start to get to me. ;^)
Please don't take this topic offline. I think many people would be interested in learning how to better use their cameras for food photography. If you feel like you are hijacking here, maybe start a new thread for this purpose. Perhaps Floyd could start a forum topic just for help with photography.
We won't take it off line. I was worried it was too off topic. --Pamela
the sandwich part and give it an appropriate topic. I hope others can benefit from all this, if you had rather, we can use your message system. Please advise.
Audra
No, not without spending a good portion of my Saturday morning on it.
Either just keep chatting about it here or start a new thread.
Then since there is a lot of good basic information already on here ,I guess it goes on. That is if that suits everyone else, or if anyone has a better idea...
Audra
Since you have editing power of your title, add " / Photographing Food" to it. That way it pops up easier in a search!
My tip with photos: Crop the pictures reducing margins so the focus can be on the subject (food), not the area around it. Also think to yourself...what is the non-subject space saying to the viewer? Is it appetizing? Does it compete with the subject? What information does it provide? Does it create a contrast or complement the food being pictured?
Mini
I have noticed you offering advice also on photo's before. I try to limit my background, but have really had trouble with all this zoom, flash business. Everyone is sure jumping in with a LOT of helpful advice.
Also thanks on the editing advice. Now the topic will be 2 fold. You saved the day and the info from being lost to others in the future. I mean I wouldn't think to look for photo advice under a sandwich question! ( That is till now!) Thanks a bunch Mini!
Audra
Glad to be of help Audra. :)
When the sun is too strong or the shadows too dark, refection can be used. Reflection off a white sheet or curtain or piece of paper placed near you but not in the way of taking the picture can add light/color onto the subject to bring out detail.
I prefer to take a good picture and then later while viewing it on the computer, zoom in for a detail shot and then crop it. I'm amazed how much easier it is to zoom in later for a clean shot. It is too difficult for me to take a picture in zoom while holding the camera steady and focused at the same time. Take enough pictures and at different angles so your chances of getting a good picture increase.
Mini
creates noise on the photo. That is much easier. My #1 priority is to get out of my kitchen to take the shot. There is no natural light in there. That with all the earth tones , and just bad lighting in general have given me pretty crappy pic's. I am quite sure all of you in the know about photography cringe when a photo taken badly is uploaded! Maybe many of us will benefit from the tips on here so that your eyes will stop bleeding!
Audra
Photo quality ??? Well I did get them out of the kitchen to natural light. I may have to work awhile to find my spot.They still look too yellow and a little "overexposed". I tried to adjust the temperature, but the slightest movement and they either were too blue or darker and even more yellow. These edits were done in Picassa 3 if that helps. I liked #2 better but I don't have it now. Oh, well Rome was not built in a day.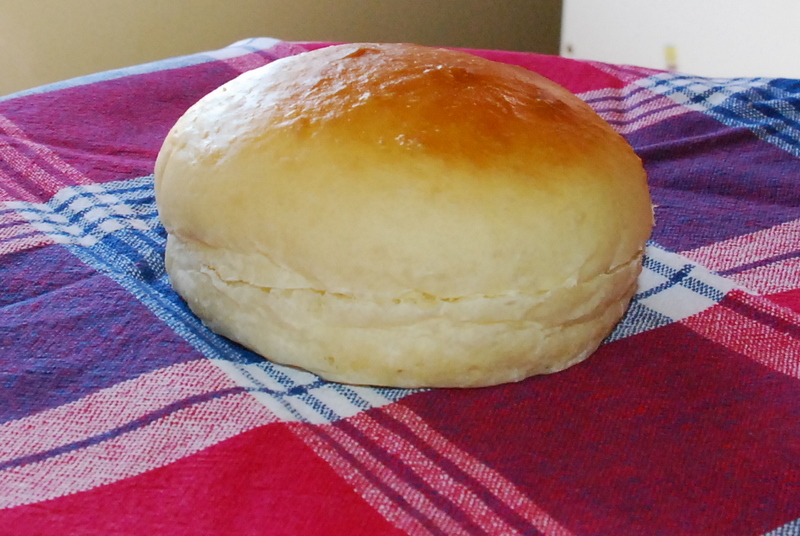
Just keep fooling around with the location and the settings and you be a pro!
--Pamela
Full frontal flash is harsh lighting. You get very sharp shadows and even light on close up work. Try turning the flash off or if you can find the control lower the flash intensity by 2 stops and (200%) and shoot near the sunlit window.
The thing about zooms is there are 2 kinds of zoom. Optical zoom is the only one you should ever use. That is where the lens element moves to change the actual image as it is displayed on the image receptor plate. The electronic zoom is telling the computer to use a smaller portion of the receptor plate as if it were zooming, which results in much lower quality resolution and quickly pixelated images. On cameras that offer both kinds of zoom, the first range is always optical and usually you can prevent running into the electronic range. It's a marketing thing that isn't helpful to most users at all.
The goal should be to shoot images that don't need to be corrected at all, color wise. Density, contrast, lightness yes. Color balance, no. Control the light, control the color.
The buns look great BTW!
Eric
Hi Mark,
I've watched your videos, and they are great. I've learned a great deal. However, when I try to roll out my baguettes with my hands--like all those snakes we made out of clay in preschool--they get sort of flabby and wrinkled and don't move much. The longer to stay after them, the more they lose their surface tension. I've tried it both on floured and clean surfaces. On the clean surface, they tend to stick a little and that ruins the surface tension. On the floured surface they just get flabby and a little wrinkled. Any suggestions? Do you use much downward pressure when you're rolling?
Many thanks,
Patricia
I had better luck with the tuck method from his video.That is how I got those to do yesterday. My snake just got longer. Mark is a talented individual.
It sounds like you're not establishing a seam when you start on your baguette rolling. I'm not sure if this is the video you're referring to, but anyway, after you scale your dough, it's important to get a good seam on your preshaping for a baguette. I tuck in the ends with my pinkies, and roll it up tight like you would trying to roll up a sleeping bag before you tie it up. The reason I don't make it any longer on the preshape, is it would both tear and be too much of a battle if I tried. So it gets a rest, then I lengthen it by using the same technique as before. One side stays still, and the rest keeps getting tucked until I'm at the length I want. There's very little downward pressure; it functions mostly to even out the dough rather than to lengthen it (even though it does lengthen it in the process).
-Mark
donw. It appears bleached out. I will keep at it. Thank you for letting us pick your brain. You are so nice to post all of those tips. A great baker, and digital photo expert. A man of many talents! You are a good guy to know!
Audra
I've really learned a lot from reading the preface material to Glezer's book. After I read the following quote, I thought of you, Audra. Glezer's advice will help me as well as I'm no ace at surface tension yet.
--Pamela
while I was working on my challah "ropes". While they were short I tucked and tucked. I rolled just like Mark did in his video, and then kept going to make the long ropes I needed to braid. I practiced through 3 recipes of challah that make 2 each. I may be a little bit better, but nothing to write home about. I just don't understand how I can make perfect little balls that are so tight that you could make them bounce, and the sandwich rolls laugh an evil sinister laugh at me! I will win, but I hope I get it right it right before doing it wrong becomes habit...does that make sense? Like when we knead, after a while it becomes a rhythm. Something you do almost mindlessly, allowing your mind to wander at times, just enjoying the repetition of it and the feel of the smooth warm dough. You could do it in your sleep. I don't want to get in the wrong way habit with the rolls and never get it the way I want it. I think I would prefer Glezer's advise of a fine tight shape and a longer proof, but I may have to start out proofing "quicker" and let the oven do the work before the dough relaxes. Correct? Very interesting Pamela. I'm glad you let me in on this. This really has me thinking. This way of thinking might even buy me some time. They are better now, but I have this irritating part of me that won't be satisfied till I get it like I want it. It's a curse!
Pamela, I may make a new batch tomorrow and try out your new insight on my problem. I'll keep you posted.
I just thought of you (and me) when I read that today. It's a process/journey that we are on and I do think we are making progress. You never know what gets us thinking.
--Pamela
Audra
Hi Audra. If it is a sandwich or Hoagie roll that you are after, then I think you want a recipe that uses milk rather than water like a French bread recipe, that I presume uses water. You want an enriched dough. I made some hamburger rolls today and the dough was real stiff which made it easy to get good surface tension and a good shape.
I found one on the King Arthur site:
http://www.kingarthurflour.com/recipes/hamburger-or-hot-dog-buns-recipe
Your pictures are definitely improving.
--Pamela
Milk and oil for softness. It might be just the ticket. You said your dough was stiff. Did you have it stiff right out of the bowl, or slack and kneaded the flour in to make it stiff? Just guessing, I would say the later. I try to always leave mine a little sticky if I can, because of the obvious you can add, but not take out. But if you give the word I'll go stiff right from the start. You have much more experience than I do on this. Thank you for all your help. I was getting discouraged.
Oh and the photo's, thanks again. They don't stink anymore! I have been working hard on that since this whole forum started. These have been easier to improve than some. Bread doesn't move, and I can move it depending on the light...my children on the other hand! Moving, now stopped, in direct sunlight, woops! now in shade....all in about 5 seconds flat! Boy this really has had me busy. But it's a fun busy!
Audra
after I incorporated the flour. I probably had it too stiff but it worked out fine after fermentation and gave great surface tension.
--Pamela
till I get this tension issue conquered, then worry about backing off on the flour gradually to soften if I've overdone it. I'll give them a few days break ( the family) and I'll try this again.
..Audra