Stayed home today to nurse my lame dog, so I have time to make some notes for myself for future reference:
For this past weekend's baking, I decided to make the Thom Leonard Country French bread (Glezer) again, but using my rye starter, and compare it to the Essential Columbia (also Glezer) my current favorite recipe. For the Columbias, however, I made two different batches for further taste comparison: one with a wet rye starter (saving the step of making a firm starter if you don't keep one) and the other with the firm white starter called for in the original recipe in Glezer's book.
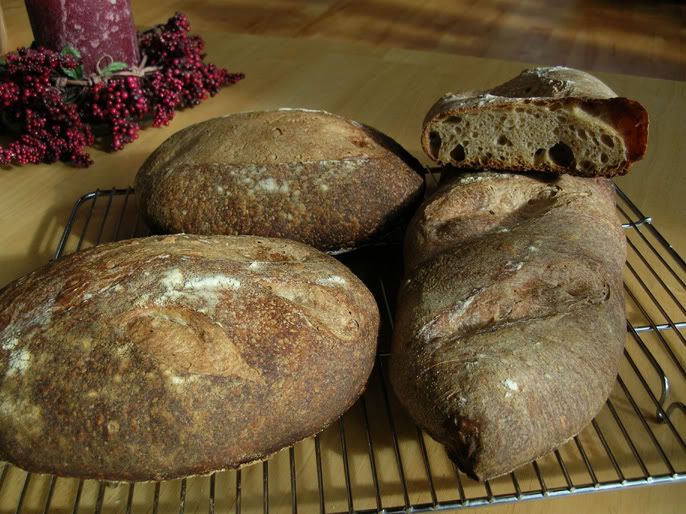
Here is how the Thom Leonard bread came out:

The crumb was beautiful as was the oven spring and crust. I also used King Arthur AP flour only, rather than a mix of AP and Bread, because the protein level of KA AP is as high as other bread flours (11.7%). The last time I made this bread using KA bread flour, the crumb was way too tough and chewy, even for me who likes chewy bread. Seems like the only reason to use a very high protein bread flour like KA (12.7%) would be to strenghten mostly whole grain breads. The Thom Leonard above tasted very nice for a mostly white French bread, however, I have developed a taste for a bit more whole wheat in my bread which is why I prefer the Columbia at the moment. Of course, the original Thom Leonard recipe calls for high extraction flour, not white AP flour. If I can ever get my hands on some, I will try it again with that.
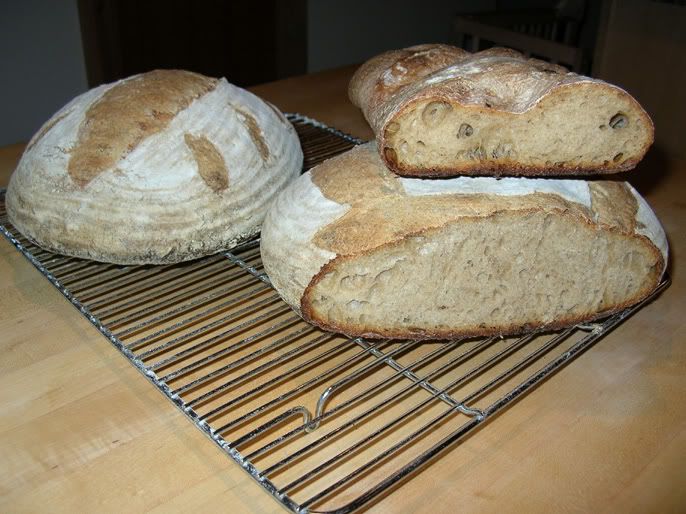
Next, I made the Columbia using a wet rye starter, and omitted the small amount of rye called for in the recipe, replacing it with additional whole wheat and white AP. To first make the levain for this recipe using the wetter rye starter rather than the stiff white starter called for, I used a bit more starter, a bit less water, and a bit more flour, until the correct consistency was achieved and the total weight of the levain as an overall ingredient in the recipe was preserved. This was a pretty slack dough, as I like to work with wetter doughs for improved crumb, so when I tried to slash it for the batard, the darn razor dragged again despite oiling and I went over the same slash too many times and compressed the dough too much in those spots, you can see the results in the crumb shot below:
Despite the spread out loaf, I still got some nice holes and the crust was gorgeous! The taste was as great as before, with a slight flavor from the rye starter that made it taste mildly like a rye bread.
The next batch of Columbias were made with the stiff white starter called for in the recipe, my stiff starter uses 75% white bread flour to 25% whole wheat flour. I fed it 3 times at 12 hr intervals before making the levain with it for this recipe. Rather than making 4 smaller loaves, I made 2 large ones using bannetons. I had trouble with slack dough sticking to bannetons before so I got over-eager with the flour on these, and I had to brush a lot of it off after baking. I also think it inhibited the crust forming nicely as in the free-form loaves above which have the nice crisp crackly bubbles. The other thing I did differently was to degas them by pressing the flat of my hand all over the dough before rounding into boules, thinking I would try to even out the crumb more, but I overdid it, and I did not get as nice holes this time - there are some big ones, but not as many as I like to have and not as even. Below are photos of the large boules made with the stiff starter, and for comparison I stacked the previous batch's smaller rye starter batard on top of the sliced boule - the pic on the right is without a flash and shows the holes in shadow a little better, while the left shows the actual color of the crumb nicely:
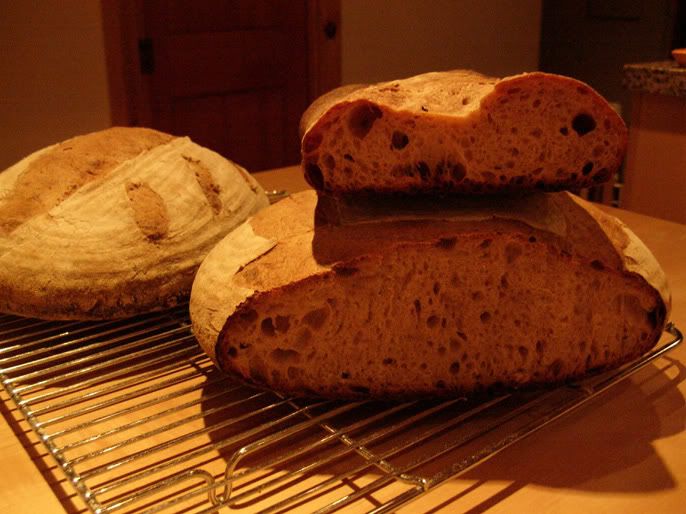
I also found that I prefer making the smaller batards free-form for this recipe rather than using a banneton to make larger boules. Not only does this avoid getting excess flour on the crust, but it provides a greater surface area and ratio of crust to crumb, since the crust is so good on this bread. As far as taste difference in crumb between the wet rye starter method vs. the stiff white starter, it is very hard to tell the difference, but I like the stiff starter version's flavor slightly better - it has a bit more tang and wheaty flavor and slightly less rye flavor - the rye flavor in the rye starter batch may outcompete the wheat germ and malt flavors. I would probably get the same result using my wet white starter, so I will try that next.
Lessons learned:
1) levain: using a wet starter seems to work just as well in this recipe as using a stiff one - the type of flour used will make a bigger difference in flavor than the hydration does.
2) first fermentation: do not de-gas the dough completely, just fold it 2 or 3 times for strength during fermentation 30 min. apart. I also retarded the dough overnight in the fridge after a 2 hour room temp. first fermentation.
3) shaping and proofing: handle as little as possible without de-gassing as noted above, but do gently form smaller batards rather then large boules to get more crust ratio. Without pressing out the gas, do tighten the batard into a very tight cylinder as much as possible to create enough surface tension to avoid it spreading out too much or flattening when scoring.
4) when slashing a slack dough like this, don't score over it again or it will flatten it out too much.
5) avoid over-flouring bannetons as it ruins the crust and didn't really help with the sticking anyhow, maybe a spray oil is better - I'd like to know how people avoid banneton stickiness and resulting collapse with the coiled willow baskets.
That's it for this week...
- mountaindog's Blog
- Log in or register to post comments
Very thoughtful analysis of your weekend! :)
I'll have to try the wet starter next time for Columbia--I'm so enthralled as I've been eating tis bread for a week--I think it would be my choice if I were trapped on a desert island and could only have one recipe!
And the Leanord loaf looks great too--what kind of flour do you use? You always have that nice, creamy interior. I think I've been skimping and getting the cheaper white flour, and the nicer wheat and rye flours, since I go through it rather fast...
Thanks BreadNerd and thanks Floyd for the highlight - I'm flattered you think this is informative.
Would you believe at this point I think I am actually getting sick of eating bread from sampling everything I tested? (say it isn't so!) Fortunately these French people I live with are using it up fast so I don't have to make French Toast out of it...
Flours: I've been researching and reading everything I can find on flours, I've even tried calling wholesale bakery suppliers begging them to sell me some hard to get types but the freight just isn't worth it. Since I live in the Northeast, King Arthur flour is readily available around here, so I've been using the KA white All Purpose flour, but for recipes like the Leonard loaf that call for high extraction flour, I tried to mimic it by mixing in 1 part whole wheat flour (also KA) with 3 parts white flour as suggested by Dan Leader in the Bread Alone book. That blend seems to work very nicely for a lot of white bread recipes, giving the bread a bit more wheaty taste and nice creamy color. The KA AP flour is itself a very nice flavorful, creamy-colored flour, if you can find it near you it is well worth the few extra cents per pound. My local supermarket even sells it in 10 and 25 lb bags (white bag with red top). I would not bother with the KA bread flour (white bag with blue top) as I think it is way too strong, making a tough, less flavorful bread - I think it was designed for bread machines anyhow.
I just managed to convince my local health food storehouse to order me some 5 lb bags of the King Arthur Organic Artisan white flour, so I look forward to trying that next because it is a lower protein (11.3%), higher ash (.54%) flour that is supposed to be much closer to French artisan flour, plus I'd rather use organic anyhow, just couldn't find it anywhere in large enough bags until now. An excellent discussion on flour that I just finished was in the Breadbuilders book by Dan Wing and Allan Scott - what an excellent book! I thought I was just going to read about brick ovens and boy did I learn a lot more! Maybe when I've gathered all my data and run some baking tests, I'll do another blog just on flours...
Once more thing about flour: my husband is going to France next week for a quick family visit, so I have the usual list of items I want him to bring back, but I'd love it if he could bring me back some French artisan flour - however, he did not think that would be a good idea - not only could it potentially violate agricultural customs rules, but haviing 5 lbs of a white powdery substance in his luggage may pose all kinds of other problems for him... ;-)
Can you please help me to create those wonderful holes in your bread? I tried Floy's technique but didn't work (5 times). Maybe, you have a better understanding of it then me.
mzublin
mzublin - here is my paraphrase of how I made the bread at the top of this page (the Leonard loaf - I just typed this up for a friend so I had it handy). What gives you the big holes in a nutshell is use a very wet, soft dough, fold it 2-3 times for the first 60-90 minutes of fermenting to strengthen the gluten, and when your ready to shape, VERY GENTLY pour it out onto your counter, VERY GENTLY fold the sides into the center to gather it up into a boule without degassing it in the least, flip upside down in your hand and tighten it into a boule by pinching the seam underneath closed. Then place it smooth-side down (seam-side up) into a floured banneton or proofing basket. Do not skimp on the rising time - if it needs 5 or 6 hours rather than the 3 stated in the recipe, let it rise all the way, and make sure your starter is very active.
I really like this bread, I just made it again this past weekend and it came out equally well as it did in the photo at top. It had more of a sour bite to it this time from the wet rye starter. Good Luck.
Thom Leonard’s Country French Bread (from "Artisan Baking" by Maggie Glezer)
Makes one 4 lb. (1.8 kilo) loaf
Time: about 18 hrs. with 30 minutes of active work
The evening before baking make the Levain as follows:
45 g ( 1 oz) fermented rye sourdough starter refreshed 8-12 hrs before (I use a batter-like starter made with equal weights water to rye flour, not a firm starter. If you only have a white flour starter, use that and just substitute 30 g of the white flour in the final dough with rye flour)
120 g (3.3 oz) lukewarm water
140 g (5.3 oz) unbleached all-purpose or bread flour (see my note below on flour)
Dissolve starter in the water in a small bowl, then add flour and beat this batter-like dough until very smooth. Place in covered container and ferment at room temp (@70F) until doubled, 8-12 hrs.
NOTE: I use only King Arthur All-Purpose flour rather than bread flour as it has a high enough protein content and a high ash content compared to other all-purpose flour. The high amount of protein found in most “bread flours” makes the crumb too tough for my taste.
Next day make the final dough as follows:
100 g (3.5 oz) Whole Wheat Flour (if you like your bread a little darker add up to 350 g whole wheat here and use 250 g less white flour below)
1030 g (36 oz) unbleached all-purpose flour (King Arthur has best protein and ash content. If using a white flour starter in the levain rather than rye, substitute 30 g of the white flour here with 30 g rye flour)
660 g (24 oz) warm water
all the fermented levain you made the night before (305 g or 10.6 oz)
23 g (0.8 oz) sea salt (preferably grey Celtic sea salt if you can find it, often sold in health food stores)
Mix By hand: combine all flours in large bowl. Add the warm water to the fermented levain to loosen it from container. Pour the watered levain into the flours and mix with spoon, dough whisk, or hands until just combined. Cover with plastic wrap and let rest (autolyse) for 20-30 minutes. Turn dough out onto work surface, knead for 10 minutes, then add salt, and knead for another 5 minutes until salt has dissolved and dough is very smooth and shiny.
Mix By stand mixer: same as by hand except leave in mixer bowl after autolyse, then mix with dough hook on lowest speed for 5 minutes. Add salt and knead in mixer at low speed for another 4-5 minutes until very smooth and almost cleans the bottom of the mixing bowl.
The dough should feel soft, sticky, and extensible at end of kneading. If it is too stiff and dry, add a few more drops of water until dough just barely clears bottom of mixing bowl at end of kneading if using a stand mixer, or until dough feels soft and stretchy, and slightly sticky, if hand kneading. Softer, wetter doughs give you larger air holes in the baked loaf, which also gives the bread more flavor.
Fermenting: Place dough in lightly-oiled bowl at least 3 times its size and cover with plastic wrap. Let ferment for 3 hours at room temp (@70F) until well-expanded but not yet doubled in bulk. Turn dough 3 times at 30 minute intervals by gently folding like a business letter and flipping upside-down, (that is, turn once at 30, 60, and 90 minutes into fermenting time), then leave the dough undisturbed for remainder of time. OR: for even more flavor, ferment at room temperature for one hour (turning 2 times, once at after 30 and once after 60 minutes), then retard overnight in fridge, warming up again next day at room temp. for 2-3 hours before shaping.
Rounding and resting: Turn dough out onto floured work surface, and very gently round it into a tight boule. Cover with plastic and let rest for 10-15 min. to relax the gluten. While resting, prepare your basket or banneton by dusting with flour. If you’d rather make 2 smaller boules than one large one, divide the dough in half with a dough cutter, and gently form each piece into a tight boule.
Shaping and proofing: Shape the dough into an even and tight round loaf (or leaves if making 2 smaller boules) without deflating it. Place dough topside down into the floured basket or banneton. Lightly sprinkle the top of the dough with flour, cover with plastic wrap and proof for 4 to 4.5 hours at room temperature (@70F) until at least doubled in volume and a slight dent remains when pressed with finger.
Preheating oven: At least 45 minutes before dough is fully-proofed, preheat oven with baking stone on middle rack to 500F.
Bake: Gently flip the dough upside down to release it from the banneton/basket onto semolina-dusted parchment on an over-turned baking sheet or wooden peel, or directly onto a semolina-dusted peel if not using parchment. Slash the boule with a razor in a pound sign (#) design, or in a spiral, cross, or any other desired pattern, as long as the slashes go completely across the top to allow for even expansion during baking. Slide parchment onto hot baking stone in oven, or onto semolina dusted baking stone if not using parchment, and quickly mist side walls of oven with water in a mister (do not spray near the oven light!) and quickly shut the oven door to prevent heat and steam from escaping. The steam helps the dough rise very quickly in the hot oven (called “oven spring”) and also makes the crust more brown and crisp. Turn oven down from 500F to 400F and set oven timer for 30 minutes (20 minutes if making 2 smaller boules). Continue misting every 30 seconds just 3 or 4 times for first 2 or 3 minutes of baking, then leave to bake. When first 30 minutes are up, open oven and rotate loaves around to even out browning. Set timer for another 30 minutes (20 minutes for 2 smaller boules) and check the loaf when that time is up. If it is still a light color brown, leave in for another 5-10 minutes until it is a deeper brown but not burnt, then probe center of loaf with instant-read thermometer, loaves are done when thermometer reads at least 205F in center. If they are getting burnt but center is not done, your oven is too hot, turn it down another 25 degrees or so next time. Let cool thoroughly on rack before cutting as the centers are still cooking, at least 2 hours.
Thanks for the detailed instructions. I'll try your method tomorrow and will keep you up-to-date with the result.
mzublin
Hello
Nice post. I recently made the country loaf. I found the dough to be pretty stiff. When I run the math I get around 62% hydration. As a result the bread had a pretty tight crumb. Did you increase the water in this recipe? Just curious. By the way your country loaf looked outstanding.
Da Crumb Bum
Your bread looks marvelous!! Can you please help me with the technique of folding? I tried Floy's technique but didn't work. Is there a clearer way to describe the technique to create those beautiful holes in your bread?
Thanks
Mzublin