This is a follow up to clazar123's post on gluten free rice shokupan.
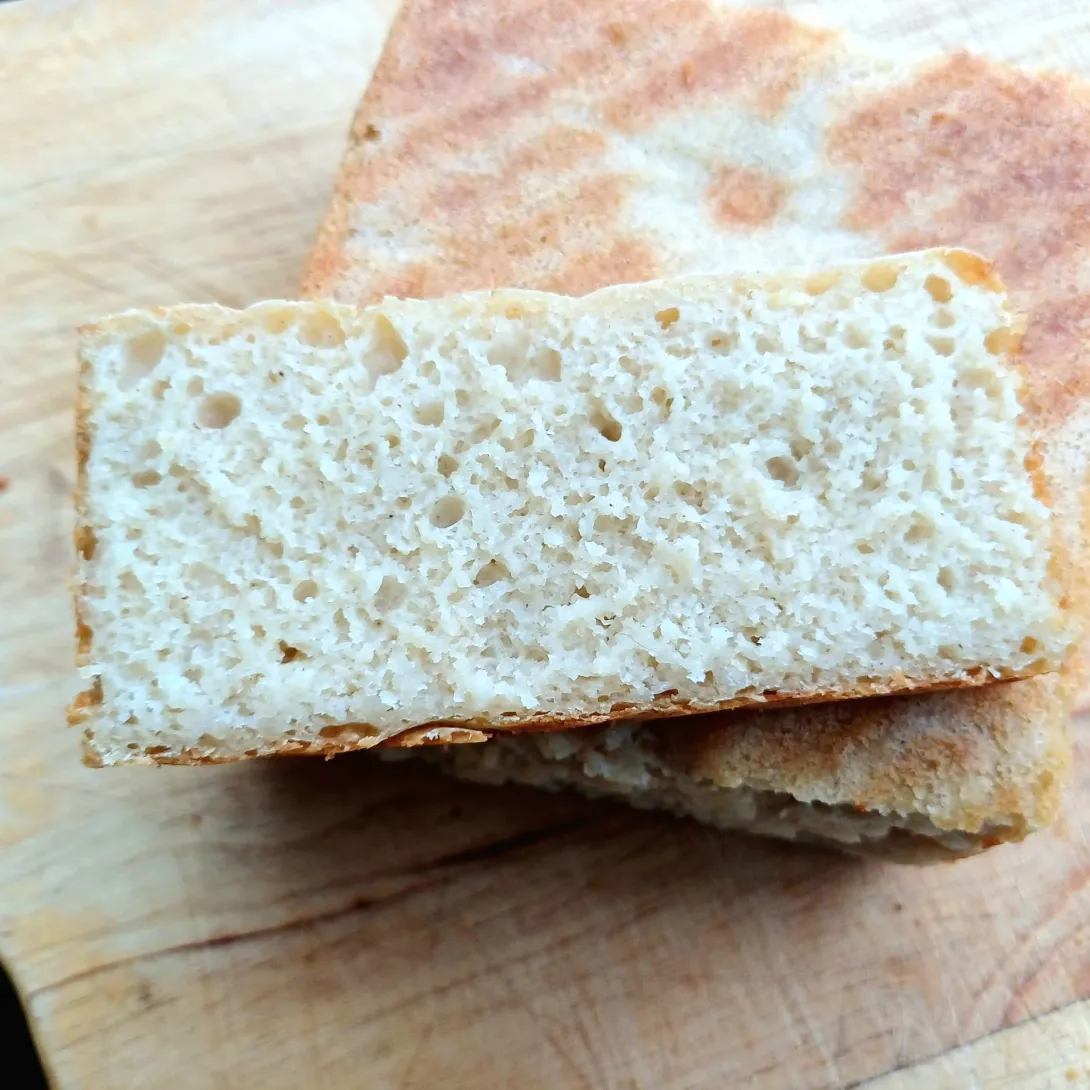
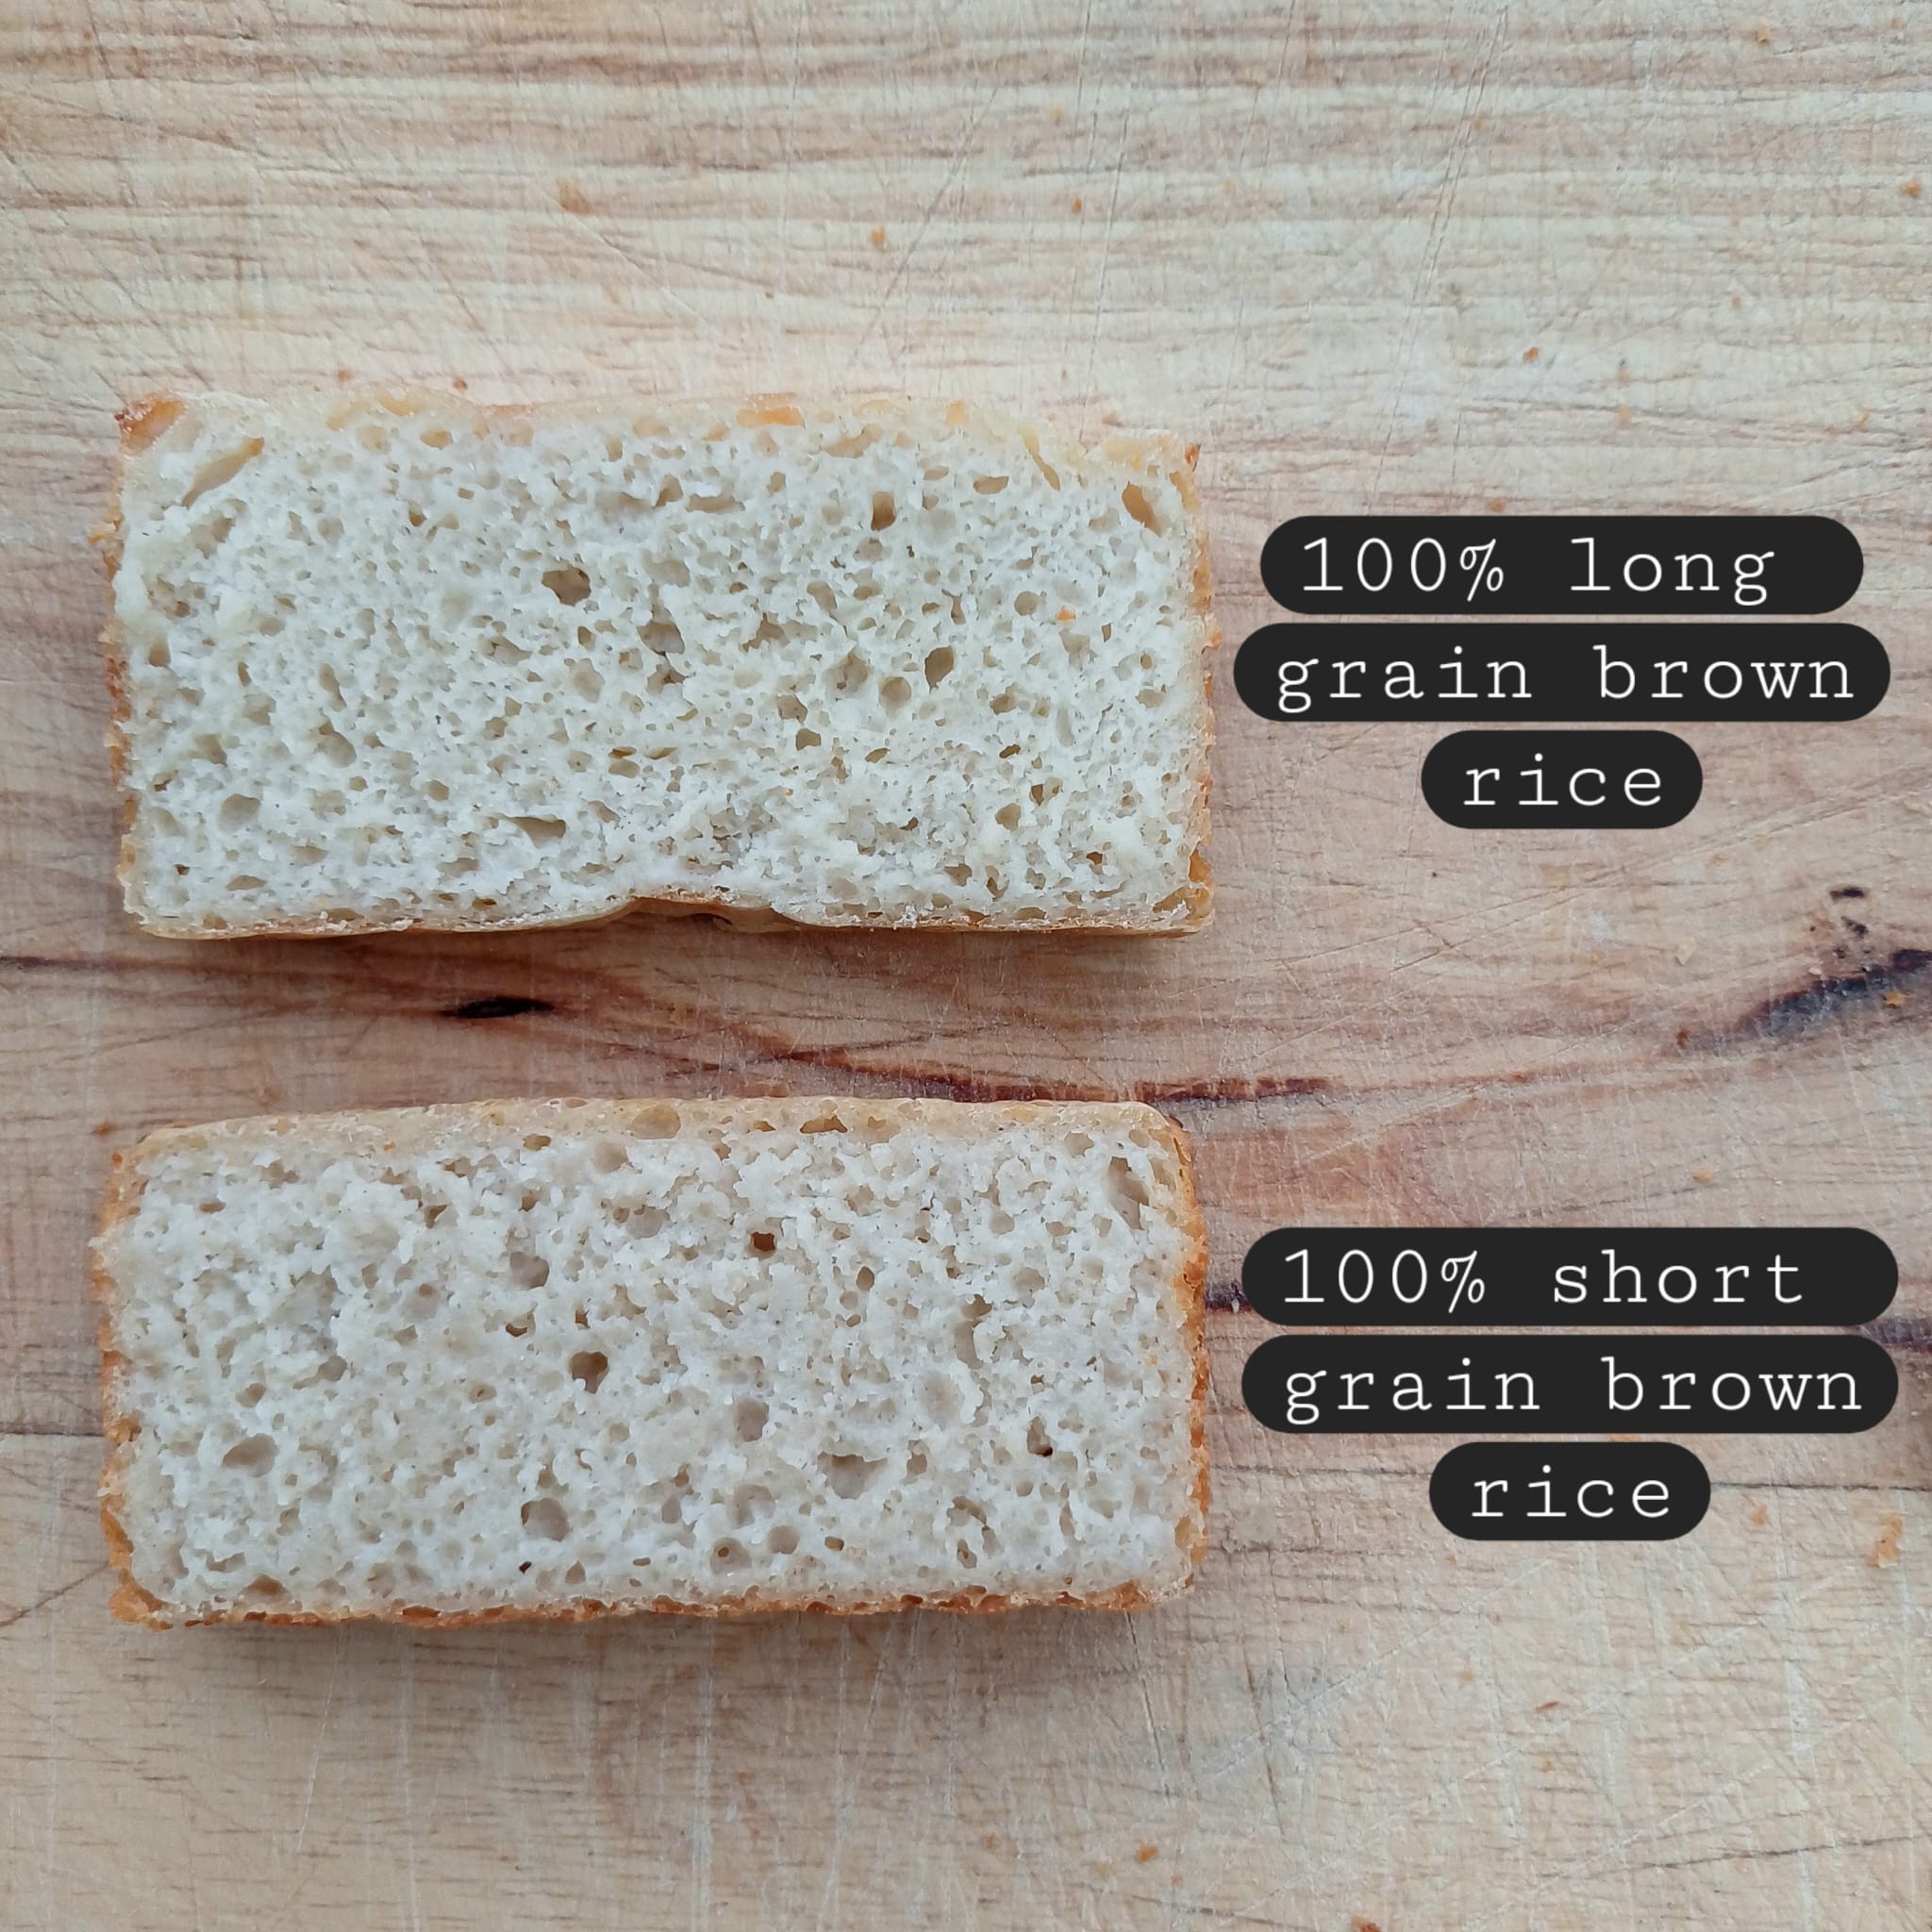
The idea was to use very simple pantry ingredients to make a gluten free loaf with rice. This means: rice, water, salt, oil, sugar and yeast. A few days ago, I managed to make a simple loaf with soaked short-grain rice. Today, I made two loaves with brown rice, one short-grain, and the other long-grain.
Both loaves turned out well. They were denser than the loaf made with white rice, but that's to be expected. I did not detect any differences between short and long grain.
To make a 660g loaf - good for a 15X10X10 cm loaf pan*
*I only had a 20X10X10, so the loaf was quite short. I don't know if the recipe would work if it were double its height, therefore the recommendation above.
- Soak 300g of brown rice in 300g of water for at least 18 hours.
- The next day, blend the rice with all the remaining soaking water, 20g of oil, 4g of salt and 15g of sugar. Resist adding more water unless your blender is really breaking down. Even then, add water in extremely small increments.
- The mixture will be quite warm after all the blending. It should resemble a rather thick paste that holds the figure 8 for a few seconds in the batter when the whisk is lifted. If the mixture is too runny, add a tablespoon or two of rice flour or cornstarch. If the mixture contains bits of rice, you need to blend the mixture further. If it still contains rice bits after subsequent blending, then sieve your mixture - the rice grains will not cook in the bread.
- Let the mixture cool down slightly before adding 2g of yeast.
- Let the mixture ferment till bubbly. At batter temperature 22 degrees, this took me about 1.5 hours.
- Give this batter a mix, then add another 2g of yeast. Pour this into a buttered loaf pan and leave to rise at batter temperature of about 25-30 degrees if possible. You want a moderately quick rise here.
Let the batter rise by 2/3 of its height (this took me another 45 mins) and bake it at 175 degrees for 40 minutes. Let the loaf cool down completely before you cut into it.
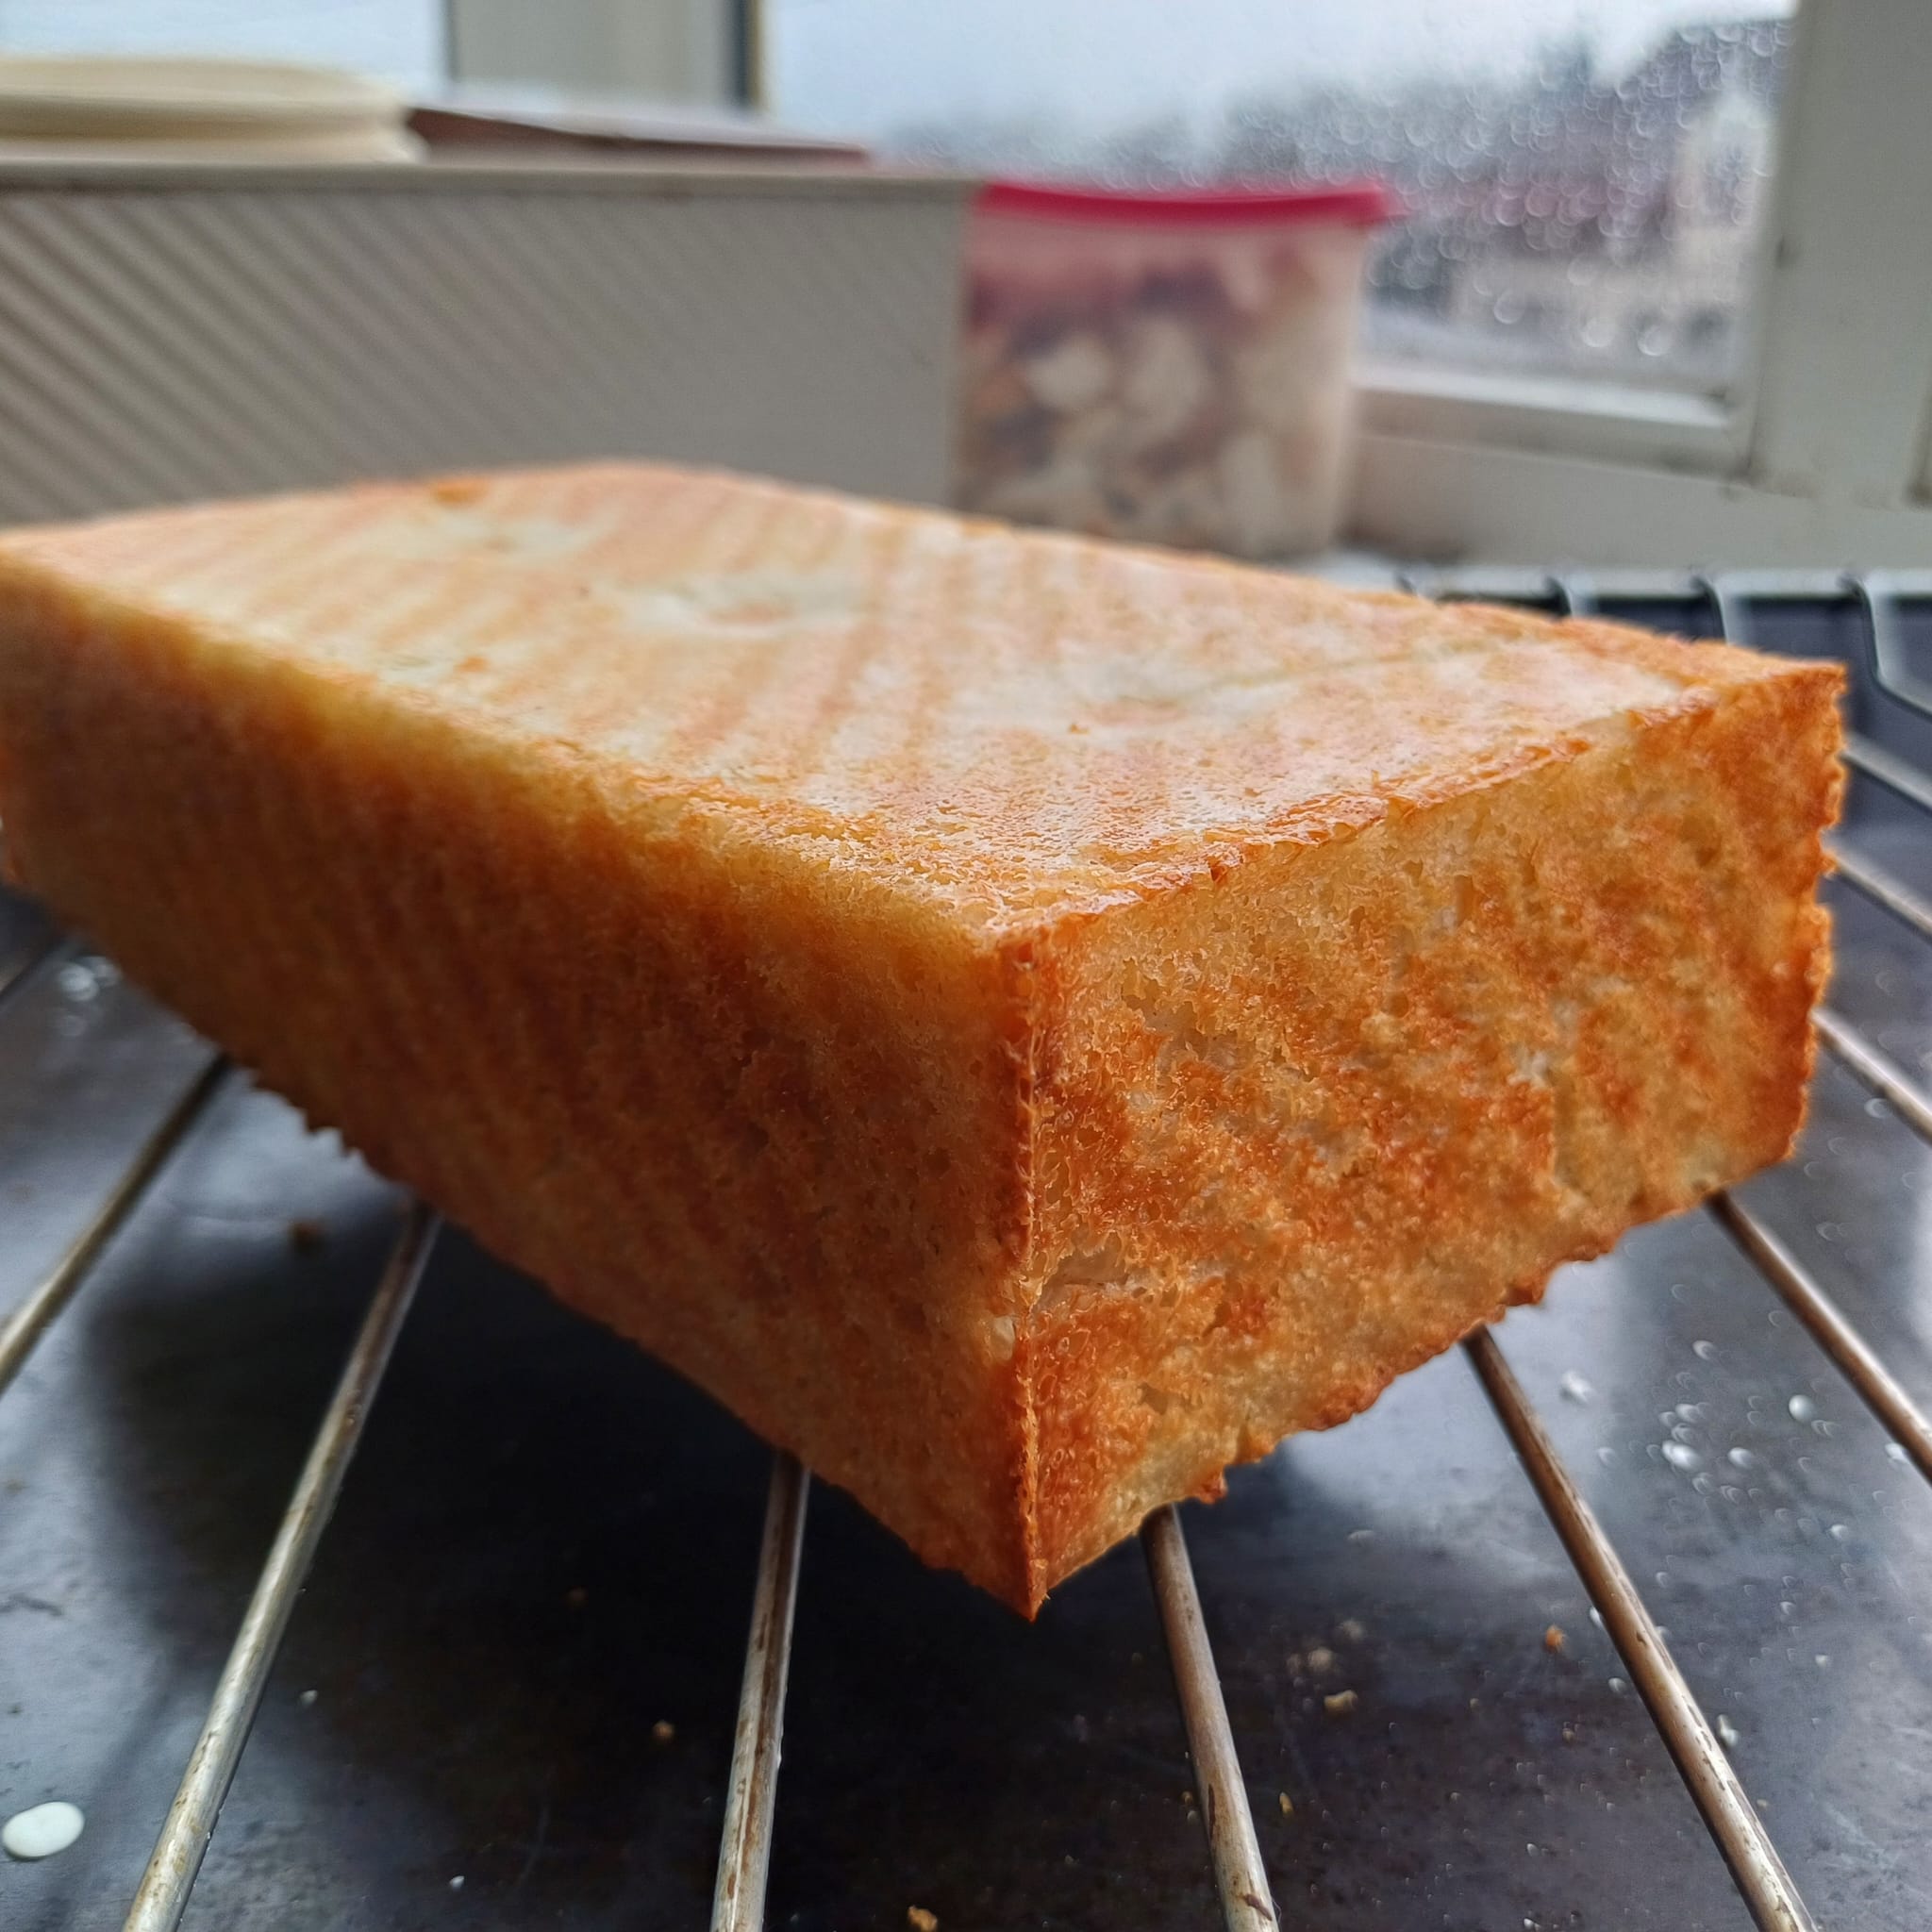
To get a brown crust, you need to be brave enough not to use parchment paper. Just butter your loaf pan.
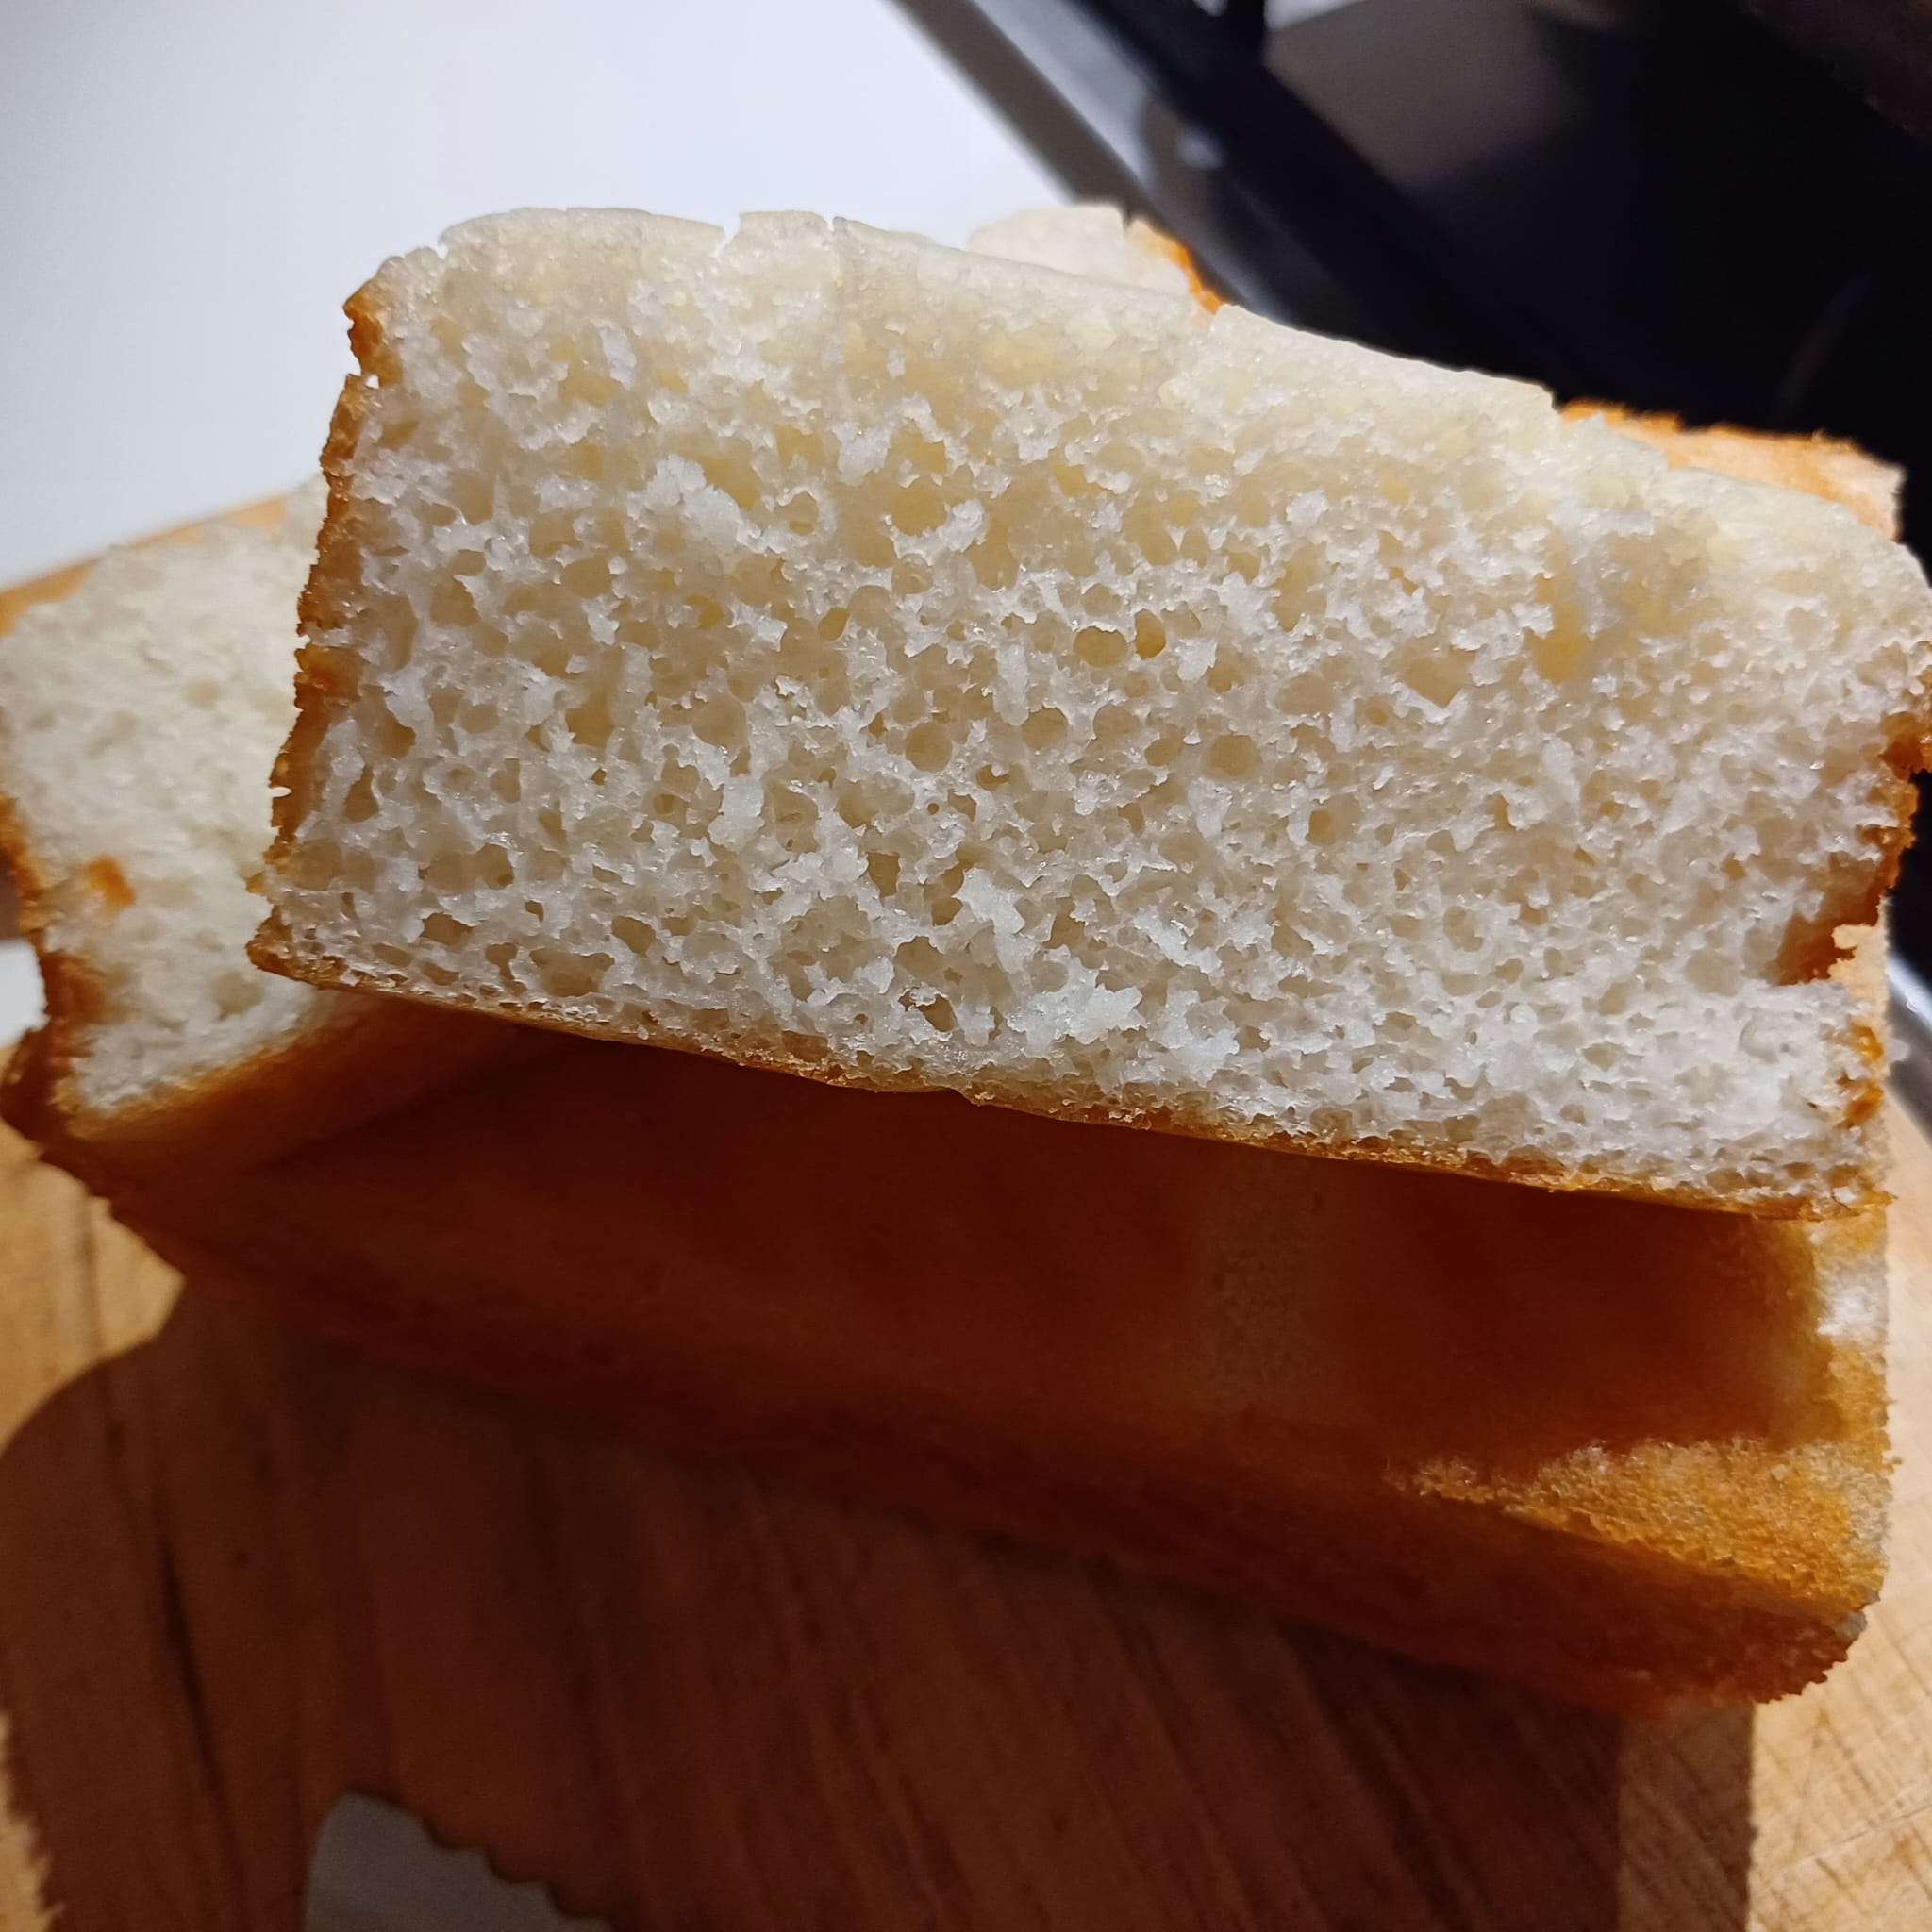
If you end up with a runny batter after blending, don't worry. Just add a tablespoon or two of rice flour or cornstarch and you will be OK. Here's the loaf that had a tablespoon of rice flour added to the batter. It used 100% white short-grain rice instead of brown rice. Take note: if you are using the recipe above for purely white rice, you will need to reduce your hydration slightly. Blend the 300g of white rice with 1/2 of the remaining soaking liquid and go from there. Whatever rice you use, err on the side of caution and aim for a thicker batter first, unless your blender starts smoking!!!
Notes:
- I only have a very cheap stand blender that I use to make smoothies and spinach juice (for spinach pasta). Bought during my student days in the UK and took it with me to Belgium 7 years ago (and continue using till this day with an adaptor!) so it's as basic as it can get. This means that this bread will work for most mixers. I think you will have even better results if you have a good mixer.
- Brown rice batter is way less starchy than white rice batter. When stirring white rice batter, there's quite some resistance, but with brown rice batter, it might be thick but there isn't the typical resistance you get with starchy mixtures. For that reason, it's important to make sure that the hydration of the brown rice batter is low enough, as there's less to hold it together.
- Browning of the crust is essential. Do it by skipping parchment paper and butter your loaf pan instead. My pan has 3 vent holes at the bottom, which I covered with parchment.
- I think it's possible to reduce the soaking time of the rice by using warm water. To judge whether your rice is ready to be blended, just crush one rice grain between your fingers. If it does not crumble, then soak it further.
- It is completely possible to make this bread with just one rise - add all 4g of yeast to the mixture and rise it directly in the loaf pan. However, make sure that your batter is warm (25-30 degrees) during the rise. Take note that the bread will have a less developed taste.
- ll433's Blog
- Log in or register to post comments
Brilliant.
do you think the sugar is totally necessary?
Rob
No, it's not necessary. But it would be important to really go for a slow first fermentation to develop the taste. Either drop the yeast further or lower the batter temperature for the first rise. You might end up with a batter that has sedimented or that appears to be runnier than when you started. That's OK, just stir and add a tablespoon or two of rice flour or cornstarch as you deem fit. The batter must be quite thick.
The second rise must be fast and at higher temperatures so that structural integrity is not compromised during baking; don't forget to add additional yeast!
funny: I would think sugar would speed up the 1st ferment.
could I use oil instead of butter, to keep the bread both gluten-free & vegan?
Rob
I've oiled the loaf pan instead of buttering it. Works perfectly.
A 'vegan' pan release formula - https://www.ellyseveryday.com/ellys-everyday-blog/ellys-pan-release-diy-nonstick-pan-coating
But I think the main concern with omitting sugar is the relatively flat flavour of the loaf if it is fermented quickly, so I would really want to deliberately slow down the first fermentation. You're right that without sugar it would already be slowed down; at high proofing temperatures you might need to slow it down further by decreasing the yeast.
So glad to read the results of the brown rice experiment, which looks to me to have been a fantastic success. Lovely method! Thank you for sharing.
In fact, inspirational. Which means I may have to make this soon!
In the past I tried to make a soak/blender rice bread recipe, with a Taiwanese short grained rice, which ended up with what I still think of to this day as my giant mochi bread. So, I'm cautious about which rice to use - in my house 'pantry' rice is a long grained white Basmati rice, do you have thoughts on the suitability?
-Jon
Giant mochi bread makes me laugh! Do you remember what happened there? I could learn from it.
I think white Basmati rice will work. The brown long grain rice I had yesterday was difficult enough to work with, and while not providing much structural support, did the job well enough.
If you want to be extra careful, shoot for a lower starting hydration and work your way up only if you need to (blender capabilities). Also, a shorter loaf rather than an elegantly tall one!
Made the most lovely rice bread following this method! And can highly recommend this bread for those who are interested.
I used a long grain basmati rice.
I was a bit worried after the 18 hour soak (19 in my case) that the rice wasn't 'crumbling' as per the instructions, it was still fairly firm. I kind of thought it should be more like a par cooked texture? It was still pretty firm. And even after blending for quite some time until I got a nice thick creamy texture it still had a grittiness to it when I felt it with my hands, which had me concerned that I'd end up with a gritty bread (which thankfully wasn't the case in the end).
It was exciting to see that it had developed into a dough-like texture when it came time to blend in the final 2g of yeast.
I used a Baker & Salt 4lb loaf pan for baking - 23.5×11.5×8.5cm - so roughly similar to Lin's pan. And I used Elly's pan release recipe of coconut oil/lecithin granules/brown rice flour for greasing the pan so that the bread would release easily.
Should have scored the batter to control the natural tearing of the top surface, which looked different to some of the other breads here. But it had a nicely browned crust on all sides including the top to a lesser degree. And the crust really did taste like rice crispies! The interior of the final bread also had a nice flavour which was surprising because the original batter didn't taste nice at all. And, even more surprisingly the texture was impressively bread like and very nice to eat.
Did have to slice fairly thickly as there was some flimsiness, especially towards the top of each slice.
Will definitely make again. And I'm going to try a few other kinds of white rice as well to see how different the outcome is.
I'm thrilled you tried the recipe and that it worked for you! Thanks for updating us.
How much water did you use in the end? Would be good knowledge if others are trying with basmati. And it's interesting yours domed and cracked. Seems to me that you might have ended up with a lower hydration that I have - my blender just cannot manage lower - especially since you mentioned the possibility of scoring.
I think the loaf works very well the next day toasted, though it doesn't really dry out anyway. We have a savoury recipe that uses cooked rice cubes pan fried with spring onions, garlic, chilli and sweet soy sauce - and that's what I've been doing with some of my frozen rice bread cubes. I hope you enjoy your bread!
-Lin
Oooh pan fried rice cubes sounds amazing. Will have to try. Although, my wife, who definitely is into gluten free bread was very happy and satisfied with this bread, so no leftovers lying around. Next time I'll do a double batch to give that a try!
The water used was the 300g soaking water and I didn't add extra. In fact, in the morning after soaking overnight,when I checked the water was barely covering the rice, I gave it a stir in case the top layer wasn't getting hydrated and left it a few hours more before blending. Was tempted to add extra water, but also wary of doing so.
I used the blender attachment on my Bosch food processor which is fairly powerful.
Jon your basmati rice loaf turned out beautifully. I can imagine that the toasted crust tasting just as you describe.
Benny
These loaves are looking very good. I can't help musing on how to make a taller loaf that looks more like bread and less like cake or quickbread. It's just the psychological factor of eating a sandwich that looks like a sandwich, if one has to eat gluten-free.
A lot of emphasis has been put on greasing the pan or using parchment paper to stop sticking, and not doing that would make the loaf hellish to remove from the pan; however, I'm wondering if baking in an ungreased pan and turning the pan upside down (like an angel cake) could result in a taller loaf. Angel cake climbs high by clinging to the sides & centre of the pan and cooling upside down. Wondering if that would work for rice bread. I don't think the outside would stay crispy if it cooled in the pan and getting the loaf out might destroy the crust altogether. In fact, I can see the whole thing being mangled.
I should put my money where my mouth is and start experimenting, I suppose. I have an acquaintance whose daughter has celiac disease.
I don't think the loaf collapses much in the pan with oiling/buttering; my loaf was certainly on the short side because I just didn't buy enough rice! I would be keen to try it out again with a smaller pan to see if it works (or double it for the current pan), and I think it would.
I might be hesitant to pour the batter into an unoiled pan. I think that the middle might end up caving in, and I would be cautious about drying the loaf upside down - it's quite a dense and wet thing without too much structural strength, which makes it quite the opposite from an angel cake. I don't think it will be a problem to release it, though, as long as the exterior is completely cooked.
-Lin
Many gluten free breads are quite short, even the commercial ones. I'm thinking of an 'artisinal' sorghum bread that we buy that is short.
-Jon
Love this rice bread Lin. This type of gluten free bread seems like it would be something we might enjoy. How would you describe the flavor of it? Is the bread strong enough to slice and toast for sandwiches? Thanks for sharing this.
Benny
It's a very pleasant, lightly yeasted taste, though the brown rice does add some complexity. Initially I thought it would just taste like baked rice "kueh" (steamed rice products), but no it does taste quite different. I hope you will try it some time. It's structurally pretty strong - just make sure you cut into it when it's fully cooled - and tastes excellent toasted.